ignition VOLKSWAGEN TRANSPORTER 1992 T4 / 4.G Owner's Manual
[x] Cancel search | Manufacturer: VOLKSWAGEN, Model Year: 1992, Model line: TRANSPORTER, Model: VOLKSWAGEN TRANSPORTER 1992 T4 / 4.GPages: 164, PDF Size: 25 MB
Page 56 of 164
Downloaded from www.Manualslib.com manuals search engine
CONTROLS AND EQUIPMENT
Windscreen
wiper
and
washer
system
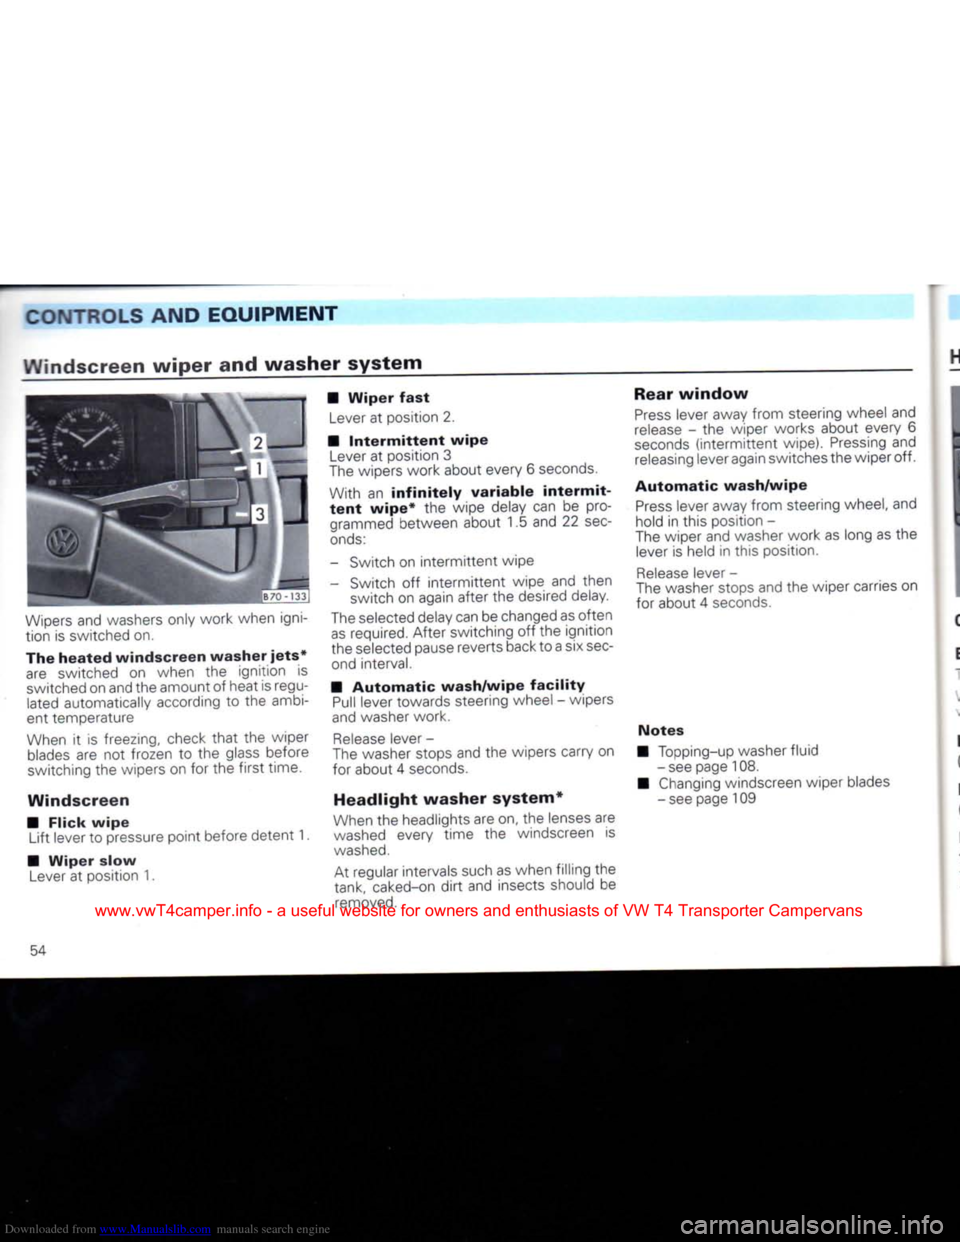
Wipers
and washers only work when igni
tion is switched on.
The
heated
windscreen
washer
jets*
are switched on when the ignition is switched on and the amount of heat is regulated automatically according to the ambi
ent temperature
When
it is freezing, check
that
the wiper
blades
are not frozen to the glass before
switching the wipers on for the
first
time.
Windscreen
• Flick
wipe
Lift lever to pressure point before detent 1.
•
Wiper
slow
Lever
at position 1. •
Wiper
fast
Lever
at position 2.
•
Intermittent
wipe
Lever
at position 3
The
wipers work about every 6
seconds.
With an
infinitely
variable
intermit
tent
wipe*
the wipe delay can be programmed between about 1.5 and 22
sec
onds:
- Switch on
intermittent
wipe
- Switch off
intermittent
wipe and then switch on again after the desired delay.
The
selected delay can be changed as often
as
required. After switching off the ignition
the selected pause reverts back to a six
sec
ond interval.
•
Automatic
wash/wipe
facility
Pull
lever towards steering wheel - wipers
and
washer work.
Release
lever -
The
washer stops and the wipers carry on
for about 4
seconds.
Headlight washer system*
When
the headlights are on, the lenses are
washed
every time the windscreen is
washed.
At regular intervals such as when filling the
tank, caked-on
dirt
and insects should be
removed.
Rear
window
Press
lever away from steering wheel and
release
- the wiper works about every 6
seconds
(intermittent
wipe).
Pressing
and
releasing
lever again switches the wiper off.
Automatic
wash/wipe
Press
lever away from steering wheel, and
hold in this position -
The
wiper and washer work as long as the
lever
is held in this position.
Release
lever -
The
washer stops and the wiper carries on
for about 4
seconds.
Notes
Topping-up washer fluid
- see page 108.
Changing
windscreen wiper blades
- see page 109
54
www.vwT4camper.info - a useful website for owners and enthusiasts of VW T4 Transporter Campervans
Page 67 of 164

Downloaded from www.Manualslib.com manuals search engine
CONTROLS
AND EQUIPMENT
12
3 4 5 6 m.bc
"fy
7 8 9 10 111
Timer*
'. ih the timer in the instrument panel up to
r-ee different switch-on times can be se
eded
for the auxiliary heater*. It is thus
::ssible
to start the heater without having
go
to the vehicle.
e
heater runs for maximum 120 minutes
ie'.d
it switches itself off. It can be switched
c~
prematurely by pressing button 9. The
preset
time is stored and can be called up
again
so that the heater switches on again =: the same time.
~ne
switch-on time can be programmed up :: one week in advance. 1- Display for 3 possible pre-selected
times
2-
Time display/pre-selected time
3-
System malfunction display
4-
Temperature display*
5-
"On" or "Off" display
6-
Display for pre-selected day 7-
Push
button for time and day of week
8-
Push
button for selecting time and day
9-
Push
button for "On" or "Off"
10-
Push
button for re-setting time or pre
selected
time and calling up remaining running time
11-
Push
button for setting time or pre-se
lected
time, setting pre-selected day
and
temperature display*
Notes
• As a temperature sender is not
fitted
at the factory an incorrect temperature figure
appears
when button 11 is
pressed.
• Displays 2 and 6 appear continuously after switching on the ignition. After switching off the ignition both displays will only ap
pear
if button 7 is
pressed.
Setting
the
actual
time
•
Press
and hold button 7.
• Set correct time with buttons
":1c".
Setting
the
actual
day of week
•
Press
and hold button 7.
• Set correct day of week with button 8.
Switching
heater
on (without preset
operation)
•
Press
button 9; symbol 5 appears r 're
display.
A
prerequisite is that rocker switch D z" control panel of heater is in centre pos : z~
With the ignition switched off the heate' .•.
be
switched on for approx. max. MZ —-
utes.
The
remaining running time can ce := e: by pressing button 10 briefly. If the c_r.c~
is
pressed longer than one second :~e
ning time will be shortened.
Note
If continuous operation of :~e -ea:e •
wanted,
it must be switcher :" B: re ::'-
trol
panel (see page 63).
www.vwT4camper.info - a useful website for owners and enthusiasts of VW T4 Transporter Campervans
Page 68 of 164

Downloaded from www.Manualslib.com manuals search engine
CONTROLS AND
EQUIPMENT
Switching
heater
off
•
Press
button
9/symbol 5 disappears.
Setting
the
pre-selected
times
•
Press
button
8/the
three possible pre
selected
times and actual time can be called up separately as follows:
1st pre-selected time
2nd pre-selected time
3rd pre-selected time
Actual
time etc.
At the same time the day of week is dis played in each level.
For
the initial input and for each change to
an old input
first
call up the corresponding pre-selected time level
with
button
8. It is
then possible to set the desired pre-se lected time in each level
with
buttons 10 or
11.
If a time is set before the actual time of
day, the next day of the week appears in the display automatically. If a different day of the week is desired, it is
necessary
to wait
until
the weekday display
flashes
before setting the new day of the
week by pressing
button
11.
The inputs are stored in the memory if no
further
inputs are made
within
about 10
sec
onds after setting a pre-selected time and
day of the week. With the ignition switched
on the actual time is
displayed,
with
the igni
tion
switched off the display disappears. However the numbers 1,2 or 3 remain in the
display 1 to indicate
that
a pre-selected
time is activated.
Notes
• If not activated the heater will not start at the pre-selected time!
• Only one pre-selected time can be acti
vated,
which in
turn
also runs only once. However, the time can be repeated by acti
vating again. When doing this the inputs re main stored in the memory.
• The switched-on period is determined
as
described in the "Switching heater on"
section (see previous page).
If the activation (not the pre-selected set
tings!) is to be cancelled, press
button
8
until
the number in display
1
is no longer vis
ible.
66
www.vwT4camper.info - a useful website for owners and enthusiasts of VW T4 Transporter Campervans
Page 70 of 164

Downloaded from www.Manualslib.com manuals search engine
CONTROLS
AND EQUIPMENT
1 2 3 4 5 6
7 8 9 10 11
Timer
With the timer in the instrument panel up to
three different switch-on times can be se
lected
for the additional water heater. It is
thus possible to start the heater without
having
to go to the vehicle.
The
heater runs for maximum 30 minutes
and
then switches itself
off.lt
can be
switched
off prematurely by pressing but
ton 9. The preset time is stored and can be
called
up again so that the heater switches on again at the same time.
The
switch-on time can be programmed up
to one week in advance. 1- Display for 3 possible pre-selected
times
2-
Time display/pre-selected time
3-
System malfunction display
4-
Temperature display*
5-
"On" or "Off" display
6-
Display for pre-selected day
7-
Push
button for time
8-
Push
button for selecting time and day
9-
Push
button for "On" or "Off"
10-
Push
button for re-setting time or pre
selected
time and calling up remaining running time
11-
Push
button for setting time or pre-se
lected
time, setting pre-selected day
and
temperature display*
Notes
• As a temperature sender is not
fitted
in the factory an incorrect temperature figure
appears
when button 11 is
pressed.
• Displays 2 and 6 appear continuously after switching on the ignition. With the igni
tion switched off both displays will only ap
pear
if button 7 is
pressed.
Setting
the
actual
time
•
Press
and hold button 7.
• Set correct time with buttons 10 or 11.
Setting
the
actual
day of
week
•
Press
and hold button 7.
• Set correct day of week with button 8. Switching on
heater
(without pre-set
operation)
•
Press
button 9; symbol 5 appears in the
display.
A
prerequisite is that the temperature
selec
tor lever is pushed fully to the right.
With ignition switched off the heater will be
switched
on for approx. max. 30 minutes.
The
remaining running time can be
called-
up by pressing button 10 briefly. If the but
ton is pressed for longer than 1
second,
the running time will be shortened.
Note
Continuous
operation of the additiona
water heater is only possible with the igni
tion switched on. Additionally the heater must be switched on at the timer with but
ton 9.
68
www.vwT4camper.info - a useful website for owners and enthusiasts of VW T4 Transporter Campervans
Page 71 of 164

Downloaded from www.Manualslib.com manuals search engine
CONTROLS AND
EQUIPMENT
Switching
heater
off
• -'ess
button
9; symbol 5 disappears. '.;te
-_e"
switching off the heater the circulation
b-~o and the combustion blower con- " • ^es to run for 2 minutes.
2
jring
this
time
the
temperature
se
lector
lever
must
not be pushed to
ae
left
-
danger
that
heater
unit
will
: .
erheat!
Setting
the
pre-selected
times
•
r-ess
button
8/the
three possible pre ss ect times and the actual time can be .i ed up one after the other as follows:
r. cre-selected time
I-; ore-selected time •-z ore-selected time
jfcrjal
time
: -jltaneously the day of the week is dis-
: z.ed at each level.
::' :he initial input and for each change to
r" Did input
first
call up the corresponding
:'e-selected
time level
with
button
8. It is "en possible to set the desired pre-select
~e
at each level
with
buttons 10 or 11. If
I: Tie is set before the actual time of day,
re next day of the week appears automati- za y in the display. If a different day of the week is desired, it is
necessary
to wait
until
the week day display
flashes
before setting the new day of the
week by pressing
button
11.
The inputs are stored in the memory if no
further
inputs are made
within
about 10
sec
onds after setting a pre-select time and day
of the week. With the ignition switched on
the actual time is displayed,
with
the ignition switched off the display disappears. How
ever
the numbers 1, 2 or 3 remain in the dis
play 1 to indicate
that
a pre-selected time is
activated.
Notes
• If not activated the heater will not
start
at
the pre-selected time!
• Only one pre-selected time can ce act •
vated,
which in
turn
only runs once, r: ever, the time can be repeated by activating
again.
When doing this the input remains stored in the memory.
• The switched-on period is determined
as
described in "Switching heater on" (see previous page). If the activation (not the pre-selected set
tings!) is to be cancelled, press
button
8
until
the number in display 1 is no longer vis
ible.
69
www.vwT4camper.info - a useful website for owners and enthusiasts of VW T4 Transporter Campervans
Page 73 of 164
Downloaded from www.Manualslib.com manuals search engine
CONTROLS AND
EQUIPMENT
Sliding/tilting
roof*
! I I
[B
70-3201
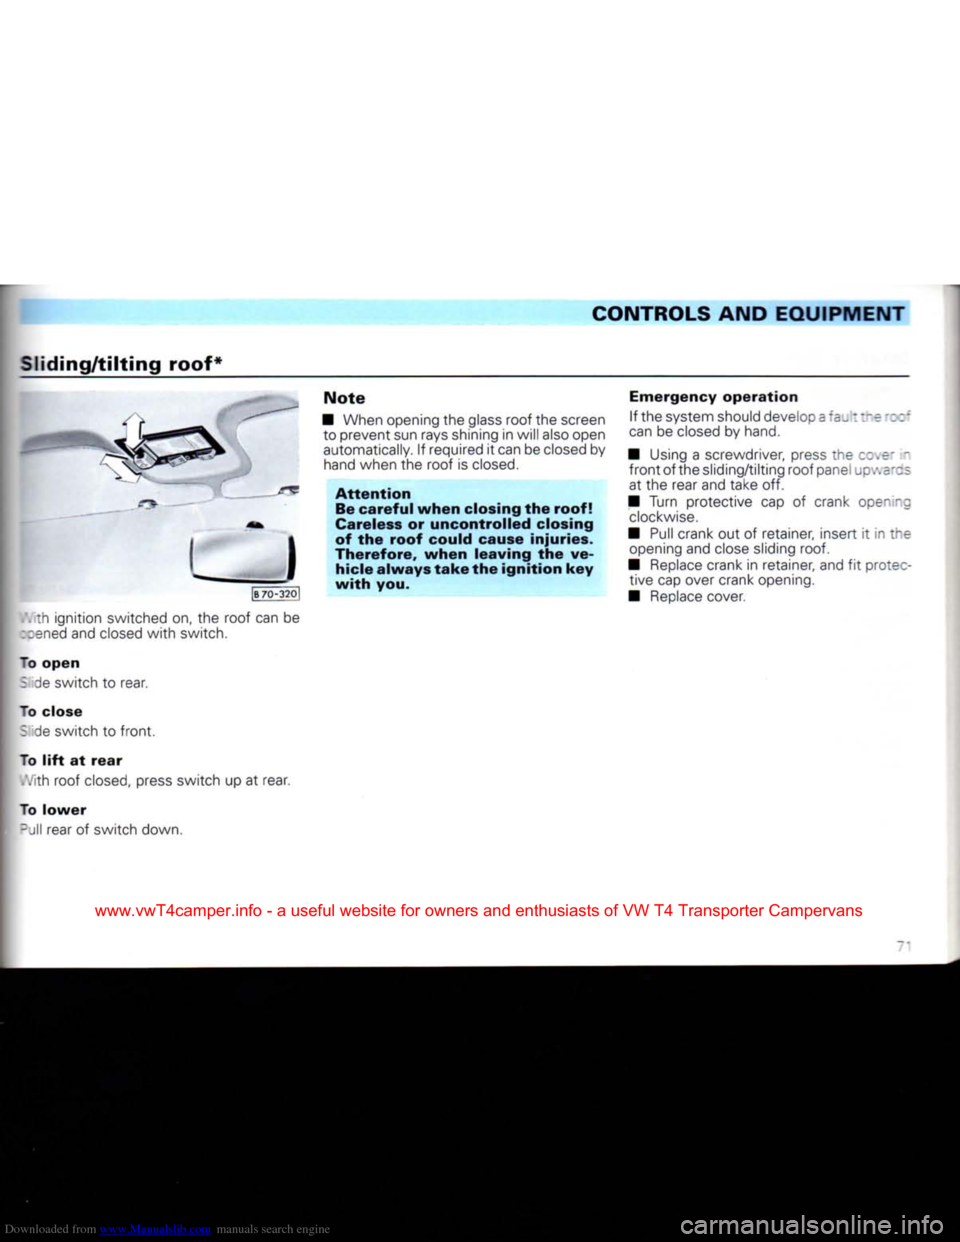
. th ignition switched on, the roof can be
::ened
and closed
with
switch.
~o
open
: de switch to rear.
To close : de switch to
front.
To
lift
at
rear
,','ith
roof closed, press switch up at rear.
To
lower
-JII
rear of switch down.
Note
• When opening the glass roof the screen to prevent sun rays shining in will also open
automatically. If required it can be closed by hand when the roof is closed.
Attention
Be
careful
when
closing the
roof!
Careless or
uncontrolled
closing
of the
roof
could cause
injuries.
Therefore,
when
leaving
the ve
hicle
always
take
the
ignition
key
with
you.
Emergency
operation
If the system should develop a t:~e
can
be closed by hand.
• Using a screwdriver, press the cove' -
front
of the sliding/tilting roof panel upv.e'os at the rear and take off.
• Turn protective cap of crank opening
clockwise.
• Pull crank out of retainer, insert it in i^e opening and close sliding
roof.
• Replace crank in retainer, and fit protec tive cap over crank opening.
• Replace cover.
www.vwT4camper.info - a useful website for owners and enthusiasts of VW T4 Transporter Campervans
Page 93 of 164

Downloaded from www.Manualslib.com manuals search engine
GENERAL
MAINTENANCE
Attention
Do
not have the belts cleaned
chemically
because the cleaning
compounds
damage the webbing
material. Ensure
that
the belts do not come into contact
with
cor
rosive
fluids.
Steel wheels
~ne wheels and
the
wheel trims should
be
:!eaned
thoroughly
at
regular intervals .'.hen the vehicle
is
being washed. This
will
"event brake dust,
dirt
and road salt
from
•cumulating
on the
wheel. Persistent "grained brake dust can
be
removed
with
="
industrial grime remover. Paint damage ;~ould
be
repaired before rust can form.
Alloy wheels - order
to
maintain
the
smart appearance
• alloy wheels
for a
long period, regular pre
is
necessary.
In
particular, salt
and
•Bke
pad dust must
be
washed
off
thor-
cghly
at
least every two weeks otherwise re surface
of the
alloy
will
be
damaged.
-~er
being washed,
the
wheels should
be
~f3ted
with
an
acid-free cleaner
for
alloy
"eels.
About every three months
it is
"f:essary
to
give wheels
a
good rubbing
». :n hard wax. Paint polish or other abrasive
•c
„tions must not be
used.
If
the protective
BE
-.t
coat has been damaged, e.g. by stone react,
the
damaged spots should be dealt
with
as soon
as
possible.
Cleaning and anti-corrosion
treatment
of
engine compart ment
Attention Before doing any
work
in the en
gine compartment it is essential
to read the notes on page 95!
The
engine compartment and
the
outside
surface
of
the power
unit
are given anti-cor
rosion treatment
at the
factory.
In
the
winter when
the
vehicle
is
being
driven frequently
on
salted roads, good
anti-corrosion treatment
is
very important.
For
this reason
the
entire engine compart
ment should
be
thoroughly cleaned before
and after
the
salting period
and
then pre
served
so
that
the
salt cannot have
a
dam
aging effect. The
ignition must be switched off
before washing the engine.
To
prevent damage to the system
the jet from the cleaning appliance must not be directed into the
intake
openings
for the heating and ventilation. The openings are located
above the air cleaner.
If
the engine compartment is cleaned
at
any
time
with
grease removing solutions1'
or if
one has the engine washed, the anti-corro
sion
compound is nearly always removed as
well.
It is
therefore essential
to
ask
for
dur
able
preservation
of all
surfaces,
seams,
joints
and components
in the
engine com partment
to
be carried out. This applies also
when corrosion protected parts
are re
newed.
Volkswagen
dealers have stocks
of the
high-quality cleaning and preservation ma
terials recommended
by the
factory
and
have
the
equipment necessary
to
apply
them.
Because
when
washing
the en
gine
petrol,
grease
and oil de
posits
are
washed
off, the
dirty
water
must
be
cleaned
by an oil
sep
arator.
For
this
reason
engine
wash-
11
Only
the
correct
cleaning
solutions may
be
used
-
on no account petrol
or
Diesel.
91
www.vwT4camper.info - a useful website for owners and enthusiasts of VW T4 Transporter Campervans
Page 97 of 164

Downloaded from www.Manualslib.com manuals search engine
GENERAL
MAINTENANCE
Engine
compartment
Page
Windscreen
washer
container
.. 108
Power
assisted
steering
fluid
reservoir*
100
Engine
oil filler
opening
97
Engine
oil
dipstick
97
Coolant
expansion
tank 102
Brake
fluid
reservoir
104
Battery
106 Attention
Particular care should be
taken
when working in the engine
com
partment!
•
Switch off engine, remove ignition key.
•
Pull handbrake on firmly.
•
Move gear lever into neutral or
"P"
position.
•
Allow engine to cool off.
•
As long as the engine is at op
erating temperature:
-
Do not put your hand into the radiator fan, it could switch on
suddenly.
-
Do not open the radiator cap be
cause
the cooling system is
under
pressure.
•
Avoid causing short circuits in
the electrical system - particular ly at the
battery
-.
•
If tests have to be
carried
out
with
the engine running,
there
is
an additional danger
present
from rotating parts - e.g.
V-belts,
generator, radiator fan etc. - and
from the high voltage ignition
system.
Attention must be paid to the warnings given in this Instruc
tion Manual and to the generally
applicable
safety regulations.
When topping up fluids one
should
ensure
that
they are not mistaken,
one
for the other, under any
circum
stances,
otherwise serious
func
tional defects
will
result.
So
that
leaks
are quickly de
tected
the ground underneath
the vehicle should be checked
reg
ularly.
If spots as caused by oil or
other
operating fluids can be seen, the vehicle should be
taken
to the
workshop for checking.
www.vwT4camper.info - a useful website for owners and enthusiasts of VW T4 Transporter Campervans
Page 109 of 164

Downloaded from www.Manualslib.com manuals search engine
GENERAL
MAINTENANCE
Winter
driving
A/inter weather
is
particularly hard
on the
cattery. Furthermore at low temperatures
it
has
only a part
of
the capacity
it
has
at
nor mal temperatures.
We
recommend there-
-'ore
that
the battery should be checked pre
ferably
by a
Volkswagen dealer before
the
onset
of
cold weather
and
charged
if
"ecessary.
At
the same time,
if
necessary,
the terminals will
be
cleaned
and
special
grease
applied. This will
not
only result
in
quicker, more reliable starting but will help
:o prolong the life
of
the battery.
If the
vehicle
is not
driven
for
sev
eral
weeks
when
temperatures
are
very
low, the
battery
should
be
taken
out
and
stored
in a
frost-free
room, so
that
it
cannot
freeze
up and
become damaged.
Attention
Store
the
battery
out of
reach
of
children.
To
take battery out,
first
disconnect the two
cables
(see previous page) and then remove
-etainer.
Charging
battery
When
charging
with
a low current (e.g.
with
a
small charger) the battery cables need not normally be taken off. The instructions from
the charger manufacturer must however be
noted.
Before
Quick charging,
that
is
charging
with
a
high current, both battery cables must be disconnected
-
see previous page.
The
following information must be noted:
• When charging
the
battery
do not re
move
caps.
•
A
discharged battery can freeze
at - 10
degrees
C. It is
essential
to
thaw
out a
frozen battery before
it is
given
a
quick
charge
otherwise
it
may explode!
• The mains cable
of the
charger should not be connected until after the clips
of
the
charger
have been properly secured
to the
battery terminals:
Red
=
plus
(or
positive)
Black
=
minus
(or
negative)
• Reconnect cables correctly after charg ing battery.
Attention
The
gas
given
off
during
the
charging process
is
highly
in
flammable
so
keep
sources
of
ignition
(naked
flames,
burning
cigarettes
etc.)
well
away
from
the
battery.
Renewing
a battery If the
battery has
to be
renewed,
the
new
battery must have the same capacity, volt
age
(12 Volts), current capacity and shape.
Volkswagen
dealers have
a
range
of
suit
able
batteries.
Because
of the
problem
of
dis
posing
of
the
old
battery
the re
newal
of
a
battery
should
preferably
be
done
by a
Volkswagen
dealer.
Batteries
contain,
amongst
other
things,
sulphuric
acid
and
lead
and
must
on no
account
be put
with
nor
mal
household
waste.
107
www.vwT4camper.info - a useful website for owners and enthusiasts of VW T4 Transporter Campervans
Page 110 of 164

Downloaded from www.Manualslib.com manuals search engine
GENERAL
MAINTENANCE
Windscreen
washer
system
"he fluid container is on the
right
of the en gine compartment. The container holds
about 5 litres, on vehicles
with
headlight
washer
system* about 7 litres.
The
rear window washer is supplied
with
fluid from the container in the engine com-oartment. Filling the
container
Pull
the cap off and
fill
container to the brim
with
washer fluid.
Press
cap on
tightly
again,
then switch on ignition and check
operation of washer system.
It is advisable to add a window cleaning
sol
ution
with
a wax remover
(with
anti-freeze
additive in winter) to the water because plain water is not usually sufficient to clean
the glass and headlight lenses quickly and
thoroughly. The mixing ratios on the win dow cleaner packaging must be adhered to.
Even
when
heated
windscreen
washer
jets*
are fitted, a window clean ing solution containing anti-freeze should
be
added to the water in the winter.
Note
If at any time no window cleaning solution
with
anti-freeze additive is available, methylated spirits can be
used.
Do not,
under any circumstances, add engine
cool
ing system fluid or other additives.
Adjusting
washer
jets
When
the vehicle is stationary, the water
should
hit the windscreen approximately as
shown.
The
jet for the rear window washer is in the
wiper shaft. The water jet should hit the
glass
in the centre of the wiped area.
The
jets can be adjusted
with
a needle.
The
jets for the
headlight
washer
sys
tem*
can only be adjusted
with
a specia
tool.
When adjustment is necessary,
con
tact your Volkswagen dealer.
:=
www.vwT4camper.info - a useful website for owners and enthusiasts of VW T4 Transporter Campervans