tailgate VOLKSWAGEN TRANSPORTER 2011 Owner's Manual
[x] Cancel search | Manufacturer: VOLKSWAGEN, Model Year: 2011, Model line: TRANSPORTER, Model: VOLKSWAGEN TRANSPORTER 2011Pages: 486, PDF Size: 69.28 MB
Page 129 of 486
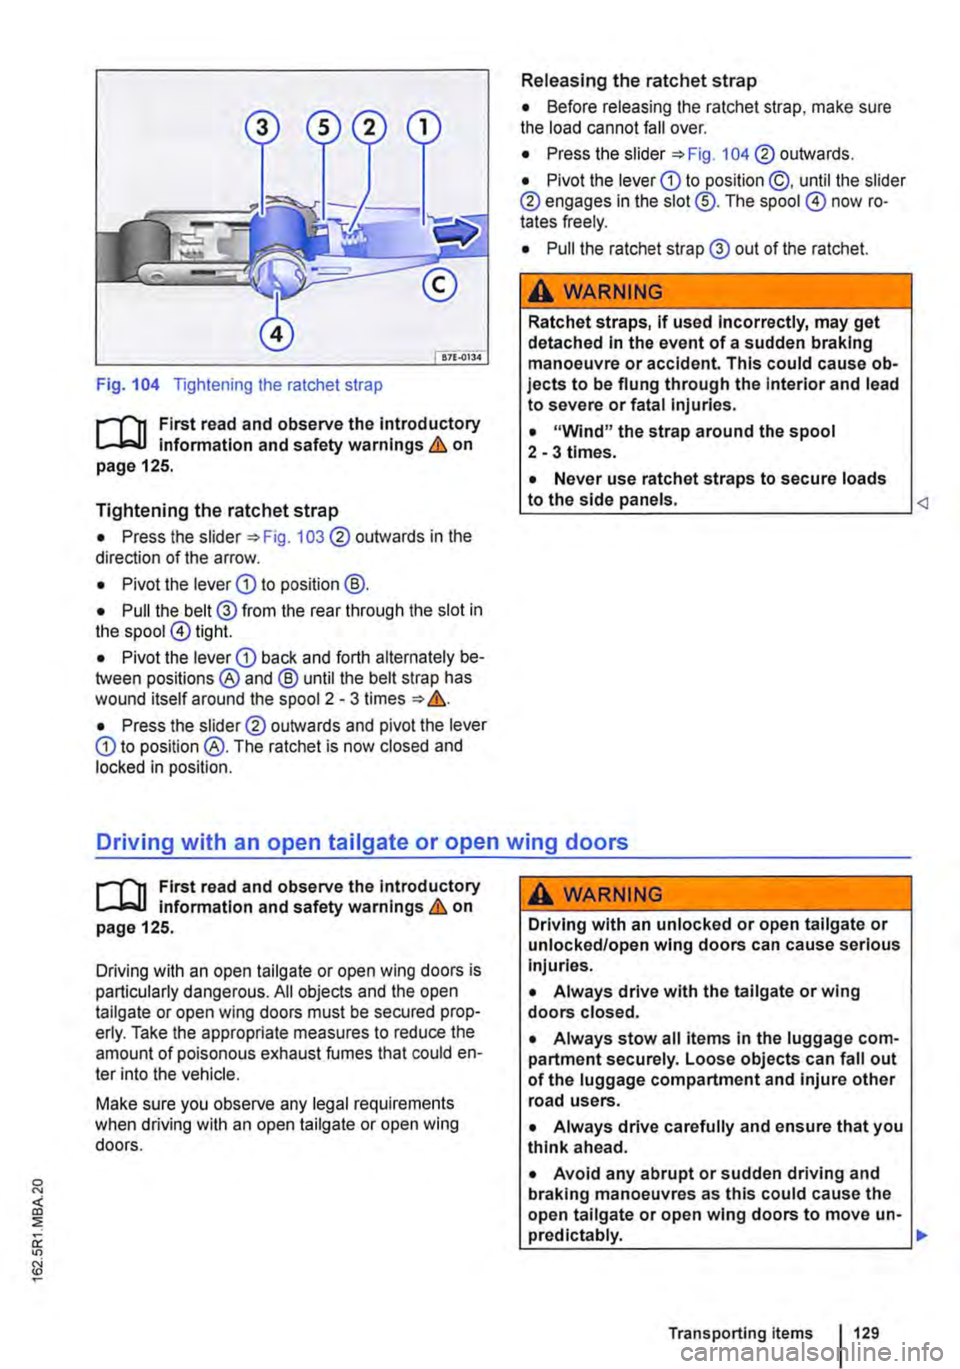
Fig. 104 Tightening the ratchet strap
r--f'n First read and observe the Introductory l.-..lr:=-ll information and safety warnings & on page 125.
Tightening the ratchet strap
• Press the slider =:>Fig. 103 ® outwards in the direction of the arrow.
• Pivot the lever CD to position@.
• Pull the belt@ from the rear through the slot in the spool@ tight.
• Pivot the lever CD back and forth alternately be-tween positions ® and @ until the belt strap has wound itself around the spool 2 -3 times ::. &.
• Press the slid er® outwards and pivot the lever CD to position @. The ratchet is now closed and locked in position.
Releasing the ratchet strap
• Before releasing the ratchet strap, make sure the load cannot fall over.
• Press the slider =:>Fig. 104 ® outwards.
• Pivot the lever CD to position @, until the slider ® engages in the slot@. The spool @) now ro-tates freely.
• Pull the ratchet strap @ out of the ratchet.
A WARNING
Ratchet straps, if used Incorrectly, may get detached in the event of a sudden braking manoeuvre or accident. This could cause ob-jects to be flung through the Interior and lead to severe or fatal injuries.
• "Wind" the strap around the spool 2-3 times.
• Never use ratchet straps to secure loads to the side panels.
r--f'n First read and observe the Introductory l.-..lr:=-ll Information and safety warnings & on page 125.
Driving with an open tailgate or open wing doors is particularly dangerous. All objects and the open tailgate or open wing doors must be secured prop-erly. Take the appropriate measures to reduce the amount of poisonous exhaust fumes that could en-ter into the vehicle.
Make sure you observe any legal requirements when driving with an open tailgate or open wing doors.
A WARNING
Driving with an unlocked or open tailgate or unlocked/open wing doors can cause serious injuries.
• Always drive with the tailgate or wing doors closed.
• Always stow all items in the luggage com-partment securely. Loose objects can fall out of the luggage compartment and injure other road users.
• Always drive carefully and ensure that you think ahead.
• Avoid any abrupt or sudden driving and braking manoeuvres as this could cause the open tailgate or open wing doors to move un-pred lctably. .,.
Transporting items 129
Page 130 of 486
A WARNING (Continued)
• Any objects protruding from the luggage compartment must be marked to ensure that they are visible to other road users. Comply with legal regulations.
• If items protrude out of the luggage com-partment, never use the tail gate or wing doors to "hold them in position".
• If you drive with the tailgate or wing doors open, remove any racks and luggage from the tail gate or a wing door.
A WARNING
Poisonous exhaust fumes can get into the in-terior when the tailgate or wing doors are open. This can result in loss of conscious-ness, carbon monoxide poisoning, serious Injury and accidents.
Driving a loaded vehicle
1"''l1 First read and observe the introductory L--Wl information and safety warnings & on page 125.
For good vehicle handling when driving a loaded vehicle, please observe the following:
• Stow all items of luggage page 127.
• Accelerate carefully and gently.
• Avoid sudden braking and driving manoeuvres.
• Brake earlier than in normal driving.
• If applicable, heed the information about driving with a trailer 139.
• If applicable, observe the information concern-ing the roof carrier 137.
Luggage compartment
CO Introduction
This chapter contains information on the following subjects:
Luggage compartment cover . . . . . . . . . . . . . . 132
130 Before the JOUrney
A WARNING (Continued)
• Always drive with the wing doors or tail-gate closed to prevent poisonous exhaust fumes getting into the vehicle.
• If exceptional circumstances require you to drive with an open tallgate or open wing doors, do the following to reduce the amount of poisonous exhaust fumes that could enter into the vehicle:
CD
-Close all windows and the sliding/tilting roof.
-Switch off air reclrculatlon mode.
-Open all vents In the dash panel.
-Switch the blowers to the highest set-ting.
The vehicle length and height are different when the wing doors or tailgate are open.
A wARNING
Moving loads can severely impair the vehi-cle's stability and driving safety which could cause accidents and severe Injuries.
• Secure objects properly to prevent them from sliding.
• Use suitable straps when securing heavy objects.
• Engage the rear seat backrests securely In
Page 131 of 486
Additional information and warnings:
• Airbag system =:.page 87
• Lights =:.page 106
• Transporting =:.page 125
• Towing a trailer=> page 139
• Luggage net, California =>page 192
• Wheels and tyres =>page 367
A WARNING
When the vehicle is not in use or is not being supervised, always lock the doors and tail-gate to reduce the risk of severe or fatal inju-ries.
• Never leave children unattended, especial-ly when the tailgate is open. Children could make their way into the luggage compart-ment, close the tailgate and be unable to get out. This can cause severe or fatal injuries.
• Never let children play in or around the ve-hicle.
• Do not travel with people in the luggage compartment.
A WARNING
Objects that are not secured, or are secured Incorrectly, can cause serious injuries in the event of a sudden driving or braking manoeu-vre or accident. This applies particularly if objects are struck by the alrbag when activa-ted and then flung through the vehicle interi-or. To reduce the risk of accidents, please ob-serve the following guidelines:
• Always stow all objects In the vehicle se· curely. Always stow luggage and heavy ob-jects in the luggage compartment.
• Always use suitable straps to prevent lug-gage from being thrown through the vehicle Interior and entering the deployment zones of
A WARNING (Continued)
the curtain alrbag, the combined curtain and side airbag or the front airbag In the event of a sudden driving or braking manoeuvre.
• Always keep stowage compartments closed while the vehicle is In motion.
• Do not stow any hard, heavy or sharp ob· jects loose in any of the vehicle's open stow-age areas, on the luggage compartment cov-er or on the dash panel.
• Remove any hard, heavy or sharp objects from items of clothing and bags Inside the vehicle and stow them securely.
A WARNING
Transporting heavy objects changes the vehi-cle's handling and increases the braking dis-tance. Heavy loads that are not properly stowed or secured in the vehicle can lead to a loss of vehicle control and can cause serious injury.
• Transporting heavy objects changes the vehicle's handling and the centre of gravity.
• The payload should be distributed as evenly as possible in the vehicle.
• Always secure heavy objects In the lug-gage compartment as far in front of the rear axle as possible.
CD
Hard objects on the shelf can chafe against the wires of the heating element in the rear window and cause damage.
m Always ensure that the venlilalion openings L!J between the rear window and the stowage area are uncovered to allow stale air to escape from the vehicle.
Page 139 of 486
Loading the roof carrier
ill1 First read and observe the introductory L-l.:.l.l information and safety warnings & on page 137.
Loads can only be attached securely when the roof carrier system is fitted correctly &.
Maximum permissible roof load
The maximum permissible roof load for vehicles with a normal roof is 150 kg and for vehicles with a pop-up roof it is 50 kg. The roof load limit refers to the combined weight of the roof carrier and the load carried on the roof &.
Each mount can bear a maximum load of 50 kg if the weight of the load is evenly distributed over the entire length of the mount.
Ensure that you know the weight of the roof rack and the items to be transported on the roof, and weigh them if necessary. Never exceed the maxi-mum permissible roof load.
However, you will not be able to carry the maxi-mum roof load if you are using a roof carrier with a lower weight rating. In this instance, do not exceed the maximum weight limit for the roof carrier. This weight limit is listed in the fitting instructions.
Distributing the load
Distribute the load evenly and secure it correctly
Checking the fittings
After the mounts and roof carrier have been at-tached, check the bolted connections and fasten-ings once you have travelled a short distance and then at regular intervals.
Towing a trailer
o:n Introduction
This chapter contains information on the following subjects:
Technical requirements . . . . . . . . . . 141 Fitting the removable ball coupling 142
Removing the ball coupling . . . . . . . . . 144
Hitching and connecting the trailer . . . 144 Loading the trailer . . . . . . . . . .. . . 146 Towing a trailer . . . . . . . . . . . . . . . . . . . . . . . . 146
Trailer stabilisation . . . . . . . . . . . . . . . . . . . . . . 147
Retrofitting a towing bracket............... 149
A WARNING
Accidents and vehicle damage can occur if the maximum permitted roof load is excee-ded.
• Never exceed the quoted roof load, the maximum permissible axle loads, and the permissible gross vehicle weight for the vehi-cle.
• Do not exceed the weight rating of the roof carrier, even if the maximum roof load has not been reached.
• Secure heavy objects as far forwards as possible and distribute the load evenly.
A WARNING
Loose and Incorrectly secured loads can fall off the roof carrier and cause accidents and injuries.
• Always use suitable and undamaged se-curing straps.
• Secure loads properly.
The additional load will affect the durability, fuel consumption and performance of the vehicle and, in certain circumstances, could shorten the service intervals.
Driving with a trailer not only places an extra load on the vehicle, but also requires increased concen-tration on the part of the driver.
Transporting items 139
Page 193 of 486
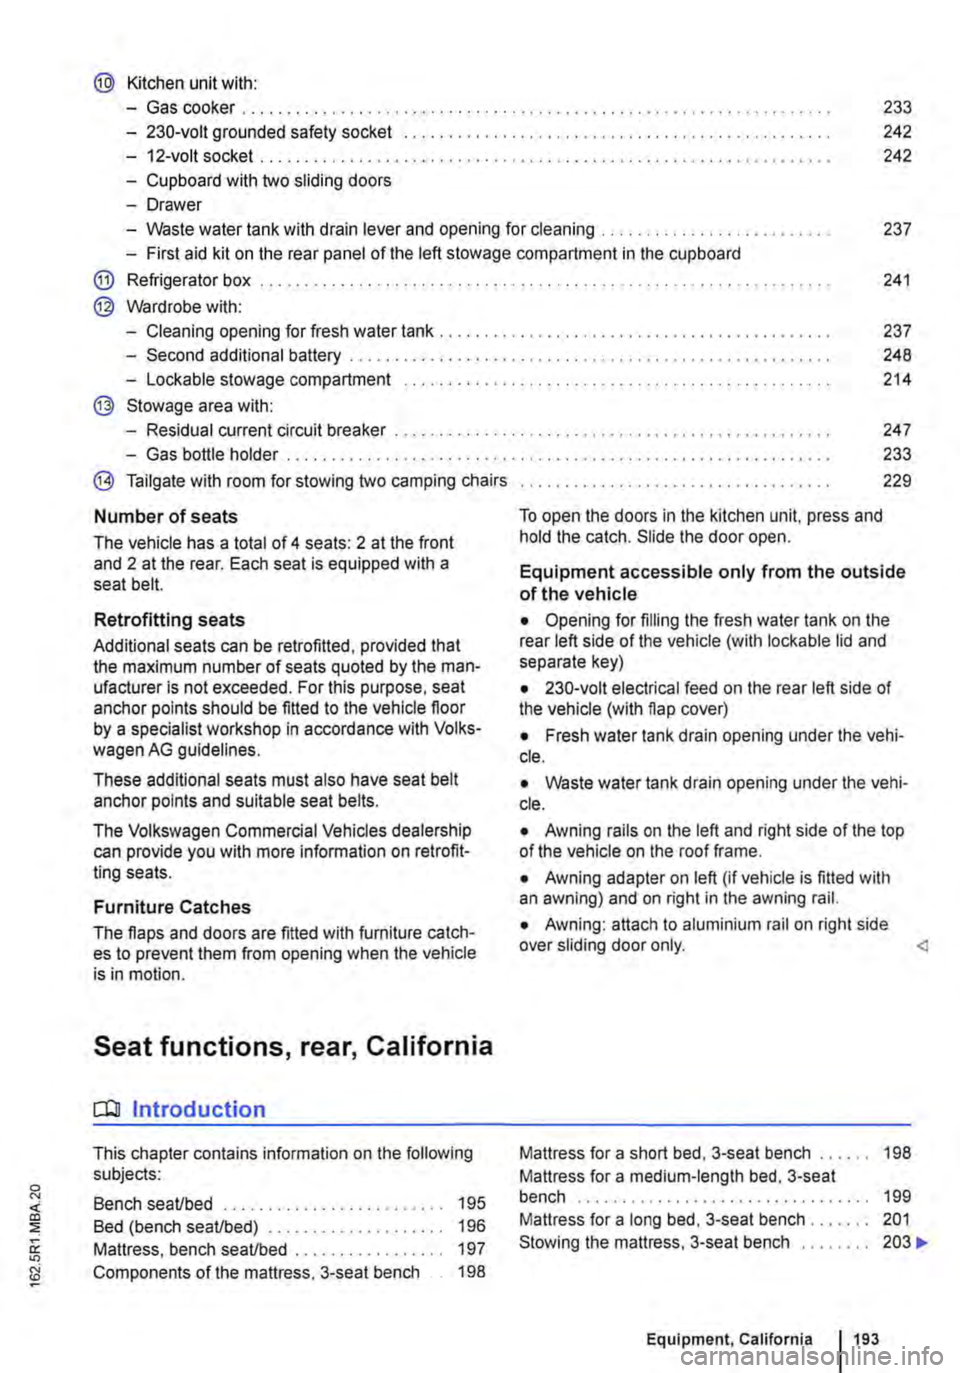
@ Kitchen unit with:
-Gas cooker ................................... . 233
242
242
-230-volt grounded safety socket ................. .
-12-volt socket .............................•..................................
-Cupboard with two sliding doors
-Drawer
-Waste water tank with drain lever and opening for cleaning ...... . 237
-First aid kit on the rear panel of the left stowage compartment in the cupboard
@ Refrigerator box ...
@ Wardrobe with:
241
-Cleaning opening for fresh water tank . . . . . . . . . . . . . . . . . . . . . . . . . . . . . . . . . . . . . . . 237
-Second additional battery . . . . . ........ , . . . . . . . . . . . . . . . . . . . . . . . . . . 248
-Lockable stowage compartment . . . . . . . . . . . . . . . . . . . . . . . . . . . . . . . . . . . . . . . . . . . . . . . . 214
@ Stowage area with:
-Residual current circuit breaker ............... , ...... . 247
233
229
-Gas bottle holder .................. .
® Tailgate with room for stowing two camping chairs
Number of seats
The vehicle has a total of 4 seats: 2 at the front and 2 at the rear. Each seat is equipped with a seat belt.
Retrofitting seats
Additional seats can be retrofitted, provided that the maximum number of seats quoted by the man-ufacturer is not exceeded. For this purpose, seat anchor points should be fitted to the vehicle floor by a specialist workshop in accordance with Volks-wagen AG guidelines.
These additional seats must also have seat belt anchor points and suitable seat belts.
The Volkswagen Commercial Vehicles dealership can provide you with more information on retrofit-ting seats.
Furniture Catches
The flaps and doors are fitted with furniture catch-es to prevent them from opening when the vehicle is in motion.
Seat functions, rear, California
ClJ Introduction
This chapter contains information on the following subjects:
Bench seat/bed . . . . . . . . . . . . . . . . . . . . • • . . . 195
Bed (bench seat/bed) . . . . . . . . . . . 196 Mattress, bench seat/bed . . . . . . . . . . . . . . . . . 197
Components of the mattress, 3-seat bench . . 198
To open the doors in the kitchen unit, press and hold the catch. Slide the door open.
Equipment accessible only from the outside of the vehicle
• Opening for filling the fresh water tank on the rear left side of the vehicle (with lockable lid and separate key)
• 230-volt electrical feed on the rear left side of the vehicle (with flap cover)
• Fresh water tank drain opening under the vehi-cle.
• Waste water tank drain opening under the vehi-cle.
• Awning rails on the left and right side of the top of the vehicle on the roof frame.
• Awning adapter on left (if vehicle is fitted with an awning) and on right in the awning rail.
• Awning: attach to aluminium rail on right side over sliding door only.
Mattress for a medium-length bed, 3-seat bench . . . . . . . . . . . . . . . . . . . . . . . . . . . . 199 Mattress for a long bed, 3-seat bench . . . . . . . 201 Stowing the mattress, 3-seat bench . . . . . . . . 203 .,..
Equipment, California 1193
Page 197 of 486
Mattress, bench seat/bed
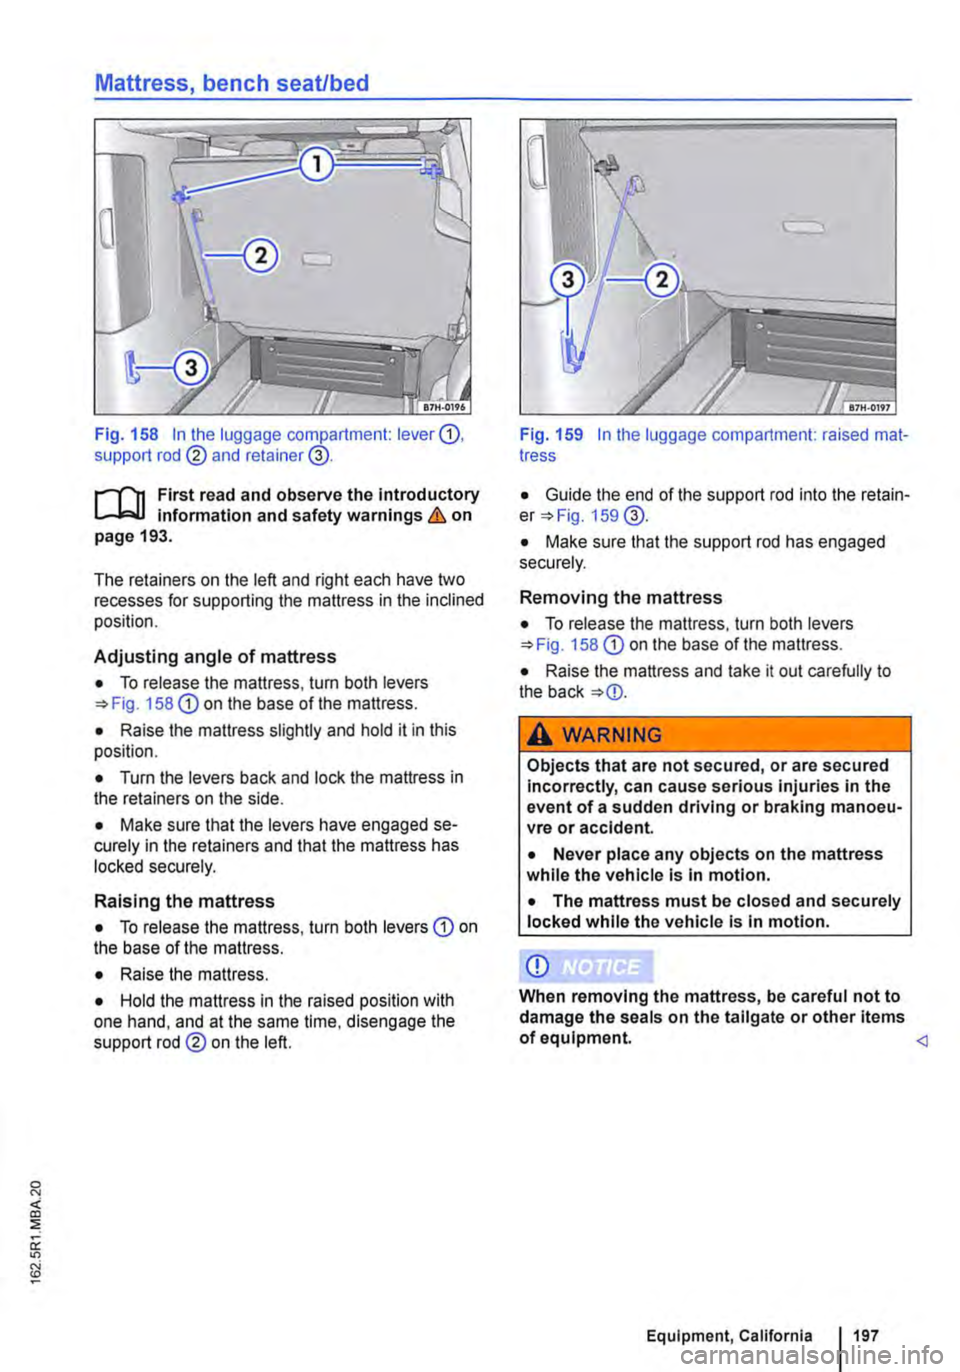
Fig. 158 In the luggage compartment: lever G), support rod @ and retainer@.
r--('n First read and observe the Introductory L.-.J,:.lJ information and safety warnings & on page 193.
The retainers on the left and right each have two recesses for supporting the mattress in the inclined position.
Adjusting angle of mattress
• To release the mattress, turn both levers 158 G) on the base of the mattress.
• Raise the mattress slightly and hold it in this position.
• Turn the levers back and lock the mattress in the retainers on the side.
• Make sure that the levers have engaged se-curely in the retainers and that the mattress has locked securely.
Raising the mattress
• To release the mattress, turn both levers G) on the base of the mattress.
• Raise the mattress.
• Hold the mattress in the raised position with one hand, and at the same time, disengage the support rod@ on the left.
Fig. 159 In the luggage compartment: raised mat-tress
• Guide the end of the support rod into the retain-er 159@.
• Make sure that the support rod has engaged securely.
Removing the mattress
• To release the mattress, turn both levers 158 G) on the base of the mattress.
• Raise the mattress and take it out carefully to the back
A WARNING
Objects that are not secured, or are secured Incorrectly, can cause serious injuries in the event of a sudden driving or braking manoeu-vre or accident.
• Never place any objects on the mattress while the vehicle Is In motion.
• The mattress must be closed and securely locked while the vehicle is In motion.
CD
When removing the mattress, be careful not to damage the seals on the tailgate or other items of equipment.
Page 209 of 486
Interior lights in the living area
OSG.OI12
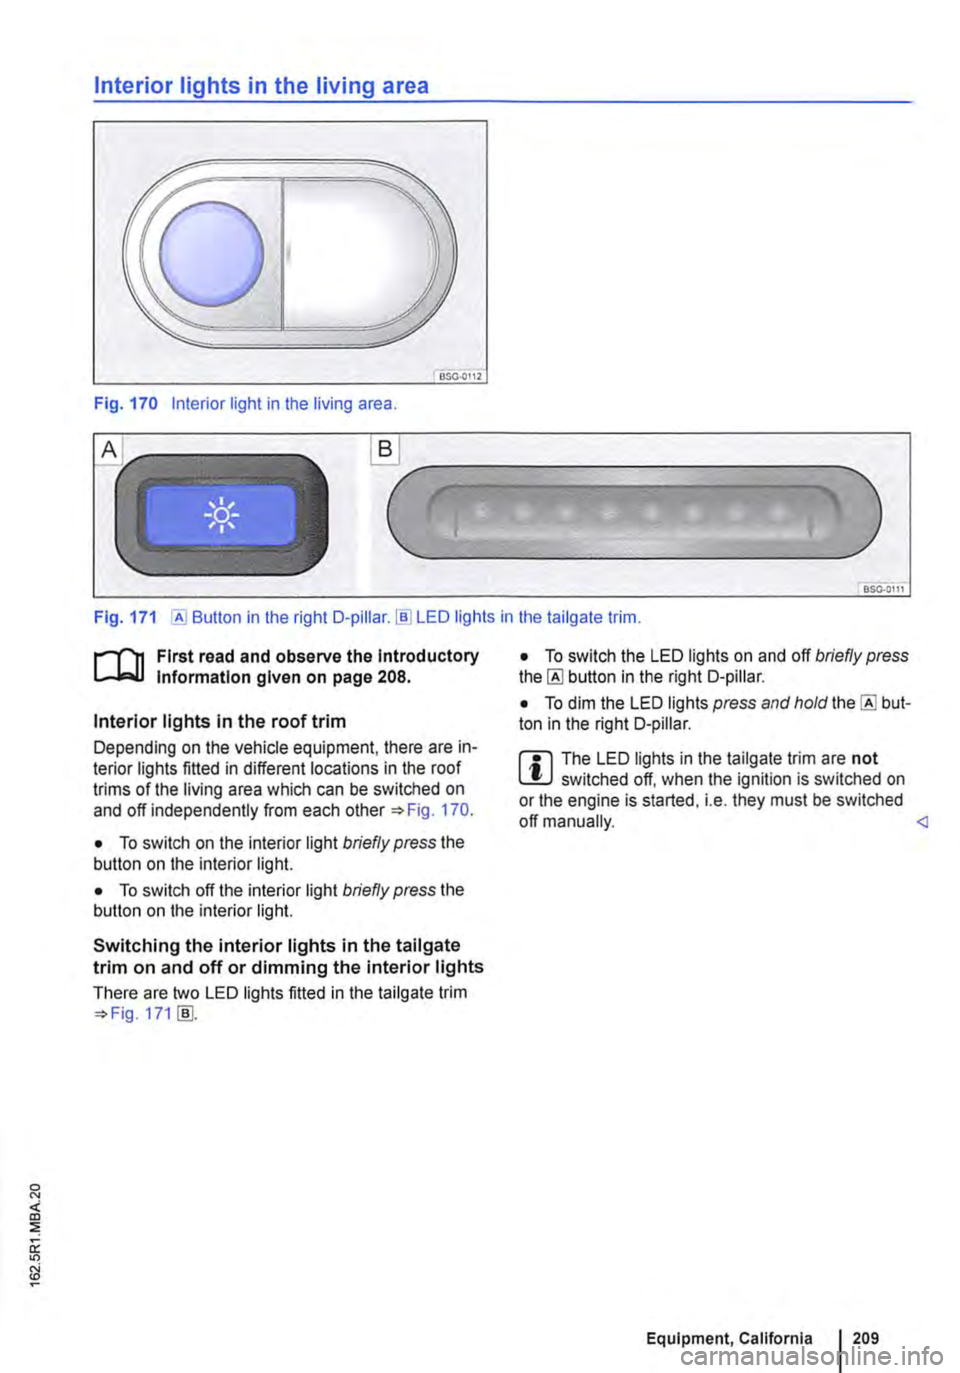
Fig. 170 Interior light in the living area .
.._______)
Fig. 171 [AI Button in the right D-pillar.!ID LED lights in the tailgate trim.
r-1'11 First read and observe the Introductory t.....J,..,lJ Information given on page 208.
Interior lights in the roof trim
Depending on the vehicle equipment, there are in-terior lights fitted in different locations in the roof trims of the living area which can be switched on and off independently from each other 170.
• To switch on the interior light briefly press the button on the interior light.
• To switch off the interior light briefly press the button on the interior light.
Switching the interior lights in the tailgate trim on and off or dimming the interior lights
There are two LED lights fitted in the tailgate trim 171 [ID.
• To switch the LED lights on and off briefly press the [AI button in the right D-pillar.
• To dim the LED lights press and hold the [AI but-ton in the right D-pillar.
m The LED lights in the tailgate trim are not W switched off, when the ignition is switched on or the engine is started, i.e. they must be switched off manually.
Page 213 of 486
Stowage box
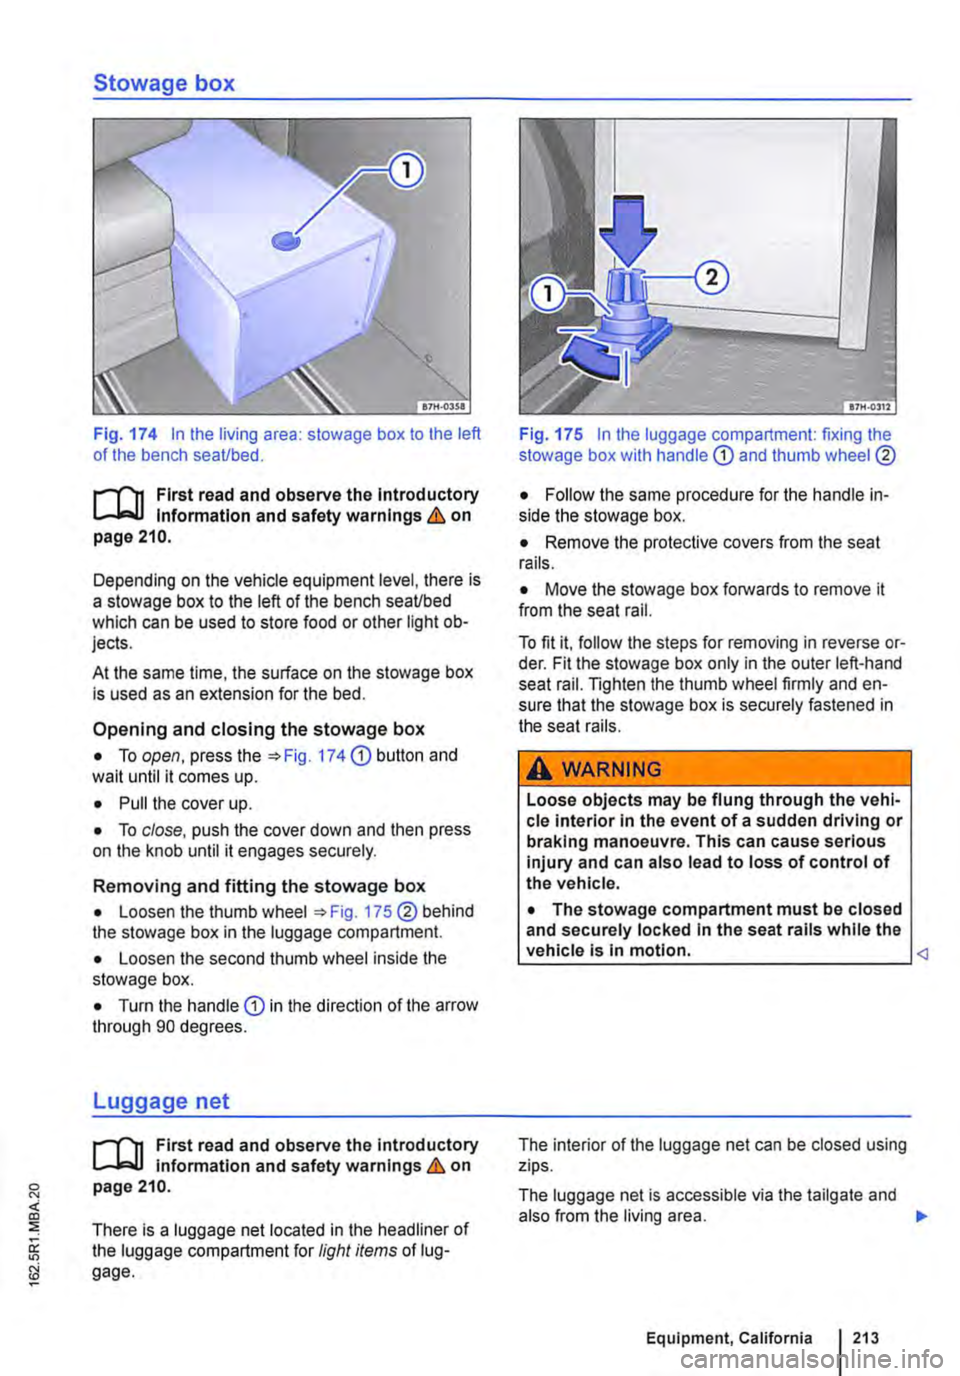
Fig. 174 In the living area: stowage box to the left of the bench seaUbed.
f""'"'('n First read and observe the lntrod uctory L-J,:.,LJ Information and safety warnings & on page 210.
Depending on the vehicle equipment level, there is a stowage box to the left of the bench seaUbed which can be used to store food or other light ob-jects.
At the same time, the surface on the stowage box is used as an extension for the bed.
Opening and closing the stowage box
• To open, press the :;. Fig. 174 (D button and wait until it comes up.
• Pull the cover up.
• To close, push the cover down and then press on the knob until it engages securely.
Removing and fitting the stowage box
• Loosen the thumb wheel :;. Fig. 175 ®behind the stowage box in the luggage compartment.
• Loosen the second thumb wheel inside the stowage box.
• Turn the handle (D in the direction of the arrow through 90 degrees.
Luggage net
f""'"'('n First read and observe the introductory L..-Wl Information and safety warnings & on page 210.
There is a luggage net located in the headliner of the luggage compartment for light items of lug-gage.
Fig. 175 In the luggage compartment: fixing the stowage box with handle
• Remove the protective covers from the seat rails.
• Move the stowage box forwards to remove it from the seat rail.
To fit it, follow the steps for removing in reverse or-der. Fit the stowage box only in the outer left-hand seat rail. Tighten the thumb wheel firmly and en-sure that the stowage box is securely fastened in the seat rails.
A WARNING
Loose objects may be flung through the vehi-cle interior in the event of a sudden driving or braking manoeuvre. This can cause serious injury and can also lead to loss of control of the vehicle.
• The stowage compartment must be closed and securely locked In the seat rails while the vehicle Is In motion.
The luggage net is accessible via the tailgate and also from the living area. .,..
Equipment, California I 213
Page 217 of 486
Opaque shades kit, integrated
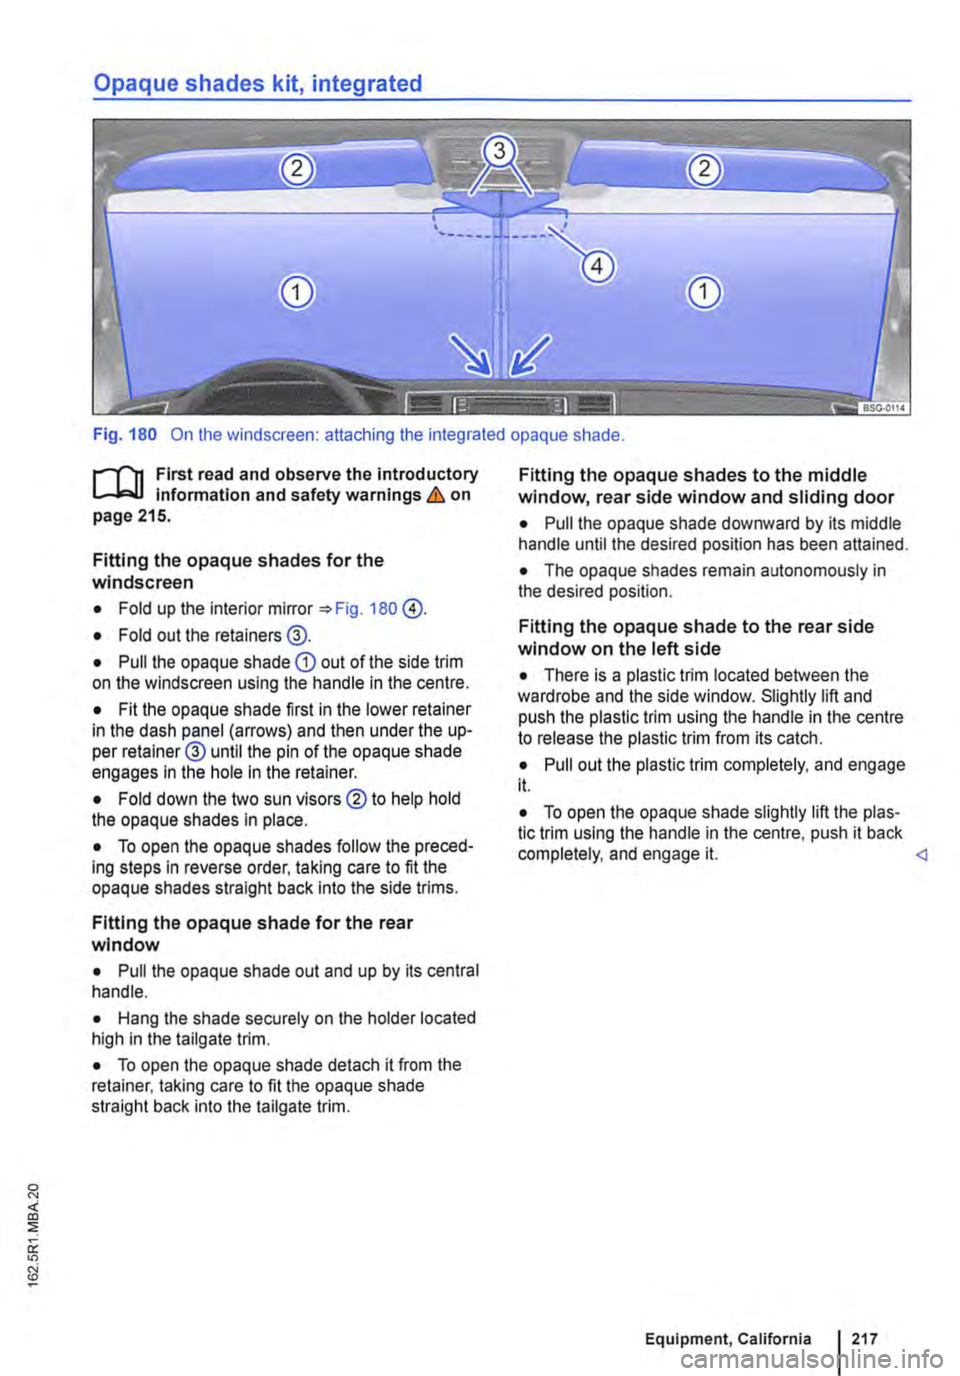
Fig. 180 On the windscreen: attaching the integrated opaque shade.
f""""'('n First read and observe the introductory L-W.I information and safety warnings & on page 215.
Fitting the opaque shades for the windscreen
• Fold up the interior mirror 180 @.
• Fold out the retainers@.
• Pull the opaque shade CD out of the side trim on the windscreen using the handle in the centre.
• Fit the opaque shade first in the lower retainer in the dash panel (arrows) and then under the up-per retainer@ until the pin of the opaque shade engages In the hole in the retainer.
• Fold down the two sun visors ®to help hold the opaque shades in place.
• To open the opaque shades follow the preced-ing steps in reverse order, taking care to fit the opaque shades straight back Into the side trims.
Fitting the opaque shade for the rear window
• Pull the opaque shade out and up by its central handle.
• Hang the shade securely on the holder located high in the tailgate trim.
• To open the opaque shade detach it from the retainer, taking care to fit the opaque shade straight back into the tailgate trim.
Fitting the opaque shades to the middle window, rear side window and sliding door
• Pull the opaque shade downward by its middle handle until the desired position has been attained.
• The opaque shades remain autonomously in the desired position.
Fitting the opaque shade to the rear side window on the left side
• There is a plastic trim located between the wardrobe and the side window. Slightly lift and push the plastic trim using the handle in the centre to release the plastic trim from its catch.
• Pull out the plastic trim completely, and engage it.
• To open the opaque shade slightly lift the plas-tic trim using the handle in the centre, push it back completely, and engage it.
Page 229 of 486
Tables and camping chairs, California
CllJ Introduction
This chapter contains information on the following subjects:
Folding table in the sliding door . . . . . . . . . . . . 229
Folding the work table out and in . . . . . . . . . . 230
Moving the work table . . . . . . . . . . . . . . . . . • . 231
Camping chairs . . . . . . . . . . . . . . . . . . . . . . . . 232 Flyscreen element for the sliding window . . . . 232
Additional Information and warnings:
• Seat functions, front 69
• Seat functions, rear =>page 72
• Stowage 150
• Stowage areas, California 210
• Drink holder 153
• Tailgate 36
• Awning 226
Folding table in the sliding door
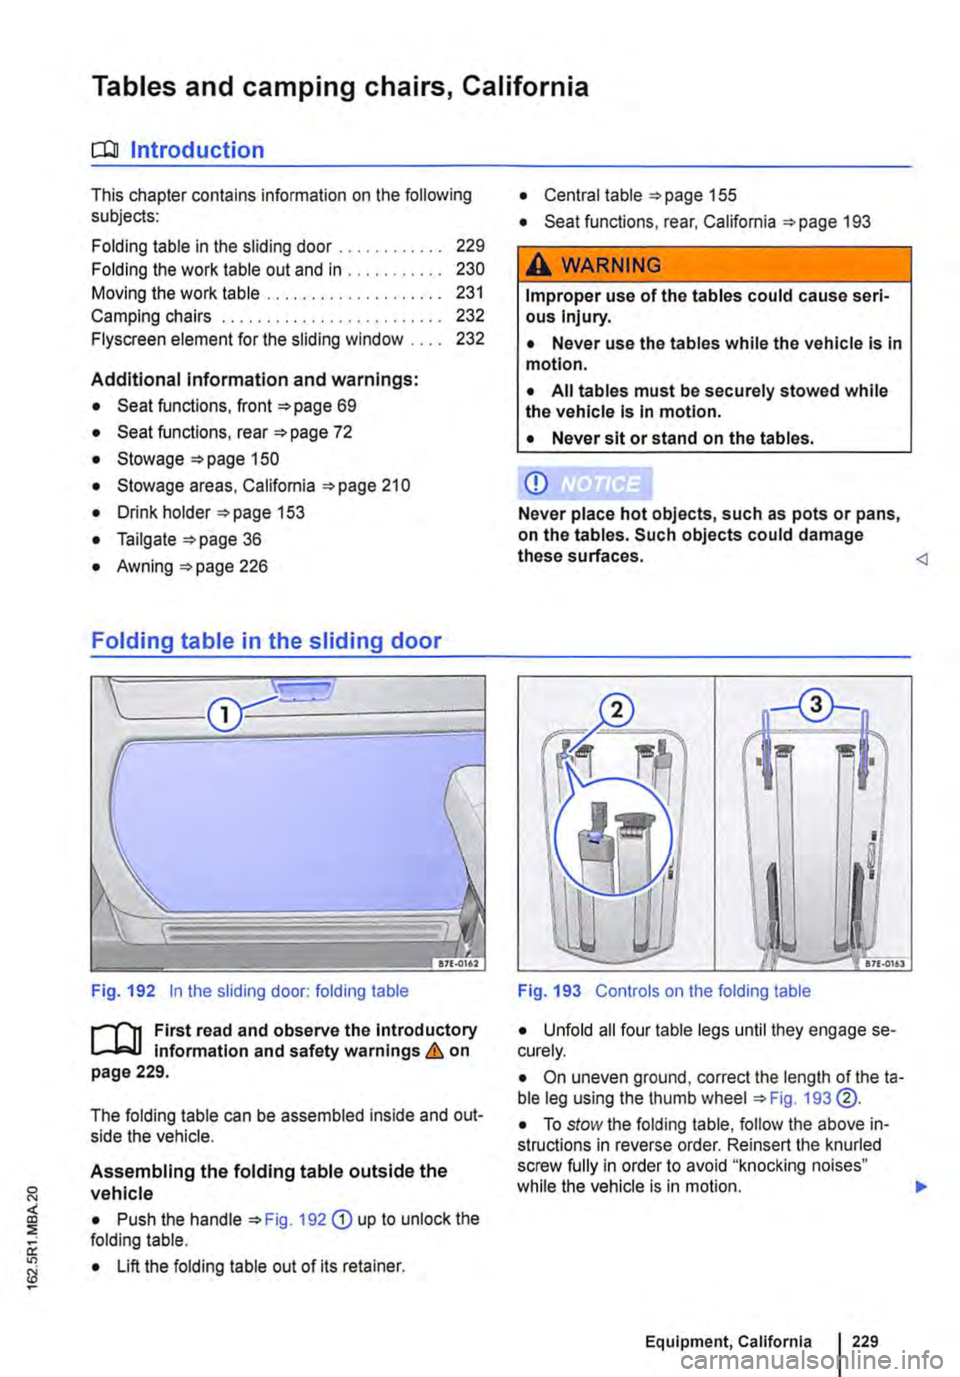
Fig. 192 in the sliding door: folding table
J"'"'"('n First read and observe the introductory L-Jo:.LI information and safety warnings & on page 229.
The folding table can be assembled inside and out-side the vehicle.
Assembling the folding table outside the vehicle
• Push the handle 192 G) up to unlock the folding table.
• Lift the folding table out of its retainer.
• Central table 155
• Seat functions, rear, California 193
,A WARNING
Improper use of the tables could cause seri-ous Injury.
• Never use the tables while the vehicle is in motion.
• All tables must be securely stowed while the vehicle is in motion.
• Never sit or stand on the tables.
CD
Never place hot objects, such as pots or pans, on the tables. Such objects could damage these surfaces.
I !! I
I
I
.. -17£.0161
Fig. 193 Controls on the folding table
• Unfold all four table legs until they engage se-curely.
• On uneven ground, correct the length of theta-ble leg using the thumb wheel 193 @.
• To stow the folding table, follow the above in-structions in reverse order. Reinsert the knurled screw fully in order to avoid "knocking noises" while the vehicle is in motion. .,.
Equipment, California 229