navigation system VOLKSWAGEN TRANSPORTER 2013 User Guide
[x] Cancel search | Manufacturer: VOLKSWAGEN, Model Year: 2013, Model line: TRANSPORTER, Model: VOLKSWAGEN TRANSPORTER 2013Pages: 486, PDF Size: 69.28 MB
Page 30 of 486
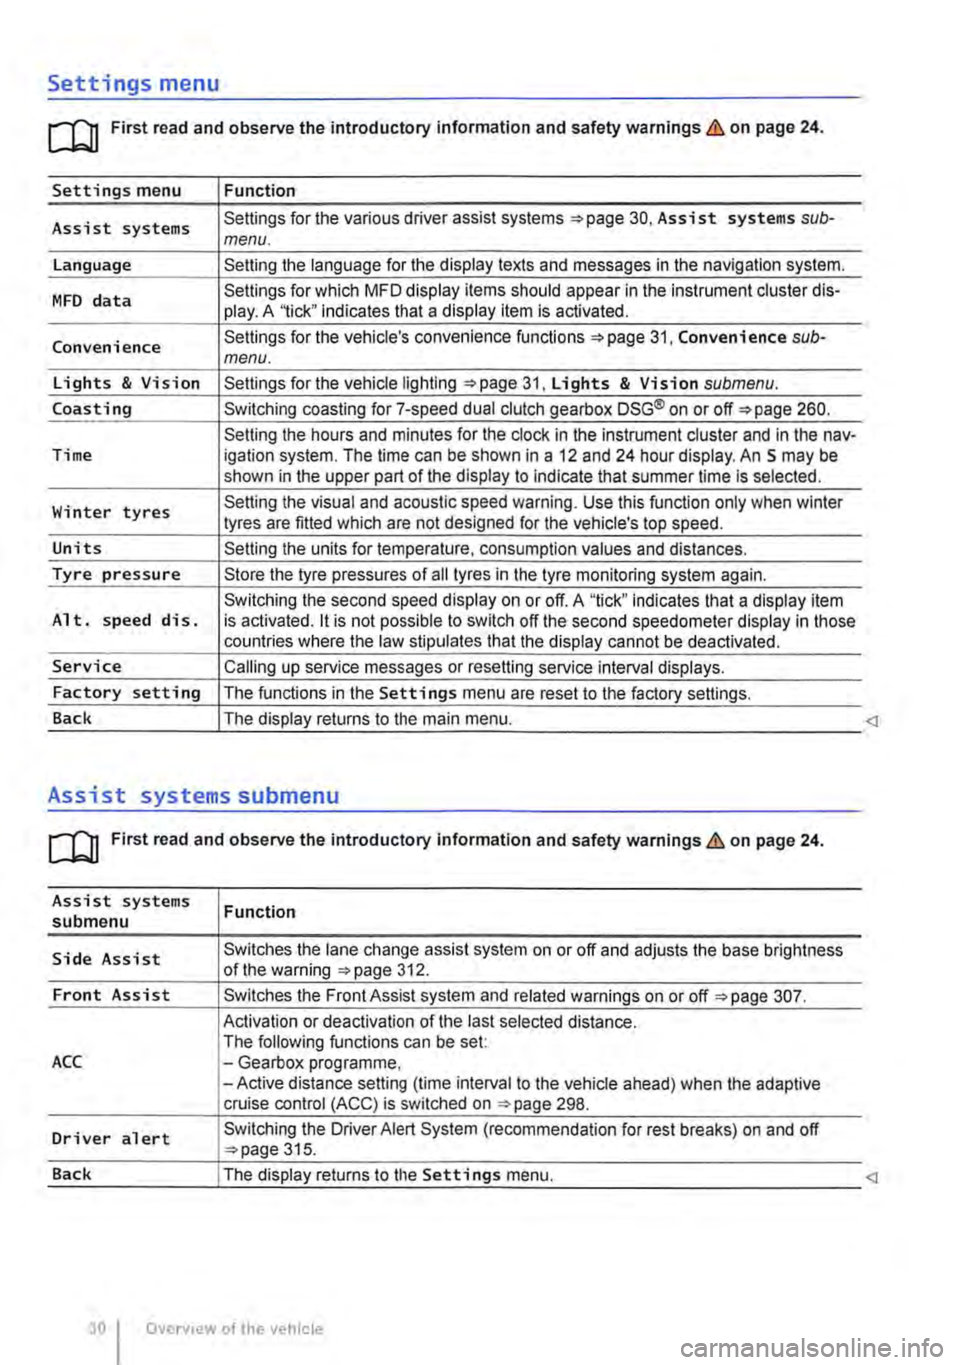
Settings menu
rn First read and observe the introductory information and safety warnings & on page 24.
Settings menu Function
Assist systems Settings for the various driver assist systems =:.page 30, Assist systems sub-menu.
Language Setting the language for the display texts and messages in the navigation system.
MFD data Settings for which MFD display items should appear in the instrument cluster dis-play. A '1ick" indicates that a display item is activated.
Convenience Settings for the vehicle's convenience functions 31, Convenience sub-menu.
Lights & Vision Settings for the vehicle lighting =:.page 31, Lights & Vision submenu.
Coasting Switching coasting for 7-speed dual clutch gearbox DSG® on or off=:. page 260.
Setting the hours and minutes for the clock in the instrument cluster and in the nav-Time igation system. The time can be shown in a 12 and 24 hour display. An S may be shown in the upper part of the display to indicate that summer time Is selected.
Winter tyres Setting the visual and acoustic speed warning. Use this function only when winter tyres are fitted which are not designed for the vehicle's top speed.
Units Setting the units for temperature, consumption values and distances.
Tyre pressure Store the tyre pressures of all tyres in the tyre monitoring system again.
Switching the second speed display on or off. A "tick" indicates that a display item Alt. speed dis. is activated. it is not possible to switch off the second speedometer display in those countries where the law stipulates that the display cannot be deactivated.
Service Calling up service messages or resetting service interval displays.
Factory setting The functions in the Settings menu are reset to the factory settings.
Back The display returns to the main menu.
Assist systems submenu
rn First read and observe the introductory information and safety warnings & on page 24.
Assist systems submenu
Side Assist
Front Assist
ACC
Driver alert
Function
Switches the lane change assist system on or off and adjusts the base brightness of the warning =:.page 312.
Switches the Front Assist system and related warnings on or off =:.page 307.
Activation or deactivation of the last selected distance. The following functions can be set: -Gearbox programme, -Active distance setting (time interval to the vehicle ahead) when the adaptive cruise control (ACC) is switched on ::.page 298.
Switching the Driver Alert System (recommendation for rest breaks) on and off ::.page 315.
Page 34 of 486
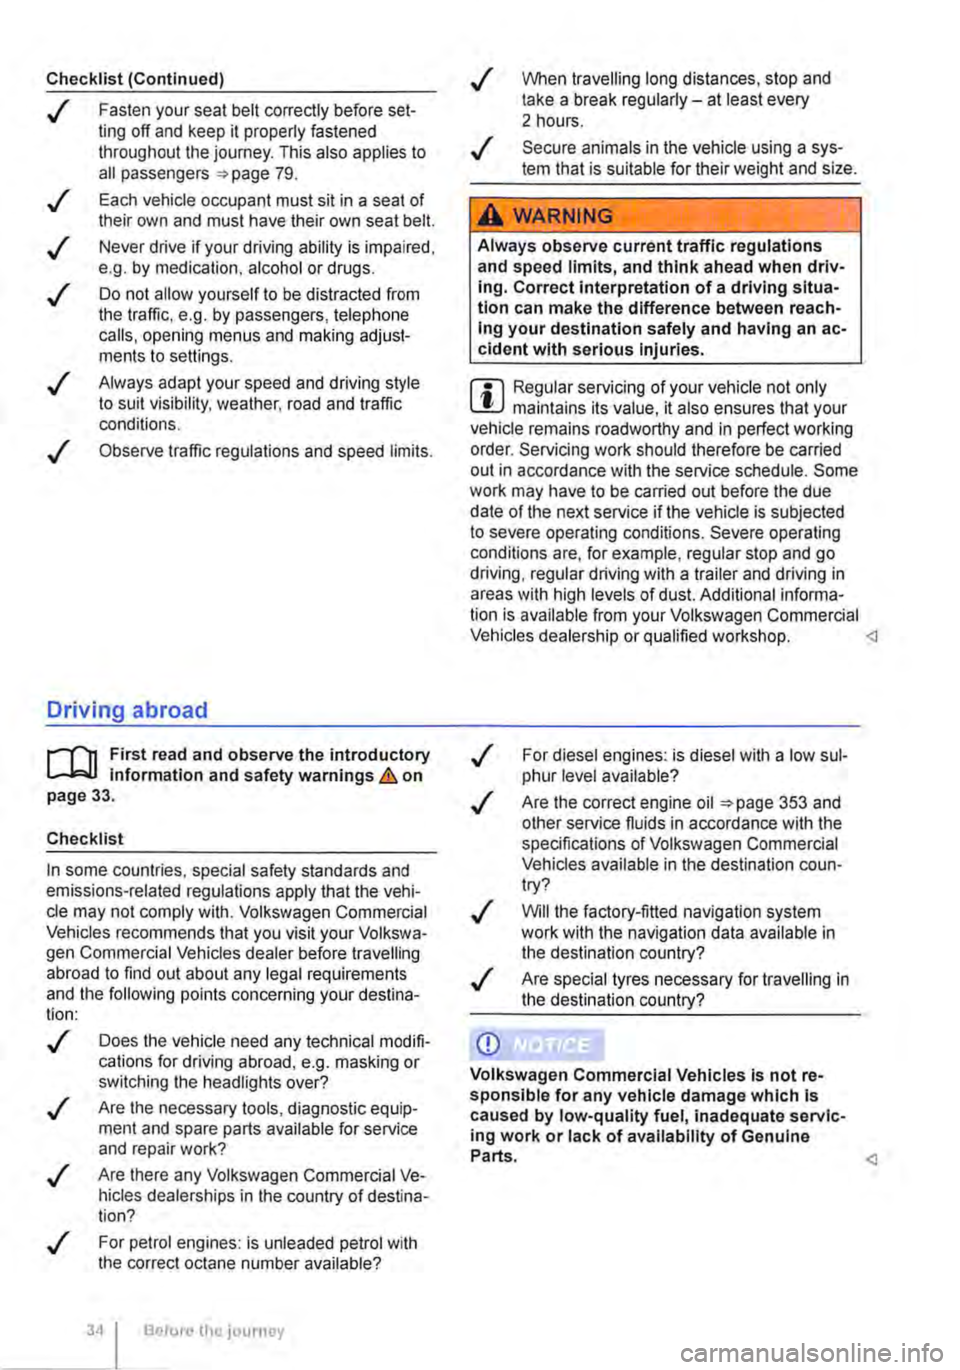
Checklist (Continued)
..( Fasten your seat belt correctly before set-ting off and keep it properly fastened throughout the journey. This also applies to all passengers 79 .
..!
..!
..!
..!
..!
Each vehicle occupant must sit in a seat of their own and must have their own seat belt.
Never drive if your driving ability is impaired, e.g. by medication, alcohol or drugs.
Do not allow yourself to be distracted from the traffic, e.g. by passengers, telephone calls, opening menus and making adjust-ments to settings .
Always adapt your speed and driving style to suit visibility, weather, road and traffic conditions.
Observe traffic regulations and speed limits.
Driving abroad
r-f'n First read and observe the introductory l.-J=.U information and safety warnings.& on page 33.
Checklist
In some countries, special safety standards and emissions-related regulations apply that the vehi-cle may not comply with. Volkswagen Commercial Vehicles recommends that you visit your Volkswa-gen Commercial Vehicles dealer before travelling abroad to find out about any legal requirements and the following points concerning your destina-tion:
..( Does the vehicle need any technical modifi-cations for driving abroad, e.g. masking or switching the headlights over?
..( Are the necessary tools, diagnostic equip-ment and spare parts available for service and repair work?
..( Are there any Volkswagen Commercial Ve-hicles dealerships in the country of destina-tion?
..( For petrol engines: is unleaded petrol with the correct octane number available?
34 Before the journey
..( When travelling long distances, stop and take a break regularly-at least every 2 hours.
..( Secure animals in the vehicle using a sys-tem that is suitable for their weight and size.
A WARNING
Always observe current traffic regulations and speed limits, and think ahead when driv-Ing. Correct interpretation of a driving situa-tion can make the difference between reach-Ing your destination safely and having an ac-cident with serious Injuries.
W Regular servicing of your vehicle not only W maintains its value, it also ensures that your vehicle remains roadworthy and in perfect working order. Servicing work should therefore be carried out in accordance with the service schedule. Some work may have to be carried out before the due date of the next service if the vehicle is subjected to severe operating conditions. Severe operating conditions are, for example, regular stop and go driving, regular driving with a trailer and driving in areas with high levels of dust. Additional informa-tion is available from your Volkswagen Commercial Vehicles dealership or qualified workshop.
..( Are the correct engine oil 353 and other service fluids in accordance with the specifications of Volkswagen Commercial Vehicles available in the destination coun-try?
..( Will the factory-fitted navigation system work with the navigation data available in the destination country?
..( Are special tyres necessary for travelling in the destination country?
CD
Volkswagen Commercial Vehicles is not re-sponsible for any vehicle damage which Is caused by low-quality fuel, inadequate servic-ing work or lack of availability of Genuine Parts.
Page 111 of 486
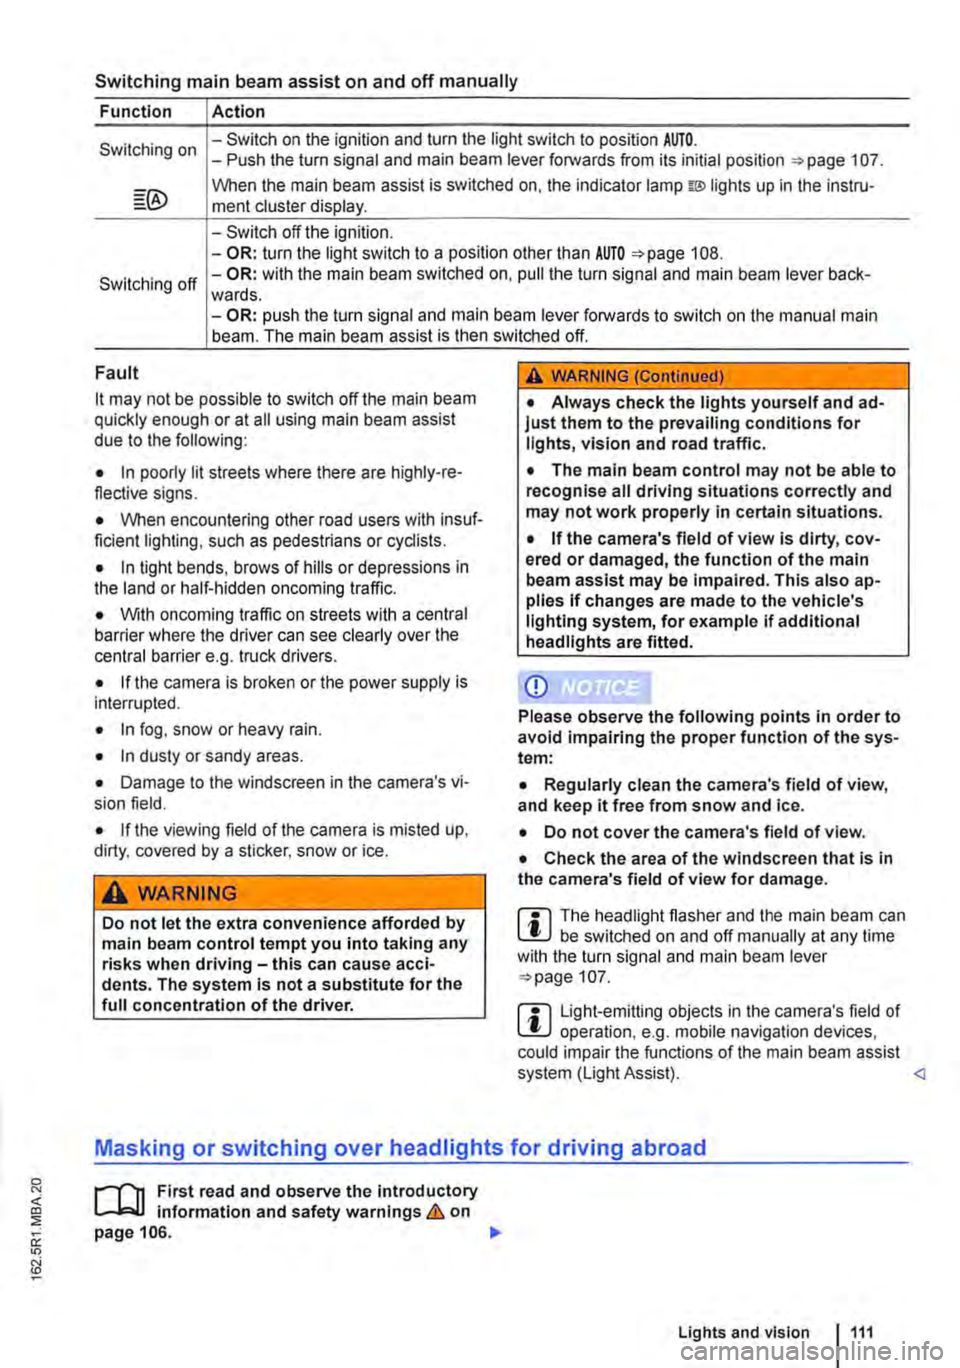
Switching main beam assist on and off manually
Function Action
Switching on -Switch on the ignition and turn the light switch to position AUTO. -Push the turn signal and main beam lever forwards from its initial position =:-page 107.
When the main beam assist is switched on, the indicator lamp w lights up in the instru-ment cluster display.
-Switch off the ignition. -OR: turn the light switch to a position other than AUTO =>page 108.
Switching off -OR: with the main beam switched on, pull the turn signal and main beam lever back-wards. -OR: push the turn signal and main beam lever forwards to switch on the manual main beam. The main beam assist is then switched off.
Fault
it may not be possible to switch off the main beam quickly enough or at all using main beam assist due to the following:
• In poorly lit streets where there are highly-re-flective signs.
• When encountering other road users with insuf-ficient lighting, such as pedestrians or cydists.
• In tight bends, brows of hills or depressions in the land or half-hidden oncoming traffic.
• With oncoming traffic on streets with a central barrier where the driver can see clearly over the central barrier e. . truck drivers. g
• If the camera is broken or the power supply is interrupted.
• In fog, snow or heavy rain.
• In dusty or sandy areas.
• Damage to the windscreen in the camera's vi-sion field.
• If the viewing field of the camera is misted up, dirty, covered by a sticker, snow or ice.
A WARNING
Do not let the extra convenience afforded by main beam control tempt you into taking any risks when driving-this can cause acci-dents. The system is not a substitute for the full concentration of the driver.
A WARNING (Continued)
• Always check the lights yourself and ad-just them to the prevailing conditions for lights, vision and road traffic.
• The main beam control may not be able to recognise all driving situations correctly and may not work properly in certain situations.
• If the camera's field of view is dirty, cov-ered or damaged, the function of the main beam assist may be impaired. This also ap-plies If changes are made to the vehicle's lighting system, for example if additional headlights are fitted.
CD
Please observe the following points in order to avoid impairing the proper function of the sys-tem:
• Regularly clean the camera's field of view, and keep it free from snow and ice.
• Do not cover the camera's field of view.
• Check the area of the windscreen that Is in the camera's field of view for damage.
m The headlight flasher and the main beam can W be switched on and off manually at any time with the turn signal and main beam lever =>page 107.
m Light-emitting objects in the camera's field of W operation, e.g. mobile navigation devices, could impair the functions of the main beam assist system (Light Assist).
1"1'11 First read and observe the introductory L-lo:J.J Information and safety warnings & on page 106.
Lights and vision 1111
Page 150 of 486
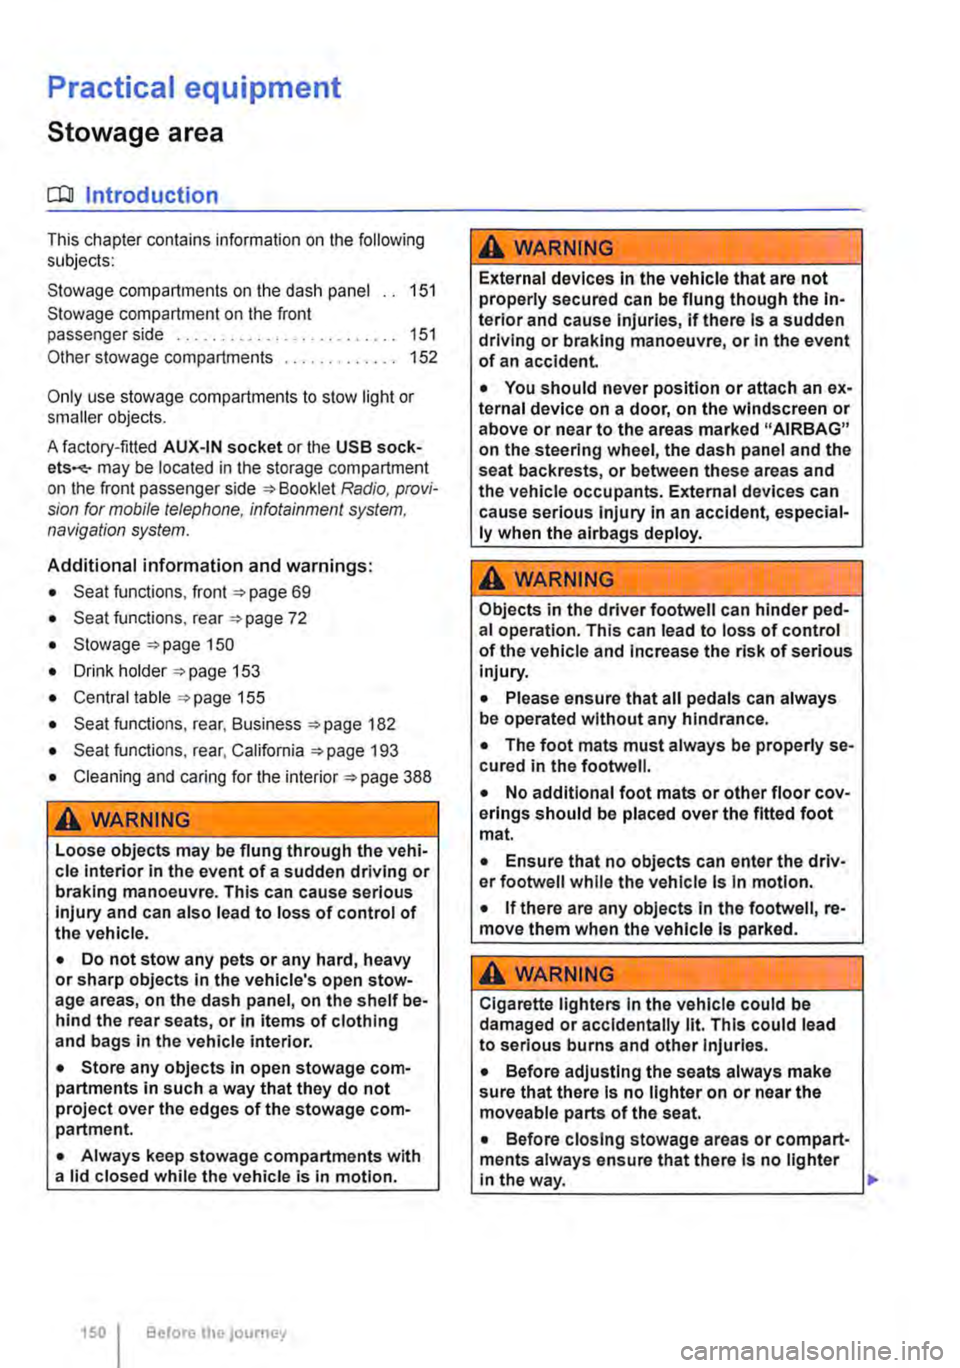
Practical equipment
Stowage area
o::n Introduction
This chapter contains information on the following subjects:
Stowage compartments on the dash panel . . 151 Stowage compartment on the front passenger side . . . . . . . . . . . . . . . . . . . . . . . . . 151 Other stowage compartments . . . . . . . . . . . . . 152
Only use stowage compartments to stow light or smaller objects.
A factory-fitted AUX-IN socket or the USB sock-may be located in the storage compartment on the front passenger side =>Booklet Radio, provi-sion for mobile telephone, infotainment system, navigation system.
Additional information and warnings:
• Seat functions, front => page 69
• Seat functions, rear =>page 72
• Stowage =>page 150
• Drink holder => page 153
• Central table =>page 155
• Seat functions, rear. Business =>page 182
• Seat functions, rear, California =>page 193
• Cleaning and caring for the interior =>page 388
A WARNING
Loose objects may be flung through the vehi-cle Interior In the event of a sudden driving or braking manoeuvre. This can cause serious injury and can also lead to loss of control of the vehicle.
• Do not stow any pets or any hard, heavy or sharp objects In the vehicle's open stow-age areas, on the dash panel, on the shelf be-hind the rear seats, or in items of clothing and bags in the vehicle Interior.
• Store any objects in open stowage com-partments in such a way that they do not project over the edges of the stowage com-partment.
• Always keep stowage compartments with a lid closed while the vehicle is in motion.
150 I Before the journey
A WARNING
External devices in the vehicle that are not properly secured can be flung though the in-terior and cause Injuries, if there is a sudden driving or braking manoeuvre, or in the event of an accident.
• You should never position or attach an ex-ternal device on a door, on the windscreen or above or near to the areas marked "AIRBAG" on the steering wheel, the dash panel and the seat backrests, or between these areas and the vehicle occupants. External devices can cause serious Injury in an accident, especial-ly when the alrbags deploy.
A WARNING
Objects in the driver footwell can hinder ped-al operation. This can lead to loss of control of the vehicle and increase the risk of serious injury.
• Please ensure that all pedals can always be operated without any hindrance.
• The foot mats must always be properly se-cured in the footwell.
• No additional foot mats or other floor cov-erings should be placed over the fitted foot mat.
• Ensure that no objects can enter the driv-er footwell while the vehicle Is in motion.
• If there are any objects in the footwell, re-move them when the vehicle is parked.
A WARNING
Cigarette lighters in the vehicle could be damaged or accidentally lit. This could lead to serious burns and other Injuries.
• Before adjusting the seats always make sure that there Is no lighter on or near the moveable parts of the seat.
• Before closing stowage areas or compart-ments always ensure that there Is no lighter in the way. 11>
Page 173 of 486
• Vehicles whose gross vehicle weight rating, in-cluding trailer exceeds 3,500 kg, if the vehicle is used commercially to transport goods. This is irre-spective of whether the vehicle or the trailer or both are used for commercial transportation of goods.
• Vehicles which are built and fitted for the pur-pose of carrying more than 9 persons, including the driver.
Checking the tachograph
The tachograph must be checked by the manufac-turer or an authorised workshop if any of the fol-lowing occurs, either in isolation or as a combina-tion:
Digital voice enhancement
ClJJ Introduction
This chapter contains information on the following subjects:
Using the digital voice enhancement . . . . . . . . 173
The digital voice enhancement (DVE) enables all vehicle occupants to hear each other clearly, even at high speeds. The driver can communicate with the occupants in the passenger compartment with out having to turn around or speak loudly.
The voice signals from the driver are recorded via a microphone in the headliner. Then, the signals are amplified and mixed with the radio or media
Using the digital voice enhancement
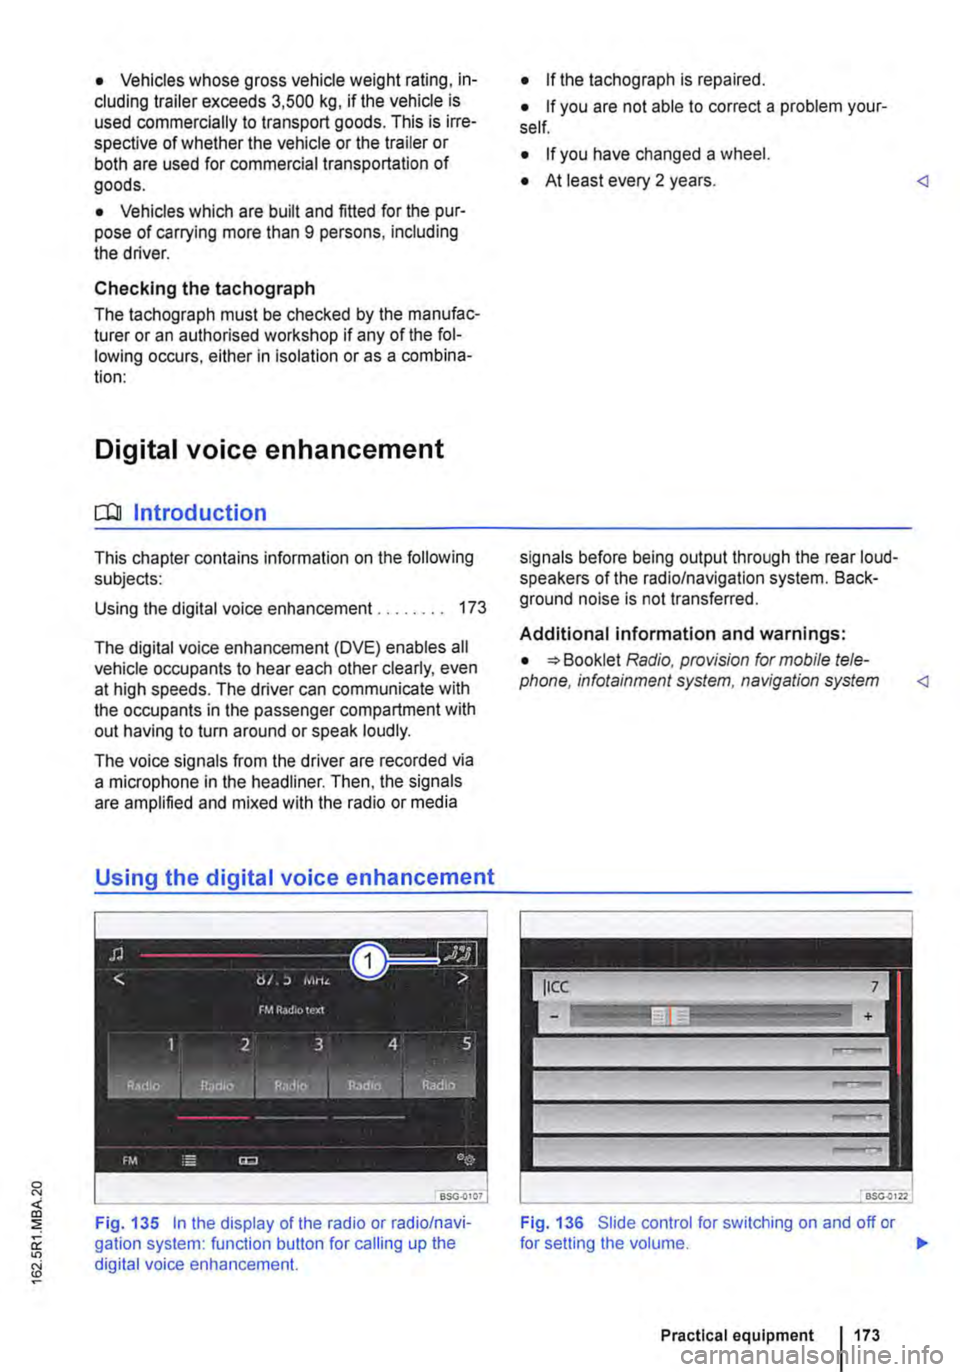
Fig. 135 In the display of the radio or radio/navi-gation system: function button for calling up the digital voice enhancement.
• If the tachograph is repaired.
• If you are not able to correct a problem your-self.
• If you have changed a wheel.
• At least every 2 years.
Additional information and warnings:
• Booklet Radio, provision for mobile tele-phone, infotainment system, navigation system
Fig. 136 Slide control for switching on and off or
Practical equipment 1173
Page 174 of 486
.--m First read and observe the introductory information given on page 173.
Switching on and off
• Turn the volume control on the powered radio or radio/navigation system Radio, provi-sion for mobile telephone, infotainment system, navigation system.
• Tap the function button with the digital voice en-hancement icon 135 CD in the top right cor-ner of the screen to open the menu for "setting the volume" directly.
• To switch off the digital voice enhancement se-lect the ICC menu item (In Car Communication) 136, and set the volume slider to the left-most position.
• To switch on the digital voice enhancement set the slide control from the leftmost position towards right to the desired volume.
• This setting is retained even after the ignition has been switched off and on.
174 I Before tho journey
Setting the volume
• Turn the volume control on the powered radio or radio/navigation system Radio, provi-sion for mobile telephone, infotainment system, navigation system.
• Tap the function button with the digital voice en-hancement icon 135 CD in the top right cor-ner of the screen to open the menu for "setting the volume" directly.
• Select the ICC menu item (In Car Communica-tion) 136, and set the slide control to the de-sired volume.
• This setting is retained even after the ignition has been switched off and on.
Page 188 of 486
menus provided by way of the instrument cluster nor the factory-installed radio or navigation system can be used to make rear-seat telephony settings.
lfv'hen pairing a mobile telephone with the rear-seat telephony system using the hands-free profile (HFP) and when the mobile telephone is not in the charging base, observe the information on use of a mobile telephone in the vehicle without connection to the external aerial =>page 399.
Follow the operating manual for your mobile tele· phone and the instructions provided by the acces-sory manufacturer.
You may experience poor reception or may be cut off in areas where the signal is weak.
Most electronic devices are shielded against high-frequency signals. In rare cases, however, it Is pos-sible that electronic devices will not be shielded against high-frequency signals emitted by the rear-seat telephony system. This can cause Interfer-ence.
Bluetooth
Bluetooth technology is used to connect a mobile telephone to the hands-free system fitted In a vehi· cle. Pairing needs to be carried out once only in or-der to use the rear-seat telephony system with a Bluetooth mobile telephone.
Use compatible Bluetooth devices only. Information on compatible Bluetooth products Is available from your Volkswagen Commercial Vehicles dealer or on the Internet.
Some Bluetooth mobile telephones are detected and connected automatically when the ignition is switched on. For this to happen, the mobile tele-phone and the Bluetooth function in the telephone must be switched on, and all active Bluetooth con-nections to other units must be disconnected.
The Bluetooth connection is free of charge.
Bluetooth® is a registered trademark of Blue-tooth® SIG, Inc.
Declaration of conformity
BURY Sp. z o.o. herewith declares that this system complies with the basic requirements and the rele· van! stipulations of directive 1999/5/EG. This sys-tem has been classified as belonging to Device Class 1. A manufacturer's declaration of conformity for this system can be requested from the following e-mail address: [email protected]. Please formulate all enquiries either In English or German.
((
166 I Before the journey
Additional information and warnings:
• Digital voice enhancement =>page 173
• Accessories, modifications, repairs and renewal of parts =>page 394
• Radio or navigation system =>Booklet Radio, provision for mobile telephone, infotainment sys-tem, navigation system
A wARNING
Accidents and Injuries can occur If the driver Is distracted. Using the telephone or the rear· seat telephony system can distract you from what Is happening on the road.
• Select volume settings that allow signals from outside the vehicle (such as emergency services sirens) to be easily heard at all times. Comply with legal regulations.
• Your call may be cut off or you may be un-able to make calls If you are In an area with no mobile telephone network coverage, an area where the network Is very weak or, In some cases, In a tunnel, garage or under-pass. This also means that no emergency calls can be made.
• In some countries, lt Is only possible to make an emergency call from the rear-seat telephony system if it is connected to a mo-bile telephone containing a SIM card that is "unlocked" and has sufficient credit.
A WARNING
Any mobile telephone that is not secured or Is incorrectly secured in the vehicle could be flung though the interior during a sudden driving or braking manoeuvre, or In the event of an accident. This could cause Injuries.
• You should never position or attach a mo-bile telephone on a door, on the windscreen or above or near to the areas marked "AIR-BAG" on the steering wheel, the dash panel and the seat backrests, or between these areas and the vehicle occupants. The mobile telephone could cause serious Injury In an accident, especially when the alrbags Inflate.
A WARNING
Always switch off the mobile telephone when filling the tank and in areas with a risk of ex-plosion. Electromagnetic radiation can gener-ate sparks which can In turn start a fire.
• The mobile telephone can automatically log Itself Into the mobile telephone network again If the Bluetooth connection to the rear-seat telephony system has been Interrupted. I>
Page 210 of 486
Interior lights in the pop-up roof
___ )
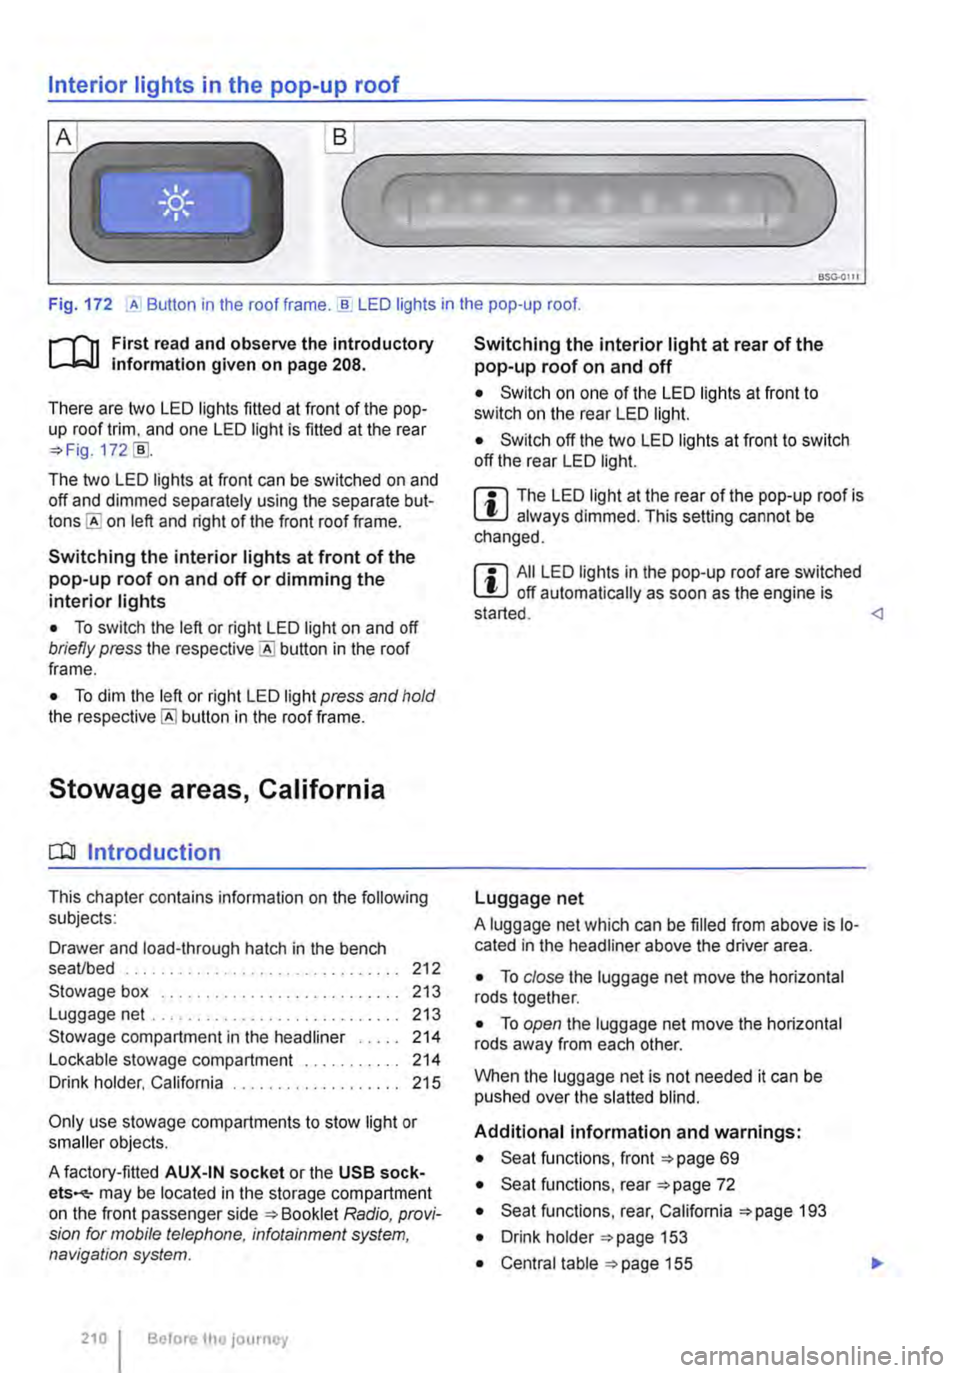
Fig. 172 ,A Button in the roof frame . ..!!. LED lights in the pop-up roof.
r--T'n First read and observe the introductory L-lcJ.I information given on page 208.
There are two LED lights fitted at front of the pop-up roof trim, and one LED light is fitted at the rear =?Fig. 172 [ID.
The two LED lights at front can be switched on and off and dimmed separately using the separate but-on left and right of the front roof frame.
Switching the interior lights at front of the pop-up roof on and off or dimming the interior lights
• To switch the left or right LED light on and off briefly press the button in the roof frame.
• To dim the left or right LED light press and hold the button in the roof frame.
Stowage areas, California
CQJ Introduction
This chapter contains information on the following subjects:
Drawer and load-through hatch in the bench seaVbed . . . . . . . . . . . . . . . . 212
Stowage box . . . . . . . . . . . . . . . . . . . 213 Luggage net .. .. .. . .. .. . 213
Stowage compartment in the headliner . . . . . 214 Lockable stowage compartment . . 214 Drink holder, California . . . . . . . . . . . 215
Only use stowage compartments to stow light or smaller objects.
A factory-fitted AUX-IN socket or the USB sock-ets-may be located in the storage compartment on the front passenger side =?Booklet Radio, provi-sion for mobile telephone, infotainment system, navigation system.
210 I Before the journey
Switching the interior light at rear of the pop-up roof on and off
• Switch on one of the LED lights at front to switch on the rear LED light.
• Switch off the two LED lights at front to switch off the rear LED light.
m The LED light at the rear of the pop-up roof is W always dimmed. This setting cannot be changed.
m All LED lights in the pop-up roof are switched W off automatically as soon as the engine is started.
A luggage net which can be filled from above is lo-cated in the headliner above the driver area.
• To close the luggage net move the horizontal rods together.
• To open the luggage net move the horizontal rods away from each other.
When the luggage net is not needed it can be pushed over the slatted blind.
Additional information and warnings:
• Seat functions, front =?page 69
• Seat functions, rear =?page 72
• Seat functions, rear, California =?page 193
• Drink holder =?page 153
• Central table =?page 155
Page 244 of 486
-Only connect devices to the socket with a voltage that matches the voltage of the socket.
-With electrical devices that require a high level of current in the start phase, the built-in excess current switch will prevent the de-vice from being switched on. If this hap-pens, disconnect the device from the power supply and reconnect after waiting approxi-mately 10 seconds.
12-volt socket
·-·
"' -
fi7E.O'i1Q
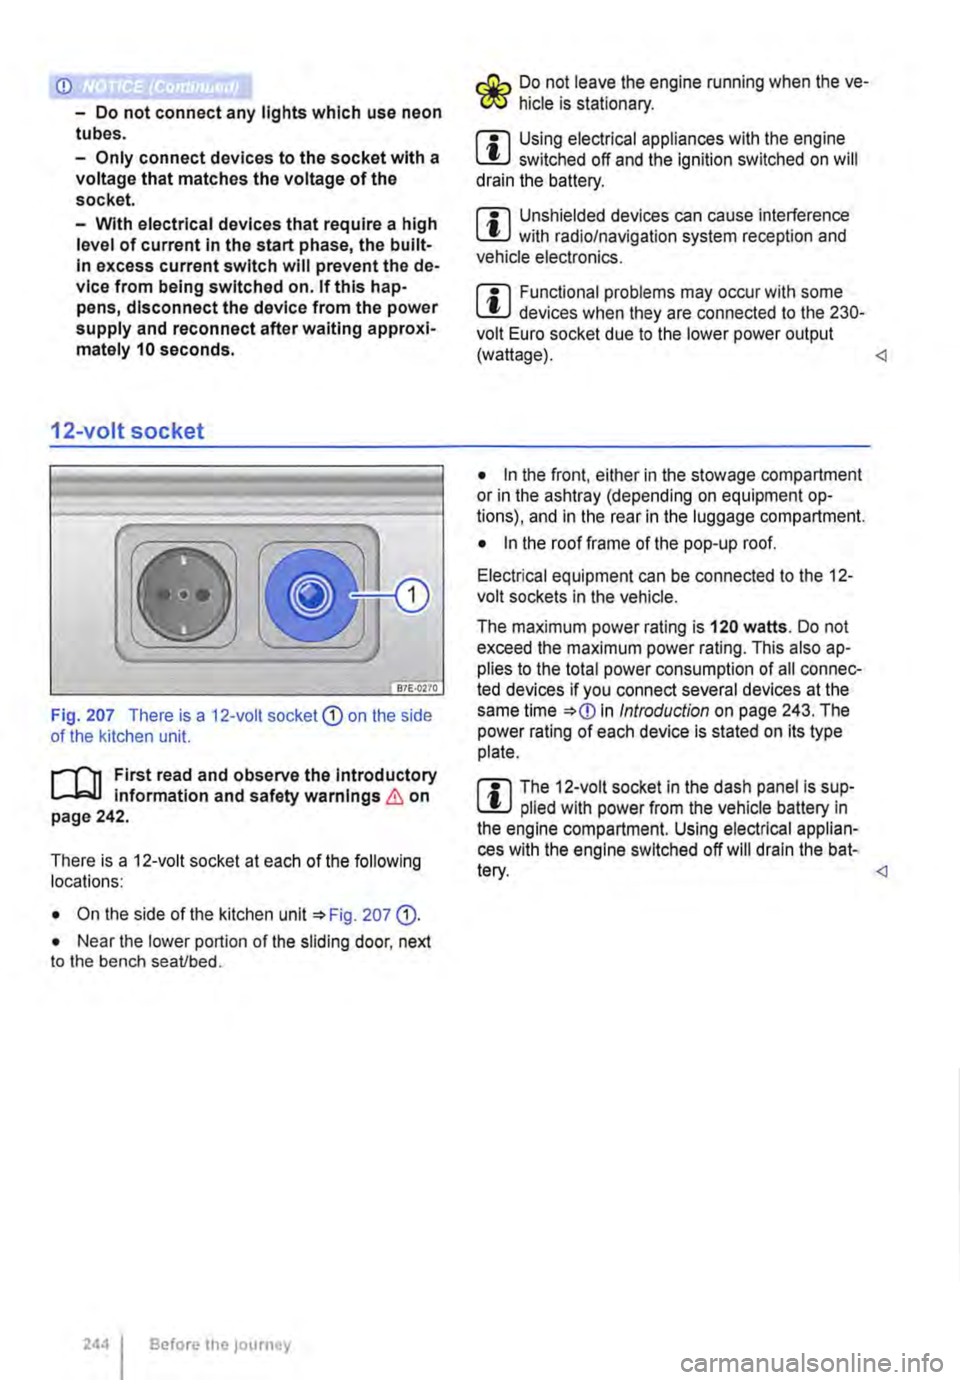
Fig. 207 There is a 12-volt socket CD on the side of the kitchen unit.
l"'"'l'l1 First read and observe the Introductory L-lc.U information and safety warnings & on page 242.
There is a 12-voit socket at each of the following locations:
• On the side of the kitchen unit '*Fig. 207 (D.
• Near the lower portion of the sliding door, next to the bench seaVbed.
2441 Before the journey
Do not leave the engine running when the ve-f!JS hide is stationary.
m Using electrical appliances with the engine W switched off and the ignition switched on will drain the battery.
m Unshielded devices can cause interference W with radio/navigation system reception and vehicle electronics.
m Functional problems may occur with some W devices when they are connected to the 230-volt Euro socket due to the lower power output (wattage).
• In the front, either in the stowage compartment or in the ashtray (depending on equipment op-tions), and in the rear in the luggage compartment.
• In the roof frame of the pop-up roof.
Electrical equipment can be connected to the 12-volt sockets in the vehicle.
The maximum power rating is 120 watts. Do not exceed the maximum power rating. This also ap-plies to the total power consumption of all connec-ted devices if you connect several devices at the same time *
Page 287 of 486
ParkPilot
o:n Introduction
This chapter contains information on the following subjects:
ParkPilot only at rear . . 288 ParkPilot front and rear . . . 289
ParkPilot signal tones and displays . 290
The Park Pilot assists the driver when
parking and manoeuvring.
The ultrasound sensors in the bumpers transmit and receive ultrasound waves. The electronic sys-tem uses the ultrasound waves (i.e. transmission, reflection from the obstacle and reception) to cal-culate the distance between the bumper and the obstacle.
Additional information and warnings:
• Exterior views =:o page 5
• Braking, stopping and parking =:o page 269
• Reversing camera (Rear Assist) =:o page 291
• Cleaning and caring for the vehicle exterior =:.page 380
• Accessories, modifications, repairs and renewal of parts =:o page 394
• Radio or navigation system =:o Booklet Radio, provision for mobile telephone, infotainment sys-tem, navigation system
A WARNING
ParkPilot technology cannot overcome sys-tem-related vehicle limitations. The ParkPilot cannot replace the full concentration of the driver.
• Unintentional vehicle movements can cause serious injury.
• Always adapt your speed and driving style to suit visibility, weather, road and traffic con-ditions.
• Ultrasound sensors have blind spots in which obstacles and people cannot be detec-ted.
• Always check the area around the vehicle as the ultrasound sensors will not always de-tect infants, animals and objects.
A WARNING (Continued)
• Certain surfaces of objects and clothes cannot reflect the signals from the ultrasound sensors. The system is unable to detect these objects or people wearing this type of clothing, or they may be detected incorrectly.
• External sources of sound can affect the signals of the ultrasound sensors. This may prevent the system from recognising people or objects.
CD
Various factors can negatively Impact the Park-Pilot functions or lead to damage to the vehicle and objects in the area surrounding the vehi-cle.
• The ultrasound sensors may not always be able to detect objects such as trailer drawbars, thin rails, fences, posts, trees and open or opening boot lids. This can result in damage to your vehicle.
• If the ParkPilot has detected an obstacle and issued a warning, the obstacle may move out of the detection range of the ultrasound sensors as the vehicle approaches it, particu-larly if the object is very high or very low. These objects are no longer registered.
• The vehicle can sustain considerable dam-age if the warning given by the ParkPiiot is ig-nored.
• Ultrasound sensors can be displaced or damaged through Impacts, e.g. when parking.
• The ultrasound sensors must be kept clean and free of ice and snow, and must not be cov-ered up by stickers or other objects, as this will prevent the system from working properly.
• Repainting the ultrasound sensors can im-pair the function of the Park Pilot.
• The ultrasound sensors should only be sprayed briefly when cleaning with pressure hoses and steam cleaners. The steam/hose nozzle must always be kept more than 10 cm away from the ultrasound sensors.
• Sources of noise can lead to errors in the ParkPilot system, e.g. rough asphalt, cobble-stones, induction loops, building equipment, or interference from other vehicles.
Driver assist systems 287