high beam VOLKSWAGEN TRANSPORTER 2016 Owners Manual
[x] Cancel search | Manufacturer: VOLKSWAGEN, Model Year: 2016, Model line: TRANSPORTER, Model: VOLKSWAGEN TRANSPORTER 2016Pages: 486, PDF Size: 69.28 MB
Page 106 of 486
Lights and vision
Lights
0::0 Introduction
This chapter contains information on the following subjects:
Indicator lamps . . . . . . . . . . . . . . . . . 106
Turn signal and main beam lever . . 107 Switching lights on and off . . . . . . . . 108
Lights and vision -functions . . . . . . . . . . . . . . 109
Main beam assist ....................... 110
Masking or switching over headlights for driving abroad . . . . . . . . . 111
Coming Home and Leaving Home functions (orientation lighting).............. 112
Headlight range control, instrument and switch lighting . . . . . 113 Interior and reading lights . . . . . . . . . 114
Observe any country-specific regulations when us-ing vehicle lighting.
The driver is responsible for the correct headlight position and the correct headlight setting.
Additional information and warnings:
• Exterior views ""page 5
• Volkswagen information system =oo page 24
• Changing bulbs =oo page 432
Indicator lamps
A WARNING
Accidents and serious injuries can occur if roads are not sufficiently Illuminated and oth-er road users have difficulty seeing the vehi-cle, or cannot see it at all.
• Always switch the dipped beam head-lights on if it is dark, raining or visibility is poor.
A WARNING
Setting headlights too high, and the incorrect use of the main beam, could distract and daz-zle other road users. This can lead to acci-dents and serious injuries.
• Always ensure that the headlights are ad-j usted correctly.
• Never use the main beam or the headlight flasher if other road users could be dazzled.
[Qj First read and observe the introductory information and safety warnings & on page 106.
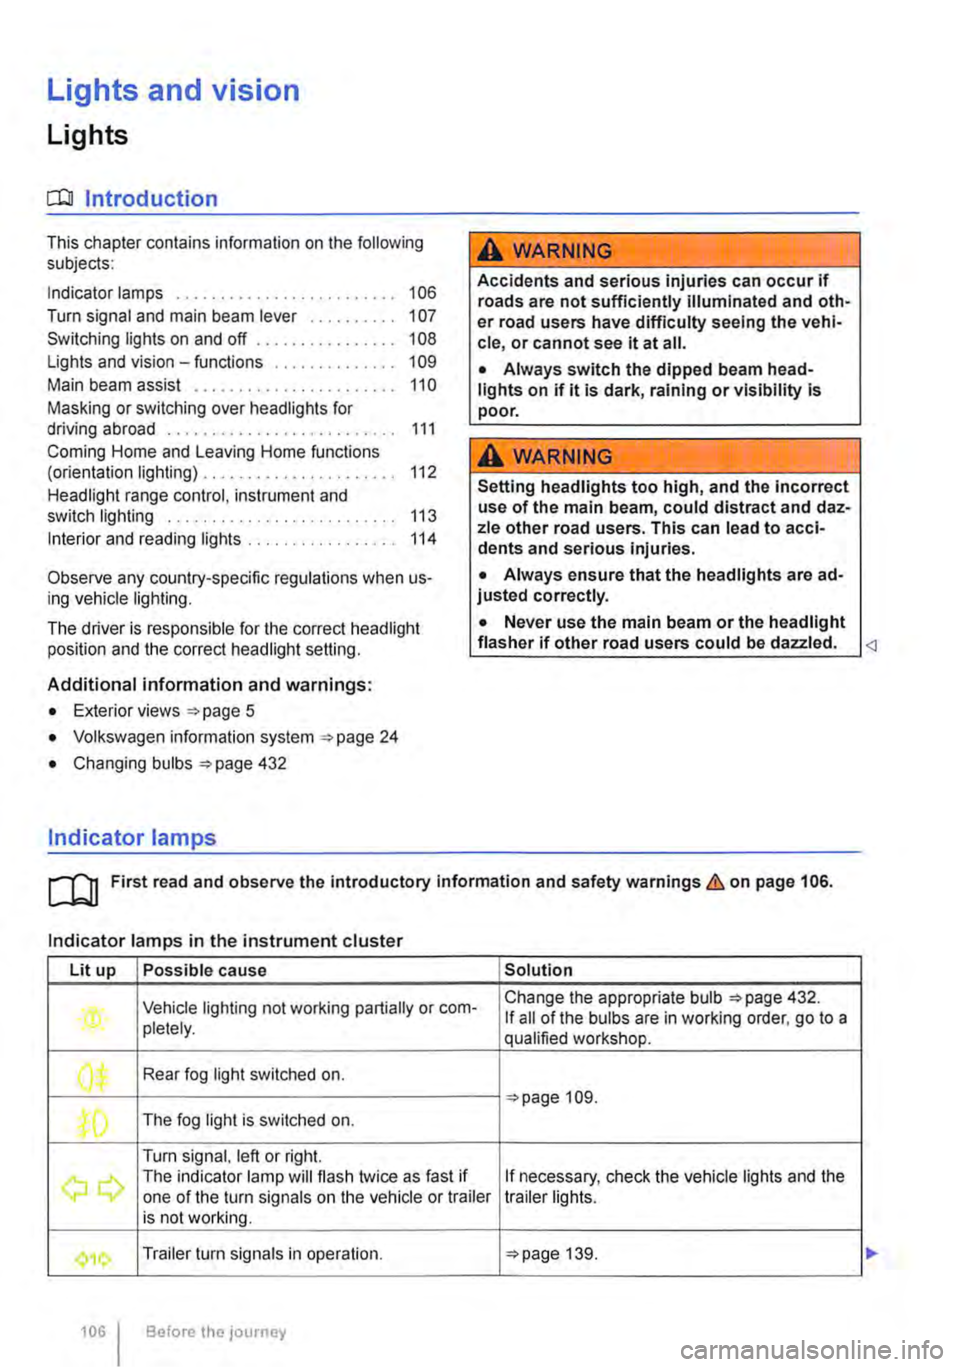
Indicator lamps in the instrument cluster
Lit up Possible cause Solution
Vehicle lighting not working partially or corn-Change the appropriate bulb 432. If all of the bulbs are in working order. go to a pletely. qualified workshop.
' Rear fog light switched on. J", =oopage 109.
,( The fog light is switched on.
Turn signal, left or right.
r The indicator lamp will flash twice as fast if If necessary, check the vehicle lights and the one of the turn signals on the vehicle or trailer trailer lights. is not working.
'111 Trailer turn signals in operation. 139.
106 Before the journey
Page 111 of 486
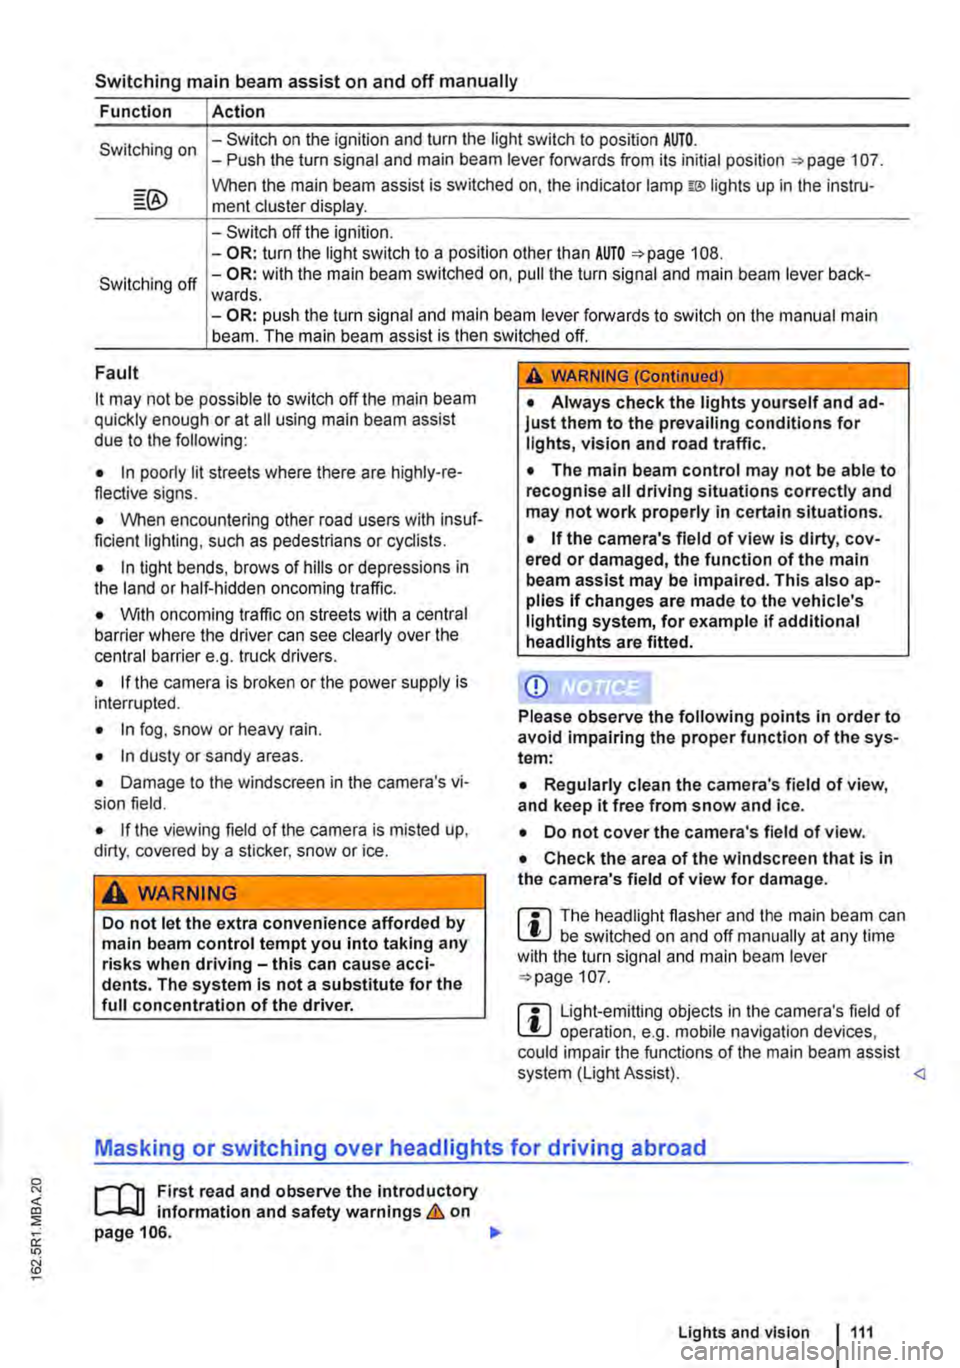
Switching main beam assist on and off manually
Function Action
Switching on -Switch on the ignition and turn the light switch to position AUTO. -Push the turn signal and main beam lever forwards from its initial position =:-page 107.
When the main beam assist is switched on, the indicator lamp w lights up in the instru-ment cluster display.
-Switch off the ignition. -OR: turn the light switch to a position other than AUTO =>page 108.
Switching off -OR: with the main beam switched on, pull the turn signal and main beam lever back-wards. -OR: push the turn signal and main beam lever forwards to switch on the manual main beam. The main beam assist is then switched off.
Fault
it may not be possible to switch off the main beam quickly enough or at all using main beam assist due to the following:
• In poorly lit streets where there are highly-re-flective signs.
• When encountering other road users with insuf-ficient lighting, such as pedestrians or cydists.
• In tight bends, brows of hills or depressions in the land or half-hidden oncoming traffic.
• With oncoming traffic on streets with a central barrier where the driver can see clearly over the central barrier e. . truck drivers. g
• If the camera is broken or the power supply is interrupted.
• In fog, snow or heavy rain.
• In dusty or sandy areas.
• Damage to the windscreen in the camera's vi-sion field.
• If the viewing field of the camera is misted up, dirty, covered by a sticker, snow or ice.
A WARNING
Do not let the extra convenience afforded by main beam control tempt you into taking any risks when driving-this can cause acci-dents. The system is not a substitute for the full concentration of the driver.
A WARNING (Continued)
• Always check the lights yourself and ad-just them to the prevailing conditions for lights, vision and road traffic.
• The main beam control may not be able to recognise all driving situations correctly and may not work properly in certain situations.
• If the camera's field of view is dirty, cov-ered or damaged, the function of the main beam assist may be impaired. This also ap-plies If changes are made to the vehicle's lighting system, for example if additional headlights are fitted.
CD
Please observe the following points in order to avoid impairing the proper function of the sys-tem:
• Regularly clean the camera's field of view, and keep it free from snow and ice.
• Do not cover the camera's field of view.
• Check the area of the windscreen that Is in the camera's field of view for damage.
m The headlight flasher and the main beam can W be switched on and off manually at any time with the turn signal and main beam lever =>page 107.
m Light-emitting objects in the camera's field of W operation, e.g. mobile navigation devices, could impair the functions of the main beam assist system (Light Assist).
1"1'11 First read and observe the introductory L-lo:J.J Information and safety warnings & on page 106.
Lights and vision 1111
Page 343 of 486
Capacities
r--('n First read and observe the introductory L-W.I information and safety warnings & on page 340.
Checks when filling the tank
r--r'n First read and observe the introductory L-W.I information and safety warnings & on page 340.
Checklist
Never carry out any work on the engine or in the engine compartment if you are not familiar with the necessary procedures and the general safety re-quirements or if the correct operating equipment, fluids and unsuitable tools are not available 350, Preparation for working in the engine compartment! The work should be carried out by a qualified workshop if you are uncertain. Please en-sure that the following are checked regular1y, pref-erably every time you fill the tank:
..( Windscreen washer fluid level 116
..( Engine oil level 353
Fuel
c:QJ Introduction
This chapter contains information on the following subjects:
Petrol
Diesel ...
344 345
Different engines require different fuels. The facto-ry-fitted sticker on the inside of the tank flap indi-cates the fuel type that is required for your particu-lar vehicle.
Volkswagen Commercial Vehicles recommends us-ing fuels with a low sulphur content or which are sulphur-free in order to reduce fuel consumption and prevent damage to the engine.
If the engine is not running smoothly or begins to judder, this can indicate poor or inadequate fuel quality, e.g. water in the fuel. If these symptoms appear, reduce the vehicle speed immediately and drive to the nearest qualified workshop at medium engine speeds, avoiding high engine loading. If these symptoms occur immediately after the vehi-
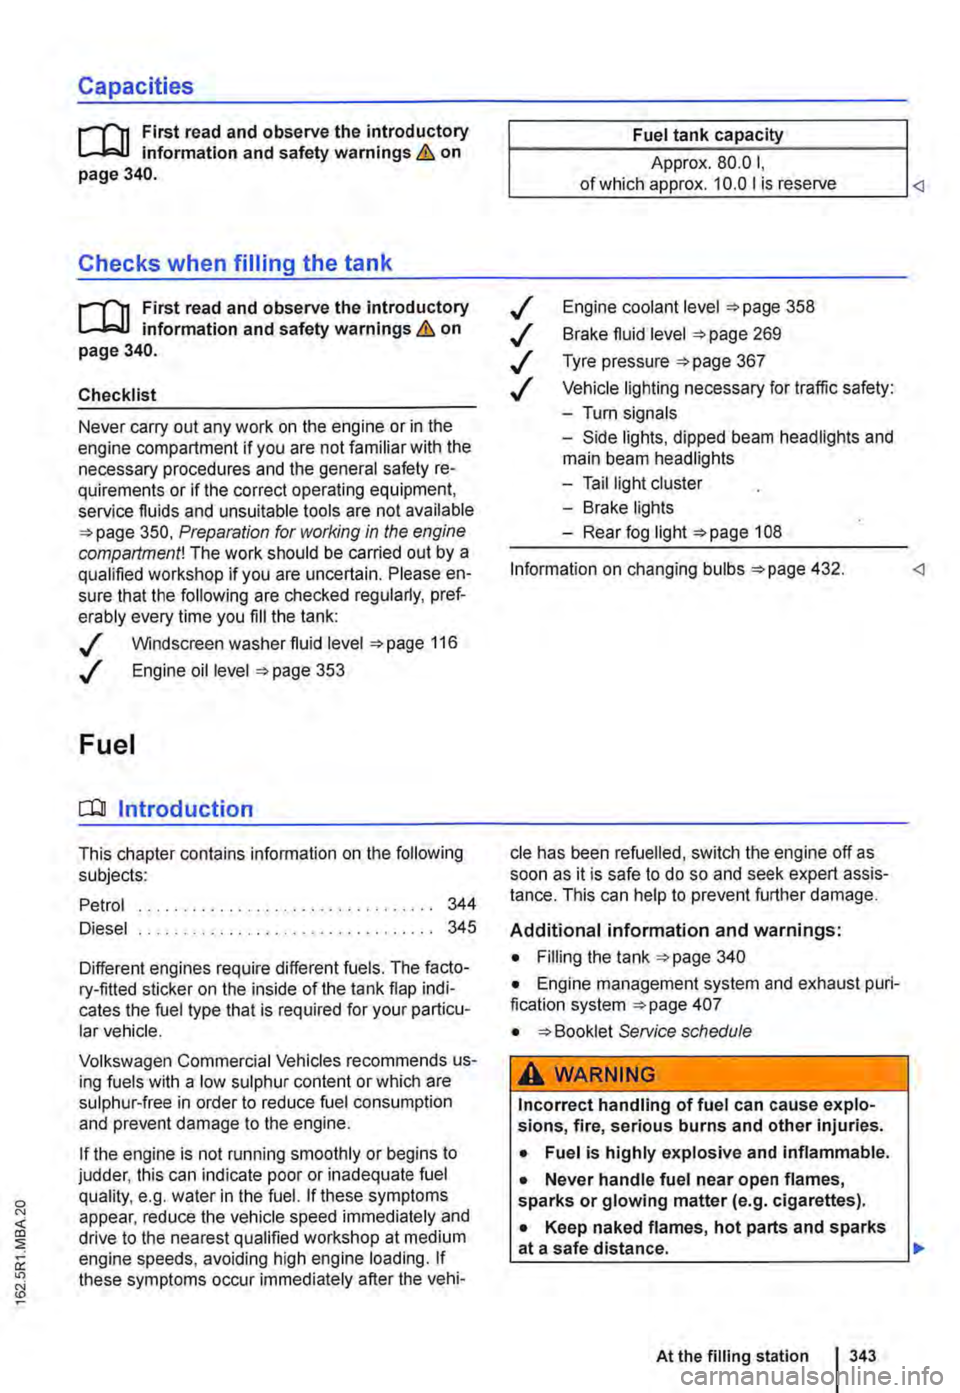
Fuel tank capacity
Approx. 80.0 I,
..( Engine coolant level 358
..( Brake fluid level 269
..( Tyre pressure 367
..( Vehicle lighting necessary for traffic safety:
-Turn signals
-Side lights, dipped beam headlights and main beam headlights
-Tail light cluster
-Brake lights
-Rear fog light 1 08
Information on changing bulbs 432.
cle has been refuelled, switch the engine off as soon as it is safe to do so and seek expert assis-tance. This can help to prevent further damage.
Additional information and warnings:
• Filling the tank 340
• Engine management system and exhaust puri-fication system 407
• Service schedule
A WARNING
Incorrect handling of fuel can cause explo-sions, fire, serious burns and other injuries.
• Fuel is highly explosive and inflammable.
• Never handle fuel near open flames, sparks or glowing matter (e.g. cigarettes).
• Keep naked flames, hot parts and sparks at a safe distance.
At the filling station 1343
Page 411 of 486
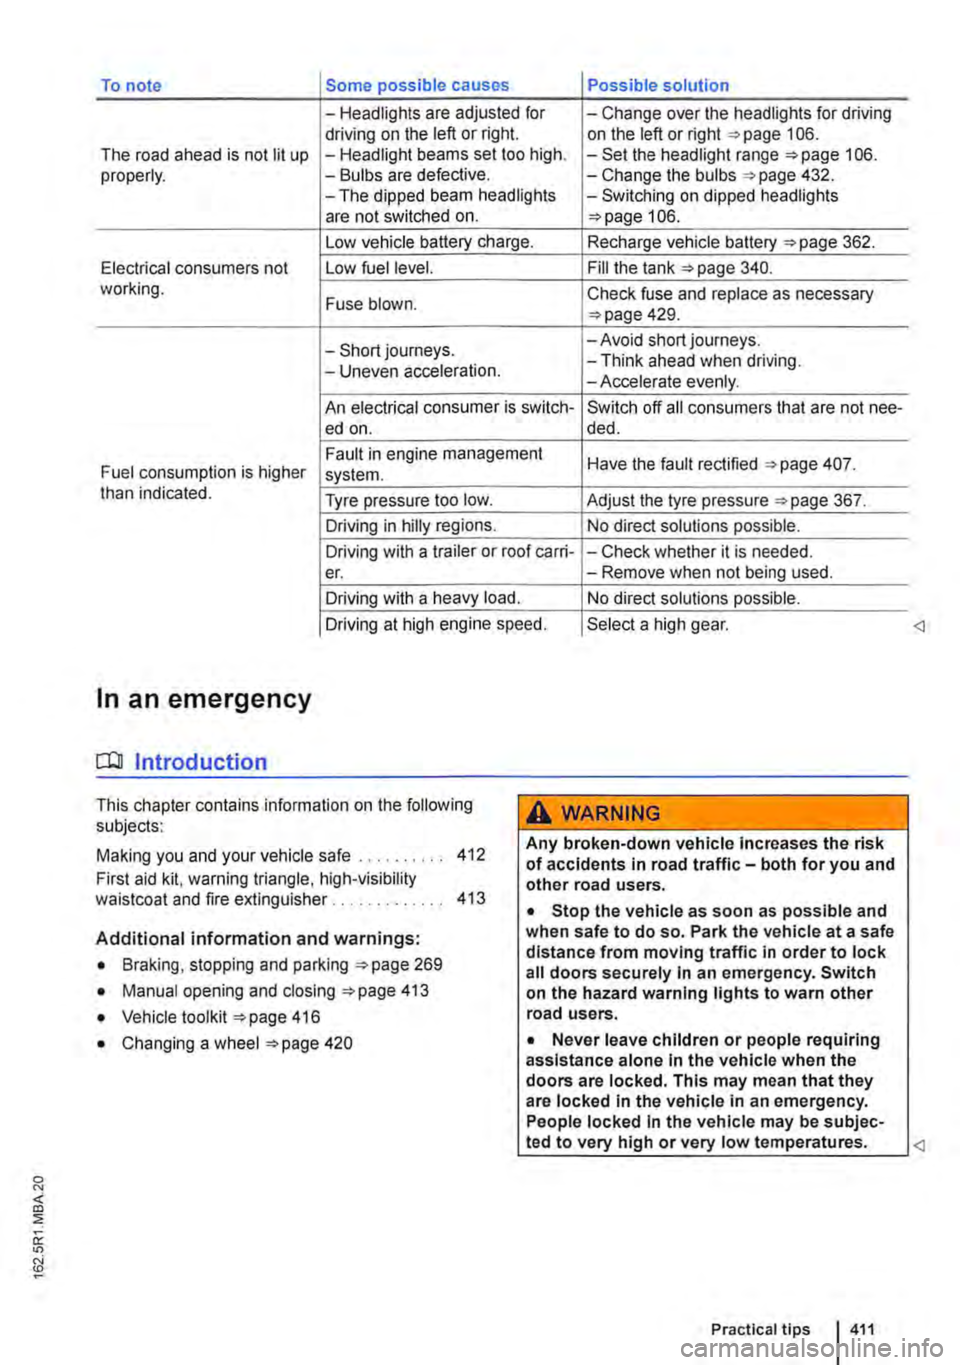
To note Some possible causes Possible solution
-Headlights are adjusted for -Change over the headlights for driving driving on the left or right. on the left or right 106. The road ahead is not lit up -Headlight beams set too high. -Set the headlight range 106. properly. -Bulbs are defective. -Change the bulbs 432. -The dipped beam headlights -Switching on dipped headlights are not switched on. 106.
Low vehicle battery charge. Recharge vehicle battery 362.
Electrical consumers not Low fuel level. Fill the tank 340. working. Fuse blown. Check fuse and replace as necessary 429.
-Short journeys. -Avoid short journeys.
-Uneven acceleration. -Think ahead when driving. -Accelerate evenly.
An electrical consumer is switch-Switch off all consumers that are not nee-ed on. de d.
Fault in engine management Have the fault rectified 407. Fuel consumption is higher system. than indicated. Tyre pressure too low. Adjust the tyre pressure 367.
Driving in hilly regions. No direct solutions possible.
Driving with a trailer or roof carri--Check whether it is needed. er. -Remove when not being used.
Driving with a heavy load. No direct solutions possible.
Driving at high engine speed. Select a high gear.
In an emergency
COl Introduction
This chapter contains information on the following subjects:
Making you and your vehicle safe . . 412
First aid kit. warning triangle, high-visibility waistcoat and fire extinguisher . . . . . . . . . . . . . 413
Additional information and warnings:
• Braking, stopping and parking 269
• Manual opening and closing 413
• Vehicle toolkit 416
• Changing a wheel 420
A WARNING
Any broken-down vehicle Increases the risk of accidents in road traffic-both for you and other road users.
• Stop the vehicle as soon as possible and when safe to do so. Park the vehicle at a safe distance from moving traffic In order to lock all doors securely In an emergency. Switch on the hazard warning lights to warn other road users.
• Never leave children or people requiring assistance alone In the vehicle when the doors are locked. This may mean that they are locked In the vehicle in an emergency. People locked In the vehicle may be subjec-
Page 476 of 486
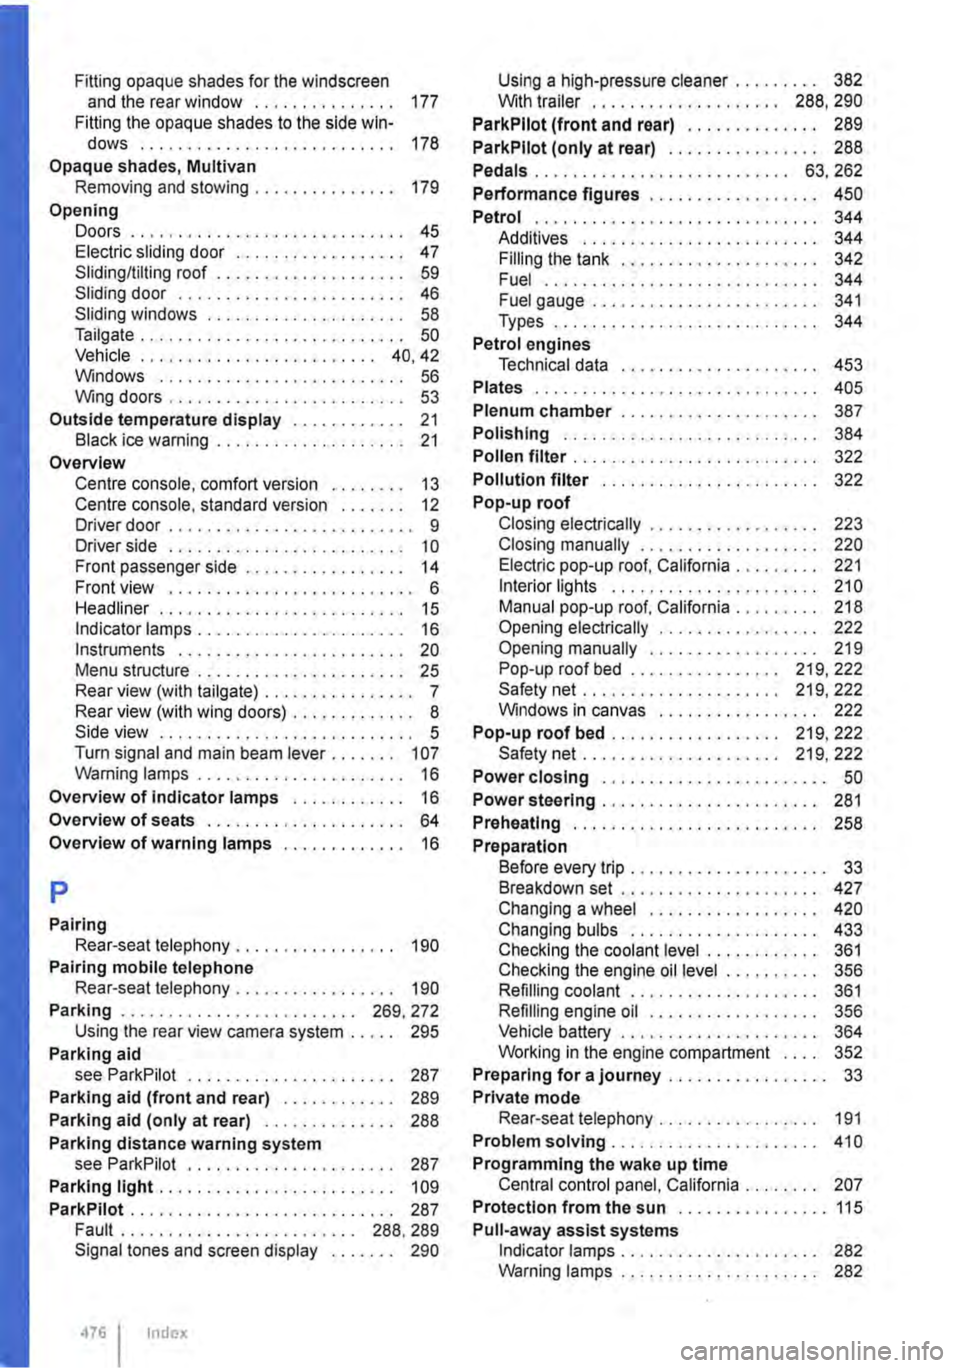
Fitting opaque shades for the windscreen and the rear window . . . . . . . . . . . . . . . 177 Fitting the opaque shades to the side win-dows . . . . . . . . . . . . . . . . . . . . . . . . . . . 178 Opaque shades, Multivan Removing and stowing ........... , . . . 179
Opening Doors . . . . . . . . . . . . . . . . . . . . . • . . . . . . . 45 Electric sliding door . . . . . . . . . . . . . . . . . . 47 Sliding/tilting roof . . . . . . . . . . . . . . . . . . . . 59 Sliding door . . . . . . . . • . . . . . . . . . . . . . . . 46 Sliding windows . . . . . . . . . . . . . . . . . . . . . 58 Tailgate . . . . . . . . . . . . . . . . . . . . . . . . . . . . 50 Vehicle . . . . . . . . . . . . • . . . . . . . . . . . . 40, 42 Windows .......................... 56 Wing doors . . . . . . . . . . . . . . . . . . . . . • . . . 53
Outside temperature display . . . . . . . . . . . . 21 Black ice warning . . . . . . . . . . . . . . . . . . . . 21 Overview Centre console, comfort version . . . . . . . . 13 Centre console, standard version . . . . . . . 12 Driver door . . . . . . . . . . . . . . . . . . . . . . . . . . 9 Driver side . . . . . . . . . . . . . . . . . . . . . . . . . 10 Front passenger side . . . . . . . . . . . .. . • . . 14 Front view . . . . . . . . . . . . . . . . . . . . . . • . . . 6 Headliner .................... , . . • . . 15 Indicator lamps . . . . . . . . . . . . . . . . . . . . . . 16 Instruments . . . . . . . . . . . . . . . . . . . . . . . . 20 Menu structure . . . . . . . . . . . . . . • . . . . . . . 25 Rear view (with tailgate) . . . . . . . . . . . . . . . . 7 Rear view (with wing doors) . . . . . . . • . . . . . 8 Side view ........................... 5 Turn signal and main beam lever . . . . . . . 107 Warning lamps . . . . . . . . . . . . . . . . . • . . . . 16
Overview of indicator lamps . . . . . . . . . . . . 16
Overview of seats . . . . . . . . . . . • . . . . . . . . . 64
Overview of warning lamps ... , . . . . . . . . . 16
p
Pairing Rear-seat telephony... . . . . . . . . . . . . . . 190 Pairing mobile telephone Rear-seat telephony................. 190
Parking . . . . . . . . . . . . . . . . . . . . . . . . . 269, 272 Using the rear view camera system . . . . . 295
Parking aid see ParkPilot . . . . . . . . . . . . . . • . . . . . . . 287
Parking aid (front and rear) . . . . . . . . . . . . 289
Parking aid (only at rear) . . . . . . . . . . . . . . 288
Parking distance warning system see ParkPilot . . . . . . . . . . . . . . . . . . . . . . 287
Parking light..... . . . . . . . . . . • . . . . . . . . . 109
ParkPIIot . . . . . . . . . . . . . . . . . . . . . . . . . . . . 287 Fault . . . . . . . . . . . . . . . . . . . . . . . . . 288. 289 Signal tones and screen display . . . . . . . 290
476 I Index
Using a high-pressure cleaner . . . . . . . . . 382 Wilh trailer . . . . . . . . . . . . . . . . . . . . 288, 290
ParkPilot (front and rear) . . . . . . . . . . . . . . 289
ParkPilot (only at rear) . . . . . . . . . . . . . . . . 288
Pedals . . . . . . . . . . . . . . . . . . . . • . . • . . . 63, 262
Performance figures . . . . . . . . . . . . . . . . . . 450
Petrol . . . . . . . . . . . . . . . . . . • . . . . . . . . . . . 344 Additives . . . . . . . • . . . . . . . . . . . . . . • . . 344 Filling the tank . . . • . . . . . • . . . . . . . . • . . 342 Fuel ..........................•.. 344 Fuel gauge . . . . . . . . . . . . • . . • . . . . . • . . 341 Types . . . . . . . . . . . . . . . . . . . . . . . . . . . . 344
Petrol engines Technical data . . . . • . . . . . . . . . . . . . . . . 453
Plates . . . . . . . . . . . . . . . . . . . . . . . . . . . . . . 405
Plenum chamber . . . . . . . • . . . . . . . . • . . . . 387
Polishing . . . . . . . . . . . . . • . . . . . . . . . . . . . 384
Pollen filter . . . . . . . . . . . . . . . . . . . . . . . . . . 322
Pollution filter . . . . . . . . . . . . • . . • . . . . . . . 322
Pop-up roof Closing electrically . . . . . . . . . . . . . . . . . . 223 Closing manually . . . . . . . . . . . . . . . . . . . 220 Electric pop-up roof, California . . . . . . . . . 221 Interior lights . . . . . . . . . . . . . . . . . . . . . . 210 Manual pop-up roof, California......... 218 Opening electrically . . . . . . . . . . . . . . . . . 222 Opening manually . . . . . . . . . . . . . . . . . . 219 Pop-up roof bed . . . . . . . . . . • . . • . . 219, 222 Safety net..................... 219, 222 Windows in canvas . . . . . . . . . . . . . . . . . 222
Pop-up roof bed . . . . . . . . . . . . . . . . . . 219, 222 Safety net . . . . . . . . . . . . . • . . . . . . . 219, 222
Power closing . . . . . • . . • . . . . . • . . . . . . . . . 50
Power steering . . . . . . . . . . . . . . . . . . . . . . . 281
Preheatlng . . . . . . . . . . . . . . . . . • . . . . . . . . 258
Preparation Before every trip . . . . . . . . . . . . . . . . . . . . . 33 Breakdown set . . . . . . . . . . . . . . . . . . . . . 427 Changing a wheel . . . . . . . . . . . . . • . . . . 420 Changing bulbs . . . . . . . . . . . . . . . • . . . . 433 Checking the coolant level . . . . . . . . . . . . 361 Checking the engine oil level . . . . . . . . . . 356 Refilling coolant . . . . . . . . . . . . . . . . . . . . 361 Refilling engine oil . . . . . . . . . . . . . . . . . . 356 Vehicle battery . . . . . . . . . . . . . . . . . . . . . 364 Working in the engine compartment . . . . 352
Preparing for a journey . . . . . . . . . . . . . . . . . 33 Private mode Rear-seat telephony . . . . . . . . . . . . . . . . . 191
Problem solving...................... 410
Programming the wake up time Central control panel, California . . . . . . . . 207
Protection from the sun . . . . . . . . . . . . . . . . 115
Pull-away assist systems Indicator lamps . . . . . . . . . . . . . . . . . . . . . 282 Warning lamps . . . . . . . . . . . . . . . . . . . . . 282