VOLKSWAGEN TRANSPORTER 2018 Owners Manual
Manufacturer: VOLKSWAGEN, Model Year: 2018, Model line: TRANSPORTER, Model: VOLKSWAGEN TRANSPORTER 2018Pages: 486, PDF Size: 69.28 MB
Page 431 of 486
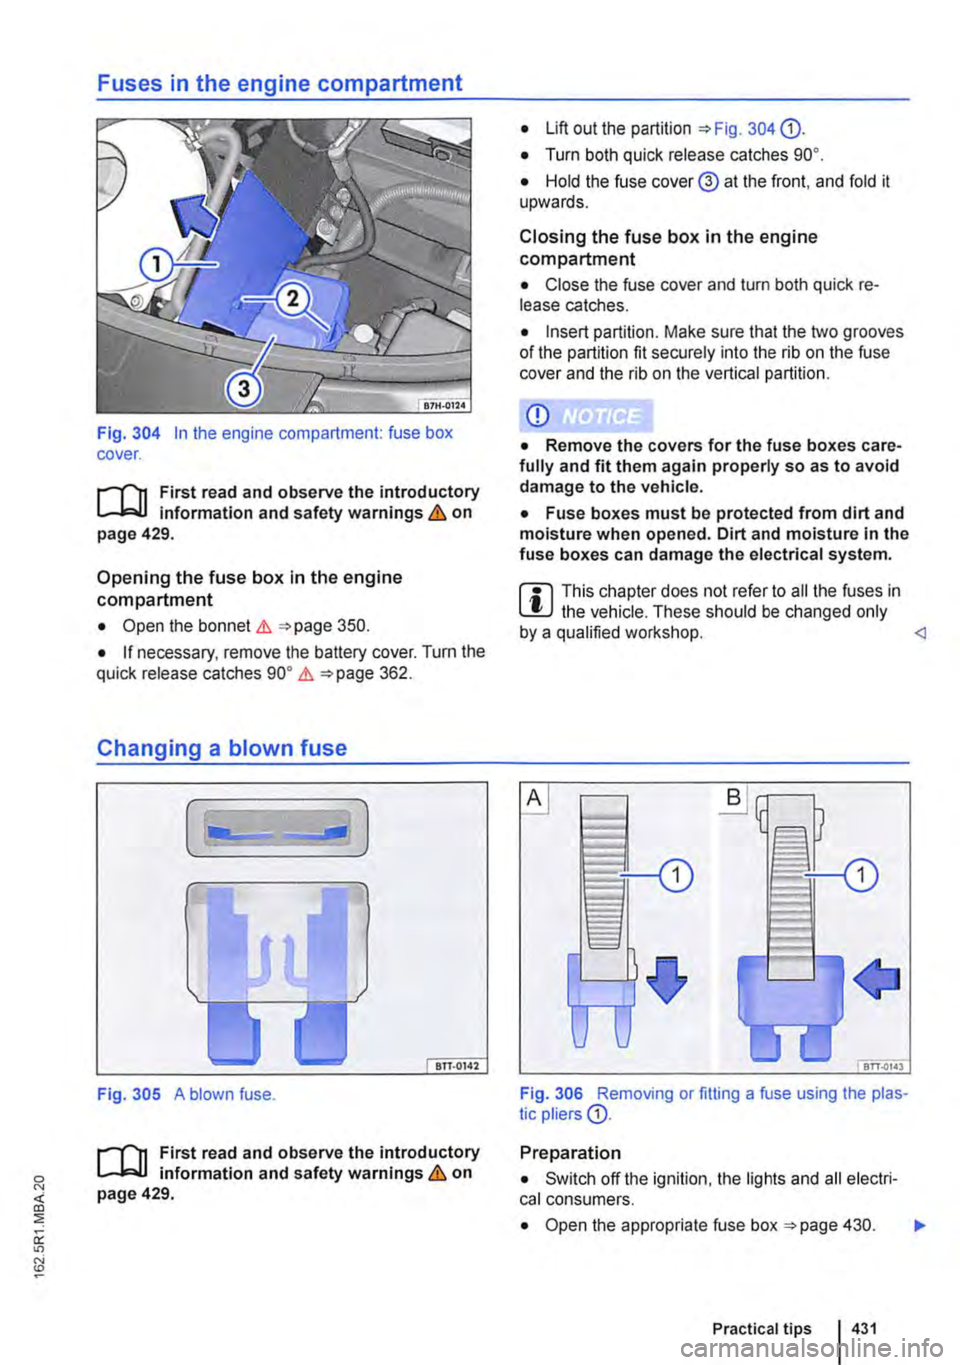
Fig. 304 In the engine compartment: fuse box cover.
;-('n First read and observe the introductory L-Jc.IJ information and safety warnings & on page 429.
Opening the fuse box in the engine compartment
• Open the bonnet .1. =<>page 350.
• If necessary, remove the battery cover. Turn the quick release catches go• .1. =<>page 362.
Changing a blown fuse
Fig. 305 A blown fuse.
;-('n First read and observe the introductory L-Jc.IJ information and safety warnings & on page 429.
• Lift out the partition =<>Fig. 304 0).
• Turn both quick release catches go•.
• Hold the fuse cover@ at the front. and fold it upwards.
Closing the fuse box in the engine compartment
• Close the fuse cover and turn both quick re-lease catches.
• Insert partition. Make sure that the two grooves of the partition fit securely into the rib on the fuse cover and the rib on the vertical partition.
CD
• Remove the covers for the fuse boxes care-fully and fit them again properly so as to avoid damage to the vehicle.
• Fuse boxes must be protected from dirt and moisture when opened. Dirt and moisture in the fuse boxes can damage the electrical system.
m This chapter does not refer to all the fuses in L!J the vehicle. These should be changed only by a qualified workshop.
Preparation
• Switch off the ignition, the lights and all electri-cal consumers.
• Open the appropriate fuse box =<>page 430. .,..
Practical tips I 431
Page 432 of 486
Detecting a blown fuse
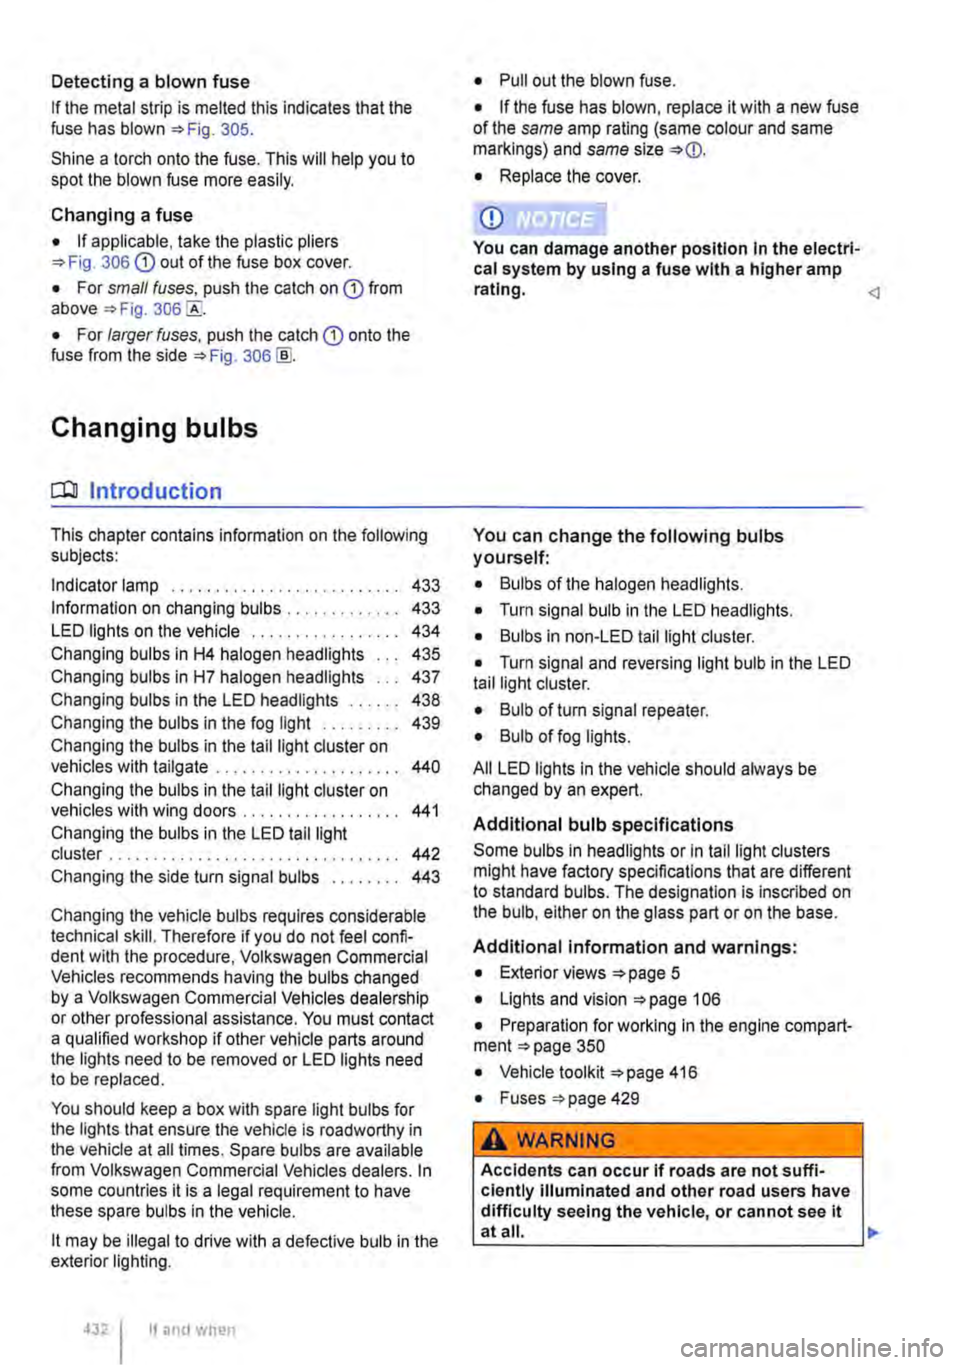
If the metal strip is melted this indicates that the fuse has blown 305.
Shine a torch onto the fuse. This will help you to spot the blown fuse more easily.
Changing a fuse
• If applicable, take the plastic pliers 306 G) out of the fuse box cover.
• For small fuses. push the catch on G) from above 306
• For larger fuses, push the catch G) onto the fuse from the side 306@
Changing bulbs
o::n Introduction
This chapter contains information on the following subjects:
Indicator lamp . . . . . . . . . . . . . . . . . . . . . . . . . 433
Information on changing bulbs . 433 LED lights on the vehicle . . . . . . . . . 434
Changing bulbs in H4 halogen headlights 435
Changing bulbs in H7 halogen headlights . . . 437
Changing bulbs in the LED headlights . . . 438
Changing the bulbs in the fog light . . . . . . . . . 439 Changing the bulbs in the tail light cluster on vehicles with tailgate . . . . . . . . . . . . . . . . . . . . . 440
Changing the bulbs in the tail light cluster on vehicles with wing doors .................. 441
Changing the bulbs in the LED tail light cluster . . . . . . . . . . . . . . . . . . . . . . . . . 442 Changing the side turn signal bulbs . . . . . . . . 443
Changing the vehicle bulbs requires considerable technical skill. Therefore if you do not feel confi-dent with the procedure. Volkswagen Commercial Vehicles recommends having the bulbs changed by a Volkswagen Commercial Vehicles dealership or other professional assistance. You must contact a qualified workshop if other vehicle parts around the lights need to be removed or LED lights need to be replaced.
You should keep a box with spare light bulbs for the lights that ensure the vehicle is roadworthy in the vehicle at all times. Spare bulbs are available from Volkswagen Commercial Vehicles dealers. In some countries it is a legal requirement to have these spare bulbs in the vehicle.
lt may be illegal to drive with a defective bulb in the exterior lighting.
4321 If and when
• Pull out the blown fuse.
• If the fuse has blown, replace it with a new fuse of the same amp rating (same colour and same markings) and same size
• Replace the cover.
CD
You can damage another position In the electri-cal system by using a fuse with a higher amp rating.
You can change the following bulbs yourself:
• Bulbs of the halogen headlights.
• Turn signal bulb in the LED headlights.
• Bulbs in non-LED tail light cluster.
• Turn signal and reversing light bulb in the LED tail light cluster.
• Bulb of turn signal repeater.
• Bulb of fog lights.
All LED lights in the vehicle should always be changed by an expert.
Additional bulb specifications
Some bulbs in headlights or In tail light clusters might have factory specifications that are different to standard bulbs. The designation is inscribed on the bulb, either on the glass part or on the base.
Additional information and warnings:
• Exterior views 5
• Lights and vision 106
• Preparation for working In the engine compart-ment 350
• Vehicle toolkit 416
• Fuses 429
A WARNING
Accidents can occur If roads are not suffi-ciently Illuminated and other road users have difficulty seeing the vehicle, or cannot see it atall. 11>
Page 433 of 486
A WARNING
Changing the bulb incorrectly can cause ac-cidents and serious Injuries.
• When working In the engine compartment, always read and observe the safety warnings =>page 350. The engine compartment of any motor vehicle Is a dangerous area. Serious Injuries can be sustained here.
• Halogen bulbs are pressurised and could explode when they are being changed.
• Only change the defective bulb once it has had time to cool down completely.
• Never change a bulb unless you are famili-ar with the procedure. If you are uncertain of what to do, the work should be carried out by a qualified workshop.
Indicator lamp
r--f"n First read and observe the introductory L-.J,:.lJ Information and safety warnings & on page 432.
Lit up Possible cause
A bulb in the exterior lighting has failed.
Several warning and indicator lamps will light up briefly as a functional check when the ignition is switched on. They will go out after a few seconds.
A WARNING
Failure to observe illuminated warning lamps and text messages can lead to your vehicle breaking down In traffic, and can cause acci-dent and serious Injury.
• Never ignore any illuminated warning lamps or text messages.
Information on changing bulbs
r--f"n First read and observe the introductory L-.J,:.lJ Information and safety warnings & on page 432.
A WARNING (Continued)
• Do not touch the glass part of the bulb with unprotected fingers. When the light is switched on, heat will cause fingerprints to evaporate on the bulb, which In turn will cause the reflector to dim.
• There are sharp-edged parts In the head-light housing In the engine compartment and on the tall light cluster housing. Protect your hands when changing bulbs.
CD
Damage to the electrical system can be caused by water entering the system if the rubber cov-ers or plastic caps on the headlight housing are not properly mounted after a bulb has been changed.
If bulbs of the exterior lighting fail, an indicator lamp lights up in the instrument cluster.
Solution
Change the defective bulb.
A WARNING (Continued)
• Stop the vehicle as soon as possible and when safe to do so.
CD
Failure to observe Illuminated indicator lamps and text messages can lead to your vehicle be-ing damaged.
m if an individual light emitting diode (LED) in W the exterior lighting fails, no warning is given. If all LEDs fail, this is indicated by the indicator lamp*··
Checklist
Always carry out the following actions for changing a bulb in the given order => &:
1. Park the vehicle on a firm and level surface at a safe distance from the flow of traffic.
2. Apply the handbrake firmly =>page 269. .,..
Practical tips I 433
Page 434 of 486
Checklist (Continued)
3. Turn the light switch to position o 106.
4. Shift the tu m signal lever to neutral 106.
5. With a DSG® dual clutch gearbox, move the selector lever to position P 260.
6. Manual gearbox: select a gear 263.
7. Stop the engine and remove the key from the ignition 257.
8. Switch off the orientation lighting 106.
9. Leave the defective bulbs to cool down.
10. Check to see if a fuse has blown 429.
11. Follow the instructions to change the affec-ted bulb Always use identical bulbs of the same type. The designation is inscribed on the bulb, either on the glass part or on the base.
12. Do not touch the glass part of the bulb with unprotected fingers. The heat of the bulb would cause the fingerprint to evaporate and condense on the renector. This will im-pair the brightness of the headlight.
LED lights on the vehicle
r--f'n First read and observe the introductory L-I=J.I information and safety warnings & on page 432.
Depending on the vehicle equipment, the following lights may be LED lights:
• Dipped beam, main beam, daytime running lights and side lights on vehicles with LED head-lights.
• Tail light, brake light and fog light on vehicles with LED tail lights.
• Number plate lights.
434 If and when
13. After changing the bulb, check to ensure that the bulb is working properly. If the bulb is not working properly, the bulb may not have been inserted properly or may have failed again, or the connector may have been inserted incorrectly.
14. Any time you change a bulb in the front of the vehicle, the headlight settings should be checked by a qualified workshop.
A WARNING
Ignoring any of the items on this important safety checklist can lead to accidents and se-vere Injuries.
• Always follow the instructions in the checklist and observe the general safety pro-cedures.
CD
Always take care when removing or fitting lights in order to prevent damage to the paint-work or to other vehicle parts. <1
Owners cannot replace the LEDs themselves. If some LEDs fail, this may be an indication that more elements are on the point of failure. If this happens, have the lights checked and replaced if necessary at a qualified workshop.
Page 435 of 486
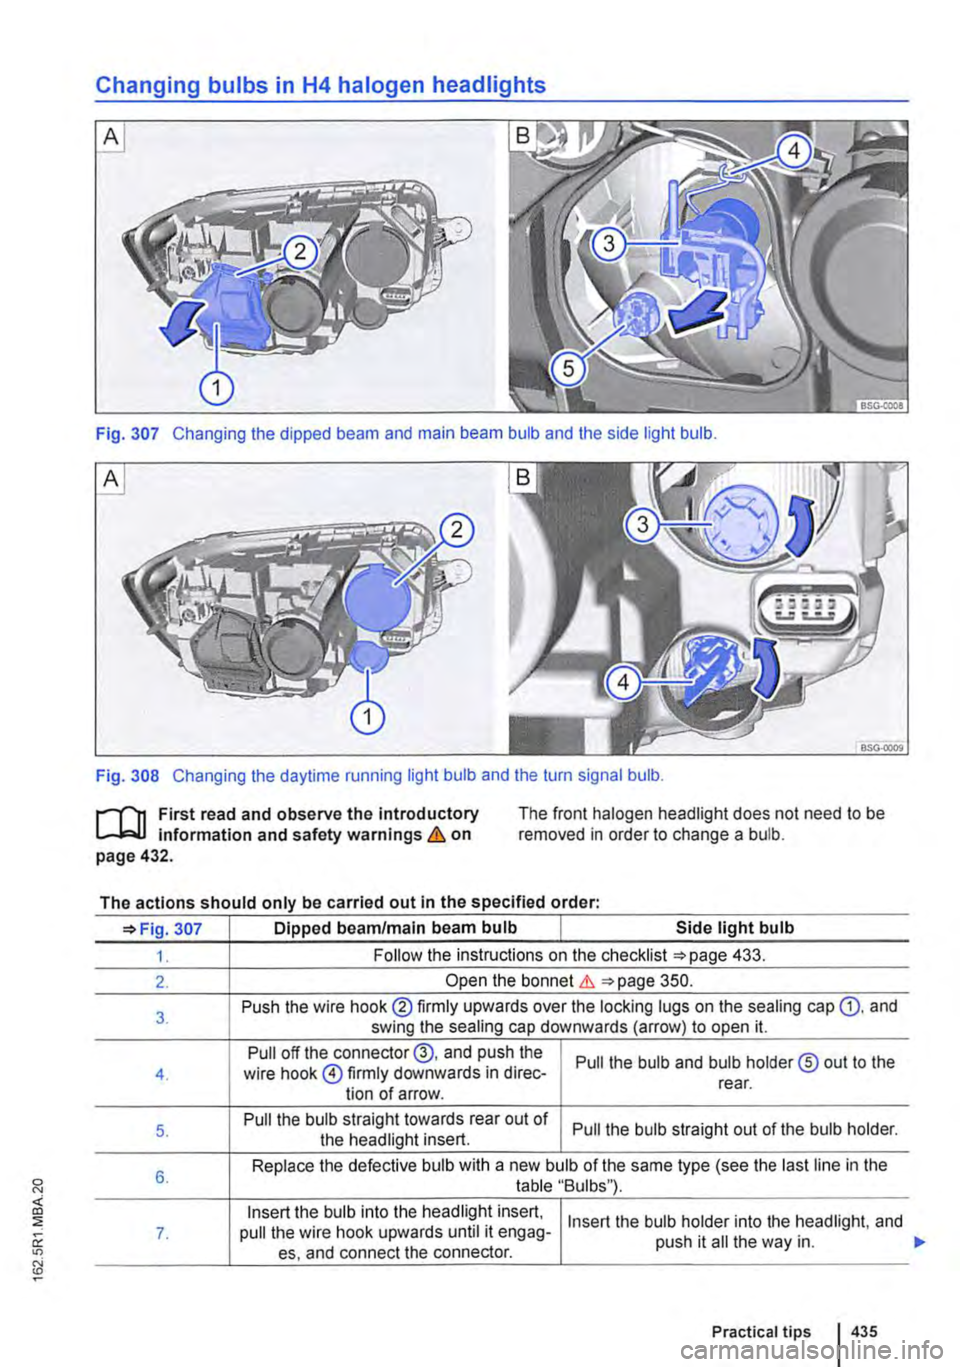
Changing bulbs in H4 halogen headlights
Fig. 307 Changing the dipped beam and main beam bulb and the side light bulb.
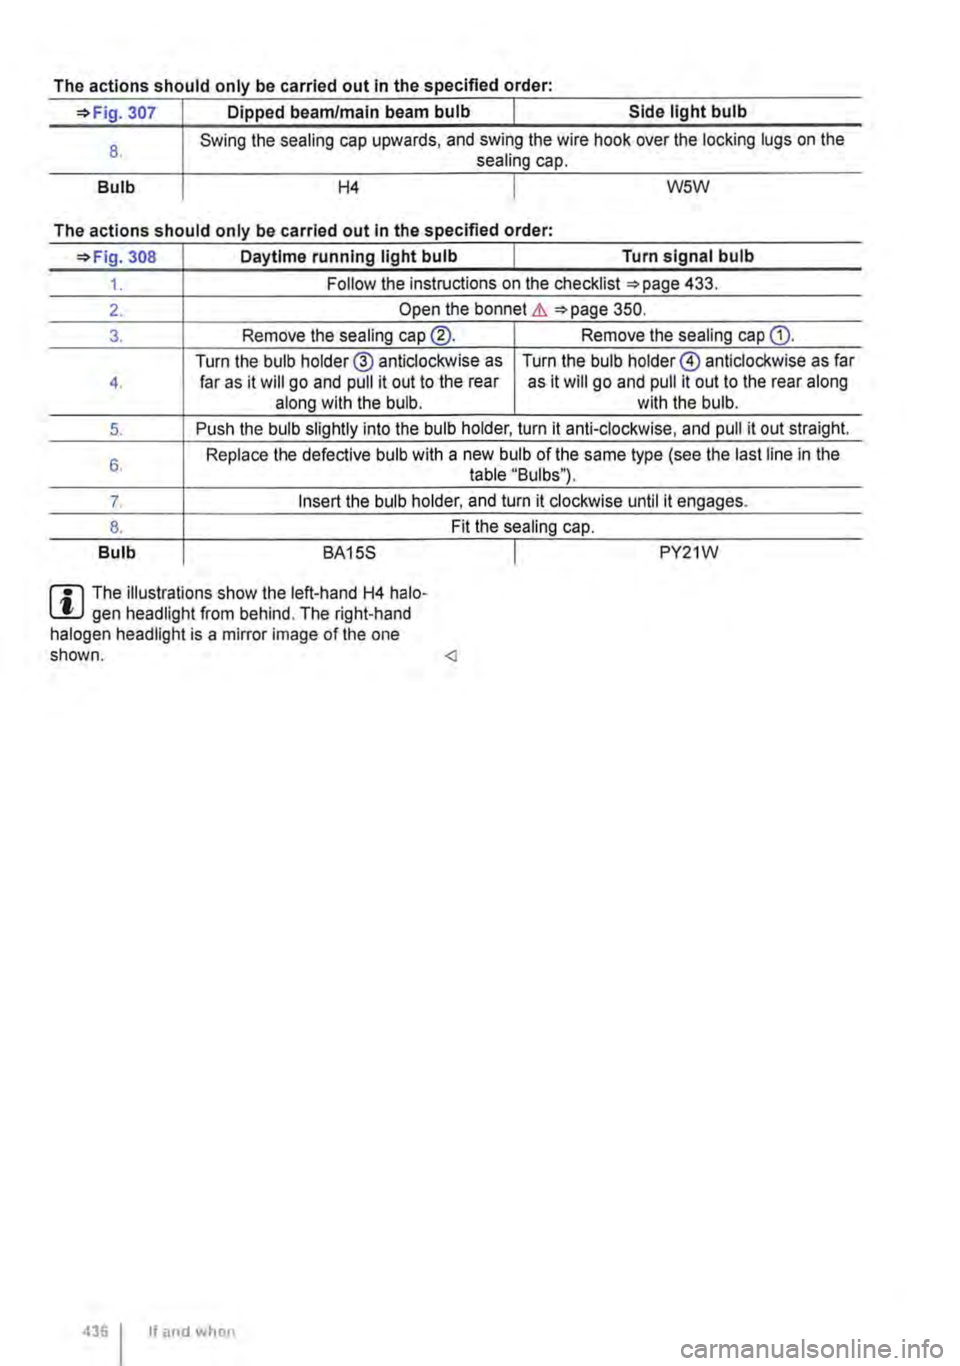
Fig. 308 Changing the daytime running light bulb and the turn signal bulb.
r-f"'n First read and observe the introductory L-J.::.l.l information and safety warnings & on page 432.
The front halogen headlight does not need to be removed in order to change a bulb.
The actions should only be carried out in the specified order:
307 Dipped beam/main beam bulb Side light bulb
1. Follow the instructions on the checklist 433.
2. Open the bonnet & 350.
3. Push the wire hook® firmly upwards over the locking lugs on the sealing cap Q). and swing the sealing cap downwards (arrow) to open it.
Pull off the connector@, and push the Pull the bulb and bulb holder® out to the 4. wire hook @firmly downwards in direc-tion of arrow. rear.
5. Pull the bulb straight towards rear out of Pull the bulb straight out of the bulb holder. the headlight insert.
6. Replace the defective bulb with a new bulb of the same type (see the last line in the table "Bulbs"}.
Insert the bulb into the headlight insert, Insert the bulb holder into the headlight, and 7. pull the wire hook upwards until it engag-push it ail the way in. es, and connect the connector.
Practical tips 435
Page 436 of 486
The actions should only be carried out in the specified order:
=>Fig. 307 Dipped beam/main beam bulb Side light bulb
8.
Bulb
Swing the sealing cap upwards, and swing the wire hook over the locking lugs on the sealing cap.
H4 W5W
The actions should only be carried out In the specified order·
=>Fig. 308 Daytime running light bulb Turn signal bulb
1. Follow the instructions on the checklist =>page 433.
2. Open the bonnet &. =>page 350.
3. Remove the sealing cap@. Remove the sealing cap Q).
Turn the bulb holder® anticlockwise as Turn the bulb holder@ anticlockwise as far 4. far as it will go and pull it out to the rear as it will go and pull it out to the rear along along with the bulb. with the bulb.
5. Push the bulb slightly into the bulb holder, turn it anti-clockwise, and pull it out straight.
6. Replace the defective bulb with a new bulb of the same type (see the last line in the table "Bulbs").
7. Insert the bulb holder, and turn it clockwise until it engages.
8. Fit the sealing cap.
Bulb BA15S I PY21W
m The illustrations show the left-hand H4 halo-L.!J gen headlight from behind. The right-hand halogen headlight is a mirror image of the one shown.
Page 437 of 486
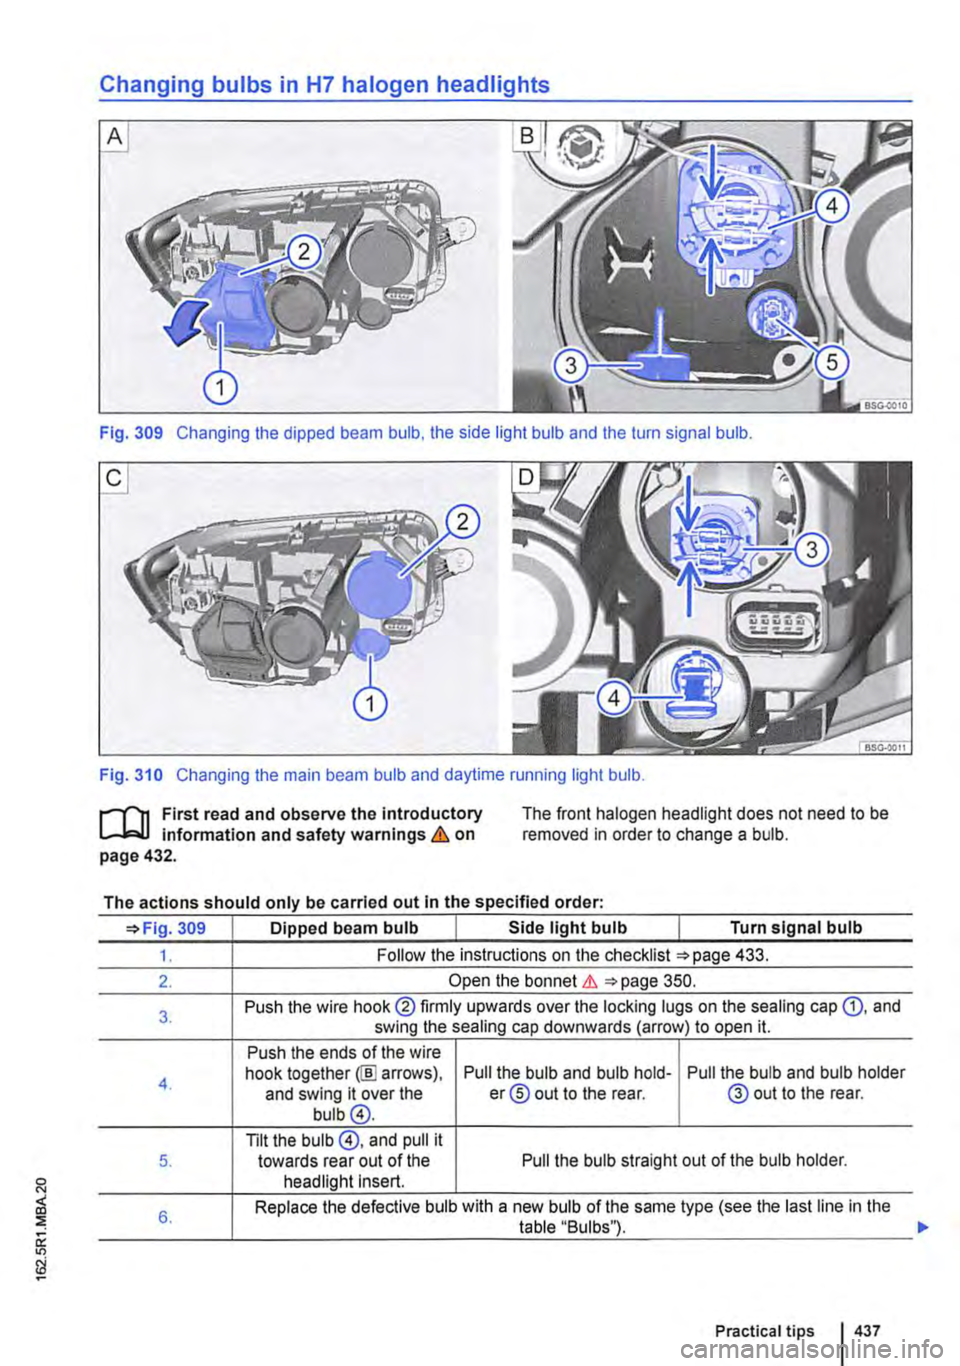
Changing bulbs in H7 halogen headlights
Fig. 309 Changing the dipped beam bulb, the side light bulb and the turn signal bulb.
Fig. 310 Changing the main beam bulb and daytime running light bulb.
l""""'('n First read and observe the introductory L-Jo:.Jl information and safety warnings & on page 432.
The front halogen headlight does not need to be removed in order to change a bulb.
The actions should only be carried out in the specified order:
=>Fig. 309 Dipped beam bulb Side light bulb Turn signal bulb
1. Follow the instructions on the checklist =>page 433.
2. Open the bonnet&. =>page 350.
3. Push the wire hook@ firmly upwards over the locking lugs on the sealing cap G), and swing the sealing cap downwards (arrow) to open it.
Push the ends of the wire
4. hook together@] arrows), Pull the bulb and bulb hold-Pull the bulb and bulb holder and swing it over the er® out to the rear. @out to the rear. bulb@.
Tilt the bulb @, and pull it 5. towards rear out of the Pull the bulb straight out of the bulb holder. headlight Insert.
6. Replace the defective bulb with a new bulb of the same type (see the last line in the table "Bulbs").
Practical tips I 437
Page 438 of 486
The actions should only be carried out in the specified order:
=>Fig. 309 Dipped beam bulb Side light bulb I Turn signal bulb
7
8.
Bulb
Swing the wire hook over the bulb, and push it into the catches.
Insert the bulb holder into the headlight, and push it all the way in.
Swing the sealing cap upwards, and swing the wire hook over the locking lugs on the sealing cap.
H7 I W5W I PW24W
The actions should only be carried out in the specified order·
=>Fig. 310 Main beam bulb Daytime running light bulb
1. Follow the instructions on the checklist =>page 433.
2. Open the bonnet Lh =>page 350.
3. Remove the sealing cap®. Remove the sealing cap G).
4. Push the ends of the wire hook together @I arrows), and swing it over the bulb @. Pull the bulb and bulb holder@ out to the rear.
5. Tilt the bulb@, and pull it towards rear Pull the bulb straight out of the bulb holder. out of the headlight insert.
6. Replace the defective bulb with a new bulb of the same type (see the last line in the table "Bulbs").
7. Swing the wire hook over the bulb, and Insert the bulb holder into the headlight, and push it into the catches. push it all the way in.
8. Fit the sealing cap.
Bulb H7
m The illustrations show the left-hand H7 halo-l!J gen headlight from behind. The right-hand halogen headlight is a mirror image of the one shown.
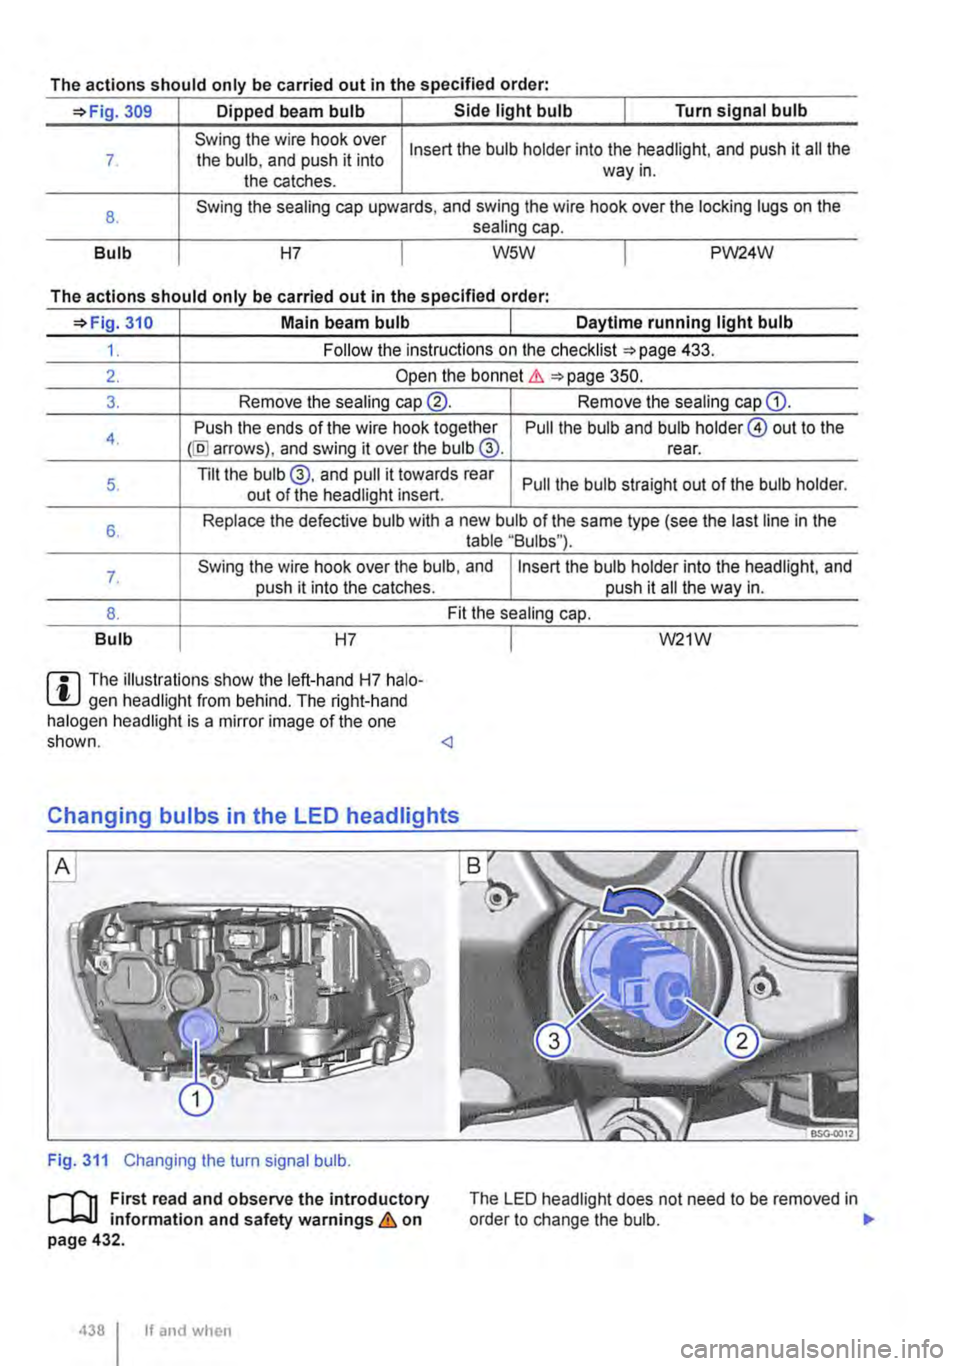
Fig. 311 Changing the turn signal bulb.
1"'"""111 First read and observe the introductory L-J,:.JJ information and safety warnings & on page 432.
438 I If and when
I W21W
The LED headlight does not need to be removed in order to change the bulb. .,..
Page 439 of 486
The actions should only be carried out in the specified order·
311 Turn signal bulb
1. Observe and follow the instructions on the checklist ""page 433.
2. Open the bonnet.&. 350.
3. Remove the seating cap Q).
4. Release the connector@, and pull it off the bulb holder.
5. Turn the bulb holder@ anticlockwise as far as it will go and pull it out to the rear along with the bulb.
6. Push the bulb slightly into the bulb holder, turn it anti-clockwise, and pull it out straight.
7. Replace the defective bulb with a new bulb of the same type (see the last line in the table "Bulbs").
8. Insert the bulb holder into the headlight and turn it clockwise as far as it will go.
9. Fit the sealing cap.
Bulb H21W
m The illustrations show the left-hand LED W headlight from behind. The right-hand LED headlight is a mirror image of the one shown.
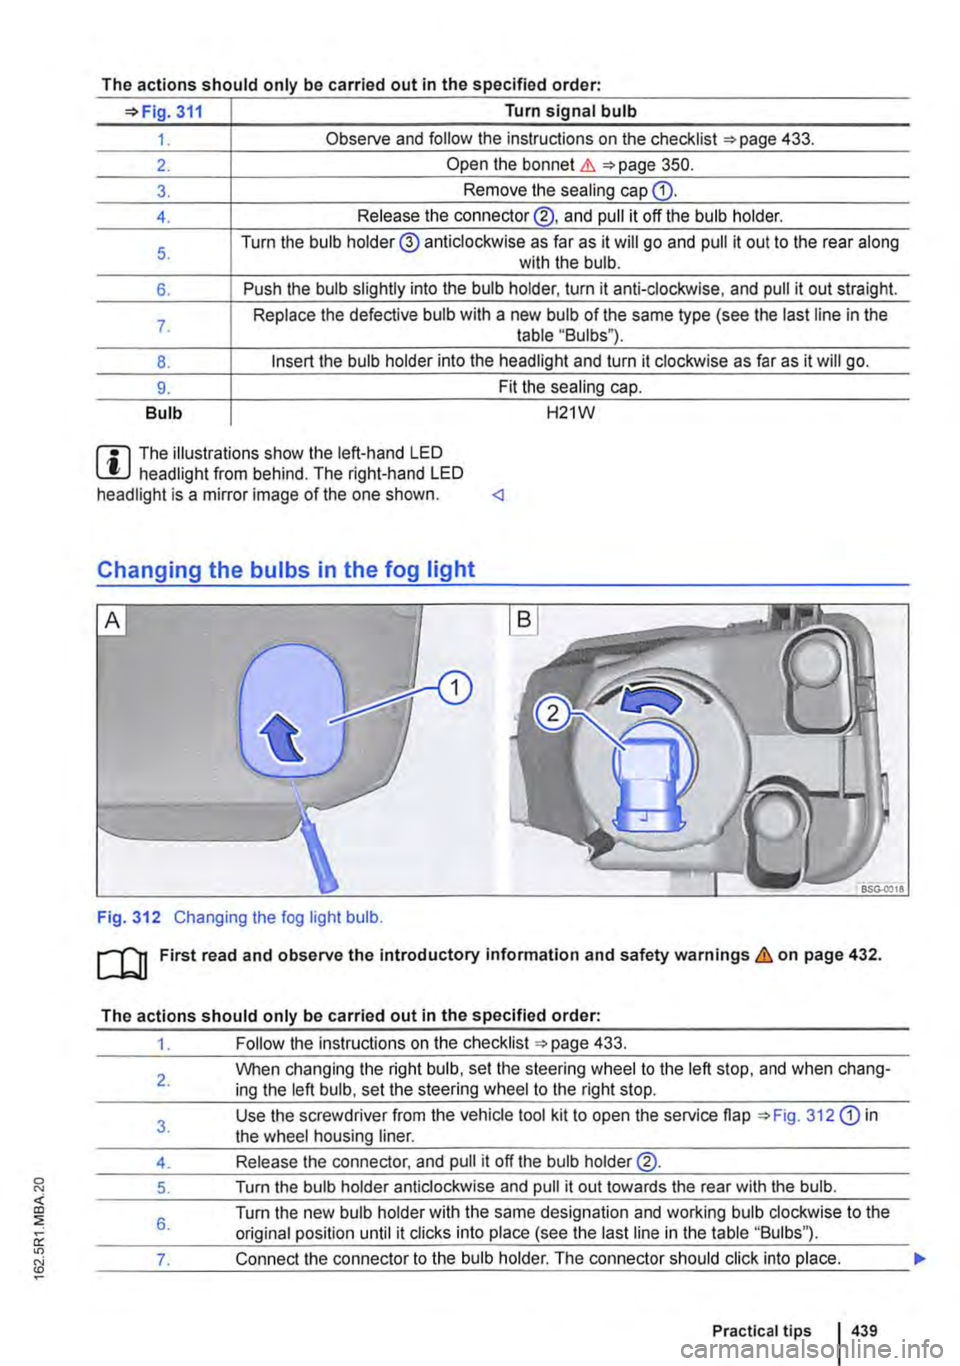
Fig. 312 Changing the fog light bulb.
m First read and observe the introductory information and safety warnings & on page 432.
The actions should only be carried out in the specified order:
1. Follow the instructions on the checklist 433.
2.
3.
4.
5.
6.
When changing the right bulb, set the steering wheel to the left stop, and when chang-ing the left bulb, set the steering wheel to the right stop.
Use the screwdriver from the vehicle tool kit to open the service flap 312 Q) in the wheel housing liner.
Release the connector, and pull it off the bulb holder@.
Turn the bulb holder anticlockwise and pull it out towards the rear with the bulb.
Turn the new bulb holder with the same designation and working bulb clockwise to the original position until it clicks into place (see the last line in the table "Bulbs").
__ ___:7...:.. ___ ..::.sh...:.o:...:u:....ld::.....:.c:...:lic.::.k:....i:....nt.:..:.o-"p-'-la:....c:..:e...:.. ___
Practical tips 439
Page 440 of 486
![VOLKSWAGEN TRANSPORTER 2018 Owners Manual The actions should only be carried out in the specified order:
8. Close the service flap CD in the wheel housing liner.
Bulb H11 <]
Fig. 313 Changing the tail light bulbs.
ro First read and observ VOLKSWAGEN TRANSPORTER 2018 Owners Manual The actions should only be carried out in the specified order:
8. Close the service flap CD in the wheel housing liner.
Bulb H11 <]
Fig. 313 Changing the tail light bulbs.
ro First read and observ](/img/18/55780/w960_55780-439.png)
The actions should only be carried out in the specified order:
8. Close the service flap CD in the wheel housing liner.
Bulb H11 <]
Fig. 313 Changing the tail light bulbs.
ro First read and observe the introductory Information and safety warnings & on page 432.
The actions should only be carried out in the specified order:
Brake light/tail Rear fog light bulb '*Fig. 313 Tail light bulb Turn signal bulb light bulb or reversing light bulb
1. Observe and follow the instructions on the checklist =>page 433.
2. Unscrew the two securing bolts G).
3. Push the tail light cluster towards the outside out of the mounting, release the connec-tor, and pull it off the bulb holder.
4. Unscrew the four securing bolts@, and pull the bulb holder@ out of the tail light cl us-ter.
Push the bulb® Push the bulb 0 Pull the bulb@ Pull the bulb ® slightly into the bulb slightly into the bulb 5. straight out of the straight out of the holder, turn it anti-holder, turn it anti-bulb holder. bulb holder. clockwise, and pull it clockwise, and pull it out straight. out straight.
6. Replace the defective bulb with a new bulb of the same type (see the last line in the table "Bulbs").
7. Insert the bulb holder into the tail light cluster and tighten the bolts.
8. Carefully insert the tail light cluster into the body so that it is flush with the vehicle body-work, and tighten the bolts.
Bulb W5W I W16W I P21/4W I H21Wor P21W <]
440 I If and whon