handbrake VOLKSWAGEN TRANSPORTER 2018 Owners Manual
[x] Cancel search | Manufacturer: VOLKSWAGEN, Model Year: 2018, Model line: TRANSPORTER, Model: VOLKSWAGEN TRANSPORTER 2018Pages: 486, PDF Size: 69.28 MB
Page 70 of 486
• The seat cushion is damp or wet.
• The interior or exterior temperature is above 2s•c (7rF).
Function
Switching on
Adjusting the heating output
Switching off
Action 49
Press the 0 or (9 button. The seat heating is switched on at the highest setting. All indicator lamps light up.
Press the 0 or (9 button repeat-edly until the required heat level is set.
Press the button 0 or (9 until the indicator lamps in the button go out 49.
A WARNING
Anyone experiencing reduced sensitivity to pain or temperature due to medication, para-lysis or chronic illness (e.g. diabetes) could sustain burns on the back, buttocks and legs when using the seat heating. These burns may take a long time to heal or may never heal fully. Please consult a doctor to deter-mine your own level of health.
Memory seats
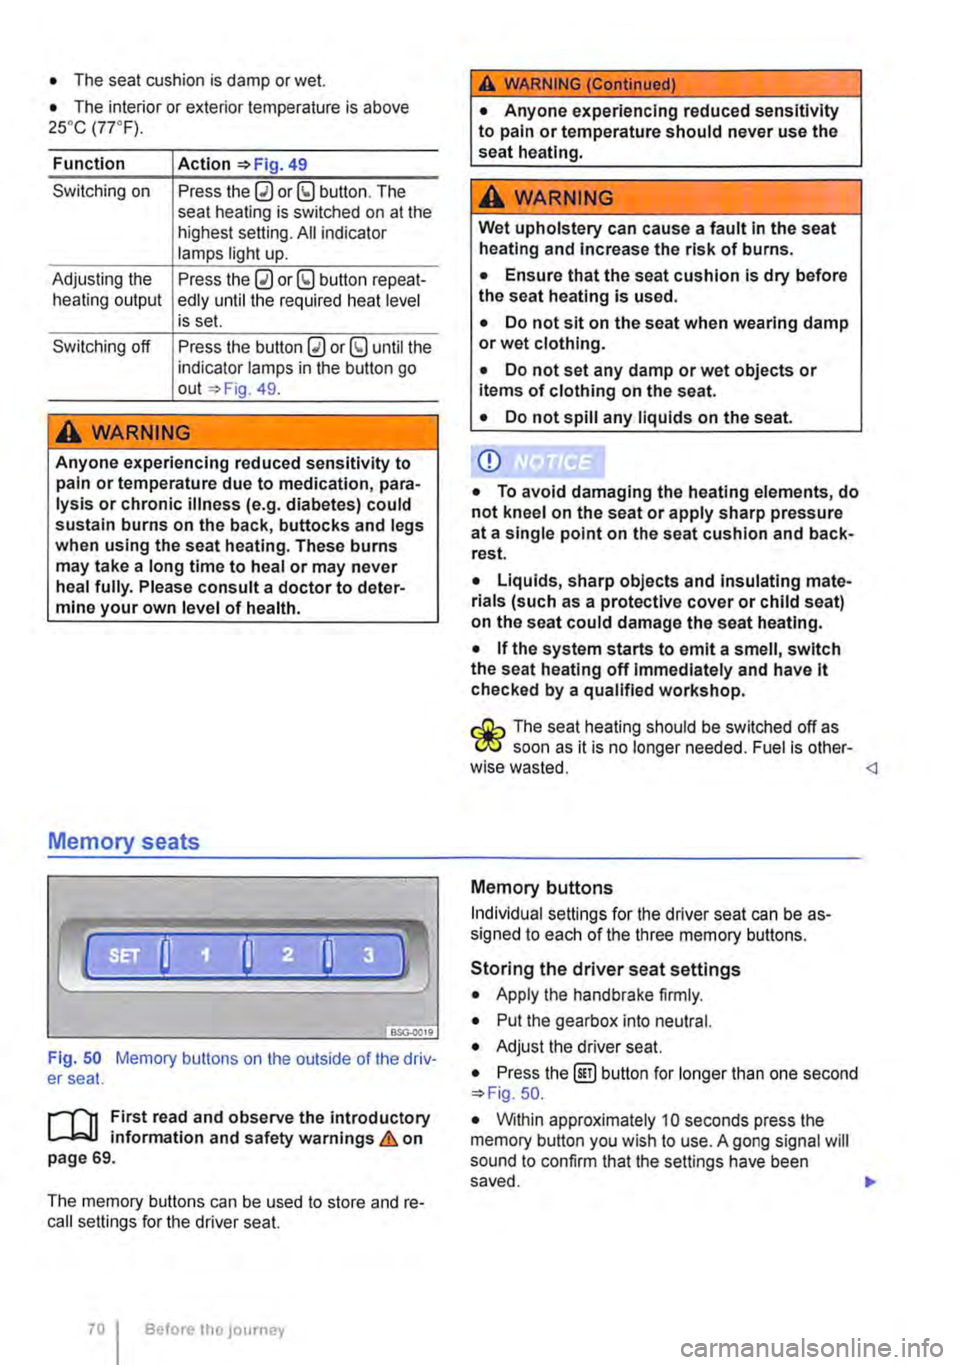
Fig. 50 Memory buttons on the outside of the driv-er seat.
r"''l1 First read and observe the introductory L-JcJ.I information and safety warnings & on page 69.
The memory buttons can be used to store and re-call settings for the driver seat.
Before the JOurney
A WARNING (Continued)
• Anyone experiencing reduced sensitivity to pain or temperature should never use the seat heating.
A wARNING
Wet upholstery can cause a fault In the seat heating and Increase the risk of burns.
• Ensure that the seat cushion is dry before the seat heating is used.
• Do not sit on the seat when wearing damp or wet clothing.
• Do not set any damp or wet objects or items of clothing on the seat.
• Do not spill any liquids on the seat.
Q)
• To avoid damaging the heating elements, do not kneel on the seat or apply sharp pressure at a single point on the seat cushion and back-rest.
• Liquids, sharp objects and Insulating mate-rials (such as a protective cover or child seat) on the seat could damage the seat heating.
• If the system starts to emit a smell, switch the seat heating off Immediately and have lt checked by a qualified workshop.
r:O:-, The seat heating should be switched off as C!JtJ soon as it is no longer needed. Fuel is other-wise wasted.
Individual settings for the driver seat can be as-signed to each of the three memory buttons.
Storing the driver seat settings
• Apply the handbrake firmly.
• Put the gearbox into neutral.
• Adjust the driver seat.
• Press the @] button for longer than one second 50.
• Within approximately 10 seconds press the memory button you wish to use. A gong signal will sound to confirm that the settings have been saved. .,..
Page 71 of 486
Calling up the driver seat settings
• Within 10 minutes after the vehicle has been unlocked, briefly press the respective memory but-ton while the driver door is opened and the ignition is switched off.
• OR: with the driver door closed or ignition switched on, press and hold the corresponding memory button until the stored position has been attained.
Activating memory function of the vehicle key
• Unlock the driver door.
• Press the desired memory button 50 and keep it pressed until the end of the activation proc-ess.
• If required, keep the memory button pressed until the saved seat position is reached.
• Keeping the memory button pressed, simulta-neously press the unlocking button@ in the vehi-cle key within 10 seconds. A gong will sound to confirm that the settings have been activated.
Rotating front seats
r--('n First read and observe the introductory information and safety warnings & on page 69.
Turning the front seats
• Additional point to note for driver seat: en-gage selector lever position P or a gear to ensure the vehicle cannot roll.
• Additional point to note for driver seat: re-lease the handbrake and adjust the steering wheel so that it is as far up and as far forward as possi-ble.
• Open driver door or front passenger door.
• Adjust the backrest to an upright position.
• Place the outer armrest in the horizontal posi-tion.
• Move the driver seat to the mid point of the fore-and-aft adjustment.
• Pull the small lever on the front of the seat base and, at the same time, turn the seat inwards.
• You may need to readjust the seat and armrest for turning.
Deactivating memory function of the vehicle key
• Press Fig. 50 button and then keep it pressed till the end of the deactivation process.
• Keeping the memory button pressed, simulta-neously press the unlocking button @ in the vehi-cle key within 10 seconds. A gong will sound to confirm that the settings have been deactivated.
Assigning driver seat settings to a vehicle key
• Activate memory function of the vehicle key.
• Unlock the vehicle using the same vehicle key.
• Adjust the driver seat.
• Lock the vehicle using the @button in the re-mote control key in order to save the settings.
After the settings have been stored, the driver seat always returns to the stored position automatically, as soon as the@ button in the vehicle key 39 is used to unlock the vehicle and the driver door is opened. <1
A WARNING
Incorrect handling of the rotating front seats can cause accidents and serious Injuries.
• Only ever adjust the front seats when the vehicle is stationary otherwise you could as-sume an incorrect sitting position.
• Rotating front seats must always be in the direction of travel and securely engaged in this position when the vehicle is in motion.
CD
If the seat is occupied when it is turned, it could be damaged.
• Turn the front seats only when they are not occupied.
Page 74 of 486
Turning the single seat
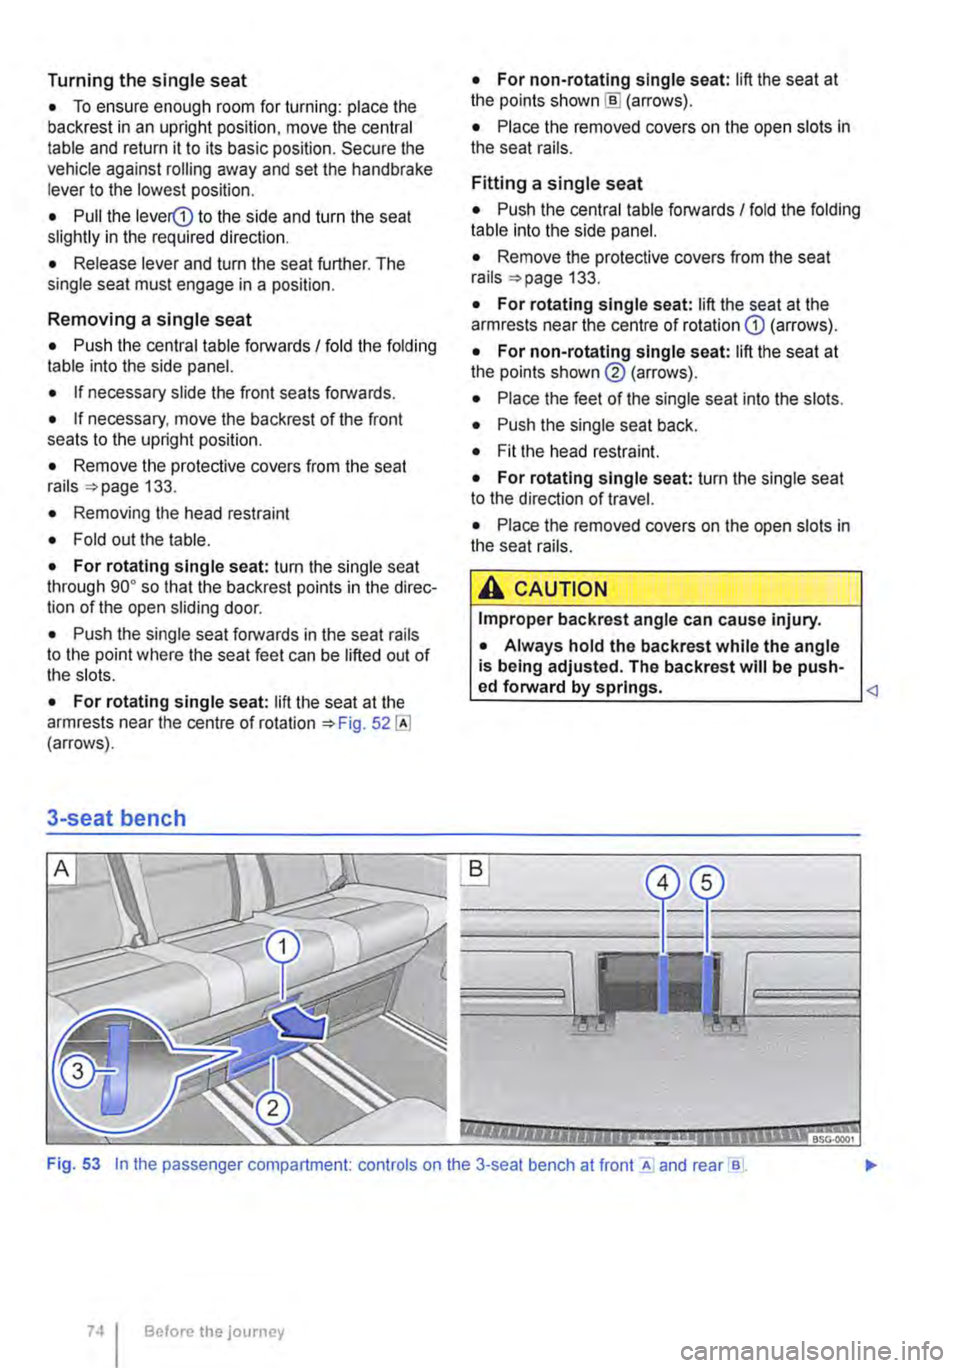
• To ensure enough room for turning: place the backrest in an upright position. move the central table and return it to its basic position. Secure the vehicle against rolling away and set the handbrake lever to the lowest position.
• Pull the lever(D to the side and turn the seat slightly in the required direction.
• Release lever and turn the seat further. The single seat must engage in a position.
Removing a single seat
• Push the central table forwards I fold the folding table into the side panel.
• If necessary slide the front seats forwards.
• If necessary, move the backrest of the front seats to the upright position.
• Remove the protective covers from the seat rails 133.
• Removing the head restraint
• Fold out the table.
• For rotating single seat: turn the single seat through go• so that the backrest points in the direc-tion of the open sliding door.
• Push the single seat forwards in the seat rails to the point where the seat feet can be lifted out of the slots.
• For rotating single seat: lift the seat at the armrests near the centre of rotation (arrows).
3-seat bench
• For non-rotating single seat: lift the seat at the points shown [ID (arrows).
• Place the removed covers on the open slots in the seat rails.
Fitting a single seat
• Push the central table forwards I fold the folding table into the side panel.
• Remove the protective covers from the seat rails 133.
• For rotating single seat: lift the seat at the armrests near the centre of rotation G) (arrows).
• For non-rotating single seat: lift the seat at the points shown@ (arrows).
• Place the feet of the single seat into the slots.
• Push the single seat back.
• Fit the head restraint.
• For rotating single seat: turn the single seat to the direction of travel.
• Place the removed covers on the open slots in the seat rails.
A CAUTION
Improper backrest angle can cause injury.
• Always hold the backrest while the angle is being adjusted. The backrest will be push-ed forward by springs.
Before the journey
Page 75 of 486
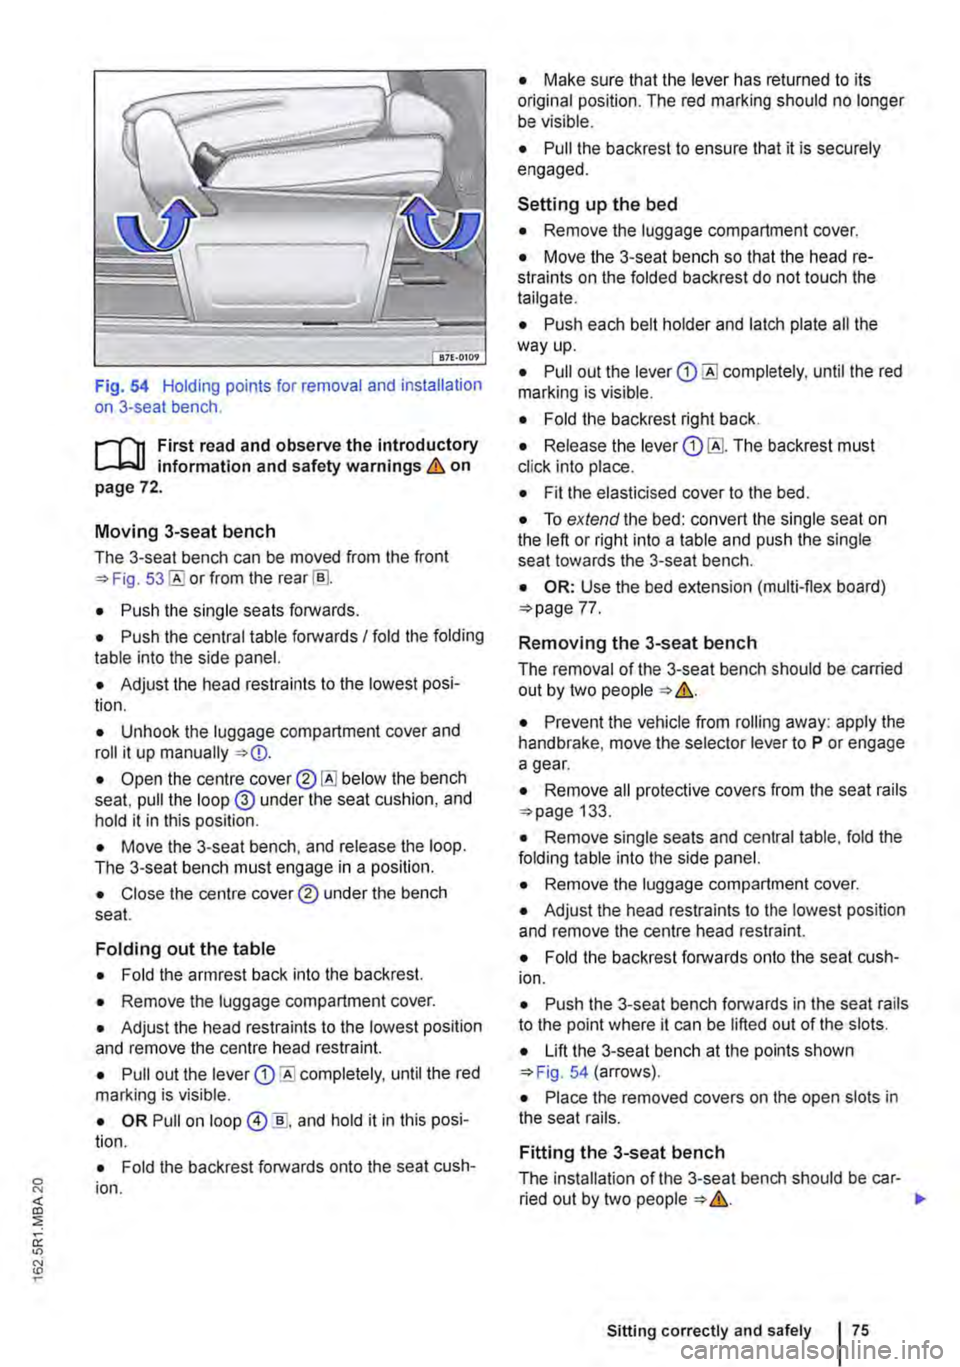
Fig. 54 Holding points for removal and installation on 3-seat bench.
,....-m First read and observe the introductory L-W.I information and safety warnings & on page 72.
Moving 3-seat bench
The 3-seat bench can be moved from the front =>Fig. or from the rear [ru.
• Push the single seats forwards.
• Push the central table forwards I fold the folding table into the side panel.
• Adjust the head restraints to the lowest posi-tion.
• Unhook the luggage compartment cover and roll it up manually =>
• Move the 3-seat bench, and release the loop. The 3-seat bench must engage in a position.
• Close the centre cover® under the bench seat.
Folding out the table
• Fold the armrest back into the backrest.
• Remove the luggage compartment cover.
• Adjust the head restraints to the lowest position and remove the centre head restraint.
• Pull out the lever Q) completely, until the red marking is visible.
• OR Pull on loop @ ]], and hold it in this posi· lion.
• Fold the backrest forwards onto the seat cush· ion.
• Make sure that the lever has returned to its original position. The red marking should no longer be visible.
• Pull the backrest to ensure that it is securely engaged.
Setting up the bed
• Remove the luggage compartment cover.
• Move the 3-seat bench so that the head re· straints on the folded backrest do not touch the tailgate.
• Push each belt holder and latch plate all the way up.
• Pull out the lever Q) until the red marking is visible.
• Fold the backrest right back.
• Release the lever Q) The backrest must click into place.
• Fit the elasticised cover to the bed.
• To extend the bed: convert the single seat on the left or right into a table and push the single seat towards the 3-seat bench.
• OR: Use the bed extension (multi-flex board) =>page 77.
Removing the 3-seat bench
The removal of the 3-seat bench should be carried out by two people => &.
• Prevent the vehicle from rolling away: apply the handbrake, move the selector lever to P or engage a gear.
• Remove all protective covers from the seat rails =>page 133.
• Remove single seats and central table, fold the folding table into the side panel.
• Remove the luggage compartment cover.
• Adjust the head restraints to the lowest position and remove the centre head restraint.
• Fold the backrest forwards onto the seat cush-ion.
• Push the 3-seat bench forwards in the seat rails to the point where it can be lifted out of the slots.
• Lift the 3-seat bench at the points shown =>Fig. 54 (arrows).
• Place the removed covers on the open slots in the seat rails.
Fitting the 3-seat bench
The installation of the 3-seat bench should be car-ried out by two people => &. .,.
Sitting correctly and safely
Page 147 of 486

Things to note when driving with a trailer
• If the trailer has an overrun brake, apply the brakes gently at first and then firmly. This will pre-vent the jerking that can be caused by the trailer wheels locking.
• The combination weight causes the braking dis-tance to increase.
• Select a low gear before driving down a slope. This enables you to use the engine braking effect to slow down the vehicle. The brake system could otherwise overheat and fail.
• The vehicle's centre of gravity and, in turn, the vehicle's handling, will change because of the trail-er load and the increased combined towing weight of the vehicle and trailer.
• The weight distribution of a loaded trailer with an unladen towing vehicle is very unfavourable. When driving in this situation, drive particularly carefully and slowly.
Tachograph
In most European countries, a tachograph has to be installed in the vehicle and used if the gross combination weight rating of the vehicle and trailer is over 3,500 kg.
• Observe the legal requirements governing the use of tachographs.
Pulling off on slopes when towing a trailer
A vehicle towing a trailer is liable to roll back a short distance when moving off on a slope, de-pending on the angle of the slope and the total weight of the trailer and vehicle.
When towing a trailer, pull off on slopes as follows:
• Depress and hold the brake pedal.
• Manual gearbox: depress the clutch fully.
• Select first gear or D =:o page 260, Changing gears.
Trailer stabilisation
r-('n First read and observe the introductory L-J,:.U information and safety warnings & on page 139.
The trailer stabilisation function can de-
tect if an attached trailer is starting to
lurch from side to side and can provide
countersteer.
• Unlock hand brake and carefully release while holding down lock button. At the same time, gently depress the accelerator and, in a manual vehicle, release the clutch pedal, until you feel the vehicle moving forwards. If necessary, read the notes on the Hill Hold Assist function =:o page 282, Pull-away assist systems.
• Only let go of the handbrake lever when the en-gine has sufficient power to move off.
• Pull away slowly.
A WARNING
Incorrect trailer towing can cause loss of ve-hicle control and serious personal injury.
• Towing a trailer and transporting heavy or bulky items can change the way the vehicle handles and increase the braking distance.
• Always drive carefully and think ahead. Brake earlier than in normal driving.
• Always adapt your speed and driving style to suit visibility, weather, road and traffic con-ditions. Reduce your speed, particularly when going downhill.
• Accelerate carefully and gently. Avoid abrupt and sudden driving and braking ma-noeuvres.
• Take special care when overtaking. Re-duce your speed immediately if the trailer shows even the slightest sign of snaking.
• Never try to stop a trailer from snaking by increasing your speed.
• Always obey speed limits. In some areas speed limits for vehicles towing trailers are lower than for vehicles without trailers.
If, however, the effects of this snaking on the vehi-cle are detected via the ESC control unit, the vehi-cle is braked automatically by the ESC in order to stabilise the trailer. In this case the ABS indicator lamp flashes .,.
Transporting items 1147
Page 195 of 486
Bench seat/bed
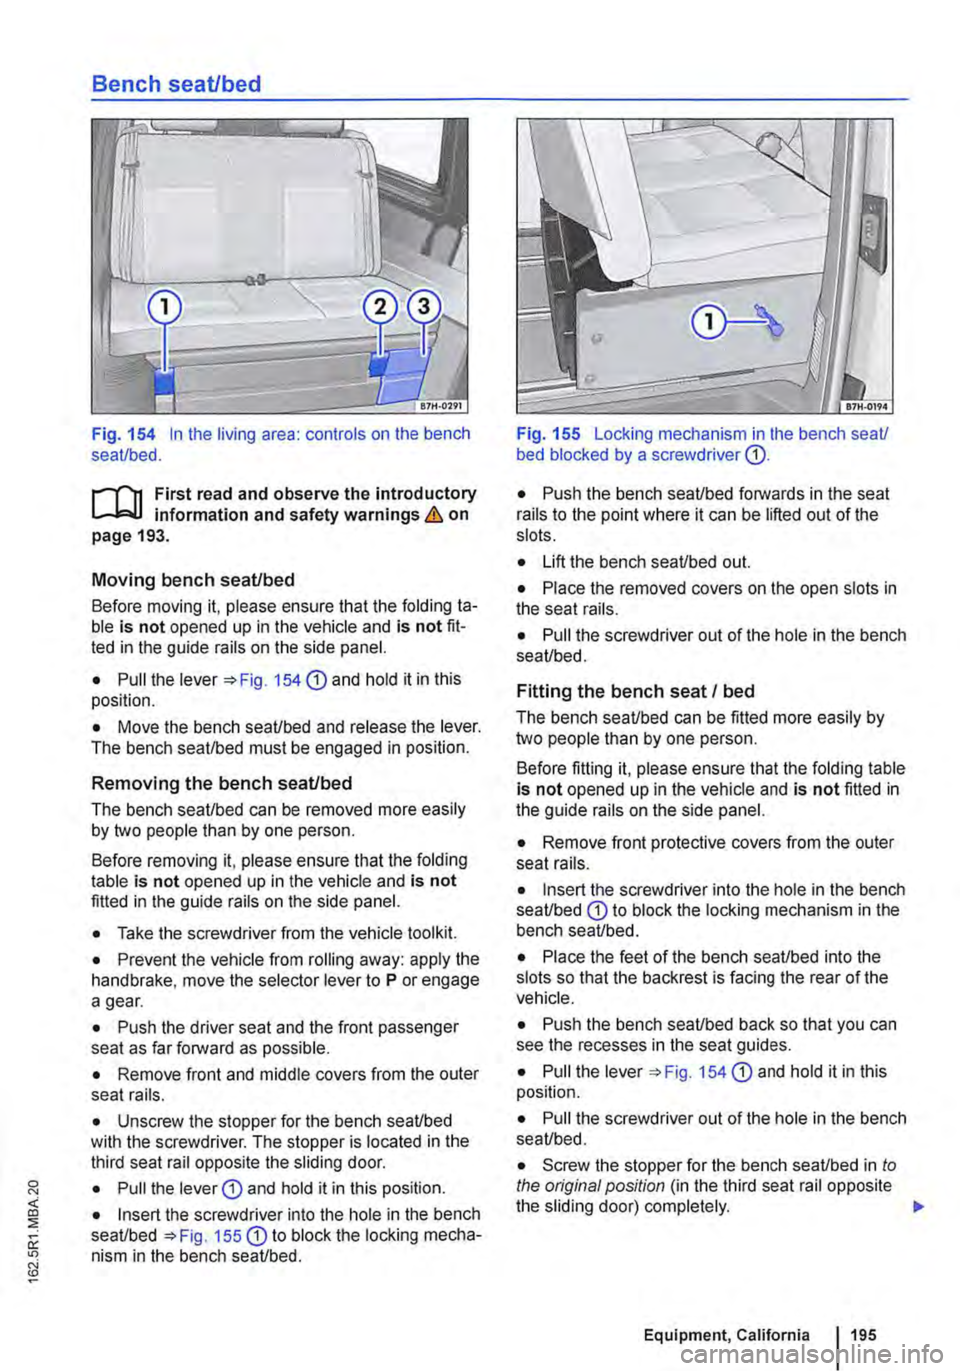
Fig. 154 In the living area: controls on the bench seat/bed.
ill1 First read and observe the introductory l-J::,jJ information and safety warnings & on page 193.
Moving bench seat/bed
Before moving it, please ensure that the folding ta-ble is not opened up in the vehicle and is not fit-ted in the guide rails on the side panel.
• Pull the lever '*Fig. 154 CD and hold it in this position.
• Move the bench seat/bed and release the lever. The bench seat/bed must be engaged in position.
Removing the bench seat/bed
The bench seat/bed can be removed more easily by two people than by one person.
Before removing it, please ensure that the folding table is not opened up in the vehicle and is not fitted in the guide rails on the side panel.
• Take the screwdriver from the vehicle tool kit.
• Prevent the vehicle from rolling away: apply the handbrake, move the selector lever to P or engage a gear.
• Push the driver seat and the front passenger seat as far forward as possible.
• Remove front and middle covers from the outer seat rails.
• Unscrew the stopper for the bench seat/bed with the screwdriver. The stopper is located in the third seat rail opposite the sliding door.
• Pull the lever G) and hold it in this position.
• Insert the screwdriver into the hole in the bench seat/bed =>Fig. 155 G) to block the locking mecha-nism in the bench seat/bed.
Fig. 155 Locking mechanism in lhe bench seat/ bed blocked by a screwdriver G).
• Push the bench seat/bed forwards in the seat rails to the point where it can be lifted out of the slots.
• Lift the bench seat/bed out.
• Place the removed covers on the open slots in the seat rails.
• Pull the screwdriver out of the hole in the bench seat/bed.
Fitting the bench seat I bed
The bench seat/bed can be fitted more easily by two people than by one person.
Before fitting it, please ensure that the folding table is not opened up in the vehicle and is not fitted in the guide rails on the side panel.
• Remove front protective covers from the outer seat rails.
• Insert the screwdriver into the hole in the bench seat/bed G) to block the locking mechanism in the bench seat/bed.
• Place the feet of the bench seat/bed into the slots so that the backrest is facing the rear of the vehicle.
• Push the bench seat/bed back so that you can see the recesses in the seat guides.
• Pull the lever =>Fig. 154 G) and hold it in this position.
• Pull the screwdriver out of the hole in the bench seat/bed.
• Screw the stopper for the bench seat/bed in to the original position (in the third seat rail opposite the sliding door) completely. .,.
Equipment, California 195
Page 253 of 486
Checklist (Continued)
-Insurance documents
-Camping and travel guides
./ Inform yourself about the peculiarities of any foreign country you plan to visit, such as driving speed limits and required papers .
./ Check the cooking gas supply and change the bottle if necessary.
Actions to take during thunderstorms
ro First read and observe the introductory information given on page 252.
Checklist
Take the following actions before an impending storm:
./ Close the pop-up roof .
./ Retract the awning completely.
Winter conditions
r-f"'n First read and observe the introductory information given on page 252.
When parked at a camping site
• Engage a gear and place chocks against the wheels to prevent the vehicle rolling away.
• Release the handbrake so that it does not freeze.
• Do not lay power cables on the ground as they could freeze to the ground.
• Keep the ground under the vehicle free of ob-structions so that the exhaust from the supplemen-tary heating system can escape.
Ventilation
High humidity levels in the vehicle can be reduced by using a commercially available fan.
Cleaning cupboards, cooker and sink
r-f"'n First read and observe the Introductory L-la.U Information given on page 252.
Cleaning the cupboards
Clean the surfaces of the kitchen unit and cup-boards with commercially available non-abrasive cleaning agents =>
./ Drain the waste water tank.
./ Check the vehicle toolkit.
./ Take a mains cable and cable reel on board so you can use the 230-volt electrical feed.
./ Disconnect the 230-volt electrical feed.
./ Wait out the storm while remaining inside the vehicle.
Additional information:
• Read and observe the information under the in-dex keyword "Winter conditions".
CD
In very cold weather the fresh and waste water systems should be emptied to prevent them from becoming damaged If the vehicle Is not to be kept heated continuously or Is only to be
Page 259 of 486
0 "' <(
"' ::;
oc "' N
The steps should only be carried out In the specified order.
Step Vehicles with a manual gearbox I Vehicles with dual clutch gearbox DSG ®
2a. Shift the gear stick to a neutral position. I Shift the selector lever to position P or N.
3. Only vehicles with diesel engines: to preheat the engine, turn the vehicle key to position 217 G). The indicator lamp mr lights up in the instrument cluster.
4. Turn vehicle key to position 217 ®-do not depress accelerator.
5. Release the vehicle key once the engine has started.
6. If the engine does not start, stop the procedure and repeat it after approximately one minute.
7. Release the handbrake if you wish to pull away =>page 269.
A WARNING
Never leave the engine running if you leave the vehicle unattended, particularly not if a gear or driving mode has been selected. The vehicle could move suddenly or something unexpected may happen that may cause damage, fire or serious injuries.
A WARNING
Start boosters may explode or suddenly cause the engine to run at high revs.
• Never use a start booster.
CD
• The starter and the engine could be dam-aged if you attempt to start the engine while the vehicle Is In motion or if the engine is started again immediately after it has been switched off.
Stopping the engine
CD
• When the engine is cold, avoid high engine speeds, driving at full throttle and overloading the engine.
• Do not push-start or tow-start the vehicle. Unburnt fuel can damage the catalytic convert-er.
&-, Do not warm up the engine by running it W while the vehicle is stationary. Instead, pull off as soon as there is good visibility through the win· dows. This helps the engine to reach operating temperature more quickly and reduces emissions.
m Components with a high power consumption L!:J are switched off temporarily when the engine is started.
m When starting from cold, the engine may be a L!:J little noisy for the first few seconds. This is quite normal, and no cause for concern.
m At outside temperatures of less than L!:J +5oC (+41°F), fumes may be detected under a vehicle with a diesel engine if the fuel-powered supplementary heater is switched on.
The steps should only be carried out In the specified order.
1. The vehicle must be completely stationary => &.
2. Press the brake pedal. Keep it held down until step 4 has been completed.
3. In vehicles with a dual clutch gearbox DSG®, shift selector lever to position P.
4. Apply the handbrake =>page 269.
5. Turn the vehicle key to position =>Fig. 217 @.
6. In vehicles with a manual gearbox, select the first gear or the reverse gear =>page 263. .,.
Starting the engine, changing gear and parking I 259
Page 263 of 486
A WARNING (Continued)
• No additional foot mats or other floor cov-erings should be placed over the fitted foot mat.
• Ensure that no objects can enter the driv-er footwell while the vehicle is in motion.
Manual gearbox: selecting a gear
®
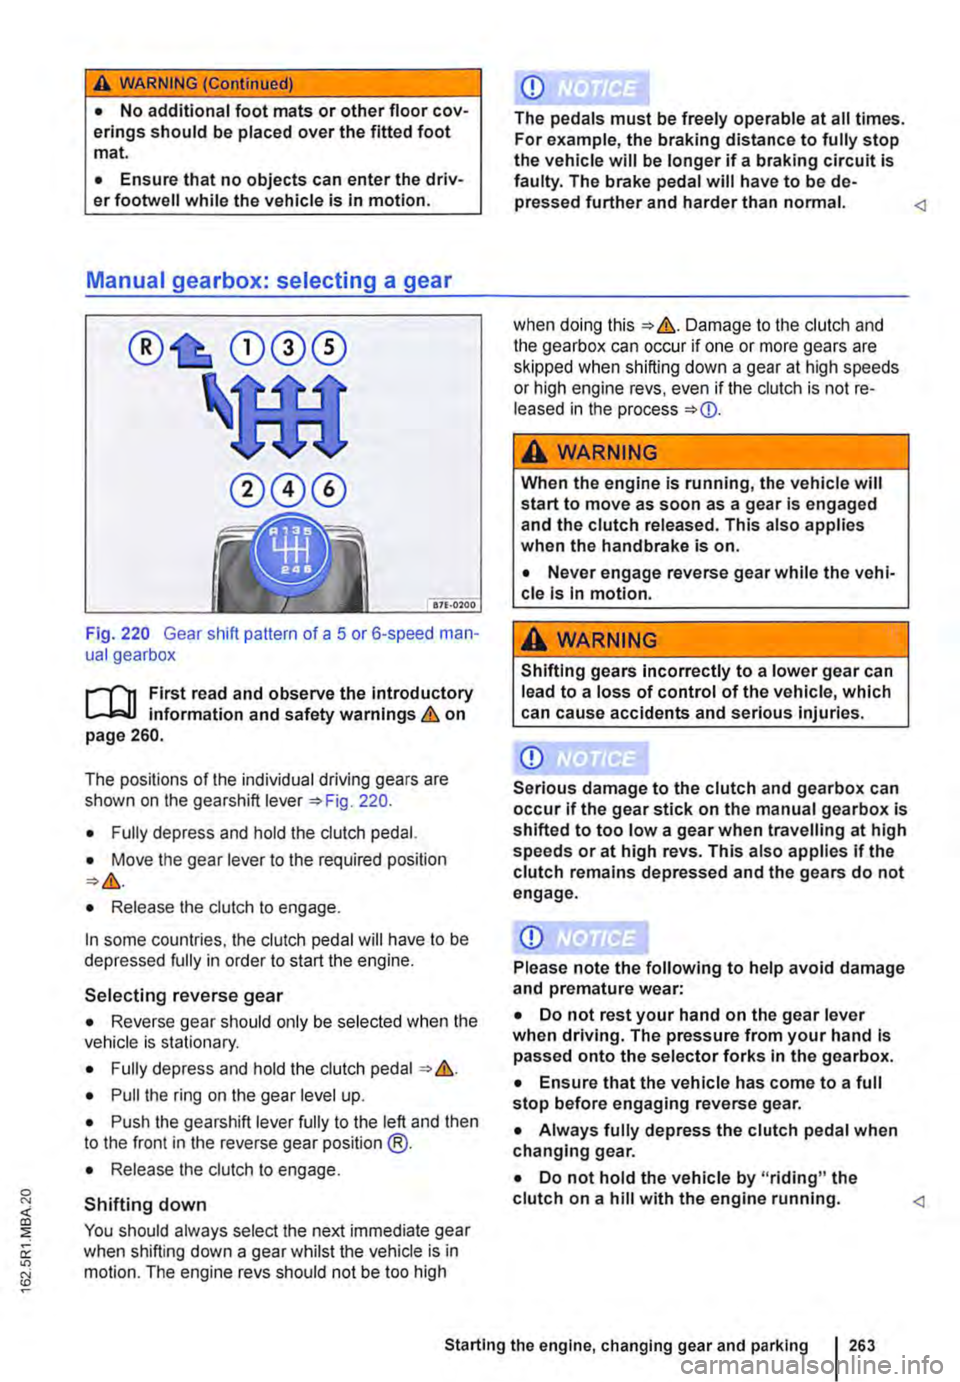
Fig. 220 Gear shift pattern of a 5 or 6-speed man-ual gearbox
r--("n First read and observe the introductory L-J,::.IJ information and safety warnings & on page 260.
The positions of the individual driving gears are shown on the gearshift lever =0oFig. 220.
• Fully depress and hold the clutch pedal.
• Move the gear lever to the required position =0>&.
• Release the clutch to engage.
In some countries, the clutch pedal will have to be depressed fully in order to start the engine.
Selecting reverse gear
• Reverse gear should only be selected when the vehicle is stationary.
• Fully depress and hold the clutch pedal""&.
• Pull the ring on the gear level up.
• Push the gearshift lever fully to the left and then to the front in the reverse gear position @.
• Release the clutch to engage.
Shifting down
You should always select the next immediate gear when shifting down a gear whilst the vehicle is in motion. The engine revs should not be too high
CD
The pedals must be freely operable at all times. For example, the braking distance to fully stop the vehicle will be longer if a braking circuit is faulty. The brake pedal will have to be de-pressed further and harder than normal.
A WARNING
When the engine is running, the vehicle will start to move as soon as a gear is engaged and the clutch released. This also applies when the handbrake is on.
• Never engage reverse gear while the vehi-cle Is In motion.
,&WARNING
Shifting gears incorrectly to a lower gear can lead to a loss of control of the vehicle, which can cause accidents and serious injuries.
CD
Serious damage to the clutch and gearbox can occur if the gear stick on the manual gearbox is shifted to too low a gear when travelling at high speeds or at high revs. This also applies if the clutch remains depressed and the gears do not engage.
CD
Please note the following to help avoid damage and premature wear:
• Do not rest your hand on the gear lever when driving. The pressure from your hand Is passed onto the selector forks in the gearbox.
• Ensure that the vehicle has come to a full stop before engaging reverse gear.
• Always fully depress the clutch pedal when changing gear.
• Do not hold the vehicle by "riding" the clutch on a hill with the engine running.
Page 265 of 486
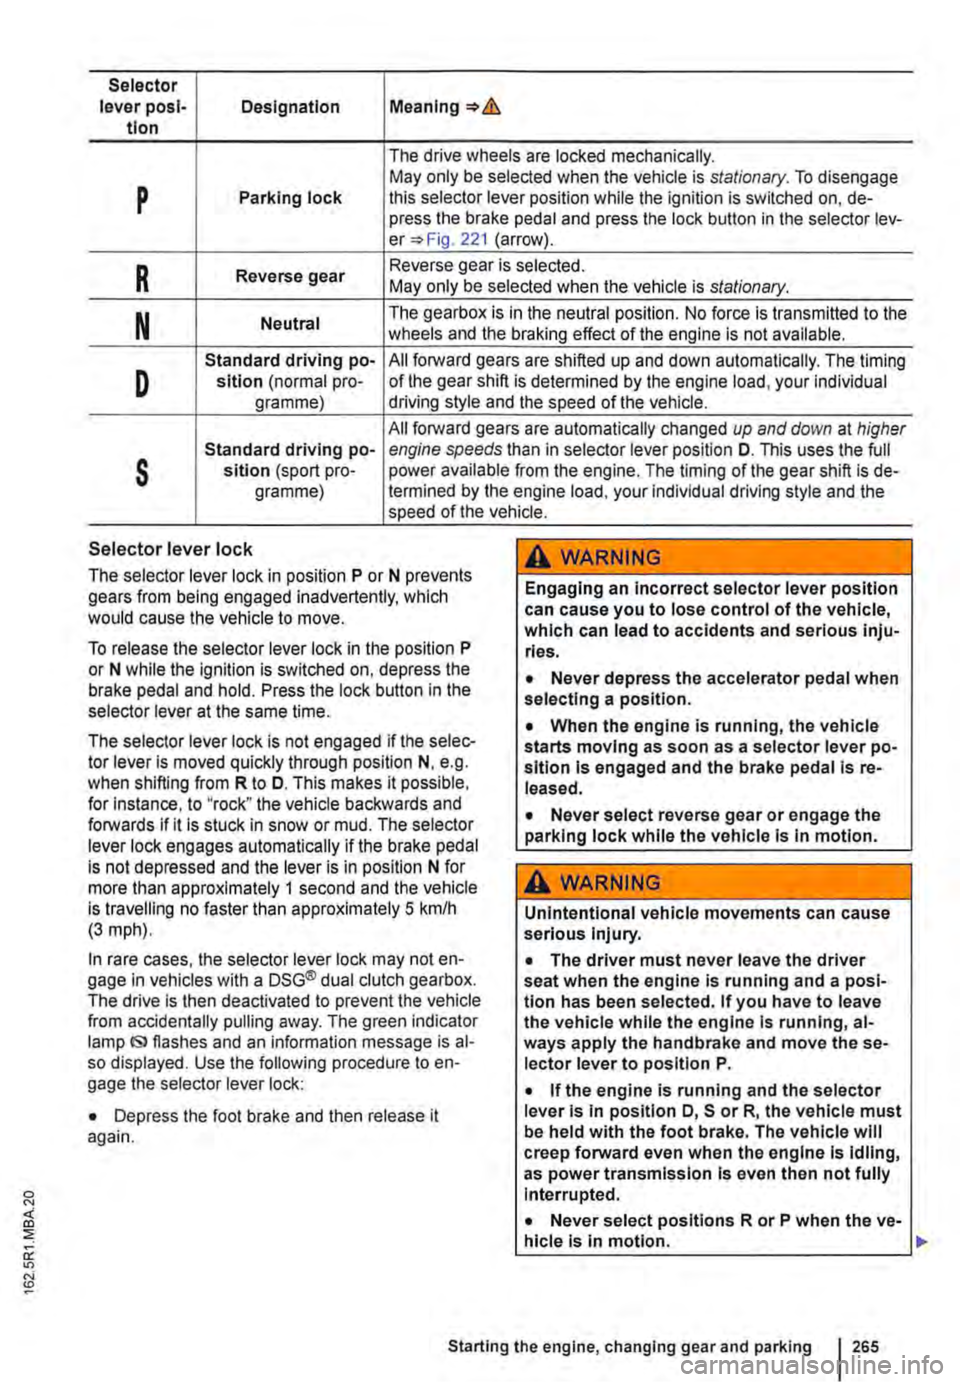
Selector lever posl-Designation Meaning=>& tlon
The drive wheels are locked mechanically.
p May only be selected when the vehicle is stationary. To disengage Parking lock this selector lever position while the ignition is switched on, de-press the brake pedal and press the lock button in the selector lev-er=> Fig. 221 (arrow).
R Reverse gear Reverse gear is selected. May only be selected when the vehicle is stationary.
N Neutral The gearbox is in the neutral position. No force is transmitted to the wheels and the braking effect of the engine is not available.
D
Standard driving po-All forward gears are shifted up and down automatically. The timing sition (normal pro-of the gear shift is determined by the engine load, your individual gramme) driving style and the speed of the vehicle.
All forward gears are automatically changed up and down at higher
s
Standard driving po-engine speeds than in selector lever position D. This uses the full sltlon (sport pro-power available from the engine. The timing of the gear shift is de-gramme) !ermined by the engine load, your individual driving style and the speed of the vehicle.
Selector lever lock
The selector lever lock in position P or N prevents gears from being engaged inadvertently, which would cause the vehicle to move.
To release the selector lever lock in the position P or N while the ignition is switched on, depress the brake pedal and hold. Press the lock button in the selector lever at the same time.
The selector lever lock is not engaged if the selec-tor lever Is moved quickly through position N, e.g. when shifting from R to D. This makes it possible, for Instance, to "rock" the vehicle backwards and forwards if it is stuck in snow or mud. The selector lever lock engages automatically if the brake pedal is not depressed and the lever is in position N for more than approximately 1 second and the vehicle is travelling no faster than approximately 5 km/h (3 mph).
In rare cases, the selector lever lock may not en-gage in vehicles with a DSG® dual clutch gearbox. The drive is then deactivated to prevent the vehicle from accidentally pulling away. The green indicator lamp IS> flashes and an information message is al-so displayed. Use the following procedure to en-gage the selector lever lock:
• Depress the foot brake and then release it again.
,A WARNING
Engaging an incorrect selector lever position can cause you to lose control of the vehicle, which can lead to accidents and serious inju-ries.
• Never depress the accelerator pedal when selecting a position.
• When the engine is running, the vehicle starts moving as soon as a selector lever po-sition is engaged and the brake pedal Is re-leased.
• Never select reverse gear or engage the parking lock while the vehicle Is In motion.
A WARNING
Unintentional vehicle movements can cause serious Injury.
• The driver must never leave the driver seat when the engine is running and a posi-tion has been selected. If you have to leave the vehicle while the engine Is running, al-ways apply the handbrake and move the se-lector lever to position P.
• If the engine is running and the selector lever Is in position D, S or R, the vehicle must be held with the foot brake. The vehicle will creep forward even when the engine Is idling, as power transmission Is even then not fully Interrupted.
• Never select positions R or P when the ve-hicle is In motion.
Starting the engine, changing gear and parking 265