key battery VOLKSWAGEN TRANSPORTER 2018 Owners Manual
[x] Cancel search | Manufacturer: VOLKSWAGEN, Model Year: 2018, Model line: TRANSPORTER, Model: VOLKSWAGEN TRANSPORTER 2018Pages: 486, PDF Size: 69.28 MB
Page 36 of 486
Opening and closing
Vehicle key set
COl Introduction
This chapter contains information on the following subjects:
Vehicle key . . . . . . . . . . . . . . . . . . . . . . . . . . . . . 37 Indicator lamp in the remote control key . . . . . 38 Replacing the battery . . . . . . . . . . . . . 38 Synchronising the remote control key . . . . . . . 39
Additional Information and warnings:
• Settings in the Volkswagen information system 24
• Central locking system 39
• Starting and stopping the engine 257
• Consumer information 404
• Manual opening and closing 413
A DANGER .
Swallowing batteries with a diameter of 20 mm or other lithium batteries can result In severe or even fatal injuries within a very short period of time.
• Always keep the vehicle key, key ring with batteries, spare batteries, round cells and other batteries that are larger than 20 mm out of the reach of children.
• Call for medical help Immediately you sus-pect that someone has swallowed a battery.
36 Before tho journey
A WARNING
Careless or unsupervised use of the vehicle key can lead to accidents or injuries.
• Always take all vehicle keys with you ev-ery time you leave the vehicle. Children or third parties could lock the doors and tail-gate, start the engine or switch on the igni-tion and thus operate electrical equipment, such as the electric windows.
• Never leave children or people requiring assistance alone In the vehicle. They could become trapped In the vehicle in an emergen-cy and may not be able to get themselves to safety. For example, locked vehicles may be subjected to very high or very low tempera-tures, according to season. This can cause serious Injuries and Illness or fatalities, espe-cially for small children.
A WARNING
Improper use of the vehicle key could lead to the engine being switched off and the steer-Ing lock engaging, which would render the vehicle unsteerable.
• Never remove the vehicle key from the Ig-nition lock when the vehicle Is In motion.
• When folding out the key bit, ensure that lt Is folded out completely and engaged fully.
• Never attach heavy objects to the vehicle key. Attach only light objects, If at all, such as a key fob with up to five house keys. <
Page 37 of 486
Vehicle key
B D E
B7E:c2Ja
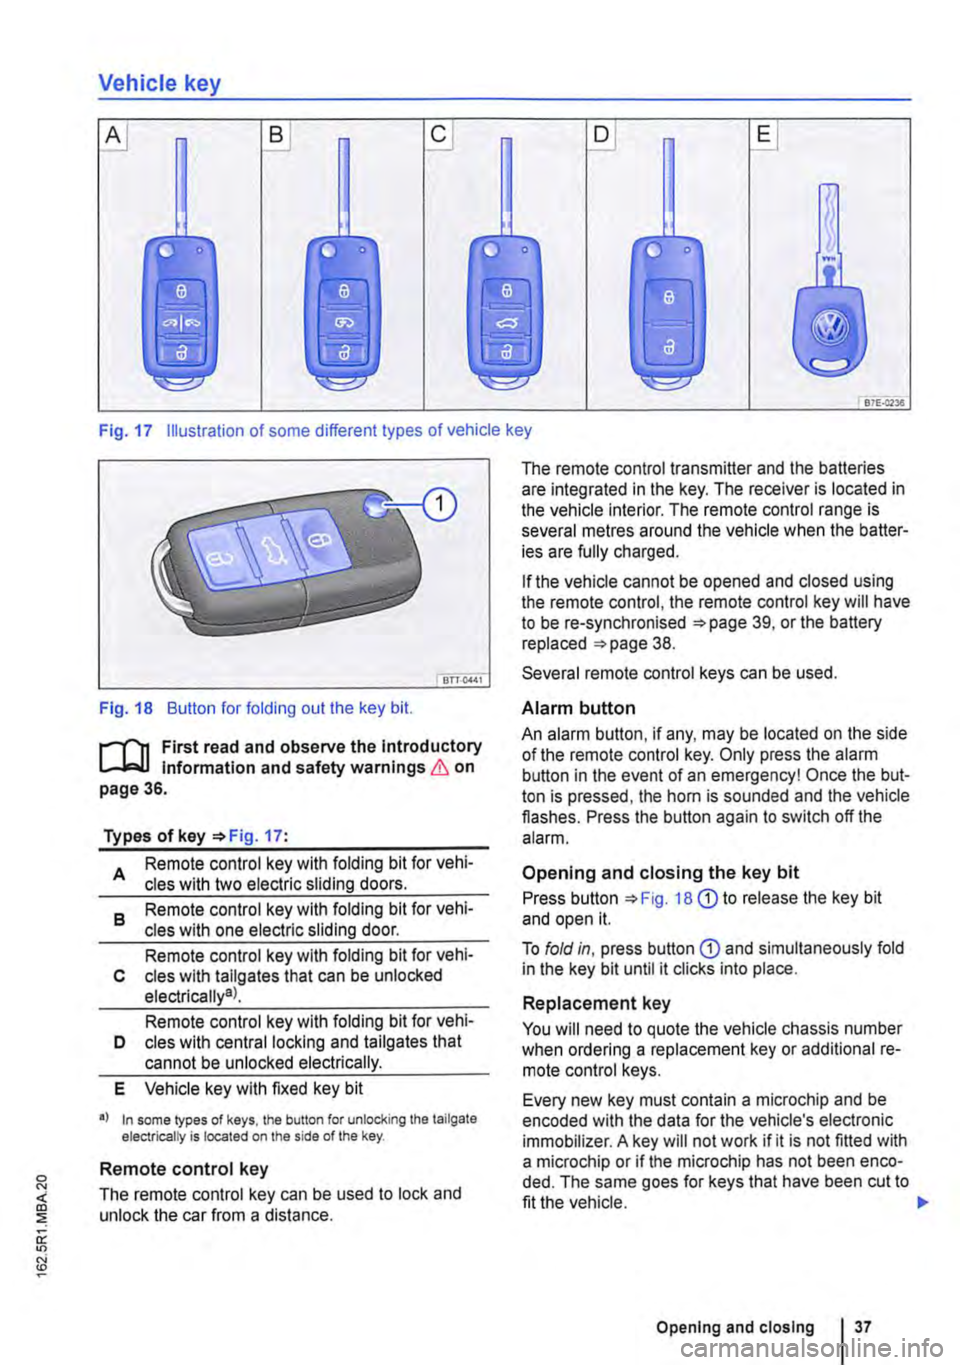
Fig. 17 Illustration of some different types of vehicle key
Fig. 18 Button for folding out the key bit.
r-('n First read and observe the Introductory L-J,..lJ Information and safety warnings & on page 36.
Types of key '*Fig. 17:
A Remote control key with folding bit for vehi-cles with two electric sliding doors.
8 Remote control key with folding bit for vehi-cles with one electric sliding door.
Remote control key with folding bit for vehi-c cles with tallgates that can be unlocked electrically9l.
Remote control key with folding bit for vehi-D cles with central locking and tailgates that cannot be unlocked electrically.
E Vehicle key with fixed key bit
•I In some lypes of keys, lhe button for unlocking the tailgate electrically is located on the side of the key.
Remote control key
The remote control key can be used to lock and unlock the car from a distance.
The remote control transmitter and the batteries are integrated in the key. The receiver is located in the vehicle interior. The remote control range is several metres around the vehicle when the batter-ies are fully charged.
If the vehicle cannot be opened and closed using the remote control, the remote control key will have to be re-synchronised '*page 39, or the battery replaced '*page 38.
Several remote control keys can be used.
Alarm button
An alarm button, if any, may be located on the side of the remote control key. Only press the alarm button in the event of an emergency! Once the but-ton is pressed, the horn is sounded and the vehicle flashes. Press the button again to switch off the alarm.
Opening and closing the key bit
Press button '*Fig. 18 G) to release the key bit and open it.
To fold in, press button G) and simultaneously fold in the key bit until it clicks into place.
Replacement key
You will need to quote the vehicle chassis number when ordering a replacement key or additional re-mote control keys.
Every new key must contain a microchip and be encoded with the data for the vehicle's electronic immobilizer. A key will not work if it is not fitted with a microchip or if the microchip has not been enco-ded. The same goes for keys that have been cut to fit the vehicle.
Opening and closing I 37
Page 38 of 486
New keys or replacement keys are available from Volkswagen Commercial Vehicle dealerships or from qualified workshops and authorised key serv-ices which are qualified to manufacture these vehi-cle keys.
New and replacement keys need to be synchron-ised before use =:-page 39.
CD
Every vehicle key contains electronic compo-nents. Protect the key from damage, moisture and excessive vibration.
m Press the buttons on the remote control key W only if the corresponding function is actually needed. Pressing a button when the function is not
required could lead to the vehicle being unlocked unintentionally or the alarm going off. This also ap-plies even when you are not within the effective range.
m The function of the remote control key can be W affected temporarily if there is more than one transmitter in the direct vicinity working on the same frequency (e.g. a mo-way radio or mobile telephone).
m Obstacles bemeen the remote control and W the vehicle, bad weather conditions and weak batteries can reduce the range of the remote con-trol.
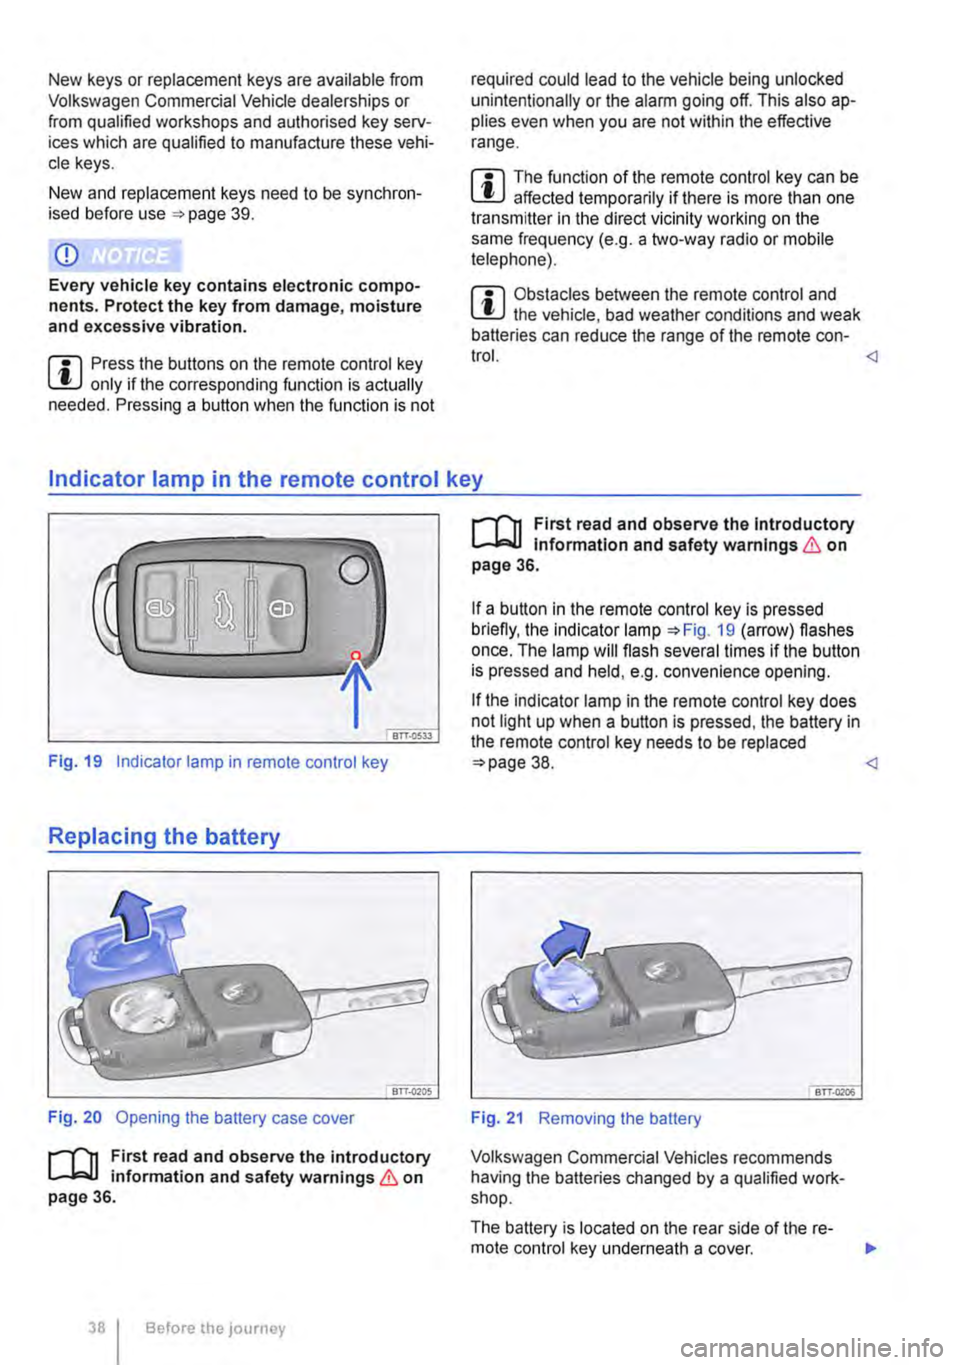
Fig. 19 Indicator lamp in remote control key
Replacing the battery
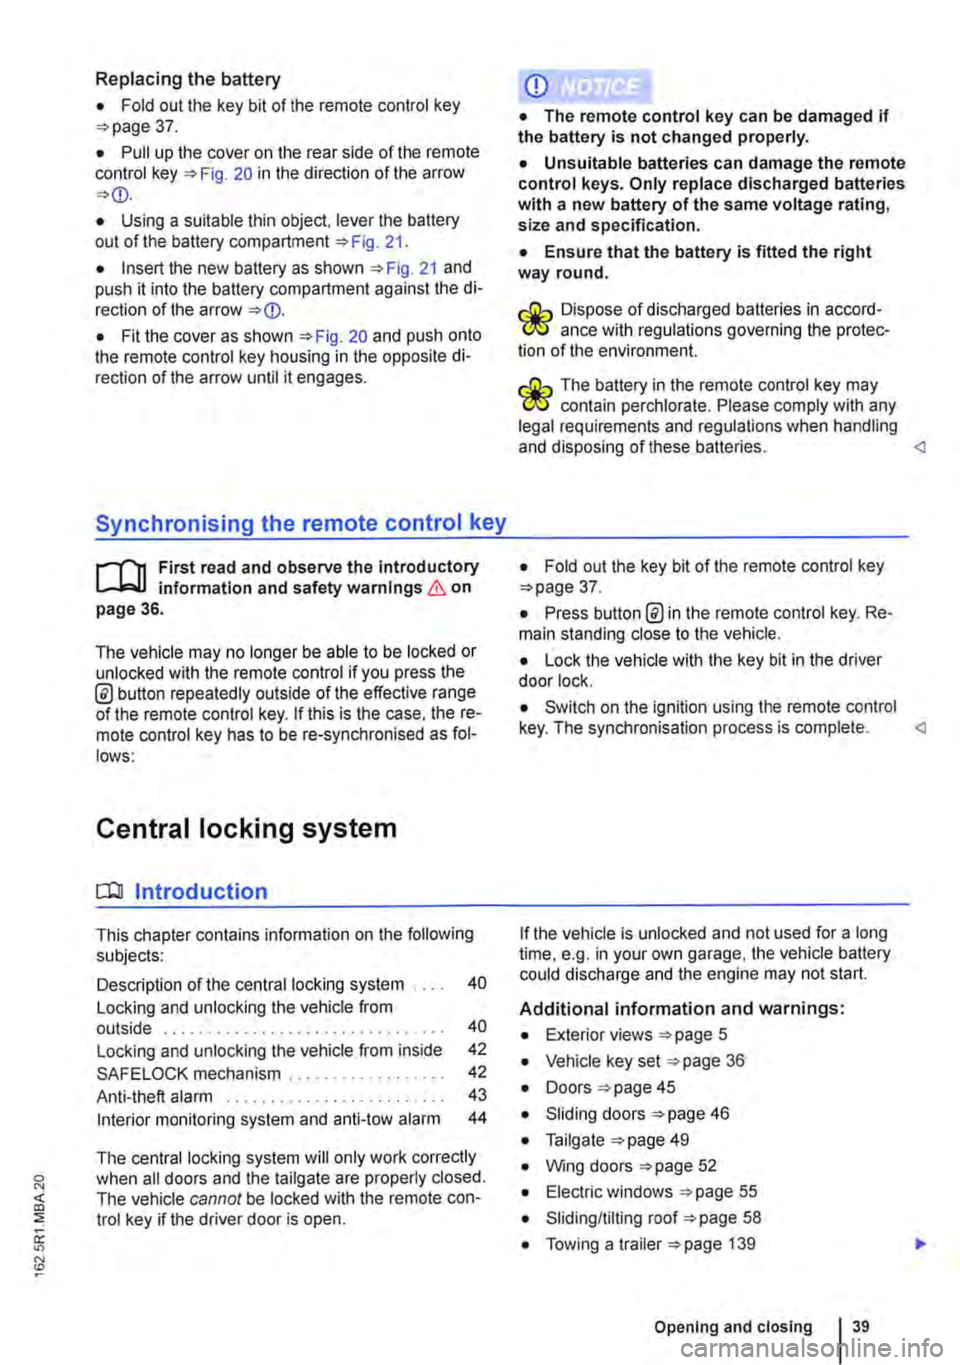
Fig. 20 Opening the battery case cover
r--('n First read and observe the introductory 1..-J=.U information and safety warnings & on page 36.
38 I Before the JOUrney
r--('n First read and observe the Introductory 1..-J=.U Information and safety warnings & on page 36.
If a button in the remote control key is pressed briefly, the indicator lamp =:-Fig. 19 (arrow) flashes once. The lamp will flash several times if the button is pressed and held, e.g. convenience opening.
If the indicator lamp in the remote control key does not light up when a button is pressed, the battery in the remote control key needs to be replaced =:>page 38.
Volkswagen Commercial Vehicles recommends having the batteries changed by a qualified work-shop.
The battery is located on the rear side of the re-mote control key underneath a cover. ..,.
Page 39 of 486
Replacing the battery
• Fold out the key bit of the remote control key =>page 37.
• Pull up the cover on the rear side of the remote control key =>Fig. 20 in the direction of the arrow =>
• Insert the new battery as shown =>Fig. 21 and push it into the battery compartment against the di-rection of the arrow =>
Synchronising the remote control key
,--m First read and observe the introductory L-.lo:.ll information and safety warnings & on page 36.
The vehicle may no longer be able to be locked or unlocked with the remote control if you press the @ button repeatedly outside of the effective range of the remote control key. If this is the case. the re-mote control key has to be re-synchronised as fol-lows:
Central locking system
CQ Introduction
This chapter contains information on the following subjects:
Description of the central locking system . . . . 40
Locking and unlocking the vehicle from outside . . . . . . . . . . . . . . . . . . . . . . . . . . . . . . . . 40
Locking and unlocking the vehicle from inside
SAFELOCK mechanism ................. .
Anti-theft alarm ........................ .
Interior monitoring system and anti-tow alarm
42
42
43
44
The central locking system will only work correctly when all doors and the tailgate are properly closed. The vehicle cannot be locked with the remote con-trol key if the driver door is open.
CD
• The remote control key can be damaged if the battery is not changed properly.
• Unsuitable batteries can damage the remote control keys. Only replace discharged batteries with a new battery of the same voltage rating, size and specification.
• Ensure that the battery Is fitted the right way round.
r:lib Dispose of discharged batteries in accord-W ance with regulations governing the protec-tion of the environment.
r:lib The battery in the remote control key may W contain perchlorate. Please comply with any legal requirements and regulations when handling and disposing of these batteries.
• Press button @in the remote control key. Re-main standing close to the vehicle.
• Lock the vehicle with the key bit in the driver door lock.
• Switch on the ignition using the remote control key. The synchronisation process is complete.
Additional information and warnings:
• Exterior views =>page 5
• Vehicle key set =>page 36
• Doors => page 45
• Sliding doors =>page 46
• Tailgate =>page 49
• Wing doors =>page 52
• Electric windows =>page 55
• Sliding/tilting roof =>page 58
• Towing a trailer =>page 139
Opening and closing 39
Page 41 of 486
ro First read and observe the Introductory Information and safety warnings & on page 39.
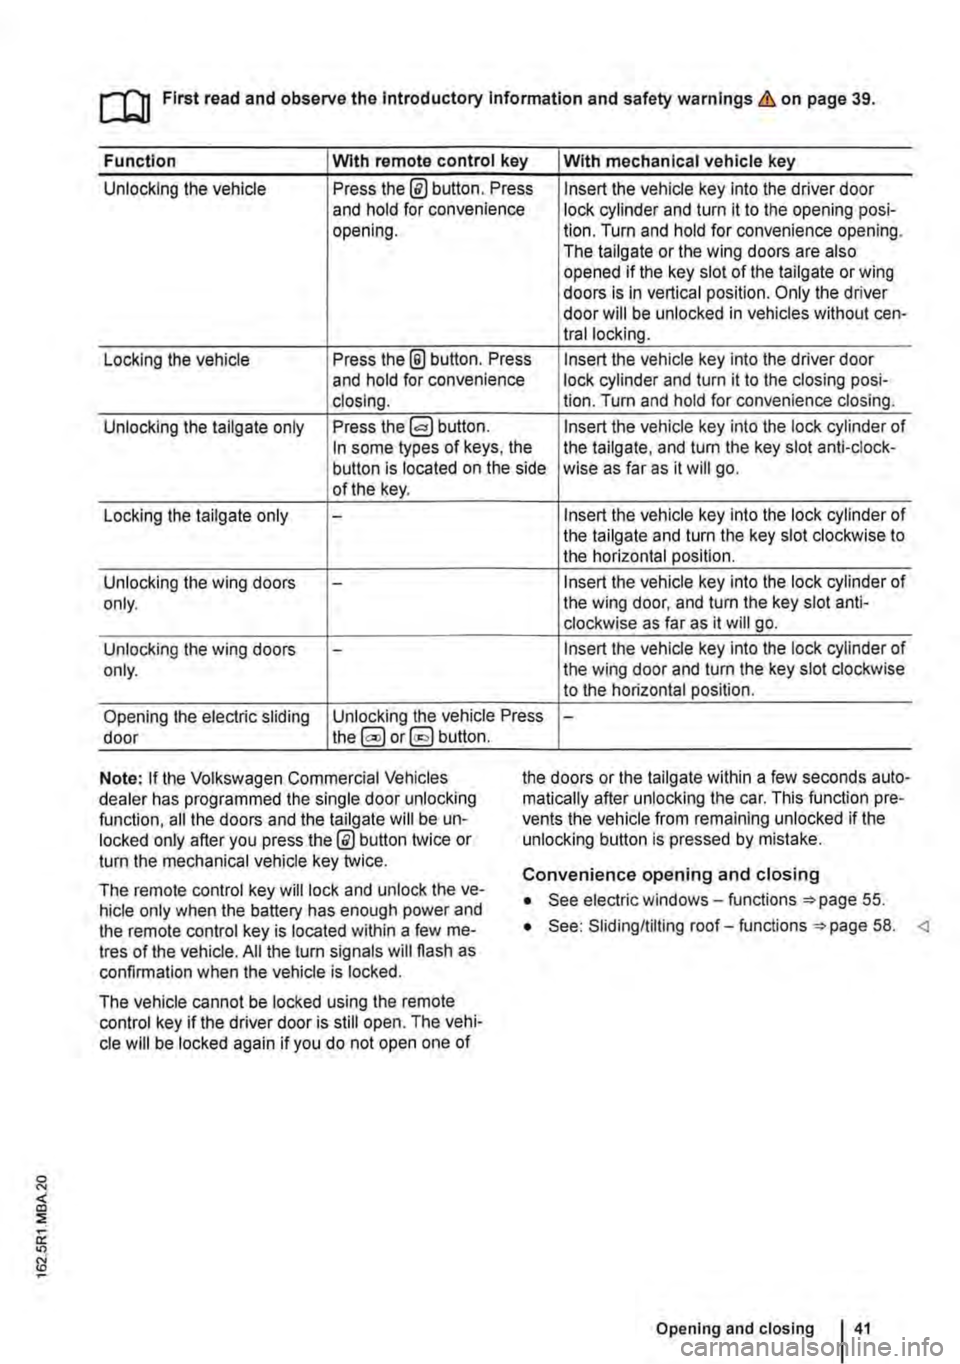
Function Wlth remote control key With mechanical vehicle key
Unlocking the vehicle Press the@ button. Press Insert the vehicle key into the driver door and hold for convenience lock cylinder and turn it to the opening posi-opening. lion. Turn and hold for convenience opening. The tailgate or the wing doors are also opened if the key slot of the tailgate or wing doors is in vertical position. Only the driver door will be unlocked in vehicles without cen-trallocking.
Locking the vehicle Press the @ button. Press Insert the vehicle key into the driver door and hold for convenience lock cylinder and turn it to the closing posi-closing. lion. Turn and hold for convenience closing.
Unlocking the tailgate only Press the Insert the vehicle key into the lock cylinder of In some types of keys, the the tailgate, and turn the key slot anti-clock-button is located on the side wise as far as it will go. of the key.
Locking the tailgate only -Insert the vehicle key into the lock cylinder of the tailgate and turn the key slot clockwise to the horizontal position.
Unlocking the wing doors -Insert the vehicle key into the lock cylinder of only. the wing door, and turn the key slot anti-clockwise as far as it will go.
Unlocking the wing doors -Insert the vehicle key into the lock cylinder of only. the wing door and turn the key slot clockwise to the horizontal position.
Opening the electric sliding Unlocking the vehicle Press -door the@ or§] button.
Note: If the Volkswagen Commercial Vehicles dealer has programmed the single door unlocking function, all the doors and the tailgate will be un-locked only after you press the @ button twice or turn the mechanical vehicle key twice.
the doors or the tailgate within a few seconds auto-matically after unlocking the car. This function pre-vents the vehicle from remaining unlocked if the unlocking button is pressed by mistake.
The remote control key will lock and unlock the ve-hicle only when the battery has enough power and the remote control key is located within a few me-tres of the vehicle. All the turn signals will flash as confirmation when the vehicle is locked.
The vehicle cannot be locked using the remote control key if the driver door is still open. The vehi-cle will be locked again if you do not open one of
Convenience opening and closing
• See electric windows-functions 55.
• See: Sliding/tilting roof-functions =:>page 58.
Page 43 of 486
• If the SAFELOCK mechanism has been activa-ted using the remote control key: the anti-theft alarm is active.
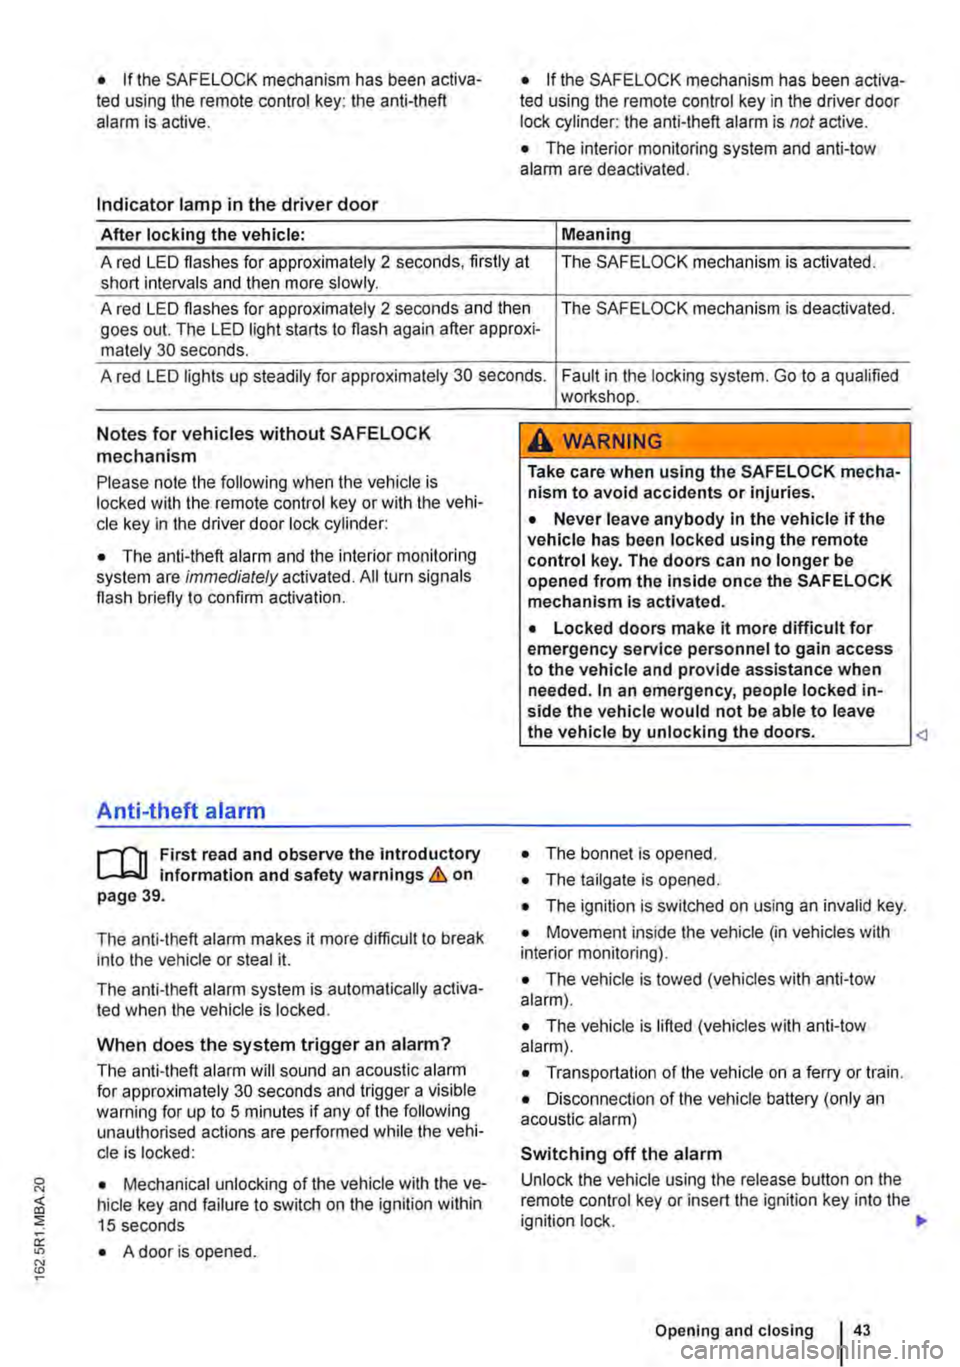
Indicator lamp in the driver door
After locking the vehicle:
• If the SAFELOCK mechanism has been activa-ted using the remote control key in the driver door lock cylinder: the anti-theft alarm is not active.
• The interior monitoring system and anti-tow alarm are deactivated.
Meaning
A red LED flashes for approximately 2 seconds, firstly at short inteNals and then more slowly. The SAFELOCK mechanism is activated.
A red LED flashes for approximately 2 seconds and then goes out. The LED light starts to flash again after approxi-mately 30 seconds.
The SAFELOCK mechanism is deactivated.
A red LED lights up steadily for approximately 30 seconds. Fault in the locking system. Go to a qualified workshop.
Notes for vehicles without SAFELOCK
mechanism
Please note the following when the vehicle is locked with the remote control key or with the vehi-cle key in the driver door lock cylinder:
• The anti-theft alarm and the interior monitoring system are immediately activated. All turn signals flash briefly to confirm activation.
Anti-theft alarm
rflt First read and observe the introductory 1..-.L::.U information and safety warnings & on page 39.
The anti-theft alarm makes it more difficult to break into the vehicle or steal it.
The anti-theft alarm system is automatically activa-ted when the vehicle is locked.
When does the system trigger an alarm?
The anti-theft alarm will sound an acoustic alarm for approximately 30 seconds and trigger a visible warning for up to 5 minutes if any of the following unauthorised actions are performed while the vehi-cle is locked:
• Mechanical unlocking of the vehicle with the ve-hicle key and failure to switch on the ignition within 15 seconds
• A door is opened.
A WARNING
Take care when using the SAFELOCK mecha-nism to avoid accidents or injuries.
• Never leave anybody in the vehicle if the vehicle has been locked using the remote control key. The doors can no longer be opened from the inside once the SAFELOCK mechanism is activated.
• Locked doors make it more difficult for emergency service personnel to gain access to the vehicle and provide assistance when needed. In an emergency, people locked in-side the vehicle would not be able to leave the vehicle by unlocking the doors.
• The tailgate is opened.
• The ignition is switched on using an invalid key.
• Movement inside the vehicle (in vehicles with interior monitoring).
• The vehicle is towed (vehicles with anti-tow alarm).
• The vehicle is lifted (vehicles with anti-tow alarm).
• Transportation of the vehicle on a ferry or train.
• Disconnection of the vehicle battery (only an acoustic alarm)
Switching off the alarm
Unlock the vehicle using the release button on the remote control key or insert the ignition key into the ignition lock. 11>-
Opening and closing 43
Page 44 of 486
m Due to the current legislation on the Israel W market, the acoustic warning signals are de-activated there.
m The alarm will be triggered again if a person W gains access to the same or a different se-cured zone after the alarm has been switched off. For example, if the tailgate is opened after a door had been opened.
m The anti-theft alarm will not be activated if W the vehicle is locked from the Inside using the central locking button @.
m If you unlock the driver door mechanically us-L!J ing the vehicle key, only the driver door is un-locked, and not the whole vehicle. The SAFELOCK mechanism on all doors is not deactivated and the central locking button is not activated until you switch on the ignition (however the doors will not be unlocked).
m The anti-theft alarm will not function correctly W if the vehicle battery is weak or discharged.
m lt is not possible to include the trailer in the W anti-theft alarm system.
81f·01U
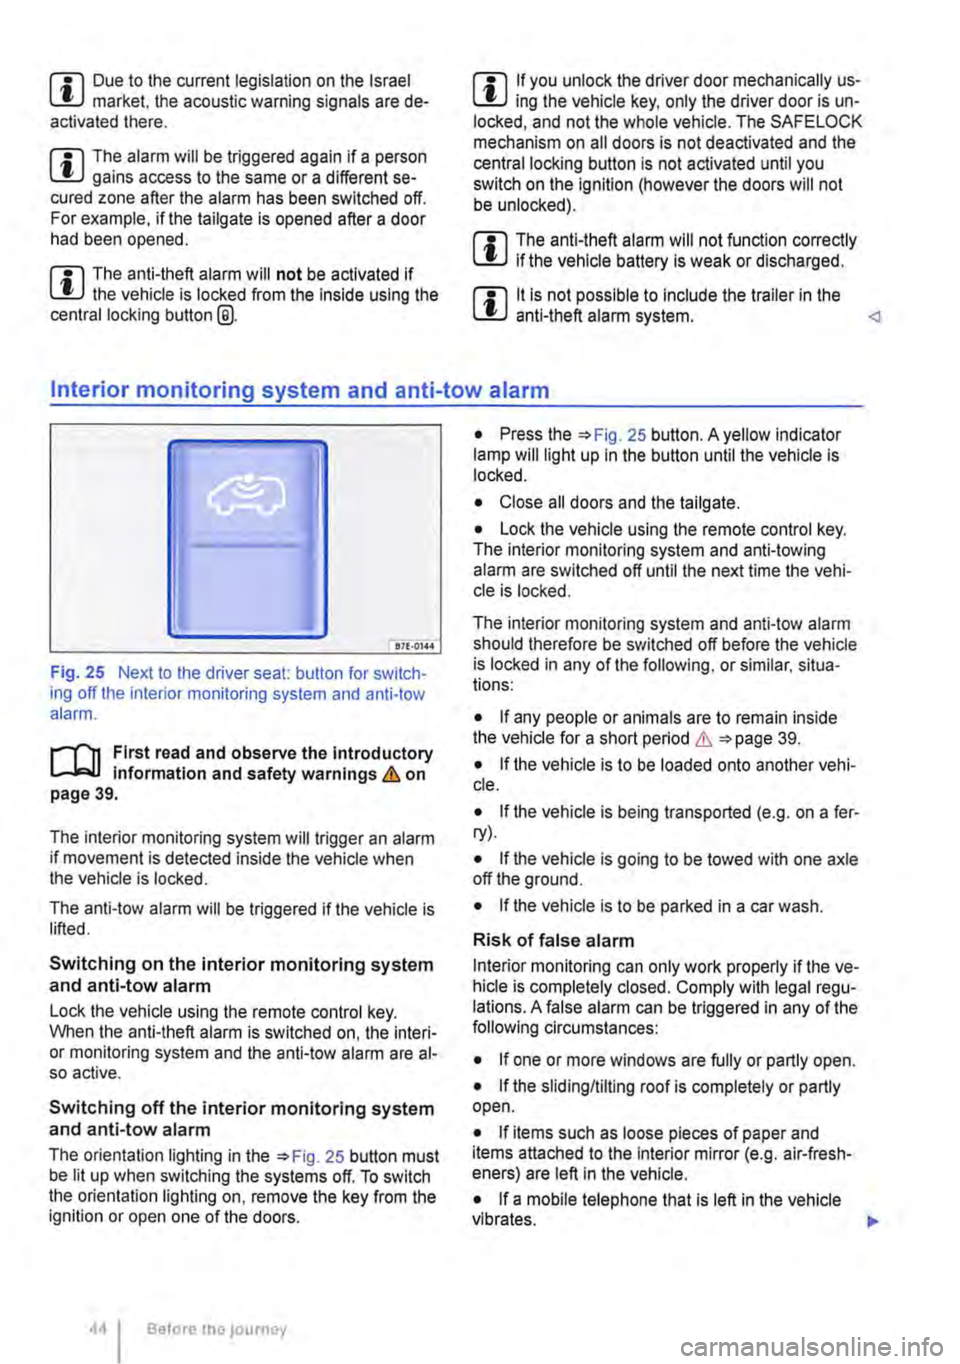
Fig. 25 Next to the driver seat: button for switch-ing off the interior monitoring system and anti-tow alarm.
r-f"n First read and observe the introductory information and safety warnings & on page 39.
The interior monitoring system will trigger an alarm if movement is detected inside the vehicle when the vehicle is locked.
The anti-tow alarm will be triggered if the vehicle is lifted.
Switching on the interior monitoring system and anti-tow alarm
Lock the vehicle using the remote control key. When the anti-theft alarm is switched on, the interi-or monitoring system and the anti-tow alarm are al-so active.
Switching off the interior monitoring system and anti-tow alarm
The orientation lighting in the =>Fig. 25 button must be lit up when switching the systems off. To switch the orientation lighting on, remove the key from the ignition or open one of the doors.
Before the journey
• Press the =>Fig. 25 button. A yellow indicator lamp will light up in the button until the vehicle is locked.
• Close all doors and the tailgate.
• Lock the vehicle using the remote control key. The interior monitoring system and anti-towing alarm are switched off until the next time the vehi-cle is locked.
The interior monitoring system and anti-tow alarm should therefore be switched off before the vehicle is locked in any of the following, or similar, situa-tions:
• If any people or animals are to remain inside the vehicle for a short period & =>page 39.
• If the vehicle is to be loaded onto another vehi-cle.
• If the vehicle is being transported (e.g. on a fer-ry).
• If the vehicle is going to be towed with one axle off the ground.
• If the vehicle is to be parked in a car wash.
Risk of false alarm
Interior monitoring can only work properly if the ve-hicle is completely closed. Comply with legal regu-lations. A false alarm can be triggered in any of the following circumstances:
• If one or more windows are fully or partly open.
• If the slidingflilting roof is completely or partly open.
• If items such as loose pieces of paper and items attached to the Interior mirror (e.g. air-fresh-eners) are left in the vehicle.
• If a mobile telephone that is left in the vehicle vibrates. 11>-
Page 56 of 486
A WARNING
Always take care when using the mechanical or electric windows otherwise you could cause serious accidents or injuries.
• Windows should only be opened or closed when you are sure that nobody is In their op-erating area.
• Never leave children or people requiring assistance alone in the vehicle when the ve-hicle is locked. Electric windows can no lon-ger be opened in an emergency.
A WARNING (Continued)
• Always take all vehicle keys with you ev-ery time you leave the vehicle. The electric windows can still be operated using the but-tons several minutes after the ignition has been switched off, provided the driver door and the front passenger door are not opened.
CD
During sudden rain showers, water can enter the vehicle interior via open windows and cause damage to the vehicle.
'----------------: BSG-0031
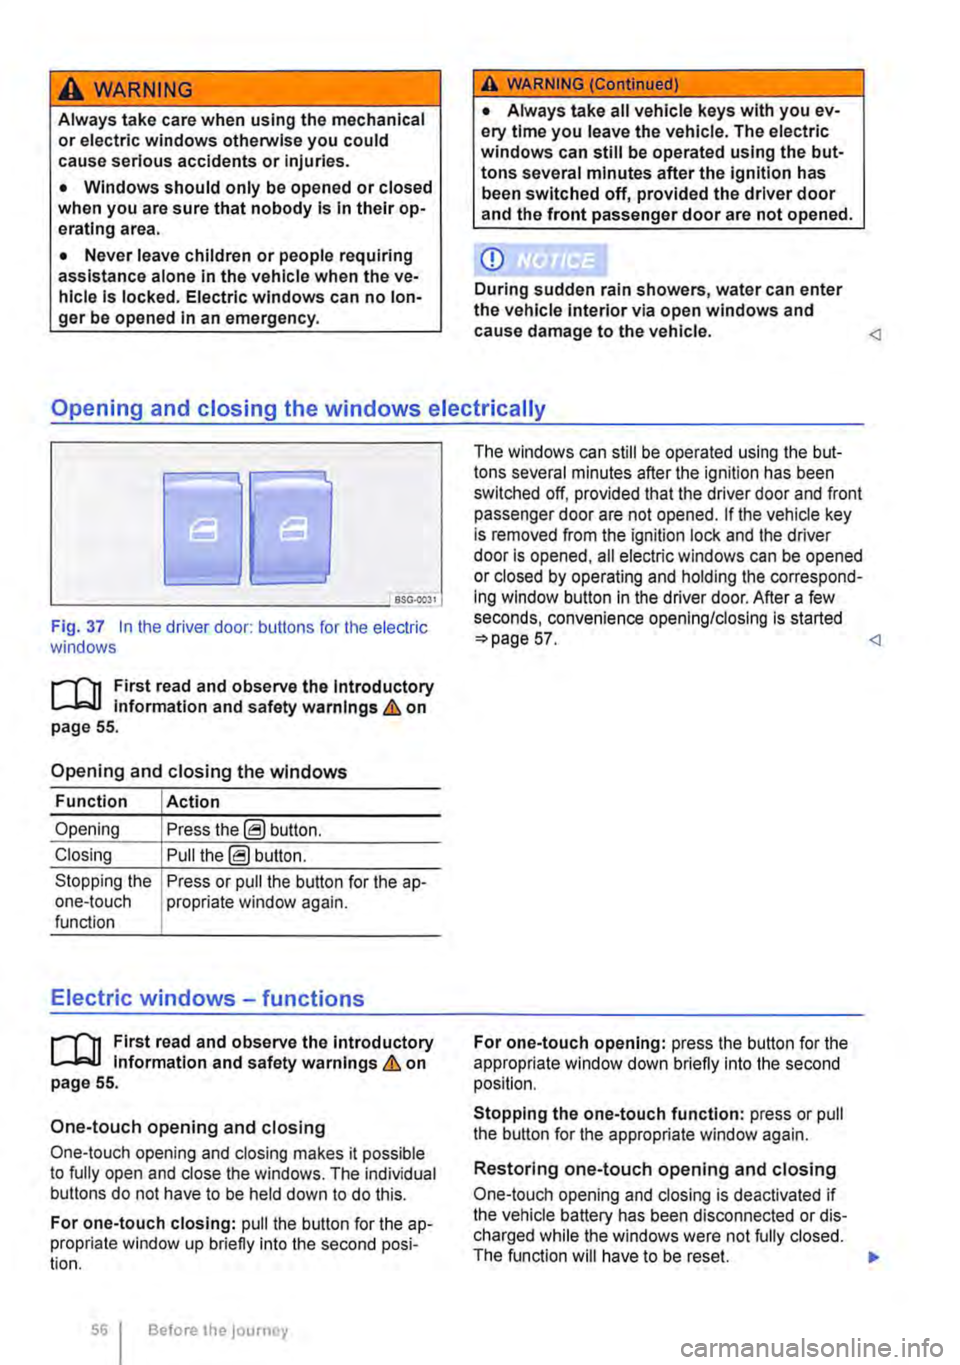
Fig. 37 In the driver door: butlons for the electric windows
r-111 First read and observe the Introductory L-J,::.JJ information and safety warnings & on page 55.
Opening and closing the windows
Function Action
Opening Press the@ button.
Closing Pull the@ button.
Stopping the Press or pull the button for the a p-one-touch propriate window again. function
Electric windows -functions
r-111 First read and observe the introductory L-J,::.JJ information and safety warnings & on page 55.
One-touch opening and closing
One-touch opening and closing makes it possible to fully open and close the windows. The individual buttons do not have to be held down to do this.
For one-touch closing: pull the butlon for the ap-propriate window up briefly into the second posi-tion.
56 Before the journey
The windows can still be operated using lhe but-tons several minutes after the ignition has been switched off, provided that the driver door and front passenger door are not opened. If the vehicle key is removed from the ignition lock and lhe driver door Is opened, all electric windows can be opened or closed by operating and holding lhe correspond-ing window button in the driver door. After a few seconds, convenience opening/closing is started 57.
Stopping the one-touch function: press or pull the button for the appropriate window again.
Restoring one-touch opening and closing
One-touch opening and closing is deactivated if the vehicle battery has been disconnected or dis-charged while the windows were not fully closed. The function will have to be reset.
Page 109 of 486
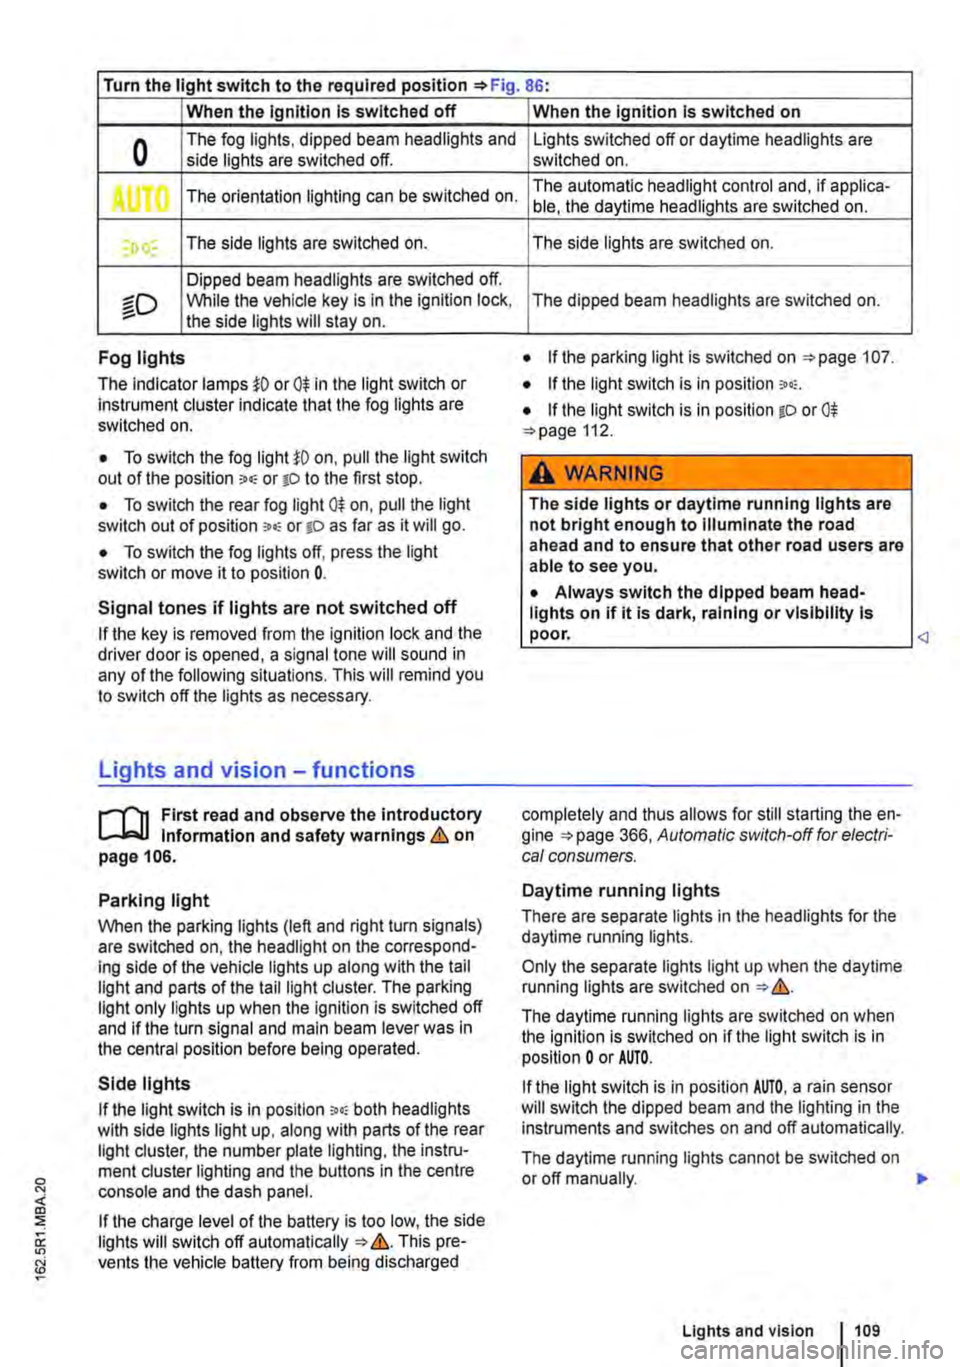
Turn the light switch to the required position 86:
When the Ignition Is switched off
0 The fog lights, dipped beam headlights and side lights are switched off.
,. The orientation lighting can be switched on.
) , The side lights are switched on.
Dipped beam headlights are switched off.
"'D While the vehicle key is in lhe ignition lock, the side lights will stay on.
Fog lights
The indicator lamps or 0$ in the light switch or Instrument cluster indicate that the fog lights are switched on.
• To switch the fog light on, pull the light switch out of the position "" or tD to the first stop.
• To switch the rear fog light 0$ on, pull the light switch out of position ,.,, or gD as far as it will go.
• To switch the fog lights off, press the light switch or move it to position 0.
Signal tones if lights are not switched off
If the key is removed from the ignition lock and the driver door is opened, a signal tone will sound in any of the following situations. This will remind you to switch off the lights as necessary.
Lights and vision -functions
1""1'11 First read and observe the introductory L-lo:.U Information and safety warnings & on page 106.
Parking light
When the parking lights (left and right turn signals) are switched on, the headlight on the correspond-ing side of the vehicle lights up along with the tail light and parts of the tail light cluster. The parking light only lights up when the Ignition is switched off and if the turn signal and main beam lever was in the central position before being operated.
Side lights
If the light switch is in position ;.o; both headlights with side lights light up, along with parts of the rear light cluster, the number plate lighting, the instru-ment cluster lighting and the buttons in the centre console and the dash panel.
If the charge level of the battery is too low, the side lights will switch off automatically &. This pre-vents the vehicle battery from being discharged
When the Ignition Is switched on
Lights switched off or daytime headlights are switched on.
The automatic headlight control and, if applica-ble, the daytime headlights are switched on.
The side lights are switched on.
The dipped beam headlights are switched on.
• If the parking light is switched on 107.
• If the light switch is in position '"'·
• If the light switch is in position iD or 0$ 112.
A WARNING
The side lights or daytime running lights are not bright enough to Illuminate the road ahead and to ensure that other road users are able to see you.
• Always switch the dipped beam head-lights on if it is dark, raining or visibility Is
completely and thus allows for still starting the en-gine 366, Automatic switch-off for electri-cal consumers.
Daytime running lights
There are separate lights in the headlights for the daytime running lights.
Only the separate lights light up when the daytime running lights are switched on &.
The daytime running lights are switched on when the ignition is switched on if the light switch is in position 0 or AUTO.
If the light switch is in position AUTO, a rain sensor will switch the dipped beam and the lighting in the instruments and switches on and off automatically.
The daytime running lights cannot be switched on or off manually. ,._
Lights and vision 1109
Page 114 of 486
Interior and reading lights
0 ( )
ITT·0116
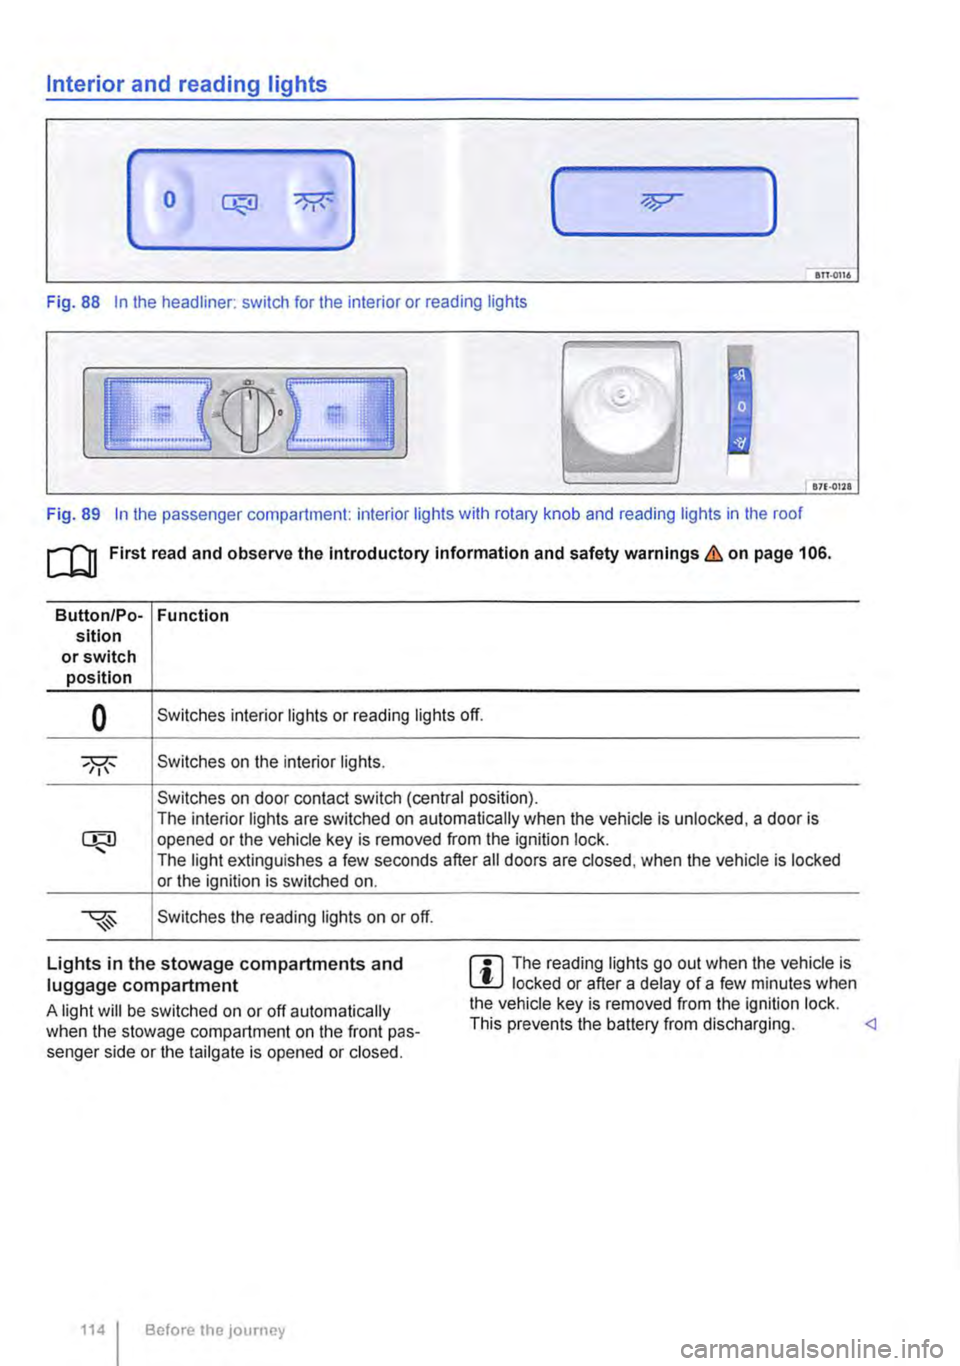
Fig. 88 In the headliner: switch for the interior or reading lights
871·01ll
Fig. 89 In the passenger compartment: interior lights with rotary knob and reading lights in the roof
[Q] First read and observe the Introductory information and safety warnings&. on page 106.
Button/Po-Function sition or switch position
0 Switches interior lights or reading lights off.
Switches on the interior lights.
Switches on door contact switch (central position). The interior lights are switched on automatically when the vehicle is unlocked, a door is opened or the vehicle key is removed from the ignition lock. The light extinguishes a few seconds after all doors are closed, when the vehicle is locked or the ignition is switched on.
Switches the reading lights on or off.
Lights in the stowage compartments and luggage compartment
A light will be switched on or off automatically when the stowage compartment on the front pas-senger side or the tailgate is opened or closed.
1141 Before the journey
m The reading lights go out when the vehicle is W locked or after a delay of a few minutes when the vehicle key is removed from the ignition lock. This prevents the battery from discharging.