rear lid light VOLKSWAGEN TRANSPORTER 2018 Owners Manual
[x] Cancel search | Manufacturer: VOLKSWAGEN, Model Year: 2018, Model line: TRANSPORTER, Model: VOLKSWAGEN TRANSPORTER 2018Pages: 486, PDF Size: 69.28 MB
Page 2 of 486
Table of Contents
About this owner's manual . . . . . . 4
Overview of the vehicle . . . . . . . . . . 5
Exterior views
-Side view . . . . . . . . . . . . . . . . . . . . . . . . . . . . 5
-Front view . . . . . . . . . . . . . . . . . . . . . . . . . . . 6
-Rear view (vehicles with tailgate) . . . . . 7
-Rear view (vehicles with wing doors) 8
Vehicle interior
-Overview of the driver door . . . . . . . . . . . 9
-Overview of the driver side . . . . . . . . . . . 10
-Overview of the centre console . . 12
-Overview of the front passenger side . . . 14
-Headliner . . . . . . . . . . . . . . . . . . . . 15
Instrument cluster
-Warning and indicator lamps . . . . . . . . . . 16
-Instruments . . . . . . . . . . . . . . . . . . . . . . . . . . 19
-Volkswagen information system . . . . . . . . 24
Before the journey . . . . . . . . . . . . . . . . 33
Before setting off
-Driving tips . . . . . . . . . . . . . . . . . . . . . . . . . . 33
Opening and closing
-Vehicle key set . . . . . . . . . . . . . . . . . . . . . . . 36
-Central locking system . . . . . . . . . . . . . . . . 39
-Doors.... . . . . . . . . . . . . . . . . . . . . . . . . . 45
-Sliding doors . . . . . . . . . . . . . . . . . . . . . . . . 46
-Tailgate . . . . . . . . . . . . . . . . . . . . . . . . . . . . 49
-Wing doors . . . . . . . . . . . . . . . . . . . . . . . . . 52
-Windows . . . . . . . . . . . . . . . . . . . . . . . . . 55
-Sliding/tilting roof. . . . . . . . . . . . . . . . 58
Sitting correctly and safely
-Adjusting the seat position . . . . . . . . . . . . 61
-Seat functions, front . . . . . . . . . . . . . . . . . . 69
-Seat functions, rear . . . . . . . . . . . . . . . . . . 72
-Seat belts . . . . . . . . . . . . . . . . . . . . . . . . . . 79
-Airbag system . . . . . . . . . . . . . . . . . . . . . . . 87
-Child seats (accessories) . . . . . . . . . . . . . 96
-Integrated child seat .................. 1 02
Lights and vision
-Lights ............................... 106
-Protection from the sun ............... 115
-Wipers and washer . . . . . . . . . . . . . 116
-Mirrors .............................. 121
Table ot Contents
Transporting items
-Driving notes ........................ 125
-Luggage compartment ................ 130
-Guide rail system in the rear vehicle floor ................................ 133
-Roof carrier ........ , ................. 137
-Towing a trailer ...................... 139
Practical equipment
-Stowage area ........................ 150
-Torches ............................. 152
-Drink holders . . . • . . . . . . . . . . . . . . . . . . 153
-Tables .............................. 155
-Cool box ............................ 158
-Ashtray and cigarette lighter ........... 161
-Electrical sockets . . . . . . . . . . . . . . . . . . . . 163
-Rear Seat Entertainment (RSE) system 165
-Tachograph . . . . . . . . . . . . . . . . . . . . . . . . . . 172
-Digital voice enhancement ............ 173
Equipment, Multivan
-Darkening the interior of the vehicle, Multivan ............................. 175
Equipment, Business
-Vehicle overview, Business . . . . . . . . . . . . 180
-Seat functions, rear, Business ......... 182
-Rear-seat telephony, Business ........ 187
Equipment, California
-Vehicle overview, California . . . . . . . . . . . 192
-Seat functions, rear, California ......... 193
-Central control panel, California ........ 204
-Interior lights, California ............... 208
-Stowage areas, California ............. 21 0
-Darkening the interior of the vehicle, California . . . . . . . . ................... 215
-Manual pop-up roof, California ......... 218
-Electric pop-up roof, California ......... 221
-Awning, California .................... 226
-Tables and camping chairs, California .. 229
-Gas system, California ................ 233
-Water supply and disposal, California .. 237
-Refrigerator box, California ............ 241
-Power supply in the vehicle, California .. 242
-Air conditioning system, California ..... 250
-Supplementary heater, California ...... 251
-Practical tips, California ............... 252
Page 12 of 486
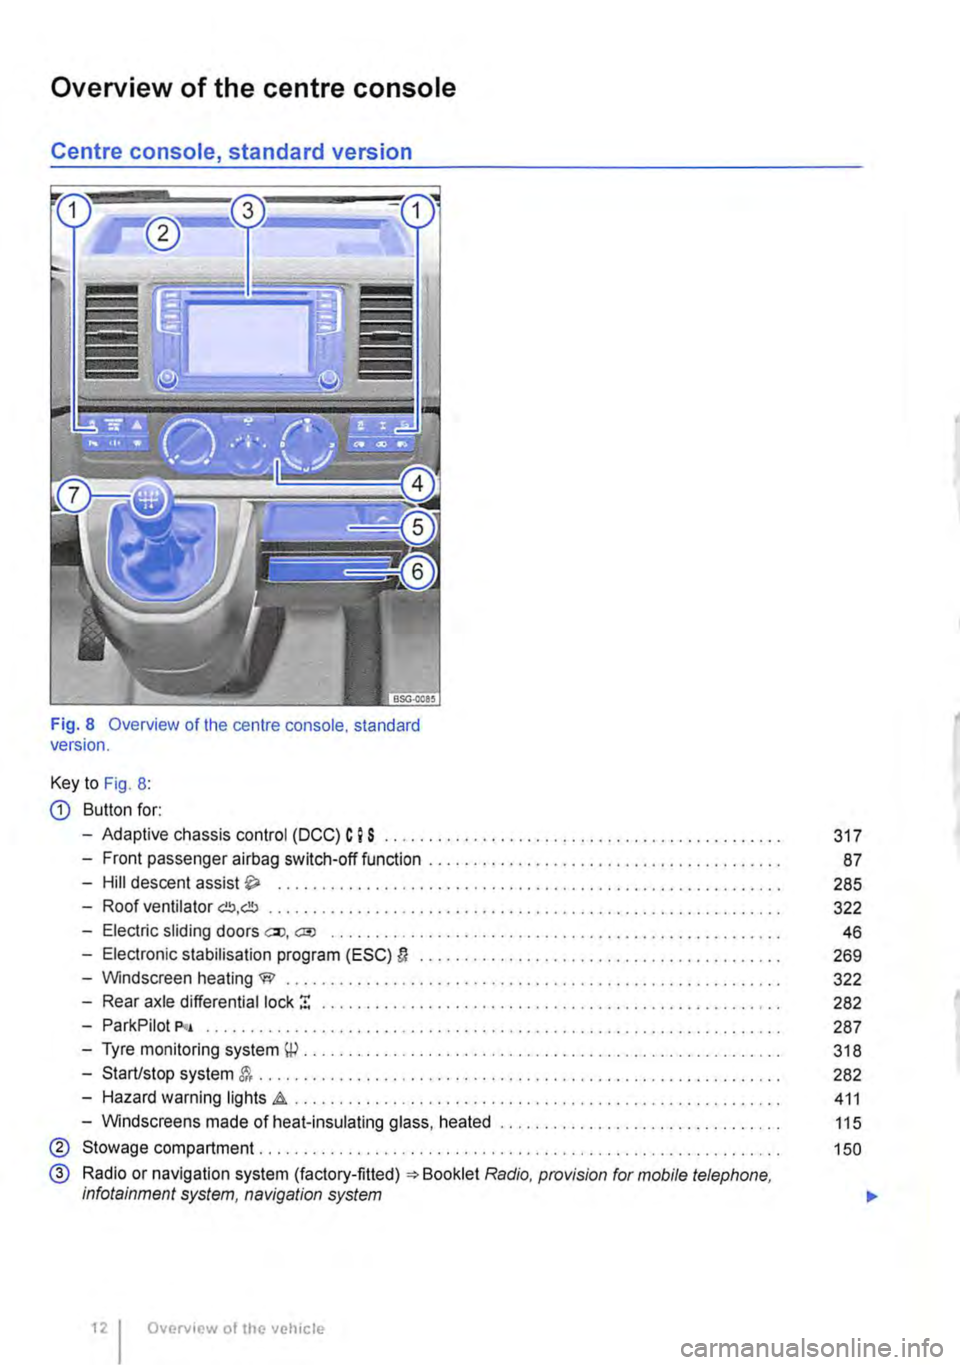
Overview of the centre console
Centre console, standard version
Fig. 8 Overview of the centre console. standard version.
Key to Fig. 8:
CD Button for:
-Adaptive chassis control (DCC) C I S .......................................... .
-Front passenger airbag switch-off function ................•.......................
-Hill descent assist .................................•.......................
-Roof ventilator G!!J,db ......................................................... .
-Electric sliding doors ell, a;o ............................................••....•
-Electronic stabilisation program (ESC) D ........................................ .
-Windscreen heating W ..................•...................................
-Rear axle differential lock ! ................................................. .
-ParkPilot P<• .....................•..••••.............••..............•••••.
-Tyre monitoring system \P . . . . . . . . . . . . . . . . . . . . . . . . ........................ .
-Start/stop system . . . . . . . . . . . . . . . . . . . . . . . . ............................... .
-Hazard warning lights .a . . . . . . . . . . . . . . . . . . . ............................ .
-Windscreens made of heat-insulating glass, heated ............................... .
® Stowage compartment. . . . . . . . . . . . . . . . ............... .
@ Radio or navigation system (factory-fitted) =:-Booklet Radio, provision for mobile telephone, infotainment system, navigation system
Overview of the vehicle
317
87
285
322
46
269
322
282
287
318
282
411
115
150
...
Page 13 of 486
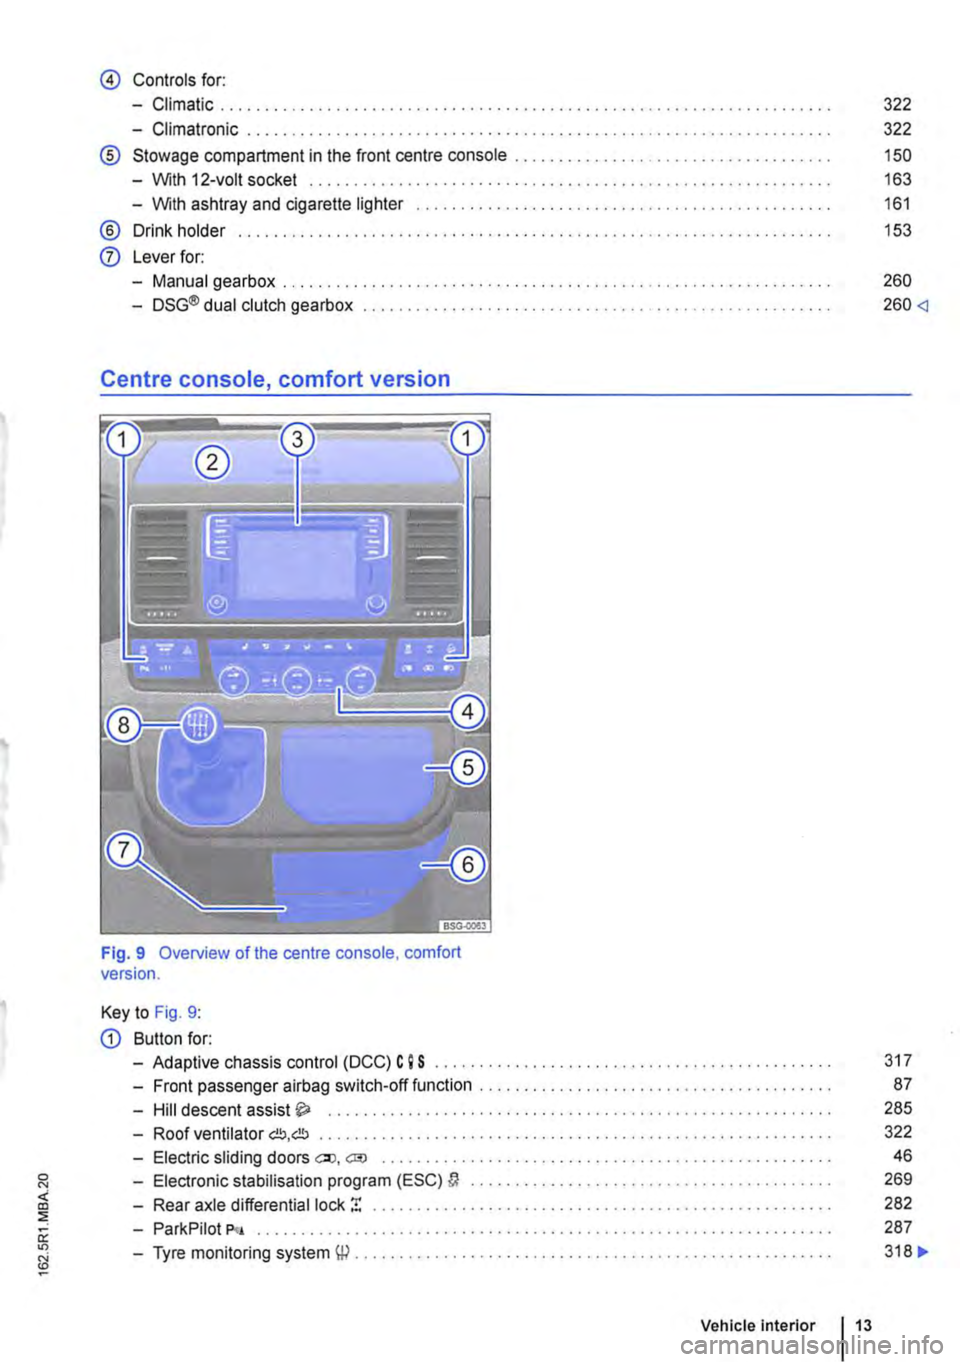
@ Controls for:
-Climatic .................................................................... .
-Climatronic ............................................•.....................
® Stowage compartment in the front centre console ...... .
-With 12-volt socket ...................... .
-With ashtray and cigarette lighter
® Drink holder ..
0 Lever for:
-Manual gearbox . . . . . . . . . . . . . . . . . . . . . . . . . . . . . . . . . . . . . . . . . . . . . ........ .
-DSG® dual clutch gearbox .................................................. .
Centre console, comfort version
Fig. 9 Overview of the centre console, comfort version.
Key to Fig. 9:
G) Button for:
-Adaptive chassis control (DCC) C 9 S
-Front passenger airbag switch-off function
-Hill descent assist ..... .
322
322
150
163
161
153
260
260
87
285
-Roof ventilator C!J,C!J . . . . . . . . . . . . . . . . . . • . . . . . . . . . . . . . • . • . . . . . . . . . . . • • . • • . • . . 322
-Electric sliding doors eo, cm . . . . . . . . . . . . . . . . . . . . . . . . . . . . . . . . . . . . . . . . . . . . . . 46
-Electronic stabilisation program (ESC) a . . . . . . . . . . . . . . . . . . . . . . 269
-Rear axle differential lock ! . . . . . . . . . . . . . . . . . . . . . . . . . . 282
-ParkPilot P<•
-Tyre monitoring system W .............. .
Vehicle Interior 13
287
318 ..
Page 74 of 486
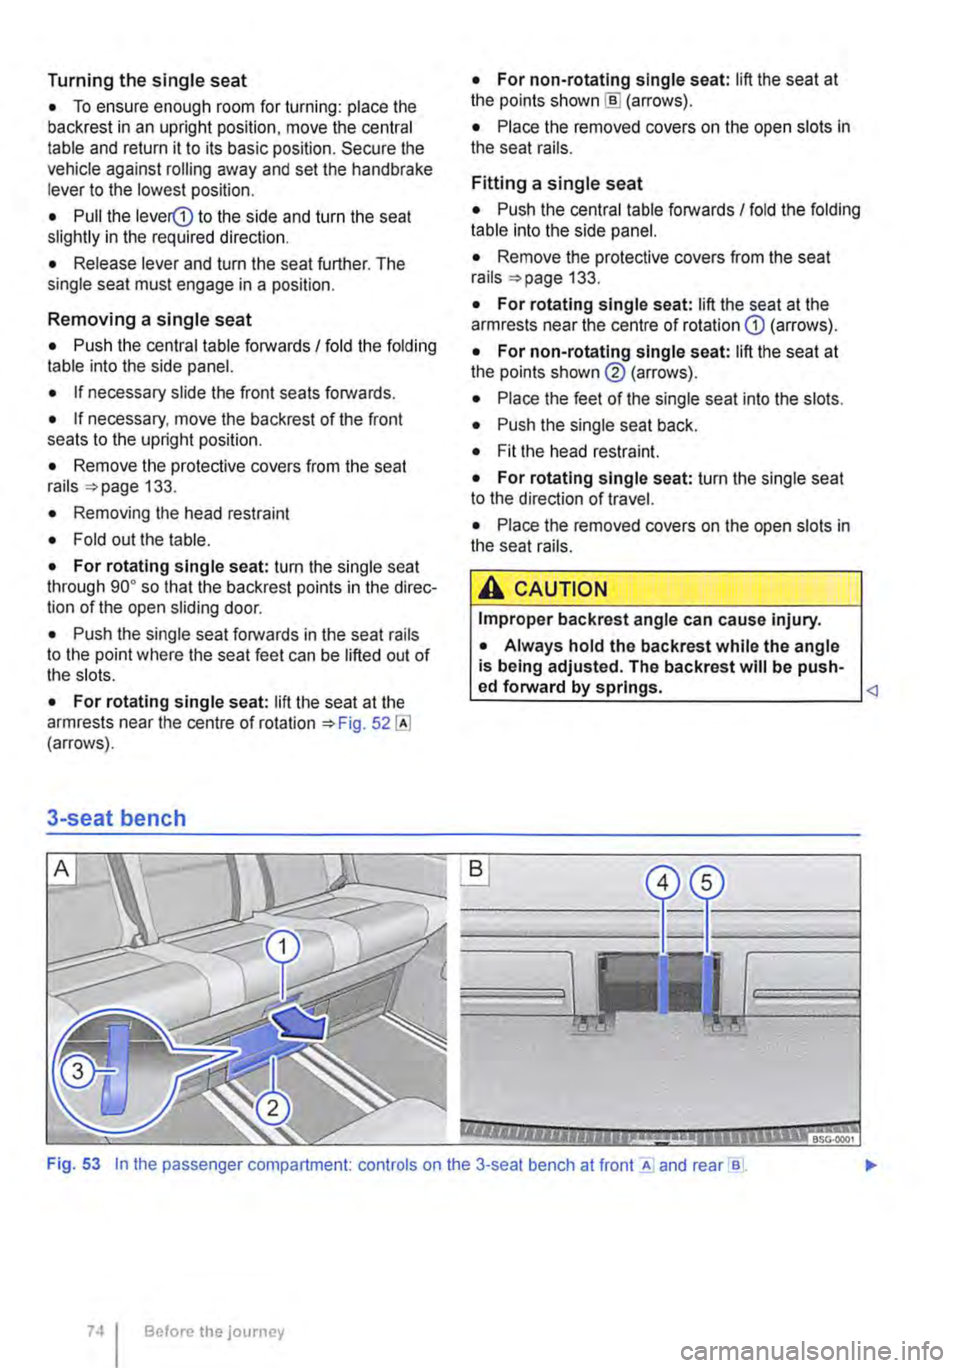
Turning the single seat
• To ensure enough room for turning: place the backrest in an upright position. move the central table and return it to its basic position. Secure the vehicle against rolling away and set the handbrake lever to the lowest position.
• Pull the lever(D to the side and turn the seat slightly in the required direction.
• Release lever and turn the seat further. The single seat must engage in a position.
Removing a single seat
• Push the central table forwards I fold the folding table into the side panel.
• If necessary slide the front seats forwards.
• If necessary, move the backrest of the front seats to the upright position.
• Remove the protective covers from the seat rails 133.
• Removing the head restraint
• Fold out the table.
• For rotating single seat: turn the single seat through go• so that the backrest points in the direc-tion of the open sliding door.
• Push the single seat forwards in the seat rails to the point where the seat feet can be lifted out of the slots.
• For rotating single seat: lift the seat at the armrests near the centre of rotation (arrows).
3-seat bench
• For non-rotating single seat: lift the seat at the points shown [ID (arrows).
• Place the removed covers on the open slots in the seat rails.
Fitting a single seat
• Push the central table forwards I fold the folding table into the side panel.
• Remove the protective covers from the seat rails 133.
• For rotating single seat: lift the seat at the armrests near the centre of rotation G) (arrows).
• For non-rotating single seat: lift the seat at the points shown@ (arrows).
• Place the feet of the single seat into the slots.
• Push the single seat back.
• Fit the head restraint.
• For rotating single seat: turn the single seat to the direction of travel.
• Place the removed covers on the open slots in the seat rails.
A CAUTION
Improper backrest angle can cause injury.
• Always hold the backrest while the angle is being adjusted. The backrest will be push-ed forward by springs.
Before the journey
Page 95 of 486
A wARNING
Incorrect use of the driver and front passen-ger seat could hinder the proper function of the combined curtain and side airbags and cause serious injury.
• Never remove the front seats from the ve-hicle or alter any components of these seats.
Curtain airbags
A WARNING (Continued)
• If too much pressure is applied to the back rest side bolster, the combined curtain and side airbags may not be triggered cor-rectly, may not trigger at all or may trigger unexpectedly.
• Any damage to the original seat uphols-tery or around the seams of the combined curtain and side airbag units must be re-paired immediately by a qualified workshop.
r-111 First read and observe the introductory l..-W information and safety warnings & on page 87.
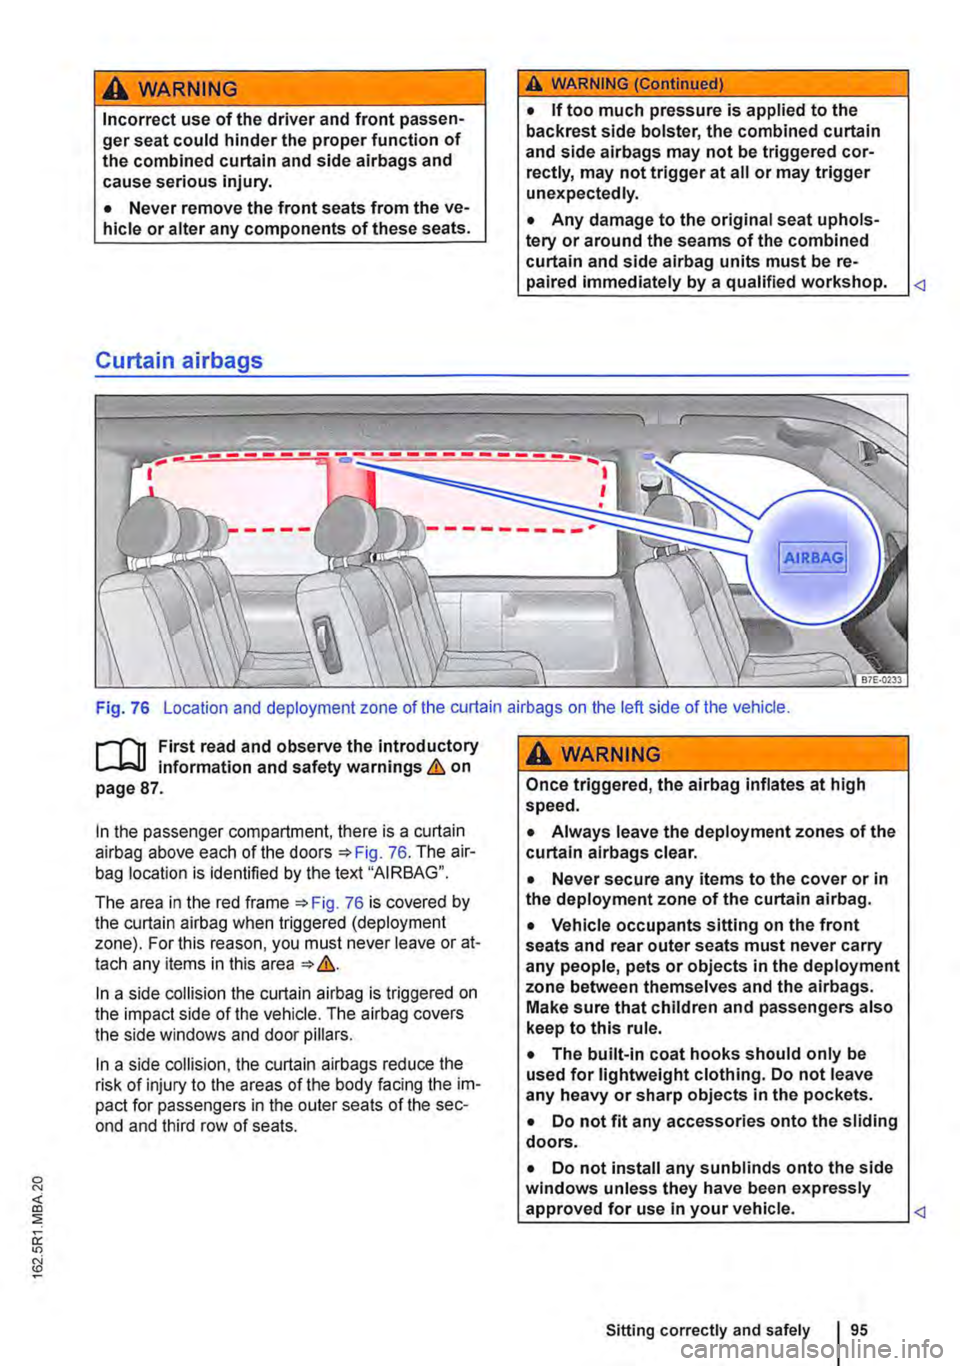
In the passenger compartment, there is a curtain airbag above each of the doors =>Fig. 76. The air-bag location is identified by the text "AIRBAG".
The area in the red frame =>Fig. 76 is covered by the curtain airbag when triggered (deployment zone). For this reason, you must never leave or at-tach any items in this area => &.
In a side collision the curtain airbag is triggered on the impact side of the vehicle. The airbag covers the side windows and door pillars.
In a side collision, the curtain airbags reduce the risk of injury to the areas of the body facing the im-pact for passengers in the outer seats of the sec-ond and third row of seats.
A WARNING
Once triggered, the airbag inflates at high speed.
• Always leave the deployment zones of the curtain alrbags clear.
• Never secure any items to the cover or in the deployment zone of the curtain airbag.
• Vehicle occupants sitting on the front seats and rear outer seats must never carry any people, pets or objects in the deployment zone between themselves and the airbags. Make sure that children and passengers also keep to this rule.
• The built-in coat hooks should only be used for lightweight clothing. Do not leave any heavy or sharp objects in the pockets.
• Do not fit any accessories onto the sliding doors.
• Do not install any sun blinds onto the side windows unless they have been expressly approved for use In your vehicle.
Page 97 of 486
![VOLKSWAGEN TRANSPORTER 2018 Owners Manual Basic information on fitting and using child seats
A AIRBAG
(®
(!]
c:::J
BTT·I20J
Fig. 77 Airbag information sticker on the sun vi-sor.
r""(n First read and observe the introductory L.....J VOLKSWAGEN TRANSPORTER 2018 Owners Manual Basic information on fitting and using child seats
A AIRBAG
(®
(!]
c:::J
BTT·I20J
Fig. 77 Airbag information sticker on the sun vi-sor.
r""(n First read and observe the introductory L.....J](/img/18/55780/w960_55780-96.png)
Basic information on fitting and using child seats
A AIRBAG
(®
(!]
c:::J
BTT·I20J
Fig. 77 Airbag information sticker on the sun vi-sor.
r""'('n First read and observe the introductory L.....Ja,U information and safety warnings & on page 96.
Information on fitting a child seat
Observe the following general information when fit-ling a child seat. This information is relevant what-ever child seat securing system is being used.
• Read and follow the instructions provided by the child seat manufacturer =:-&.
• Whenever possible, fit child seats to one of the rear seats on the front passenger side so that chil-dren can exit the vehicle on the kerb side.
• Deactivate the front passenger front airbag if fit-ting a rear-facing child seat on the front passenger seat.
• If a child seat is fitted on the front passenger seat, move the backrest to the upright position. slide the seat back as far as it will go, and set the seat height adjustment and belt height adjuster to the highest position.
• When fitting a child seat on the vehicle's rear seats, leave as much unencumbered space as possible around the child seat. If necessary, adjust the position of the relevant front seat. When doing so, ensure that the driver or front passenger can stili maintain a correct sitting position =:-page 61.
• Adjust the seat backrest angle so that the child seat lies flush against the backrest.
• When using child seats with a backrest, remove the vehicle head restraints and stow them safely in the vehicle =:-page 61. Reinstall the head restraint after the child seat has been removed.
Airbag sticker
The vehicle may be provided with stickers giving key information about the front passenger front air-bag. The information on these stickers may vary from country to country. The stickers may be at-tached on the sun visor for the driver and/or front passenger=:-Fig. 77.
11 is essential to note the warning information shown on these stickers before installing a rear-facing child seat =:-&.
Risks involved in carrying children on the front passenger seat
If you are using a rear-facing child seat, the front passenger front airbag can cause critical or poten-tially fatal injuries when it inflates =:-&.
Rear-facing child seat may only be used on the front passenger seat if the front passenger front airbag has been deactivated. An indicator lamp in the centre console lights up steadily when the front passenger front airbag has been effectively deacti-vated. Deactivating the front passenger front air-bag =:-page 87.
If using a front-facing child seat, do not deacti-vate the front passenger front airbag.
When fitting a child seat, make sure that it is as far away as possible from the front passenger airbag. The front passenger front airbag can cause severe injuries when it inflates =:-&.
Some child seats are not suitable for use on the front passenger seat. Any child seat fitted on the front passenger seat must be specially authorised by the manufacturer for this use in vehicles with front and side airbags. Volkswagen dealers hips keep an up-to-date list of authorised child seats.
Risks presented by side airbags
Any child on the front passenger seat may be hit on the head and severely injured by the front side airbag inflating =:-&.
If you use a rear-facing child seat on the front passenger seat the child in it is at increased risk of sustaining critical or fatal injuries In the event of an accident.
• Deactivate the front passenger front air-bag. If the front passenger front airbag can-not be deactivated no rear-facing child seat may be used. 11>
Sitting correctly and safely
Page 126 of 486
A WARNING (Continued)
• Transporting heavy objects changes the vehicle's handling and the centre of gravity.
• The load should be distributed as evenly and low as possible In the vehicle.
• Always secure heavy objects in the lug-gage compartment as far in front of the rear axle as possible.
A WARNING
The vehicle handling and braking effect may alter significantly If large or heavy objects are being transported.
• Always adapt your speed and driving style to suit visibility, weather, road and traffic con-ditions.
• Accelerate carefully and gently .
• Avoid sudden braking and driving ma-noeuvres.
• Brake earlier than in normal driving.
A WARNING
Unsuitable or damaged securing straps could rip In the event of a braking manoeuvre or ac-cident. This could cause objects to be flung through the interior and lead to severe or fa-tal injuries.
• Always use suitable and undamaged se-curing straps.
• Attach securing straps securely to the fas-tening rings.
• Never load the securing straps in excess of the load rating.
A wARNING
Securing straps, if used incorrectly, may get detached in the event of a sudden braking manoeuvre or accident. This could cause ob-jects to be flung through the interior and lead to severe or fatal injuries.
Stowing items of luggage
1'"'1'11 First read and observe the introductory L-.lr::.U information and safety warnings & on page 125. .,..
1261 Before the journey
A WARNING (Continued)
• Never fix securing straps between the fas-tening rings In the side panel and the fasten-ing rings in the vehicle floor.
• Never fix securing straps between oppo-site side walls.
• Observe the Information on the side trim panels.
A WARNING
Incorrect use of fastening rings can cause se-vere or fatal accidents.
• Always use suitable and undamaged se-curing straps.
• Attach securing straps securely to the fas-tening rings.
• loose objects in the vehicle can suddenly slide and change the way the vehicle han-dles.
• Never exceed the maximum load rating of the fastening rings when securing objects.
• Small and light objects should also be se-cured.
• Never secure a child seat to the fastening rings.
• Rotating single seats must always be turned In the direction of travel If a load is se-cured behind this seat using fastening rings.
• Never use elastic straps or nets to tie down loads.
• Distribute the load on the fastening rings evenly.
• Ensure that the load retains its form and position once it has been secured. Use stable packaging and anti-slip floor surfacing for your load.
m Suitable fastening belts and luggage stowage L!.J systems are available from a qualified work-shop. Volkswagen Commercial Vehicles recom-mends using a Voikswagen Commercial Vehicles dealership for this purpose.
Page 127 of 486
Always stow all items of luggage in the vehicle securely.
• Distribute items in the vehicle, on the roof and on the trailer as evenly as possible.
• Place heavy objects as far forward in the lug-gage compartment as possible. Position the rear seat backrests securely in the upright position.
• Secure luggage in the luggage compartment to the fastening rings with suitable straps 130.
• Adjust the headlight range 106.
• Adjust the tyre pressure according to the vehi-cle load. Adhere to the tyre pressure plate 367.
• In vehicles with a tyre monitoring system, set the new vehicle load level as necessary 318.
Stowing cargo
r-111 First read and observe the introductory L-l=:.LI information and safety warnings & on page 125.
Stow the load securely in the vehicle or on the load surface
• Before loading the vehicle, place a sturdy mat or similar cover flush with the vehicle floor. Where necessary, do not cover protruding parts of the ve-hicle floor.
• If necessary, remove the seats to increase the load area.
• The vehicle floor must be free of oil and dust, dry and fully clean in order to help prevent the load from sliding.
• Observe gross axle weight ratings and the gross vehicle weight rating.
• Distribute items in the vehicle, on the load sur-face, on the roof and on the trailer as evenly as possible.
• Stow heavy objects directly on the floor and above or in front of the rear axle and engage the rear seat backrests securely in an upright position.
CD
Hard objects on the shelf can chafe against the wires of the heating element in the rear window and cause damage.
m • Observe any information concerning the l!J loading of a trailer 139 .
• Observe any information concerning the load-ing of a roof carrier 137.
• Protect the seat rails or seat anchor points from damage.
• Secure luggage with suitable securing straps on the fastening rings 130.
• Adjust the headlight range 106.
• Adjust the tyre pressure according to the vehi-cle load. Adhere to the tyre pressure plate 367.
• In vehicles with a tyre monitoring system, set the new vehicle load level as necessary 318.
CD
Hard objects on the shelf can chafe against the wires of the heating element in the rear window and cause damage.
m • Observe any information concerning the l!J loading of a trailer =>page 139 .
• Observe any information concerning the load-ing of a roof carrier =>page 137 .
Page 146 of 486
m If the vehicle battery charge level is low, the W electrical connection to the trailer will be in-terrupted automatically.
Loading the trailer
ill1 First read and observe the introductory L-W.! information and safety warnings & on page 139.
Trailer weight and drawbar load
The trailer weight is the weight that the vehicle can pull &. The drawbar load is the weight that the towing bracket exerts on the ball coupling vertically from above.
The figures for trailer weights and draw bar weights that are given on the data plate of the towing bracket are for certification purposes only. The cor-rect values for your specific model, which may be lower than these figures, are given in the vehicle registration documents. All data in the official vehi-cle documents take precedence over these data.
In the interest of road safety, Volkswagen Commer-cial Vehicles recommends that you always trans-port the maximum drawbar load. The response of the trailer on the road will be poor if the drawbar load is too small.
The drawbar load increases the weight on the rear axle and reduces the maximum load level as a re-sult.
Gross combination weight rating
The combination weight is made up of the actual weight of the loaded vehicle and of the loaded trail-er.
Loading the trailer
The weight of the load should be distributed even-ly. The maximum permitted drawbar load should be utilised. Do not place the load only at the front or the rear of the trailer:
Towing a trailer
ill1 First read and observe the introductory L-W.! information and safety warnings & on page 139.
146 Before the Journey
m When the engine is running, electrical con-w sumers in the trailer are supplied with voltage via the electrical connection (pin 9 and pin 10 of the trailer socket).
• Secure all loads on the trailer properly.
Tyre pressure
Follow the trailer manufacturer's recommendations concerning the tyre pressure for the trailer tyres.
When towing a trailer, inflate the wheels on the towing vehicle with the maximum permitted tyre pressure 367.
A WARNING
Accidents and serious injuries can occur if you exceed the vehicle's maximum permitted gross axle weight rating, drawbar load, gross vehicle weight rating or gross combination weight rating.
• Never exceed the specified values .
• Never let the actual weights at the front and rear axles exceed the gross axle weight ratings. Never exceed the permissible gross vehicle weight for the vehicle with weight at the front and rear of the vehicle.
A wARNING
Loads that may slide can severely Impair sta-bility and driving safety, which can cause ac-cidents and severe injuries.
• Always load trailers correctly .
• Always secure loads using suitable and undamaged securing straps.
Headlight adjustment
Towing a trailer can raise the front end of the vehi-cle enough for the dipped beam to blind other road users. Use the headlight range control to lower the
Page 150 of 486
Practical equipment
Stowage area
o::n Introduction
This chapter contains information on the following subjects:
Stowage compartments on the dash panel . . 151 Stowage compartment on the front passenger side . . . . . . . . . . . . . . . . . . . . . . . . . 151 Other stowage compartments . . . . . . . . . . . . . 152
Only use stowage compartments to stow light or smaller objects.
A factory-fitted AUX-IN socket or the USB sock-may be located in the storage compartment on the front passenger side =>Booklet Radio, provi-sion for mobile telephone, infotainment system, navigation system.
Additional information and warnings:
• Seat functions, front => page 69
• Seat functions, rear =>page 72
• Stowage =>page 150
• Drink holder => page 153
• Central table =>page 155
• Seat functions, rear. Business =>page 182
• Seat functions, rear, California =>page 193
• Cleaning and caring for the interior =>page 388
A WARNING
Loose objects may be flung through the vehi-cle Interior In the event of a sudden driving or braking manoeuvre. This can cause serious injury and can also lead to loss of control of the vehicle.
• Do not stow any pets or any hard, heavy or sharp objects In the vehicle's open stow-age areas, on the dash panel, on the shelf be-hind the rear seats, or in items of clothing and bags in the vehicle Interior.
• Store any objects in open stowage com-partments in such a way that they do not project over the edges of the stowage com-partment.
• Always keep stowage compartments with a lid closed while the vehicle is in motion.
150 I Before the journey
A WARNING
External devices in the vehicle that are not properly secured can be flung though the in-terior and cause Injuries, if there is a sudden driving or braking manoeuvre, or in the event of an accident.
• You should never position or attach an ex-ternal device on a door, on the windscreen or above or near to the areas marked "AIRBAG" on the steering wheel, the dash panel and the seat backrests, or between these areas and the vehicle occupants. External devices can cause serious Injury in an accident, especial-ly when the alrbags deploy.
A WARNING
Objects in the driver footwell can hinder ped-al operation. This can lead to loss of control of the vehicle and increase the risk of serious injury.
• Please ensure that all pedals can always be operated without any hindrance.
• The foot mats must always be properly se-cured in the footwell.
• No additional foot mats or other floor cov-erings should be placed over the fitted foot mat.
• Ensure that no objects can enter the driv-er footwell while the vehicle Is in motion.
• If there are any objects in the footwell, re-move them when the vehicle is parked.
A WARNING
Cigarette lighters in the vehicle could be damaged or accidentally lit. This could lead to serious burns and other Injuries.
• Before adjusting the seats always make sure that there Is no lighter on or near the moveable parts of the seat.
• Before closing stowage areas or compart-ments always ensure that there Is no lighter in the way. 11>