winter tyres VOLKSWAGEN TRANSPORTER 2019 Owners Manual
[x] Cancel search | Manufacturer: VOLKSWAGEN, Model Year: 2019, Model line: TRANSPORTER, Model: VOLKSWAGEN TRANSPORTER 2019Pages: 486, PDF Size: 69.28 MB
Page 26 of 486

Unlock doors (door unlocking)
Back
-Window op. (window operation)
Off
All
Driver
Back
-Factory setting (factory setting)
-Back
• Lights & Vision
-Coming Home
System on/off
+ 10 Sec.
-10 Sec.
Back
-Leaving Home
System on/off
+ 10 Sec.
-10 Sec.
Back
-Backgrnd light.
System on/off
+5%
-5%
Back
-Footwelllight
System on/off
+5%
-5%
Back
-Lane change flash on/off
-Travel mode on/off
-Factory setting (factory setting)
-Back
• Coasting on/off
• Time
-Hours
-Minutes
Overview of the vehicle
-24 hr mode on/off
-Summer on/off
-Back
• Winter tyres
-System on/off
- + 10 km/h (6 mph)
--10 km/h (6 mph)
-Back
• Units
-Temperature oc
OF
Back
-Consump./dist.
l/100km, km
km/1, km
MPG(GB), mi
MPG(US), mi
Back
-Air pressure
bar
psi
kPa
Back
-Back
• Tyre pressure
-Save
-Back
• Alt. speed dis. (secondary speed display) on/off
• Service
-Information
-Back
• Factory settings
Page 28 of 486
Main menu
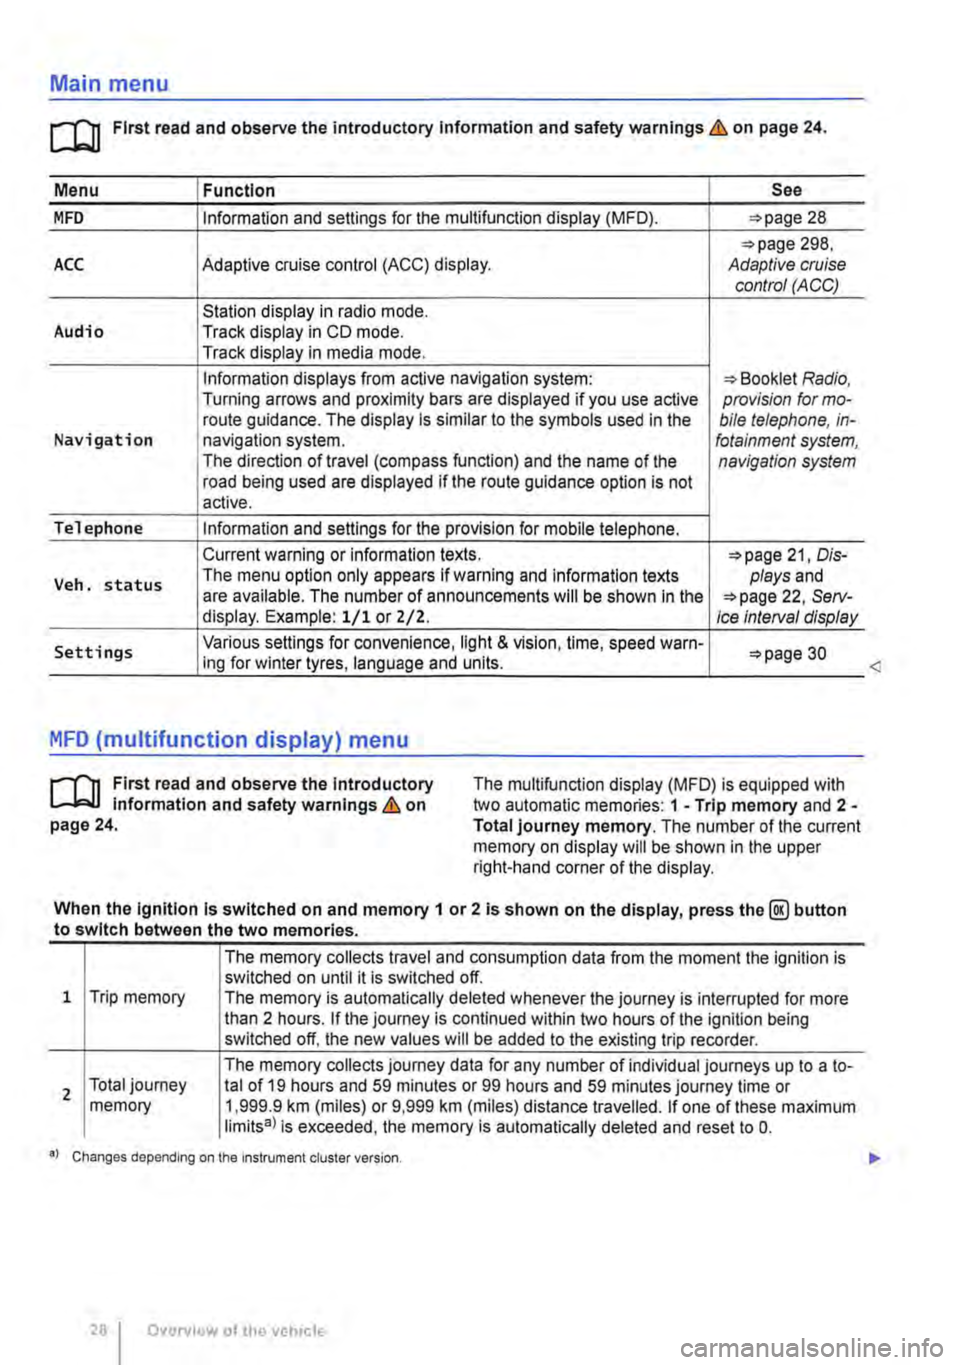
m First read and observe the introductory Information and safety warnings & on page 24.
Menu I Function See
MFD Information and settings for the multifunction display (MFD). 28
298, ACC Adaptive cruise control (ACC) display. Adaptive cruise control (ACC)
Station display in radio mode. Audio Track display in CD mode. Track display in media mode.
Information displays from active navigation system: Booklet Radio, Turning arrows and proximity bars are displayed if you use active provision for mo-route guidance. The display is similar to the symbols used in the bile telephone, in-Navigation navigation system. fotainment system, The direction of travel (compass function) and the name of the navigation system road being used are displayed if the route guidance option is not active.
Telephone Information and settings for the provision for mobile telephone.
Current warning or information texts. 21, Dis-
Veh. status The menu option only appears If warning and information texts plays and are available. The number of announcements will be shown In the 22, Serv-display. Example: 1/1 or Z/2. Ice Interval display
Settings Various settings for convenience, light & vision, time, speed warn-30 ing for winter tyres, language and units.
MFD (multifunction display) menu
rl'l1 First read and observe the Introductory L-J,.:.U Information and safety warnings & on page 24.
The multifunction display (MFD) is equipped with two automatic memories: 1 -Trip memory and 2 -Total journey memory. The number of the current memory on display will be shown in the upper right-hand corner of the display.
When the Ignition Is switched on and memory 1 or 2 is shown on the display, press the@ button to switch between the two memories.
1 Trip memory
2 Total journey memory
The memory collects travel and consumption data from the moment the ignition is switched on until it is switched off. The memory is automatically deleted whenever the journey is interrupted for more than 2 hours. If the journey is continued within two hours of the ignition being switched off, the new values will be added to the existing trip recorder.
The memory collects journey data for any number of individual journeys up to a to-tal of 19 hours and 59 minutes or 99 hours and 59 minutes journey time or 1,999.9 km (miles) or 9,999 km (miles) distance travelled. If one of these maximum limits8l is exceeded, the memory is automatically deleted and reset to 0.
•l Changes depending on the Instrument cluster version.
28 I Overview of the vehicle
<
Page 30 of 486
Settings menu
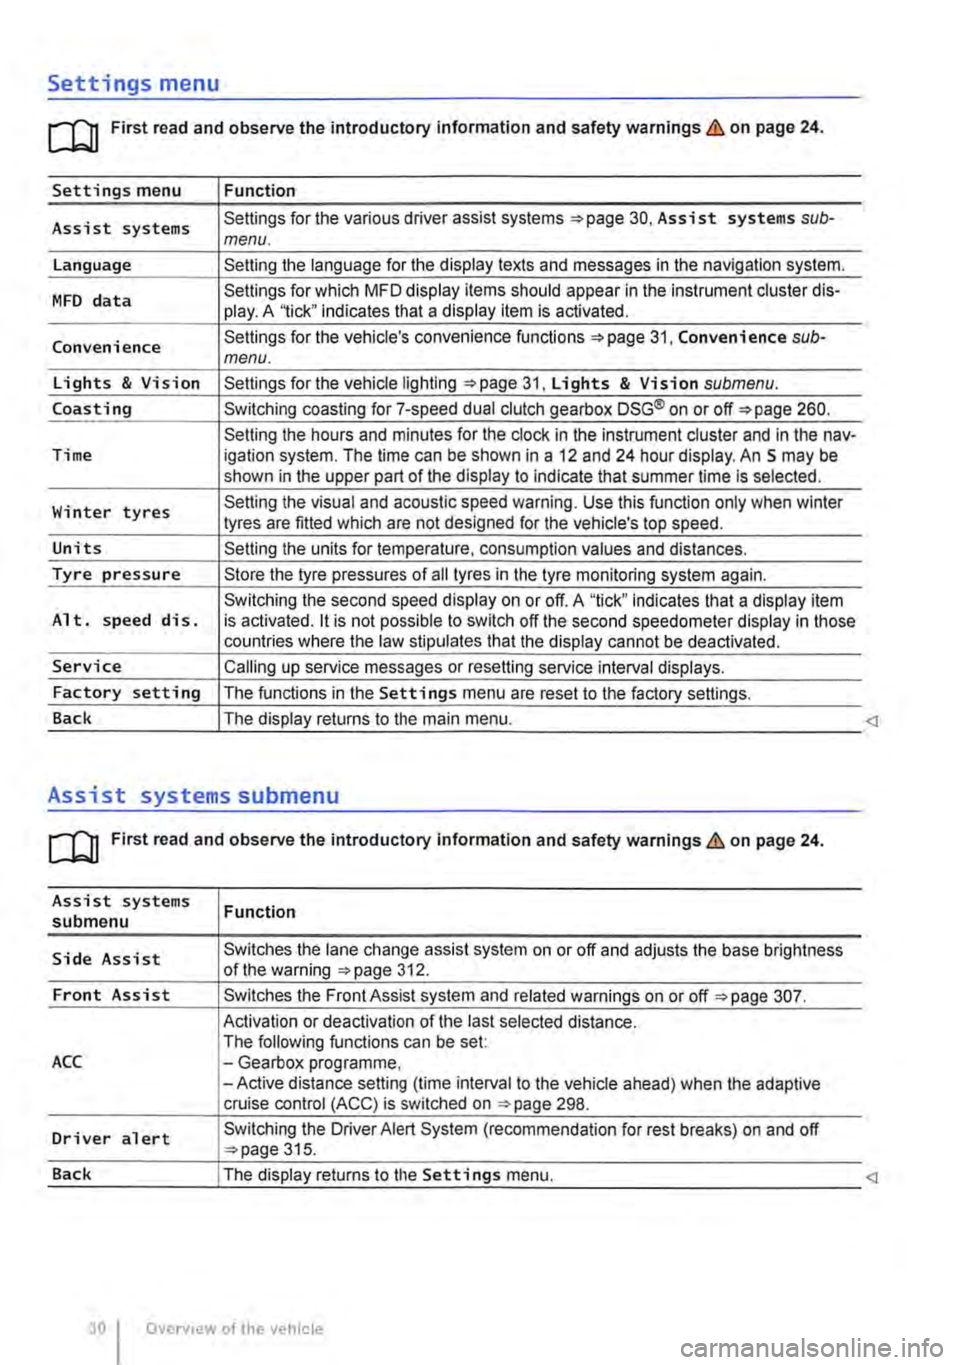
rn First read and observe the introductory information and safety warnings & on page 24.
Settings menu Function
Assist systems Settings for the various driver assist systems =:.page 30, Assist systems sub-menu.
Language Setting the language for the display texts and messages in the navigation system.
MFD data Settings for which MFD display items should appear in the instrument cluster dis-play. A '1ick" indicates that a display item is activated.
Convenience Settings for the vehicle's convenience functions 31, Convenience sub-menu.
Lights & Vision Settings for the vehicle lighting =:.page 31, Lights & Vision submenu.
Coasting Switching coasting for 7-speed dual clutch gearbox DSG® on or off=:. page 260.
Setting the hours and minutes for the clock in the instrument cluster and in the nav-Time igation system. The time can be shown in a 12 and 24 hour display. An S may be shown in the upper part of the display to indicate that summer time Is selected.
Winter tyres Setting the visual and acoustic speed warning. Use this function only when winter tyres are fitted which are not designed for the vehicle's top speed.
Units Setting the units for temperature, consumption values and distances.
Tyre pressure Store the tyre pressures of all tyres in the tyre monitoring system again.
Switching the second speed display on or off. A "tick" indicates that a display item Alt. speed dis. is activated. it is not possible to switch off the second speedometer display in those countries where the law stipulates that the display cannot be deactivated.
Service Calling up service messages or resetting service interval displays.
Factory setting The functions in the Settings menu are reset to the factory settings.
Back The display returns to the main menu.
Assist systems submenu
rn First read and observe the introductory information and safety warnings & on page 24.
Assist systems submenu
Side Assist
Front Assist
ACC
Driver alert
Function
Switches the lane change assist system on or off and adjusts the base brightness of the warning =:.page 312.
Switches the Front Assist system and related warnings on or off =:.page 307.
Activation or deactivation of the last selected distance. The following functions can be set: -Gearbox programme, -Active distance setting (time interval to the vehicle ahead) when the adaptive cruise control (ACC) is switched on ::.page 298.
Switching the Driver Alert System (recommendation for rest breaks) on and off ::.page 315.
Page 140 of 486
In low temperatures, fit winter tyres to both the ve-hicle and the trailer.
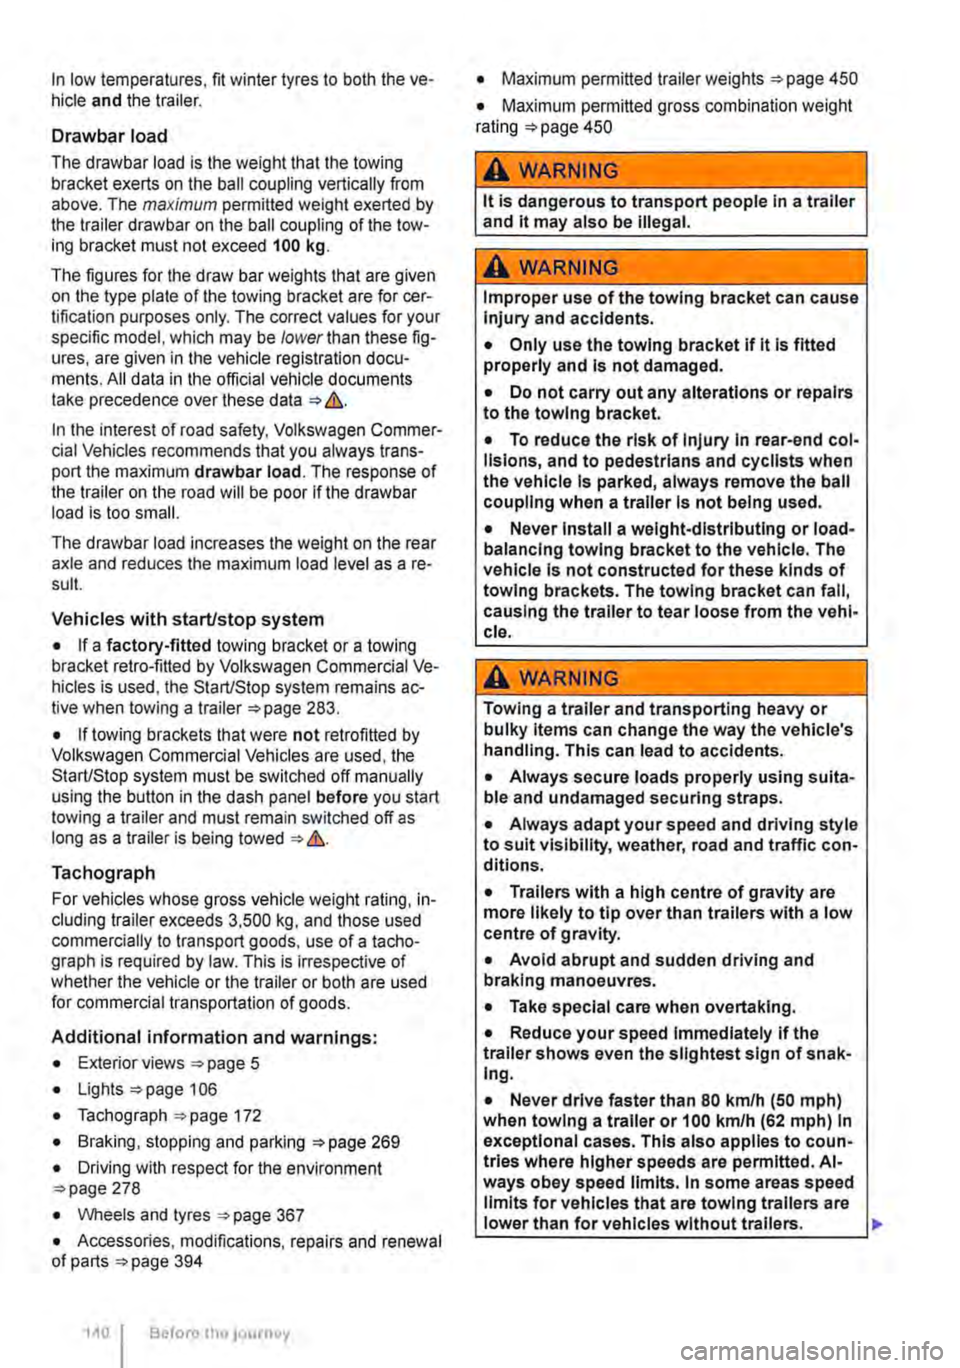
Drawbar load
The drawbar load is the weight that the towing bracket exerts on the ball coupling vertically from above. The maximum permitted weight exerted by the trailer drawbar on the ball coupling of the tow-ing bracket must not exceed 100 kg.
The figures for the draw bar weights that are given on the type plate of the towing bracket are for cer-tification purposes only. The correct values for your specific model, which may be lower than these fig-ures, are given in the vehicle registration docu-ments. All data in the official vehicle documents take precedence over these data &.
In the interest of road safety, Volkswagen Commer-cial Vehicles recommends that you always trans-port the maximum drawbar load. The response of the trailer on the road will be poor if the drawbar load is too small.
The drawbar load increases the weight on the rear axle and reduces the maximum load level as a re-sult.
Vehicles with starUstop system
• If a factory-fitted towing bracket or a towing bracket retro-fitted by Volkswagen Commercial Ve-hicles is used, the Start/Stop system remains ac-tive when towing a trailer 283.
• If towing brackets that were not retrofitted by Volkswagen Commercial Vehicles are used, the StarUStop system must be switched off manually using the button in the dash panel before you start towing a trailer and must remain switched off as long as a trailer is being towed &.
Tachograph
For vehicles whose gross vehicle weight rating, in-cluding trailer exceeds 3,500 kg, and those used commercially to transport goods, use of a tacho-graph is required by law. This is irrespective of whether the vehicle or the trailer or both are used for commercial transportation of goods.
Additional information and warnings:
• Exterior views 5
• Lights 106
• Tachograph 172
• Braking, stopping and parking 269
• Driving with respect for the environment 278
• Wheels and tyres 367
• Accessories, modifications, repairs and renewal of parts 394
140 Before the journey
• Maximum permitted trailer weights =>page 450
• Maximum permitted gross combination weight rating =>page 450
A WARNING
it is dangerous to transport people In a trailer and it may also be illegal.
A WARNING
Improper use of the towing bracket can cause Injury and accidents.
• Only use the towing bracket if it Is fitted properly and Is not damaged.
• Do not carry out any alterations or repairs to the towing bracket.
• To reduce the risk of Injury In rear-end col· lis ions, and to pedestrians and cyclists when the vehicle Is parked, always remove the ball coupling when a trailer Is not being used.
• Never Install a weight-distributing or load-balancing towing bracket to the vehicle. The vehicle Is not constructed for these kinds of towing brackets. The towing bracket can fall, causing the trailer to tear loose from the vehl· cl e.
A WARNING
Towing a trailer and transporting heavy or bulky Items can change the way the vehicle's handling. This can lead to accidents.
• Always secure loads properly using suita-ble and undamaged securing straps.
• Always adapt your speed and driving style to suit visibility, weather, road and traffic con-ditions.
• Trailers with a high centre of gravity are more likely to tip over than trailers with a low centre of gravity.
• Avoid abrupt and sudden driving and braking manoeuvres.
• Take special care when overtaking.
• Reduce your speed Immediately if the trailer shows even the slightest sign of snak-Ing.
• Never drive faster than 80 km/h (50 m ph) when towing a trailer or 100 km/h (62 mph) In exceptional cases. This also applies to coun-tries where higher speeds are permitted. AI· ways obey speed limits. In some areas speed limits for vehicles that are towing trailers are lower than for vehicles without trailers. .,.
Page 280 of 486
Saving fuel
1/100 km
-10°C
+20 oc
L----------------tkm 5 15 25 30
en-o11S
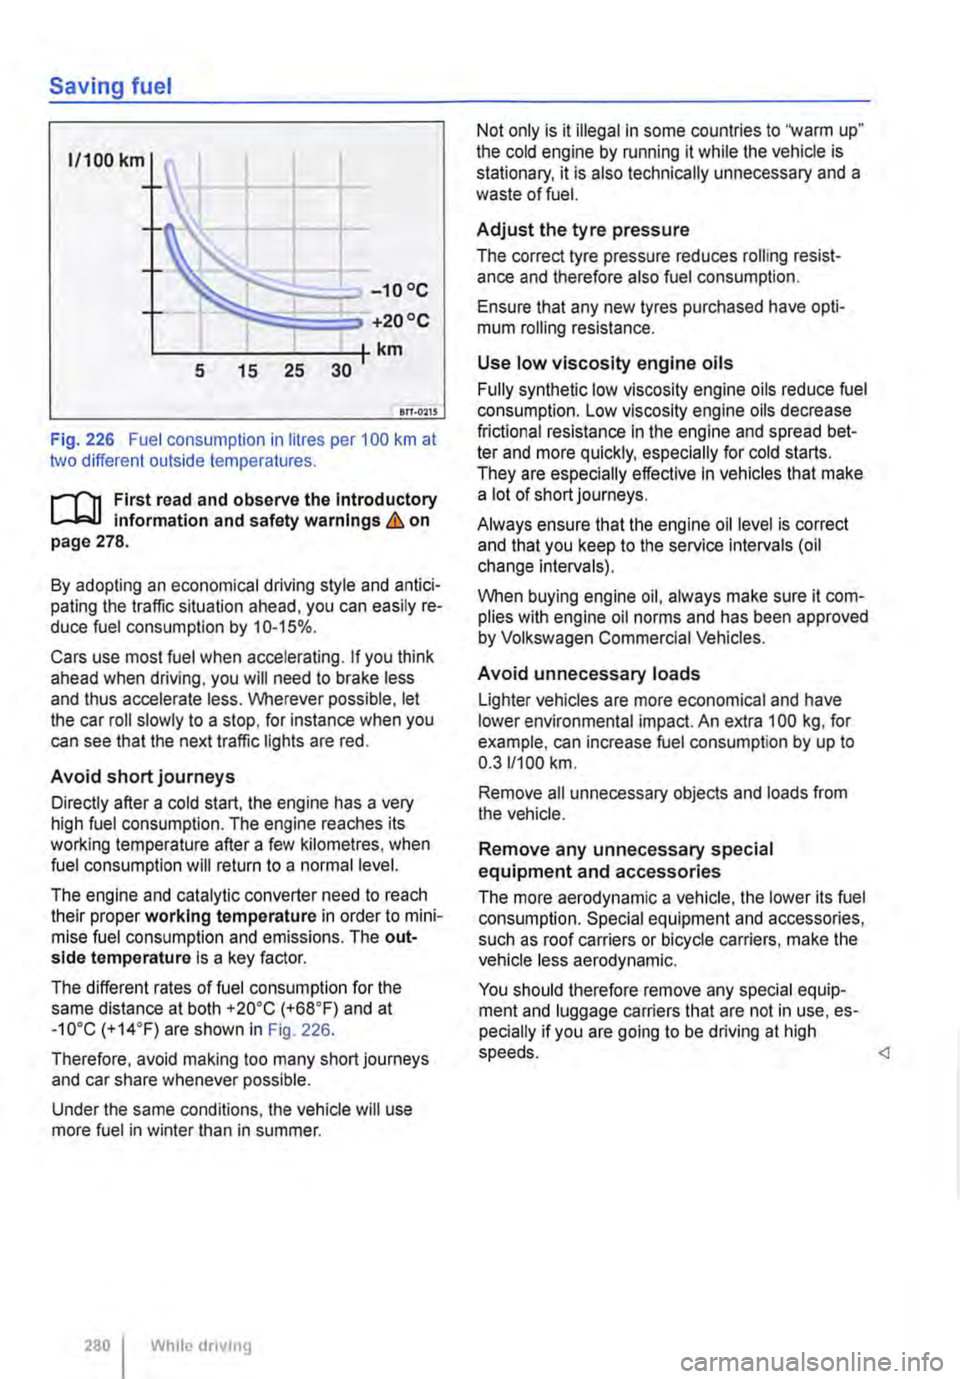
Fig. 226 Fuel consumption in litres per 100 km at two different outside temperatures.
r-1"'11 First read and observe the Introductory Information and safety warnings&. on page 278.
By adopting an economical driving style and antici-pating the traffic situation ahead, you can easily re-duce fuel consumption by 10-15%.
Cars use most fuel when accelerating. If you think ahead when driving, you will need to brake less and thus accelerate less. Wherever possible, let the car roll slowly to a stop, for instance when you can see that the next traffic lights are red.
Avoid short journeys
Directly after a cold start, the engine has a very high fuel consumption. The engine reaches its working temperature after a few kilometres, when fuel consumption will return to a normal level.
The engine and catalytic converter need to reach their proper working temperature in order to mini-mise fuel consumption and emissions. The out-side temperature is a key factor.
The different rates of fuel consumption for the same distance at both +20"C (+68"F) and at -10"C (+14"F) are shown in Fig. 226.
Therefore, avoid making too many short journeys and car share whenever possible.
Under the same conditions, the vehicle will use more fuel in winter than in summer.
280 I While dnvmg
Not only is it illegal in some countries to "warm up" the cold engine by running it while the vehicle is stationary, it is also technically unnecessary and a waste of fuel.
Adjust the tyre pressure
The correct tyre pressure reduces rolling resist-ance and therefore also fuel consumption.
Ensure that any new tyres purchased have opti-mum rolling resistance.
Use low viscosity engine oils
Fully synthetic low viscosity engine oils reduce fuel consumption. Low viscosity engine oils decrease frictional resistance in the engine and spread bet-ter and more quickly, especially for cold starts. They are especially effective In vehicles that make alotofshortjourneys.
Always ensure that the engine oil level is correct and that you keep to the service intervals (oil change intervals).
When buying engine oil, always make sure it com-plies with engine oil norms and has been approved by Volkswagen Commercial Vehicles.
Avoid unnecessary loads
Lighter vehicles are more economical and have lower environmental impact. An extra 100 kg, for example, can increase fuel consumption by up to 0.311100 km.
Remove all unnecessary objects and loads from the vehicle.
Remove any unnecessary special equipment and accessories
The more aerodynamic a vehicle, the lower its fuel consumption. Special equipment and accessories, such as roof carriers or bicycle carriers, make the vehicle less aerodynamic.
You should therefore remove any special equip-ment and luggage carriers that are not in use, es-pecially if you are going to be driving at high speeds.
Page 321 of 486
Function and control
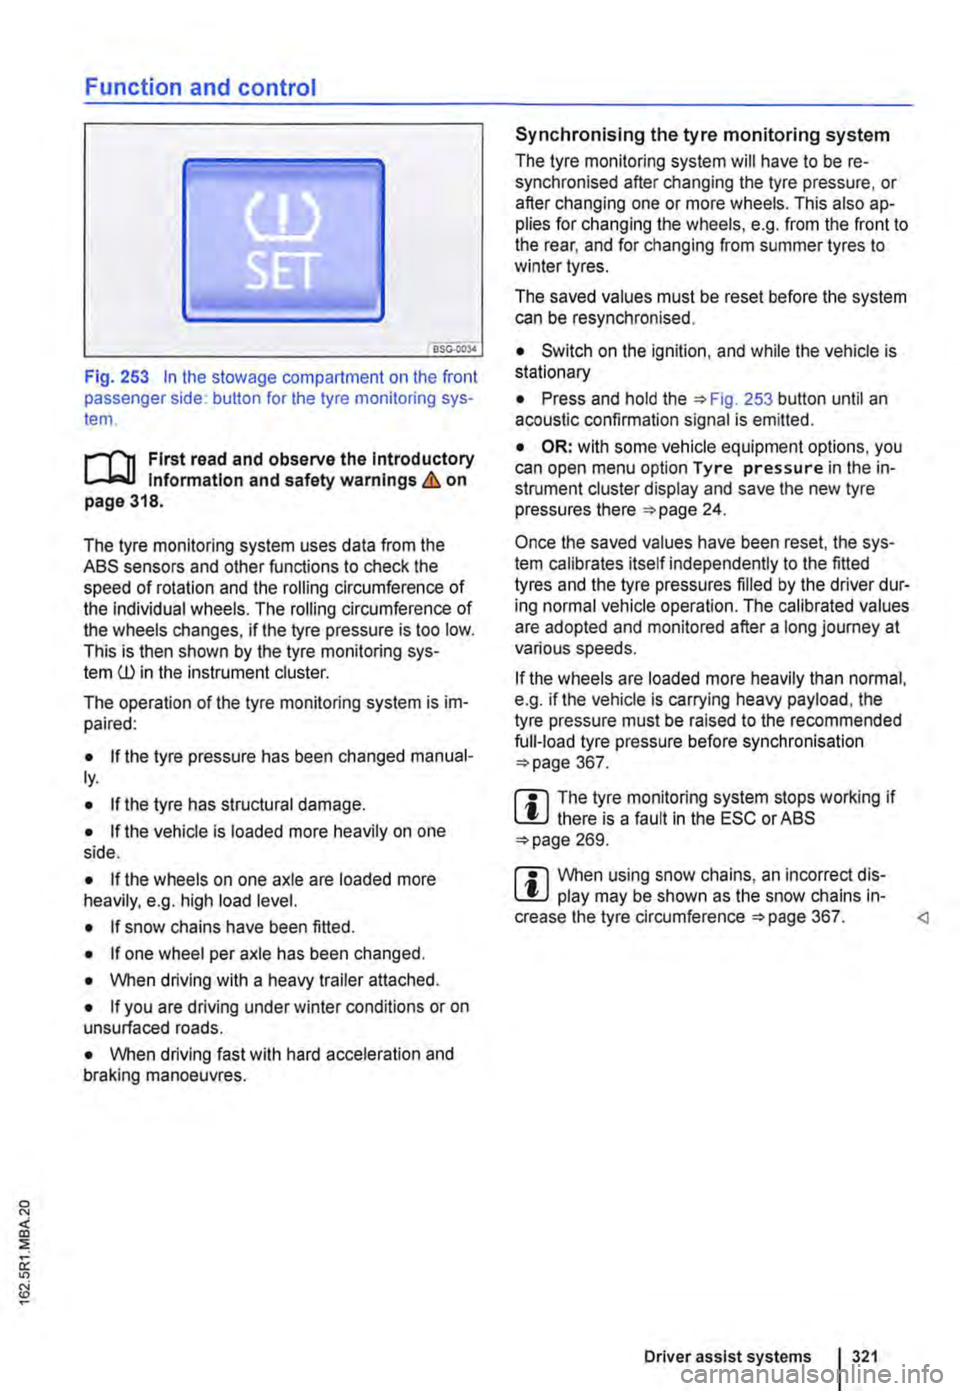
Fig. 253 In the stowage compartment on the front passenger side: button for the tyre monitoring sys-tem.
l"'"""f'n First read and observe the Introductory l.-J,.:,LL Information and safety warnings & on page 318.
The tyre monitoring system uses data from the ASS sensors and other functions to check the speed of rotation and the rolling circumference of the individual wheels. The rolling circumference of the wheels changes, if the tyre pressure is too low. This is then shown by the tyre monitoring sys-tem ill in the instrument cluster.
The operation of the tyre monitoring system is im-paired:
• If the tyre pressure has been changed manual-ly.
• If the tyre has structural damage.
• If the vehicle Is loaded more heavily on one side.
• If the wheels on one axle are loaded more heavily, e.g. high load level.
• If snow chains have been fitted.
• If one wheel per axle has been changed.
• When driving with a heavy trailer attached.
• If you are driving under winter conditions or on unsurfaced roads.
• When driving fast with hard acceleration and braking manoeuvres.
Synchronising the tyre monitoring system
The tyre monitoring system will have to be re-synchronised after changing the tyre pressure, or after changing one or more wheels. This also ap-plies for changing the wheels, e.g. from the front to the rear, and for changing from summer tyres to winter tyres.
The saved values must be reset before the system can be resynchronised.
• Switch on the ignition, and while the vehicle is stationary
• Press and hold the =>Fig. 253 button until an acoustic confirmation signal is emitted.
• OR: with some vehicle equipment options, you can open menu option Tyre pressure in the in-strument cluster display and save the new tyre pressures there =>page 24.
Once the saved values have been reset, the sys-tem calibrates itself independently to the fitted tyres and the tyre pressures filled by the driver dur-ing normal vehicle operation. The calibrated values are adopted and monitored after a long journey at various speeds.
If the wheels are loaded more heavily than normal, e.g. if the vehicle is carrying heavy payload, the tyre pressure must be raised to the recommended full-load tyre pressure before synchronisation =>page 367.
m The tyre monitoring system stops working if l!.J there is a fault in the ESC or ASS =>page 269.
m When using snow chains, an incorrect dis-l!.J play may be shown as the snow chains in-crease the tyre circumference =>page 367.
Page 367 of 486
Wheels and tyres
Useful information about wheels and tyres
o:::n Introduction
This chapter contains information on the following subjects:
Handling wheels and tyres .............. .
Rims
368
369
New wheels and tyres . . . . . . . . . . . . . . . . . . . 370 Tyre pressure . . . . . . . . . . . . . . . . 371
Tread depth and wear indicators 372 Tyre damage 373
Spare wheel . . . . . . . . . . . . . . . . . . . . . . . . . . . . 374
Tyre lettering . . . . . . . . . . . . . . . . . . . . . . . . . . . 375
Winter tyres . . . . . . . . . . • . • • . . . . . . . . . . . . 378 Snow chains . . . . . . . . . . . . . . . . . 379
Volkswagen Commercial Vehicles recommends that work on tyres and wheels is carried out by a qualified workshop. They are familiar with the pro-cedure and have the necessary special tools and spare parts and the proper facilities for disposing of the old tyres. Volkswagen Commercial Vehicles recommends using a Volkswagen Commercial Ve-hicles dealership for this purpose.
Additional information and warnings:
• Transporting 125
• Towing a trailer 139
• Braking, stopping and parking 269
• Tyre monitoring system 318
• Cleaning and caring for the vehicle exterior 380
• Consumer information 404
• Vehicle tool kit 416
• Hubcaps 417
• Changing a wheel 420
• Breakdown set 425
A WARNING
New tyres or tyres which are old, worn down or damaged cannot provide full levels of vehi-cle control and braking power.
• Incorrect handling of wheels and tyres can reduce vehicle safety and cause accidents and serious injuries.
A WARNING (Continued)
• All four wheels must be fitted with radial tyres of the same type, size (rolling circum-ference) and the same tread.
• New tyres will have to be run In as they will initially have reduced grip and braking ef-fect. Drive particularly carefully for the first 600 km in order to prevent accidents and se-rious injury.
• Check tyre pressures regularly and always keep to the specified tyre pressure value. If the tyre pressure is too low, it Is possible that the tyre temperature will Increase to such an extent when driving that the tread peels off and the tyre bursts.
• Never drive with worn tyres or tyres that are damaged (cuts, cracks or blisters). Driv-Ing with tyres in this condition can result in blown tyres, accidents and serious Injuries. Worn or damaged tyres must be replaced as soon as possible.
• Never exceed the top speed and load per-mitted for the fitted tyres.
• The effectiveness of the driver assist sys-tems and brake support systems depends on the tyre grip.
• If you notice unusual vibration or if the ve-hicle pulls to one side when driving, stop the car immediately and check the wheels and tyres for damage.
• In order to reduce the risk of losing con-trol of the vehicle, and the risk of accident and serious injury, never loosen the bolts on rims with bolted on rim rings.
• Do not use wheels or tyres if you do not know their history. Used wheels and tyres could be damaged, even If the damage is not visible.
• Old tyres (even if never used) can sudden-ly Jose pressure or burst, especially at high speeds. This can cause accidents and seri-ous injuries. Avoid using tyres that are more than six years old. If you have no alternative, drive slowly and with extra care at all times.
m For technical reasons, it is not generally pos-L!.J sible to use the wheels from other vehicles. This can also apply to wheels of the same vehicle .,.
Wheels and tyres I 367
Page 371 of 486
A wARNING
New tyres will have to be run in as they will Initially have reduced grip and braking effect.
• Drive particularly carefully for the first 600 km in order to prevent accidents and se-rious injury.
A WARNING
Wheels must have the necessary freedom of operation. If the wheels do not have the nec-essary freedom of operation, the tyre could rub on parts of the running gear, the vehicle body and the brake lines. This can lead to a fault in the brake system and to tread separa-tion and thus to a tyre bursting.
Tyre pressure
r-T'n First read and observe the introductory L-k.U Information and safety warnings & on page 367.
The correct tyre pressure for factory-fitted tyres is shown on the tyre pressure label and applies to all-season, summer and winter tyres. The tyre pres-sure label is located on the lock column on the left front door.
If the tyre pressure is too low or too high, the tyres will wear prematurely and the vehicle will not han-dle well => &. The correct tyre pressure is particu-larly important at high speeds. Incorrect tyre pres-sure causes premature wear and can cause a tyre burst.
The pressure should therefore be checked at least once a month and before starting a journey.
The given tyre pressure applies to cold tyres. Tyre pressure is always higher in warm tyres than it is in cold tyres.
For this reason, never reduce the pressure in warm tyres to adjust the tyre pressure. This would result in low tyre pressures that could potentially cause the tyre to burst suddenly.
Checking tyre pressure
Always check the tyre inflation pressure on "cold" tyres. A "cold" tyre can be defined as one on a ve-hicle that has only been driven a few kilometres (miles) within 3 hours prior to the test and at low speeds.
A WARNING (Continued)
• The actual tyre size must not exceed the tyre dimensions of manufacturers approved by Volkswagen Commercial Vehicles and must not rub on any vehicle body parts.
m Despite identical size details, the actual size L!..J of the various tyre makes may vary from these specified dimensions, or the tyre contours may vary considerably.
m Volkswagen Commercial Vehicles-approved L!..J tyres are guaranteed to have the dimensions that are suitable for the vehicle. The salesperson will have to provide a certificate from the tyre man-ufacturer for other tyre makes to prove that the tyre is also suitable for the vehicle. This certificate must be stored in a safe place in the vehicle.
• The tyre pressures must be adjusted to suit a heavy vehicle load.
• After altering the tyre pressures, please ensure that the valve caps are screwed on and observe any information and instructions on setting the tyre monitoring system =>page 318.
The temporary spare wheel is filled to the highest tyre pressure permissible for the vehicle.
A WARNING
Too high or too low a pressure may cause the tyre to suddenly lose pressure or burst while the vehicle is in motion. This can cause seri-ous accidents and fatal Injuries.
• If the tyre pressure Is too low, it is possi-ble that the tyre temperature will increase to such an extent when driving that the tread peels off and the tyre bursts.
• Fast speeds or overloading of the vehicle can cause overheating, sudden tyre damage including tyre bursts and ripping of the tread surface and thus to a loss of control of the vehicle.
• If the tyre pressure is too low or too high, the tyres will wear prematurely and the vehi-cle will not handle well. .,.
Wheels and tyres 371
Page 372 of 486
A WARNING (Continued)
• Check tyre pressures regularly, at least once a month, and before every long journey.
• All tyres must have the correct tyre pres-sure to suit the vehicle load.
• Never reduce excess pressure when the tyres are warm.
CD
• When attaching the tyre pressure gauge make sure that you do not position it at an an-gle to the valve shaft. This can damage the tyre valve.
Tread depth and wear indicators
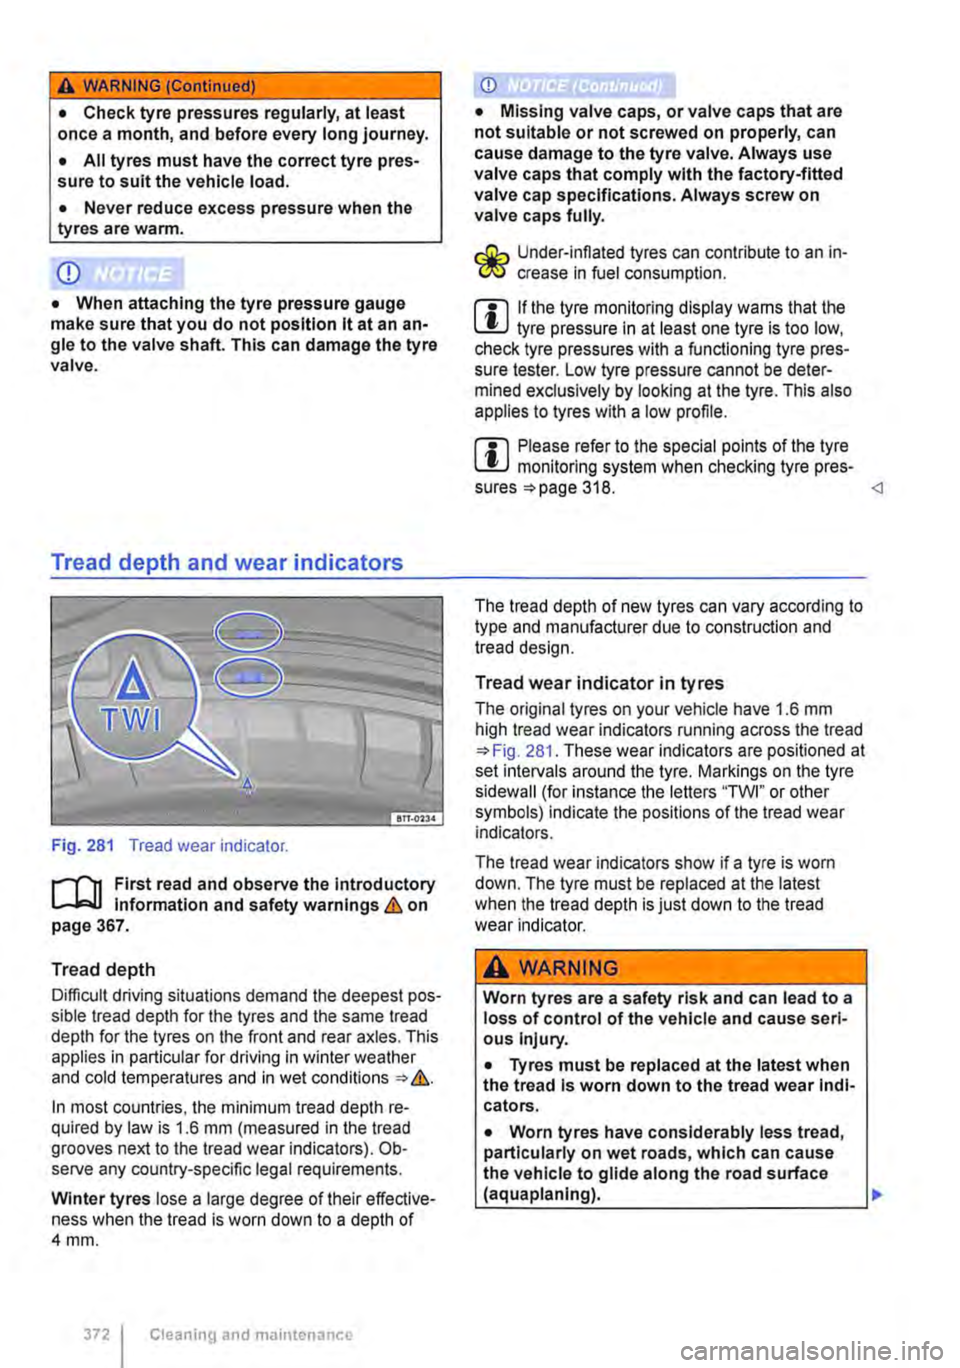
Fig. 281 Tread wear indicator.
r-fl1 First read and observe the Introductory L-.lo:::.l.l Information and safety warnings & on page 367.
Tread depth
Difficult driving situations demand the deepest pos-sible tread depth for the tyres and the same tread depth for the tyres on the front and rear axles. This applies in particular for driving in winter weather and cold temperatures and in wet conditions=>&.
In most countries, the minimum tread depth re-quired by law is 1.6 mm (measured in the tread grooves next to the tread wear indicators). Ob-serve any country-specific legal requirements.
Winter tyres lose a large degree of their effective-ness when the tread is worn down to a depth of 4mm.
3721 Cleaning and maintenance
CD
• Missing valve caps, or valve caps that are not suitable or not screwed on properly, can cause damage to the tyre valve. Always use valve caps that comply with the factory-fitted valve cap specifications. Always screw on valve caps fully.
Under-infiated tyres can contribute to an in-I!IS crease in fuel consumption.
m If the tyre monitoring display warns that the W tyre pressure in at least one tyre is too low, check tyre pressures with a functioning tyre pres-sure tester. Low tyre pressure cannot be deter-mined exclusively by looking at the tyre. This also applies to tyres with a low profile.
m Please refer to the special points of the tyre W monitoring system when checking tyre pres-sures =>page 318.
Tread wear indicator in tyres
The original tyres on your vehicle have 1.6 mm high tread wear indicators running across the tread =>Fig. 281. These wear indicators are positioned at set intervals around the tyre. Markings on the tyre sidewall (for instance the letters "TWI" or other symbols) indicate the positions of the tread wear indicators.
The tread wear indicators show if a tyre is worn down. The tyre must be replaced at the latest when the tread depth is just down to the tread wear indicator.
A WARNING
Worn tyres are a safety risk and can lead to a loss of control of the vehicle and cause seri-ous Injury.
• Tyres must be replaced at the latest when the tread Is worn down to the tread wear Indi-cators.
• Worn tyres have considerably less tread, particularly on wet roads, which can cause the vehicle to glide along the road surface (aquaplaning).
Page 374 of 486
Spare wheel
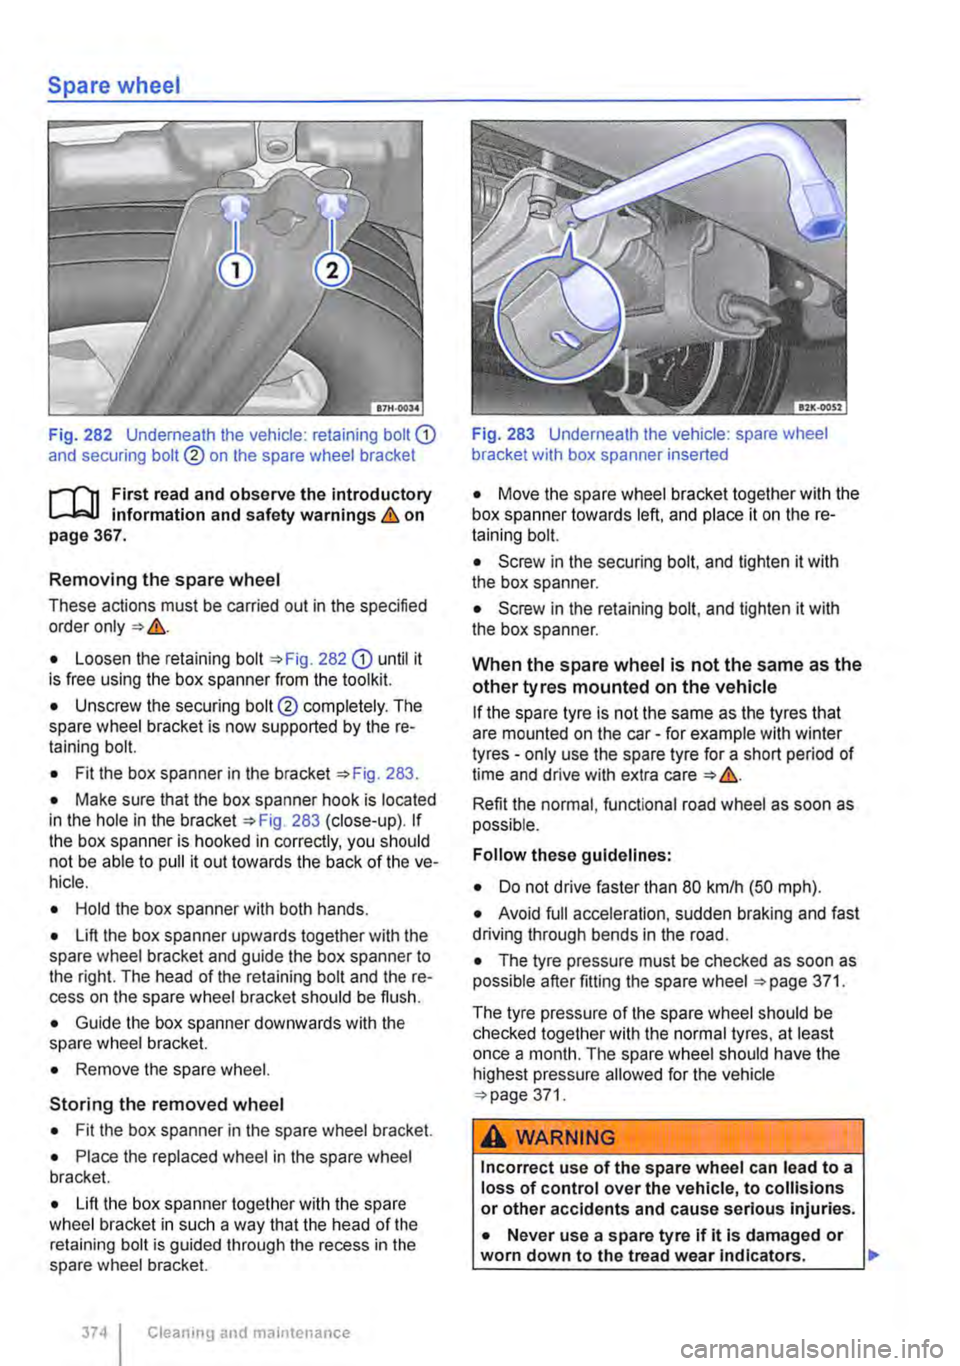
Fig. 282 Underneath the vehicle: retaining bolt G) and securing bolt® on the spare wheel bracket
r-T'n First read and observe the introductory L.-.lo:.U Information and safety warnings & on page 367.
Removing the spare wheel
These actions must be carried out in the specified order only &.
• Loosen the retaining bolt 282 G) until it is free using the box spanner from the toolkit.
• Unscrew the securing bolt® completely. The spare wheel bracket is now supported by the re-taining bolt.
• Fit the box spanner in the bracket 283.
• Make sure that the box spanner hook is located in the hole in the bracket 283 (close-up). If the box spanner is hooked in correctly, you should not be able to pull it out towards the back of the ve-hicle.
• Hold the box spanner with both hands.
• Lift the box spanner upwards together with the spare wheel bracket and guide the box spanner to the right. The head of the retaining bolt and the re-cess on the spare wheel bracket should be flush.
• Guide the box spanner downwards with the spare wheel bracket.
• Remove the spare wheel.
Storing the removed wheel
• Fit the box spanner in the spare wheel bracket.
• Place the replaced wheel in the spare wheel bracket.
• Lift the box spanner together with the spare wheel bracket in such a way that the head of the retaining bolt is guided through the recess in the spare wheel bracket.
374 I Cleaning and maintenance
Fig. 283 Underneath the vehicle: spare wheel bracket with box spanner inserted
• Move the spare wheel bracket together with the box spanner towards left, and place it on the re-taining bolt.
• Screw in the securing bolt, and tighten it with the box spanner.
• Screw in the retaining bolt, and tighten it with the box spanner.
When the spare wheel is not the same as the
other tyres mounted on the vehicle
If the spare tyre is not the same as the tyres that are mounted on the car-for example with winter tyres -only use the spare tyre for a short period of time and drive with extra care &.
Refit the normal, functional road wheel as soon as possible.
Follow these guidelines:
• Do not drive faster than 80 km/h (50 m ph).
• Avoid full acceleration, sudden braking and fast driving through bends in the road.
• The tyre pressure must be checked as soon as possible after fitting the spare wheel =>page 371.
The tyre pressure of the spare wheel should be checked together with the normal tyres, at least once a month. The spare wheel should have the highest pressure allowed for the vehicle 371.
A WARNING
Incorrect use of the spare wheel can lead to a loss of control over the vehicle, to collisions or other accidents and cause serious injuries.
• Never use a spare tyre if it is damaged or worn down to the tread wear Indicators. .,..