stop start VOLVO 240 1990 Owners Manual
[x] Cancel search | Manufacturer: VOLVO, Model Year: 1990, Model line: 240, Model: VOLVO 240 1990Pages: 143, PDF Size: 2.32 MB
Page 10 of 143
Volvo 1990 240 Model
pg. 11 Warning lights
The warning lights described on this page should never be on when drivin\
g
When the ignition is turned on, and before the engine starts, all of the\
warning lights should be on to test
the function of the bulbs. Should a light not go off after the engine ha\
s started, the system indicated
should be inspected. (However, the parking brake reminder light will no\
t go off until the parking brake
is fully released.)
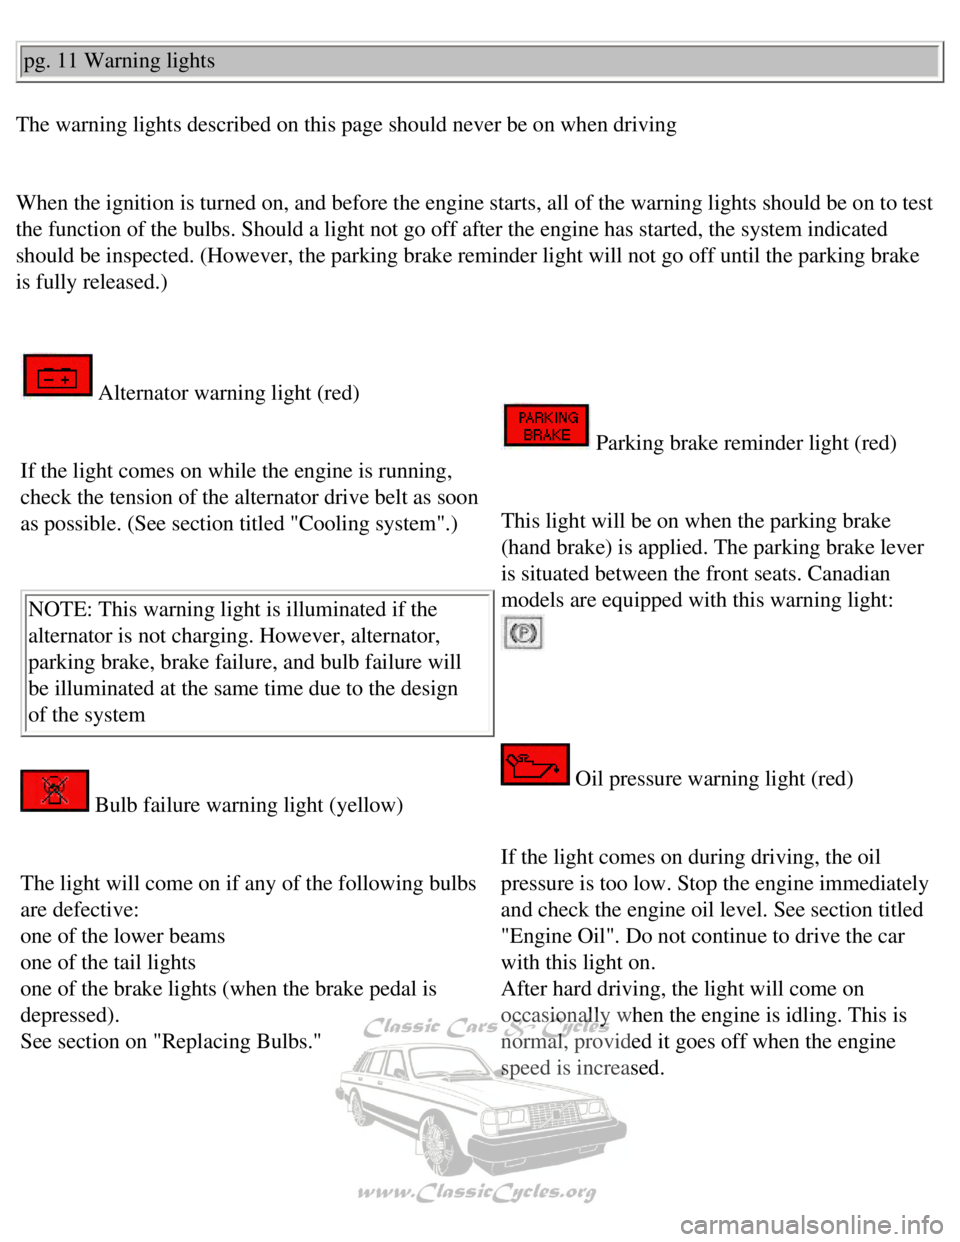
Alternator warning light (red)
If the light comes on while the engine is running,
check the tension of the alternator drive belt as soon
as possible. (See section titled "Cooling system".)
NOTE: This warning light is illuminated if the
alternator is not charging. However, alternator,
parking brake, brake failure, and bulb failure will
be illuminated at the same time due to the design
of the system
Parking brake reminder light (red)
This light will be on when the parking brake
(hand brake) is applied. The parking brake lever
is situated between the front seats. Canadian
models are equipped with this warning light:
Bulb failure warning light (yellow)
The light will come on if any of the following bulbs
are defective:
one of the lower beams
one of the tail lights
one of the brake lights (when the brake pedal is
depressed).
See section on "Replacing Bulbs."
Oil pressure warning light (red)
If the light comes on during driving, the oil
pressure is too low. Stop the engine immediately
and check the engine oil level. See section titled
"Engine Oil". Do not continue to drive the car
with this light on.
After hard driving, the light will come on
occasionally when the engine is idling. This is
normal, provided it goes off when the engine
speed is increased.
file:///K|/ownersdocs/1990/1990_240/90240_02.htm (1 of 4)12/30/2006 8:\
25:02 AM
Page 11 of 143
Volvo 1990 240 Model
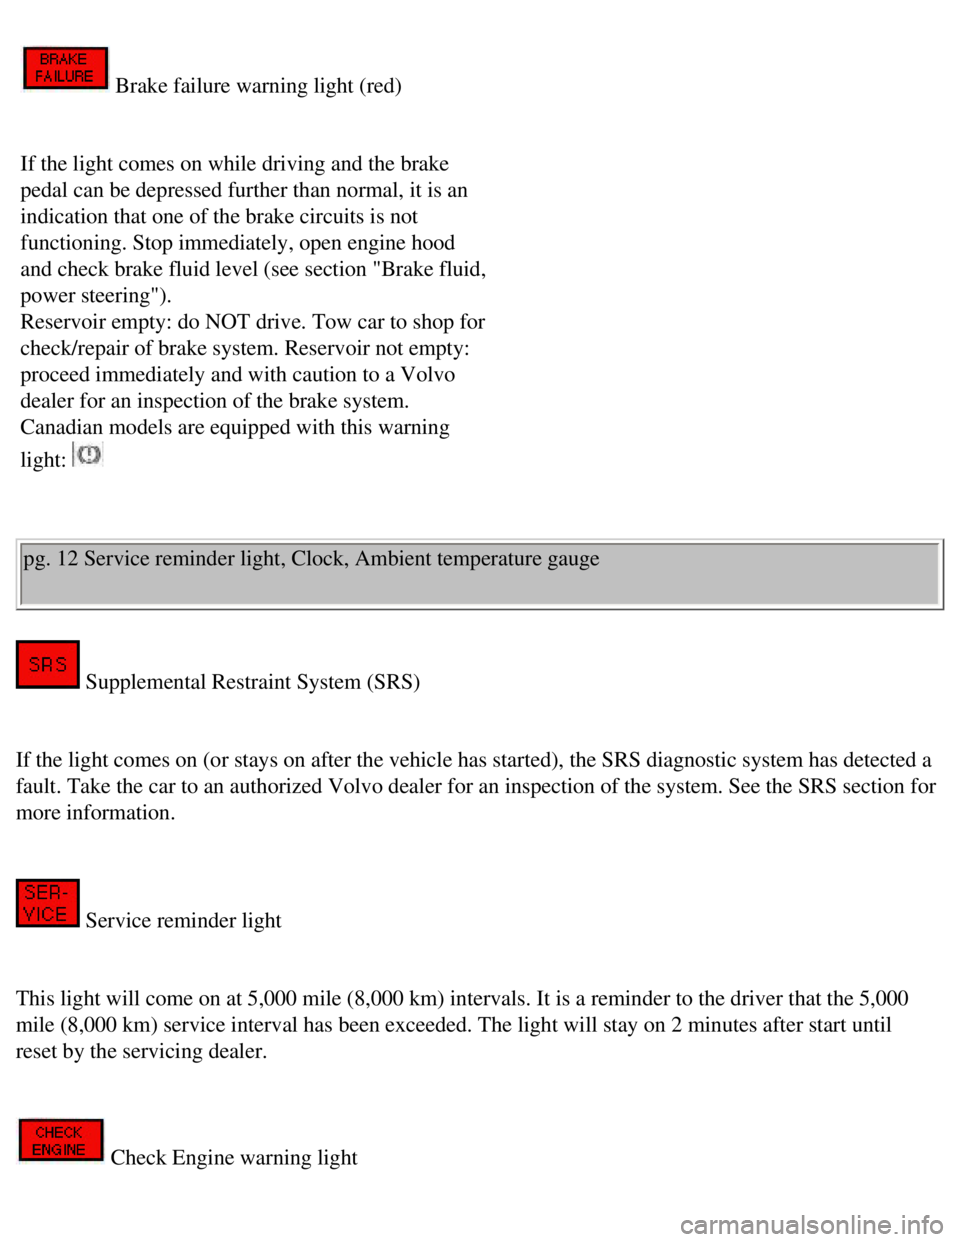
Brake failure warning light (red)
If the light comes on while driving and the brake
pedal can be depressed further than normal, it is an
indication that one of the brake circuits is not
functioning. Stop immediately, open engine hood
and check brake fluid level (see section "Brake fluid,
power steering").
Reservoir empty: do NOT drive. Tow car to shop for
check/repair of brake system. Reservoir not empty:
proceed immediately and with caution to a Volvo
dealer for an inspection of the brake system.
Canadian models are equipped with this warning
light:
pg. 12 Service reminder light, Clock, Ambient temperature gauge
Supplemental Restraint System (SRS)
If the light comes on (or stays on after the vehicle has started), the\
SRS diagnostic system has detected a
fault. Take the car to an authorized Volvo dealer for an inspection of t\
he system. See the SRS section for
more information.
Service reminder light
This light will come on at 5,000 mile (8,000 km) intervals. It is a re\
minder to the driver that the 5,000
mile (8,000 km) service interval has been exceeded. The light will sta\
y on 2 minutes after start until
reset by the servicing dealer.
Check Engine warning light
file:///K|/ownersdocs/1990/1990_240/90240_02.htm (2 of 4)12/30/2006 8:\
25:02 AM
Page 53 of 143
Volvo 1990 240 Model
To obtain best parking brake performance, the brake linings should be br\
oken in.
Stop 5-7 times from 30 mph (50 km/h), transmission in neutral, applyin\
g the parking brake with the
release button pressed in during the stop. The force must not lock the r\
ear wheels. If this happens,
release the brake enough to let the wheels rotate. Drive a mile between \
each stop to cool the brakes.
Check for proper parking brake operation.
Note: The brake lights are not illuminated when applying the parking bra\
ke. To warn traffic from
behind it is therefore advisable to depress the brake pedal slightly to \
illuminate the brake lights.
600 - 1,200 mile maintenance service
To ensure proper operation the car should be taken to a Volvo dealer bet\
ween the first 600 - 1,200 miles
(1,000 - 2,000 km) for a maintenance service. The oil in the engine, m\
anual transmission and rear axle
will then be changed. This is very important since the oil rapidly colle\
cts impurities during the break-in
period.
pg. 43 Driving economy, Shift indicator light
Economical driving does not necessarily mean driving slowly
Better driving economy may be obtained by thinking ahead, avoiding rapid\
starts and stops and
adjusting the speed of your vehicle to immediate traffic conditions. Obs\
erve the following rules:
l Bring the engine to normal operating temperature as soon as possible by \
driving with a light foot on
the accelerator pedal instead of allowing the engine to idle for a prolo\
nged period. A cold engine uses
more fuel and is subject to increased wear.
l When possible avoid using the car for driving short distances. This does\
not allow the engine to reach
normal operating temperature.
l Drive carefully and avoid rapid acceleration and hard braking.
l Do not exceed speed limit.
l Avoid carrying unnecessary items (extra load) in the car.
l Check tire pressures regularly (cold tires).
l Remove snow tires when threat of snow or ice has ended.
l Note that roof racks, ski racks, etc., increase air resistance and there\
by fuel consumption.
file:///K|/ownersdocs/1990/1990_240/90240_09.htm (3 of 6)12/30/2006 8:\
25:05 AM
Page 60 of 143
Volvo 1990 240 Model
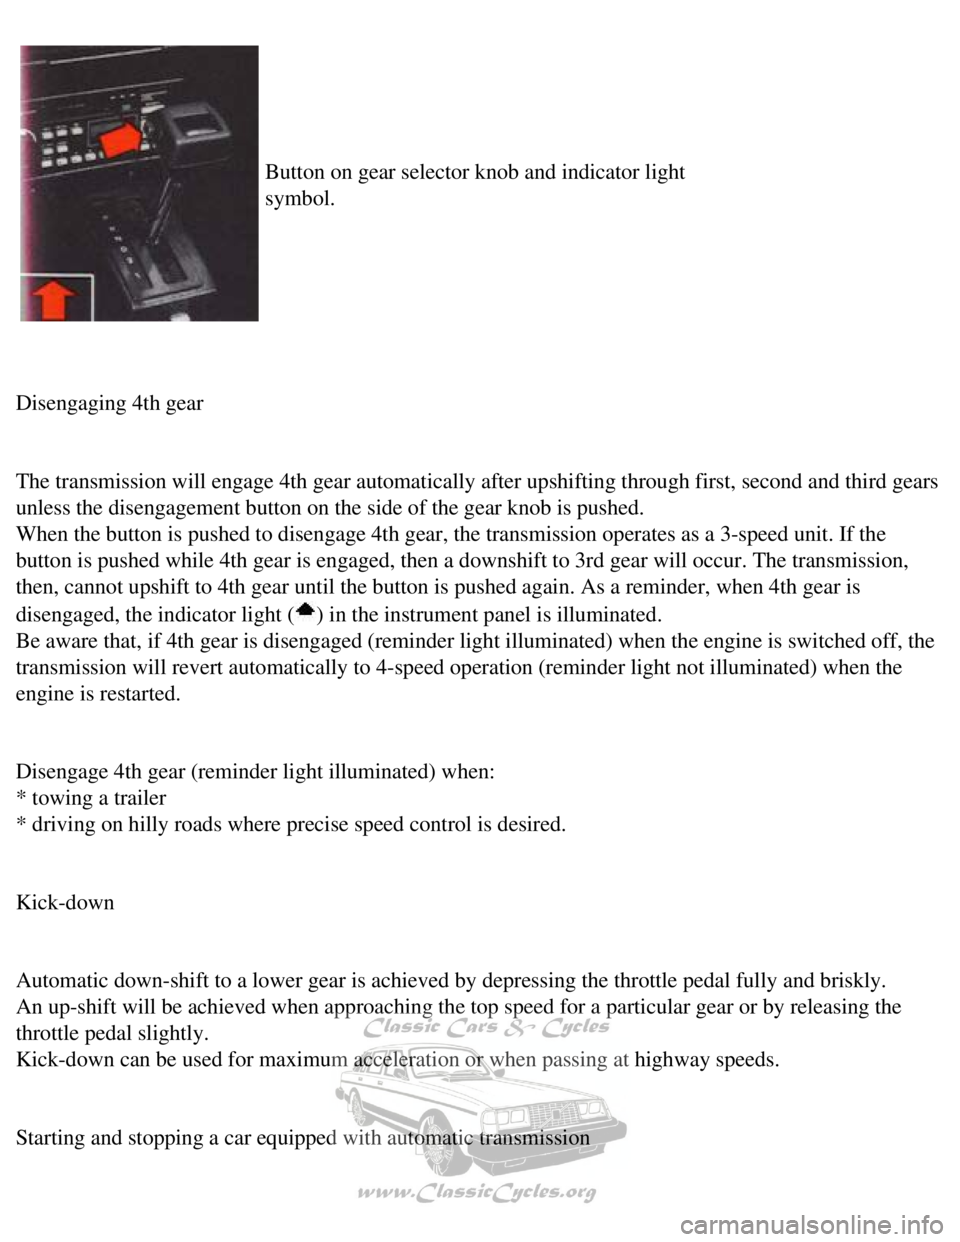
Button on gear selector knob and indicator light
symbol.
Disengaging 4th gear
The transmission will engage 4th gear automatically after upshifting thr\
ough first, second and third gears
unless the disengagement button on the side of the gear knob is pushed. \
When the button is pushed to disengage 4th gear, the transmission operat\
es as a 3-speed unit. If the
button is pushed while 4th gear is engaged, then a downshift to 3rd gear\
will occur. The transmission,
then, cannot upshift to 4th gear until the button is pushed again. As a \
reminder, when 4th gear is
disengaged, the indicator light (
) in the instrument panel is illuminated.
Be aware that, if 4th gear is disengaged (reminder light illuminated) \
when the engine is switched off, the
transmission will revert automatically to 4-speed operation (reminder l\
ight not illuminated) when the
engine is restarted.
Disengage 4th gear (reminder light illuminated) when:
* towing a trailer
* driving on hilly roads where precise speed control is desired.
Kick-down
Automatic down-shift to a lower gear is achieved by depressing the throt\
tle pedal fully and briskly.
An up-shift will be achieved when approaching the top speed for a partic\
ular gear or by releasing the
throttle pedal slightly.
Kick-down can be used for maximum acceleration or when passing at highwa\
y speeds.
Starting and stopping a car equipped with automatic transmission
file:///K|/ownersdocs/1990/1990_240/90240_10.htm (4 of 7)12/30/2006 8:\
25:05 AM
Page 61 of 143
Volvo 1990 240 Model
1. Enter the car and check that the seat is adjusted properly. Make sure\
that the brake pedal can be
depressed completely. Move the seat closer if necessary.
2. Fasten the seat belt.
3. Apply the parking brake if not already set. Depress the brake pedal w\
ith your right foot.
4. Place the gear selector in Park (or neutral).
5. Without touching the accelerator pedal, turn the ignition key to the \
starting position. Release the key
as soon as the engine starts.
6. Select the desired gear. There is a slight delay before the gear enga\
ges which is most notable when
selecting Reverse. Do not accelerate until you have felt the gear engage\
!
Note: Too-rapid acceleration immediately after selecting a gear will cau\
se harsh engagement and
premature transmission wear.
7. Release parking brake, then foot brake, and accelerate. To stop the c\
ar release the accelerator and
apply the brakes with your right foot.
It is not necessary to move the gear selector as the transmission will d\
ownshift automatically.
When idling for extended periods of time, select position N to prevent u\
nnecessary heating of the
transmission.
WARNING! Always place gear selector in Park and apply parking brake befo\
re leaving vehicle. Never
leave car unattended with engine running.
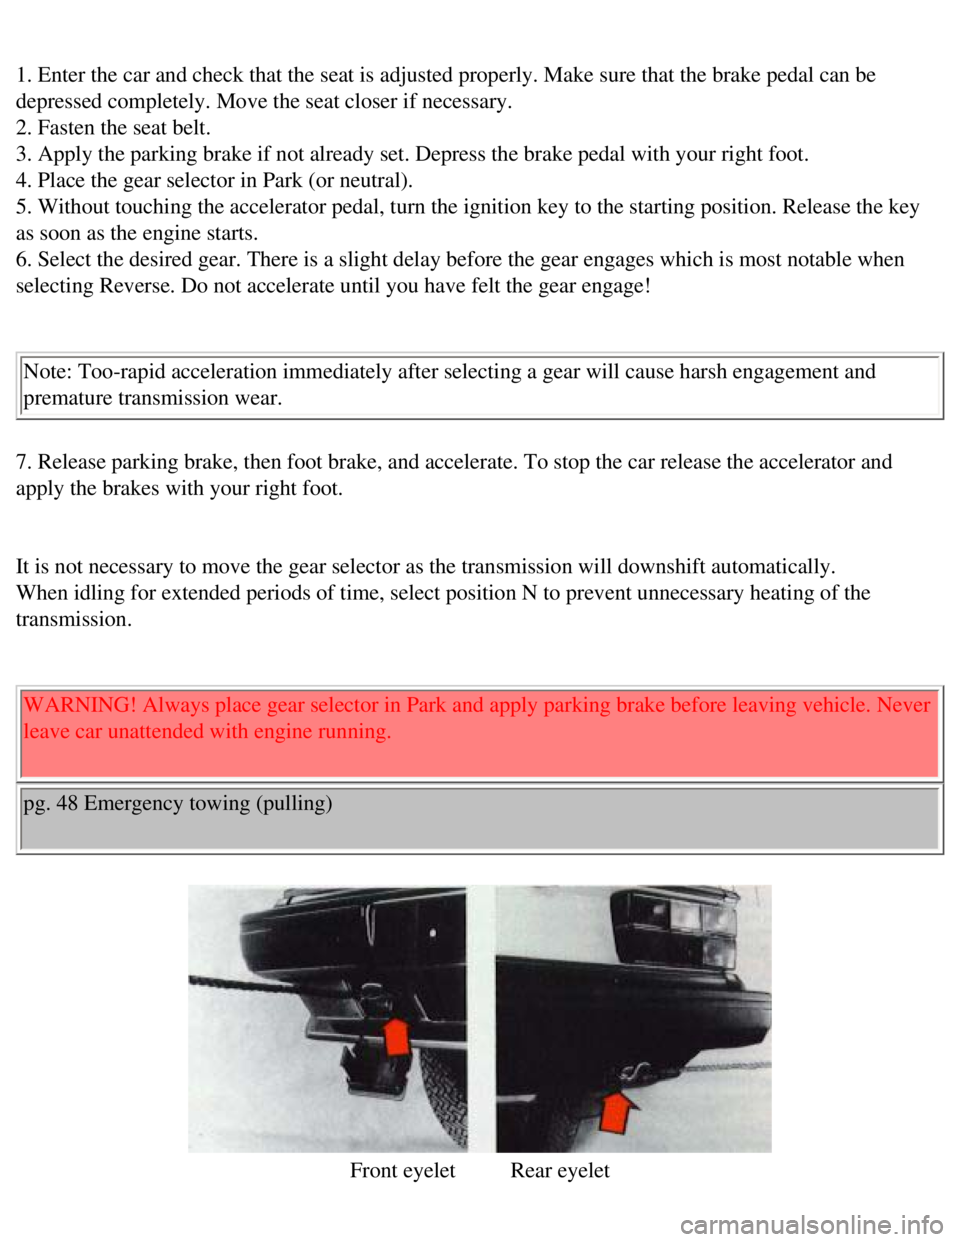
pg. 48 Emergency towing (pulling)
Front eyelet Rear eyelet
file:///K|/ownersdocs/1990/1990_240/90240_10.htm (5 of 7)12/30/2006 8:\
25:05 AM
Page 100 of 143
Volvo 1990 240 Model
Cooling system
The risk of overheating is greatest, especially in hot weather, when:
- towing a trailer up steep inclines for prolonged periods at full throt\
tle, and at low engine rpm.
- idling for prolonged periods while the air conditioning system is in o\
peration.
- stopping the engine suddenly after high speed driving, so called after\
-boiling.
To avoid overheating. the following rules should be followed.
l Reduce speed and downshift when towing a trailer up long steep inclines.\
The risk of over heating can
be reduced by switching off the air conditioning system for a short whil\
e.
l Do not let the engine idle unnecessarily.
l Do not stop the engine immediately after high-speed driving, but allow t\
he engine to idle for 1/2 - 1
minute before switching off.
When the risk of overheating is imminent, or in the event of overheating\
, (the temperature gauge goes
repeatedly into, or stays continually in, the red section) the followin\
g precautions should be taken:
l Switch off the air conditioning system and switch the heater to full (m\
aximum) position.
l Stop the car and put the gear lever into neutral position-position N. Do\
not stop the engine!
l Increase the engine speed to approx. 2000 rpm (twice idling speed).
l Check the level of coolant in the expansion tank. Top-up, if necessary
pg. 75 Alternator, Jump starting
Electrical System cautions
When changing the battery or when carrying out work involving the electr\
ical system, the following
should be observed:
1 A battery connection to the wrong terminal will damage the diodes. Bef\
ore connections are made,
check the polarity of the battery with a voltmeter.
2 If booster batteries are used for starting, they must be properly conn\
ected to prevent the diodes from
being damaged. For correct connection, see "Jump starting".
3 The battery leads should be disconnected any time the battery is being\
charged.
file:///K|/ownersdocs/1990/1990_240/90240_15.htm (8 of 10)12/30/2006 8\
:25:09 AM