ECO mode VOLVO C30 2008 User Guide
[x] Cancel search | Manufacturer: VOLVO, Model Year: 2008, Model line: C30, Model: VOLVO C30 2008Pages: 234, PDF Size: 4.8 MB
Page 118 of 234
Bring the engine to normal operating temperature as soon as possible by driving with a light foot on the accelerator
pedal for the first few minutes of operation. A cold engine uses more fuel and is subject to increased wear.
Whenever possible, avoid using the vehicle for driving short distances. This does not allow the engine to reach
normal operating temperature.
Drive carefully and avoid rapid acceleration and hard braking.
Use the transmission's (D)rive position as often as possible and avoid using kickdown.
Do not exceed posted speed limits.
Avoid carrying unnecessary items (extra load) in the vehicle.
Maintain correct tire pressure. Check tire pressure regularly (when tires are cold).
Remove snow tires when threat of snow or ice has ended.
Note that roof racks, ski racks, etc., increase air resistance and also fuel consumption.
At highway driving speeds, fuel consumption will be lower with the air conditioning on and the windows closed
than with the air conditioning off and the windows open.
Using the onboard trip computer's fuel consumption modes can help you learn how to drive more economically.
Other factors that decrease gas mileage are:
Dirty air cleaner
Dirty engine oil and clogged oil filter
Dragging brakes
Incorrect front end alignment
Some of the above mentioned items and others are checked at the standard maintenance intervals.
WARNING
Driving with the rear liftgate open : Driving with the rear liftgate open could lead to poisonous exhaust gases
entering the passenger compartment. If the rear liftgate must be kept open for any reason, proceed as follows:
Close the windows
Set the ventilation system control to air flow to floor, windshield and side windows and the blower control to its
highest setting.
Weight distribution affects handling
At the specified curb weight your vehicle has a tendency to understeer, which means that the steering wheel has to be
turned more than might seem appropriate for the curvature of a bend. This ensures good stability and reduces the risk
of rear wheel skid. Remember that these properties can alter with the vehicle load. The heavier the load in the cargo
area, the less the tendency to understeer.
Handling, roadholding
Vehicle load, tire design and inflation pressure all affect vehicle handling. Therefore, check that the tires are inflated to
the recommended pressure according to the vehicle load. See the "Tire pressure" section. Loads should be distributed
so that capacity weight
133 06 Starting and driving
General information
or maximum permissible axle loads are not exceeded.
Driving through water
Page 126 of 234
141 06 Starting and driving
Starting the vehicle
To start the engine
1. Fasten the seat belt.
WARNING
Before starting, check that the seat, steering wheel and mirrors are adjusted properly. Make sure the brake pedal can
be depressed completely. Adjust the seat if necessary.
2. Apply the parking brake if not already set. The gear selector should be locked in the (P)ark position (Shiftlock). See
also page 147
.
Manual transmission : the clutch must be fully depressed.
3. The vehicle is equipped with an autostart feature. Without touching the throttle pedal, turn the key to position III
and release it. The starter motor will then operate automatically (for up to ten seconds) until the engine starts. If the
engine fails to start, repeat this step.
NOTE
After a cold start, idle speed may be noticeably higher than normal for a short period. This is done to help bring
components in the emission control system to their normal operating temperature as quickly as possible, which
enables them to control emissions and help reduce the vehicle's impact on the environment.
4. To release the gear selector from the (P)ark position, the engine must be running (or the ignition key must be in
position II) and the brake pedal must be depressed.
5. Select the desired gear. On models with an automatic transmission, the gear engages after a very slight delay which
is especially noticeable when selecting R.
NOTE
Immobilizer : If two of the keys to your vehicle are close together, e.g., on the same key ring when you try to start
the vehicle, this could cause interference in the immobilizer system and result in the vehicle not starting. If this
should occur, remove one of the keys from the key ring before trying to start the vehicle again.
Keylock: Models equipped an automatic transmission have a keylock system. When the engine is switched off, the
gear selector must be in the ( P)ark position before the key can be removed from the ignition switch
1.
When starting in cold weather, the transmission may shift up at slightly higher engine speeds than normal until the
automatic transmission fluid reaches normal operating temperature.
Do not race a cold engine immediately after starting. Oil flow may not reach some lubrication points fast enough
to prevent engine damage.
1The optional keyless drive start control does not need to be removed from the ignition switch.
142 06 Starting and driving
Starting the vehicle
Page 127 of 234
WARNING
Volvo's floor mats are specially manufactured for your car. They must be firmly secured in the clips on the floor so
that they cannot slide and become trapped under the pedals on the driver's side.
CAUTION
Automatic transmission: The engine should be idling when you move the gear selector. Never accelerate until after
you feel the transmission engage! Accelerating immediately after selecting a gear will cause harsh engagement and
premature transmission wear. Selecting P or N when idling at a standstill for prolonged periods of time will help
prevent overheating of the automatic transmission fluid.
WARNING
Always place the gear selector in Park (manual transmission: first or reverse gear) and apply the parking brake
before leaving the vehicle. Never leave the vehicle unattended with the engine running.
Always open garage doors fully before starting the engine inside a garage to ensure adequate ventilation. The
exhaust gases contain carbon monoxide, which is invisible and odorless but very poisonous.
143 06 Starting and driving
Starting the vehicle (keyless drive)
Starting a vehicle with keyless drive (option as available)
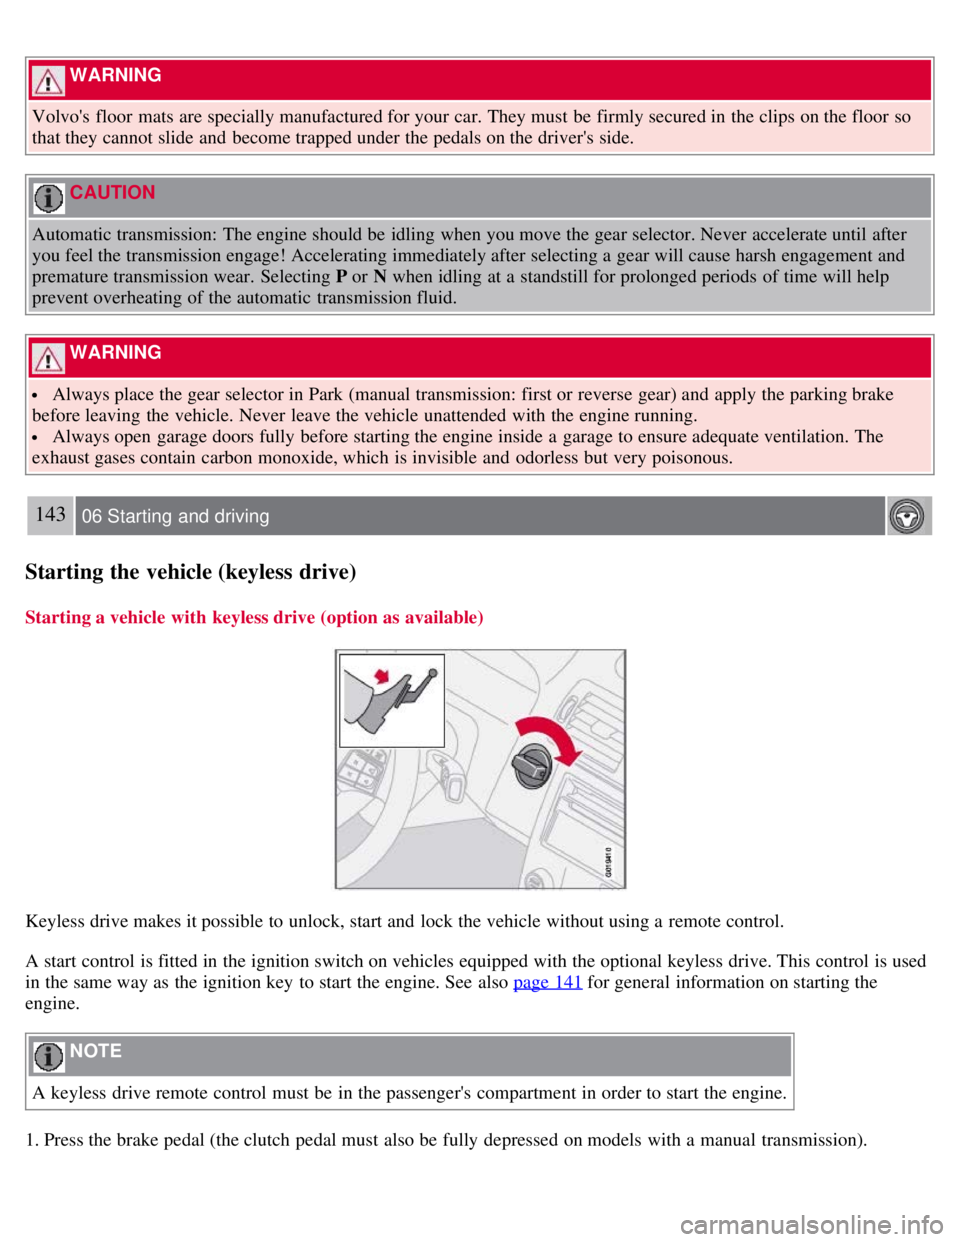
Keyless drive makes it possible to unlock, start and lock the vehicle without using a remote control.
A start control is fitted in the ignition switch on vehicles equipped with the optional keyless drive. This control is used
in the same way as the ignition key to start the engine. See also page 141
for general information on starting the
engine.
NOTE
A keyless drive remote control must be in the passenger's compartment in order to start the engine.
1. Press the brake pedal (the clutch pedal must also be fully depressed on models with a manual transmission).
Page 131 of 234
NOTE
If the gear selector is in the Neutral position and the vehicle has been at a standstill for at least 3 seconds, the brake
pedal must be pressed before the gear selector can be moved to another position.
In order to move the gear selector to another position:
1. Turn the ignition key to position II (if the engine is not already running).
2. Depress the brake pedal.
3. Move the gear selector to the desired position.
D - Drive
D is the normal driving position. The Drive position offers 5 forward gears
1.The vehicle automatically shifts between
the various forward gears, based on the level of acceleration and speed. The vehicle must be at a standstill when
shifting to position D from position R.
1T5 models have 6 forward gears.
Manual shifting - Geartronic
The manual shifting mode (Geartronic) can be selected at any time to manually select forward gears, including while
the vehicle is moving.
NOTE
Reverse, Neutral, and Park cannot be selected in Geartronic mode.
To access the ( M)anual shifting position from ( D)rive, move the gear selector to the right to M.
To return to the ( D)rive position from M , move the gear selector to the left.
While driving
If you select the M position while driving, the gear that was being used in the Drive position will also initially be
selected in the M position.
Move the gear selector forward (toward "+") to shift to a higher gear or rearward (toward "-") to shift to a lower
gear.
If you hold the gear selector toward "-", the transmission will downshift one gear at a time and will utilize the
braking power of the engine. If the current speed is too high for using a lower gear, the downshift will not occur until
the speed has decreased enough to allow the lower gear to be used.
If you slow to a very low speed, the transmission will automatically shift down.
Cold starts (turbo engines)
When driving before the engine has reached its normal operating temperature, the transmission will shift up at slightly
higher engine speeds to heat the three-way catalytic converter as quickly as possible.
Kickdown
Automatic shift to a lower gear (kickdown) is achieved by depressing the accelerator pedal fully and briskly. An
upshift will occur when approaching the top speed for a particular gear or by releasing the accelerator pedal slightly.
Kickdown can be used for maximum acceleration or when passing at highway speeds.
Page 149 of 234
2 0 0 8
VOLVO C30
164 07 Wheels and tires
General information 166
Tire inflation168
Tire designations172
Glossary of tire terminology174
Carrying loads175
Uniform tire quality gradings176
Winter driving177
Temporary spare178
Wheel nuts179
Tire rotation180
Changing a wheel181
Tire Pressure Monitoring System (TPMS)184
165 07 Wheels and tires
166 07 Wheels and tires
General information
Your vehicle is equipped with tires according to the vehicle's tire information placard on the B-pillar (the structural
member at the side of the vehicle, at the rear of the driver's door opening), or on the inside of the fuel filler door on
Canadian models.
The tires have good road holding characteristics and offer good handling on dry and wet surfaces. It should be noted
however that the tires have been developed to give these features on snow/ice-free surfaces.
Certain models are equipped with "all-season" tires, which provide a somewhat higher degree of road holding on
slippery surfaces than tires without the "all-season" rating. However, for optimum road holding on icy or snow-
covered roads, we recommend suitable winter tires on all four wheels.
Page 153 of 234
After driving a distance of approximately 1 mile (1.6 km), the tires are considered to be hot. If you have to drive
farther than this distance to pump your tire(s), check and record the tire pressure first and add the appropriate air
pressure when you get to the pump.
If checking tire pressure when the tire is hot, never "bleed" or reduce air pressure. The tires are hot from driving and it
is normal for pressures to increase above recommended cold pressures. A hot tire at or below recommended cold
inflation pressure could be significantly under-inflated.
To check inflation pressure:
1. Remove the cap from the valve on one tire, then firmly press the tire gauge onto the valve.
2. Add air to reach the recommended air pressure
3. Replace the valve cap.
4. Repeat this procedure for each tire, including the spare.
5. Visually inspect the tires to make sure there are no nails or other objects embedded that could puncture the tire and
cause an air leak.
6. Check the sidewalls to make sure there are no gouges, cuts, bulges or other irregularities.
NOTE
If you overfill the tire, release air by pushing on the metal stem in the center of the valve. Then recheck the
pressure with your tire gauge.
Some spare tires require higher inflation pressure than the other tires. Consult the tire inflation table on page 170
or see the inflation pressure placard.
170 07 Wheels and tires
Tire inflation
Tire inflation pressure tables - U.S. models
The following tire pressures are recommended by Volvo for your vehicle. Refer to the tire inflation placard for
information specific to the tires installed on your vehicle at the factory.
Page 154 of 234
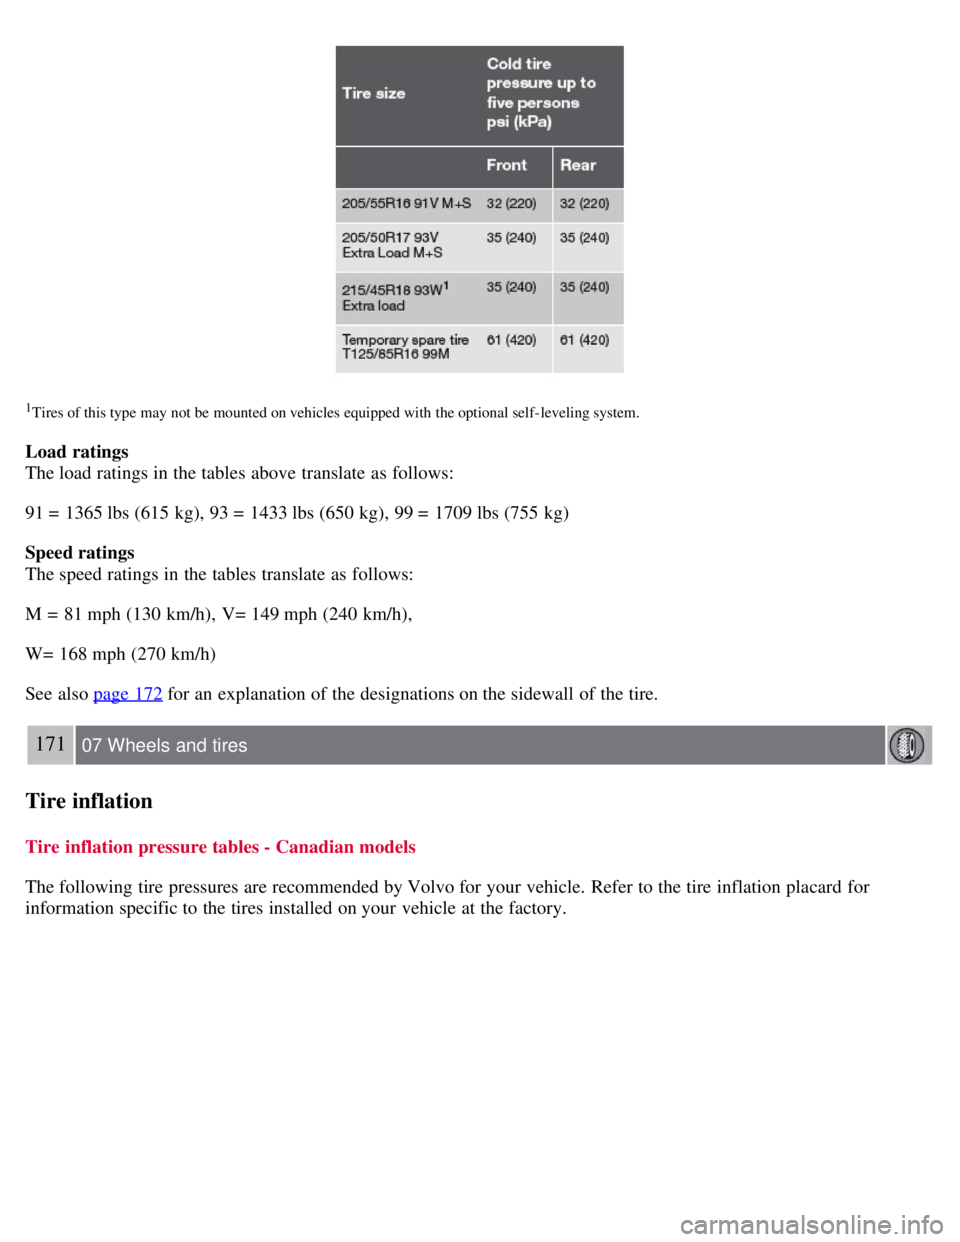
1Tires of this type may not be mounted on vehicles equipped with the optional self- leveling system.
Load ratings
The load ratings in the tables above translate as follows:
91 = 1365 lbs (615 kg), 93 = 1433 lbs (650 kg), 99 = 1709 lbs (755 kg)
Speed ratings
The speed ratings in the tables translate as follows:
M = 81 mph (130 km/h), V= 149 mph (240 km/h),
W= 168 mph (270 km/h)
See also page 172
for an explanation of the designations on the sidewall of the tire.
171 07 Wheels and tires
Tire inflation
Tire inflation pressure tables - Canadian models
The following tire pressures are recommended by Volvo for your vehicle. Refer to the tire inflation placard for
information specific to the tires installed on your vehicle at the factory.
Page 156 of 234
6. H: The tire's speed rating, or the maximum speed at which the tire is designed to be driven for extended periods of
time, carrying a permissible load for the vehicle, and with correct inflation pressure. For example, H indicates a speed
rating of 130 mph (210 km/h).
NOTE
This information may not appear on the tire because it is not required by law.
7. M+S or M/S = Mud and Snow, AT = All Terrain, AS = All Season
8. U.S. DOT Tire Identification Number (TIN) : This begins with the letters "DOT" and indicates that the tire meets
all federal standards. The next two numbers or letters are the plant code where it was manufactured, the next two are
the tire size code and the last four numbers represent the week and year the tire was built. For example, the numbers
317 mean the 31st week of 1997. After 2000 the numbers go to four digits. For example, 2501 means the 25th week of
2001. The numbers in between are marketing codes used at the manufacturer's discretion. This information helps a tire
manufacturer identify a tire for safety recall purposes.
9. Tire Ply Composition and Material Used: Indicates the number of plies indicates or the number of layers of rubber-
coated fabric in the tire tread and sidewall. Tire manufacturers also must indicate the ply materials in the tire and the
sidewall, which include steel, nylon, polyester, and others.
10. Maximum Load : Indicates the maximum load in pounds and kilograms that can be carried by the tire. Refer to the
vehicle's tire information placard or the safety certification label, located on the B-Pillar or the driver's door or on the
inside of the fuel filler door on Canadian models, for the correct tire pressure for your vehicle.
11. Treadwear, Traction, and Temperature grades : See page 176
for more information.
173 07 Wheels and tires
Tire designations
12. Maximum permissible inflation pressure: the greatest amount of air pressure that should ever be put in the tire.
This limit is set by the tire manufacturer.
The tire suppliers may have additional markings, notes or warnings such as standard load, radial tubeless, etc.
174 07 Wheels and tires
Glossary of tire terminology
Tire terminology
Tire information placard : A placard showing the OE (Original Equipment) tire sizes, recommended inflation
pressure, and the maximum weight the vehicle can carry.
Tire Identification Number (TIN) : A number on the sidewall of each tire providing information about the tire
brand and manufacturing plant, tire size and date of manufacturer.
Inflation pressure : A measure of the amount of air in a tire.
Standard load: A class of P-metric or Metric tires designed to carry a maximum load at 35 psi [37 psi (2.5 bar) for
Metric tires]. Increasing the inflation pressure beyond this pressure will not increase the tires load carrying capability.
Extra load : A class of P-metric or Metric tires designed to carry a heavier maximum load at 41 psi [43 psi (2.9 bar)
for Metric tires]. Increasing the inflation pressure beyond this pressure will not increase the tires load carrying
Page 157 of 234
capability.
kPa: Kilopascal, a metric unit of air pressure.
PSI: Pounds per square inch, a standard unit of air pressure.
B-pillar : The structural member at the side of the vehicle behind the front door.
Bead area of the tire : Area of the tire next to the rim.
Sidewall of the tire: Area between the bead area and the tread.
Tread area of the tire : Area of the perimeter of the tire that contacts the road when mounted on the vehicle.
Rim: The metal support (wheel) for a tire or a tire and tube assembly upon which the tire beads are seated.
Maximum load rating : a figure indicating the maximum load in pounds and kilograms that can be carried by the
tire. This rating is established by the tire manufacturer.
Maximum permissible inflation pressure : the greatest amount of air pressure that should ever be put in the tire.
This limit is set by the tire manufacturer.
Recommended tire inflation pressure : inflation pressure, established by Volvo, which is based on the type of tires
that are mounted on a vehicle at the factory. This inflation pressure is affected by the number of occupants in the car,
the amount of cargo, and the speed at which the vehicle will be driven for a prolonged period. This information can be
found on the tire inflation placard(s) located on the driver's side B-pillar or on the inside of the fuel filler door on
Canadian models, and in the tire inflation table in this chapter.
Cold tires : The tires are considered to be cold when they have the same temperature as the surrounding (ambient)
air. This temperature is normally reached after the vehicle has been parked for at least 3 hours.
Properly loading your vehicle will provide maximum return of vehicle design performance.
175 07 Wheels and tires
Carrying loads
Vehicle loading
Before loading your vehicle, familiarize yourself with the following terms for determining your vehicle's weight
ratings, with or without a trailer, from the vehicle's Federal/Canadian Motor Vehicle Safety Standards
(FMVSS/CMVSS) label, and the vehicle's tire information placard:
Curb weight
The weight of the vehicle including a full tank of fuel and all standard equipment. It does not include passengers,
cargo, or optional equipment.
Capacity weight
All weight added to the curb weight, including cargo and optional equipment. When towing, trailer hitch tongue load
is also part of cargo weight.
Permissible axle weight
The maximum allowable weight that can be carried by a single axle (front or rear). These numbers are shown on the
Federal/Canadian Motor Vehicle Safety Standards (FMVSS/CMVSS) label. The total load on each axle must never
exceed its maximum permissible weight.
Gross vehicle weight (GVW)
The vehicle's curb weight + cargo + passengers.
NOTE
The location of the various labels in your vehicle can be found on page 247
.
A table listing important weight limits for your vehicle can be found on page 249.
Page 207 of 234
To use the AUTO function:
1. Select a waveband using the AM/FM button (1).
2. Start the search by pressing AUTO until AUTO STORING appears in the display.
When the search is completed, AUTO STORING will no longer be displayed If there are no stations with sufficient
signal strength, NO AST FOUND is displayed.
The auto-stored stations can be selected using the preset buttons (2).
Press EXIT (6) to terminate the automatic storing function.
When the radio is in auto-store mode, AUTO is shown in the display. AUTO disappears when you return to normal
radio mode, which can be done by briefly pressing AM/FM (1), EXIT (6), or AUTO (7).
234 10 Audio
Radio functions
To return to the Auto-store mode, press the AUTO button briefly and select a stored station by pressing one of the
preset buttons (2).
Saving auto-stored stations in the preset memory
An auto-stored station can be saved in the memory for manually preset stations.
1. Press AUTO (7) briefly.
2. Auto is displayed.
3. Press one of the preset buttons (2) under which the station is to be stored. Hold down the button until STATION
STORED is displayed.
The radio will then exit auto-store mode and the stored station can be selected by pressing the preset button.
Scanning
SCAN (4) automatically searches through the selected waveband for strong AM or FM stations. When the radio finds a
station, that station will be played for approximately 8 seconds, after which scanning resumes.
Activating/deactivating SCAN
1. Select radio mode using the AM/FM button (2).
2. Press SCAN to activate the function. SCAN is shown in the display.
3. Press the SCAN or EXIT button to deactivate the scan function and listen to the selected station.
Storing a station found with SCAN
A station can be stored as a preset while the SCAN function is activated.
Press one of the preset buttons (2) under which the station is to be stored. Hold down the button until STATION
STORED is displayed.