buttons VOLVO C30 2008 User Guide
[x] Cancel search | Manufacturer: VOLVO, Model Year: 2008, Model line: C30, Model: VOLVO C30 2008Pages: 234, PDF Size: 4.8 MB
Page 91 of 234
2. Move the control forward/rearward to move the seat forward or rearward.
3. Move this section of the control up or down to raise/lower the rear section of the seat cushion.
4. Backrest tilt.
NOTE
The power seats have an overload protector that activates if a seat is blocked by any object. If this occurs, switch off
the ignition (key in position 0) and wait for approximately 20 seconds before operating the seat again.
Emergency stop
If the seat inadvertently begins to move, press any of the buttons to stop the seat.
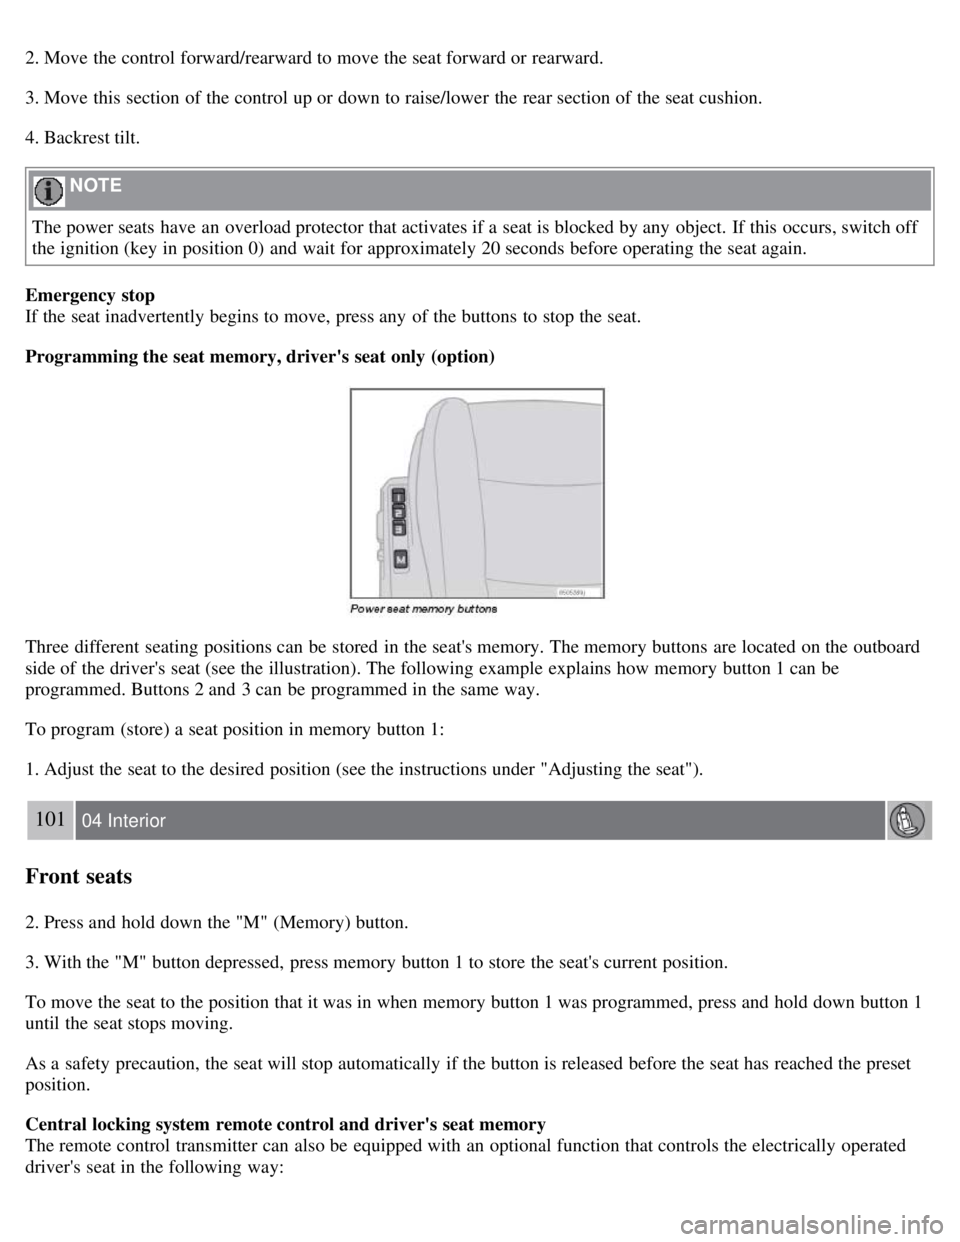
Programming the seat memory, driver's seat only (option)
Three different seating positions can be stored in the seat's memory. The memory buttons are located on the outboard
side of the driver's seat (see the illustration). The following example explains how memory button 1 can be
programmed. Buttons 2 and 3 can be programmed in the same way.
To program (store) a seat position in memory button 1:
1. Adjust the seat to the desired position (see the instructions under "Adjusting the seat").
101 04 Interior
Front seats
2. Press and hold down the "M" (Memory) button.
3. With the "M" button depressed, press memory button 1 to store the seat's current position.
To move the seat to the position that it was in when memory button 1 was programmed, press and hold down button 1
until the seat stops moving.
As a safety precaution, the seat will stop automatically if the button is released before the seat has reached the preset
position.
Central locking system remote control and driver's seat memory
The remote control transmitter can also be equipped with an optional function that controls the electrically operated
driver's seat in the following way:
Page 92 of 234
1. Adjust the seat to the desired position.
2. When you leave the car, lock it using the remote control.
3. The next time the driver's door is unlocked with the same remote control and that door is opened within 2 minutes,
the driver's seat and side door mirrors will automatically move to the position that they were in when the doors were
most recently locked with the same remote control.
NOTE
The memory function in the remote control operates independently of the memory function in the seat.
WARNING
Because the driver's seat can be adjusted with the ignition off, children should never be left unattended in the car.
Movement of the seat can be STOPPED at any time by pressing any button on the power seat control panel.
Do not adjust the seat while driving. The seat should be adjusted so that the brake pedal can be depressed fully. In
addition, position the seat as far rearward as comfort and control allow.
The seat rails on the floor must not be obstructed in any way when the seat is in motion.
102 04 Interior
Interior lighting
Interior lighting
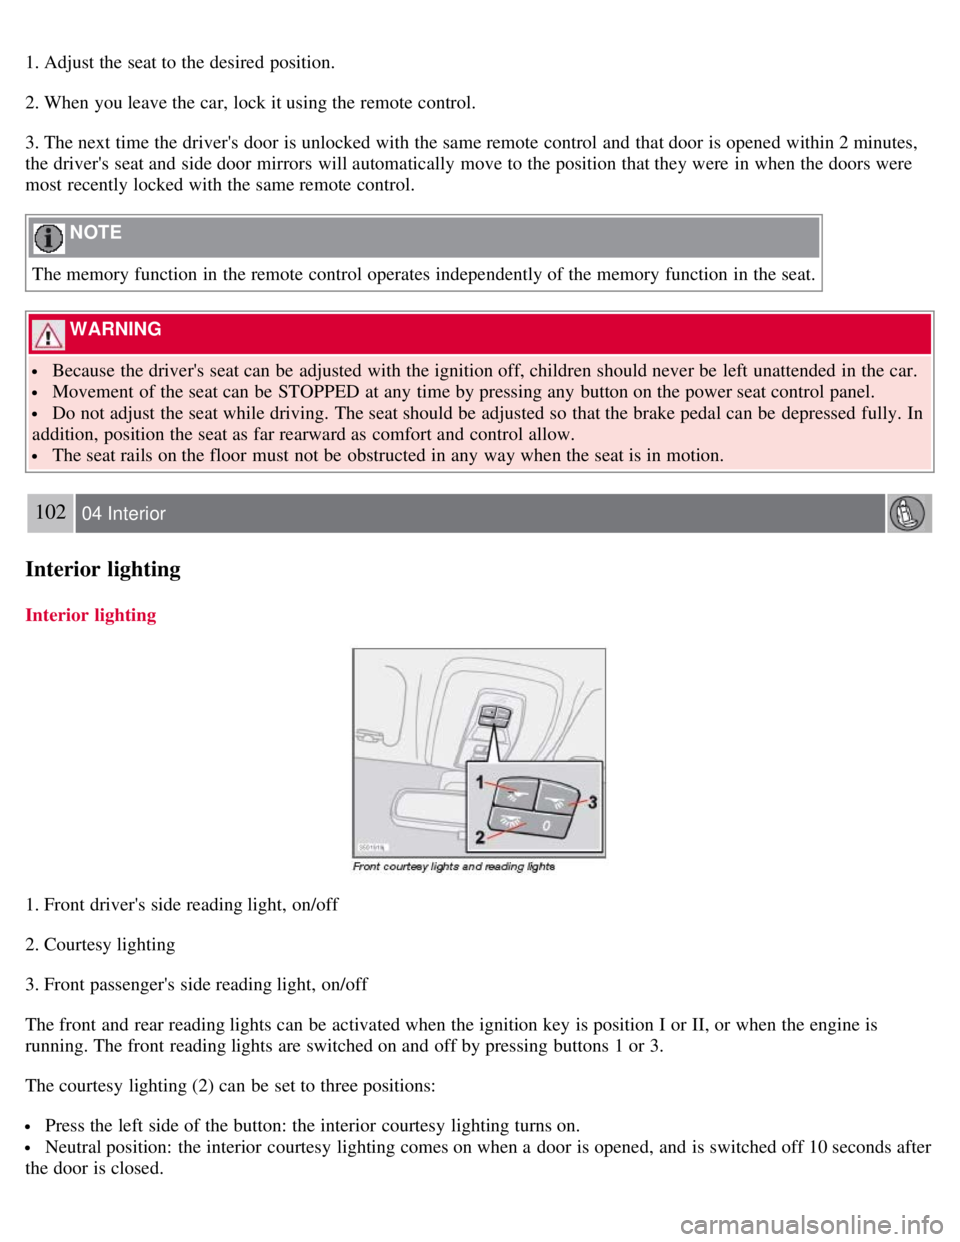
1. Front driver's side reading light, on/off
2. Courtesy lighting
3. Front passenger's side reading light, on/off
The front and rear reading lights can be activated when the ignition key is position I or II, or when the engine is
running. The front reading lights are switched on and off by pressing buttons 1 or 3.
The courtesy lighting (2) can be set to three positions:
Press the left side of the button: the interior courtesy lighting turns on.
Neutral position: the interior courtesy lighting comes on when a door is opened, and is switched off 10 seconds after
the door is closed.
Page 97 of 234
2. Press down the rear edge of the cup holder.
To close the sliding cover, grasp the underside of the front edge and pull.
107 04 Interior
Storage compartments
Storage compartment behind the gear lever
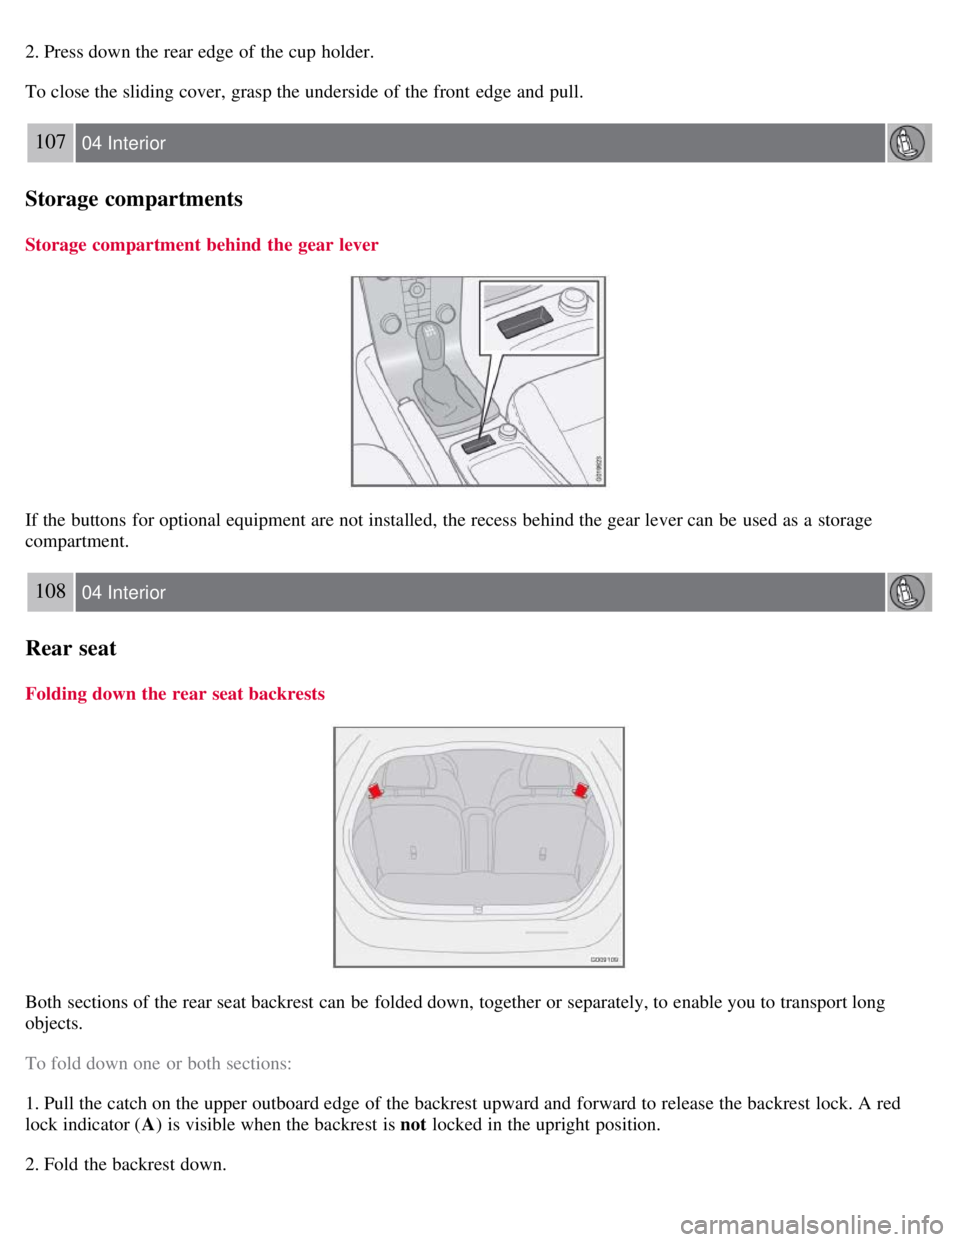
If the buttons for optional equipment are not installed, the recess behind the gear lever can be used as a storage
compartment.
108 04 Interior
Rear seat
Folding down the rear seat backrests
Both sections of the rear seat backrest can be folded down, together or separately, to enable you to transport long
objects.
To fold down one or both sections:
1. Pull the catch on the upper outboard edge of the backrest upward and forward to release the backrest lock. A red
lock indicator (A) is visible when the backrest is not locked in the upright position.
2. Fold the backrest down.
Page 99 of 234
Hard cargo area cover (option)
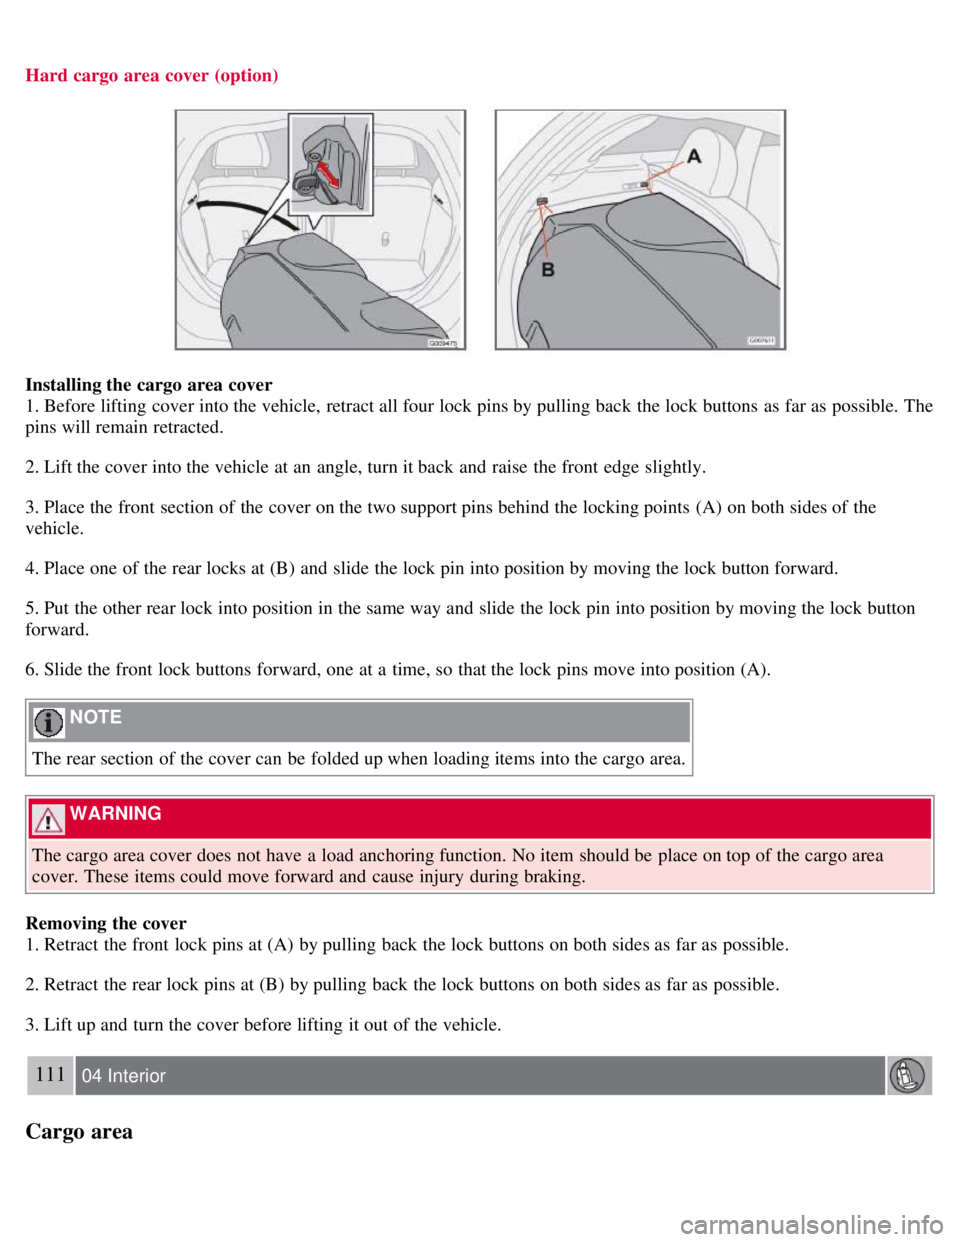
Installing the cargo area cover
1. Before lifting cover into the vehicle, retract all four lock pins by pulling back the lock buttons as far as possible. The
pins will remain retracted.
2. Lift the cover into the vehicle at an angle, turn it back and raise the front edge slightly.
3. Place the front section of the cover on the two support pins behind the locking points (A) on both sides of the
vehicle.
4. Place one of the rear locks at (B) and slide the lock pin into position by moving the lock button forward.
5. Put the other rear lock into position in the same way and slide the lock pin into position by moving the lock button
forward.
6. Slide the front lock buttons forward, one at a time, so that the lock pins move into position (A).
NOTE
The rear section of the cover can be folded up when loading items into the cargo area.
WARNING
The cargo area cover does not have a load anchoring function. No item should be place on top of the cargo area
cover. These items could move forward and cause injury during braking.
Removing the cover
1. Retract the front lock pins at (A) by pulling back the lock buttons on both sides as far as possible.
2. Retract the rear lock pins at (B) by pulling back the lock buttons on both sides as far as possible.
3. Lift up and turn the cover before lifting it out of the vehicle.
111 04 Interior
Cargo area
Page 108 of 234
Unlocking the doors with the detached key blade
1. Insert the key blade as far as possible in the driver's door lock. Turn the key blade clockwise approximately one -
quarter turn to unlock the driver's door only.
To disable the alarm:
1. Press the Unlock button on the remote control, or insert the key in the ignition switch.
Locking the doors with the detached key blade
1. Lock the rear doors and the front passenger's door by pressing the lock button on each door.
NOTE
After unlocking the driver's door with the key blade, opening the door will trigger the alarm.
121 05 Locks and alarm
Remote control and key blade
2. Turn the key blade one -quarter turn counter-clockwise to lock the driver's door.
NOTE
This does not arm the alarm or lock the rear liftgate.
122 05 Locks and alarm
Keyless drive (option as available)
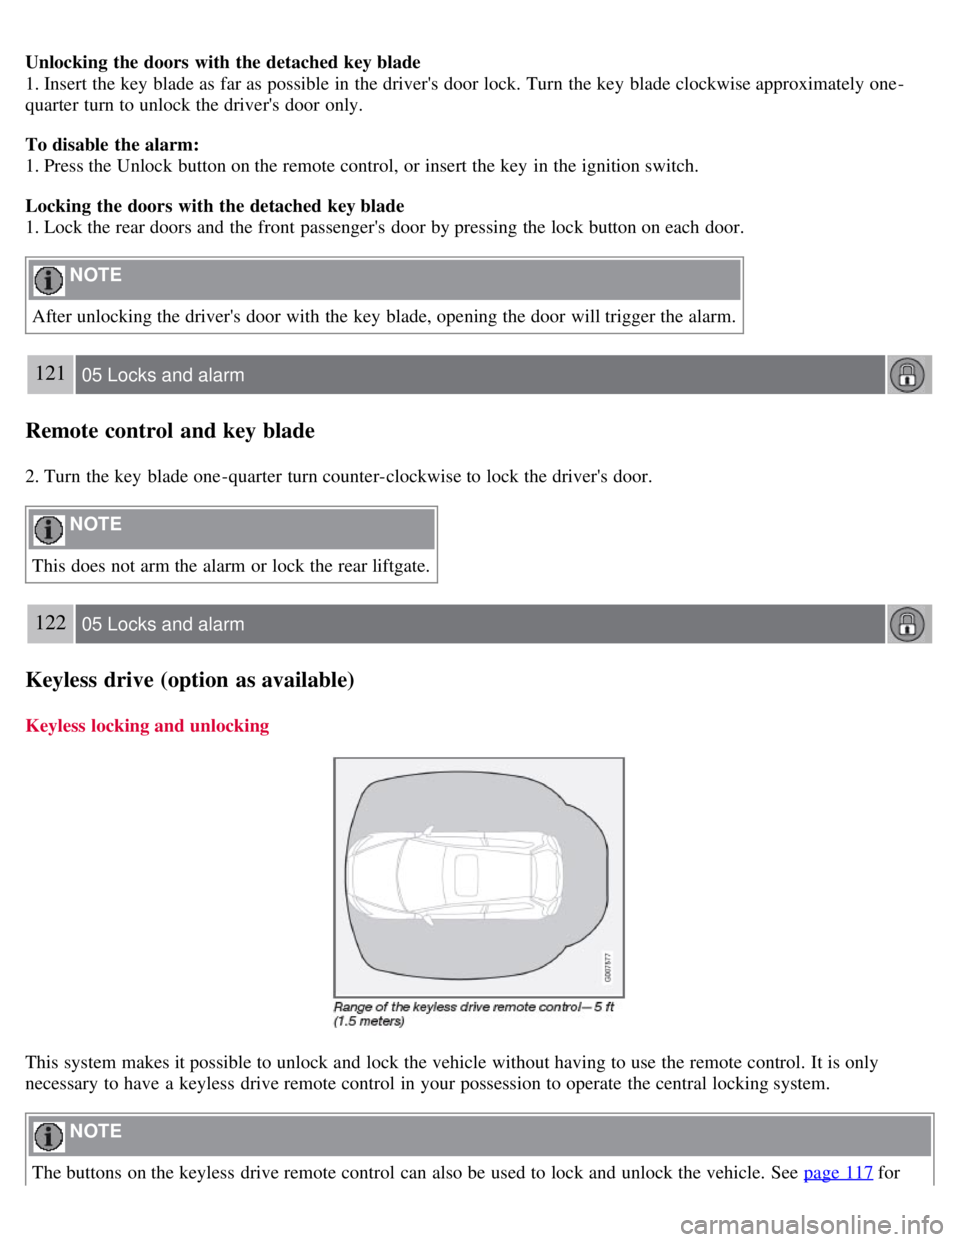
Keyless locking and unlocking
This system makes it possible to unlock and lock the vehicle without having to use the remote control. It is only
necessary to have a keyless drive remote control in your possession to operate the central locking system.
NOTE
The buttons on the keyless drive remote control can also be used to lock and unlock the vehicle. See page 117 for
Page 113 of 234
The doors cannot be opened by pulling up the lock buttons.
127 05 Locks and alarm
Glove compartment
Locking the glove compartment
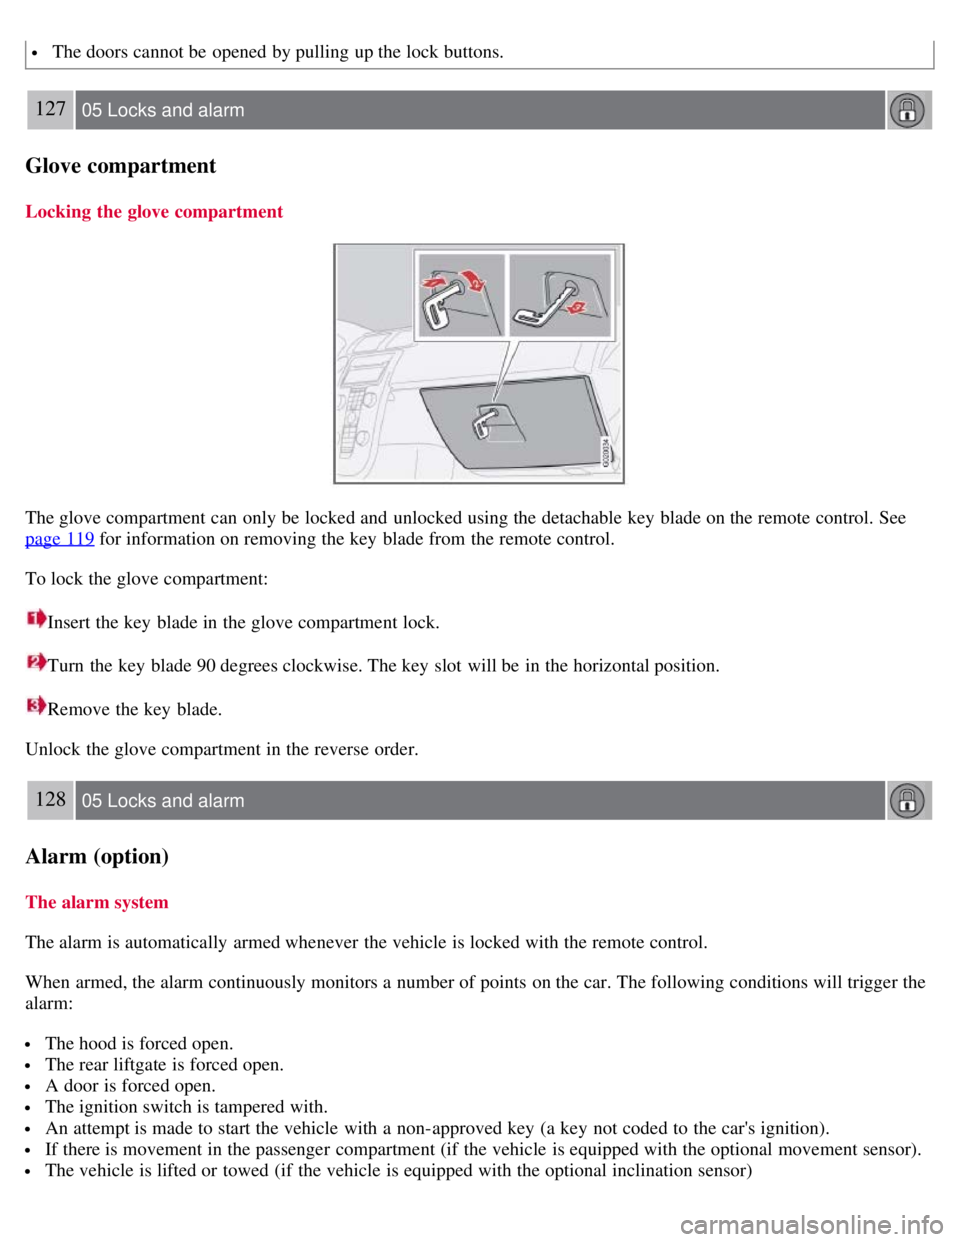
The glove compartment can only be locked and unlocked using the detachable key blade on the remote control. See
page 119
for information on removing the key blade from the remote control.
To lock the glove compartment:
Insert the key blade in the glove compartment lock.
Turn the key blade 90 degrees clockwise. The key slot will be in the horizontal position.
Remove the key blade.
Unlock the glove compartment in the reverse order.
128 05 Locks and alarm
Alarm (option)
The alarm system
The alarm is automatically armed whenever the vehicle is locked with the remote control.
When armed, the alarm continuously monitors a number of points on the car. The following conditions will trigger the
alarm:
The hood is forced open.
The rear liftgate is forced open.
A door is forced open.
The ignition switch is tampered with.
An attempt is made to start the vehicle with a non-approved key (a key not coded to the car's ignition).
If there is movement in the passenger compartment (if the vehicle is equipped with the optional movement sensor).
The vehicle is lifted or towed (if the vehicle is equipped with the optional inclination sensor)
Page 202 of 234
7. If there is distortion, lower your music player's headphone volume until the distortion goes away.
8. Finally, exit the menu and adjust the audio volume to a comfortable level.
Volume
Use the volume dial (1) or the buttons in the optional steering wheel keypad to adjust the volume level. The volume
level is also adjusted automatically according to the vehicleÕs speed, see page 232
for more information on this
function.
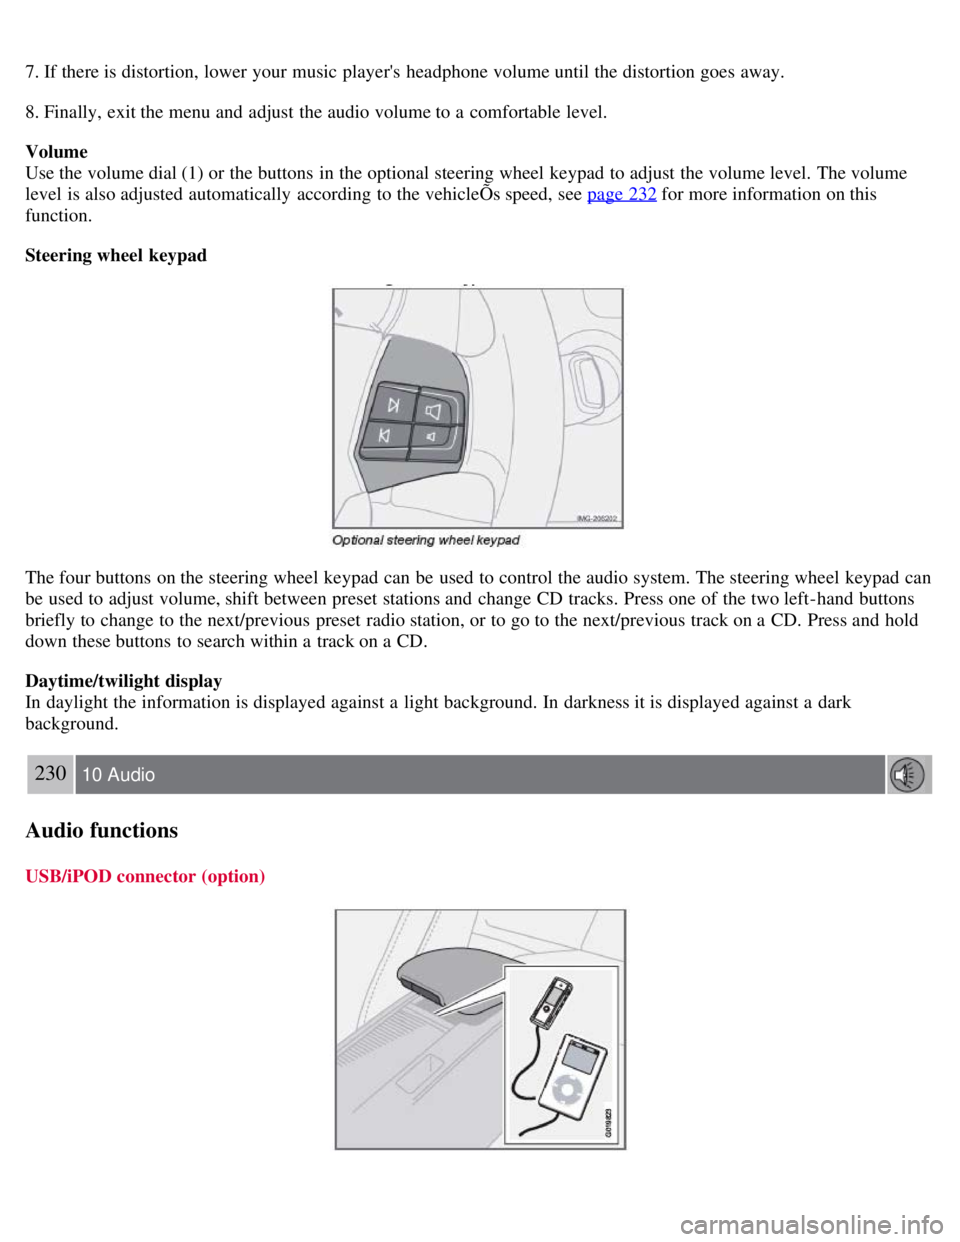
Steering wheel keypad
The four buttons on the steering wheel keypad can be used to control the audio system. The steering wheel keypad can
be used to adjust volume, shift between preset stations and change CD tracks. Press one of the two left-hand buttons
briefly to change to the next/previous preset radio station, or to go to the next/previous track on a CD. Press and hold
down these buttons to search within a track on a CD.
Daytime/twilight display
In daylight the information is displayed against a light background. In darkness it is displayed against a dark
background.
230 10 Audio
Audio functions
USB/iPOD connector (option)
Page 206 of 234
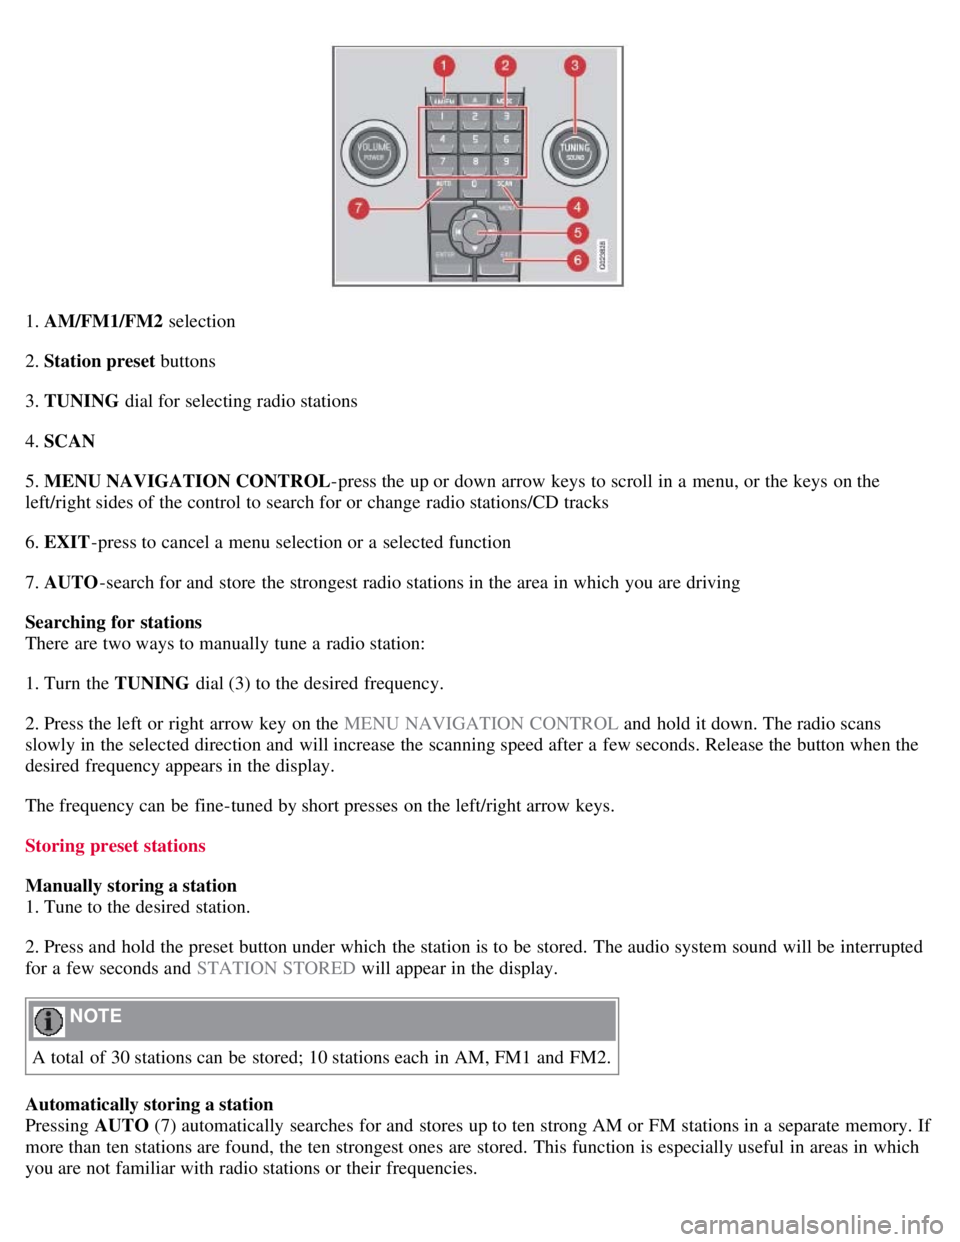
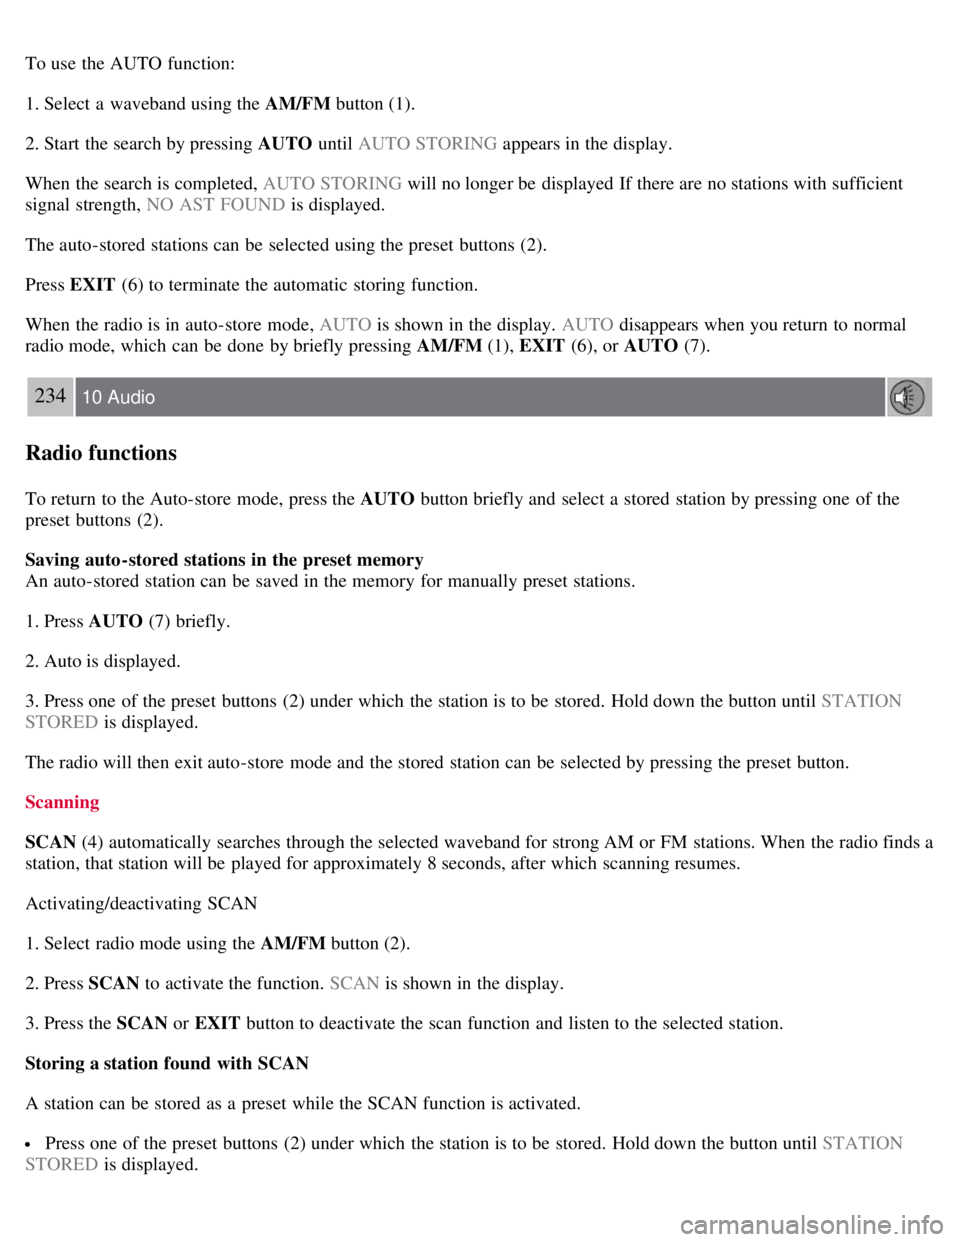
1. AM/FM1/FM2 selection
2. Station preset buttons
3. TUNING dial for selecting radio stations
4. SCAN
5. MENU NAVIGATION CONTROL -press the up or down arrow keys to scroll in a menu, or the keys on the
left/right sides of the control to search for or change radio stations/CD tracks
6. EXIT -press to cancel a menu selection or a selected function
7. AUTO -search for and store the strongest radio stations in the area in which you are driving
Searching for stations
There are two ways to manually tune a radio station:
1. Turn the TUNING dial (3) to the desired frequency.
2. Press the left or right arrow key on the MENU NAVIGATION CONTROL and hold it down. The radio scans
slowly in the selected direction and will increase the scanning speed after a few seconds. Release the button when the
desired frequency appears in the display.
The frequency can be fine-tuned by short presses on the left/right arrow keys.
Storing preset stations
Manually storing a station
1. Tune to the desired station.
2. Press and hold the preset button under which the station is to be stored. The audio system sound will be interrupted
for a few seconds and STATION STORED will appear in the display.
NOTE
A total of 30 stations can be stored; 10 stations each in AM, FM1 and FM2.
Automatically storing a station
Pressing AUTO (7) automatically searches for and stores up to ten strong AM or FM stations in a separate memory. If
more than ten stations are found, the ten strongest ones are stored. This function is especially useful in areas in which
you are not familiar with radio stations or their frequencies.
Page 207 of 234
To use the AUTO function:
1. Select a waveband using the AM/FM button (1).
2. Start the search by pressing AUTO until AUTO STORING appears in the display.
When the search is completed, AUTO STORING will no longer be displayed If there are no stations with sufficient
signal strength, NO AST FOUND is displayed.
The auto-stored stations can be selected using the preset buttons (2).
Press EXIT (6) to terminate the automatic storing function.
When the radio is in auto-store mode, AUTO is shown in the display. AUTO disappears when you return to normal
radio mode, which can be done by briefly pressing AM/FM (1), EXIT (6), or AUTO (7).
234 10 Audio
Radio functions
To return to the Auto-store mode, press the AUTO button briefly and select a stored station by pressing one of the
preset buttons (2).
Saving auto-stored stations in the preset memory
An auto-stored station can be saved in the memory for manually preset stations.
1. Press AUTO (7) briefly.
2. Auto is displayed.
3. Press one of the preset buttons (2) under which the station is to be stored. Hold down the button until STATION
STORED is displayed.
The radio will then exit auto-store mode and the stored station can be selected by pressing the preset button.
Scanning
SCAN (4) automatically searches through the selected waveband for strong AM or FM stations. When the radio finds a
station, that station will be played for approximately 8 seconds, after which scanning resumes.
Activating/deactivating SCAN
1. Select radio mode using the AM/FM button (2).
2. Press SCAN to activate the function. SCAN is shown in the display.
3. Press the SCAN or EXIT button to deactivate the scan function and listen to the selected station.
Storing a station found with SCAN
A station can be stored as a preset while the SCAN function is activated.
Press one of the preset buttons (2) under which the station is to be stored. Hold down the button until STATION
STORED is displayed.
Page 213 of 234
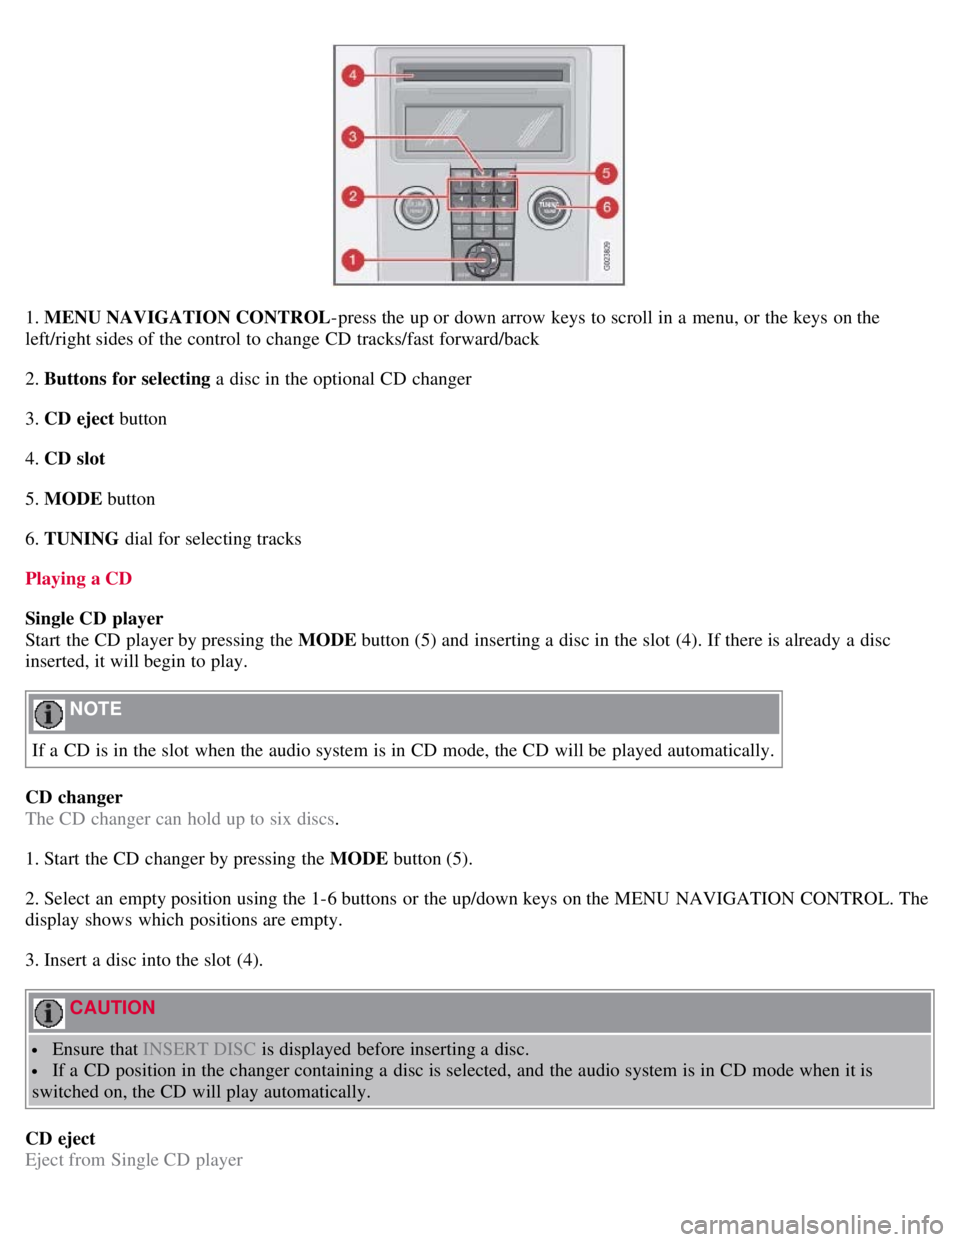
1. MENU NAVIGATION CONTROL-press the up or down arrow keys to scroll in a menu, or the keys on the
left/right sides of the control to change CD tracks/fast forward/back
2. Buttons for selecting a disc in the optional CD changer
3. CD eject button
4. CD slot
5. MODE button
6. TUNING dial for selecting tracks
Playing a CD
Single CD player
Start the CD player by pressing the MODE button (5) and inserting a disc in the slot (4). If there is already a disc
inserted, it will begin to play.
NOTE
If a CD is in the slot when the audio system is in CD mode, the CD will be played automatically.
CD changer
The CD changer can hold up to six discs.
1. Start the CD changer by pressing the MODE button (5).
2. Select an empty position using the 1-6 buttons or the up/down keys on the MENU NAVIGATION CONTROL. The
display shows which positions are empty.
3. Insert a disc into the slot (4).
CAUTION
Ensure that INSERT DISC is displayed before inserting a disc.
If a CD position in the changer containing a disc is selected, and the audio system is in CD mode when it is
switched on, the CD will play automatically.
CD eject
Eject from Single CD player