light VOLVO C30 2013 Owner´s Manual
[x] Cancel search | Manufacturer: VOLVO, Model Year: 2013, Model line: C30, Model: VOLVO C30 2013Pages: 300, PDF Size: 6.58 MB
Page 65 of 300
02 Instruments and controls
12-volt sockets
02
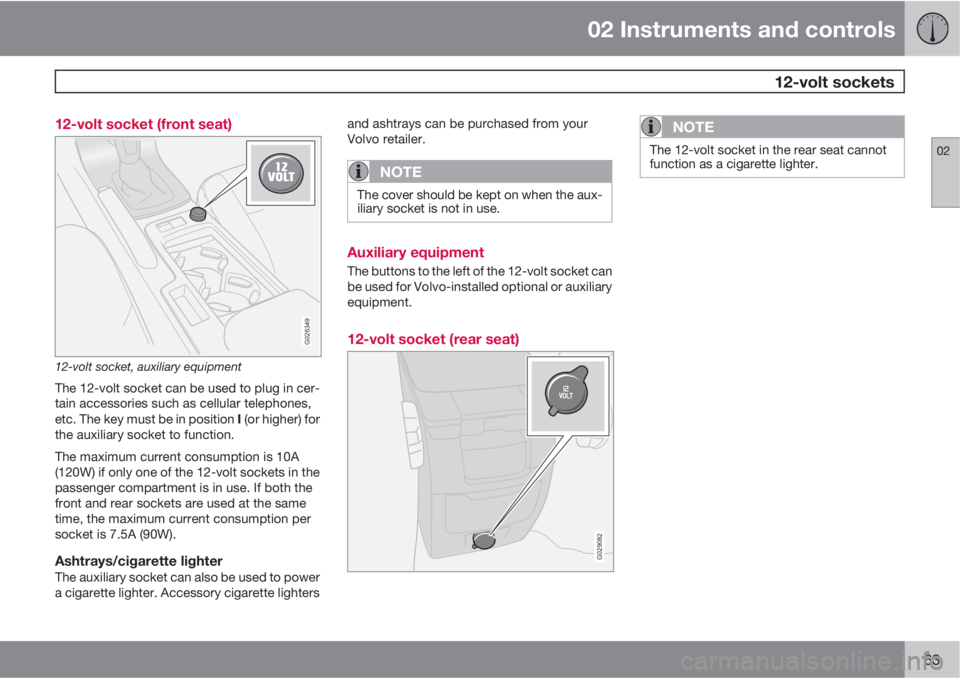
63 12-volt socket (front seat)
G026349
12-volt socket, auxiliary equipment
The 12-volt socket can be used to plug in cer-
tain accessories such as cellular telephones,
etc. The key must be in position I (or higher) for
the auxiliary socket to function.
The maximum current consumption is 10A
(120W) if only one of the 12-volt sockets in the
passenger compartment is in use. If both the
front and rear sockets are used at the same
time, the maximum current consumption per
socket is 7.5A (90W).
Ashtrays/cigarette lighterThe auxiliary socket can also be used to power
a cigarette lighter. Accessory cigarette lightersand ashtrays can be purchased from your
Volvo retailer.
NOTE
The cover should be kept on when the aux-
iliary socket is not in use.
Auxiliary equipment
The buttons to the left of the 12-volt socket can
be used for Volvo-installed optional or auxiliary
equipment.
12-volt socket (rear seat)
G029082
NOTE
The 12-volt socket in the rear seat cannot
function as a cigarette lighter.
Page 66 of 300
02 Instruments and controls
Lighting panel
02
64* Option/accessory, for more information, see Introduction.
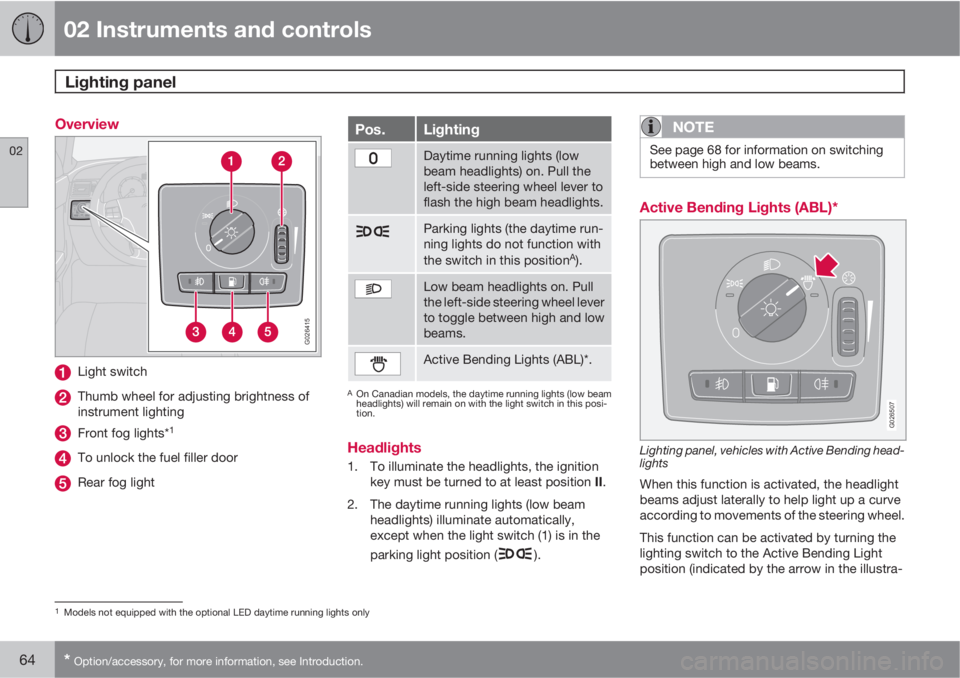
Overview
G026415
Light switch
Thumb wheel for adjusting brightness of
instrument lighting
Front fog lights*1
To unlock the fuel filler door
Rear fog light
Pos.Lighting
Daytime running lights (low
beam headlights) on. Pull the
left-side steering wheel lever to
flash the high beam headlights.
Parking lights (the daytime run-
ning lights do not function with
the switch in this position
A).
Low beam headlights on. Pull
the left-side steering wheel lever
to toggle between high and low
beams.
Active Bending Lights (ABL)*.
AOn Canadian models, the daytime running lights (low beam
headlights) will remain on with the light switch in this posi-
tion.
Headlights
1. To illuminate the headlights, the ignition
key must be turned to at least position II.
2. The daytime running lights (low beam
headlights) illuminate automatically,
except when the light switch (1) is in the
parking light position (
).
NOTE
See page 68 for information on switching
between high and low beams.
Active Bending Lights (ABL)*
G026507
Lighting panel, vehicles with Active Bending head-
lights
When this function is activated, the headlight
beams adjust laterally to help light up a curve
according to movements of the steering wheel.
This function can be activated by turning the
lighting switch to the Active Bending Light
position (indicated by the arrow in the illustra-
1Models not equipped with the optional LED daytime running lights only
Page 67 of 300
02 Instruments and controls
Lighting panel
02
* Option/accessory, for more information, see Introduction.65
tion). The indicator light in the Active
Bending Light symbol will illuminate. The func-
tion can be deactivated by turning the lighting
switch counterclockwise to one of the other
lighting positions.
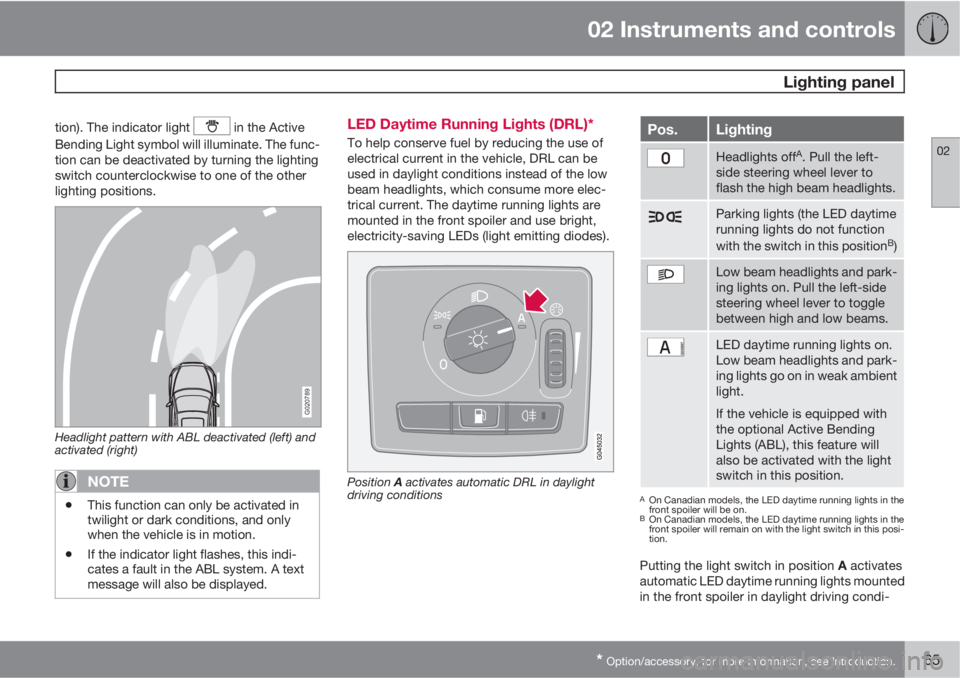
G020789
Headlight pattern with ABL deactivated (left) and
activated (right)
NOTE
•This function can only be activated in
twilight or dark conditions, and only
when the vehicle is in motion.
•If the indicator light flashes, this indi-
cates a fault in the ABL system. A text
message will also be displayed.
LED Daytime Running Lights (DRL)*
To help conserve fuel by reducing the use of
electrical current in the vehicle, DRL can be
used in daylight conditions instead of the low
beam headlights, which consume more elec-
trical current. The daytime running lights are
mounted in the front spoiler and use bright,
electricity-saving LEDs (light emitting diodes).
Position A activates automatic DRL in daylight
driving conditions
Pos.Lighting
Headlights offA. Pull the left-
side steering wheel lever to
flash the high beam headlights.
Parking lights (the LED daytime
running lights do not function
with the switch in this position
B)
Low beam headlights and park-
ing lights on. Pull the left-side
steering wheel lever to toggle
between high and low beams.
LED daytime running lights on.
Low beam headlights and park-
ing lights go on in weak ambient
light.
If the vehicle is equipped with
the optional Active Bending
Lights (ABL), this feature will
also be activated with the light
switch in this position.
AOn Canadian models, the LED daytime running lights in the
front spoiler will be on.
BOn Canadian models, the LED daytime running lights in the
front spoiler will remain on with the light switch in this posi-
tion.
Putting the light switch in position A activates
automatic LED daytime running lights mounted
in the front spoiler in daylight driving condi-
Page 68 of 300

02 Instruments and controls
Lighting panel
02
66* Option/accessory, for more information, see Introduction.
tions. A light sensor then monitors the ambient
lighting conditions and automatically switches
from LED DRL to the low beam headlights in
weaker ambient light (and will switch back to
DRL when the ambient light becomes brighter).
The LED DRLs will also switch off automatically
(and the low beams will switch on) if:
•The rear fog light is switched on
•The windshield wipers are switched on for
more than 10 seconds
WARNING
•DRL is a driving aid designed to help
conserve electrical current. This system
cannot always determine if the ambient
lighting conditions are sufficient for
switching from low beams to DRL (or
vice versa). It is always the driver's
responsibility to visually determine if the
low beam headlights should be used.
•As the driver, you have full responsibility
for operating the vehicle in a safe man-
ner.
Parking lights
The front and rear parking lights can be turned
on even when the ignition is switched off.
–Turn the light switch (1) to the parking light
position.
The license plate lights also illuminate when the
parking lights are switched on.
Brake lights
The brake lights come on automatically when
the brakes are applied.
Fog lights
Front fog lights*2
The front fog lights can be used in combination
with either the headlights or the parking lights.
1.
Turn the ignition key to position II.
2. Press button (3) to turn on the front fog
lights.
An indicator light in the button illuminates when
the front fog lights are on.
Rear fog lightsThe rear fog lights are located in both taillight
clusters.The rear fogs light will only function in combi-
nation with the high/low beam headlights or the
optional front fog lights.
1.
Turn the ignition key to position II.
2. Press button (5) to turn on the rear fog
lights.
An indicator light in the button illuminates when
the rear fog lights are on.
NOTE
The rear fog lights are considerably brighter
than the normal taillights and should be
used only when conditions such as fog, rain,
snow, smoke or dust reduce visibility for
other vehicles to less than 500 ft.
(150 meters).
Instrument panel lighting
The instrument panel lighting illuminates when
the ignition is in position II and the light
switch (1) is in either position
or .
2Not available on models equipped with the optional LED Daytime Running LIGHTS
Page 69 of 300
02 Instruments and controls
Lighting panel
02
67
NOTE
To make it easier to read the odometer, trip
odometer, clock, and ambient temperature,
these gauges illuminate when the vehicle is
unlocked and when the key has been
removed from the ignition switch. The light-
ing will go out when the vehicle is locked.
Move the thumb wheel (2) up to increase
brightness or down to decrease brightness.
Unlocking the fuel filler door
With the ignition switched off, press button (4)
to unlock the fuel filler door. Please note that
the fuel filler door will remain unlocked until the
car begins to move forward.
An audible click will be heard when the fuel filler
door re-locks.
Page 70 of 300
02 Instruments and controls
Left-side steering wheel lever
02
68* Option/accessory, for more information, see Introduction.
Lever positions
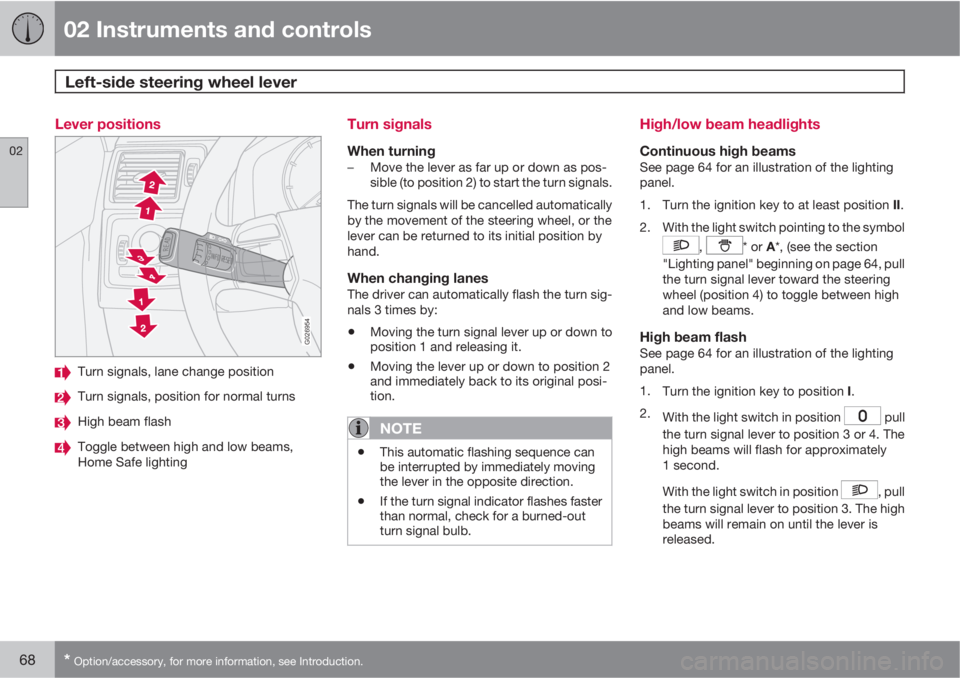
G026954
Turn signals, lane change position
Turn signals, position for normal turns
High beam flash
Toggle between high and low beams,
Home Safe lighting
Turn signals
When turning–Move the lever as far up or down as pos-
sible (to position 2) to start the turn signals.
The turn signals will be cancelled automatically
by the movement of the steering wheel, or the
lever can be returned to its initial position by
hand.
When changing lanesThe driver can automatically flash the turn sig-
nals 3 times by:
•Moving the turn signal lever up or down to
position 1 and releasing it.
•Moving the lever up or down to position 2
and immediately back to its original posi-
tion.
NOTE
•This automatic flashing sequence can
be interrupted by immediately moving
the lever in the opposite direction.
•If the turn signal indicator flashes faster
than normal, check for a burned-out
turn signal bulb.
High/low beam headlights
Continuous high beamsSee page 64 for an illustration of the lighting
panel.
1.
Turn the ignition key to at least position II.
2. With the light switch pointing to the symbol
, * or A*, (see the section
"Lighting panel" beginning on page 64, pull
the turn signal lever toward the steering
wheel (position 4) to toggle between high
and low beams.
High beam flashSee page 64 for an illustration of the lighting
panel.
1.
Turn the ignition key to position I.
2.
With the light switch in position
pull
the turn signal lever to position 3 or 4. The
high beams will flash for approximately
1 second.
With the light switch in position
, pull
the turn signal lever to position 3. The high
beams will remain on until the lever is
released.
Page 71 of 300
02 Instruments and controls
Left-side steering wheel lever
02
* Option/accessory, for more information, see Introduction.69
Home safe lightingWhen you leave your car at night, you can
make use of the home safe lighting function to
illuminate the area in front of the car.
1. Remove the key from the ignition switch (or
turn the start control on models with key-
less drive* to position 0).
2. Pull the direction indicator lever to position
3 and release it.
3. Exit the car and lock the doors.
The headlights and parking lights will illuminate
and remain on for 30
1, 60 or 90 seconds. The
time interval can be changed according to your
preferences by using the Personal Settings
function, see page 84 for more information.
1Factory setting.
Page 73 of 300
02 Instruments and controls
Trip computer
02
71
stored and remains in system memory until the
RESET (button 3) is pressed again.
MPH ACTUAL SPEED (Canadian models
only)
This function provides the driver with an instan-
taneous conversion of the car's current speed
from km/h to mph.
NOTE
Trip computer readings may vary slightly
depending on the circumference of the tires
on the car, tire inflation, or driving style.
Page 76 of 300

02 Instruments and controls
Right-side steering wheel lever
02
74
Windshield wipers
Windshield/headlight washers
Rain sensor – on/off, see page 74
Thumb wheel
Liftgate wiper/washer
Windshield wipers offThe windshield wipers are off when
the lever is in position 0.
Manual wiper functionFrom position 0, move the lever
upward. The windshield wipers will
sweep one stroke at a time for as
long as the lever is held up.
Intermittent wiper functionWith the lever in this position, you
can set the wiper interval by mov-
ing the thumb wheel (C) upward to
increase wiper speed or down-
ward to decrease the speed.
Continuous wiper functionThe wipers operate at "normal"
speed.
High speed wiper function.
– Windshield washers
Pull the lever toward the steering wheel and
release it. The wipers will make 2–3 sweeps
across the windshield after the lever has been
released.
CAUTION
•Use ample washer fluid when washing
the windshield. The windshield should
be thoroughly wet when the wipers are
in operation.
•Before using the wipers, ice and snow
should be removed from the wind-
shield/rear window. Be sure the wiper
blades are not frozen in place.
Headlight washers (certain models)
When the lever has been pulled, high pressure
jets mounted in the bumper will spray the head-
lights.
The following applies to conserve washer fluid,
see page 64 for information on the light switch
positions:
Low/high beam headlights onThe headlights will be washed the first time the
windshield is washed. Thereafter, the head-
lights will only be washed once for every five
times the windshield is washed within a
10 minute period.
Parking lights onThe optional Active Bending Lights will be
washed once for every five times the wind-
shield is washed.
Page 77 of 300

02 Instruments and controls
Right-side steering wheel lever
02
* Option/accessory, for more information, see Introduction.75
Normal halogen headlights will not be washed.
When approx. 1 US quart (1 liter) of washer fluid
remains in the reservoir, the headlights will no
longer be washed. A text message will also be
displayed to remind the driver to fill the washer
fluid reservoir.
– Rain sensor*
G031469
The rain sensor regulates windshield wiper
speed according to the amount of water on the
windshield. The sensitivity of the rain sensor is
adjusted by moving the thumb wheel (C in the
illustration on the previous page) up (the wipers
will sweep the windshield more frequently) ordown (the wipers will sweep the windshield
less frequently).
On/Off
Activating the rain sensor
1. Switch on the ignition.
2. Put the windshield wiper lever in posi-
tion 0.
3. Press button B (see page 74). The rain sen-
sor symbol will appear in the lower display.
Manual deactivationThe rain sensor can be deactivated by:
Pressing button (B).
or
Moving the windshield wiper lever down.
NOTE
The rain sensor function will remain acti-
vated if the lever is briefly moved up to acti-
vate the "manual sweep" function.
CAUTION
The rain sensor should be deactivated when
washing the car in an automatic car wash,
etc. If the rain sensor function is left on, the
wipers will start inadvertently in the car
wash and could be damaged.
Automatic deactivationThe rain sensor is deactivated automatically in
the following situations:
•When the key is removed from the ignition.
•Five minutes after the ignition is switched
off if the key is left in the ignition.
– Thumb wheel
The thumb wheel is used to set the wiper inter-
val when intermittent wiping is selected, or the
sensitivity to the amount of rain on the wind-
shield when the rain sensor is selected. Move
the wheel upward or downward to increase/
decrease wiper speed when the intermittent
function is selected, or to increase/decrease
the optional rain sensor's sensitivity when the
this function is activated.
– Liftgate wiper/washer
Press the lever forward to wipe and wash the
liftgate window. The wiper will sweep the win-
dow several times after the lever has been
released.
The button at the end of the lever has three
positions: