psi VOLVO C30 2013 Owner´s Manual
[x] Cancel search | Manufacturer: VOLVO, Model Year: 2013, Model line: C30, Model: VOLVO C30 2013Pages: 300, PDF Size: 6.58 MB
Page 183 of 300
07 Wheels and tires
Tire inflation
07
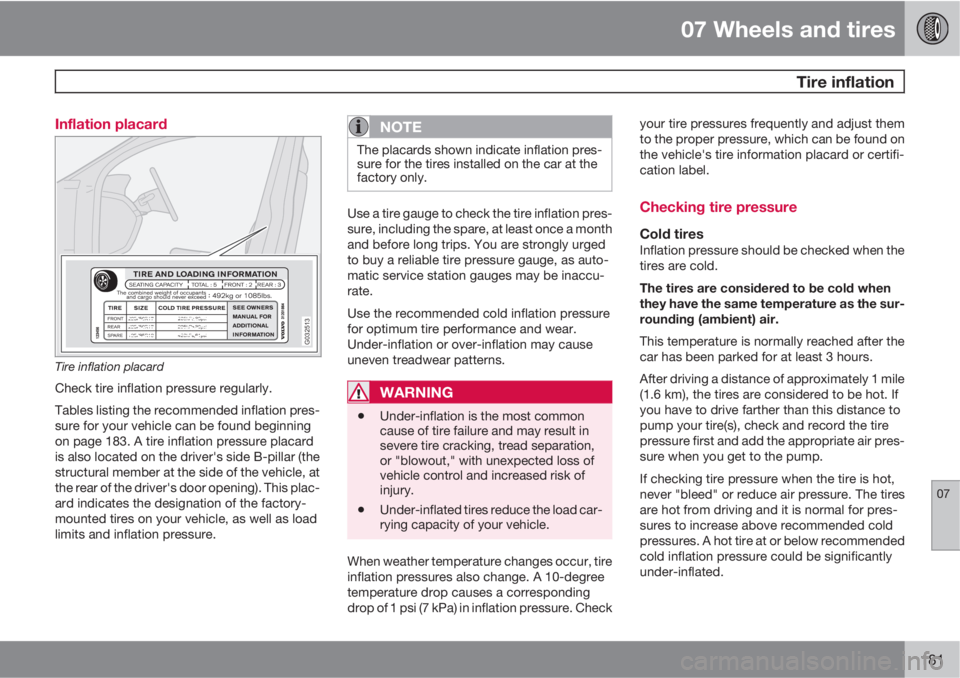
181 Inflation placard
G032513
Tire inflation placard
Check tire inflation pressure regularly.
Tables listing the recommended inflation pres-
sure for your vehicle can be found beginning
on page 183. A tire inflation pressure placard
is also located on the driver's side B-pillar (the
structural member at the side of the vehicle, at
the rear of the driver's door opening). This plac-
ard indicates the designation of the factory-
mounted tires on your vehicle, as well as load
limits and inflation pressure.
NOTE
The placards shown indicate inflation pres-
sure for the tires installed on the car at the
factory only.
Use a tire gauge to check the tire inflation pres-
sure, including the spare, at least once a month
and before long trips. You are strongly urged
to buy a reliable tire pressure gauge, as auto-
matic service station gauges may be inaccu-
rate.
Use the recommended cold inflation pressure
for optimum tire performance and wear.
Under-inflation or over-inflation may cause
uneven treadwear patterns.
WARNING
•Under-inflation is the most common
cause of tire failure and may result in
severe tire cracking, tread separation,
or "blowout," with unexpected loss of
vehicle control and increased risk of
injury.
•Under-inflated tires reduce the load car-
rying capacity of your vehicle.
When weather temperature changes occur, tire
inflation pressures also change. A 10-degree
temperature drop causes a corresponding
drop of 1 psi (7 kPa) in inflation pressure. Checkyour tire pressures frequently and adjust them
to the proper pressure, which can be found on
the vehicle's tire information placard or certifi-
cation label.
Checking tire pressure
Cold tiresInflation pressure should be checked when the
tires are cold.
The tires are considered to be cold when
they have the same temperature as the sur-
rounding (ambient) air.
This temperature is normally reached after the
car has been parked for at least 3 hours.
After driving a distance of approximately 1 mile
(1.6 km), the tires are considered to be hot. If
you have to drive farther than this distance to
pump your tire(s), check and record the tire
pressure first and add the appropriate air pres-
sure when you get to the pump.
If checking tire pressure when the tire is hot,
never "bleed" or reduce air pressure. The tires
are hot from driving and it is normal for pres-
sures to increase above recommended cold
pressures. A hot tire at or below recommended
cold inflation pressure could be significantly
under-inflated.
Page 185 of 300
07 Wheels and tires
Inflation pressure
07
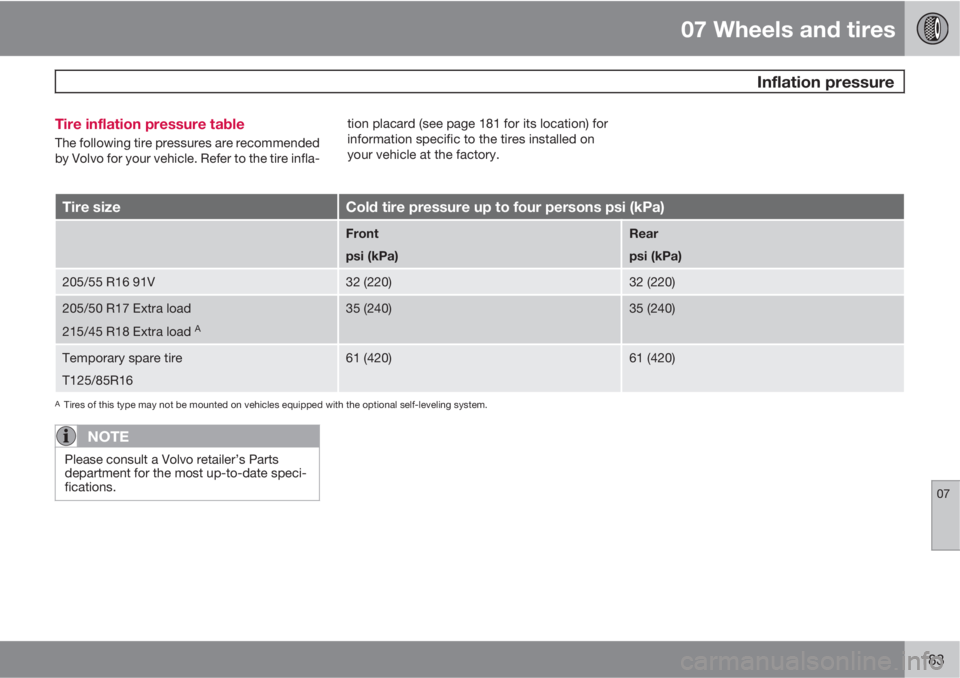
183 Tire inflation pressure table
The following tire pressures are recommended
by Volvo for your vehicle. Refer to the tire infla-tion placard (see page 181 for its location) for
information specific to the tires installed on
your vehicle at the factory.
Tire sizeCold tire pressure up to four persons psi (kPa)
Front
psi (kPa)Rear
psi (kPa)
205/55 R16 91V32 (220)32 (220)
205/50 R17 Extra load
215/45 R18 Extra load
A
35 (240)35 (240)
Temporary spare tire
T125/85R1661 (420)61 (420)
ATires of this type may not be mounted on vehicles equipped with the optional self-leveling system.
NOTE
Please consult a Volvo retailer’s Parts
department for the most up-to-date speci-
fications.
Page 188 of 300
07 Wheels and tires
Glossary of tire terminology
07
186
Terminology
•Tire information placard: A placard
showing the OE (Original Equipment) tire
sizes, recommended inflation pressure,
and the maximum weight the vehicle can
carry.
•Tire Identification Number (TIN): A num-
ber on the sidewall of each tire providing
information about the tire brand and man-
ufacturing plant, tire size and date of man-
ufacturer.
•Inflation pressure: A measure of the
amount of air in a tire.
•Standard load: A class of P-metric or Met-
ric tires designed to carry a maximum load
at 35 psi [37 psi (2.5 bar) for Metric tires].
Increasing the inflation pressure beyond
this pressure will not increase the tires load
carrying capability.
•Extra load: A class of P-metric or Metric
tires designed to carry a heavier maximum
load at 41 psi [43 psi (2.9 bar) for Metric
tires]. Increasing the inflation pressure
beyond this pressure will not increase the
tires load carrying capability.
•kPa: Kilopascal, a metric unit of air pres-
sure.
•PSI: Pounds per square inch, a standard
unit of air pressure.
•B-pillar: The structural member at the side
of the vehicle behind the front door.
•Bead area of the tire: Area of the tire next
to the rim.
•Sidewall of the tire: Area between the
bead area and the tread.
•Tread area of the tire: Area of the perim-
eter of the tire that contacts the road when
mounted on the vehicle.
•Rim: The metal support (wheel) for a tire or
a tire and tube assembly upon which the
tire beads are seated.
•Maximum load rating: a figure indicating
the maximum load in pounds and kilo-
grams that can be carried by the tire. This
rating is established by the tire manufac-
turer.
•Maximum permissible inflation pres-
sure: the greatest amount of air pressure
that should ever be put in the tire. This limit
is set by the tire manufacturer.
•Recommended tire inflation pressure:
inflation pressure, established by Volvo,
which is based on the type of tires that are
mounted on a vehicle at the factory. This
information can be found on the tire infla-
tion placard(s) located on the driver's side
B-pillar and in the tire inflation table in this
chapter.
•Cold tires: The tires are considered to be
cold when they have the same temperatureas the surrounding (ambient) air. This tem-
perature is normally reached after the car
has been parked for at least 3 hours.
Properly loading your vehicle will provide maxi-
mum return of vehicle design performance.
Page 195 of 300
07 Wheels and tires
Tire Sealing System*
07
* Option/accessory, for more information, see Introduction.193
5. Unscrew the orange cover over the bottle
holder and unscrew the cap on the bottle
of sealing compound.
NOTE
Do not break the seal on the bottle. This
occurs automatically when the bottle is
screwed into the holder.
6. Screw the bottle into the bottle holder.
WARNING
The bottle is equipped with a catch to keep
it securely in place and help prevent sealing
compound leakage. Once in place, the bot-
tle cannot be unscrewed. This must be done
by a trained and qualified Volvo service
technician.
7. Remove the valve cap from the tire’s infla-
tion valve and screw the tire sealing sys-
tem’s hose connector onto the valve as
tightly as possible by hand.
8. Connect the electrical wire to the nearest
12-volt socket in the vehicle.
NOTE
Be sure that none of the other 12-volt sock-
ets is being used while the compressor is in
operation.
9. Start the vehicle’s engine.
10. Start the tire sealing system’s compressor
by pressing the on/off switch to position I.
WARNING
•Never stand next to the tire being inflated
when the compressor is in operation.
•If cracks, bubbles, etc. form on the tire,
switch off the compressor immediately.
•If there is visible damage to the sidewall
or the rim, the tire cannot be repaired.
The vehicle should not be driven if this
occurs. Contact a towing service or
Volvo On Call Roadside Assistance if
applicable.
NOTE
The air pressure gauge will temporarily
show an increase in pressure to approxi-
mately 88 psi (6 bar) while the sealing com-
pound is being pumped into the tire. The
pressure should return to a normal level
after approximately 30 seconds.
11. Within seven minutes, inflate the tire to
between 22—44 psi (1.8—3.0 bar). Switch
off the compressor briefly to get a clear
reading from the pressure gauge.
CAUTION
The compressor should not be used for
more than 10 minutes at a time to avoid
overheating.
WARNING
If the pressure remains below 22 psi
(1.8 bar) after approximately seven minutes,
turn off the compressor. In this case, the
hole is too large to be sealed and the vehicle
should not be driven.
12. Switch off the compressor and disconnect
the electrical wire from the 12-volt socket.
Page 196 of 300

07 Wheels and tires
Tire Sealing System*
07
194* Option/accessory, for more information, see Introduction.
13. Unscrew the hose from the tire’s inflation
valve and reinstall the valve cap.
14. Immediately drive the vehicle for approxi-
mately 2 miles (3 km) at a maximum speed
of 50 mph (80 km/h) to distribute the seal-
ing compound in the tire.
CAUTION
If your vehicle is equipped with the Tire
Pressure Monitoring System (TPMS), the
use of the sealing compound may lead to
incorrect tire pressure readings or in rare
cases, damage to the tire pressure sensor.
Use the tire sealing system to check and
adjust the damaged tire's inflation pressure.
NOTE
•Safely stow the tire sealing system in a
convenient place as it will soon be used
again to check the tire’s inflation pres-
sure.
•The empty bottle of sealing compound
cannot be removed from the bottle
holder. Consult a trained and qualified
Volvo service technician to have the
bottle removed and properly disposed
of.
WARNING
If heavy vibrations, unsteady steering
behavior, or noises should occur while driv-
ing, reduce speed and park the vehicle in a
safe place. Recheck the tire for bumps,
cracks, or other visible damage, and
recheck its inflation pressure. If the pressure
is below 19 psi (1.3 bar), do not continue
driving. Have the vehicle towed to a trained
and qualified Volvo service technician.
Stage 2: Checking inflation pressure1. Connect the tire sealing system as descri-
bed in stage 1.
2. Refer to the inflation pressure table for the
correct inflation pressure. If the tire needs
to be inflated, start the tire sealing system’s
compressor. If necessary, release air from
the tire by turning the air release knob
counterclockwise.
CAUTION
The compressor should not be used for
more than 10 minutes at a time to avoid
overheating.
WARNING
If you interrupt your trip for more than 1
hour, check the inflation pressure in the
damaged tire again before continuing.
Replacing the sealing compound
container
The sealing compound container must be
replaced if:
•the tire sealing system has been used to
repair a tire
•the container’s expiration date has passed
(see the date on decal).
NOTE
•After use, the sealing compound bottle,
the hose, and certain other system
components must be replaced. Please
consult your Volvo retailer for replace-
ment parts.
•If the sealing compound bottle’s expi-
ration date has passed, please take it to
a Volvo retailer or a recycling station
that can properly dispose of harmful
substances.