stop start VOLVO C70 2003 Owners Manual
[x] Cancel search | Manufacturer: VOLVO, Model Year: 2003, Model line: C70, Model: VOLVO C70 2003Pages: 98, PDF Size: 1.64 MB
Page 17 of 98

20 Stability and Traction Control (STC) System
21 Malfunction indicator lamp
(See page 20
for more information)
22 Service reminder indicator
pg. 18 Warning lights
The warning lights described on pages 18 and 19 should never stay on when driving
When the ignition key is turned on and before the engine starts, all of the warning lights should go on to test the
function of the bulbs. Should a light not go off after the engine has started, the system indicated should be inspected.
However, the parking brake reminder light will not go off until the parking brake has been fully released.
Malfunction indicator lamp
On-Board Diagnostic II (OBDII): As you drive, a computer called "OBDII" monitors your car's engine, transmission,
electrical and emission systems. The CHECK ENGINE light will light up if the computer senses a condition that
potentially may need correcting. When this happens, please have your car checked by a Volvo retailer as soon as
possible.
A CHECK ENGINE light may have many causes. Sometimes, you may not notice a change in your car's behavior.
Even so, an uncorrected condition could hurt fuel economy, emission cleanliness, and driveability. Extended driving
without correcting the cause could even damage other components in your car.
NOTE : If the fuel filler cap is not closed tightly or if the engine is running when the car is refueled, the Malfunction
Indicator Lamp may indicate a fault. However, your vehicle's performance will not be affected. Use only Volvo
original or approved fuel filler caps.
Canadian models are equipped with this warning light:
Oil pressure warning light
If the light comes on while driving, stop the car and then stop the engine immediately and check the engine oil
level . See page 116.
If the light stays on after restart, have the car towed to the nearest authorized Volvo retailer. After
hard driving, the light may come on occasionally when the engine is idling. This is normal, provided it goes off when
the engine speed is increased.
Roll Over Protection System (ROPS)
If the warning lamp remains on after the engine has started or comes on while you are driving, the ROPS self -
diagnostic system has detected a fault. The car should be driven to an authorized Volvo retailer as soon as possible for
inspection.
Please refer to page 10
for more information on the ROPS system.
Brake failure warning light
If the light comes on while driving or braking, stop immediately, open the hood and check the brake fluid level
ProCarManuals.com
Page 24 of 98

To lower the convertible top:
Start the engine. The car must be at a standstill, the parking brake must be ON and the trunk must be closed
when raising/lowering the convertible top. The gear selector must be in position P (automatic transmission) or in
neutral (manual transmission).
Press and hold down the lower section of the control switch (an indicator lamp will light up and all four windows
will automatically be lowered slightly) until the convertible top is completely lowered. A chime will indicate when the
top is completely down and properly in place in the storage compartment. The windows can then be raised/lowered
with the "All windows" button on the driver's door.
"All windows" control button
To raise the convertible top:
Press and hold down the upper section of the control switch until the convertible top is completely raised. A chime
will indicate when the top is properly in position.
Check that the cover over the convertible top storage compartment closes completely.
Movement of the convertible top can be stopped at any time by releasing the control switch.
WARNING!
The convertible top must not be obstructed in any way when it is being raised or lowered.
The rear seat should not be occupied while the convertible top is being raised or lowered.
Anyone near the car should be well clear of the convertible top's moving parts before it is raised or lowered.
Children should never be allowed to play with the convertible top control switch.
CAUTION: If the cover over the convertible top storage space is not completely closed , the trunk lid should NOT be
opened to help avoid scratching the paint.
NOTE:
The electrically operated convertible top has an overload protecting circuit breaker that is activated when an object
blocks the top when it is in motion. If this occurs, remove the object and wait 20 seconds for the circuit breaker to reset
before trying to raise/lower the top again.
See page 102
for fault tracing information and instructions on manually raising the convertible top.
The trunk cannot be opened and the power windows/power antenna cannot be operated while the convertible top is
being raised/lowered.
pg. 41 Electrically operated convertible top, Wind deflector
CAUTION:
Be sure there is sufficient clearance above the car before raising/lowering the convertible top.
ProCarManuals.com
Page 38 of 98

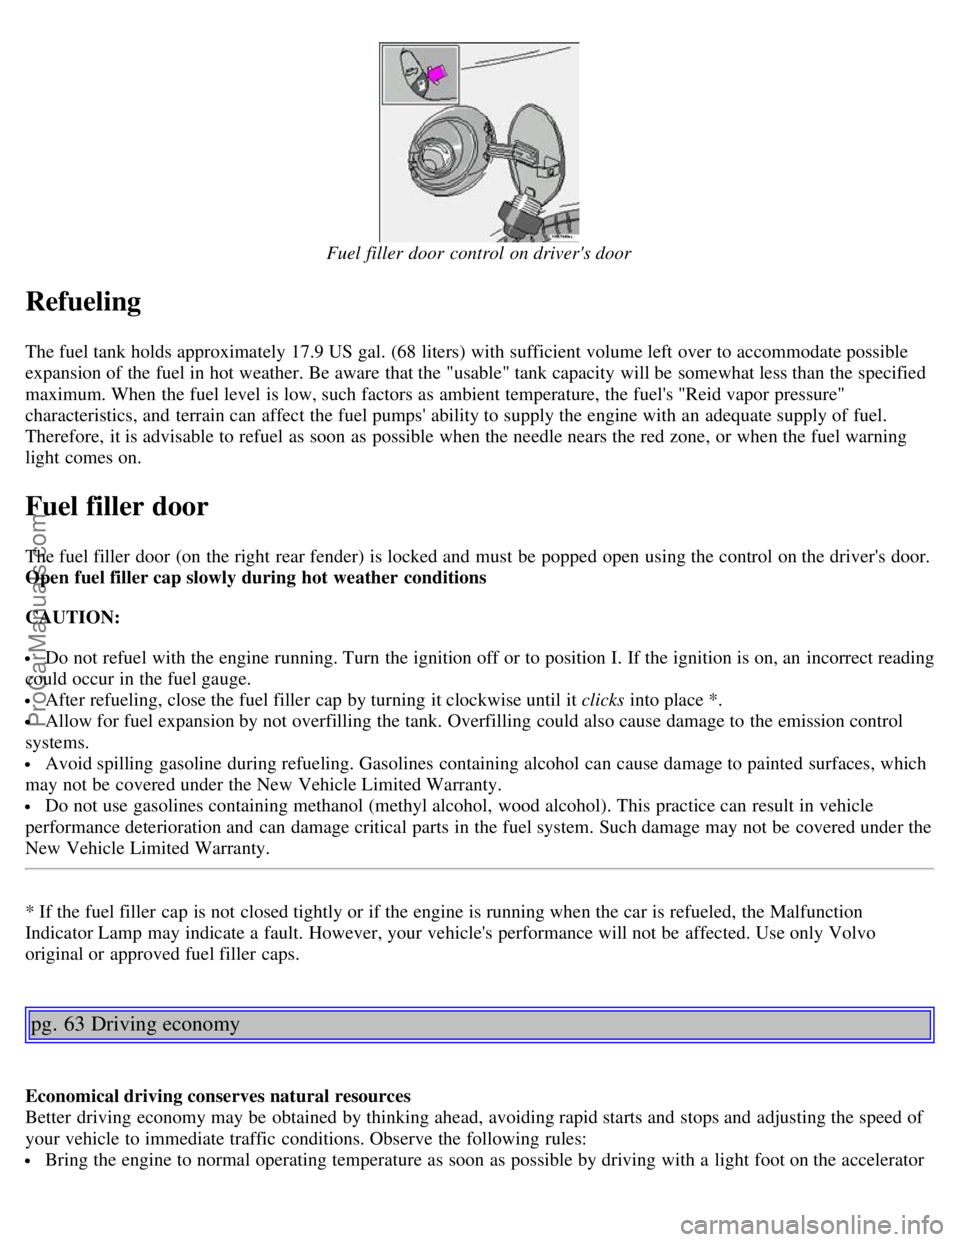
Fuel filler door control on driver's door
Refueling
The fuel tank holds approximately 17.9 US gal. (68 liters) with sufficient volume left over to accommodate possible
expansion of the fuel in hot weather. Be aware that the "usable" tank capacity will be somewhat less than the specified
maximum. When the fuel level is low, such factors as ambient temperature, the fuel's "Reid vapor pressure"
characteristics, and terrain can affect the fuel pumps' ability to supply the engine with an adequate supply of fuel.
Therefore, it is advisable to refuel as soon as possible when the needle nears the red zone, or when the fuel warning
light comes on.
Fuel filler door
The fuel filler door (on the right rear fender) is locked and must be popped open using the control on the driver's door.
Open fuel filler cap slowly during hot weather conditions
CAUTION:
Do not refuel with the engine running. Turn the ignition off or to position I. If the ignition is on, an incorrect reading
could occur in the fuel gauge.
After refueling, close the fuel filler cap by turning it clockwise until it clicks into place *.
Allow for fuel expansion by not overfilling the tank. Overfilling could also cause damage to the emission control
systems.
Avoid spilling gasoline during refueling. Gasolines containing alcohol can cause damage to painted surfaces, which
may not be covered under the New Vehicle Limited Warranty.
Do not use gasolines containing methanol (methyl alcohol, wood alcohol). This practice can result in vehicle
performance deterioration and can damage critical parts in the fuel system. Such damage may not be covered under the
New Vehicle Limited Warranty.
* If the fuel filler cap is not closed tightly or if the engine is running when the car is refueled, the Malfunction
Indicator Lamp may indicate a fault. However, your vehicle's performance will not be affected. Use only Volvo
original or approved fuel filler caps.
pg. 63 Driving economy
Economical driving conserves natural resources
Better driving economy may be obtained by thinking ahead, avoiding rapid starts and stops and adjusting the speed of
your vehicle to immediate traffic conditions. Observe the following rules:
Bring the engine to normal operating temperature as soon as possible by driving with a light foot on the accelerator
ProCarManuals.com
Page 39 of 98

pedal for the first few minutes of operation. A cold engine uses more fuel and is subject to increased wear.
Whenever possible, avoid using the car for driving short distances. This does not allow the engine to reach normal
operating temperature.
Drive carefully and avoid rapid acceleration and hard braking.
Do not exceed speed limit.
Avoid carrying unnecessary items (extra load) in the car.
Maintain correct tire pressure. Check tire pressure regularly (check when tires are cold).
Remove snow tires when threat of snow or ice has ended.
Note that trunk-mounted luggage racks increase air resistance and thereby fuel consumption.
Avoid using automatic transmission kickdown feature unless necessary.
Avoid using the air conditioning when it is not required. When engaged, the air conditioner's compressor places an
additional load on the engine. However, please note that fuel consumption is lower with the air conditioning on than it
is when driving with the air conditioning switched off and the windows down.
If your car is equipped with the optional Trip Computer, utilizing the fuel consumption modes can help you "learn"
how to drive more economically.
Other factors which decrease gas mileage are:
Dirty air cleaner
Dirty engine oil and clogged oil filter
Dragging brakes
Incorrect front end alignment
Some of the above mentioned items and others are checked at the standard Maintenance Service intervals.
NOTE : (D)rive or 5th gear (manual transmissions) should be used as often as possible to help improve fuel economy.
pg. 64 Starting the Engine
Starting and stopping
1. Fasten the seat belt.
WARNING!
Before starting, check that the seat, steering wheel and mirrors are adjusted properly. Make sure the brake pedal can
be depressed completely. Move the seat closer if necessary. Refer to section "front seats".
2. Apply the parking brake, if not already set. The gear selector (automatic transmission) is locked in the (P)ark
position (SHIFT LOCK).
Manual transmission: the clutch must be fully depressed.
3. Without touching the accelerator pedal, turn the ignition key to the starting position*. Allow the starter to operate
for up to 10 seconds. Release the key as soon as the engine starts. If the engine fails to start, repeat step 3.
For cold starts at altitudes above 6000 ft (1800 meters), depress the accelerator pedal halfway and turn the key to the
starting position. Release the pedal slowly when the engine starts.
4. To release the gear selector from the (P)ark position (automatic transmission), the ignition key must be in position II
ProCarManuals.com
Page 83 of 98

A - Cassette slot
The cassette is inserted with the open side to the right (side 1 or A of the cassette upwards).
When the cassette is inserted, the radio is disengaged and the cassette will start to play automatically. "TAPE > " or
"TAPE < " is displayed to indicate which side of the tape is being played. When one side of the tape has been played
the unit will automatically play the other side (auto-reverse). The cassette can be inserted or ejected even when the unit
is switched off.
B - Reversing the tape (PROG)
Press the button to play the other side of the tape.
The side of the tape being played will be displayed.
C - Fast winding
The tape is advanced with " " and rewound with " ".
Fast winding can be stopped by pressing either the selected button or the fast wind button again or by pressing the
"TAPE" button.
D - Dolby B NR button
Press this button when you use tapes recorded with the Dolby B noise reduction system.
The Dolby symbol
will be indicated in the display.
pg. 141 Cassette deck
ProCarManuals.com
Page 84 of 98

A - Next selector
Press the " " button and the tape will automatically advance to the next song.
There must be a gap (no audio sound) of approx. 5 seconds between songs for this function to operate.
B - Previous selector
Press the " " button and the tape will automatically rewind to the previous song.
There must be a gap (no audio sound) of approx. 5 seconds between songs for this function to operate.
C - Pause
If you press the "volume" knob the tape is stopped, the unit is silent and "PAUSE" is displayed. To restart the tape
press the knob again.
D - Scan
Press this button to listen to the first five seconds of each song. Press this button or the "TAPE" button to stop
scanning. During scanning "SCAN" will be displayed. There must be a gap (no audio sound) of approx. 5 seconds
between songs for this function to operate.
Contents | Top of Page
ProCarManuals.com