buttons VOLVO C70 2006 User Guide
[x] Cancel search | Manufacturer: VOLVO, Model Year: 2006, Model line: C70, Model: VOLVO C70 2006Pages: 182, PDF Size: 3.35 MB
Page 88 of 182

The doors cannot be opened by pulling up the lock button.
If both doors are closed when a lock button is pressed, the alarm will not be armed.
Each door can also be locked manually using the lock button on that particular door. This applies only if the car has
not been locked from the outside.
The doors can also be unlocked (and the door opened) by pulling the handle in the door twice.
Locking the doors when leaving the vehicle
The lock switches in the doors can also be used for locking all doors when leaving the vehicle. However, please be
aware of the following:
If one or more of the doors is open and the key is not in the ignition when the button is pressed, the doors will lock
automatically when they are closed. This will also arm the alarm.
If the key is in the ignition and one of the doors is open, the vehicle cannot be locked using the buttons on the
doors.
pg. 94 Locks and alarm
Alarm
The alarm system
The alarm is automatically armed whenever the car is locked with the remote control, or if a front lock button is
depressed.
When armed, the alarm continuously monitors a number of points on the car. The following conditions will trigger the
alarm:
The hood, trunk, or a door is forced open.
The ignition switch is tampered with
An attempt is made to start the car with a non-approved key (a key not coded to the car's ignition).
If there is movement in the passenger compartment (if the car is equipped with the optional movement sensor).
The car is lifted or towed (if the car is equipped with the optional inclination sensor)
The battery is disconnected (while the alarm is armed).
The siren is disconnected when the alarm is disarmed.
NOTE: The alarm system functions in the same way, regardless of whether the power retractable hard top is raised or
lowered.
The alarm indicator light
The status of the alarm system is indicated by the indicator light on at the top of the dashboard (see illustration):
ProCarManuals.com
Page 159 of 182

The system will automatically start the next time the key is turned to position I.
Turn the volume dial or use the buttons in the optional steering wheel keypad to adjust the volume level. The volume
level is also adjusted automatically according to the vehicle's speed, see page 177
for more information on this
function.
Steering wheel keypad
The four buttons on the steering wheel keypad can be used to control the audio system. The steering wheel keypad can
be used to adjust volume, shift between preset stations and change CD tracks. Press one of the two left-hand buttons
briefly to change to the next/previous preset radio station, or to go to the next/previous track on a CD. Press and hold
down these buttons to search within a track on a CD.
Daytime/twilight display
In daylight the information is displayed against a light background. In darkness it is displayed against a dark
background.
Sound source
A sound source can be selected by pressing AM/FM (2) or CD (3). Press AM/FM repeatedly to toggle between FM1,
FM2, and AM. The currently selected sound source will be shown in the display.
Sound settings
Press SOUND (5). Press this button repeatedly until you come to the setting that you wish to change.
Turn the TUNING dial (4) to make the desired setting.
The following settings can be made:
BASS -set the bass level
TREBLE-set the treble level
BALANCE-set the left/right sound balance
FADER-set the front/rear sound balance
SUBWOOFER (option)-set the level for the subwoofer (bass speaker)
pg. 177 Audio
Audio functions
CENTER1-make settings for the center speaker
SURROUND
1-make settings for surround sound
Subwoofer (option)
To switch the subwoofer on or off:
Press MENU followed by ENTER.
ProCarManuals.com
Page 161 of 182

Select ASC in the menu and press ENTER.
Select Low, Medium , or High and press ENTER.
1. Dynaudio Sound System only
pg. 178 Audio
Radio functions
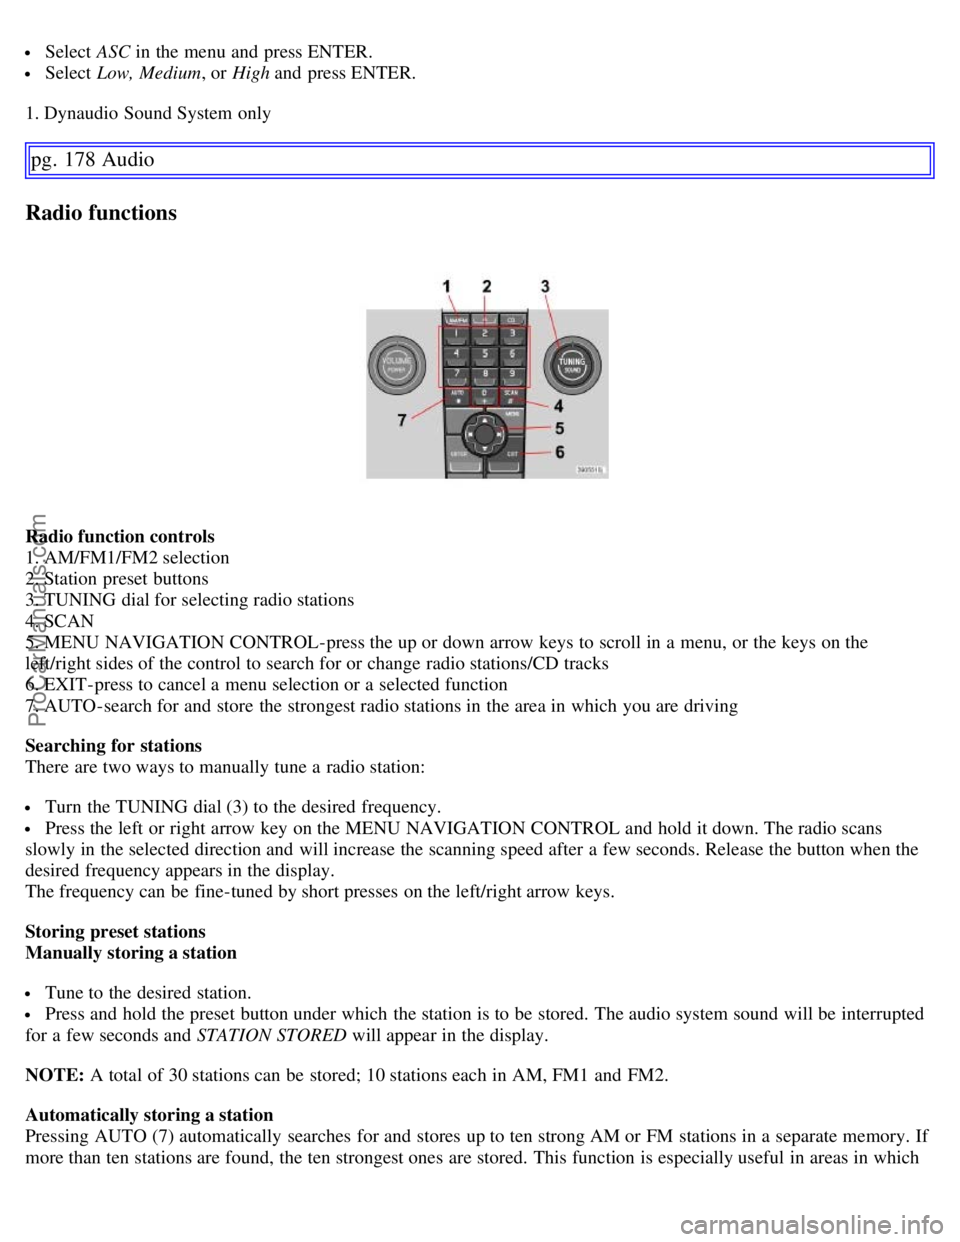
Radio function controls
1. AM/FM1/FM2 selection
2. Station preset buttons
3. TUNING dial for selecting radio stations
4. SCAN
5. MENU NAVIGATION CONTROL-press the up or down arrow keys to scroll in a menu, or the keys on the
left/right sides of the control to search for or change radio stations/CD tracks
6. EXIT-press to cancel a menu selection or a selected function
7. AUTO-search for and store the strongest radio stations in the area in which you are driving
Searching for stations
There are two ways to manually tune a radio station:
Turn the TUNING dial (3) to the desired frequency.
Press the left or right arrow key on the MENU NAVIGATION CONTROL and hold it down. The radio scans
slowly in the selected direction and will increase the scanning speed after a few seconds. Release the button when the
desired frequency appears in the display.
The frequency can be fine-tuned by short presses on the left/right arrow keys.
Storing preset stations
Manually storing a station
Tune to the desired station.
Press and hold the preset button under which the station is to be stored. The audio system sound will be interrupted
for a few seconds and STATION STORED will appear in the display.
NOTE: A total of 30 stations can be stored; 10 stations each in AM, FM1 and FM2.
Automatically storing a station
Pressing AUTO (7) automatically searches for and stores up to ten strong AM or FM stations in a separate memory. If
more than ten stations are found, the ten strongest ones are stored. This function is especially useful in areas in which
ProCarManuals.com
Page 162 of 182

you are not familiar with radio stations or their frequencies.
To use the AUTO function:
Select a waveband using the AM/FM button (1).
Start the search by pressing AUTO until AUTO STORING appears in the display.
When the search is completed, AUTO STORING will no longer be displayed. If there are no stations with sufficient
signal strength, NO AST FOUND is displayed.
The auto-stored stations can be selected using the preset buttons (2).
Press EXIT (6) to terminate the automatic storing function.
When the radio is in auto-store mode, AUTO is shown in the display. AUTO disappears when you return to normal
radio mode, which can be done by briefly pressing AM/FM (1), EXIT (6), or AUTO (7).
pg. 179 Audio
Radio functions
To return to the Auto-store mode, press the AUTO button briefly and select a stored station by pressing one of the
preset buttons (2).
Saving auto-stored stations in the preset memory
An auto-stored station can be saved in the memory for manually preset stations.
Press AUTO (7) briefly.
Auto is displayed.
Press one of the preset buttons (2) under which the station is to be stored. Hold down the button until STATION
STORED is displayed .
The radio will then exit auto-store mode and the stored station can be selected by pressing the preset button.
Scanning
SCAN (4) automatically searches through the selected waveband for strong AM or FM stations. When the radio finds a
station, that station will be played for approximately 8 seconds, after which scanning resumes.
Activating/deactivating SCAN
Select radio mode using the AM/FM button (2).
Press SCAN to activate the function. SCAN is shown in the display.
Press the SCAN or EXIT button to deactivate the scan function and listen to the selected station.
Storing a station found with SCAN
A station can be stored as a preset while the SCAN function is activated.
Press one of the preset buttons (2) under which the station is to be stored. Hold down the button until STATION
STORED is displayed .
The SCAN function will be deactivated and the station can be selected by pressing the preset button.
Radio Broadcast Data System - RBDS
This feature, which may not be available in your area, functions only with FM broadcasts. The radio in your car is
equipped with an advanced system allowing information from broadcasters to be transmitted visually, as text, together
with the audio signal. This information is then decoded by the radio and made available for several new and unique
features.
The RBDS or Radio Broadcast Data System operates in the FM band only, and the information transmitted is
supplied exclusively by participating broadcasters.
ProCarManuals.com
Page 165 of 182

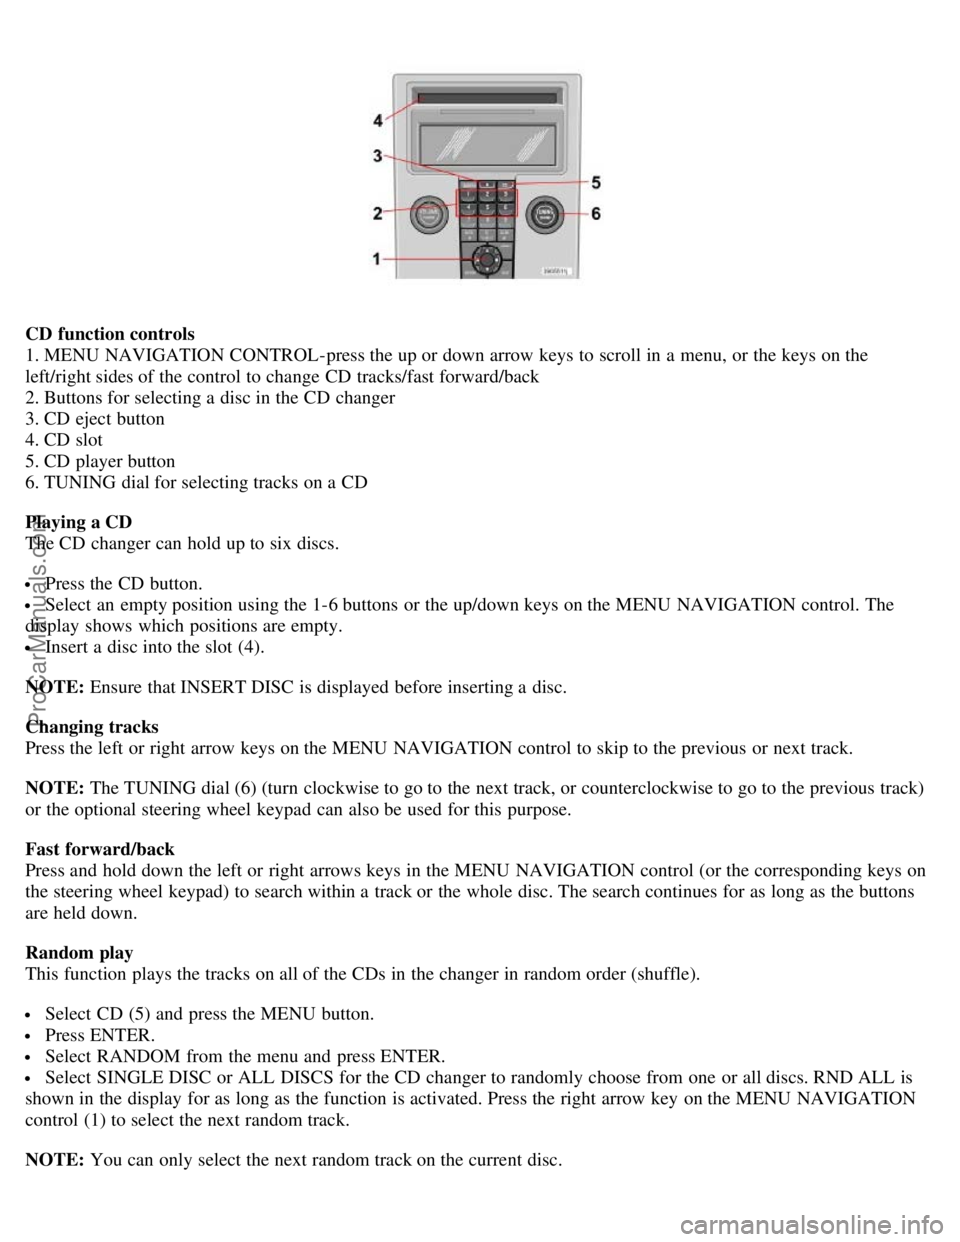
CD function controls
1. MENU NAVIGATION CONTROL-press the up or down arrow keys to scroll in a menu, or the keys on the
left/right sides of the control to change CD tracks/fast forward/back
2. Buttons for selecting a disc in the CD changer
3. CD eject button
4. CD slot
5. CD player button
6. TUNING dial for selecting tracks on a CD
Playing a CD
The CD changer can hold up to six discs.
Press the CD button.
Select an empty position using the 1-6 buttons or the up/down keys on the MENU NAVIGATION control. The
display shows which positions are empty.
Insert a disc into the slot (4).
NOTE: Ensure that INSERT DISC is displayed before inserting a disc.
Changing tracks
Press the left or right arrow keys on the MENU NAVIGATION control to skip to the previous or next track.
NOTE: The TUNING dial (6) (turn clockwise to go to the next track, or counterclockwise to go to the previous track)
or the optional steering wheel keypad can also be used for this purpose.
Fast forward/back
Press and hold down the left or right arrows keys in the MENU NAVIGATION control (or the corresponding keys on
the steering wheel keypad) to search within a track or the whole disc. The search continues for as long as the buttons
are held down.
Random play
This function plays the tracks on all of the CDs in the changer in random order (shuffle).
Select CD (5) and press the MENU button.
Press ENTER.
Select RANDOM from the menu and press ENTER.
Select SINGLE DISC or ALL DISCS for the CD changer to randomly choose from one or all discs. RND ALL is
shown in the display for as long as the function is activated. Press the right arrow key on the MENU NAVIGATION
control (1) to select the next random track.
NOTE: You can only select the next random track on the current disc.
ProCarManuals.com
Page 177 of 182

Central locking system, remote controls86
Changing oil158
Changing wheels138
Charge air cooler192
Child safety28
Clock setting button32
Cold weather precautions99
Collision status26
Compact disc care184
Compartments, storage79
Compass in rearview mirror49
Convertible top -- buttons for operating72
Convertible top -- emergency operation73
Convertible top -- temporary cover73, 75
Coolant159
Cover, temporary75
Cruise control42
D
Dimensions189
Disabling the passenger's side front airbag18
Display, instrument panel32
Door mirrors50
Door open warning36
Double locking91
Driving after a collision26
E
Economical driving98
Electrical current - conserving99
Electrical sockets, 12 volt47
Electrical system193
Electronic Brake Force Distribution (EBD)112
Emission inspection readiness156
Engine compartment157
Engine oil, changing158
Engine specifications192
Environment2
Equalizer, audio system177
Eyelets in trunk83
F
Federal Clean Air Act154
Flash, high beam40
Floor mats105
Floor mats, cleaning150
Fog lights38
ProCarManuals.com