key VOLVO C70 2006 Service Manual
[x] Cancel search | Manufacturer: VOLVO, Model Year: 2006, Model line: C70, Model: VOLVO C70 2006Pages: 182, PDF Size: 3.35 MB
Page 147 of 182

Removing the headlight housing
The entire headlight housing must be lifted out when replacing the high/low beam, parking light, turn signal, and side
marker bulbs. To lift out the housing:
Remove the key from the ignition and turn the headlight switch to position 0.
Open the hood.
Pull up the headlight housing's retaining pin (1)
Pull the headlight housing to one side and then forward (2).
Disconnect the wiring connector.
Lift out the headlight housing and place it on a soft surface to avoid scratching the lens.
After the defective bulb has been replaced, reinsert the housing in the reverse order. Check that the retaining pin is
correctly inserted.
WARNING!
Bi -Xenon headlights (option) - due to the high voltage used by these headlights, these bulbs should only be replaced
by a trained and qualified Volvo service technician.
Low beam bulb
Open the hood.
Remove the headlight housing.
Press the retaining clamps to the sides.
Release the bulb's retaining spring by pressing it to the right, and then moving it outward and downward.
Pull out the bulb.
Disconnect the wiring connector from the bulb. Installing a new bulb.
Insert the new bulb. It can only be installed in one position.
ProCarManuals.com
Page 150 of 182

Side marker light
Turn the bulb holder counterclockwise, pull it out, and replace the bulb.
Reinstall the bulb holder. It can only be installed in one position.
Front fog light (option)
Switch off all lights and turn the key to position 0.
Remove the panel around the fog light housing. Depress the tabs around the edges as shown in the illustration in the
right column.
Unscrew both torx screws in the fog light housing and remove it.
Disconnect the connector from the bulb.
Turn the bulb counterclockwise and pull it out.
Install the new bulb in its seat and turn it clockwise.
Reconnect the connector to the bulb.
Secure the fog light housing with the screws and press the panel back into place.
pg. 168 Maintenance and servicing
Replacing bulbs in the trunk
ProCarManuals.com
Page 151 of 182

Removing the tail light bulb holder
All bulbs in the tail light cluster can be replaced from the trunk. To access the bulb holder:
Switch off all lights and turn the key to position 0.
Remove the covers in the left/right panels as shown above to access the bulbs.
Disconnect the wiring connector from the bulb holder.
Press the catches together and pull out the bulb holder.
Replace the defective bulb.
Press the wiring connector back into position.
Press the bulb holder into place and reinstall the cover.
Location of tail light bulbs
1. Brake light
2. Parking light
3. Fog light (driver's side only)
4. Turn signal
5. Back-up light
NOTE: If the message indicating a burned out bulb remains in the information display after the bulb has been
replaced, consult a trained and qualified Volvo service technician.
ProCarManuals.com
Page 152 of 182

Rear reading lights
Insert a screwdriver and turn it gently to detach the bulb housing.
Remove the defective bulb.
Install a new bulb.
Press the bulb housing back into place.
High-level brake light
These bulbs are of a special type. It is recommended that they be replaced by a trained and qualified Volvo service
technician.
pg. 169 Maintenance and servicing
Replacing interior bulbs
License plate lighting
Replacing the bulb
Switch off all lights and turn the key to position 0.
Remove the screw with a screw driver.
Detach the entire bulb housing and carefully pull it out. Turn the connector counterclockwise and pull out the bulb.
Replace the bulb.
Reinstall the connector and turn it clockwise.
Reinstall the entire bulb housing and screw it into place.
Footwell lighting
The footwell lighting is located under the dashboard on the driver's and passenger's sides. To replace a bulb:
ProCarManuals.com
Page 158 of 182

2 0 0 6
VOLVO C70
Chapter 11 - Audio
pg. 175 Audio
Audio functions 176
Radio functions178
CD changer182
Compact disc care184
Audio menu settings and selections185
pg. 176 Audio
Audio functions
Audio system controls
1. VOLUME dial
2. AM/FM1/FM2 selection
3. CD player button
4. TUNING dial
5. SOUND button
On/off
Press POWER (1) to switch the audio system off or on.
If the system is on when the ignition is turned to position 0 it will remain on until the key has been removed from
the ignition switch.
ProCarManuals.com
Page 159 of 182

The system will automatically start the next time the key is turned to position I.
Turn the volume dial or use the buttons in the optional steering wheel keypad to adjust the volume level. The volume
level is also adjusted automatically according to the vehicle's speed, see page 177
for more information on this
function.
Steering wheel keypad
The four buttons on the steering wheel keypad can be used to control the audio system. The steering wheel keypad can
be used to adjust volume, shift between preset stations and change CD tracks. Press one of the two left-hand buttons
briefly to change to the next/previous preset radio station, or to go to the next/previous track on a CD. Press and hold
down these buttons to search within a track on a CD.
Daytime/twilight display
In daylight the information is displayed against a light background. In darkness it is displayed against a dark
background.
Sound source
A sound source can be selected by pressing AM/FM (2) or CD (3). Press AM/FM repeatedly to toggle between FM1,
FM2, and AM. The currently selected sound source will be shown in the display.
Sound settings
Press SOUND (5). Press this button repeatedly until you come to the setting that you wish to change.
Turn the TUNING dial (4) to make the desired setting.
The following settings can be made:
BASS -set the bass level
TREBLE-set the treble level
BALANCE-set the left/right sound balance
FADER-set the front/rear sound balance
SUBWOOFER (option)-set the level for the subwoofer (bass speaker)
pg. 177 Audio
Audio functions
CENTER1-make settings for the center speaker
SURROUND
1-make settings for surround sound
Subwoofer (option)
To switch the subwoofer on or off:
Press MENU followed by ENTER.
ProCarManuals.com
Page 161 of 182

Select ASC in the menu and press ENTER.
Select Low, Medium , or High and press ENTER.
1. Dynaudio Sound System only
pg. 178 Audio
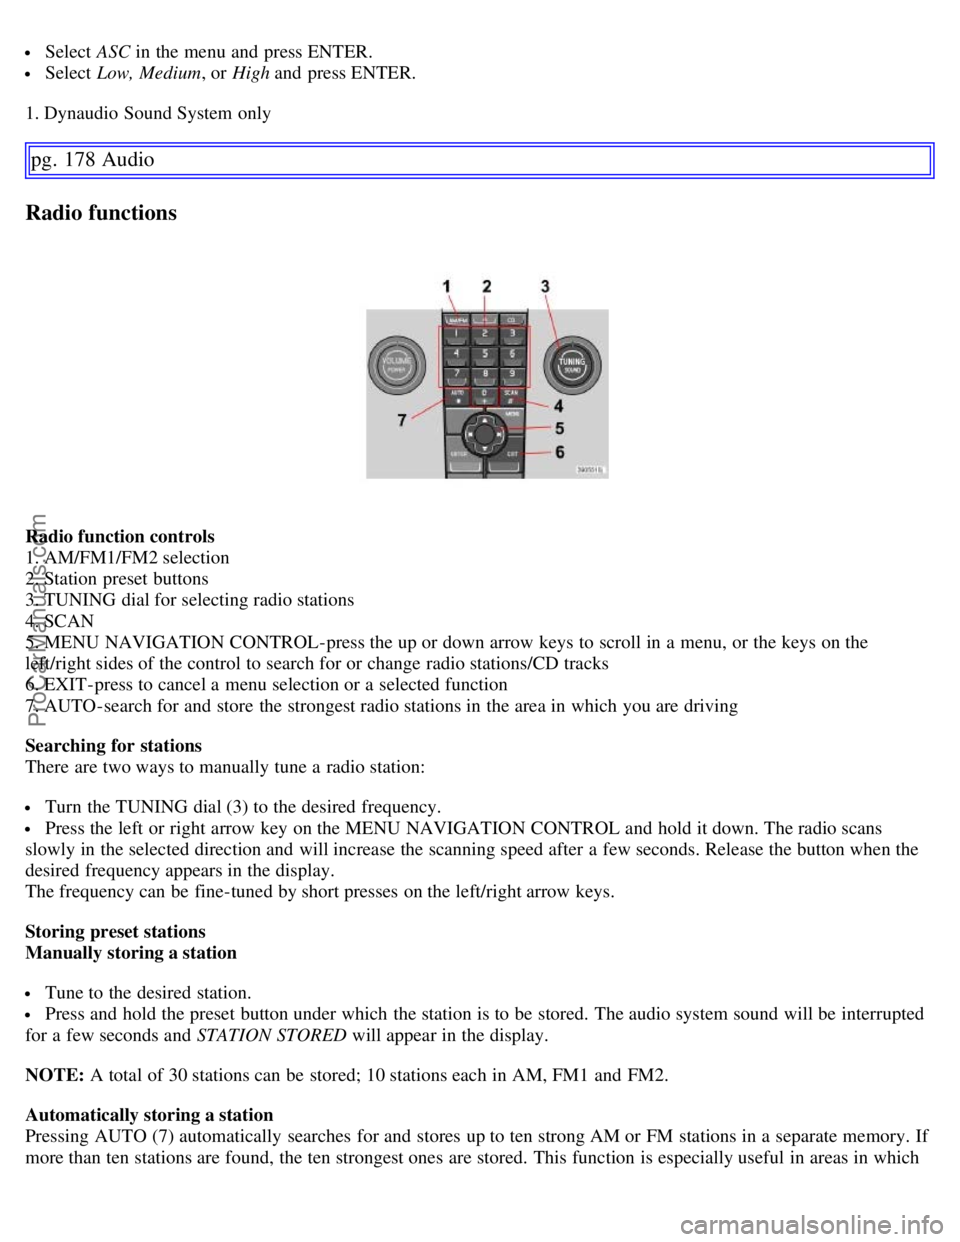
Radio functions
Radio function controls
1. AM/FM1/FM2 selection
2. Station preset buttons
3. TUNING dial for selecting radio stations
4. SCAN
5. MENU NAVIGATION CONTROL-press the up or down arrow keys to scroll in a menu, or the keys on the
left/right sides of the control to search for or change radio stations/CD tracks
6. EXIT-press to cancel a menu selection or a selected function
7. AUTO-search for and store the strongest radio stations in the area in which you are driving
Searching for stations
There are two ways to manually tune a radio station:
Turn the TUNING dial (3) to the desired frequency.
Press the left or right arrow key on the MENU NAVIGATION CONTROL and hold it down. The radio scans
slowly in the selected direction and will increase the scanning speed after a few seconds. Release the button when the
desired frequency appears in the display.
The frequency can be fine-tuned by short presses on the left/right arrow keys.
Storing preset stations
Manually storing a station
Tune to the desired station.
Press and hold the preset button under which the station is to be stored. The audio system sound will be interrupted
for a few seconds and STATION STORED will appear in the display.
NOTE: A total of 30 stations can be stored; 10 stations each in AM, FM1 and FM2.
Automatically storing a station
Pressing AUTO (7) automatically searches for and stores up to ten strong AM or FM stations in a separate memory. If
more than ten stations are found, the ten strongest ones are stored. This function is especially useful in areas in which
ProCarManuals.com
Page 165 of 182

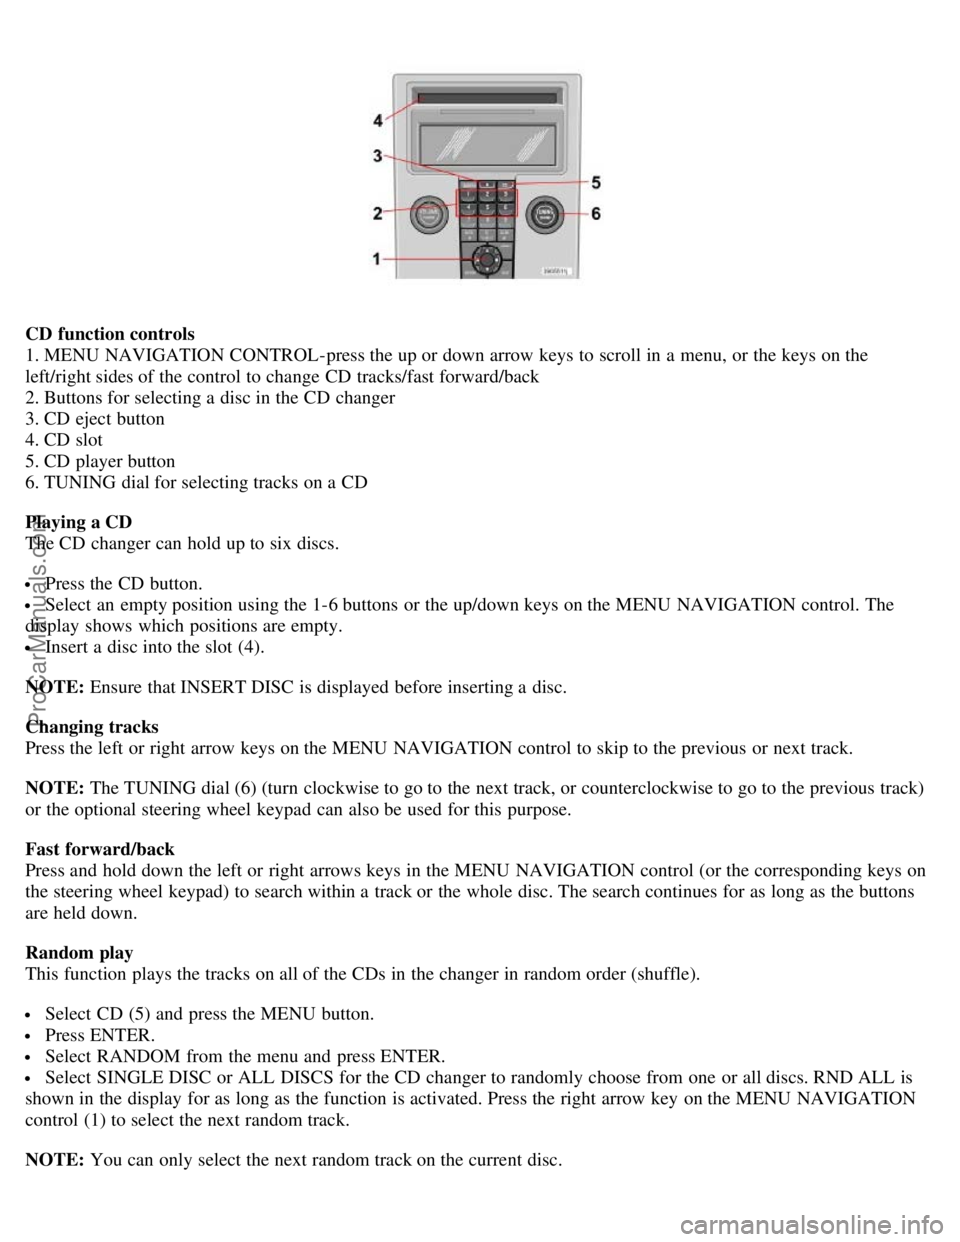
CD function controls
1. MENU NAVIGATION CONTROL-press the up or down arrow keys to scroll in a menu, or the keys on the
left/right sides of the control to change CD tracks/fast forward/back
2. Buttons for selecting a disc in the CD changer
3. CD eject button
4. CD slot
5. CD player button
6. TUNING dial for selecting tracks on a CD
Playing a CD
The CD changer can hold up to six discs.
Press the CD button.
Select an empty position using the 1-6 buttons or the up/down keys on the MENU NAVIGATION control. The
display shows which positions are empty.
Insert a disc into the slot (4).
NOTE: Ensure that INSERT DISC is displayed before inserting a disc.
Changing tracks
Press the left or right arrow keys on the MENU NAVIGATION control to skip to the previous or next track.
NOTE: The TUNING dial (6) (turn clockwise to go to the next track, or counterclockwise to go to the previous track)
or the optional steering wheel keypad can also be used for this purpose.
Fast forward/back
Press and hold down the left or right arrows keys in the MENU NAVIGATION control (or the corresponding keys on
the steering wheel keypad) to search within a track or the whole disc. The search continues for as long as the buttons
are held down.
Random play
This function plays the tracks on all of the CDs in the changer in random order (shuffle).
Select CD (5) and press the MENU button.
Press ENTER.
Select RANDOM from the menu and press ENTER.
Select SINGLE DISC or ALL DISCS for the CD changer to randomly choose from one or all discs. RND ALL is
shown in the display for as long as the function is activated. Press the right arrow key on the MENU NAVIGATION
control (1) to select the next random track.
NOTE: You can only select the next random track on the current disc.
ProCarManuals.com
Page 179 of 182

Information symbol32, 33
Inspection readiness156
Instrument overview7
Instrument panel32
Instrument panel lighting38
Interior lighting77
ISOFIX/LATCH anchors29
J
Jack, positioning140
Jack, positioning correctly140
Jump starting119
K
Key blade88
Keylock2, 105
Kickdown109
L
Label information188
LATCH anchors29
License plate lighting, replacing169
Lighting panel38
Lighting, interior77
Load anchoring eyelets83
Loading the vehicle133
Locking (double locking feature)91
Long distance trips100
Low beam bulb, replacing165
Low beam headlights40
M
Maintenance154
Malfunction indicator light34
Manual front seat adjustment66
Manual shifting (Geartronic)108
Manual transmission107
Mirror, rearview49
Mirrors, door-mounted50
O
OBD II156
Occupant safety10
Occupant Weight Sensor (OWS), disabling front passenger's side airbag18
Octane rating101
Oil pressure warning light35
Oil, changing158
On Call Roadside Assistance195
Onboard Diagnostic System (OBD II)156
ProCarManuals.com