alarm VOLVO S40 2005 Owners Manual
[x] Cancel search | Manufacturer: VOLVO, Model Year: 2005, Model line: S40, Model: VOLVO S40 2005Pages: 127, PDF Size: 2.32 MB
Page 4 of 127
Drive at a constant speed whenever possible.
See an authorized Volvo retailer as soon as possible for inspection if the check engine (malfunction indicator) lamp
illuminates, or stays on after the vehicle has started.
Properly dispose of any vehicle-related waste such as used motor oil, used batteries, brake pads, etc.
When cleaning your car, use Volvo's own car care products, all of which have systematically been adapted to the
environment.
Introduction
PremAir®
The surface of the radiator in the engine compartment is treated with a special coating called Premair*. This coating
works as a catalytic converter, converting most of the ground level ozone passing through the radiator into oxygen,
thereby reducing harmful ground-level ozone.
* PremAir is a registered trademark of Engelhard Corporation.
Contents
Contents
Chapter 1 - Instrument overview
Chapter 2 - Safety
Chapter 3 - Instruments and controls
Chapter 4 - Climate
Chapter 5 - Interior
Chapter 6 - Locks and alarm
Chapter 7 - Starting and driving
Chapter 8 - Wheels and tires
Chapter 9 - Vehicle care
Chapter 10 - Maintenance and servicing
Chapter 11 - Audio
Chapter 12 - Specifications
Index
Supplement - VALET OR SERVICE LOCKING
Supplement - ACCESSORY 18-INCH TIRE PRESSURES
Supplement - SAFETY - AIRBAG LABELS
ProCarManuals.com
Page 6 of 127
2 0 0 5
VOLVO S40
Chapter 1 - Instrument overview
pg. 8 Instrument overview
pg. 9 Instrument overview
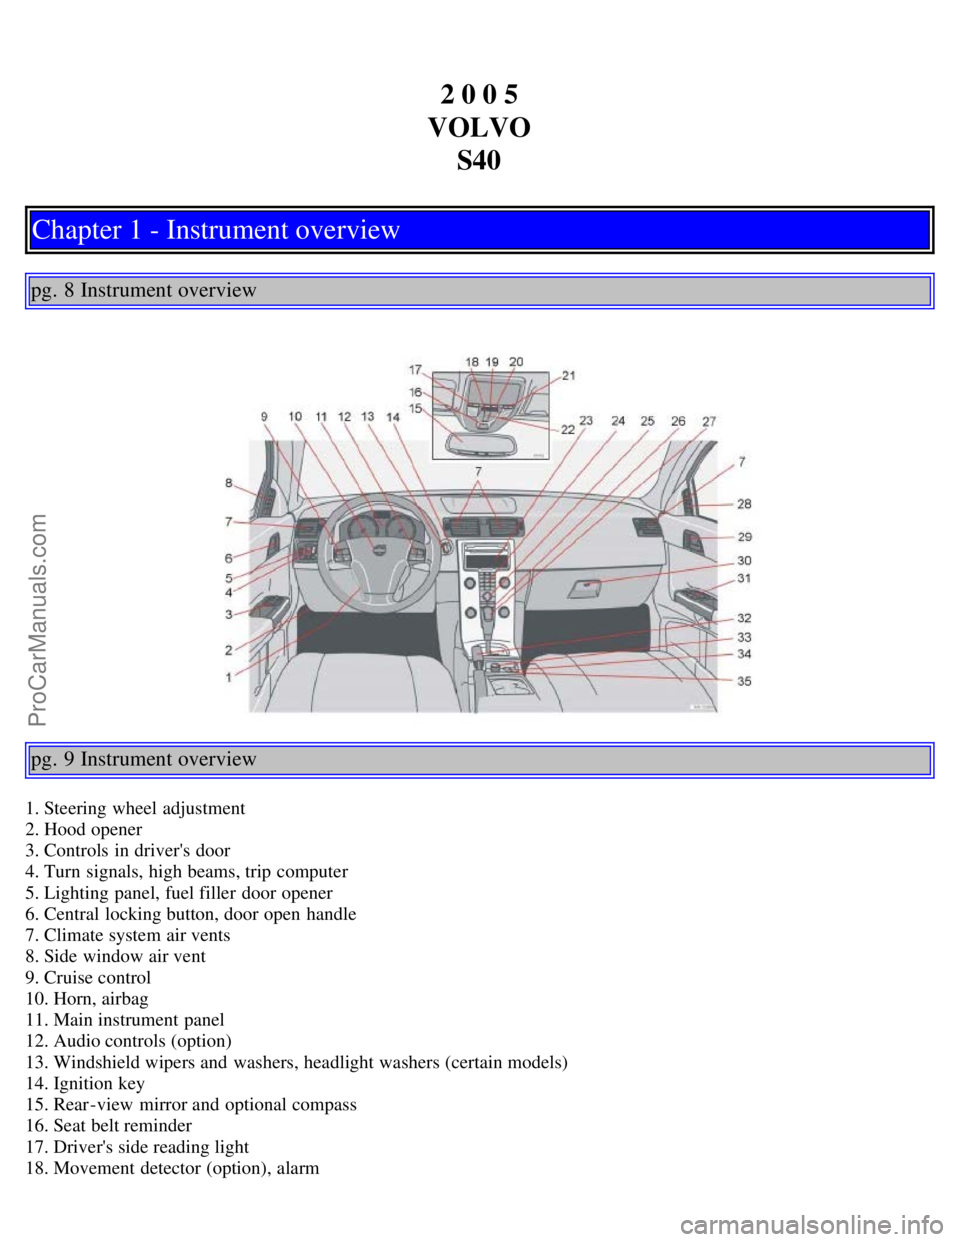
1. Steering wheel adjustment
2. Hood opener
3. Controls in driver's door
4. Turn signals, high beams, trip computer
5. Lighting panel, fuel filler door opener
6. Central locking button, door open handle
7. Climate system air vents
8. Side window air vent
9. Cruise control
10. Horn, airbag
11. Main instrument panel
12. Audio controls (option)
13. Windshield wipers and washers, headlight washers (certain models)
14. Ignition key
15. Rear-view mirror and optional compass
16. Seat belt reminder
17. Driver's side reading light
18. Movement detector (option), alarm
ProCarManuals.com
Page 47 of 127
2. Compartment in door panel
3. Ticket clip
4. Glove compartment
5. Waste bin (accessory), located behind the center instrument panel
6. Storage compartment and cup holders
7. Storage compartment and cup holders.WARNING!
Anchor any heavy objects to prevent them from moving during sudden stops.
Packages on the rear parcel shelf can obscure vision and may become dangerous projectiles in the event of a sudden
stop or an accident.
Glove compartment
The owners manual and maps can be stored here. There are also holders for coins, pens and fuel cards. The glove
compartment can only be locked and unlocked using the detachable key blade from the central locking system's remote
control. See the chapter "Locks and alarm" for further information about the key blade.
pg. 84 Rear seat
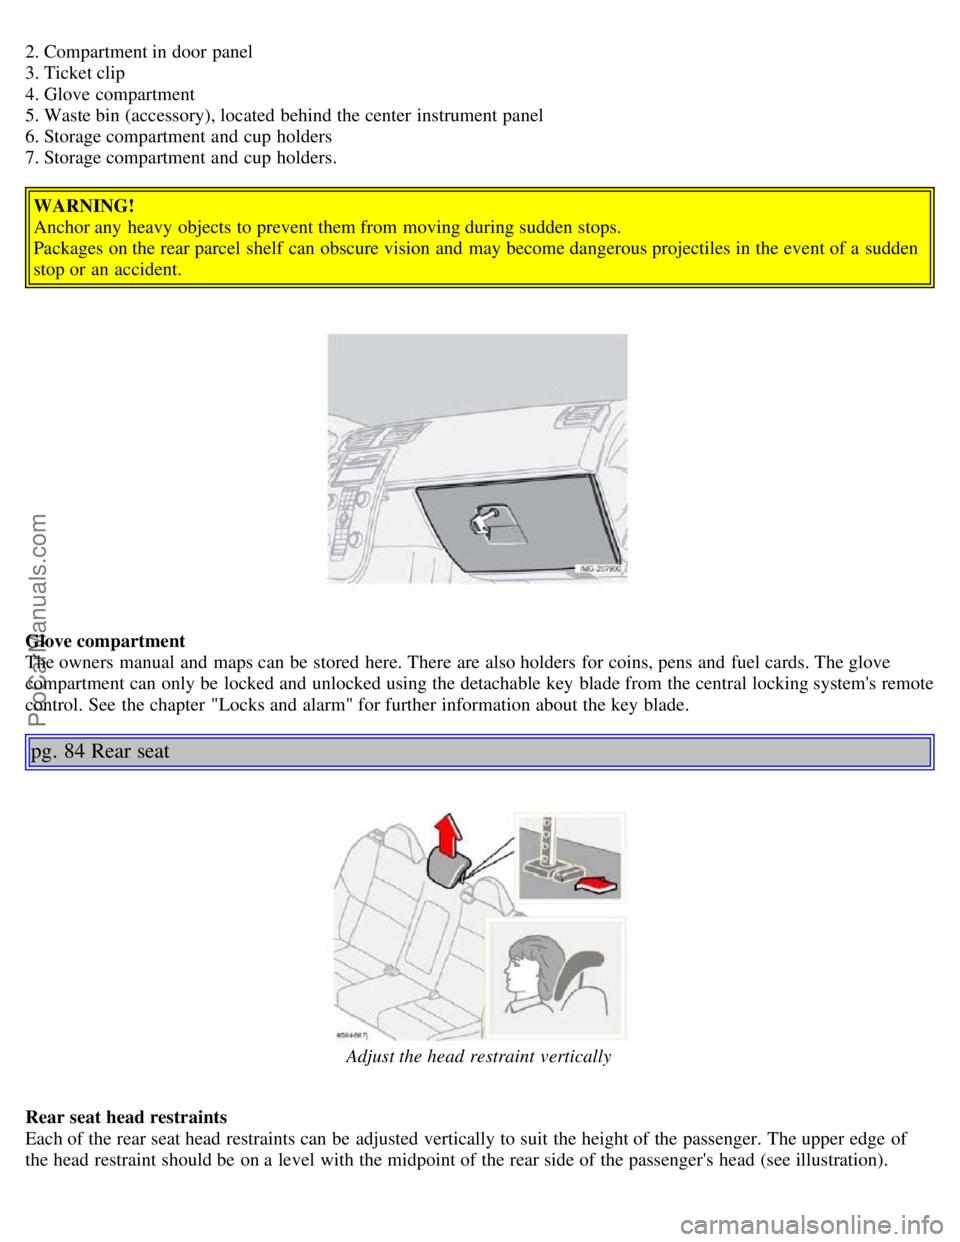
Adjust the head restraint vertically
Rear seat head restraints
Each of the rear seat head restraints can be adjusted vertically to suit the height of the passenger. The upper edge of
the head restraint should be on a level with the midpoint of the rear side of the passenger's head (see illustration).
ProCarManuals.com
Page 51 of 127
2 0 0 5
VOLVO S40
Chapter 6 - Locks and alarm
pg. 87 Locks and alarm
Remote control and key blade88
Locking and unlocking92
Locking the glove compartment, Child safety locks93
Alarm94
pg. 88 Remote control and key blade
Remote controls
Two remote controls that also function as ignition keys are provided with your car. The remote controls contain
detachable metal key blades for manually locking or unlocking the driver's door and the glove compartment.
USA - FCC ID: LTQVO315TX
This device complies with part 15 of the FCC rules. Operation is subject to the following conditions: (1) This device
may not cause harmful interference, and (2) this device must accept any interference received, including interference
that may cause undesired operation.
Canada - IC: 3659AVO315TX
Operation is subject to the following conditions: (1) this device may not cause interference, and (2) this device must
accept any interference, including interference that may cause undesired operation of the device.
Loss of a remote control
If either of the remote controls is lost, the other must be taken with the car to a Volvo retailer. As an anti-theft
measure, the code of the lost remote control must be erased from the system.
A separate label with the code of the key blade is supplied. Store the label in a safe place. Take the label to a Volvo
retailer when ordering new keys. A maximum of six remote controls/key blades can be programmed and used for one
car.
Immobilizer (start inhibitor)
Each of the keys supplied with your car contains a coded transponder. The code in the key is transmitted to an antenna
in the ignition switch where it is compared to the code stored in the start inhibitor module. The car will start only with
a properly coded key. If you misplace a key, take the other keys to an authorized Volvo retailer for reprogramming as
an antitheft measure.
ProCarManuals.com
Page 52 of 127
USA - FCC ID: LTQWFS 125VO
This device complies with part 15 of the FCC rules. Operation is subject to the following condition: (1) This device
may not cause harmful interference, and (2) this device must accept any interference received, including interference
that may cause undesired operation.
Canada - IC: 3659A-WFS125VO
Operation is subject to the following conditions: (1) this device may not cause interference, and (2) this device must
accept any interference, including interference that may cause undesired operation of the device.
CAUTION!
Never use force on the narrow section of the remote control - this is where the transponder is located. The car cannot
be started if the transponder is damaged.
pg. 89 Remote control and key blade
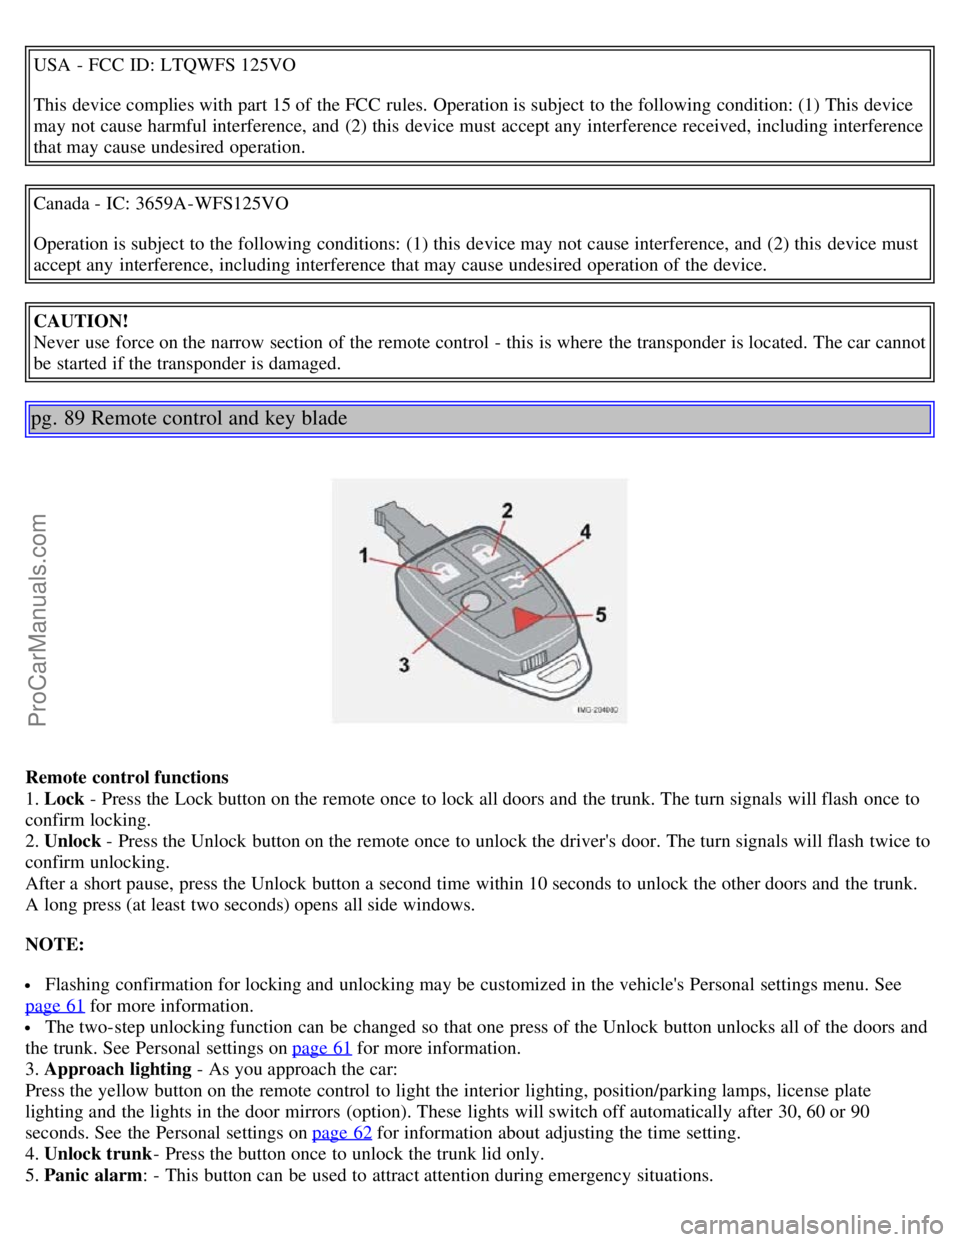
Remote control functions
1. Lock - Press the Lock button on the remote once to lock all doors and the trunk. The turn signals will flash once to
confirm locking.
2. Unlock - Press the Unlock button on the remote once to unlock the driver's door. The turn signals will flash twice to
confirm unlocking.
After a short pause, press the Unlock button a second time within 10 seconds to unlock the other doors and the trunk.
A long press (at least two seconds) opens all side windows.
NOTE:
Flashing confirmation for locking and unlocking may be customized in the vehicle's Personal settings menu. See
page 61
for more information.
The two-step unlocking function can be changed so that one press of the Unlock button unlocks all of the doors and
the trunk. See Personal settings on page 61
for more information.
3. Approach lighting - As you approach the car:
Press the yellow button on the remote control to light the interior lighting, position/parking lamps, license plate
lighting and the lights in the door mirrors (option). These lights will switch off automatically after 30, 60 or 90
seconds. See the Personal settings on page 62
for information about adjusting the time setting.
4. Unlock trunk - Press the button once to unlock the trunk lid only.
5. Panic alarm: - This button can be used to attract attention during emergency situations.
ProCarManuals.com
Page 53 of 127
To activate the panic alarm, press and hold the red button for at least 3 seconds or press it twice within 3 seconds. The
turn signals and horn will be activated.
The panic alarm will stop automatically after 30 seconds. To deactivate, wait approximately 5 seconds and press the
red button again.
NOTE: This button will NOT unlock the car.
pg. 90 Remote control and key blade
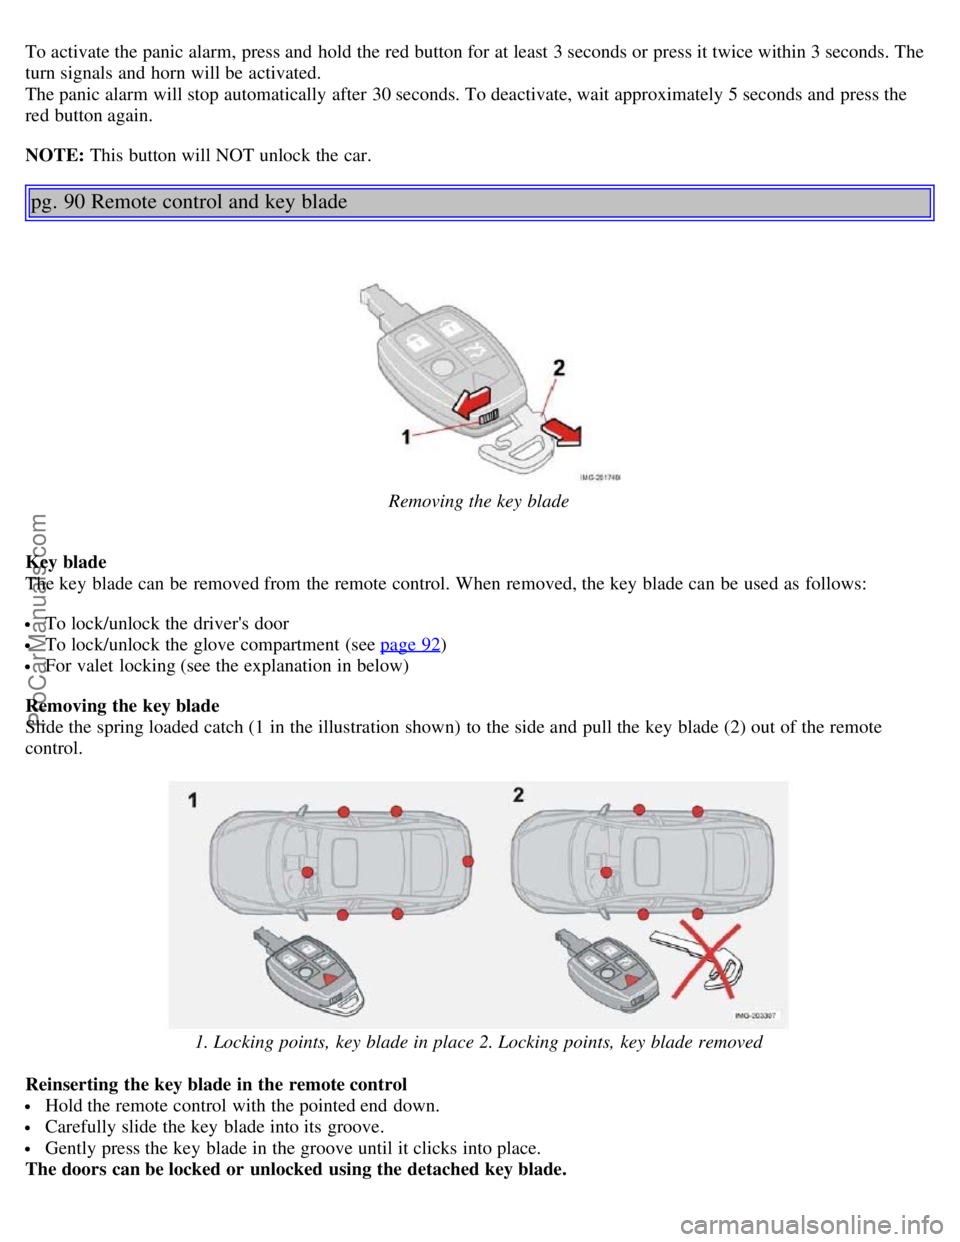
Removing the key blade
Key blade
The key blade can be removed from the remote control. When removed, the key blade can be used as follows:
To lock/unlock the driver's door
To lock/unlock the glove compartment (see page 92)
For valet locking (see the explanation in below)
Removing the key blade
Slide the spring loaded catch (1 in the illustration shown) to the side and pull the key blade (2) out of the remote
control.
1. Locking points, key blade in place 2. Locking points, key blade removed
Reinserting the key blade in the remote control
Hold the remote control with the pointed end down.
Carefully slide the key blade into its groove.
Gently press the key blade in the groove until it clicks into place.
The doors can be locked or unlocked using the detached key blade.
ProCarManuals.com
Page 55 of 127
5. Pry out (2) and replace the battery. Avoid touching the battery and its contact surfaces with your fingers.
6. Press the cover back into place and tighten the screw.
7. Reinsert the key blade in the remote control.
NOTE: The old battery should be disposed of properly at a recycling center or at your Volvo retailer.
pg. 92 Locking and unlocking
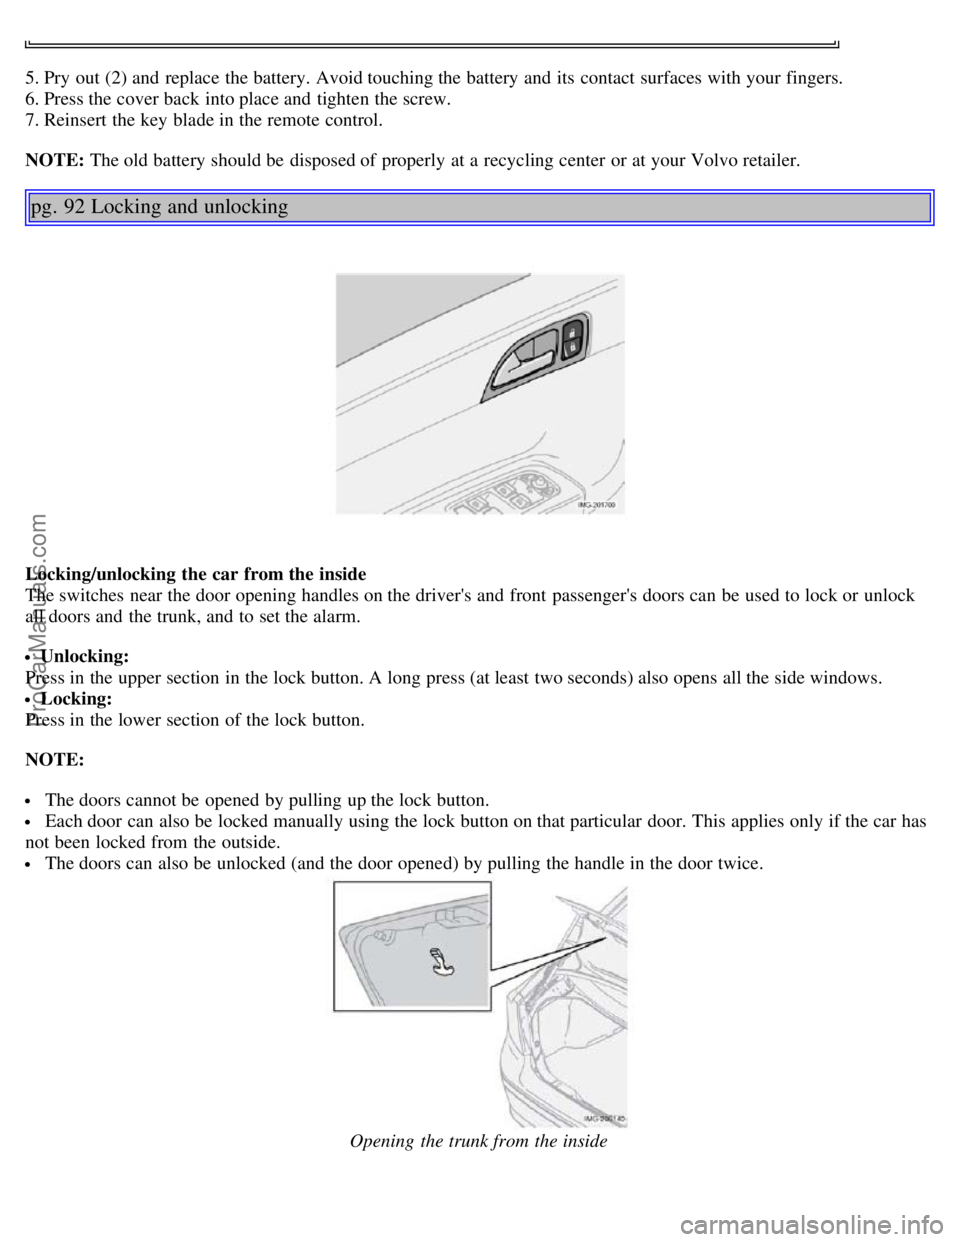
Locking/unlocking the car from the inside
The switches near the door opening handles on the driver's and front passenger's doors can be used to lock or unlock
all doors and the trunk, and to set the alarm.
Unlocking:
Press in the upper section in the lock button. A long press (at least two seconds) also opens all the side windows.
Locking:
Press in the lower section of the lock button.
NOTE:
The doors cannot be opened by pulling up the lock button.
Each door can also be locked manually using the lock button on that particular door. This applies only if the car has
not been locked from the outside.
The doors can also be unlocked (and the door opened) by pulling the handle in the door twice.
Opening the trunk from the inside
ProCarManuals.com
Page 56 of 127
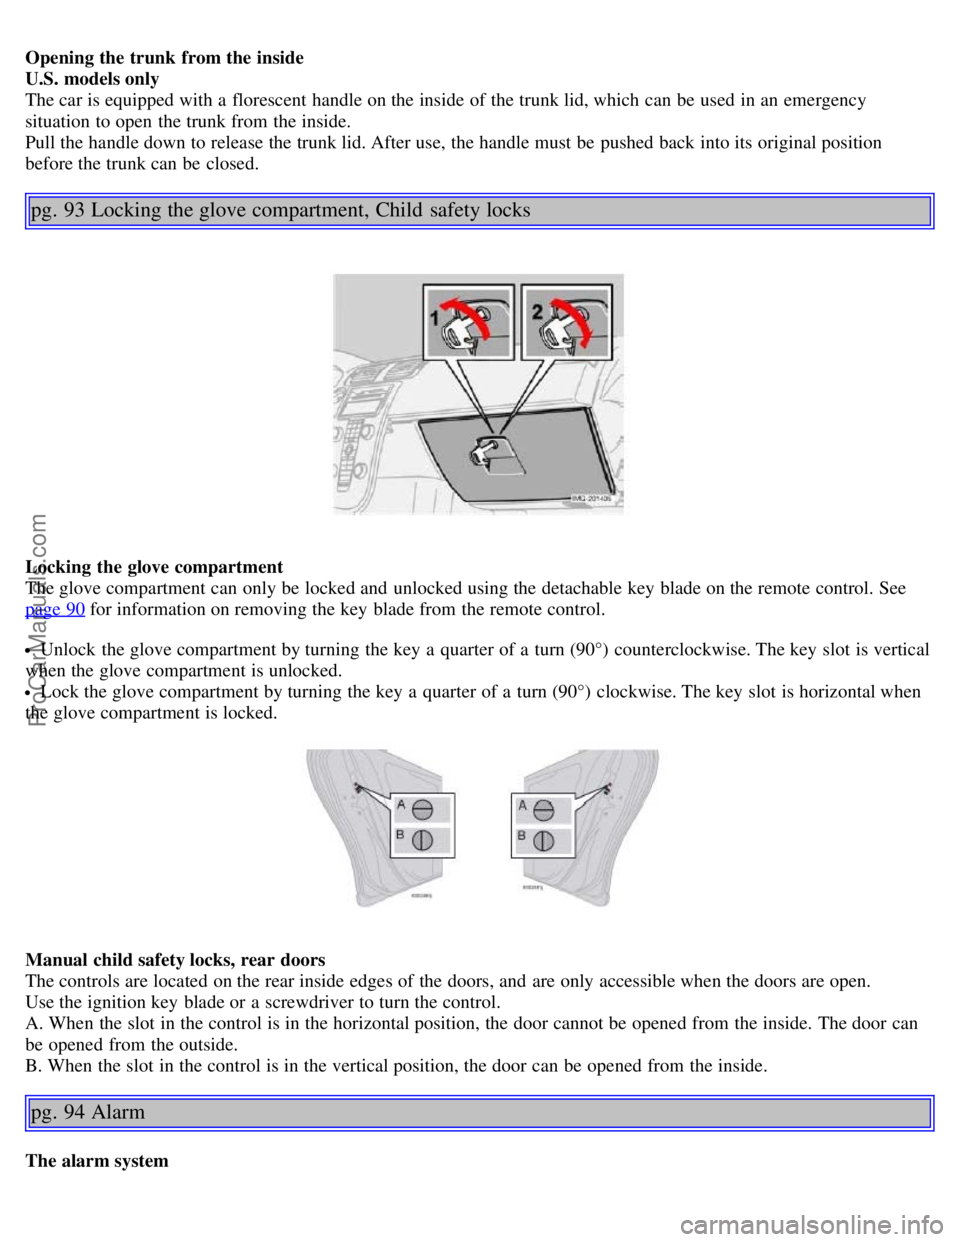
Opening the trunk from the inside
U.S. models only
The car is equipped with a florescent handle on the inside of the trunk lid, which can be used in an emergency
situation to open the trunk from the inside.
Pull the handle down to release the trunk lid. After use, the handle must be pushed back into its original position
before the trunk can be closed.
pg. 93 Locking the glove compartment, Child safety locks
Locking the glove compartment
The glove compartment can only be locked and unlocked using the detachable key blade on the remote control. See
page 90
for information on removing the key blade from the remote control.
Unlock the glove compartment by turning the key a quarter of a turn (90°) counterclockwise. The key slot is vertical
when the glove compartment is unlocked.
Lock the glove compartment by turning the key a quarter of a turn (90°) clockwise. The key slot is horizontal when
the glove compartment is locked.
Manual child safety locks, rear doors
The controls are located on the rear inside edges of the doors, and are only accessible when the doors are open.
Use the ignition key blade or a screwdriver to turn the control.
A. When the slot in the control is in the horizontal position, the door cannot be opened from the inside. The door can
be opened from the outside.
B. When the slot in the control is in the vertical position, the door can be opened from the inside.
pg. 94 Alarm
The alarm system
ProCarManuals.com
Page 57 of 127
The alarm is automatically armed whenever the car is locked with the remote control.
When armed, the alarm continuously monitors a number of points on the car. The following conditions will trigger the
alarm:
The hood is forced open.
The trunk is forced open.
A door is forced open.
The ignition switch is tampered with
An attempt is made to start the car with a non-approved key (a key not coded to the car's ignition).
If there is movement in the passenger compartment (if the car is equipped with the optional movement sensor).
The car is lifted or towed (if the car is equipped with the optional inclination sensor)
The battery is disconnected (while the alarm is armed).
The siren is disconnected when the alarm is disarmed.
The alarm indicator light
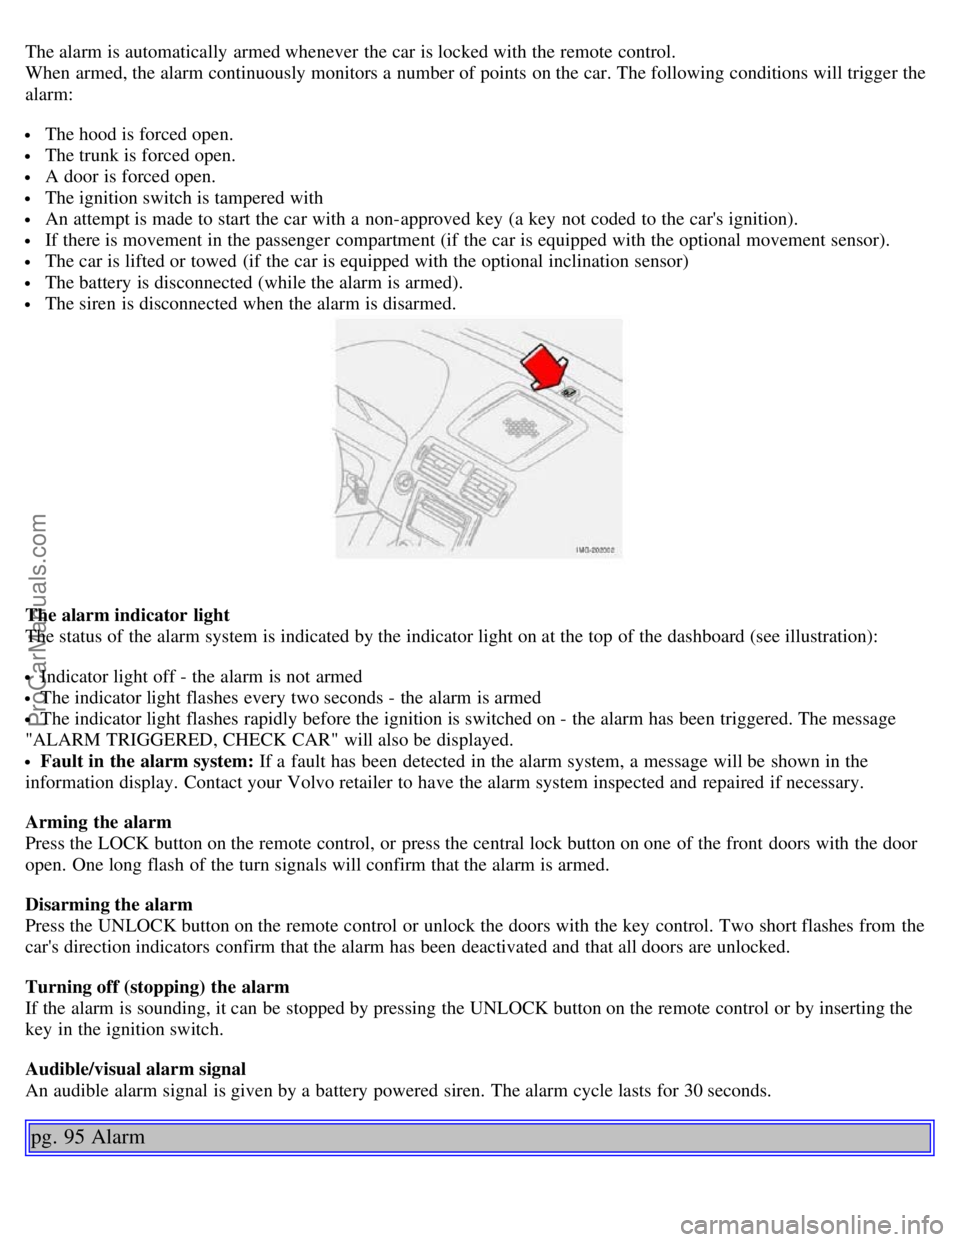
The status of the alarm system is indicated by the indicator light on at the top of the dashboard (see illustration):
Indicator light off - the alarm is not armed
The indicator light flashes every two seconds - the alarm is armed
The indicator light flashes rapidly before the ignition is switched on - the alarm has been triggered. The message
"ALARM TRIGGERED, CHECK CAR" will also be displayed.
Fault in the alarm system: If a fault has been detected in the alarm system, a message will be shown in the
information display. Contact your Volvo retailer to have the alarm system inspected and repaired if necessary.
Arming the alarm
Press the LOCK button on the remote control, or press the central lock button on one of the front doors with the door
open. One long flash of the turn signals will confirm that the alarm is armed.
Disarming the alarm
Press the UNLOCK button on the remote control or unlock the doors with the key control. Two short flashes from the
car's direction indicators confirm that the alarm has been deactivated and that all doors are unlocked.
Turning off (stopping) the alarm
If the alarm is sounding, it can be stopped by pressing the UNLOCK button on the remote control or by inserting the
key in the ignition switch.
Audible/visual alarm signal
An audible alarm signal is given by a battery powered siren. The alarm cycle lasts for 30 seconds.
pg. 95 Alarm
ProCarManuals.com
Page 58 of 127
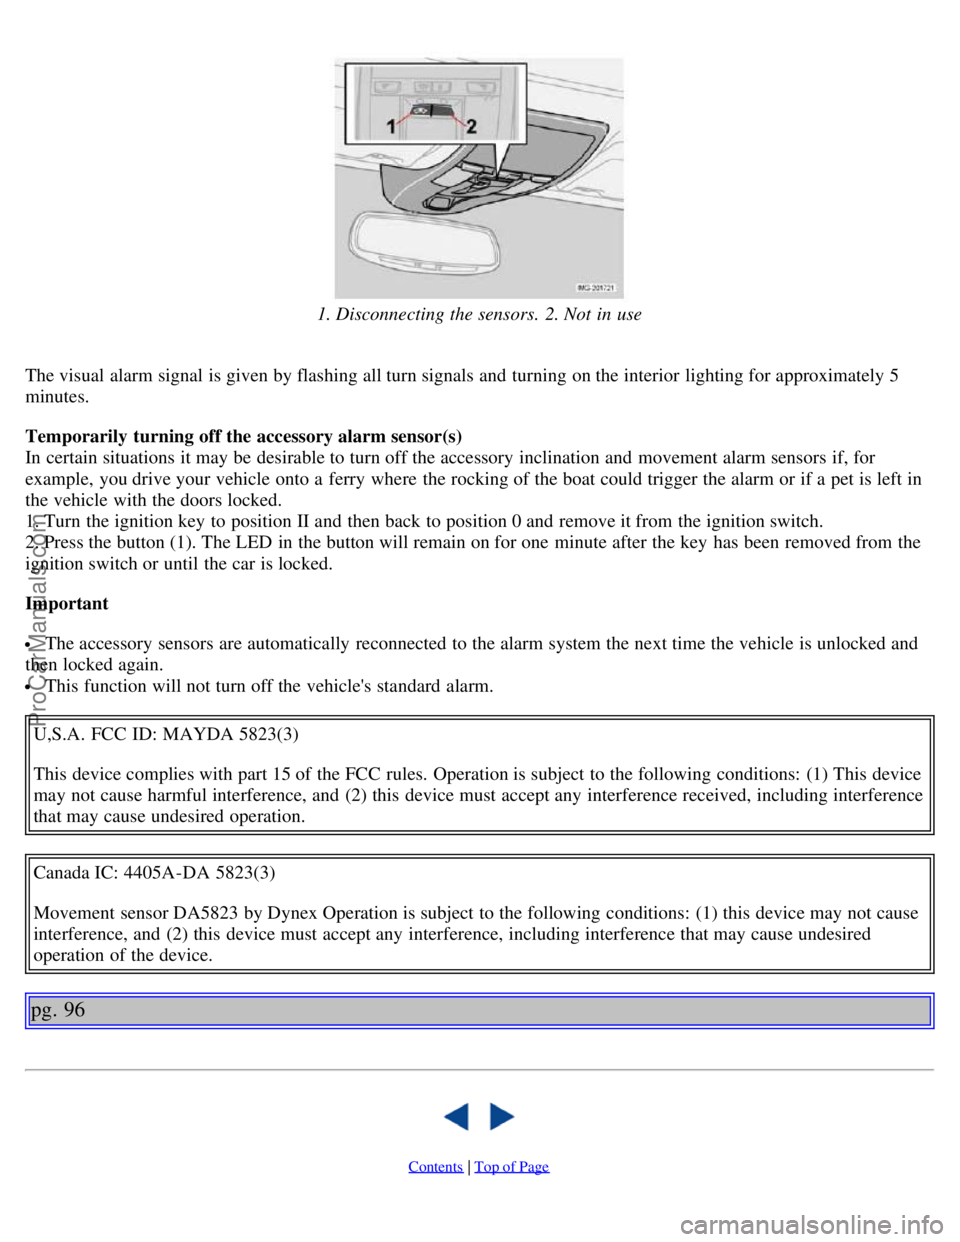
1. Disconnecting the sensors. 2. Not in use
The visual alarm signal is given by flashing all turn signals and turning on the interior lighting for approximately 5
minutes.
Temporarily turning off the accessory alarm sensor(s)
In certain situations it may be desirable to turn off the accessory inclination and movement alarm sensors if, for
example, you drive your vehicle onto a ferry where the rocking of the boat could trigger the alarm or if a pet is left in
the vehicle with the doors locked.
1. Turn the ignition key to position II and then back to position 0 and remove it from the ignition switch.
2. Press the button (1). The LED in the button will remain on for one minute after the key has been removed from the
ignition switch or until the car is locked.
Important
The accessory sensors are automatically reconnected to the alarm system the next time the vehicle is unlocked and
then locked again.
This function will not turn off the vehicle's standard alarm.
U,S.A. FCC ID: MAYDA 5823(3)
This device complies with part 15 of the FCC rules. Operation is subject to the following conditions: (1) This device
may not cause harmful interference, and (2) this device must accept any interference received, including interference
that may cause undesired operation.
Canada IC: 4405A-DA 5823(3)
Movement sensor DA5823 by Dynex Operation is subject to the following conditions: (1) this device may not cause
interference, and (2) this device must accept any interference, including interference that may cause undesired
operation of the device.
pg. 96
Contents | Top of Page
ProCarManuals.com