door lock VOLVO S40 2005 Owners Manual
[x] Cancel search | Manufacturer: VOLVO, Model Year: 2005, Model line: S40, Model: VOLVO S40 2005Pages: 127, PDF Size: 2.32 MB
Page 2 of 127
Your Volvo is designed to meet all applicable safety and emission standards, as indicated by the certification labels
attached to the driver's door opening, and on the underside of the hood.
For further information please contact your retailer, or:
In the USA: Volvo Cars of North America
Customer Care Center
P.O. Box 914 Rockleigh, New Jersey 07647-0914
1-800-458-1552
http://www.volvocars.us
In Canada:Volvo Cars of Canada Ltd.
Customer Care Center
175 Gordon Baker Road
North York, Ontario M2H 2N7
1-800-663-8255
http://www.volvocanada.com
2005 © Volvo Cars of North America, LLC
Introduction
General information
Shiftlock
When your car is parked, the gear selector is locked in the (P)ark position. To release the selector from this position,
turn the ignition key to position II (or start the engine), depress the brake pedal, press the button on the front side of the
gear selector and move the selector from (P)ark.
Keylock
When the ignition is switched off, the gear selector must be in the (P)ark position before the key can be removed from
the ignition switch.
Anti-lock Brake System (ABS)
The ABS system in your car performs a self -diagnostic test when the vehicle first reaches the speed of approximately
12 mph (20 km/h). The brake pedal will pulsate several times and a sound may be audible from the ABS control
module. This is normal.
Fuel filler door
Press the button on the light switch panel when the car is at a standstill to unlock the fuel filler door.
Fuel filler cap
After refueling, close the fuel filler cap by turning it clockwise until it clicks into place. If this cap is not closed tightly
or if the engine is running when the car is refueled, the Malfunction Indicator Lamp ("Check Engine" light) may
indicate a fault.
Points to keep in mind
Before you operate your vehicle for the first time, please familiarize yourself with the new-engine oil consumption
information on page 187
. You should also be familiar with the information found in the chapters "Instruments and
controls", and "Starting and driving".
Information contained in the balance of the manual is extremely useful and should be read after operating the vehicle
for the first time.
The manual is structured so that it can be used for reference. For this reason, it should be kept in the vehicle for
ProCarManuals.com
Page 6 of 127
2 0 0 5
VOLVO S40
Chapter 1 - Instrument overview
pg. 8 Instrument overview
pg. 9 Instrument overview
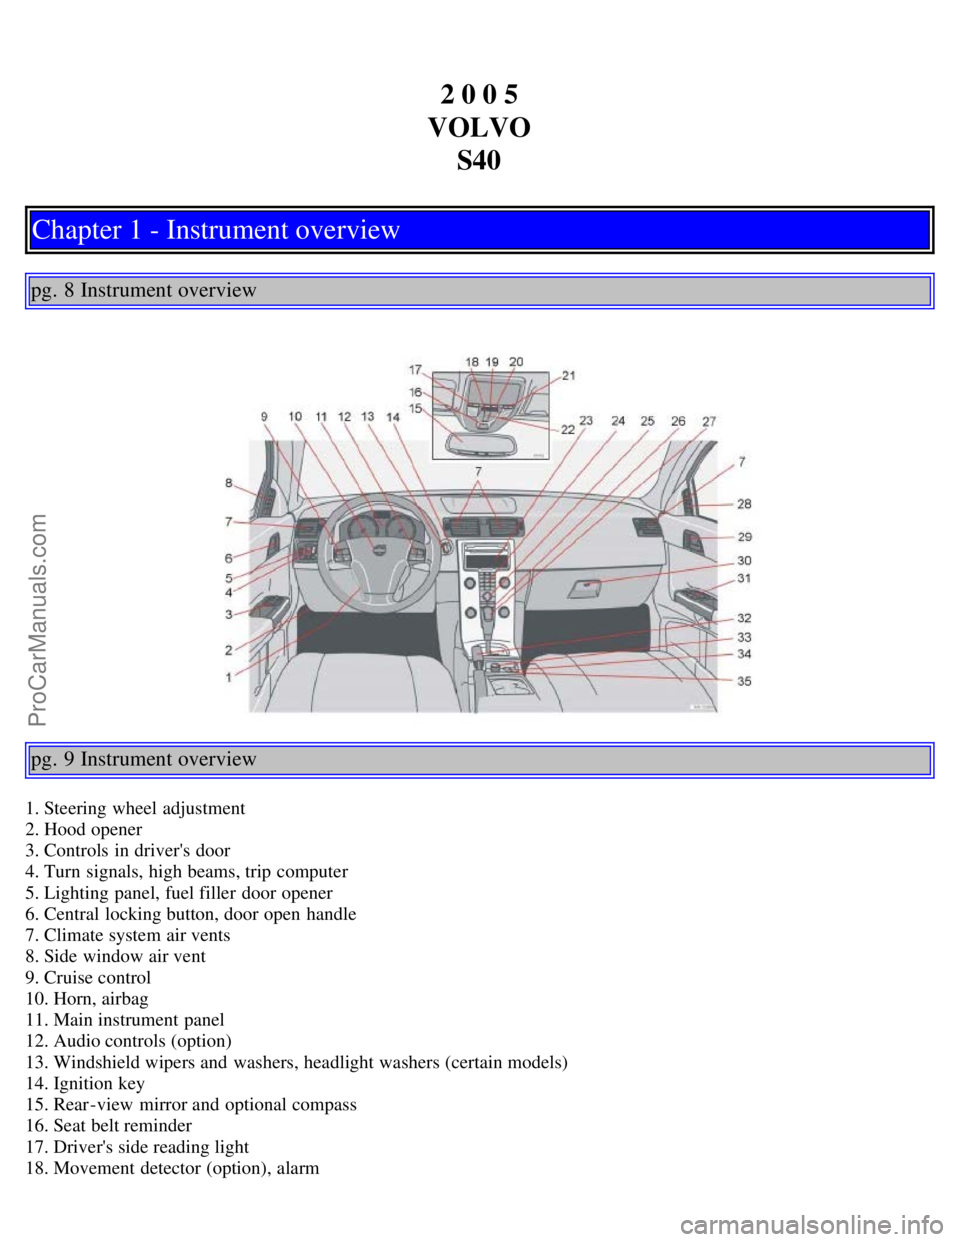
1. Steering wheel adjustment
2. Hood opener
3. Controls in driver's door
4. Turn signals, high beams, trip computer
5. Lighting panel, fuel filler door opener
6. Central locking button, door open handle
7. Climate system air vents
8. Side window air vent
9. Cruise control
10. Horn, airbag
11. Main instrument panel
12. Audio controls (option)
13. Windshield wipers and washers, headlight washers (certain models)
14. Ignition key
15. Rear-view mirror and optional compass
16. Seat belt reminder
17. Driver's side reading light
18. Movement detector (option), alarm
ProCarManuals.com
Page 7 of 127
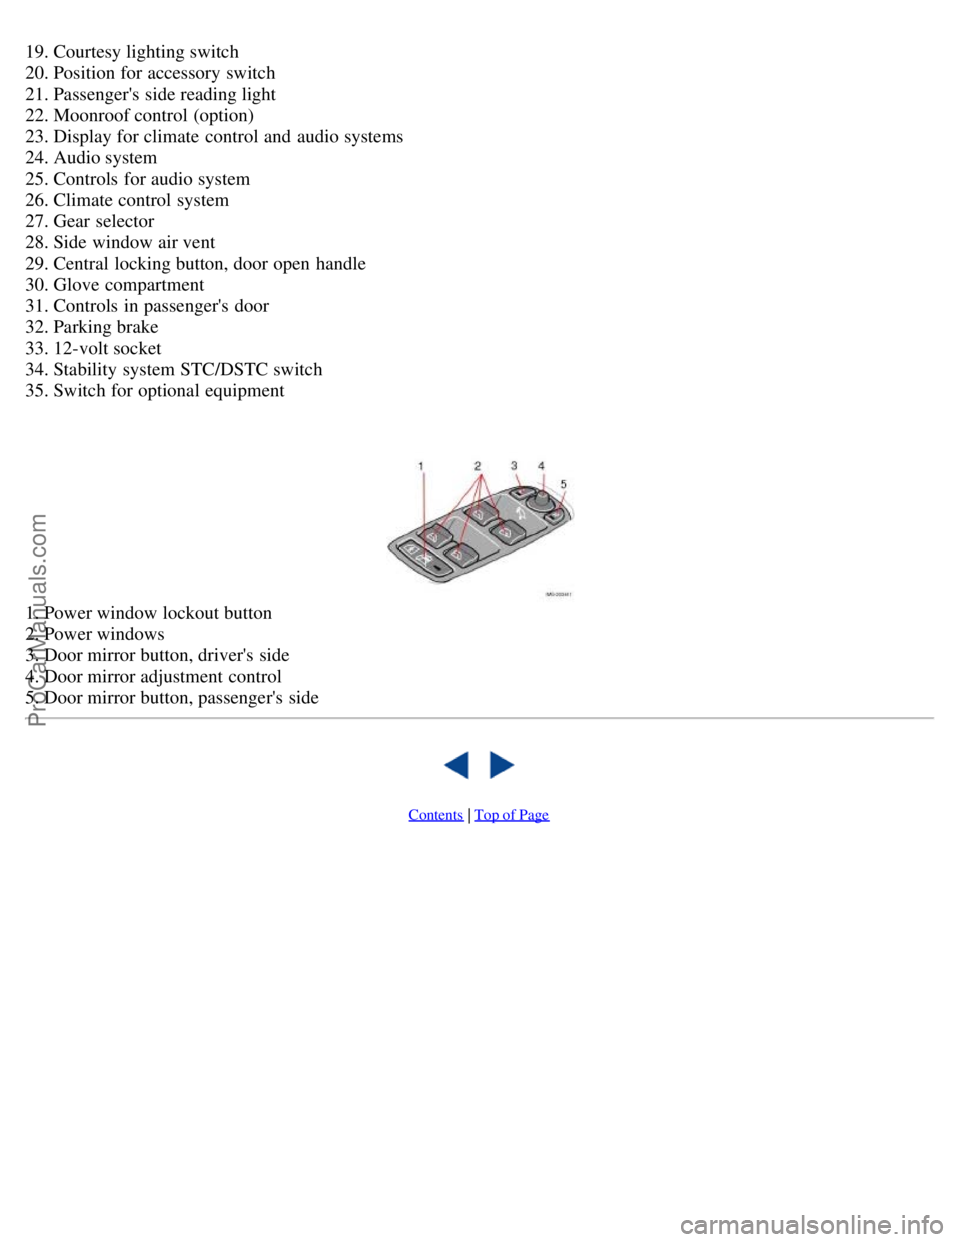
19. Courtesy lighting switch
20. Position for accessory switch
21. Passenger's side reading light
22. Moonroof control (option)
23. Display for climate control and audio systems
24. Audio system
25. Controls for audio system
26. Climate control system
27. Gear selector
28. Side window air vent
29. Central locking button, door open handle
30. Glove compartment
31. Controls in passenger's door
32. Parking brake
33. 12-volt socket
34. Stability system STC/DSTC switch
35. Switch for optional equipment
1. Power window lockout button
2. Power windows
3. Door mirror button, driver's side
4. Door mirror adjustment control
5. Door mirror button, passenger's side
Contents | Top of Page
ProCarManuals.com
Page 16 of 127
vehicle is started.
WARNING!
If the safety system warning light stays on after the engine has started or if it comes on while you are driving, drive
the vehicle to the nearest authorized Volvo retailer for inspection as soon as possible.
There is no maintenance to perform on the SRS yourself. The month and year shown on the decal on the door pillar
indicate when you should contact your Volvo retailer for specific servicing or replacement of airbags and seat belt
tensioners. This service must be performed by an authorized Volvo retailer. WARNING!
If your vehicle has been subjected to flood conditions (e.g. soaked carpeting/ standing water on the floor of the
vehicle) or if your vehicle has become flood-damaged in any way, do not attempt to start the vehicle or put the key
in the ignition before disconnecting the battery (see below). This may cause airbag deployment which could result in
personal injury. Have the vehicle towed to an authorized Volvo retailer for repairs.
Automatic transmission:
Before attempting to tow the vehicle, use the following procedure to override the shiftlock system to move the gear
selector to the neutral position.
Switch off the ignition for at least 10 minutes and disconnect the battery
Wait at least one minute.
Insert the key in the ignition and turn it to position II.
Press firmly on the brake pedal.
Move the gear selector from (P)ark to the (N)eutral position. See page 111 for information on manually overriding
the shiftlock system.
pg. 23 Front airbags (Supplemental Restraint System - SRS)
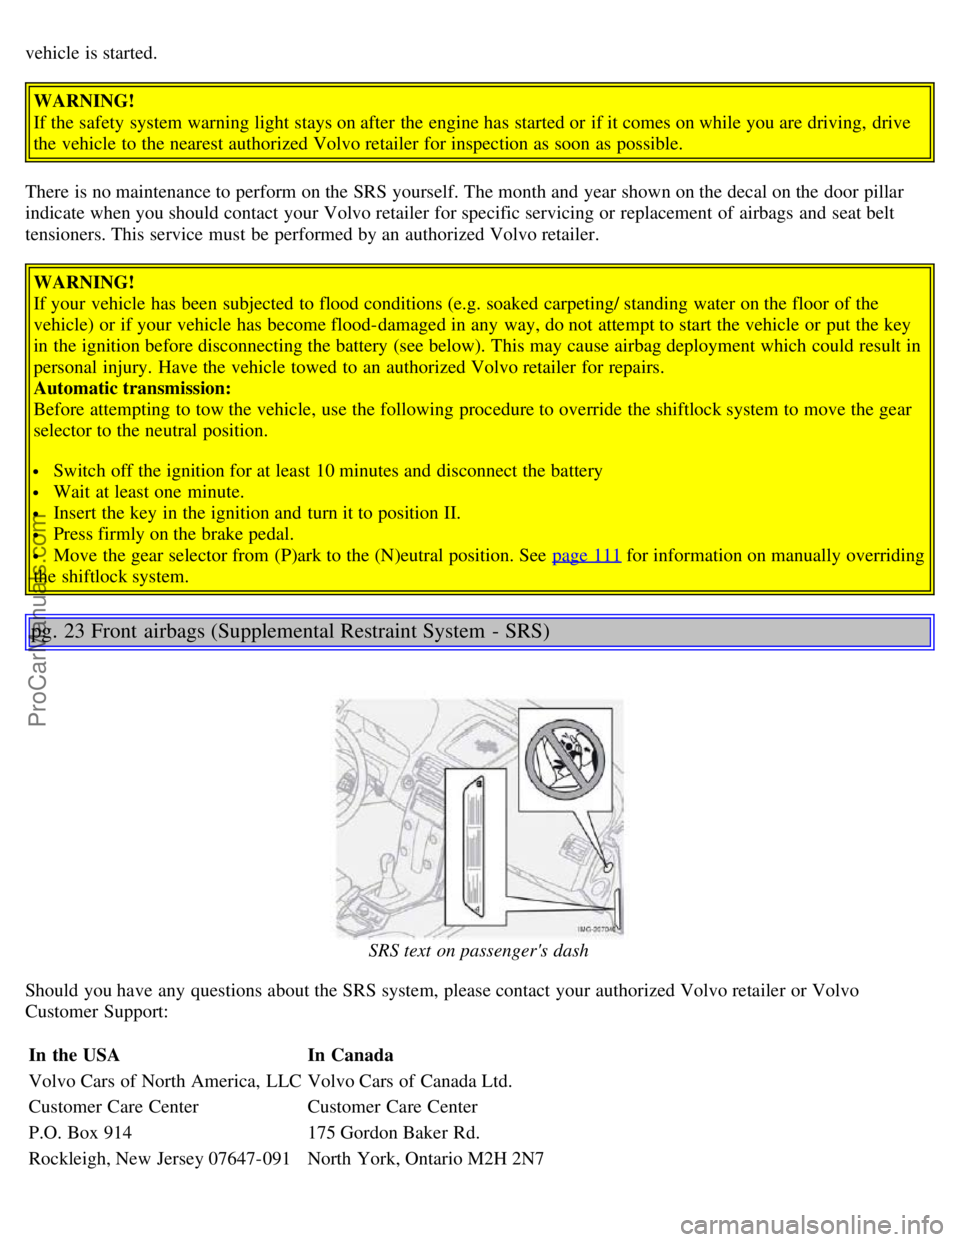
SRS text on passenger's dash
Should you have any questions about the SRS system, please contact your authorized Volvo retailer or Volvo
Customer Support:
In the USA In Canada
Volvo Cars of North America, LLC Volvo Cars of Canada Ltd.
Customer Care Center Customer Care Center
P.O. Box 914 175 Gordon Baker Rd.
Rockleigh, New Jersey 07647-091 North York, Ontario M2H 2N7
ProCarManuals.com
Page 27 of 127
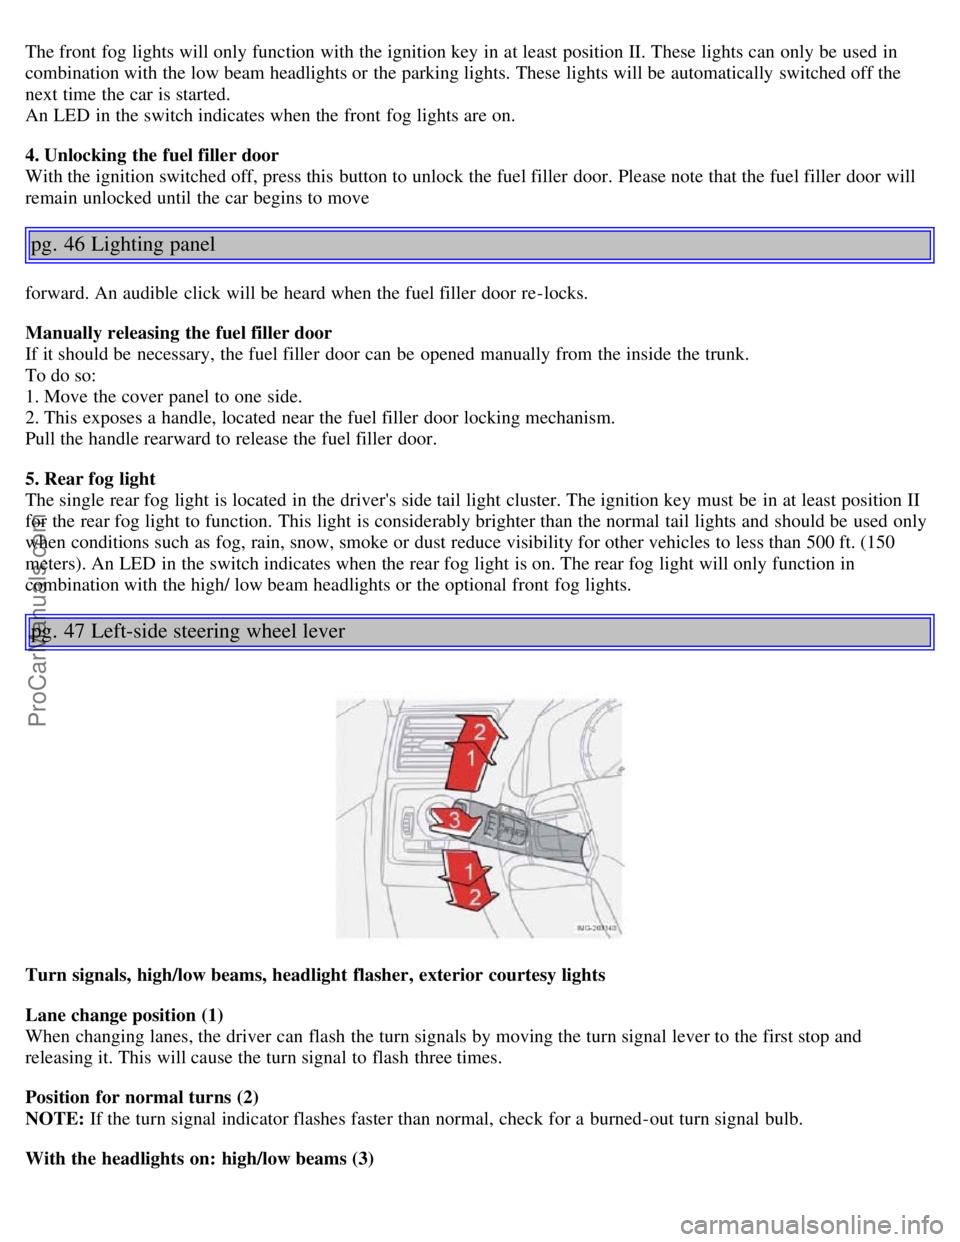
The front fog lights will only function with the ignition key in at least position II. These lights can only be used in
combination with the low beam headlights or the parking lights. These lights will be automatically switched off the
next time the car is started.
An LED in the switch indicates when the front fog lights are on.
4. Unlocking the fuel filler door
With the ignition switched off, press this button to unlock the fuel filler door. Please note that the fuel filler door will
remain unlocked until the car begins to move
pg. 46 Lighting panel
forward. An audible click will be heard when the fuel filler door re-locks.
Manually releasing the fuel filler door
If it should be necessary, the fuel filler door can be opened manually from the inside the trunk.
To do so:
1. Move the cover panel to one side.
2. This exposes a handle, located near the fuel filler door locking mechanism.
Pull the handle rearward to release the fuel filler door.
5. Rear fog light
The single rear fog light is located in the driver's side tail light cluster. The ignition key must be in at least position II
for the rear fog light to function. This light is considerably brighter than the normal tail lights and should be used only
when conditions such as fog, rain, snow, smoke or dust reduce visibility for other vehicles to less than 500 ft. (150
meters). An LED in the switch indicates when the rear fog light is on. The rear fog light will only function in
combination with the high/ low beam headlights or the optional front fog lights.
pg. 47 Left-side steering wheel lever
Turn signals, high/low beams, headlight flasher, exterior courtesy lights
Lane change position (1)
When changing lanes, the driver can flash the turn signals by moving the turn signal lever to the first stop and
releasing it. This will cause the turn signal to flash three times.
Position for normal turns (2)
NOTE: If the turn signal indicator flashes faster than normal, check for a burned-out turn signal bulb.
With the headlights on: high/low beams (3)
ProCarManuals.com
Page 28 of 127
Move the lever toward the steering wheel and release it to switch between high and low beams.
With the headlights off: headlight flasher (3)
With the headlights switched off (the switch on the lighting panel in position 0), move the lever toward the steering
wheel. The high beams will remain on until the lever is released.
Home safe lighting (3)
When you leave your car at night, you can make use of the home safe lighting function to illuminate the area in front
of the car:
1. Remove the key from the ignition switch.
2. Pull the direction indicator lever towards the steering wheel (as when using the headlight flasher function).
3. Exit the car and lock the doors.
The headlights, parking lights, license plate lights will now come on and remain on for 30, 60 or 90 seconds. The time
interval can be changed according to your preferences by using the Personal Settings function, described at the end of
this chapter.
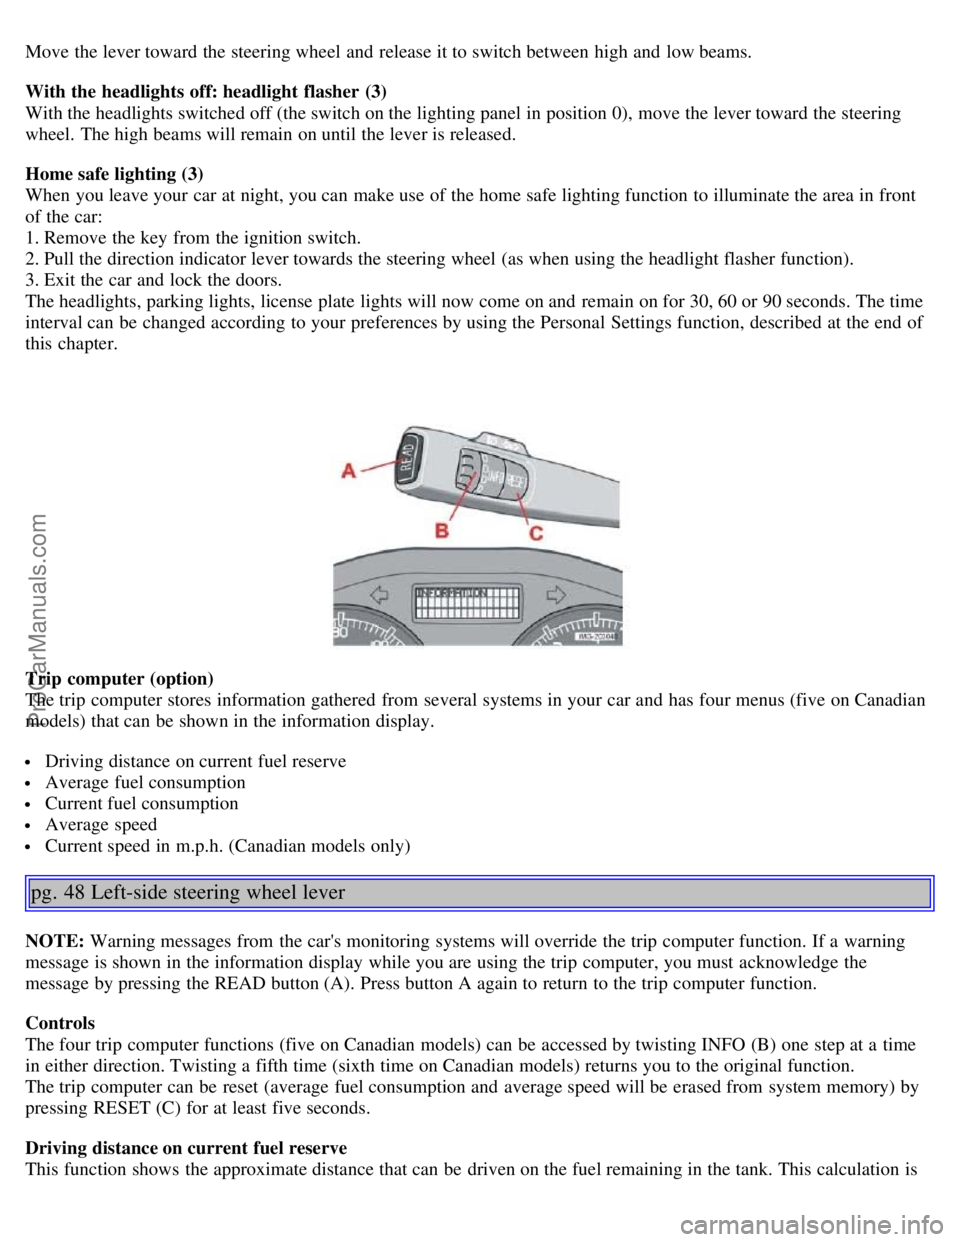
Trip computer (option)
The trip computer stores information gathered from several systems in your car and has four menus (five on Canadian
models) that can be shown in the information display.
Driving distance on current fuel reserve
Average fuel consumption
Current fuel consumption
Average speed
Current speed in m.p.h. (Canadian models only)
pg. 48 Left-side steering wheel lever
NOTE: Warning messages from the car's monitoring systems will override the trip computer function. If a warning
message is shown in the information display while you are using the trip computer, you must acknowledge the
message by pressing the READ button (A). Press button A again to return to the trip computer function.
Controls
The four trip computer functions (five on Canadian models) can be accessed by twisting INFO (B) one step at a time
in either direction. Twisting a fifth time (sixth time on Canadian models) returns you to the original function.
The trip computer can be reset (average fuel consumption and average speed will be erased from system memory) by
pressing RESET (C) for at least five seconds.
Driving distance on current fuel reserve
This function shows the approximate distance that can be driven on the fuel remaining in the tank. This calculation is
ProCarManuals.com
Page 36 of 127
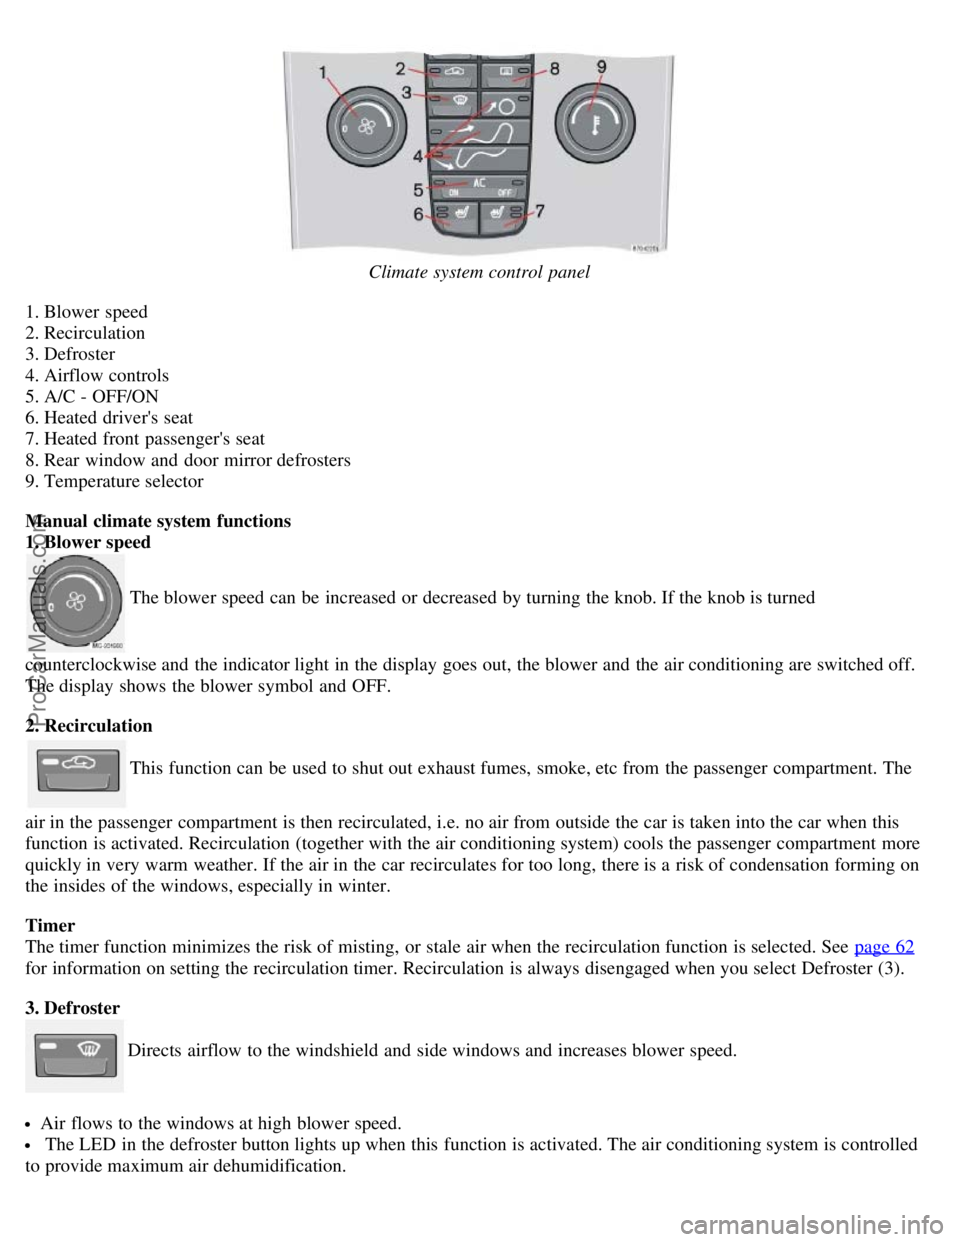
Climate system control panel
1. Blower speed
2. Recirculation
3. Defroster
4. Airflow controls
5. A/C - OFF/ON
6. Heated driver's seat
7. Heated front passenger's seat
8. Rear window and door mirror defrosters
9. Temperature selector
Manual climate system functions
1. Blower speed
The blower speed can be increased or decreased by turning the knob. If the knob is turned
counterclockwise and the indicator light in the display goes out, the blower and the air conditioning are switched off.
The display shows the blower symbol and OFF.
2. Recirculation
This function can be used to shut out exhaust fumes, smoke, etc from the passenger compartment. The
air in the passenger compartment is then recirculated, i.e. no air from outside the car is taken into the car when this
function is activated. Recirculation (together with the air conditioning system) cools the passenger compartment more
quickly in very warm weather. If the air in the car recirculates for too long, there is a risk of condensation forming on
the insides of the windows, especially in winter.
Timer
The timer function minimizes the risk of misting, or stale air when the recirculation function is selected. See page 62
for information on setting the recirculation timer. Recirculation is always disengaged when you select Defroster (3).
3. Defroster
Directs airflow to the windshield and side windows and increases blower speed.
Air flows to the windows at high blower speed.
The LED in the defroster button lights up when this function is activated. The air conditioning system is controlled
to provide maximum air dehumidification.
ProCarManuals.com
Page 38 of 127
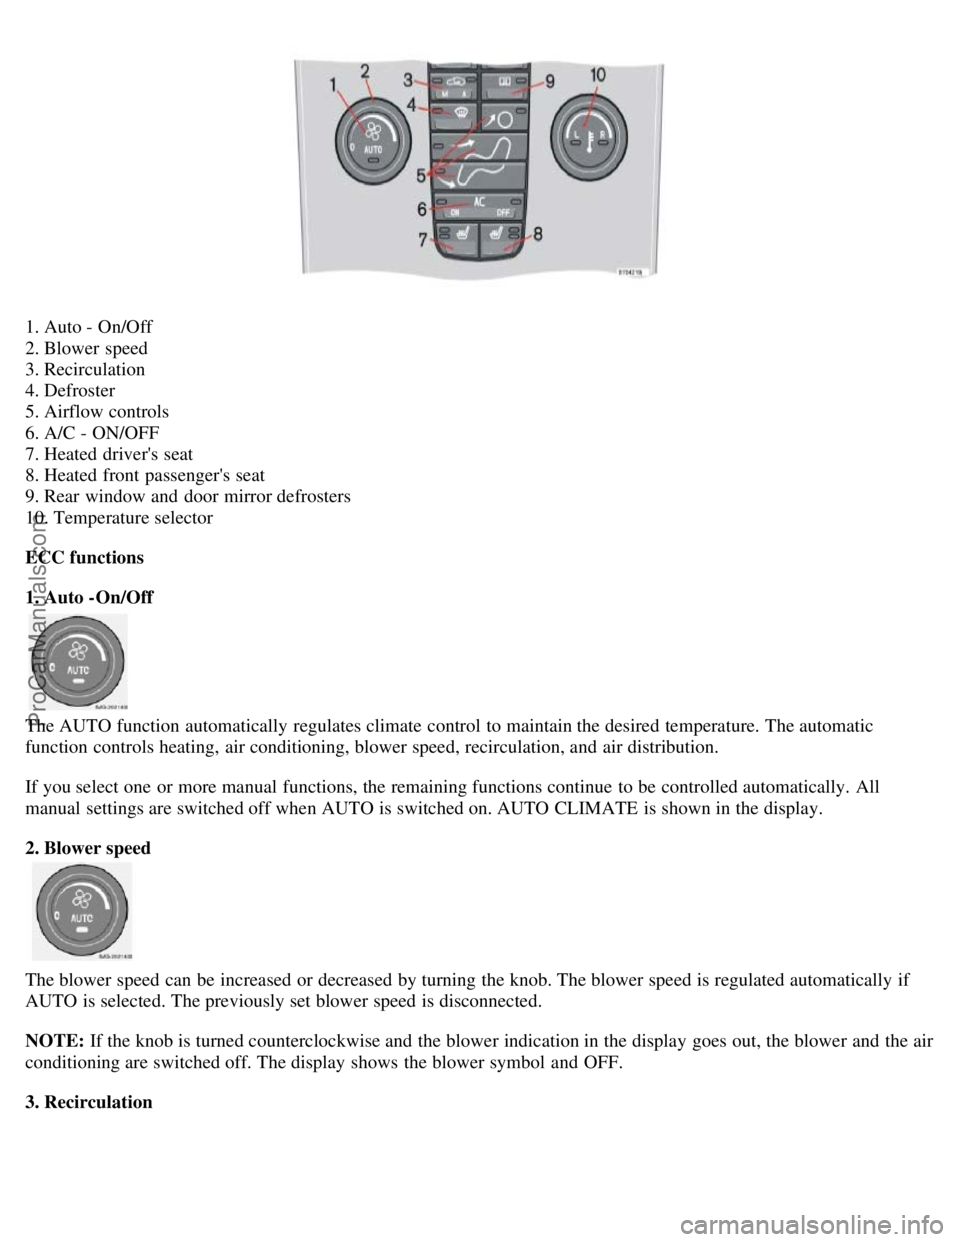
1. Auto - On/Off
2. Blower speed
3. Recirculation
4. Defroster
5. Airflow controls
6. A/C - ON/OFF
7. Heated driver's seat
8. Heated front passenger's seat
9. Rear window and door mirror defrosters
10. Temperature selector
ECC functions
1. Auto -On/Off
The AUTO function automatically regulates climate control to maintain the desired temperature. The automatic
function controls heating, air conditioning, blower speed, recirculation, and air distribution.
If you select one or more manual functions, the remaining functions continue to be controlled automatically. All
manual settings are switched off when AUTO is switched on. AUTO CLIMATE is shown in the display.
2. Blower speed
The blower speed can be increased or decreased by turning the knob. The blower speed is regulated automatically if
AUTO is selected. The previously set blower speed is disconnected.
NOTE: If the knob is turned counterclockwise and the blower indication in the display goes out, the blower and the air
conditioning are switched off. The display shows the blower symbol and OFF.
3. Recirculation
ProCarManuals.com
Page 44 of 127
If the ignition key is in position I or II.
During a 10 minute period after the doors have been unlocked if the door remains open.
If the door is closed and the ignition key is not yet in the ignition, or if the key is in position 0, the seat can be
adjusted or during a period of 40 seconds. The power passenger's seat can only be adjusted if the ignition key is in
position I or II, or if the engine is running.
Adjusting the seat
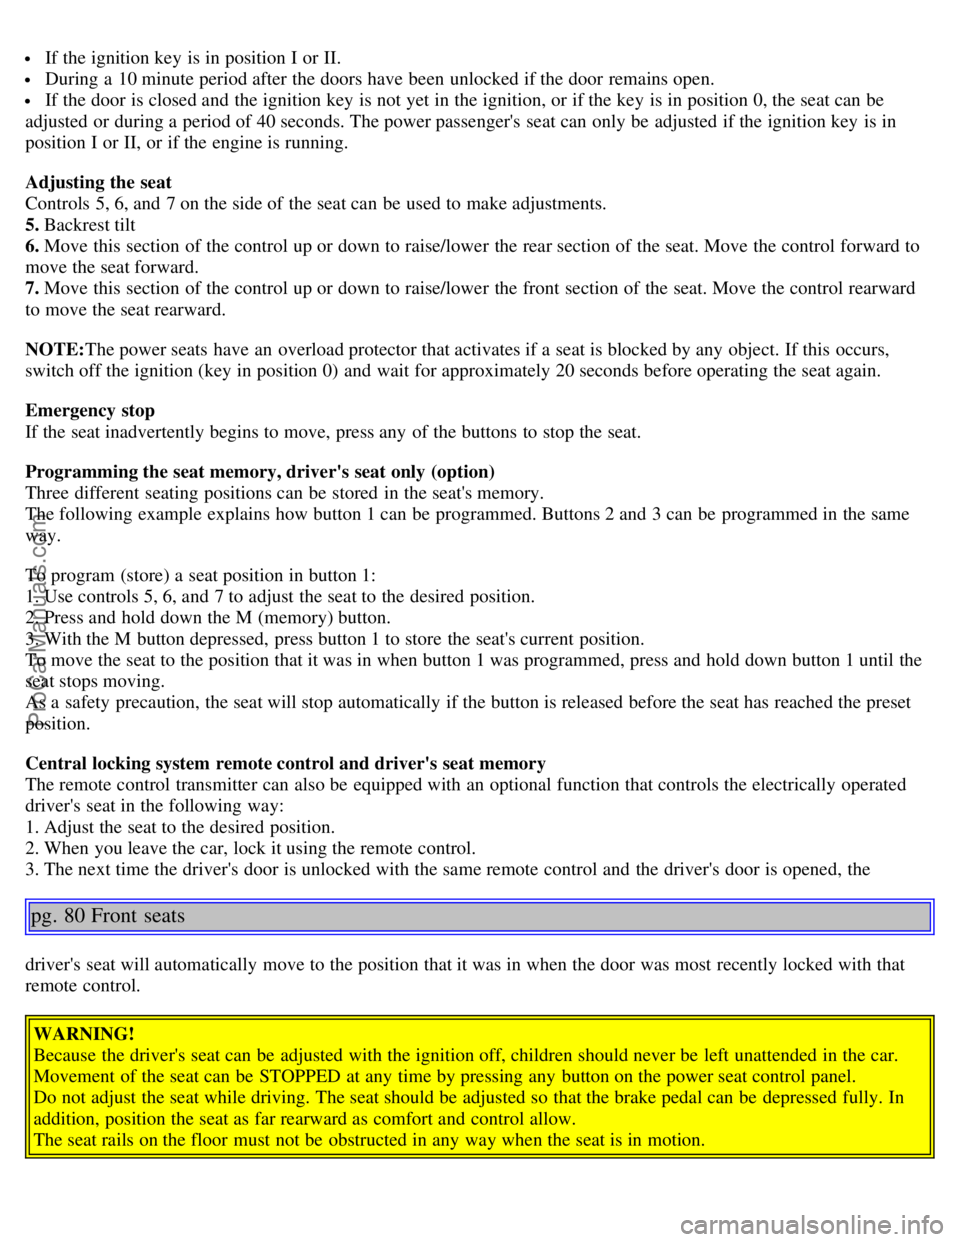
Controls 5, 6, and 7 on the side of the seat can be used to make adjustments.
5. Backrest tilt
6. Move this section of the control up or down to raise/lower the rear section of the seat. Move the control forward to
move the seat forward.
7. Move this section of the control up or down to raise/lower the front section of the seat. Move the control rearward
to move the seat rearward.
NOTE: The power seats have an overload protector that activates if a seat is blocked by any object. If this occurs,
switch off the ignition (key in position 0) and wait for approximately 20 seconds before operating the seat again.
Emergency stop
If the seat inadvertently begins to move, press any of the buttons to stop the seat.
Programming the seat memory, driver's seat only (option)
Three different seating positions can be stored in the seat's memory.
The following example explains how button 1 can be programmed. Buttons 2 and 3 can be programmed in the same
way.
To program (store) a seat position in button 1:
1. Use controls 5, 6, and 7 to adjust the seat to the desired position.
2. Press and hold down the M (memory) button.
3. With the M button depressed, press button 1 to store the seat's current position.
To move the seat to the position that it was in when button 1 was programmed, press and hold down button 1 until the
seat stops moving.
As a safety precaution, the seat will stop automatically if the button is released before the seat has reached the preset
position.
Central locking system remote control and driver's seat memory
The remote control transmitter can also be equipped with an optional function that controls the electrically operated
driver's seat in the following way:
1. Adjust the seat to the desired position.
2. When you leave the car, lock it using the remote control.
3. The next time the driver's door is unlocked with the same remote control and the driver's door is opened, the
pg. 80 Front seats
driver's seat will automatically move to the position that it was in when the door was most recently locked with that
remote control.
WARNING!
Because the driver's seat can be adjusted with the ignition off, children should never be left unattended in the car.
Movement of the seat can be STOPPED at any time by pressing any button on the power seat control panel.
Do not adjust the seat while driving. The seat should be adjusted so that the brake pedal can be depressed fully. In
addition, position the seat as far rearward as comfort and control allow.
The seat rails on the floor must not be obstructed in any way when the seat is in motion.
ProCarManuals.com
Page 45 of 127
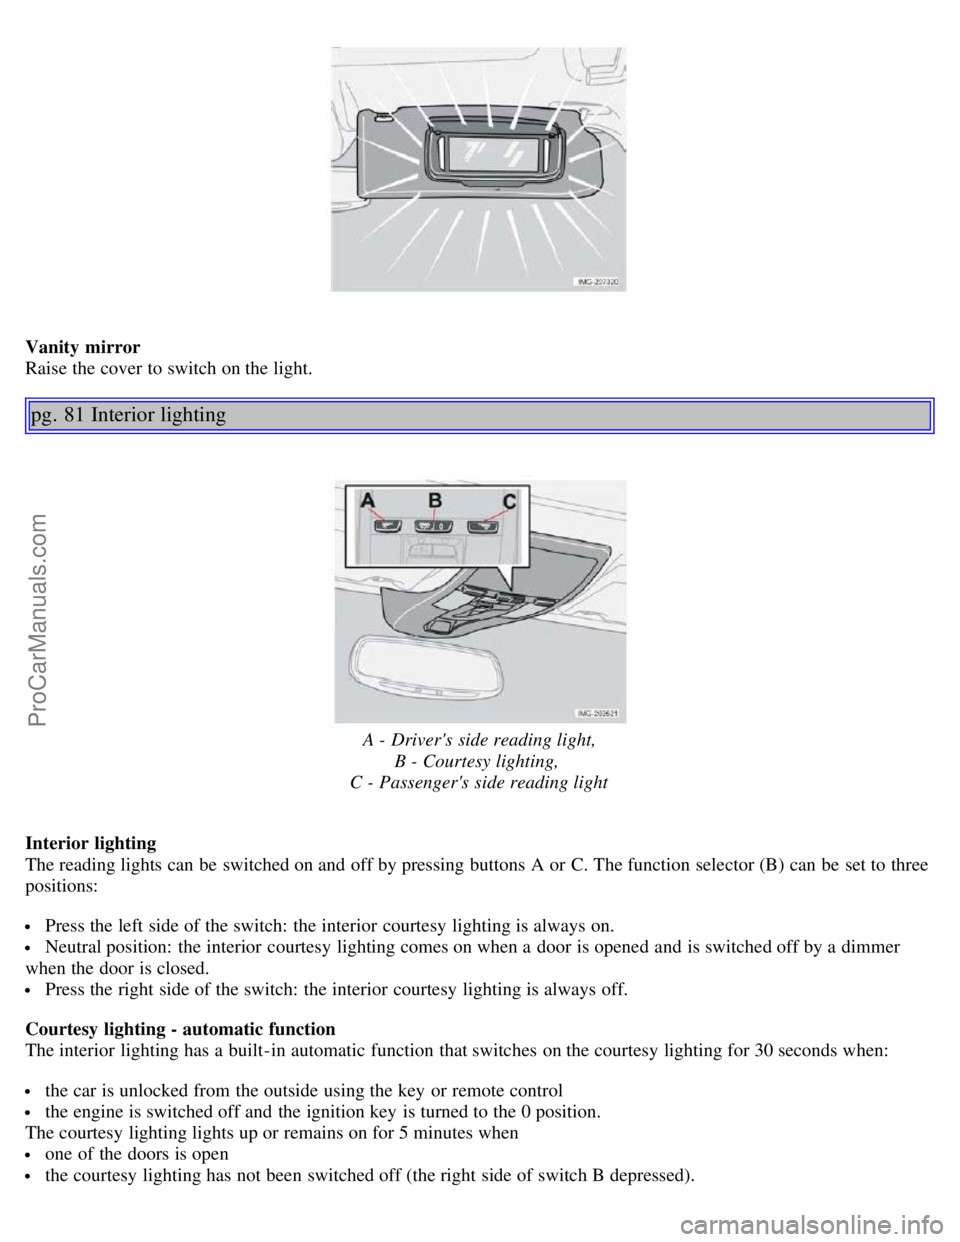
Vanity mirror
Raise the cover to switch on the light.
pg. 81 Interior lighting
A - Driver's side reading light,B - Courtesy lighting,
C - Passenger's side reading light
Interior lighting
The reading lights can be switched on and off by pressing buttons A or C. The function selector (B) can be set to three
positions:
Press the left side of the switch: the interior courtesy lighting is always on.
Neutral position: the interior courtesy lighting comes on when a door is opened and is switched off by a dimmer
when the door is closed.
Press the right side of the switch: the interior courtesy lighting is always off.
Courtesy lighting - automatic function
The interior lighting has a built-in automatic function that switches on the courtesy lighting for 30 seconds when:
the car is unlocked from the outside using the key or remote control
the engine is switched off and the ignition key is turned to the 0 position.
The courtesy lighting lights up or remains on for 5 minutes when
one of the doors is open
the courtesy lighting has not been switched off (the right side of switch B depressed).
ProCarManuals.com