turn signal VOLVO S40 2005 Owners Manual
[x] Cancel search | Manufacturer: VOLVO, Model Year: 2005, Model line: S40, Model: VOLVO S40 2005Pages: 127, PDF Size: 2.32 MB
Page 6 of 127
2 0 0 5
VOLVO S40
Chapter 1 - Instrument overview
pg. 8 Instrument overview
pg. 9 Instrument overview
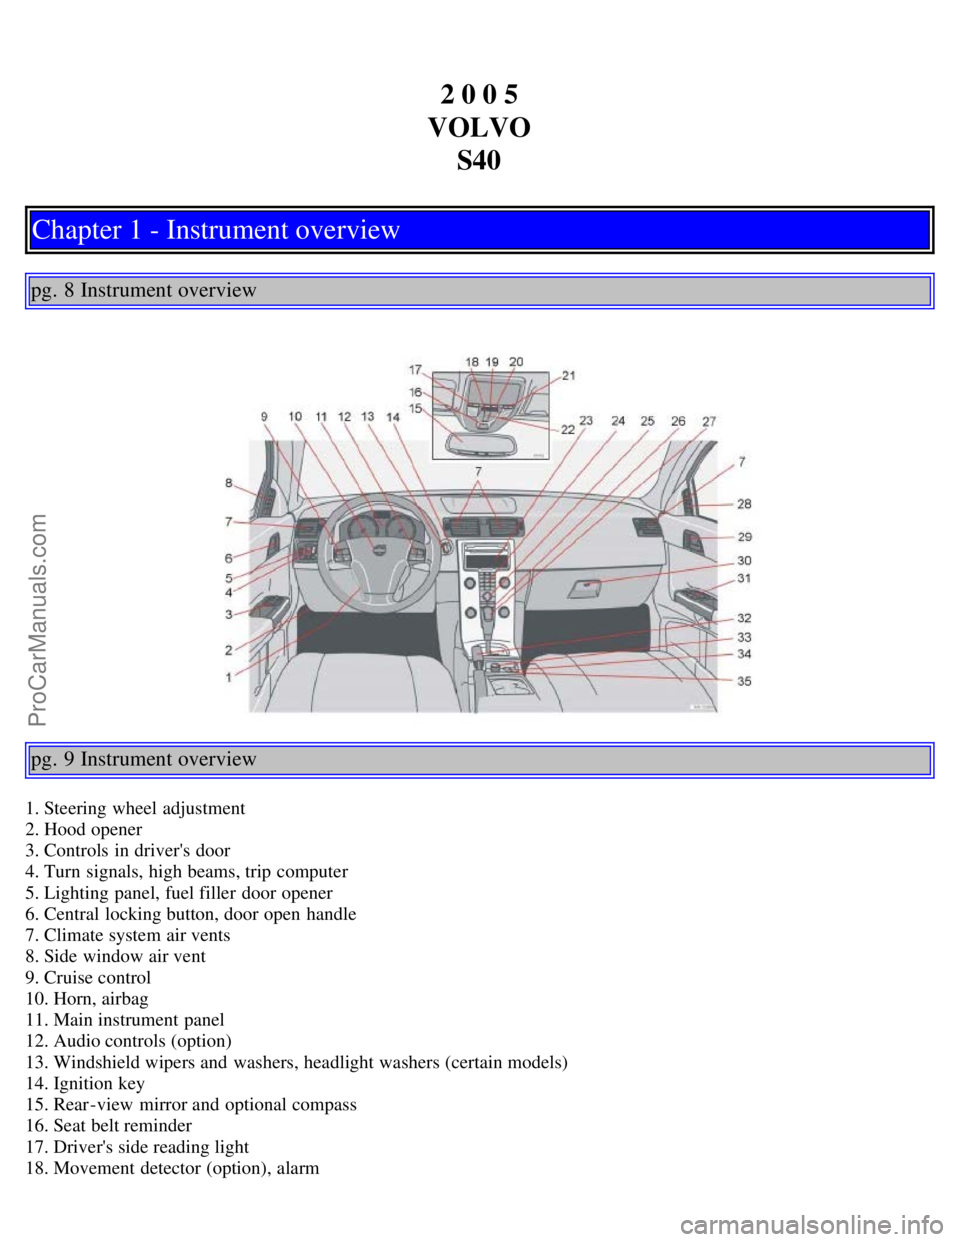
1. Steering wheel adjustment
2. Hood opener
3. Controls in driver's door
4. Turn signals, high beams, trip computer
5. Lighting panel, fuel filler door opener
6. Central locking button, door open handle
7. Climate system air vents
8. Side window air vent
9. Cruise control
10. Horn, airbag
11. Main instrument panel
12. Audio controls (option)
13. Windshield wipers and washers, headlight washers (certain models)
14. Ignition key
15. Rear-view mirror and optional compass
16. Seat belt reminder
17. Driver's side reading light
18. Movement detector (option), alarm
ProCarManuals.com
Page 19 of 127
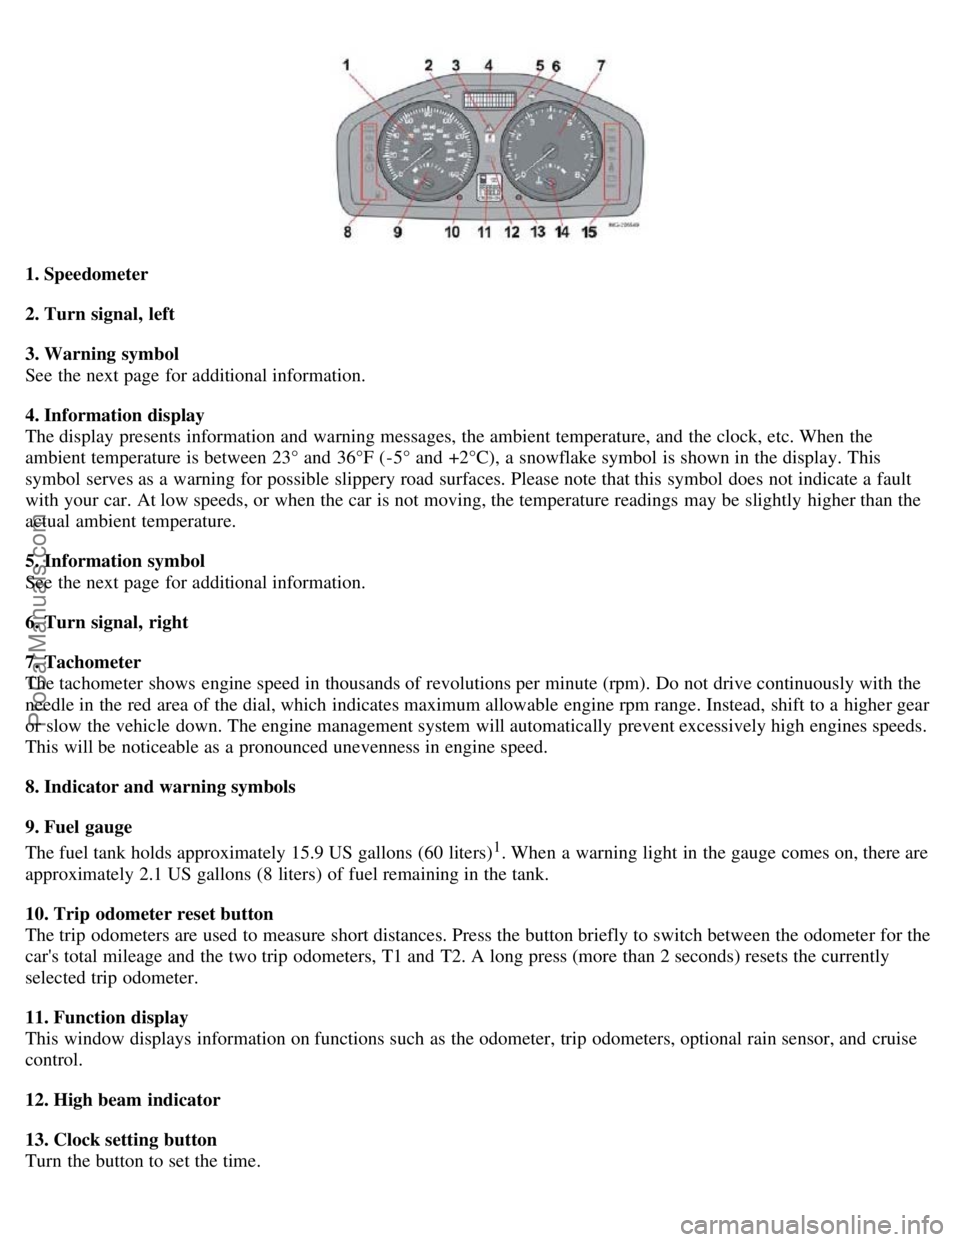
1. Speedometer
2. Turn signal, left
3. Warning symbol
See the next page for additional information.
4. Information display
The display presents information and warning messages, the ambient temperature, and the clock, etc. When the
ambient temperature is between 23° and 36°F (-5° and +2°C), a snowflake symbol is shown in the display. This
symbol serves as a warning for possible slippery road surfaces. Please note that this symbol does not indicate a fault
with your car. At low speeds, or when the car is not moving, the temperature readings may be slightly higher than the
actual ambient temperature.
5. Information symbol
See the next page for additional information.
6. Turn signal, right
7. Tachometer
The tachometer shows engine speed in thousands of revolutions per minute (rpm). Do not drive continuously with the
needle in the red area of the dial, which indicates maximum allowable engine rpm range. Instead, shift to a higher gear
or slow the vehicle down. The engine management system will automatically prevent excessively high engines speeds.
This will be noticeable as a pronounced unevenness in engine speed.
8. Indicator and warning symbols
9. Fuel gauge
The fuel tank holds approximately 15.9 US gallons (60 liters)
1. When a warning light in the gauge comes on, there are
approximately 2.1 US gallons (8 liters) of fuel remaining in the tank.
10. Trip odometer reset button
The trip odometers are used to measure short distances. Press the button briefly to switch between the odometer for the
car's total mileage and the two trip odometers, T1 and T2. A long press (more than 2 seconds) resets the currently
selected trip odometer.
11. Function display
This window displays information on functions such as the odometer, trip odometers, optional rain sensor, and cruise
control.
12. High beam indicator
13. Clock setting button
Turn the button to set the time.
ProCarManuals.com
Page 22 of 127
pg. 41 Symbols on the right side of the instrument panel
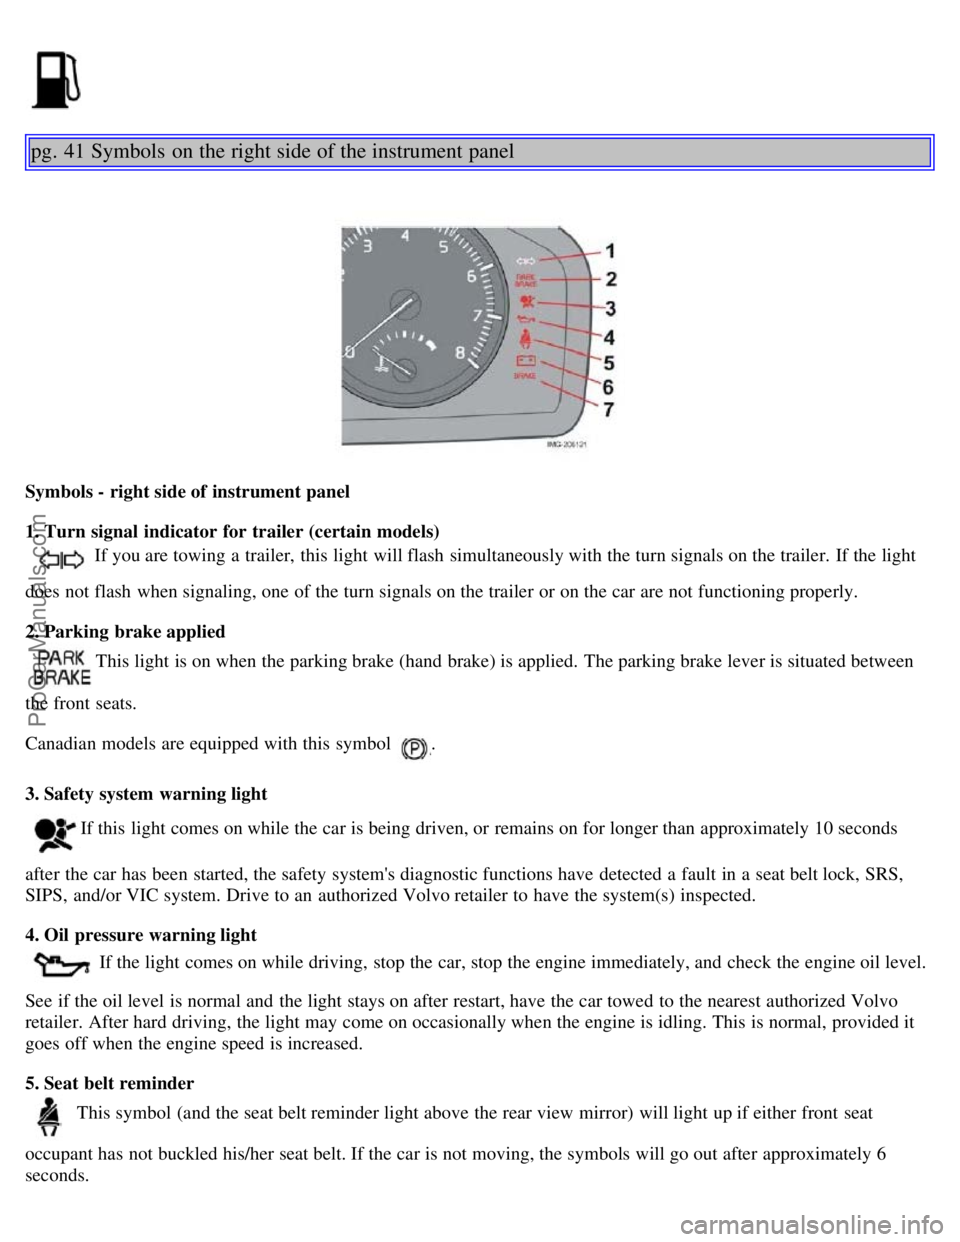
Symbols - right side of instrument panel
1. Turn signal indicator for trailer (certain models)
If you are towing a trailer, this light will flash simultaneously with the turn signals on the trailer. If the light
does not flash when signaling, one of the turn signals on the trailer or on the car are not functioning properly.
2. Parking brake applied
This light is on when the parking brake (hand brake) is applied. The parking brake lever is situated between
the front seats.
Canadian models are equipped with this symbol
.
3. Safety system warning light
If this light comes on while the car is being driven, or remains on for longer than approximately 10 seconds
after the car has been started, the safety system's diagnostic functions have detected a fault in a seat belt lock, SRS,
SIPS, and/or VIC system. Drive to an authorized Volvo retailer to have the system(s) inspected.
4. Oil pressure warning light
If the light comes on while driving, stop the car, stop the engine immediately, and check the engine oil level.
See if the oil level is normal and the light stays on after restart, have the car towed to the nearest authorized Volvo
retailer. After hard driving, the light may come on occasionally when the engine is idling. This is normal, provided it
goes off when the engine speed is increased.
5. Seat belt reminder
This symbol (and the seat belt reminder light above the rear view mirror) will light up if either front seat
occupant has not buckled his/her seat belt. If the car is not moving, the symbols will go out after approximately 6
seconds.
ProCarManuals.com
Page 26 of 127
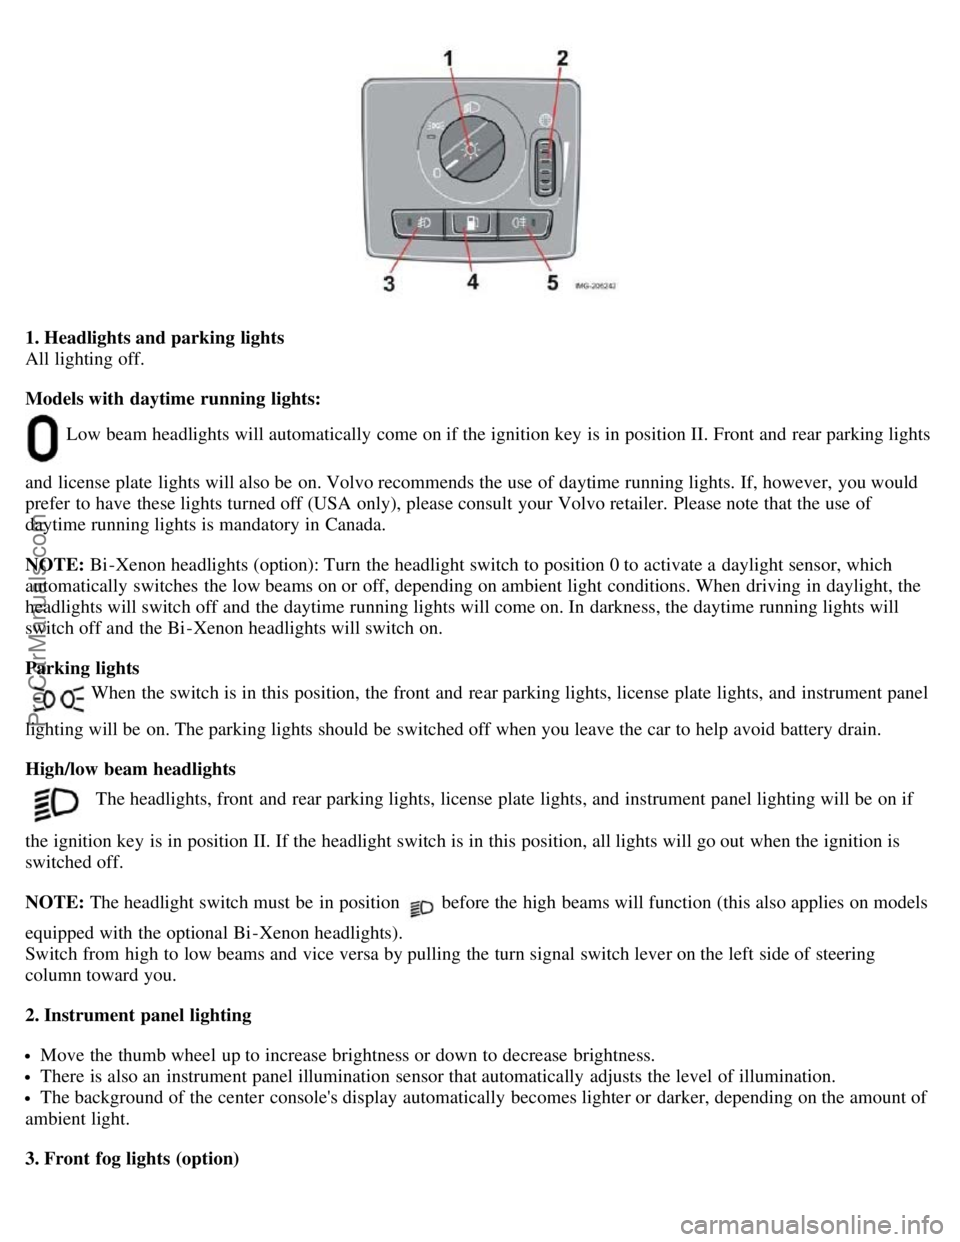
1. Headlights and parking lights
All lighting off.
Models with daytime running lights:
Low beam headlights will automatically come on if the ignition key is in position II. Front and rear parking lights
and license plate lights will also be on. Volvo recommends the use of daytime running lights. If, however, you would
prefer to have these lights turned off (USA only), please consult your Volvo retailer. Please note that the use of
daytime running lights is mandatory in Canada.
NOTE: Bi -Xenon headlights (option): Turn the headlight switch to position 0 to activate a daylight sensor, which
automatically switches the low beams on or off, depending on ambient light conditions. When driving in daylight, the
headlights will switch off and the daytime running lights will come on. In darkness, the daytime running lights will
switch off and the Bi -Xenon headlights will switch on.
Parking lights
When the switch is in this position, the front and rear parking lights, license plate lights, and instrument panel
lighting will be on. The parking lights should be switched off when you leave the car to help avoid battery drain.
High/low beam headlights
The headlights, front and rear parking lights, license plate lights, and instrument panel lighting will be on if
the ignition key is in position II. If the headlight switch is in this position, all lights will go out when the ignition is
switched off.
NOTE: The headlight switch must be in position
before the high beams will function (this also applies on models
equipped with the optional Bi -Xenon headlights).
Switch from high to low beams and vice versa by pulling the turn signal switch lever on the left side of steering
column toward you.
2. Instrument panel lighting
Move the thumb wheel up to increase brightness or down to decrease brightness.
There is also an instrument panel illumination sensor that automatically adjusts the level of illumination.
The background of the center console's display automatically becomes lighter or darker, depending on the amount of
ambient light.
3. Front fog lights (option)
ProCarManuals.com
Page 27 of 127
The front fog lights will only function with the ignition key in at least position II. These lights can only be used in
combination with the low beam headlights or the parking lights. These lights will be automatically switched off the
next time the car is started.
An LED in the switch indicates when the front fog lights are on.
4. Unlocking the fuel filler door
With the ignition switched off, press this button to unlock the fuel filler door. Please note that the fuel filler door will
remain unlocked until the car begins to move
pg. 46 Lighting panel
forward. An audible click will be heard when the fuel filler door re-locks.
Manually releasing the fuel filler door
If it should be necessary, the fuel filler door can be opened manually from the inside the trunk.
To do so:
1. Move the cover panel to one side.
2. This exposes a handle, located near the fuel filler door locking mechanism.
Pull the handle rearward to release the fuel filler door.
5. Rear fog light
The single rear fog light is located in the driver's side tail light cluster. The ignition key must be in at least position II
for the rear fog light to function. This light is considerably brighter than the normal tail lights and should be used only
when conditions such as fog, rain, snow, smoke or dust reduce visibility for other vehicles to less than 500 ft. (150
meters). An LED in the switch indicates when the rear fog light is on. The rear fog light will only function in
combination with the high/ low beam headlights or the optional front fog lights.
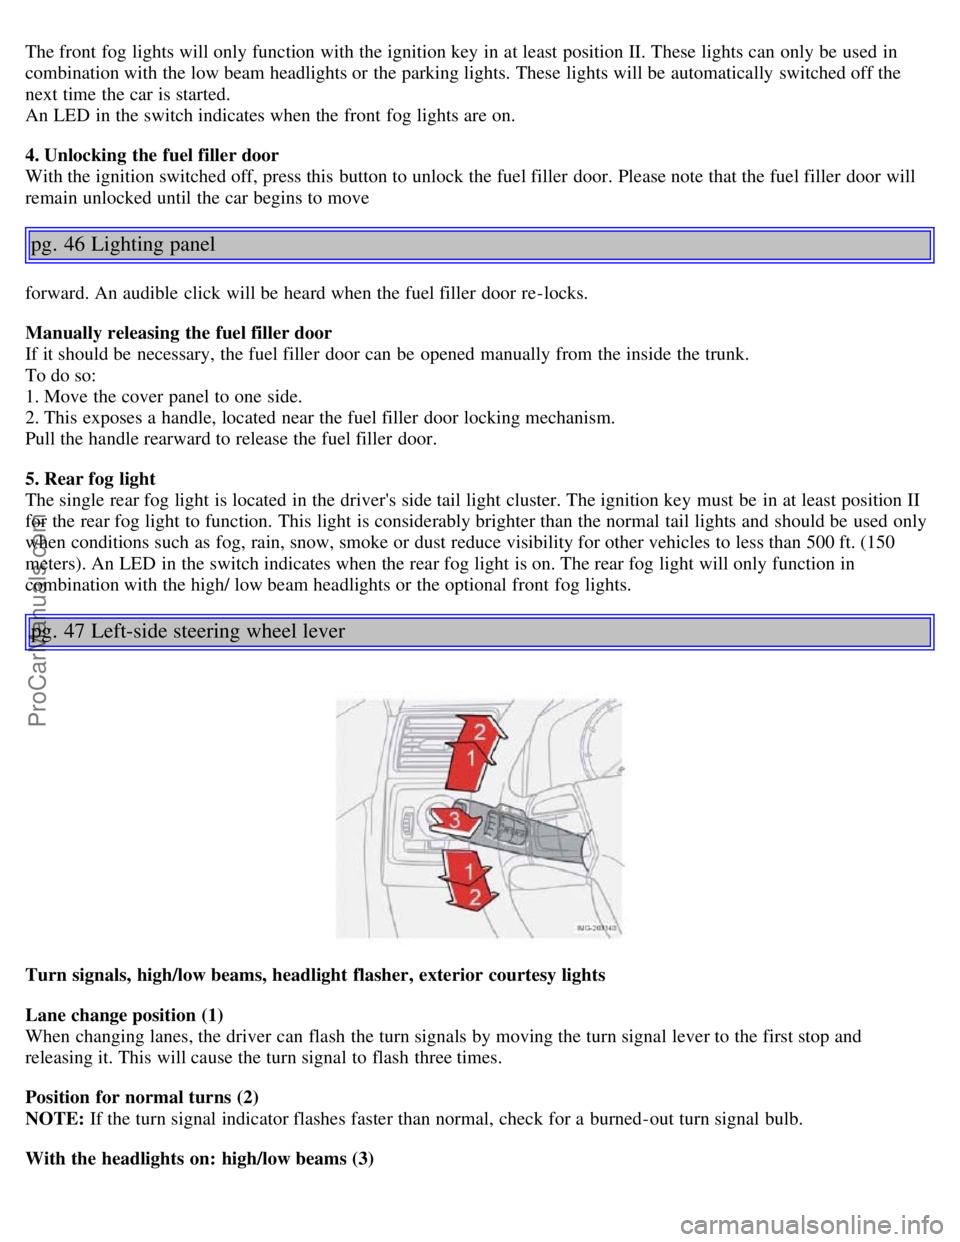
pg. 47 Left-side steering wheel lever
Turn signals, high/low beams, headlight flasher, exterior courtesy lights
Lane change position (1)
When changing lanes, the driver can flash the turn signals by moving the turn signal lever to the first stop and
releasing it. This will cause the turn signal to flash three times.
Position for normal turns (2)
NOTE: If the turn signal indicator flashes faster than normal, check for a burned-out turn signal bulb.
With the headlights on: high/low beams (3)
ProCarManuals.com
Page 52 of 127
USA - FCC ID: LTQWFS 125VO
This device complies with part 15 of the FCC rules. Operation is subject to the following condition: (1) This device
may not cause harmful interference, and (2) this device must accept any interference received, including interference
that may cause undesired operation.
Canada - IC: 3659A-WFS125VO
Operation is subject to the following conditions: (1) this device may not cause interference, and (2) this device must
accept any interference, including interference that may cause undesired operation of the device.
CAUTION!
Never use force on the narrow section of the remote control - this is where the transponder is located. The car cannot
be started if the transponder is damaged.
pg. 89 Remote control and key blade
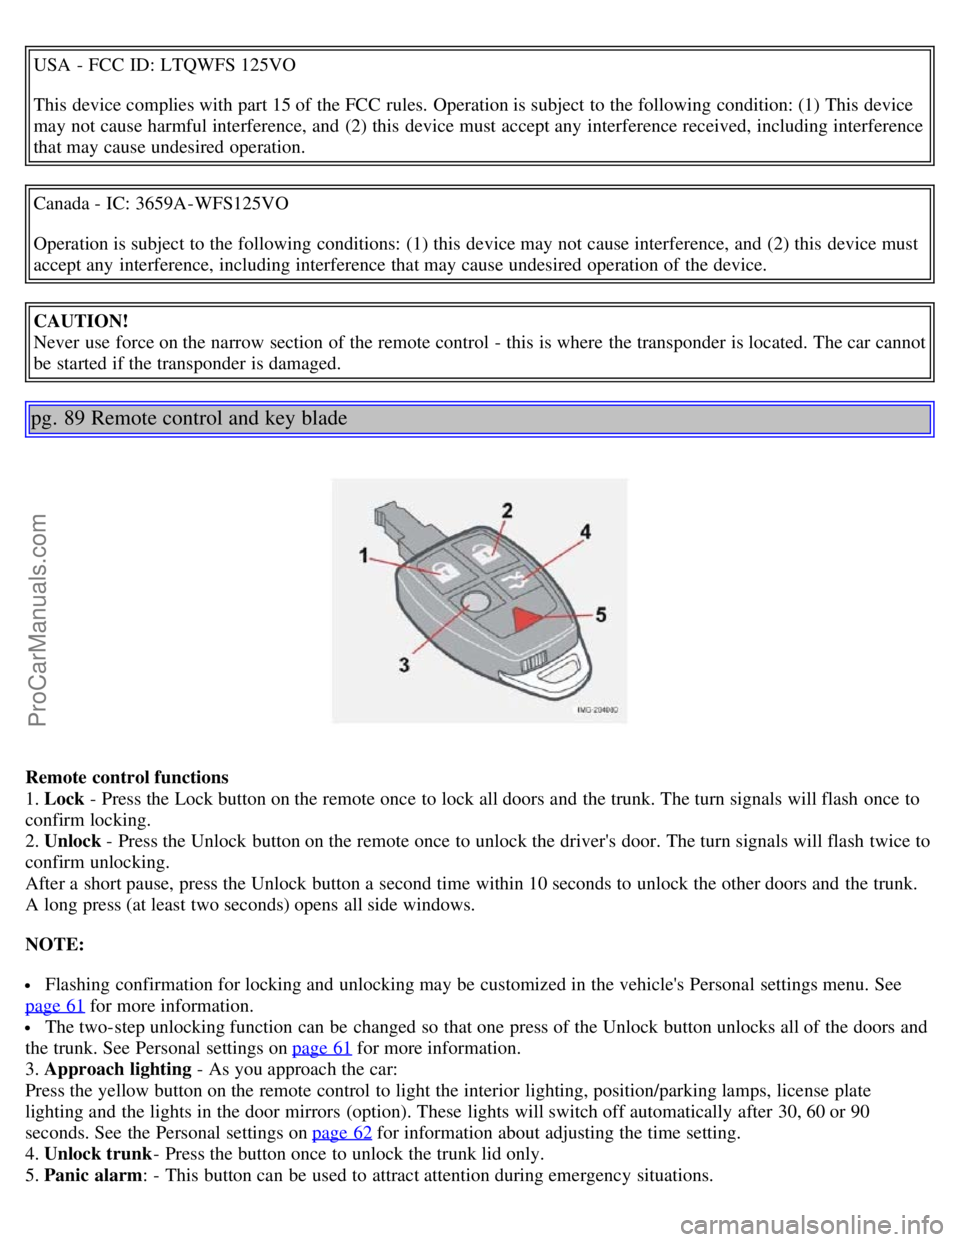
Remote control functions
1. Lock - Press the Lock button on the remote once to lock all doors and the trunk. The turn signals will flash once to
confirm locking.
2. Unlock - Press the Unlock button on the remote once to unlock the driver's door. The turn signals will flash twice to
confirm unlocking.
After a short pause, press the Unlock button a second time within 10 seconds to unlock the other doors and the trunk.
A long press (at least two seconds) opens all side windows.
NOTE:
Flashing confirmation for locking and unlocking may be customized in the vehicle's Personal settings menu. See
page 61
for more information.
The two-step unlocking function can be changed so that one press of the Unlock button unlocks all of the doors and
the trunk. See Personal settings on page 61
for more information.
3. Approach lighting - As you approach the car:
Press the yellow button on the remote control to light the interior lighting, position/parking lamps, license plate
lighting and the lights in the door mirrors (option). These lights will switch off automatically after 30, 60 or 90
seconds. See the Personal settings on page 62
for information about adjusting the time setting.
4. Unlock trunk - Press the button once to unlock the trunk lid only.
5. Panic alarm: - This button can be used to attract attention during emergency situations.
ProCarManuals.com
Page 53 of 127
To activate the panic alarm, press and hold the red button for at least 3 seconds or press it twice within 3 seconds. The
turn signals and horn will be activated.
The panic alarm will stop automatically after 30 seconds. To deactivate, wait approximately 5 seconds and press the
red button again.
NOTE: This button will NOT unlock the car.
pg. 90 Remote control and key blade
Removing the key blade
Key blade
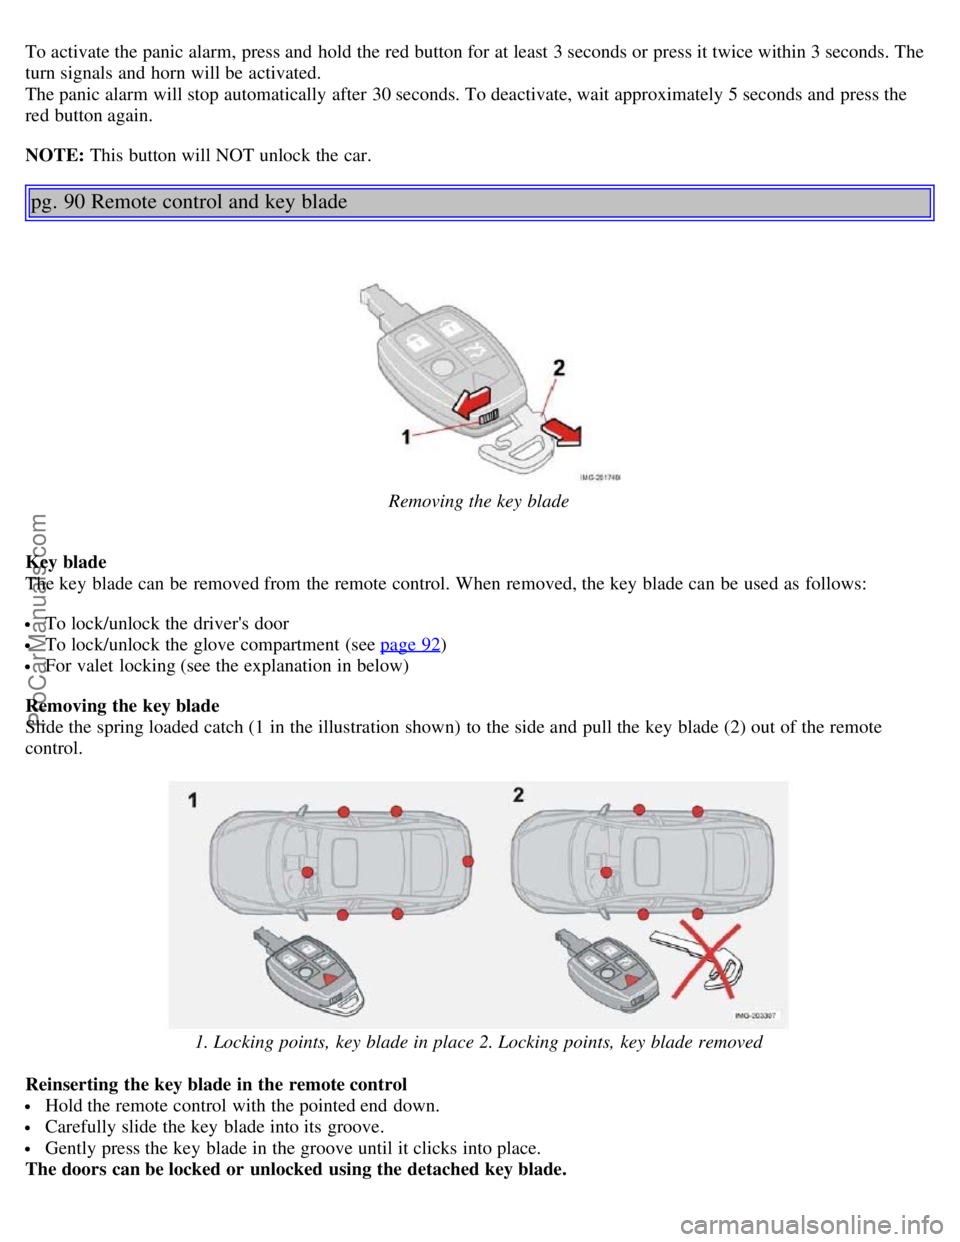
The key blade can be removed from the remote control. When removed, the key blade can be used as follows:
To lock/unlock the driver's door
To lock/unlock the glove compartment (see page 92)
For valet locking (see the explanation in below)
Removing the key blade
Slide the spring loaded catch (1 in the illustration shown) to the side and pull the key blade (2) out of the remote
control.
1. Locking points, key blade in place 2. Locking points, key blade removed
Reinserting the key blade in the remote control
Hold the remote control with the pointed end down.
Carefully slide the key blade into its groove.
Gently press the key blade in the groove until it clicks into place.
The doors can be locked or unlocked using the detached key blade.
ProCarManuals.com
Page 57 of 127
The alarm is automatically armed whenever the car is locked with the remote control.
When armed, the alarm continuously monitors a number of points on the car. The following conditions will trigger the
alarm:
The hood is forced open.
The trunk is forced open.
A door is forced open.
The ignition switch is tampered with
An attempt is made to start the car with a non-approved key (a key not coded to the car's ignition).
If there is movement in the passenger compartment (if the car is equipped with the optional movement sensor).
The car is lifted or towed (if the car is equipped with the optional inclination sensor)
The battery is disconnected (while the alarm is armed).
The siren is disconnected when the alarm is disarmed.
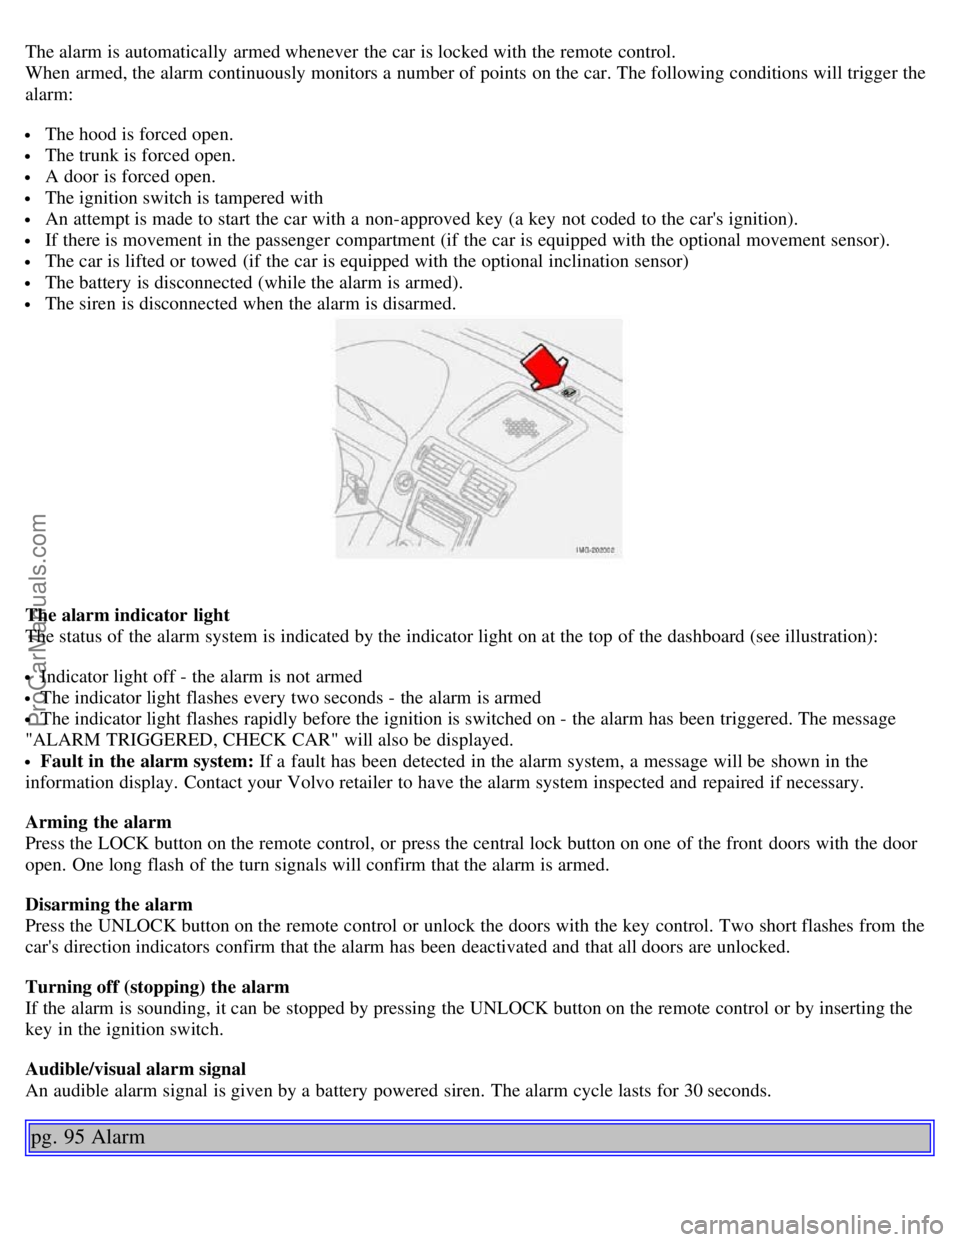
The alarm indicator light
The status of the alarm system is indicated by the indicator light on at the top of the dashboard (see illustration):
Indicator light off - the alarm is not armed
The indicator light flashes every two seconds - the alarm is armed
The indicator light flashes rapidly before the ignition is switched on - the alarm has been triggered. The message
"ALARM TRIGGERED, CHECK CAR" will also be displayed.
Fault in the alarm system: If a fault has been detected in the alarm system, a message will be shown in the
information display. Contact your Volvo retailer to have the alarm system inspected and repaired if necessary.
Arming the alarm
Press the LOCK button on the remote control, or press the central lock button on one of the front doors with the door
open. One long flash of the turn signals will confirm that the alarm is armed.
Disarming the alarm
Press the UNLOCK button on the remote control or unlock the doors with the key control. Two short flashes from the
car's direction indicators confirm that the alarm has been deactivated and that all doors are unlocked.
Turning off (stopping) the alarm
If the alarm is sounding, it can be stopped by pressing the UNLOCK button on the remote control or by inserting the
key in the ignition switch.
Audible/visual alarm signal
An audible alarm signal is given by a battery powered siren. The alarm cycle lasts for 30 seconds.
pg. 95 Alarm
ProCarManuals.com
Page 58 of 127
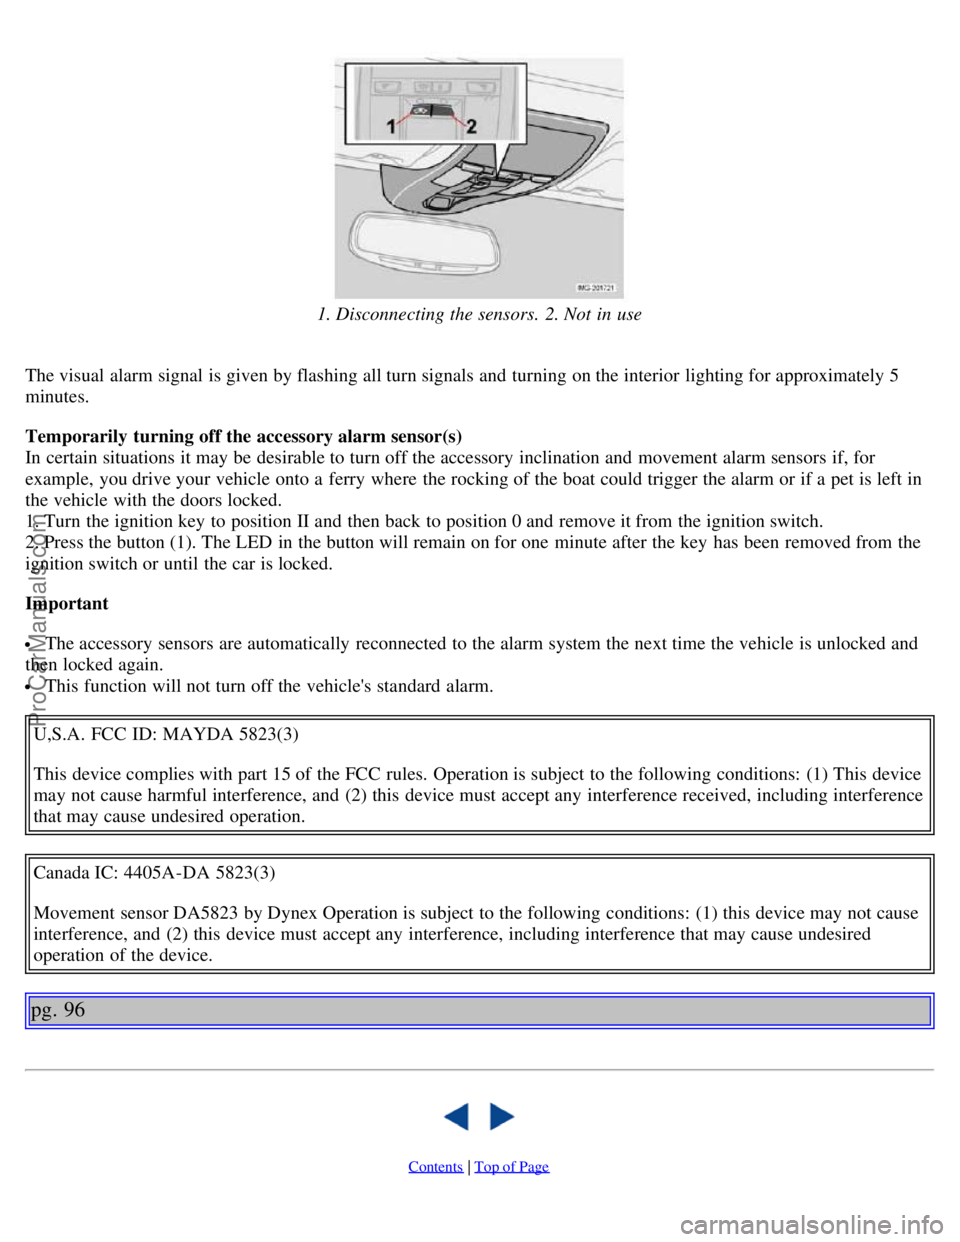
1. Disconnecting the sensors. 2. Not in use
The visual alarm signal is given by flashing all turn signals and turning on the interior lighting for approximately 5
minutes.
Temporarily turning off the accessory alarm sensor(s)
In certain situations it may be desirable to turn off the accessory inclination and movement alarm sensors if, for
example, you drive your vehicle onto a ferry where the rocking of the boat could trigger the alarm or if a pet is left in
the vehicle with the doors locked.
1. Turn the ignition key to position II and then back to position 0 and remove it from the ignition switch.
2. Press the button (1). The LED in the button will remain on for one minute after the key has been removed from the
ignition switch or until the car is locked.
Important
The accessory sensors are automatically reconnected to the alarm system the next time the vehicle is unlocked and
then locked again.
This function will not turn off the vehicle's standard alarm.
U,S.A. FCC ID: MAYDA 5823(3)
This device complies with part 15 of the FCC rules. Operation is subject to the following conditions: (1) This device
may not cause harmful interference, and (2) this device must accept any interference received, including interference
that may cause undesired operation.
Canada IC: 4405A-DA 5823(3)
Movement sensor DA5823 by Dynex Operation is subject to the following conditions: (1) this device may not cause
interference, and (2) this device must accept any interference, including interference that may cause undesired
operation of the device.
pg. 96
Contents | Top of Page
ProCarManuals.com
Page 103 of 127
8. Press EXIT to leave the menu without saving any changes.
ASC - speed compensated volume
The audio system's volume is adjusted automatically according to the speed of the vehicle. There are three settings
available (see e.g. menu point 4.6), which determine the level of volume compensation:
Low
Medium*
High
* Default setting.
pg. 174 Radio functions
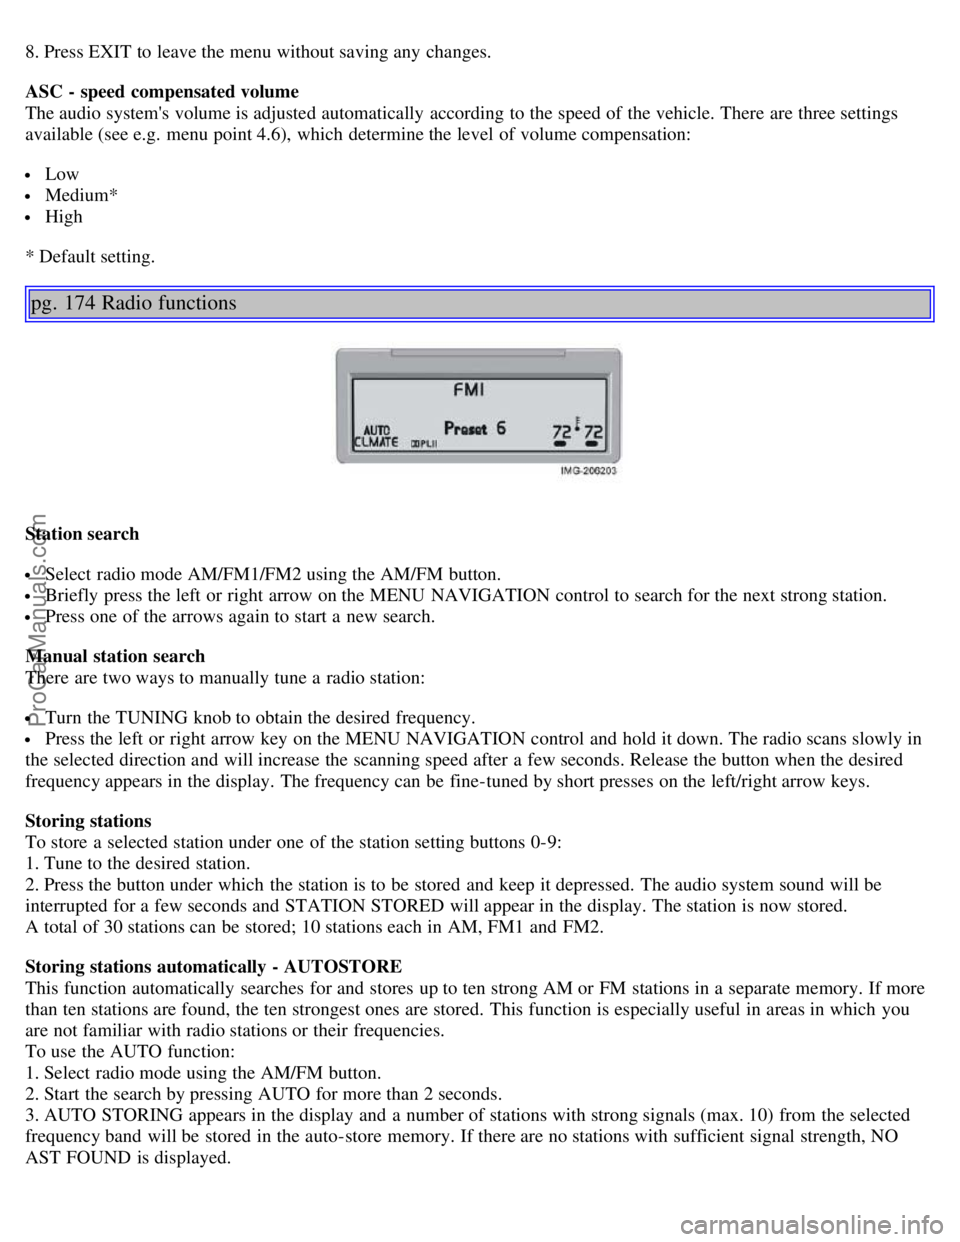
Station search
Select radio mode AM/FM1/FM2 using the AM/FM button.
Briefly press the left or right arrow on the MENU NAVIGATION control to search for the next strong station.
Press one of the arrows again to start a new search.
Manual station search
There are two ways to manually tune a radio station:
Turn the TUNING knob to obtain the desired frequency.
Press the left or right arrow key on the MENU NAVIGATION control and hold it down. The radio scans slowly in
the selected direction and will increase the scanning speed after a few seconds. Release the button when the desired
frequency appears in the display. The frequency can be fine-tuned by short presses on the left/right arrow keys.
Storing stations
To store a selected station under one of the station setting buttons 0-9:
1. Tune to the desired station.
2. Press the button under which the station is to be stored and keep it depressed. The audio system sound will be
interrupted for a few seconds and STATION STORED will appear in the display. The station is now stored.
A total of 30 stations can be stored; 10 stations each in AM, FM1 and FM2.
Storing stations automatically - AUTOSTORE
This function automatically searches for and stores up to ten strong AM or FM stations in a separate memory. If more
than ten stations are found, the ten strongest ones are stored. This function is especially useful in areas in which you
are not familiar with radio stations or their frequencies.
To use the AUTO function:
1. Select radio mode using the AM/FM button.
2. Start the search by pressing AUTO for more than 2 seconds.
3. AUTO STORING appears in the display and a number of stations with strong signals (max. 10) from the selected
frequency band will be stored in the auto-store memory. If there are no stations with sufficient signal strength, NO
AST FOUND is displayed.
ProCarManuals.com