audio VOLVO S40 2006 Owners Manual
[x] Cancel search | Manufacturer: VOLVO, Model Year: 2006, Model line: S40, Model: VOLVO S40 2006Pages: 127, PDF Size: 2.26 MB
Page 4 of 127
Drive at a constant speed whenever possible.
See a trained and qualified Volvo service technician as soon as possible for inspection if the check engine
(malfunction indicator) lamp illuminates, or stays on after the vehicle has started.
Properly dispose of any vehicle-related waste such as used motor oil, used batteries, brake pads, etc.
Introduction
When cleaning your car, use Volvo's own car care products, all of which have systematically been adapted to the
environment.
PremAir®
The surface of the radiator in the engine compartment is treated with a special coating called Premair
1. This coating
works as a catalytic converter, converting most of the ground level ozone passing through the radiator into oxygen,
thereby reducing harmful ground-level ozone.
1. PremAir is a registered trademark of Engelhard Corporation.
Contents
Contents
Chapter 1 - Instrument overview
Chapter 2 - Safety
Chapter 3 - Instruments and controls
Chapter 4 - Climate
Chapter 5 - Interior
Chapter 6 - Locks and alarm
Chapter 7 - Starting and driving
Chapter 8 - Wheels and tires
Chapter 9 - Vehicle care
Chapter 10 - Maintenance and servicing
Chapter 11 - Audio
Chapter 12 - Specifications
Index
Top of Page
ProCarManuals.com
Page 5 of 127
2 0 0 6
VOLVO S40
Chapter 1 - Instrument overview
pg. 7 Instrument overview
pg. 8 Instrument overview
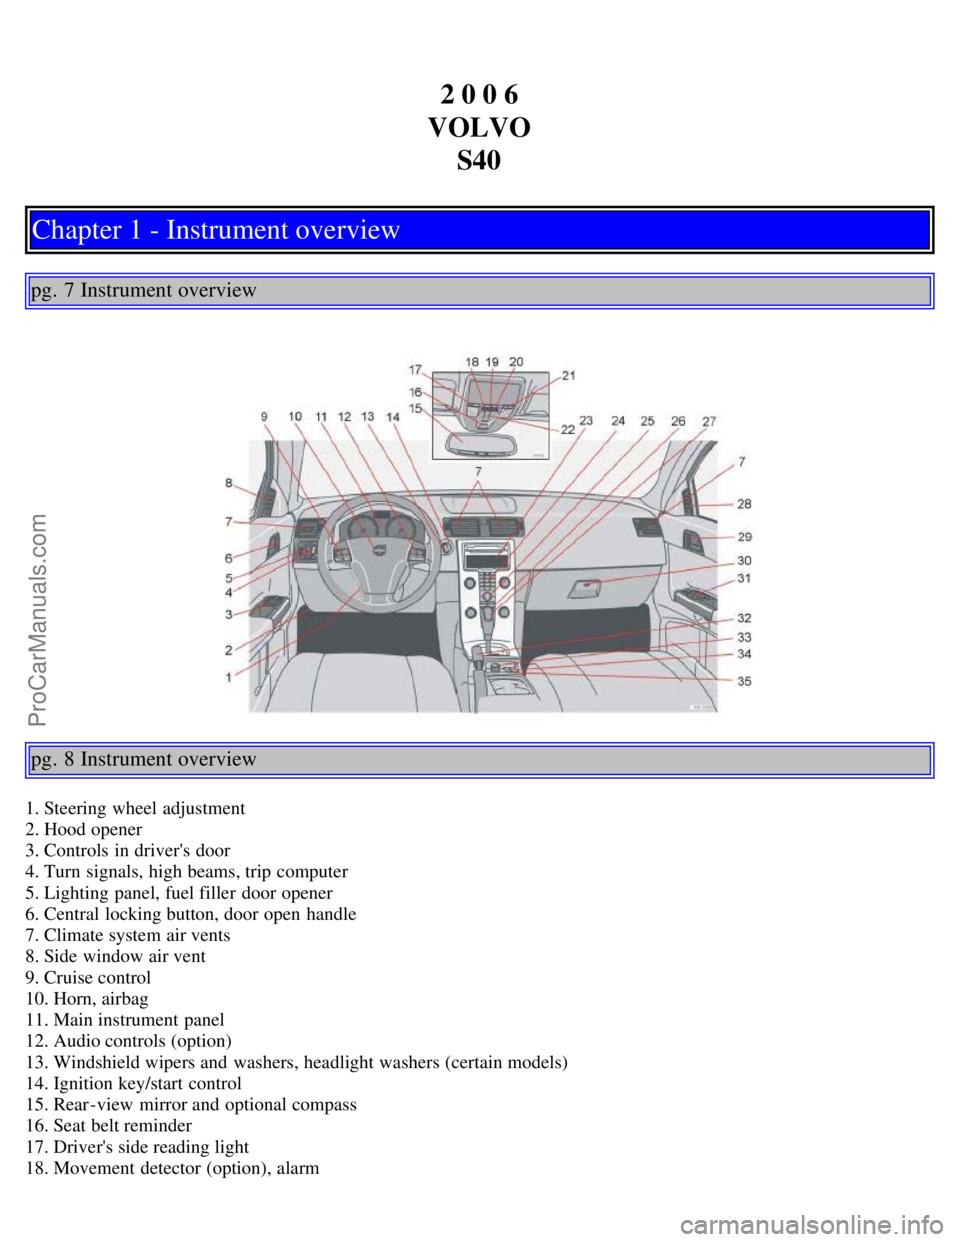
1. Steering wheel adjustment
2. Hood opener
3. Controls in driver's door
4. Turn signals, high beams, trip computer
5. Lighting panel, fuel filler door opener
6. Central locking button, door open handle
7. Climate system air vents
8. Side window air vent
9. Cruise control
10. Horn, airbag
11. Main instrument panel
12. Audio controls (option)
13. Windshield wipers and washers, headlight washers (certain models)
14. Ignition key/start control
15. Rear-view mirror and optional compass
16. Seat belt reminder
17. Driver's side reading light
18. Movement detector (option), alarm
ProCarManuals.com
Page 6 of 127
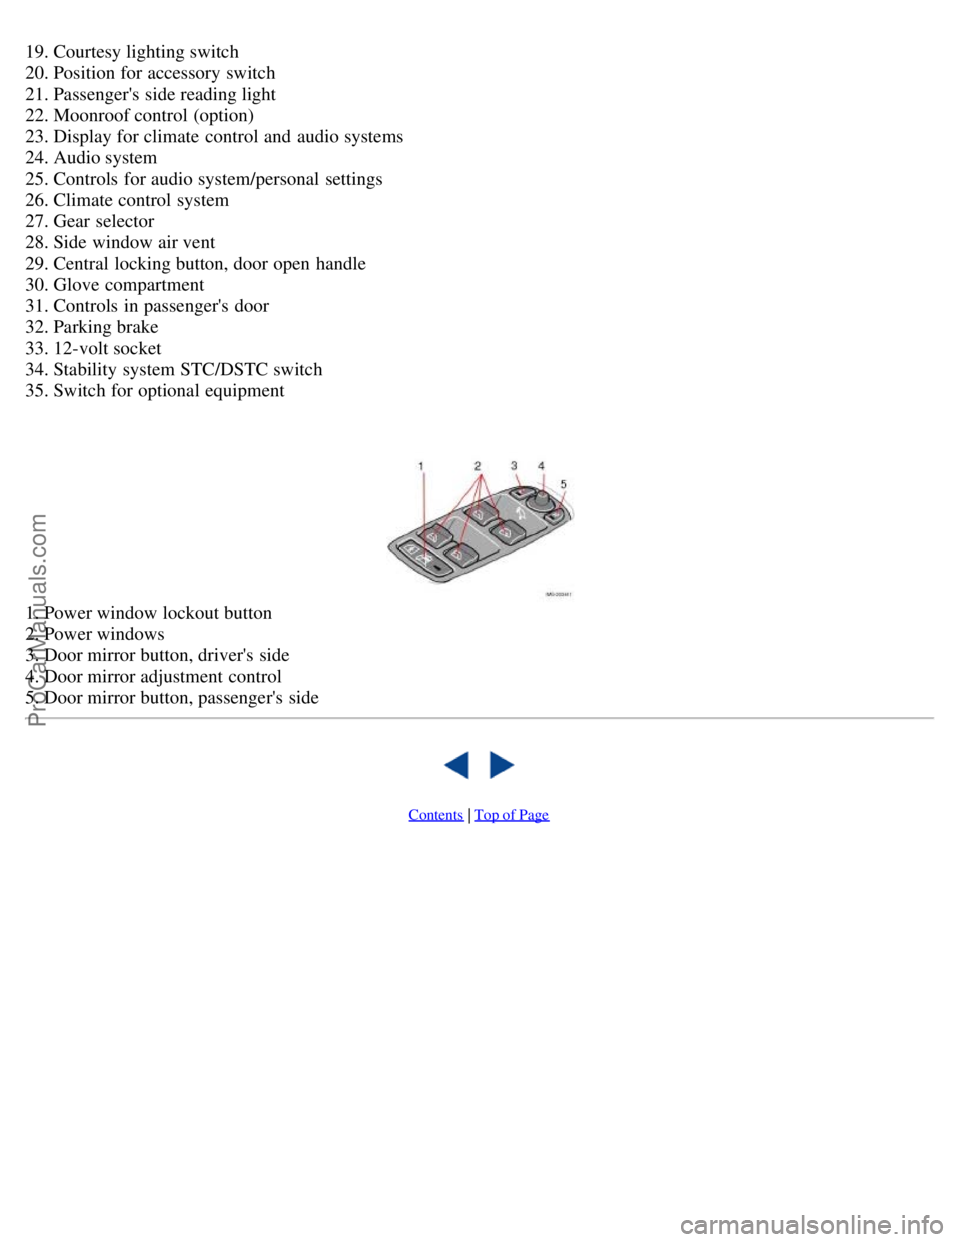
19. Courtesy lighting switch
20. Position for accessory switch
21. Passenger's side reading light
22. Moonroof control (option)
23. Display for climate control and audio systems
24. Audio system
25. Controls for audio system/personal settings
26. Climate control system
27. Gear selector
28. Side window air vent
29. Central locking button, door open handle
30. Glove compartment
31. Controls in passenger's door
32. Parking brake
33. 12-volt socket
34. Stability system STC/DSTC switch
35. Switch for optional equipment
1. Power window lockout button
2. Power windows
3. Door mirror button, driver's side
4. Door mirror adjustment control
5. Door mirror button, passenger's side
Contents | Top of Page
ProCarManuals.com
Page 62 of 127
is not approved by Volvo. Different types of antifreeze must not be mixed.
Volvo recommends using only genuine Volvo antifreeze in your vehicle's radiator.
Try to keep the fuel tank well filled - this prevents the formation of condensation in the tank. In addition, in
extremely cold weather conditions it is worthwhile to add fuel line de -icer before refueling.
The viscosity of the engine oil is important. Oil with low viscosity (thinner oil) improves cold-weather starting as
well as decreasing fuel consumption while the engine is warming up. For winter use, 5W -30 oil, particularly the
synthetic type
1 , is recommended. Be sure to use good quality oil but do not use cold-weather oil for hard driving or in
warm weather. See page 179
for more information.
The load placed on the battery is greater during the winter since the windshield wipers, lighting, etc. are used more
often. Moreover, the capacity of the battery decreases as the temperature drops. In very cold weather, a poorly charged
battery can freeze and be damaged. It is therefore advisable to check the state of charge more frequently and spray an
anti-rust oil on the battery posts.
Volvo recommends the use of snow tires on all four wheels for winter driving - see the chapter "Wheels and tires."
To prevent the washer fluid reservoir from freezing, add washer solvents containing antifreeze (see page 145 for the
location of the washer fluid reservoir). This is important since dirt is often splashed on the windshield during winter
driving, requiring the frequent use of the washers and wipers. Volvo Washer Solvent should be diluted as follows:
Down to 14° F (-10° C): 1 part washer solvent and 4 parts water, Down to 5° F (-15° C): 1 part washer solvent and 3
parts water, Down to 0° F (-18° C): 1 part washer solvent and 2 parts water, Down to -18° F (-28° C): 1 part washer
solvent and 1 part water.
Use Volvo Teflon Lock Spray in the locks.
NOTE: Avoid using de -icing sprays as they can cause damage to the locks.
1. Synthetic oil is not used when the oil is changed at the normal maintenance intervals except at owner request and at
additional charge.
Conserving electrical current
Keep the following in mind to help minimize battery drain:
When the engine is not running, avoid turning the ignition key to position II. Many electrical systems (the audio
pg. 94 General information
system, the optional navigation system, power windows, etc) will function with the ignition key in position I. This
position reduces drain on the battery.
Please keep in mind that using systems, accessories, etc that consume a great deal of current when the engine is not
running could result in the battery being completely drained.
The optional 12 volt socket in the trunk provides electrical current even with the ignition switched off, which drains
the battery.
NOTE: If the ignition is switched on, a warning message will be displayed in the text window in the instrument panel
when the battery charge is low.
An energy conserving function designed into the vehicle's electrical system will switch off certain functions or reduce
the load on the battery by, e.g., reducing the audio system's volume.
Before a long distance trip
It is always worthwhile to have your vehicle checked by a trained and qualified Volvo service technician before
driving long distances. Your retailer will also be able to supply you with bulbs, fuses, spark plugs and wiper blades for
your use in the event that problems occur.
As a minimum, the following items should be checked before any long trip:
Check that engine runs smoothly and that fuel consumption is normal.
Check for fuel, oil, and fluid leakage
ProCarManuals.com
Page 102 of 127
2 0 0 6
VOLVO S40
Chapter 11 - Audio
pg. 163 Audio
Audio functions164
Radio functions166
CD player/CD changer (option)170
Compact disc care172
Audio menu settings and selections173
pg. 164 Audio functions
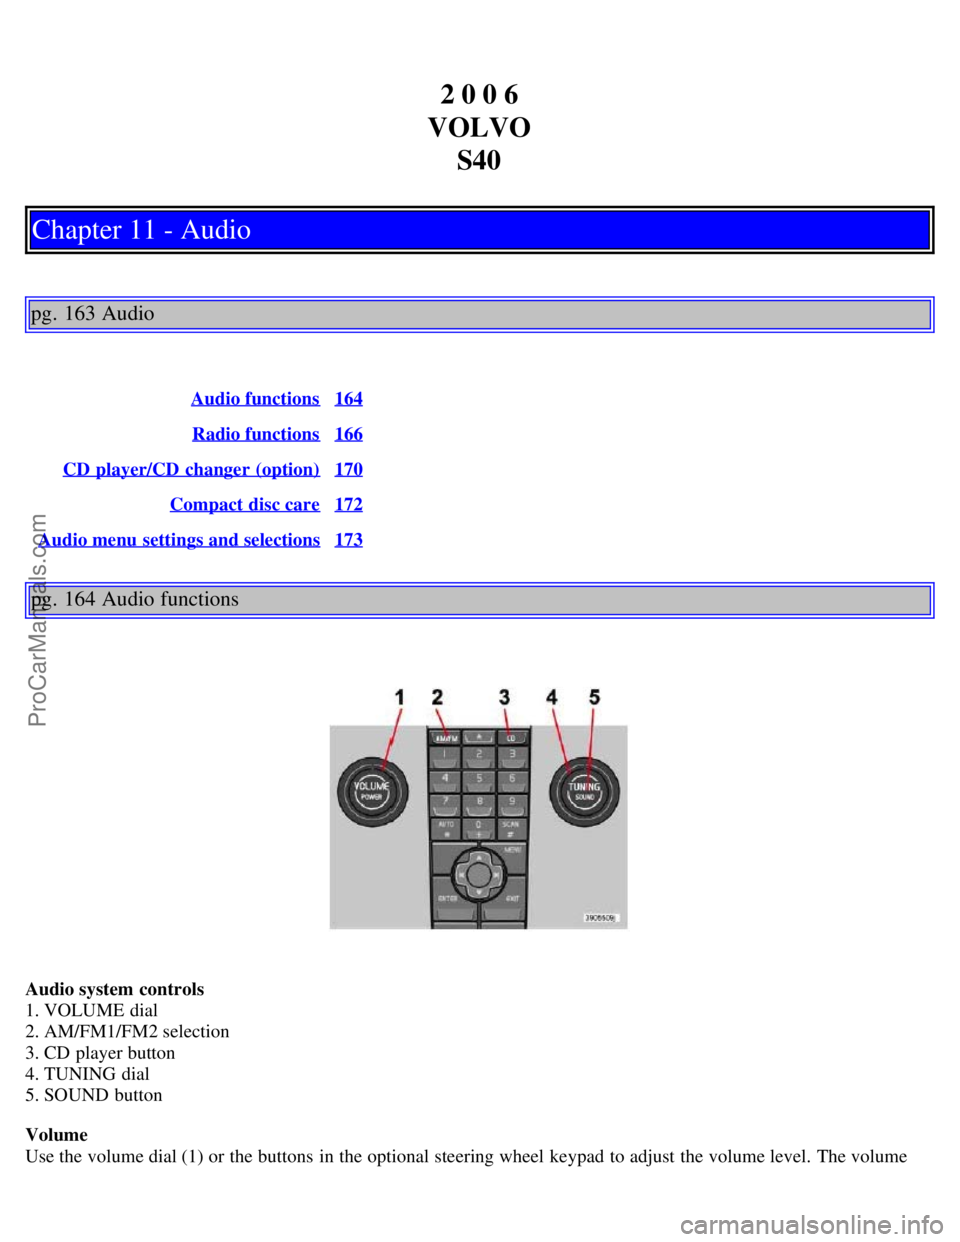
Audio system controls
1. VOLUME dial
2. AM/FM1/FM2 selection
3. CD player button
4. TUNING dial
5. SOUND button
Volume
Use the volume dial (1) or the buttons in the optional steering wheel keypad to adjust the volume level. The volume
ProCarManuals.com
Page 103 of 127
level is also adjusted automatically according to the vehicle's speed, see page 165 for more information on this
function.
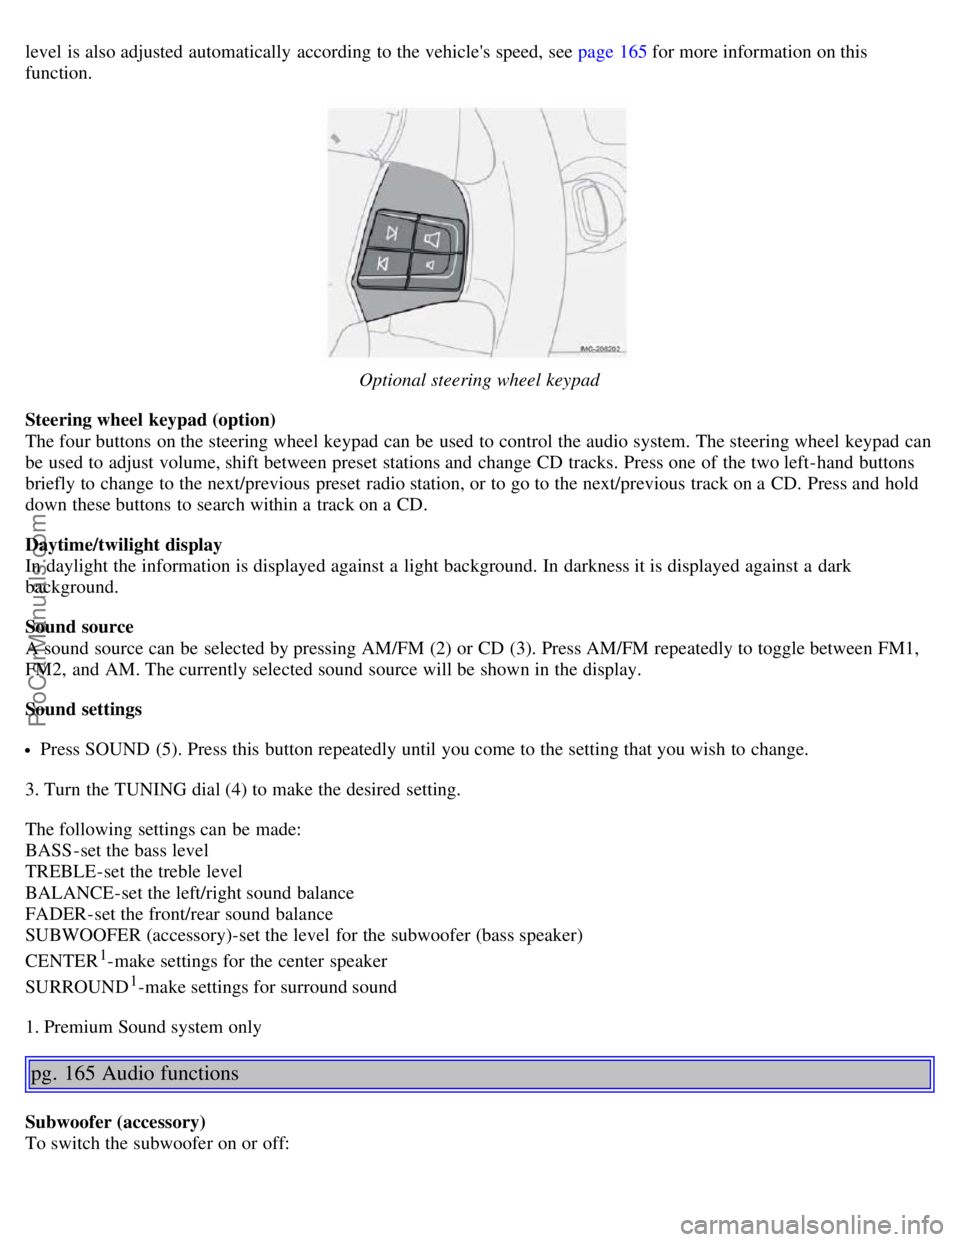
Optional steering wheel keypad
Steering wheel keypad (option)
The four buttons on the steering wheel keypad can be used to control the audio system. The steering wheel keypad can
be used to adjust volume, shift between preset stations and change CD tracks. Press one of the two left-hand buttons
briefly to change to the next/previous preset radio station, or to go to the next/previous track on a CD. Press and hold
down these buttons to search within a track on a CD.
Daytime/twilight display
In daylight the information is displayed against a light background. In darkness it is displayed against a dark
background.
Sound source
A sound source can be selected by pressing AM/FM (2) or CD (3). Press AM/FM repeatedly to toggle between FM1,
FM2, and AM. The currently selected sound source will be shown in the display.
Sound settings
Press SOUND (5). Press this button repeatedly until you come to the setting that you wish to change.
3. Turn the TUNING dial (4) to make the desired setting.
The following settings can be made:
BASS -set the bass level
TREBLE-set the treble level
BALANCE-set the left/right sound balance
FADER-set the front/rear sound balance
SUBWOOFER (accessory)-set the level for the subwoofer (bass speaker)
CENTER
1-make settings for the center speaker
SURROUND
1-make settings for surround sound
1. Premium Sound system only
pg. 165 Audio functions
Subwoofer (accessory)
To switch the subwoofer on or off:
ProCarManuals.com
Page 104 of 127
Press MENU followed by ENTER.
Select AUDIO SETTINGS and press ENTER.
Select SUBWOOFER and press ENTER.
Surround sound
Surround settings are used to balance sound levels throughout the vehicle. Surround settings for FM and CD are stored
separately.
NOTE:
Dolby Surround Pro Logic II is only available on the Premium Sound system.
When listening to FM radio stations, Dolby Surround Pro Logic II functions best in areas with strong reception. If
reception is weak, selecting 2 or 3-channel stereo may provide better sound quality.
The Dolby symbol will be appear in the display when Dolby Pro Logic II is activated. There are three alternative
settings:
Pro Logic II
3-channel
Off (normal 2-channel stereo)
Activating/deactivating Surround sound
Press MENU followed by ENTER.
Select AUDIO SETTINGS in the menu and press ENTER.
Select Surround FM or Surround CD and press ENTER.
Select Pro logic II, 3-channel stereo or Off and press ENTER.
Equalizer Front/Rear
This function is used to fine-tune the sound from the front and rear speakers separately.
NOTE: This function is only available on certain sound systems.
To adjust the equalizer settings:
Press MENU followed by ENTER.
Select AUDIO SETTINGS in the menu and press ENTER.
Select Equalizer Front/Rear and press ENTER.
The column in the display indicates the level for the current frequency.
Adjust the level with the Tuning dial (4), or use the Up/Down arrows. Additional frequencies can be selected with
the Right/Left arrows.
Save the settings by pressing ENTER or exit without saving by pressing EXIT.
ASC - speed compensated volume
The audio system's volume is adjusted automatically according to the speed of the vehicle. There are three settings
available, which determine the level of volume compensation:
Low
Medium*
High
ProCarManuals.com
Page 105 of 127
* Default setting.
To set the level of speed compensation:
Press MENU followed by ENTER.
Select AUDIO SETTINGS in the menu and press ENTER.
Select ASC in the menu and press ENTER.
Select Low, Medium, or High and press ENTER.
pg. 166 Radio functions
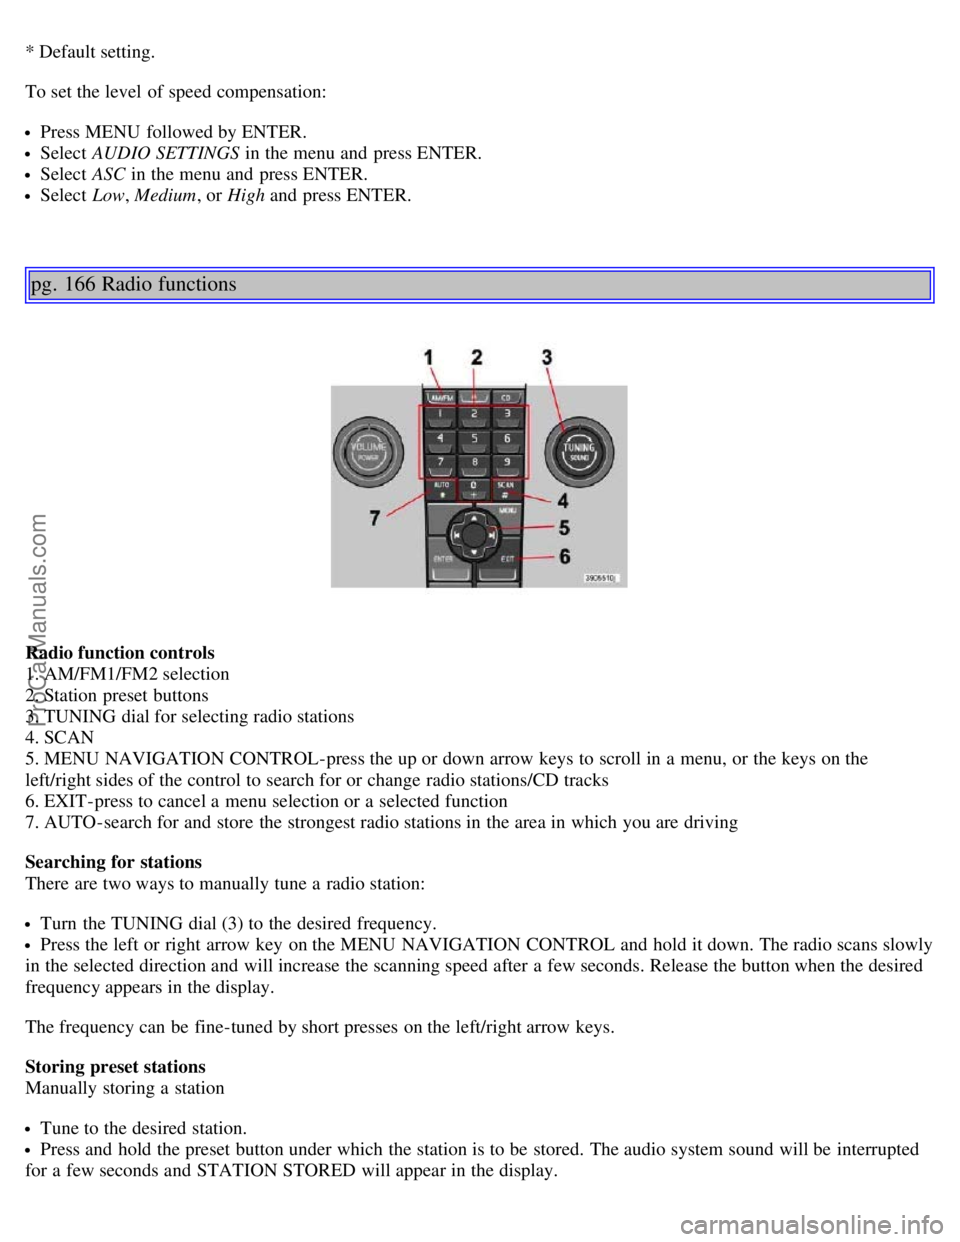
Radio function controls
1. AM/FM1/FM2 selection
2. Station preset buttons
3. TUNING dial for selecting radio stations
4. SCAN
5. MENU NAVIGATION CONTROL-press the up or down arrow keys to scroll in a menu, or the keys on the
left/right sides of the control to search for or change radio stations/CD tracks
6. EXIT-press to cancel a menu selection or a selected function
7. AUTO-search for and store the strongest radio stations in the area in which you are driving
Searching for stations
There are two ways to manually tune a radio station:
Turn the TUNING dial (3) to the desired frequency.
Press the left or right arrow key on the MENU NAVIGATION CONTROL and hold it down. The radio scans slowly
in the selected direction and will increase the scanning speed after a few seconds. Release the button when the desired
frequency appears in the display.
The frequency can be fine-tuned by short presses on the left/right arrow keys.
Storing preset stations
Manually storing a station
Tune to the desired station.
Press and hold the preset button under which the station is to be stored. The audio system sound will be interrupted
for a few seconds and STATION STORED will appear in the display.
ProCarManuals.com
Page 107 of 127
The SCAN function will be deactivated and the station can be selected by pressing the preset button.
Radio Broadcast Data System - RBDS
This feature, which may not be available in your area, functions only with FM broadcasts. The radio in your car is
equipped with an advanced system allowing information from broadcasters to be transmitted visually, as text, together
with the audio signal. This information is then decoded by the radio and made available for several new and unique
features.
The RBDS or Radio Broadcast Data System operates in the FM band only, and the information transmitted is
supplied exclusively by participating broadcasters.
Volvo has no control over the accuracy of the data or information.
Coverage by local broadcasters may be limited at this time, but as the technology and benefits grow, you will find the
radio in your car is equipped to take advantage of this system.
PI (Program Information) seek
When an FM station has been stored as a preset, the radio also stores RBDS program information if it is available.
When the preset is selected at a later time, the radio tries to access updated program information. In weak signal areas,
there may be a delay before the station becomes audible. During this delay, there will be no sound.
PI seek can be interrupted by pressing EXIT.
Radio text
Certain RBDS stations broadcast program information, which can be shown in the display.
To start this function:
1. Select FM1 or FM2 and press the MENU button.
2. Press ENTER.
3. Select RADIOTEXT in the menu and press ENTER.
pg. 168 Radio functions
To deactivate this function, select RADIOTEXT again and press ENTER.
Alarm
Alarms bulletins are transmitted automatically by certain RBDS stations. The function cannot be deactivated.
"Alarm!" is shown in the radio display when an alarm message is sent. The function is used to warn motorists of
serious accidents, etc.
Program type/station format - PTY
The PTY function allows you to find stations whose programs suit your taste. Use the PTY function to select among
the different station formats shown in the list.
To show the format of the current station:
Select FM1 or FM2 and press the MENU button.
Press ENTER.
Select PTY from the menu and press ENTER.
Select SHOW PTY and press ENTER. The PTY (program type) of the selected station is now shown in the display.
NOTE: Not all RBDS radio stations have PTY designations.
Station formats
ProCarManuals.com
Page 111 of 127

NOTE:
The EJECT ALL function can only be used while the vehicle is at a standstill and will be cancelled if the vehicle
begins to move.
NOTE: For reasons of traffic safety, the ejected CD must be removed within 12 seconds or it will be automatically
drawn back into the slot and the CD player will enter pause mode. Press the CD button to restart the disc.
pg. 172 CD player/CD changer (option)
Compact disc care
Keep the following in mind when playing/handling compact discs
Use CD standard EN 60908 discs only. Discs not meeting this standard may cause problems with system (poor
sound). CD-R discs can cause listening problems due to the quality of the disc or recording equipment used.
Keep the discs clean. Wipe them with a soft, clean, lint-free cloth, working from the center outward. If necessary,
dampen the cloth with a neutral soap solution. Dry thoroughly before using.
Never use cleaning spray or antistatic liquid. Use only cleaners specifically made for CDs.
Use discs of the correct size only (3.5" discs should never be used).
Do not put tape or labels on the disc itself. They could become stuck in the player.
Volvo does not recommend the use of plastic outer rings on the disc.
Condensation may occur on discs/ optical components of the changer in cold winter weather. The disc can be dried
with a clean, lint-free cloth. Optical components in the CD changer may, however, take up to one hour to dry off.
Never attempt to play a damaged CD.
When not in use, the discs should be stored in their covers. Avoid storing discs in excessive heat, direct sunlight or
dusty locations.
pg. 173 Audio menu settings and selections
Audio menu settings and selections
NOTE:
All alternatives marked * can be selected or set to On or Off by navigating to the alternative in the menu and pressing
Enter.
FM1/FM2 menu
1. PTY
1.1. SELECT PTY
1.1.1. CLEAR ALL PTY
1.1.2. The available program types are listed here
1.2. SEARCH PTY
1.3. SHOW PTY ON/OFF (default)*
2. RADIOTEXT ON/OFF (default)*
3. ADVANCED RADIO SETTINGS
3.1. AF ON/OFF (default)*
3.2. RESET All
4. AUDIO SETTINGS
4.1. SURROUND FM (Premium sound system only)
4.1.1. Dolby Pro Logic II*
4.1.2.3 Channel*
4.1.3. OFF (default)*
4.2. SURROUND CD
4.2.1. Dolby Pro Logic II (default)*
ProCarManuals.com