check engine light VOLVO S40 2007 User Guide
[x] Cancel search | Manufacturer: VOLVO, Model Year: 2007, Model line: S40, Model: VOLVO S40 2007Pages: 208, PDF Size: 5.99 MB
Page 116 of 208
CAUTION
Do not refuel with the engine running1. Turn the ignition off or to position I. If the ignition is on, an incorrect
reading could occur in the fuel gauge
After refueling, close the fuel filler cap by turning it clockwise until it clicks into place.
Avoid overfilling the fuel tank. Do not press the handle on the filler nozzle more than one extra time. Too much
fuel in the tank in hot weather conditions can cause the fuel to overflow. Overfilling could also cause damage to the
emission control systems.
Avoid spilling gasoline during refueling. In addition to causing damage to the environment, gasolines containing
alcohol can cause damage to painted surfaces, which may not be covered under the New Vehicle Limited Warranty.
Do not use gasolines containing methanol (methyl alcohol, wood alcohol). This practice can result in vehicle
performance deterioration and can damage critical parts in the fuel system. Such damage may not be covered under
the New Vehicle Limited Warranty.
1If the fuel filler cap is not closed tightly or if the engine is running when the vehicle is refueled, the Check Engine Light (malfunction indicator
lamp) may indicate a fault. However, your vehicle's performance will not be affected. Use only Volvo original or approved fuel filler caps.
128 06 Starting and driving
Ignition switch/Steering wheel lock
Ignition switch and steering wheel lock
0 - Locked position
Remove the key to lock the steering wheel1. Never turn the key to position 0 while driving or when the vehicle is
being towed.
NOTE
A ticking sound may be audible if the key is turned to a position between 0 and I. To stop this sound, turn the key to
position II and back to position 0.
I - Intermediate position
2
Certain accessories, radio, etc. on, daytime running lights off.
1Automatic transmission: the gear selector must be in the Park position. The optional keyless drive start control does not need to be removed.
2Please be aware that leaving the key in this positions I or II will increase battery drain.
II - Drive position
ProCarManuals.com
Page 118 of 208
Never switch off the ignition (turn the ignition key or start control to position 0) or remove the key or start control
from the ignition switch while the vehicle is in motion. This could cause the steering wheel to lock, which would
make the vehicle impossible to steer.
To start the engine
1. Fasten the seat belt.
WARNING
Before starting, check that the seat, steering wheel and mirrors are adjusted properly. Make sure the brake pedal can
be depressed completely. Adjust the seat if necessary.
2. Apply the parking brake if not already set. The gear selector should be locked in the Park ( P) position (Shiftlock).
See also page 138
.
Manual transmission : the clutch must be fully depressed.
3. The vehicle is equipped with an autostart feature. Without touching the throttle pedal, turn the key to position III
and release it. The starter motor will then operate automatically (for up to ten seconds) until the engine starts. If the
engine fails to start, repeat this step.
NOTE
After a cold start, idle speed may be noticeably higher than normal for a short period. This is done to help bring
components in the emission control system to their normal operating temperature as quickly as possible, which
enables them to control emissions and help reduce the vehicle's impact on the environment.
4. To release the gear selector from the Park ( P) position, the engine must be running (or the ignition key must be in
position II) and the brake pedal must be depressed.
5. Select the desired gear. On models with an automatic transmission, the gear engages after a very slight delay which
is especially noticeable when selecting R.
130 06 Starting and driving
Starting the vehicle
NOTE
Immobilizer : If two of the keys to your vehicle are close together, e.g., on the same key ring when you try to start
the vehicle, this could cause interference in the immobilizer system and result in the vehicle not starting. If this
should occur, remove one of the keys from the key ring before trying to start the vehicle again.
Keylock: Models equipped an automatic transmission have a keylock system. When the engine is switched off, the
gear selector must be in the Park ( P) position before the key can be removed from the ignition switch
1.
When starting in cold weather, the transmission may shift up at slightly higher engine speeds than normal until the
automatic transmission fluid reaches normal operating temperature.
Do not race a cold engine immediately after starting. Oil flow may not reach some lubrication points fast enough
to prevent engine damage.
1 The optional keyless drive start control does not need to be removed from the ignition switch.
ProCarManuals.com
Page 127 of 208
If this light comes on while driving or braking, stop immediately and check the brake fluid level in the reservoir.
NOTE
Press the brake pedal hard and maintain pressure on the pedal - do not pump the brakes.
WARNING
If the fluid level is below the MIN mark in the reservoir or if a brake system message is shown in the information
display: DO NOT DRIVE. Have the vehicle towed to a Volvo retailer and have the brake system inspected.
Power brakes function only when the engine is running
The power brakes utilize vacuum pressure which is only created when the engine is running. Never let the vehicle roll
to a stop with the engine switched off.
If the power brakes are not working, the brake pedal must be pressed approximately five times harder than usual to
make up for the lack of power assistance. This can happen for example when towing your vehicle or if the engine is
switched off when the vehicle is rolling. The brake pedal feels harder than usual.
Water on brake discs and brake pads affects braking
Driving in rain and slush or passing through an automatic car wash can cause water to collect on the brake discs and
pads. This will cause a delay in braking effect when the pedal is depressed. To avoid such a delay when the brakes are
needed, depress the pedal occasionally when driving through rain, slush, etc. This will remove the water from the
brakes. Check that brake application feels normal. This should also be done after washing or starting in very damp or
cold weather.
Severe strain on the brake system
The brakes will be subject to severe strain when driving in mountains or hilly areas, or when towing a trailer. Vehicle
speed is usually slower, which means that the cooling of the brakes is less efficient than when driving on level roads.
To reduce the strain on the brakes, shift into a lower gear and let the engine help with the braking. Do not forget that if
you are towing a trailer, the brakes will be subjected to a greater than normal load.
Anti-lock brakes (ABS)
The Anti-lock Braking System (ABS) helps to improve vehicle control (stopping and steering) during severe braking
conditions by limiting brake lockup. When the system "senses" impending lockup, braking pressure is automatically
modulated in order to help prevent lockup that could lead to a skid.
The system performs a self -diagnostic test when the engine is started and when the vehicle first reaches a speed
of approximately 12 m.p.h. (20 km/h) . The brake pedal will pulsate several times and a sound may be audible from
the ABS control module. This is normal.
141 06 Starting and driving
Brake system
For optimal ABS braking effect:
1. Press down on the brake pedal with full force. The pedal will pulsate.
ProCarManuals.com
Page 128 of 208
2. Steer the vehicle in the direction of travel and keep the brake pedal depressed.
Electronic Brake Force Distribution (EBD)
EBD is an integrated part of the ABS system. EBD regulates the hydraulic pressure to the rear brakes to help provide
optimal braking capacity.
The switching of the ABS modulator will be audible and the brake pedal will pulsate during braking. Please be aware
that ABS does not increase the absolute braking potential of the vehicle. While control will be enhanced, ABS will not
shorten stopping distances on slippery surfaces.
If the warning lamp lights up there is a malfunction of the ABS system (the standard braking system will still function)
and the vehicle should be driven cautiously to a Volvo retailer for inspection.
WARNING
If the BRAKE and ABS warning symbols light at the same time, there may be a problem in the brake system. If the
brake fluid level is normal in these circumstances, drive carefully to the nearest Volvo workshop to have the brake
system checked.
Emergency Brake Assistance - EBA
EBA is designed to provide full brake effect immediately in the event of sudden, hard braking. The system is activated
by the speed with which the brake pedal is depressed.
When the EBA system is activated, the brake pedal will go down and pressure in the brake system immediately
increases to the maximum level. Maintain full pressure on the brake pedal in order to utilize the system completely.
EBA is automatically deactivated when the brake pedal is released.
NOTE
When the EBA system is activated, the brake pedal will go down and pressure in the brake system immediately
increases to the maximum level. You must maintain full pressure on the brake pedal in order to utilize the system
completely. There will be no braking effect if the pedal is released. EBA is automatically deactivated when the brake
pedal is released.
When the vehicle has been parked for some time, the brake pedal may sink more than usual when the engine is
started. This is normal and the pedal will return to its usual position when it is released.
142 06 Starting and driving
Stability system
Stability Traction Control (STC)/Dynamic Stability Traction Control (DSTC)
The stability system consists of a number of functions designed help reduce wheel spin, counteract skidding, and to
generally help improve directional stability.
A pulsating sound will be audible when the system is actively operating and is normal.
ProCarManuals.com
Page 130 of 208
the vehicle shows a tendency to skid or slide laterally.
143 06 Starting and driving
Stability system
This is one of the stability system's permanent functions and cannot be switched off.
WARNING
The car's handling and stability characteristics will be altered if the STC/DSTC system functions have been disabled.
STC/DSTC-related messages in the text window
" TRACTION CONTROL TEMPORARILY OFF " - The system has been temporarily switched off due to high
brake temperature and will automatically switch on again when the brakes have cooled.
" ANTI SKID SERVICE REQUIRED " - the system has been automatically disengaged due to a fault. An authorized
Volvo retailer should check the system.
Symbols in the instrument panel
The Stability Control indicator light
This light indicates different conditions, depending on how it illuminates.
The Stability Control indicator light illuminates for approximately 2 seconds
This indicates that the system is performing a self -diagnostic test when the ignition is switched on.
The Stability Control indicator light flashes
This indicates that the stability system is actively functioning to help counteract wheel spin and/or a skid.
The Stability Control indicator light glows steadily
"ANTI SKID SERVICE REQUIRED" will be displayed in the text window at the same time.
A fault is indicated in the stability system.
1. Stop the vehicle in a safe place and switch off the engine.
2. Restart the engine.
3. If the indicator light goes out, the fault was temporary and no further action is required.
4. If the indicator light remains on, drive to an authorized Volvo workshop as soon as possible to have the system
checked.
The Stability Control indicator light glows steadily
If " STC/DSTC SPIN CONTROL OFF " is displayed in the text window at the same time, this is a reminder that spin
control has been disabled by the driver.
The warning symbol
The warning symbol glows steadily yellow
ProCarManuals.com
Page 132 of 208
WARNING
Towing a vehicle with a locked steering wheel will make the vehicle impossible to steer.
3. Turn the ignition key to position II.
4. Place the gear selector in neutral. For vehicles with automatic transmissions, follow instruction on page 138
,
"Shiftlock override" to allow the gear selector to be moved from the Park position.
5. Keep firm pressure on the brake pedal while releasing the parking brake.
6. When towing has been completed, return the gear selector to Park (automatic) or Reverse (manual) and apply the
parking brake.
The following points should also be observed:
Never exceed 50 mph (80 km/h) . Never exceed local towing speed limits and heed all local towing restrictions.
Never tow farther than 50 miles (80 km) .
Keep the tow rope taut at all times while the vehicle is in motion.
The disabled vehicle should be towed in the forward direction only.
145 06 Starting and driving
Towing
WARNING
Never allow a vehicle to be towed without a driver behind the wheel of the disabled vehicle.
Never remove the key from the ignition while the vehicle is moving. The steering wheel could lock, making it
impossible to steer the vehicle.
When the engine is not running, steering resistance and the effort needed to apply the brakes will be great.
Never attempt to tow a vehicle with a dead battery at night.
CAUTION
Check with state and local authorities before attempting this type of towing, as vehicles being towed are subject to
regulations regarding maximum towing speed, length and type of towing device, lighting, marker flags, etc.
Never attempt to push- or tow-start a vehicle with a dead battery. This would inject unburned fuel into the three-
way catalytic converter(s), causing overheating, backfiring, and damage. See page 146
for instructions on jump
starting the vehicle.
Towing vehicles with front wheel drive
ProCarManuals.com
Page 135 of 208
Trailers without brakes: 1,540 lbs (700 kg).
Trailers with brakes: 2,000 lbs (900 kg) Observe the legal requirements of the state/province in which the vehicles
are registered.
The maximum recommended hitch tongue load is 165 lbs (75 kg).
All Volvo models are equipped with energy-absorbing shock-mounted bumpers. Trailer hitch installation should not
interfere with the proper operation of this bumper system.
Trailer towing does not normally present any particular problems, but take into consideration:
Increase tire pressure to recommended full. See the chapter "Wheels and tires."
When your vehicle is new, avoid towing heavy trailers during the first 620 miles (1,000 km).
Maximum speed when towing a trailer: 50 m.p.h. (80 km/h).
Engine and transmission are subject to increased loads. Therefore, engine coolant temperature should be closely
watched when driving in hot climates or hilly terrain. Use a lower gear and turn off the air conditioner if the
temperature gauge needle enters the red range.
If the automatic transmission begins to overheat, a message will be displayed in the information display.
Avoid overload and other abusive operation.
Hauling a trailer affects handling, durability, and economy.
It is necessary to balance trailer brakes with the towing vehicle brakes to provide a safe stop (check and observe
state/local regulations).
Do not connect the trailer's brake system directly to the vehicle's brake system.
More frequent vehicle maintenance is required.
Remove the ball and drawbar assembly when the hitch is not being used.
Volvo recommends the use of synthetic engine oil when towing a trailer over long distances or in mountainous
areas.
WARNING
Bumper-attached trailer hitches must not be used on Volvos, nor should safety chains be attached to the bumper.
Trailer hitches attaching to the vehicle's rear axle must not be used.
Never connect a trailer's hydraulic brake system directly to the vehicle brake system, nor a trailer's lighting system
directly to the vehicle lighting system. Consult your nearest authorized Volvo retailer for correct installation.
When towing a trailer, the trailer's safety wire must be correctly fastened to the hole or hook provided in the
trailer hitch on the vehicle. The safety wire should never be fastened to or wound around the drawbar ball.
148 06 Starting and driving
Towing a trailer
NOTE
When parking the vehicle with a trailer on a hill, apply the parking brake before putting the gear selector in Park
( P ) or in reverse on models with a manual transmission. Always follow the trailer manufacturer's recommendations
for wheel chocking.
If you use the manual (Geartronic) shift positions while towing a trailer, or if the vehicle is equipped with a
manual transmission, make sure the gear you select does not put too much strain on the engine (using too high a
gear).
The drawbar assembly/trailer hitch may be rated for trailers heavier than the vehicle is designed to tow. Please
adhere to Volvo's recommended trailer weights.
Avoid driving with a trailer on inclines exceeding 15%.
ProCarManuals.com
Page 160 of 208
2 0 0 7
VOLVO S40
182 09 Maintenance and servicing
Volvo maintenance 184
Maintaining your car185
Hood and engine compartment187
Engine oil189
Fluids190
Wiper blades192
Battery193
Bulbs195
Replacing front bulbs196
Replacing taillight bulbs200
Replacing interior bulbs201
Fuses202
183 09 Maintenance and servicing
184 09 Maintenance and servicing
Volvo maintenance
General
Volvo advises you to follow the maintenance program outlined in the Warranty and Service Records Information booklet.
This maintenance program contains inspections and services necessary for the proper function of your vehicle. The
maintenance services contain several checks that require special tools and training, and therefore must be performed by a
qualified technician. To keep your Volvo in top condition, specify time-tested and proven Genuine Volvo Parts and
Accessories.
The Federal Clean Air Act - U.S
The Federal Clean Air Act requires vehicle manufacturers to furnish written instructions to the ultimate purchaser to assure
the proper servicing and function of the components that control emissions. These services, which are listed in the
ProCarManuals.com
Page 162 of 208
Clean the windshield, windshield wipers, headlights, and taillights
Monthly:
Check cold tire pressure in all tires. Inspect the tires for wear.
Check that engine coolant and other fluid levels are between the indicated "min" and "max" markings.
Clean interior glass surfaces with a glass cleaner and soft paper towels.
Wipe driver information displays with a soft cloth.
Visually inspect battery terminals for corrosion. Corrosion may indicate a loose terminal connector, or a battery near the
end of its useful service life. Consult your Volvo retailer for additional information.
As needed:
Wash the car, including the undercarriage, to reduce wear that can be caused by a buildup of dirt, and corrosion that can
be caused by salt residues.
Clean leaves and twigs from air intake vents at the base of the windshield, and from other places where they may
collect.
NOTE
Complete service information for qualified technicians is available online for purchase or subscription at
www.volvotechinfo.com
.
186 09 Maintenance and servicing
Maintaining your car
Emission inspection readiness
What is an Onboard Diagnostic System (OBD II)?
OBD II is part of your vehicle's computerized engine management system. It stores diagnostic information about your
vehicle's emission controls. It can light the Check Engine light (MIL) if it detects an emission control "fault." A "fault" is a
component or system that is not performing within an expected range. A fault may be permanent or temporary. OBD II
will store a message about any fault.
How Do States Use OBD II for Emission Inspections?
Many states connect a computer directly to a vehicle's OBD II system. The inspector can then read "faults." In some states,
this type of inspection has replaced the tailpipe emission test.
How Can My Vehicle Fail OBD II Emission Inspection ?
Your vehicle can fail OBD II emission inspection for any of the following reasons.
If your Check Engine (MIL) light is lit, your vehicle may fail inspection.
If your vehicle's Check Engine light was lit, but went out without any action on your part, OBD II will still have a
recorded fault. Your vehicle may pass or fail, depending on the inspection practices in your area.
If you had recent service that required disconnecting the battery, OBD II diagnostic information may be incomplete and
"not ready" for inspection. A vehicle that is not ready may fail inspection.
How Can I Prepare for My Next OBD II Emission Inspection ?
If your Check Engine (MIL) light is lit - or was lit but went out without service, have your vehicle diagnosed and, if
necessary, serviced by a qualified Volvo technician.
If you recently had service for a lit Check Engine light, or if you had service that required disconnecting the battery, a
period of driving is necessary to bring the OBD II system to "ready" for inspection. A half-hour trip of mixed stop-and -
go/highway driving is typically needed to allow OBD II to reach readiness. Your Volvo retailer can provide you with more
ProCarManuals.com
Page 163 of 208
information on planning a trip.
Maintain your vehicle in accordance with your vehicle's maintenance schedule.
187 09 Maintenance and servicing
Hood and engine compartment
Opening the hood
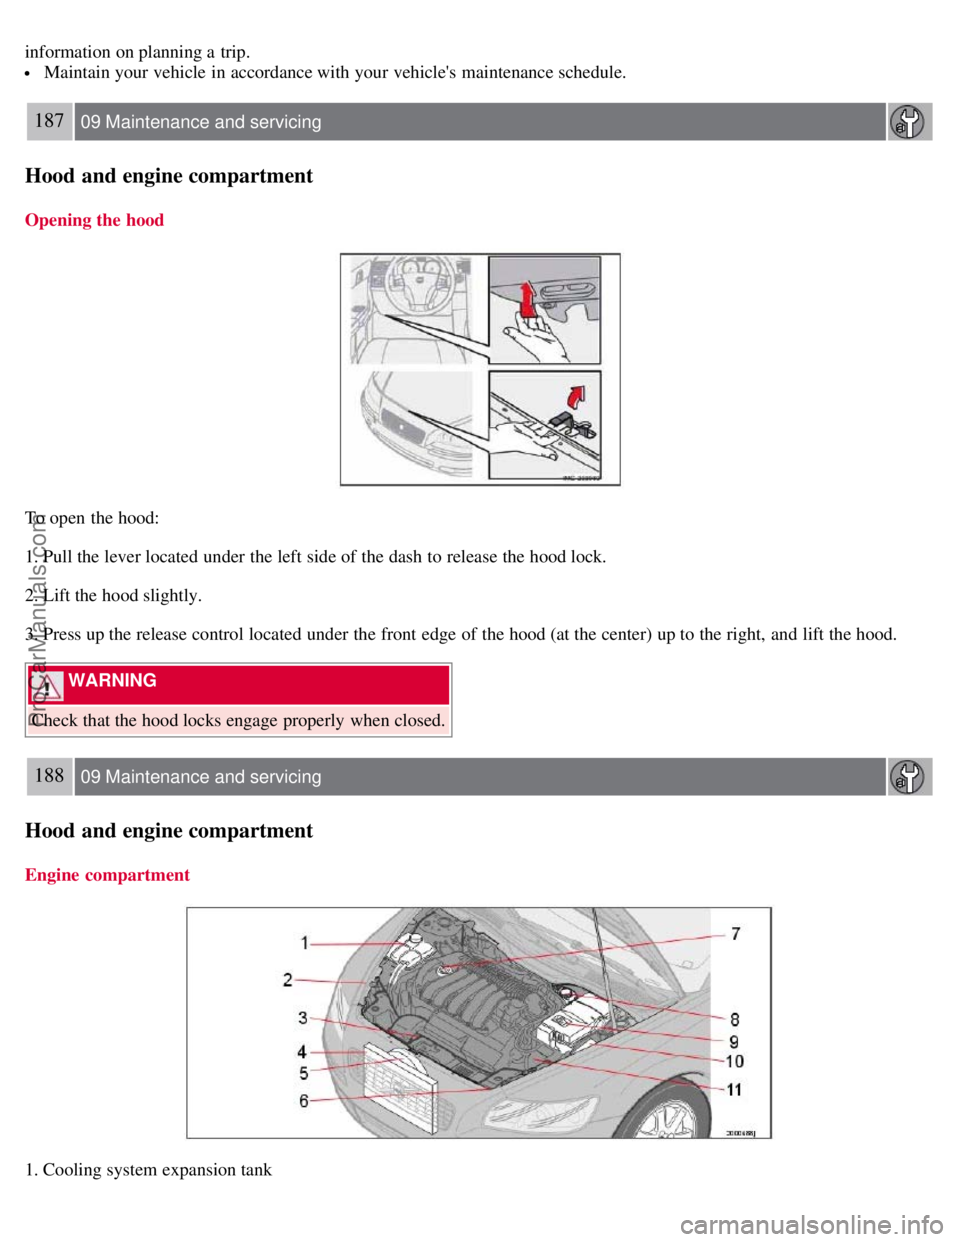
To open the hood:
1. Pull the lever located under the left side of the dash to release the hood lock.
2. Lift the hood slightly.
3. Press up the release control located under the front edge of the hood (at the center) up to the right, and lift the hood.
WARNING
Check that the hood locks engage properly when closed.
188 09 Maintenance and servicing
Hood and engine compartment
Engine compartment
1. Cooling system expansion tank
ProCarManuals.com