ECO mode VOLVO S40 2008 User Guide
[x] Cancel search | Manufacturer: VOLVO, Model Year: 2008, Model line: S40, Model: VOLVO S40 2008Pages: 239, PDF Size: 5.94 MB
Page 118 of 239
Better driving economy may be obtained by thinking ahead, avoiding rapid starts and stops and adjusting the speed of
your vehicle to immediate traffic conditions.
Observe the following rules:
Bring the engine to normal operating temperature as soon as possible by driving with a light foot on the accelerator
pedal for the first few minutes of operation. A cold engine uses more fuel and is subject to increased wear.
Whenever possible, avoid using the vehicle for driving short distances. This does not allow the engine to reach
normal operating temperature.
Drive carefully and avoid rapid acceleration and hard braking.
Use the transmission's Drive ( D) position as often as possible and avoid using kickdown.
Do not exceed posted speed limits.
Avoid carrying unnecessary items (extra load) in the vehicle.
Maintain correct tire pressure. Check tire pressure regularly (when tires are cold).
Remove snow tires when threat of snow or ice has ended.
Note that roof racks, ski racks, etc, increase air resistance and also fuel consumption.
At highway driving speeds, fuel consumption will be lower with the air conditioning on and the windows closed
than with the air conditioning off and the windows open.
Using the onboard trip computer's fuel consumption modes can help you learn how to drive more economically.
Other factors that decrease gas mileage are:
Dirty air cleaner
Dirty engine oil and clogged oil filter
Dragging brakes
Incorrect front end alignment
Some of the above mentioned items and others are checked at the standard maintenance intervals.
Weight distribution affects handling
WARNING
Driving with the trunk open: Driving with the trunk open could lead to poisonous exhaust gases entering the
passenger compartment. If the trunk must be kept open for any reason, proceed as follows:
Close the windows
Set the ventilation system control to air flow to floor, windshield and side windows and the blower control to its
highest setting.
At the specified curb weight your vehicle has a tendency to understeer, which means that the steering wheel has to be
turned more than might seem appropriate for the curvature of a bend. This ensures good stability and reduces the risk
of rear wheel skid. Remember that these properties can alter with the vehicle load. The heavier the load in the cargo
area, the less the tendency to understeer.
Handling, roadholding
Vehicle load, tire design and inflation pressure all affect vehicle handling. Therefore, check that the tires are inflated to
the recommended pressure according to the vehicle load. See the "Tire pressure" section. Loads should be distributed
so that capacity weight
129 06 Starting and driving
General information
ProCarManuals.com
Page 126 of 239
In order to help reduce vehicle theft, make sure the steering wheel lock is engaged before leaving the vehicle.
3Vehicles with optional keyless drive: Turn the start control to position 0, turn the wheel slightly to release the pressure, and turn the start control
to position III to start the vehicle.
136 06 Starting and driving
Starting the vehicle
WARNING
Never switch off the ignition (turn the ignition key or start control to position 0) or remove the key or start control
from the ignition switch while the vehicle is in motion. This could cause the steering wheel to lock, which would
make the vehicle impossible to steer.
To start the engine
1. Fasten the seat belt.
WARNING
Before starting, check that the seat, steering wheel and mirrors are adjusted properly. Make sure the brake pedal can
be depressed completely. Adjust the seat if necessary.
2. Apply the parking brake if not already set. The gear selector should be locked in the Park ( P) position (Shiftlock).
See also page 145
.
Manual transmission: the clutch must be fully depressed.
3. The vehicle is equipped with an autostart feature. Without touching the throttle pedal, turn the key to position III
and release it. The starter motor will then operate automatically (for up to ten seconds) until the engine starts. If the
engine fails to start, repeat this step.
NOTE
After a cold start, idle speed may be noticeably higher than normal for a short period. This is done to help bring
components in the emission control system to their normal operating temperature as quickly as possible, which
enables them to control emissions and help reduce the vehicle's impact on the environment.
4. To release the gear selector from the Park ( P) position, the engine must be running (or the ignition key must be in
position II) and the brake pedal must be depressed.
5. Select the desired gear. On models with an automatic transmission, the gear engages after a very slight delay which
is especially noticeable when selecting R.
NOTE
Immobilizer : If two of the keys to your vehicle are close together, e.g., on the same key ring when you try to start
the vehicle, this could cause interference in the immobilizer system and result in the vehicle not starting. If this
should occur, remove one of the keys from the key ring before trying to start the vehicle again.
Keylock: Models equipped an automatic transmission have a keylock system. When the engine is switched off, the
gear selector must be in the Park ( P) position before the key can be removed from the ignition switch1.
ProCarManuals.com
Page 128 of 239
Keyless drive makes it possible to unlock, start and lock the vehicle without using a remote control.
A start control is fitted in the ignition switch on vehicles equipped with the optional keyless drive. This control is used
in the same way as the ignition key to start the engine. See also page 136
for general information on starting the
engine.
NOTE
A keyless drive remote control must be in the passenger's compartment or in the trunk/cargo area in order to start the
engine.
1. Press the brake pedal (the clutch pedal must also be fully depressed on models with a manual transmission).
2. Press in the keyless drive start control and turn it to position III.
NOTE
The vehicle is equipped with an autostart function that makes it possible to start the engine without holding the start
control in position III. Turn the start control to position III and release it. The starter motor will then operate
automatically (for up to ten seconds) until the engine starts.
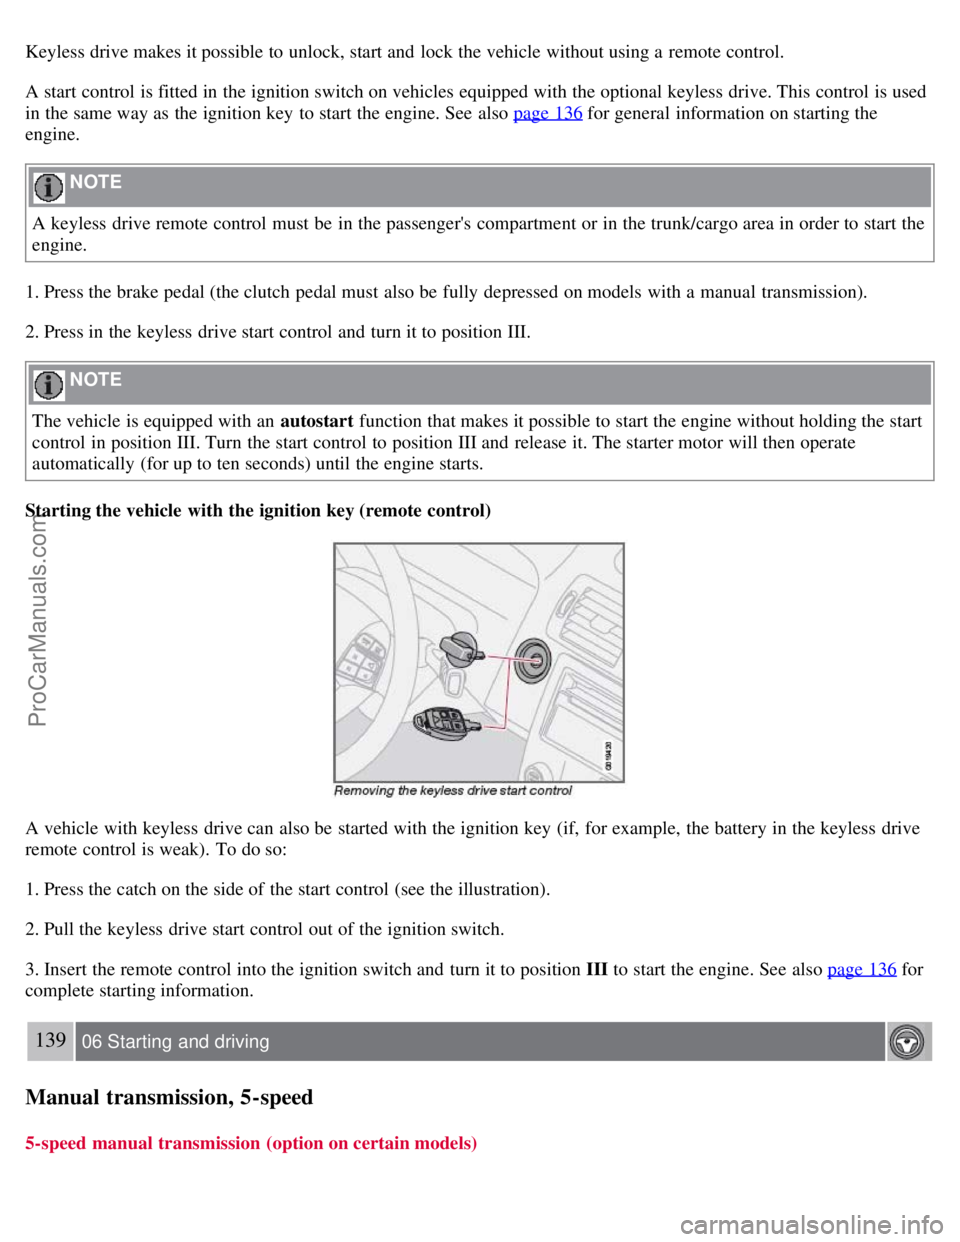
Starting the vehicle with the ignition key (remote control)
A vehicle with keyless drive can also be started with the ignition key (if, for example, the battery in the keyless drive
remote control is weak). To do so:
1. Press the catch on the side of the start control (see the illustration).
2. Pull the keyless drive start control out of the ignition switch.
3. Insert the remote control into the ignition switch and turn it to position III to start the engine. See also page 136
for
complete starting information.
139 06 Starting and driving
Manual transmission, 5-speed
5-speed manual transmission (option on certain models)
ProCarManuals.com
Page 130 of 239
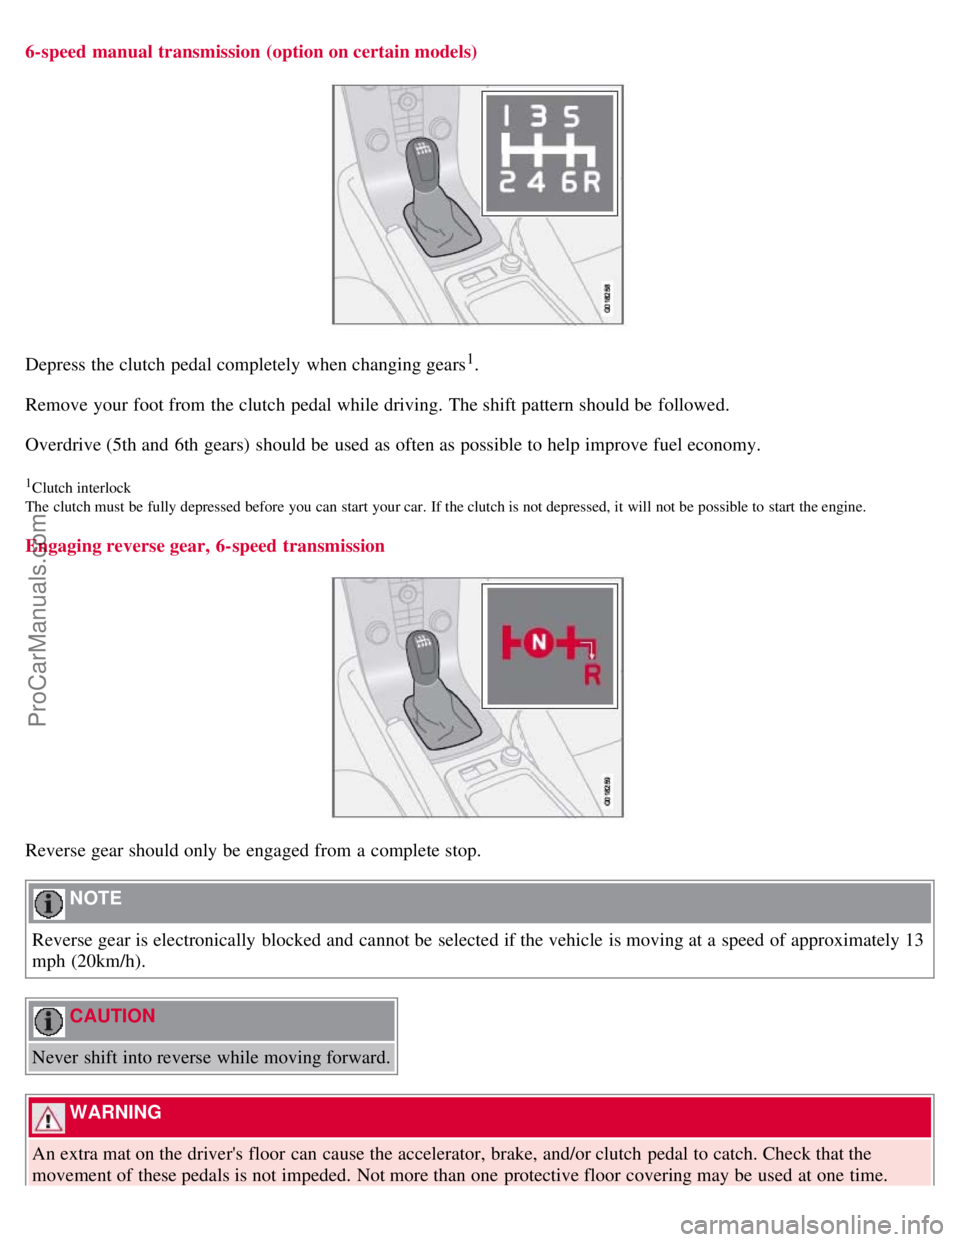
6-speed manual transmission (option on certain models)
Depress the clutch pedal completely when changing gears1.
Remove your foot from the clutch pedal while driving. The shift pattern should be followed.
Overdrive (5th and 6th gears) should be used as often as possible to help improve fuel economy.
1Clutch interlock
The clutch must be fully depressed before you can start your car. If the clutch is not depressed, it will not be possible to start the engine.
Engaging reverse gear, 6-speed transmission
Reverse gear should only be engaged from a complete stop.
NOTE
Reverse gear is electronically blocked and cannot be selected if the vehicle is moving at a speed of approximately 13
mph (20km/h).
CAUTION
Never shift into reverse while moving forward.
WARNING
An extra mat on the driver's floor can cause the accelerator, brake, and/or clutch pedal to catch. Check that the
movement of these pedals is not impeded. Not more than one protective floor covering may be used at one time.
ProCarManuals.com
Page 132 of 239
N - Neutral
N is the neutral position. The engine can be started, but no gear is selected. Apply the
142 06 Starting and driving
Automatic transmission
parking brake when the car is stationary with the gear selector in N .
NOTE
If the gear selector is in the Neutral position and the vehicle has been at a standstill for at least 3 seconds, the brake
pedal must be pressed before the gear selector can be moved to another position.
In order to move the gear selector to another position:
1. Turn the ignition key to position II (if the engine is not already running).
2. Depress the brake pedal.
3. Move the gear selector to the desired position.
D - Drive
D is the normal driving position. The Drive position offers 5 forward gears
1. The car automatically shifts between the
various forward gears, based on the level of acceleration and speed. The car must be at a standstill when shifting to
position D from position R .
1T5 models have 6 forward gears.
Manual shifting - Geartronic
The manual shifting mode (Geartronic) can be selected at any time to manually select forward gears, including while
the car is moving.
NOTE
Reverse, Neutral, and Park cannot be selected in Geartronic mode.
To access the ( M)anual shifting position from Drive ( D), move the gear selector to the right to M.
To return to the ( D)rive position from M , move the gear selector to the left.
While driving
If you select the M position while driving, the gear that was being used in the Drive position will also initially be
selected in the M position.
Move the gear selector forward (toward "+") to shift to a higher gear or rearward (toward "-") to shift to a lower
gear.
If you hold the gear selector toward "-", the transmission will downshift one gear at a time and will utilize the
braking power of the engine. If the current speed is too high for using a lower gear, the downshift will not occur until
the speed has decreased enough to allow the lower gear to be used.
If you slow to a very low speed, the transmission will automatically shift down.
ProCarManuals.com
Page 138 of 239
Spin control (SC)
The spin control function is designed to help prevent the drive wheels from spinning while the vehicle is accelerating.
Under certain circumstances, such as when driving with snow chains, or driving in deep snow or loose sand, it may be
advisable to temporarily switch off this function for maximum tractive force
1.
1Models equipped with All Wheel Drive (AWD) have an integrated traction control function that cannot be disabled. DSTC is optional on AWD
models.
Temporarily switching off Spin control
1. Turn the thumbwheel (A) on the left-side steering wheel lever until the STC/DSTC menu is displayed.
2. Hold down the RESET button (B) to toggle between STC/DSTC SPIN CONTROL ON or OFF.
NOTE
The message STC/DSTC SPIN CONTROL OFF indicates that the stability system's spin control function has
temporarily been switched off.
The stability control indicator light will illuminate and remain on until spin control has been reactivated.
The spin control function is automatically enabled each time the engine is started.
STC/DSTC ON indicates that all system functions are active.
Active yaw control - AYC (DSTC only)
This function helps maintain directional stability, for example when cornering, by braking one or more of the wheels if
the vehicle shows a tendency to skid or slide laterally.
150 06 Starting and driving
Stability system
This is one of the stability system's permanent functions and cannot be switched off.
WARNING
The car's handling and stability characteristics will be altered if the STC/DSTC system functions have been disabled.
STC/DSTC-related messages in the text window
" TRACTION CONTROL TEMPORARILY OFF " - The system has been temporarily switched off due to high brake
temperature and will automatically switch on again when the brakes have cooled.
" ANTI SKID SERVICE REQUIRED " - the system has been automatically disengaged due to a fault. A trained and
qualified Volvo service technician should check the system.
Symbols in the instrument panel
The Stability Control indicator light
This light indicates different conditions, depending on how it illuminates.
The Stability Control indicator light illuminates for approximately 2 seconds
ProCarManuals.com
Page 143 of 239
Do not connect the jumper cable to any part of the fuel system or to any moving parts. Avoid touching hot
manifolds.
Batteries generate hydrogen gas, which is flammable and explosive.
Battery fluid contains sulfuric acid. Do not allow battery fluid to contact eyes, skin, fabrics or painted surfaces. If
contact occurs, flush the affected area immediately with water. Obtain medical help immediately if eyes are affected.
Never expose the battery to open flame or electric spark.
Do not smoke near the battery.
Failure to follow the instructions for jump starting can lead to personal injury.
Do not touch the jumper cables during the attempt to start the vehicle. This could cause sparks.
154 06 Starting and driving
Towing a trailer
General information
Volvo recommends the use of Volvo trailer hitches that are specially designed for the vehicle.
CAUTION
Models equipped with the B5244S7 engine (engine code 39, which is the 6th and 7th digits from the left in your
vehicle's VIN number, see page 249
for the location of the VIN plate), may not be used to tow trailers or vehicles of
any kind. This could cause damage to the vehicle's emission control systems.
Maximum trailer weights recommended by Volvo are:
Trailers without brakes: 1,540 lbs (700 kg).
Trailers with brakes: 2,000 lbs (900 kg) Observe the legal requirements of the state/province in which the vehicles
are registered.
The maximum recommended hitch tongue load is 165 lbs (75 kg).
All Volvo models are equipped with energy-absorbing shock-mounted bumpers. Trailer hitch installation should not
interfere with the proper operation of this bumper system.
Trailer towing does not normally present any particular problems, but take into consideration:
Increase tire pressure to recommended full. See the chapter "Wheels and tires."
When your vehicle is new, avoid towing heavy trailers during the first 620 miles (1,000 km).
Maximum speed when towing a trailer: 50 m.p.h. (80 km/h).
Engine and transmission are subject to increased loads. Therefore, engine coolant temperature should be closely
watched when driving in hot climates or hilly terrain. Use a lower gear and turn off the air conditioner if the
temperature gauge needle enters the red range.
If the automatic transmission begins to overheat, a message will be displayed in the information display.
Avoid overload and other abusive operation.
Hauling a trailer affects handling, durability, and economy.
It is necessary to balance trailer brakes with the towing vehicle brakes to provide a safe stop (check and observe
state/local regulations).
Do not connect the trailer's brake system directly to the vehicle's brake system.
More frequent vehicle maintenance is required.
Remove the ball and drawbar assembly when the hitch is not being used.
Volvo recommends the use of synthetic engine oil when towing a trailer over long distances or in mountainous
areas.
ProCarManuals.com
Page 144 of 239
WARNING
Bumper-attached trailer hitches must not be used on Volvos, nor should safety chains be attached to the bumper.
Trailer hitches attaching to the vehicle's rear axle must not be used.
Never connect a trailer's hydraulic brake system directly to the vehicle brake system, nor a trailer's lighting system
directly to the vehicle lighting system. Consult your nearest trained and qualified Volvo service technician for correct
installation.
When towing a trailer, the trailer's safety wire must be correctly fastened to the hole or hook provided in the
trailer hitch on the vehicle. The safety wire should never be fastened to or wound around the drawbar ball.
155 06 Starting and driving
Towing a trailer
NOTE
When parking the vehicle with a trailer on a hill, apply the parking brake before putting the gear selector in Park
( P ) or in reverse on models with a manual transmission. Always follow the trailer manufacturer's recommendations
for wheel chocking.
If you use the manual (Geartronic) shift positions while towing a trailer, or if the vehicle is equipped with a
manual transmission, make sure the gear you select does not put too much strain on the engine (using too high a
gear).
The drawbar assembly/trailer hitch may be rated for trailers heavier than the vehicle is designed to tow. Please
adhere to Volvo's recommended trailer weights.
Avoid driving with a trailer on inclines exceeding 15%.
156 06 Starting and driving
Detachable trailer hitch
Installing the ball holder
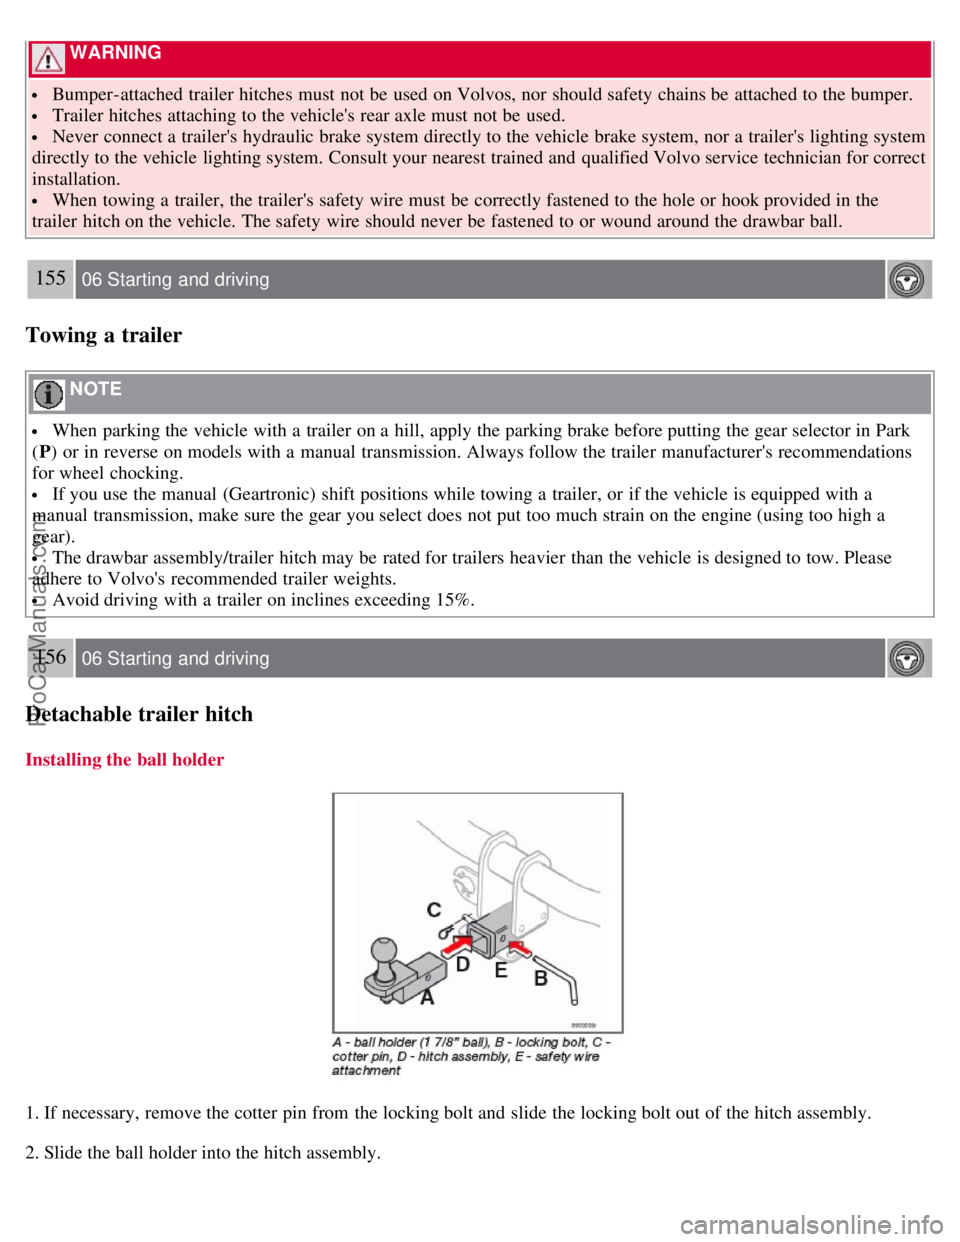
1. If necessary, remove the cotter pin from the locking bolt and slide the locking bolt out of the hitch assembly.
2. Slide the ball holder into the hitch assembly.
ProCarManuals.com
Page 154 of 239
2 0 0 8
VOLVO S40
166 07 Wheels and tires
General information 168
Tire inflation170
Tire designations174
Glossary of tire terminology176
Vehicle loading177
Uniform tire quality gradings179
Snow chains, snow tires, studded tires180
Temporary spare181
Wheel nuts182
Tire rotation183
Changing a wheel184
Tire Pressure Monitoring System (TPMS)187
167 07 Wheels and tires
168 07 Wheels and tires
General information
Your vehicle is equipped with tires according to the vehicle's tire information placard on the B-pillar (the structural
member at the side of the vehicle, at the rear of the driver's door opening), or on the inside of the fuel filler door on
Canadian models.
The tires have good road holding characteristics and offer good handling on dry and wet surfaces. It should be noted
however that the tires have been developed to give these features on snow/ice-free surfaces.
Certain models are equipped with "all-season" tires, which provide a somewhat higher degree of road holding on
slippery surfaces than tires without the "all-season" rating. However, for optimum road holding on icy or snow-
covered roads, we recommend suitable winter tires on all four wheels.
ProCarManuals.com
Page 158 of 239
If checking tire pressure when the tire is hot, never "bleed" or reduce air pressure. The tires are hot from driving and it
is normal for pressures to increase above recommended cold pressures. A hot tire at or below recommended cold
inflation pressure could be significantly under-inflated.
To check inflation pressure:
1. Remove the cap from the valve on one tire, then firmly press the tire gauge onto the valve.
2. Add air to reach the recommended air pressure
3. Replace the valve cap.
4. Repeat this procedure for each tire, including the spare.
5. Visually inspect the tires to make sure there are no nails or other objects embedded that could puncture the tire and
cause an air leak.
6. Check the sidewalls to make sure there are no gouges, cuts, bulges or other irregularities.
NOTE
If you overfill the tire, release air by pushing on the metal stem in the center of the valve. Then recheck the
pressure with your tire gauge.
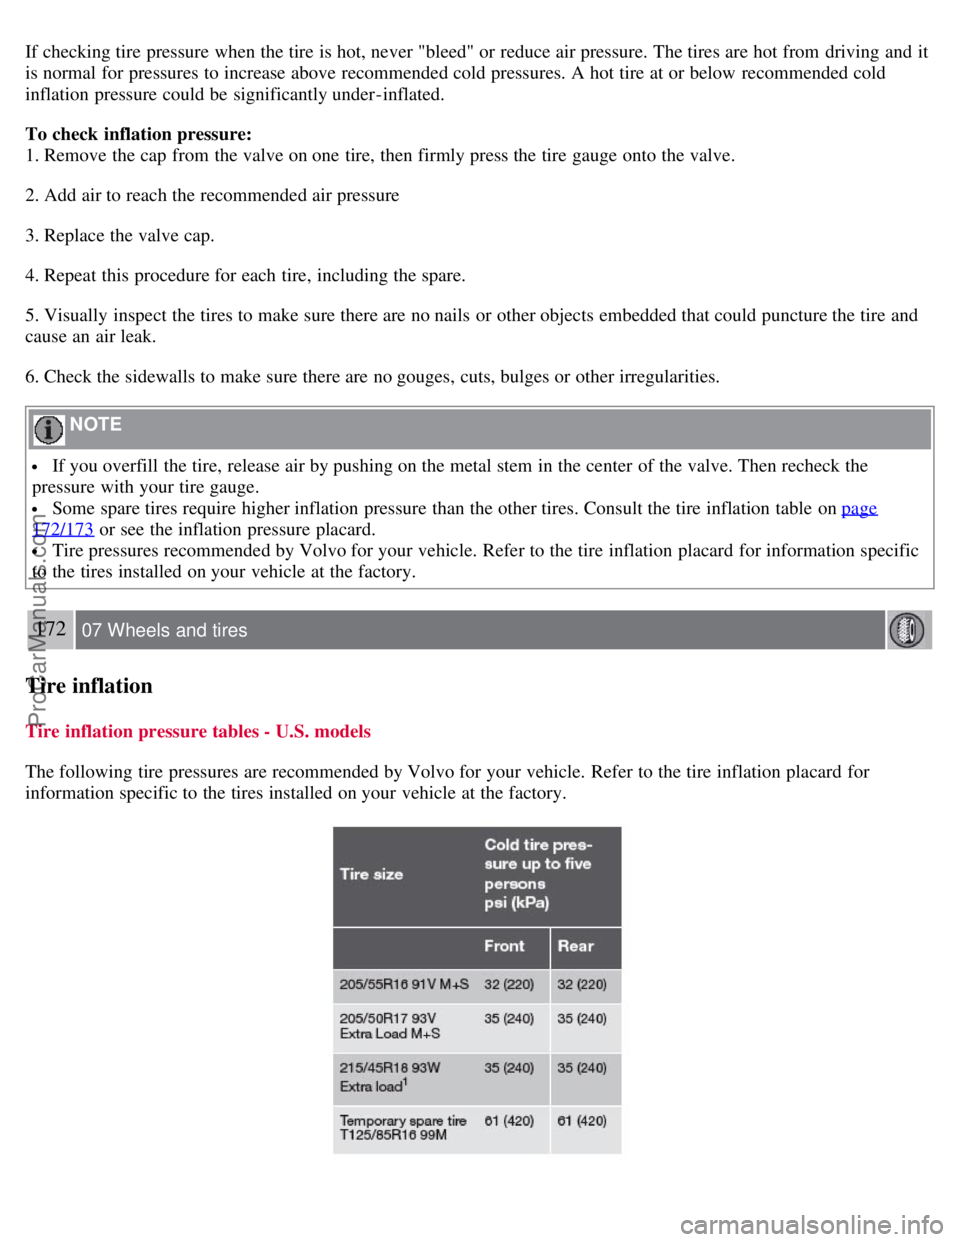
Some spare tires require higher inflation pressure than the other tires. Consult the tire inflation table on page
172/173 or see the inflation pressure placard.
Tire pressures recommended by Volvo for your vehicle. Refer to the tire inflation placard for information specific
to the tires installed on your vehicle at the factory.
172 07 Wheels and tires
Tire inflation
Tire inflation pressure tables - U.S. models
The following tire pressures are recommended by Volvo for your vehicle. Refer to the tire inflation placard for
information specific to the tires installed on your vehicle at the factory.
ProCarManuals.com