turn signal VOLVO S40 2008 User Guide
[x] Cancel search | Manufacturer: VOLVO, Model Year: 2008, Model line: S40, Model: VOLVO S40 2008Pages: 239, PDF Size: 5.94 MB
Page 114 of 239
The alarm system
The alarm is automatically armed whenever the car is locked with the remote control, or if a front lock button is
depressed.
When armed, the alarm continuously monitors a number of points on the car. The following conditions will trigger the
alarm:
The hood is forced open.
The trunk is forced open.
A door is forced open.
The ignition switch is tampered with
An attempt is made to start the car with a non-approved key (a key not coded to the car's ignition).
If there is movement in the passenger compartment (if the car is equipped with the optional movement sensor).
The car is lifted or towed (if the car is equipped with the optional inclination sensor)
The battery is disconnected (while the alarm is armed).
The siren is disconnected when the alarm is disarmed.
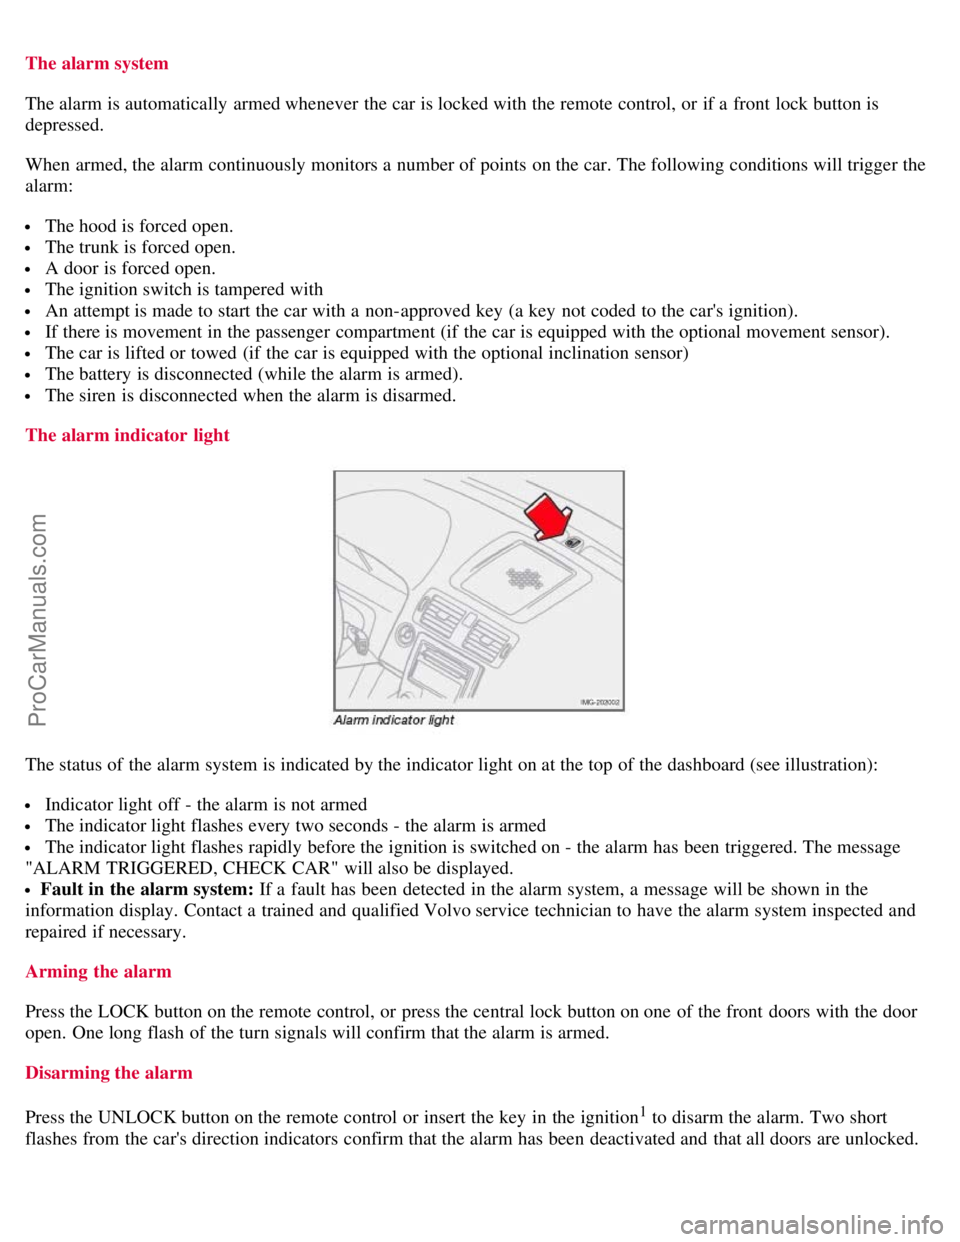
The alarm indicator light
The status of the alarm system is indicated by the indicator light on at the top of the dashboard (see illustration):
Indicator light off - the alarm is not armed
The indicator light flashes every two seconds - the alarm is armed
The indicator light flashes rapidly before the ignition is switched on - the alarm has been triggered. The message
"ALARM TRIGGERED, CHECK CAR" will also be displayed.
Fault in the alarm system: If a fault has been detected in the alarm system, a message will be shown in the
information display. Contact a trained and qualified Volvo service technician to have the alarm system inspected and
repaired if necessary.
Arming the alarm
Press the LOCK button on the remote control, or press the central lock button on one of the front doors with the door
open. One long flash of the turn signals will confirm that the alarm is armed.
Disarming the alarm
Press the UNLOCK button on the remote control or insert the key in the ignition
1 to disarm the alarm. Two short
flashes from the car's direction indicators confirm that the alarm has been deactivated and that all doors are unlocked.
ProCarManuals.com
Page 115 of 239
Turning off (stopping) the alarm
If the alarm is sounding, it can be stopped by pressing the UNLOCK button on the remote control or by inserting the
key in the ignition
1On vehicles with the optional keyless drive, press in the start control in the ignition switch.
125 05 Locks and alarm
Alarm
switch. The driver's door must first be unlocked with the key blade.
NOTE
On vehicles equipped with the optional keyless drive, the start control must be removed from the ignition switch
before the key can be inserted. See page 138
for instructions.
Audible/visual alarm signal
An audible alarm signal is given by a battery powered siren. The alarm cycle lasts for 30 seconds.
NOTE
The visual alarm signal is given by flashing all turn signals and turning on the interior lighting for approximately 5
minutes.
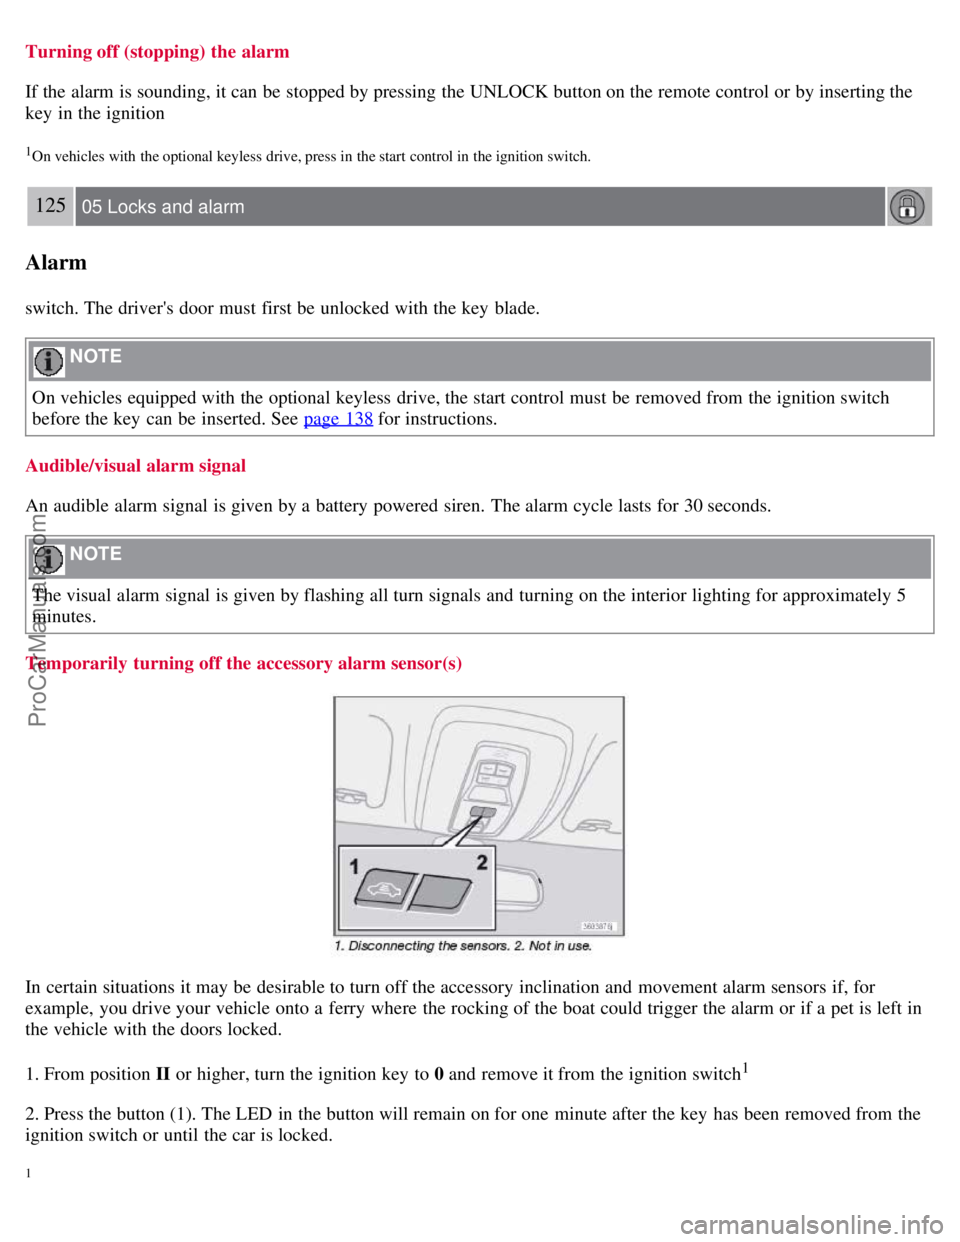
Temporarily turning off the accessory alarm sensor(s)
In certain situations it may be desirable to turn off the accessory inclination and movement alarm sensors if, for
example, you drive your vehicle onto a ferry where the rocking of the boat could trigger the alarm or if a pet is left in
the vehicle with the doors locked.
1. From position II or higher, turn the ignition key to 0 and remove it from the ignition switch
1
2. Press the button (1). The LED in the button will remain on for one minute after the key has been removed from the
ignition switch or until the car is locked.
1
ProCarManuals.com
Page 133 of 239
Cold starts (turbo engines)
When driving before the engine has reached its normal operating temperature, the transmission will shift up at slightly
higher engine speeds to heat the three-way catalytic converter as quickly as possible.
143 06 Starting and driving
Automatic transmission
Kickdown
Automatic shift to a lower gear (kickdown) is achieved by depressing the accelerator pedal fully and briskly. An
upshift will occur when approaching the top speed for a particular gear or by releasing the accelerator pedal slightly.
Kickdown can be used for maximum acceleration or when passing at highway speeds.
Safety function
To help prevent excessive engine speeds (rpm) that could lead to engine damage, the engine management system
includes a function that prevents kickdown from taking place if the engine speed is too high.
Kickdown will not occur if the driver attempts to use this function when engine speeds are too high. The transmission
will remain in the currently selected gear.
144 06 Starting and driving
Automatic transmission
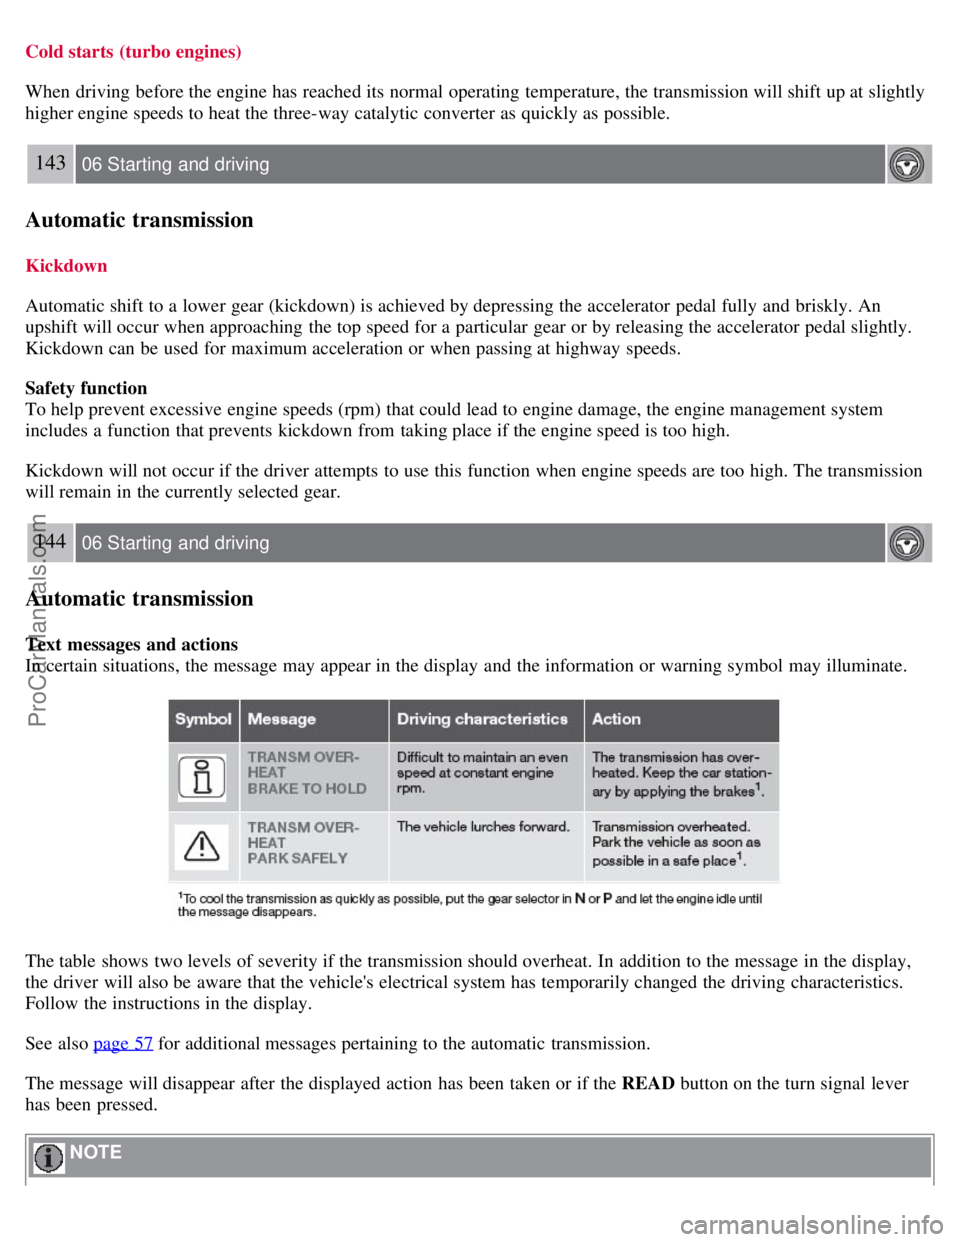
Text messages and actions
In certain situations, the message may appear in the display and the information or warning symbol may illuminate.
The table shows two levels of severity if the transmission should overheat. In addition to the message in the display,
the driver will also be aware that the vehicle's electrical system has temporarily changed the driving characteristics.
Follow the instructions in the display.
See also page 57
for additional messages pertaining to the automatic transmission.
The message will disappear after the displayed action has been taken or if the READ button on the turn signal lever
has been pressed.
NOTE
ProCarManuals.com
Page 151 of 239
The system is activated automatically when the vehicle is started. The indicator light in the button in the center console
illuminates.
The front park assist system is active from the time the engine is started until the vehicle exceeds a speed of
approximately 10 mph (15 km/h). It is also active when the vehicle is backing up.
Rear park assist is active when the engine is running and reverse gear has been selected.
Rear park assist
The distance monitored behind the vehicle is approximately 5 ft (1.5 m). The signal comes from the rear speakers.
The system must be deactivated when towing a trailer, carrying bicycles in a rear-mounted carrier, etc, which could
trigger the rear park assist system's sensors.
NOTE
Rear park assist is deactivated automatically when towing a trailer if Volvo genuine trailer wiring is used.
Front park assist
The distance monitored in front of the vehicle is approximately 2.5 ft (0.8 m). The audible signal comes from the audio
system's front speakers.
It may not be possible to combine auxiliary headlights and front park assist since these lights could trigger the system's
sensors.
163 06 Starting and driving
Park assist (option/accessory)
Activating/deactivating park assist
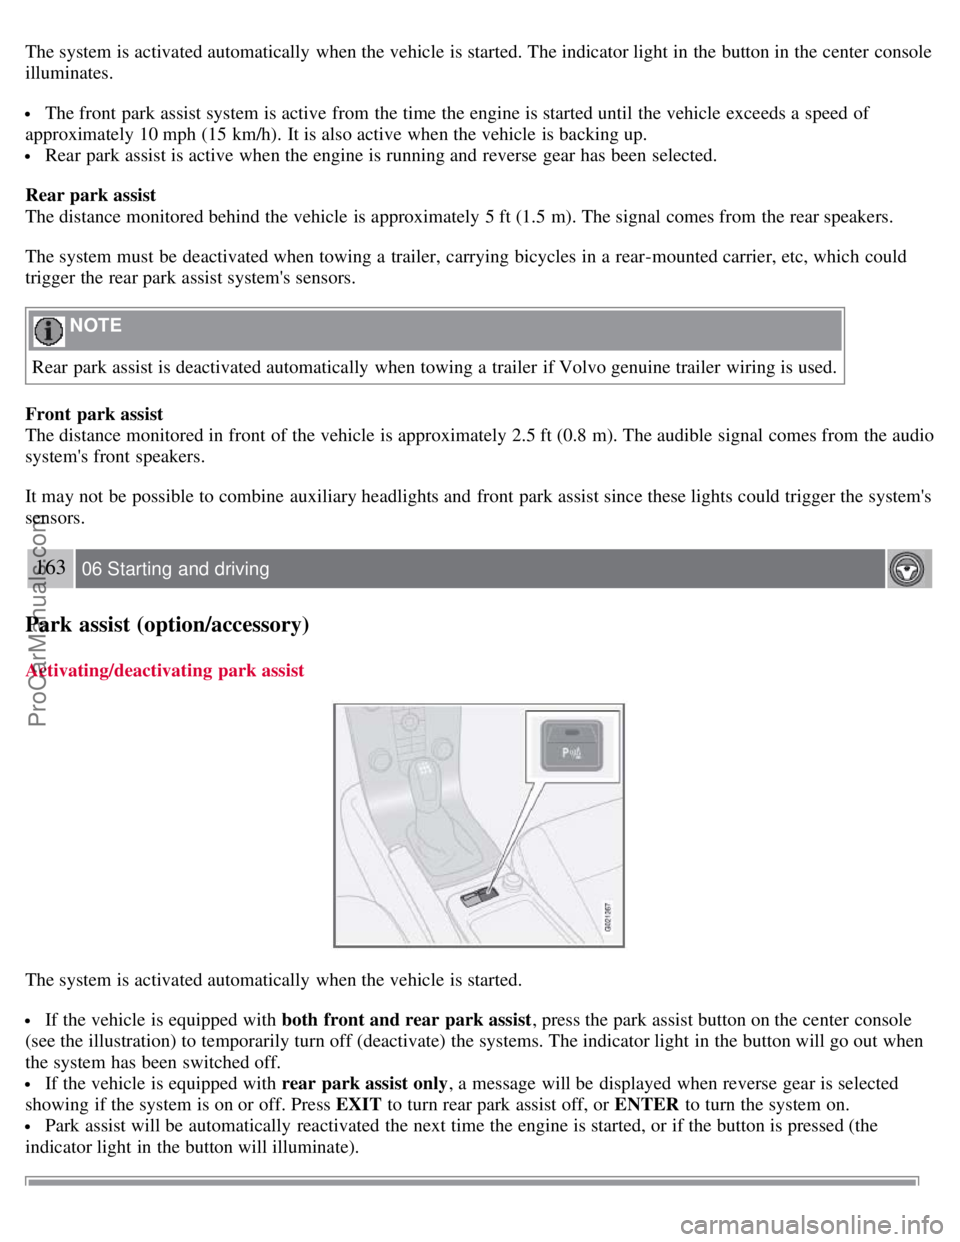
The system is activated automatically when the vehicle is started.
If the vehicle is equipped with both front and rear park assist , press the park assist button on the center console
(see the illustration) to temporarily turn off (deactivate) the systems. The indicator light in the button will go out when
the system has been switched off.
If the vehicle is equipped with rear park assist only , a message will be displayed when reverse gear is selected
showing if the system is on or off. Press EXIT to turn rear park assist off, or ENTER to turn the system on.
Park assist will be automatically reactivated the next time the engine is started, or if the button is pressed (the
indicator light in the button will illuminate).
ProCarManuals.com
Page 191 of 239
4. Connect the positive cable.
5. Connect the ground cable.
6. Reinstall the cover over the battery.
NOTE
Used batteries should be properly disposed of at a recycling station or similar facility, or taken to your Volvo
retailer.
WARNING
Never expose the battery to open flame or electric spark.
Do not smoke near the battery.
Battery fluid contains sulfuric acid. Do not allow battery fluid to contact eyes, skin, fabrics or painted surfaces. If
contact occurs, flush the affected area immediately with water. Obtain medical help immediately if eyes are affected.
211 09 Maintenance and servicing
Replacing bulbs
Introduction
Before replacing bulbs in your vehicle, please keep the following points in mind:
NOTE
Never touch the glass of bulbs with your fingers. Grease and oils from your fingers vaporize in the heat and will
leave a deposit on the reflector, which will damage it.
The optional Bi -Xenon® headlight bulbs contain trace amounts of mercury. These bulbs should always be
disposed of by an authorized Volvo retailer.
Certain bulbs should only be replaced by a trained and qualified Volvo service technician:
- Courtesy (dome) lighting
- Reading lights
- Glove compartment lights
- Turn signals and courtesy lights in the side door mirrors
- High-mounted brake lights
- Bi -Xenon® headlights
- Brake lights
212 09 Maintenance and servicing
Replacing bulbs
Removing the headlight housing
ProCarManuals.com
Page 192 of 239
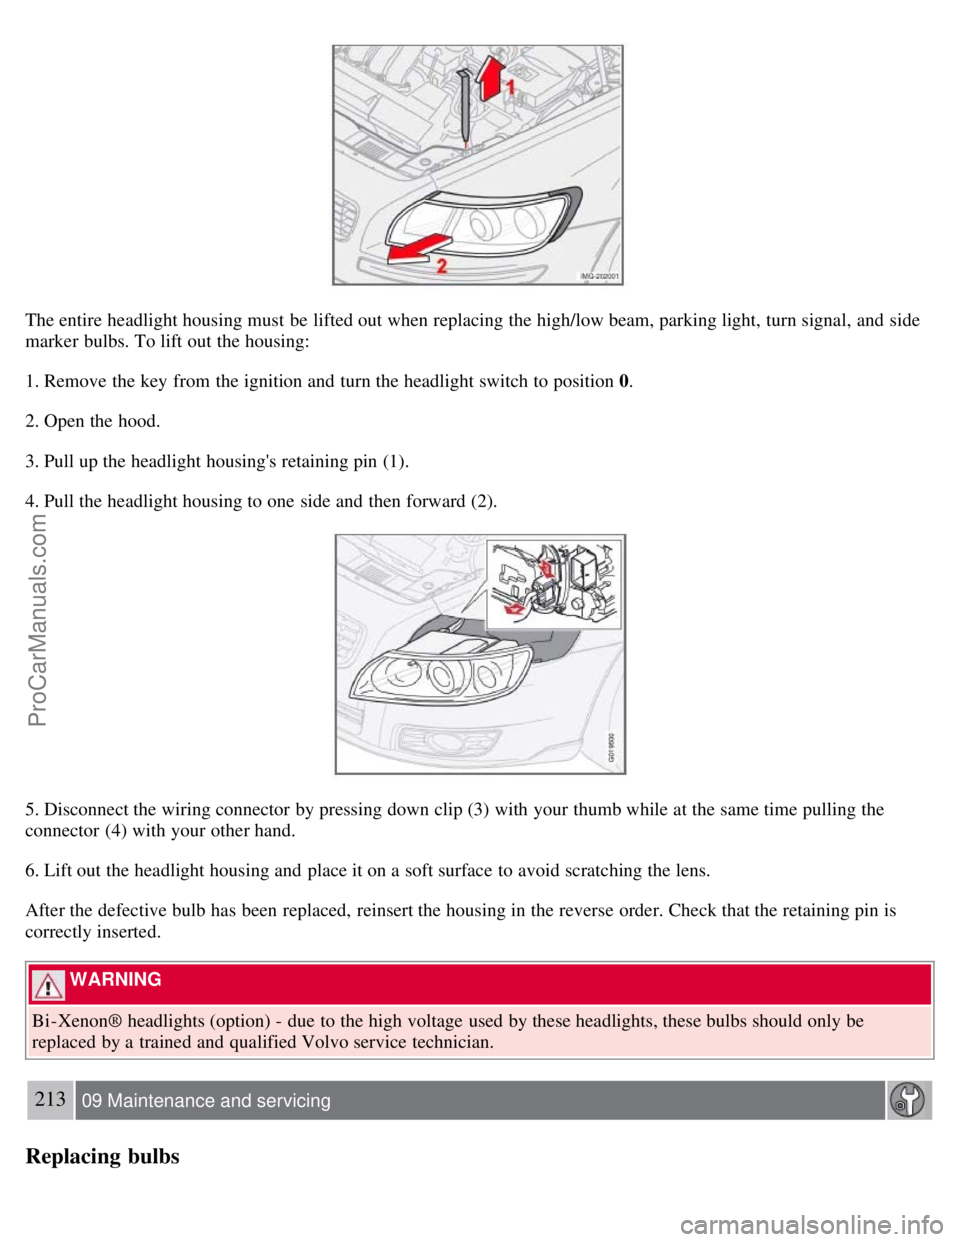
The entire headlight housing must be lifted out when replacing the high/low beam, parking light, turn signal, and side
marker bulbs. To lift out the housing:
1. Remove the key from the ignition and turn the headlight switch to position 0.
2. Open the hood.
3. Pull up the headlight housing's retaining pin (1).
4. Pull the headlight housing to one side and then forward (2).
5. Disconnect the wiring connector by pressing down clip (3) with your thumb while at the same time pulling the
connector (4) with your other hand.
6. Lift out the headlight housing and place it on a soft surface to avoid scratching the lens.
After the defective bulb has been replaced, reinsert the housing in the reverse order. Check that the retaining pin is
correctly inserted.
WARNING
Bi -Xenon® headlights (option) - due to the high voltage used by these headlights, these bulbs should only be
replaced by a trained and qualified Volvo service technician.
213 09 Maintenance and servicing
Replacing bulbs
ProCarManuals.com
Page 195 of 239
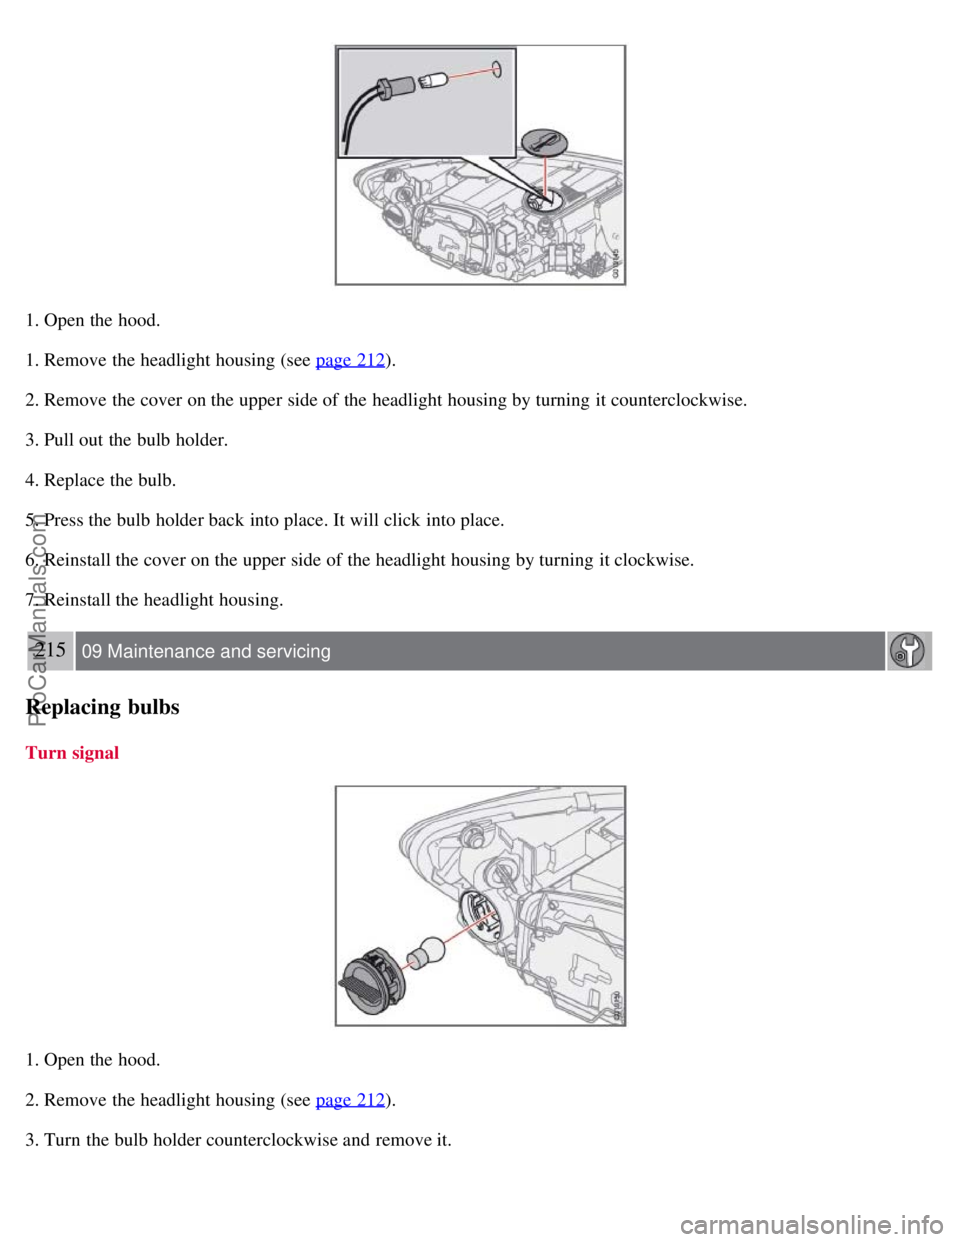
1. Open the hood.
1. Remove the headlight housing (see page 212
).
2. Remove the cover on the upper side of the headlight housing by turning it counterclockwise.
3. Pull out the bulb holder.
4. Replace the bulb.
5. Press the bulb holder back into place. It will click into place.
6. Reinstall the cover on the upper side of the headlight housing by turning it clockwise.
7. Reinstall the headlight housing.
215 09 Maintenance and servicing
Replacing bulbs
Turn signal
1. Open the hood.
2. Remove the headlight housing (see page 212
).
3. Turn the bulb holder counterclockwise and remove it.
ProCarManuals.com
Page 198 of 239
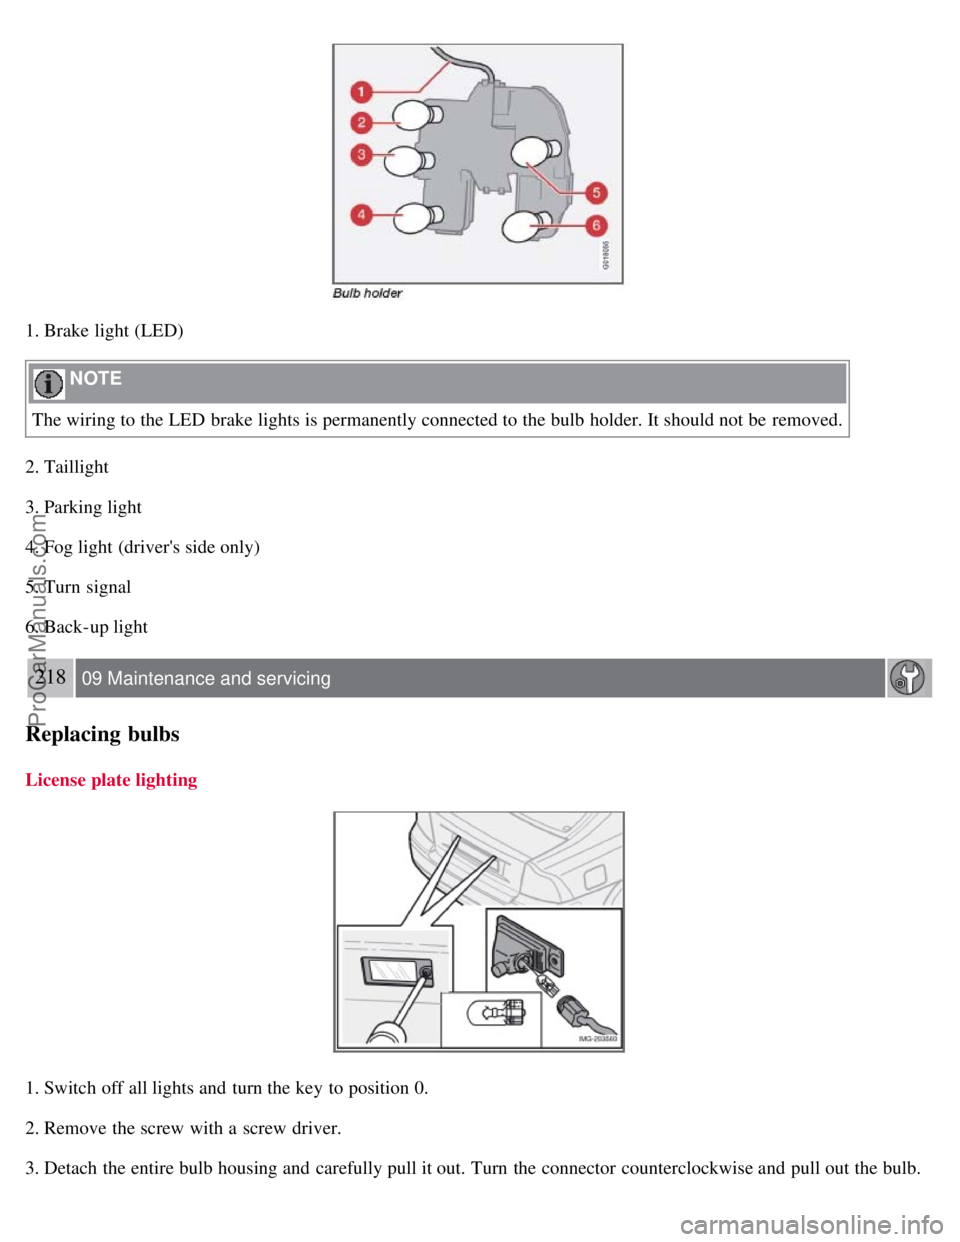
1. Brake light (LED)
NOTE
The wiring to the LED brake lights is permanently connected to the bulb holder. It should not be removed.
2. Taillight
3. Parking light
4. Fog light (driver's side only)
5. Turn signal
6. Back-up light
218 09 Maintenance and servicing
Replacing bulbs
License plate lighting
1. Switch off all lights and turn the key to position 0.
2. Remove the screw with a screw driver.
3. Detach the entire bulb housing and carefully pull it out. Turn the connector counterclockwise and pull out the bulb.
ProCarManuals.com
Page 208 of 239
An auxiliary device, such as an iPOD or a USB flash drive can be connected to the audio system via the connector in
the center console storage compartment.
A sound source must be chosen, depending on the device that has been connected:
1. Use MODE to select iPOD or USB. The text CONNECT DEVICE will be displayed.
2. Connect the device to the connector in the center console storage compartment (see the illustration).
The text LOADING will be displayed while the system indexes the files on the device. This may take a short time.
When indexing has been completed, track information will be displayed, and the desired track can then be selected.
Tracks can be selected in two ways:
Turn the Tuning knob (no. 4 in the illustration on page 230) clockwise or counterclockwise
Use the right or left arrow keys on the navigation control (no. 5 in the illustration on page 235) to select the desired
track. The arrow keys on the steering wheel keypad can also be used in the same way.
NOTE
The system supports playback of files in the most common versions of formats such as mp3, wma, and wav.
However, there may be versions of these formats that the system does not support.
USB flash drive
To simplify the use of a USB flash drive, it is advisable to only store music files on the drive. It will take considerably
longer for the system to index the files on the drive if it contains anything other than compatible music files.
MP3 player
Many mp3 players have a file indexing system that is not supported by the vehicle's audio system. In order to use an
mp3 player, the system must be set to USB Removable device/Mass Storage Device .
iPod
An iPod receives current and its battery is charged through the connecting cord. However, if the iPOD's battery is
completely drained, it should be recharged before the iPOD is connected to the audio system.
NOTE
When an iPOD is used as a sound source, the vehicle's audio system has a menu structure similar to the one in the
iPOD. See the iPOD's manual for detailed information.
For further information, refer to the accessory manual USB/iPOD Music Interface .
Sound settings
Optimal sound reproduction
The audio system is calibrated for optimal sound reproduction through the use of digital signal processing. This
calibration takes into account the speakers, amplifier, cabin
233 10 Audio
Audio functions
ProCarManuals.com
Page 212 of 239
NOTE
A total of 30 stations can be stored; 10 stations each in AM, FM1 and FM2.
Automatically storing a station
Pressing AUTO (7) automatically searches for and stores up to ten strong AM or FM stations in a separate memory. If
more than ten stations are found, the ten strongest ones are stored. This function is especially useful in areas in which
you are not familiar with radio stations or their frequencies.
To use the AUTO function:
1. Select a waveband using the AM/FM button (1).
2. Start the search by pressing AUTO until AUTO STORING appears in the display.
When the search is completed, AUTO STORING will no longer be displayed. If there are no stations with sufficient
signal strength, NO AST FOUND is displayed.
The auto-stored stations can be selected using the preset buttons (2).
Press EXIT (6) to terminate the automatic storing function.
When the radio is in auto-store mode, AUTO is shown in the display. AUTO disappears when you return to normal
radio mode, which can be done by briefly pressing AM/FM (1), EXIT (6), or AUTO (7).
236 10 Audio
Radio functions
To return to the Auto-store mode, press the AUTO button briefly and select a stored station by pressing one of the
preset buttons (2).
Saving auto-stored stations in the preset memory
An auto-stored station can be saved in the memory for manually preset stations.
1. Press AUTO (7) briefly.
2. Auto is displayed.
3. Press one of the preset buttons (2) under which the station is to be stored. Hold down the button until STATION
STORED is displayed.
The radio will then exit auto-store mode and the stored station can be selected by pressing the preset button.
Scanning
SCAN (4) automatically searches through the selected waveband for strong AM or FM stations. When the radio finds a
station, that station will be played for approximately 8 seconds, after which scanning resumes.
Activating/deactivating SCAN
1. Select radio mode using the AM/FM button (2).
2. Press SCAN to activate the function. SCAN is shown in the display.
ProCarManuals.com