VOLVO S40 2008 Owners Manual
Manufacturer: VOLVO, Model Year: 2008, Model line: S40, Model: VOLVO S40 2008Pages: 239, PDF Size: 5.94 MB
Page 191 of 239
4. Connect the positive cable.
5. Connect the ground cable.
6. Reinstall the cover over the battery.
NOTE
Used batteries should be properly disposed of at a recycling station or similar facility, or taken to your Volvo
retailer.
WARNING
Never expose the battery to open flame or electric spark.
Do not smoke near the battery.
Battery fluid contains sulfuric acid. Do not allow battery fluid to contact eyes, skin, fabrics or painted surfaces. If
contact occurs, flush the affected area immediately with water. Obtain medical help immediately if eyes are affected.
211 09 Maintenance and servicing
Replacing bulbs
Introduction
Before replacing bulbs in your vehicle, please keep the following points in mind:
NOTE
Never touch the glass of bulbs with your fingers. Grease and oils from your fingers vaporize in the heat and will
leave a deposit on the reflector, which will damage it.
The optional Bi -Xenon® headlight bulbs contain trace amounts of mercury. These bulbs should always be
disposed of by an authorized Volvo retailer.
Certain bulbs should only be replaced by a trained and qualified Volvo service technician:
- Courtesy (dome) lighting
- Reading lights
- Glove compartment lights
- Turn signals and courtesy lights in the side door mirrors
- High-mounted brake lights
- Bi -Xenon® headlights
- Brake lights
212 09 Maintenance and servicing
Replacing bulbs
Removing the headlight housing
ProCarManuals.com
Page 192 of 239
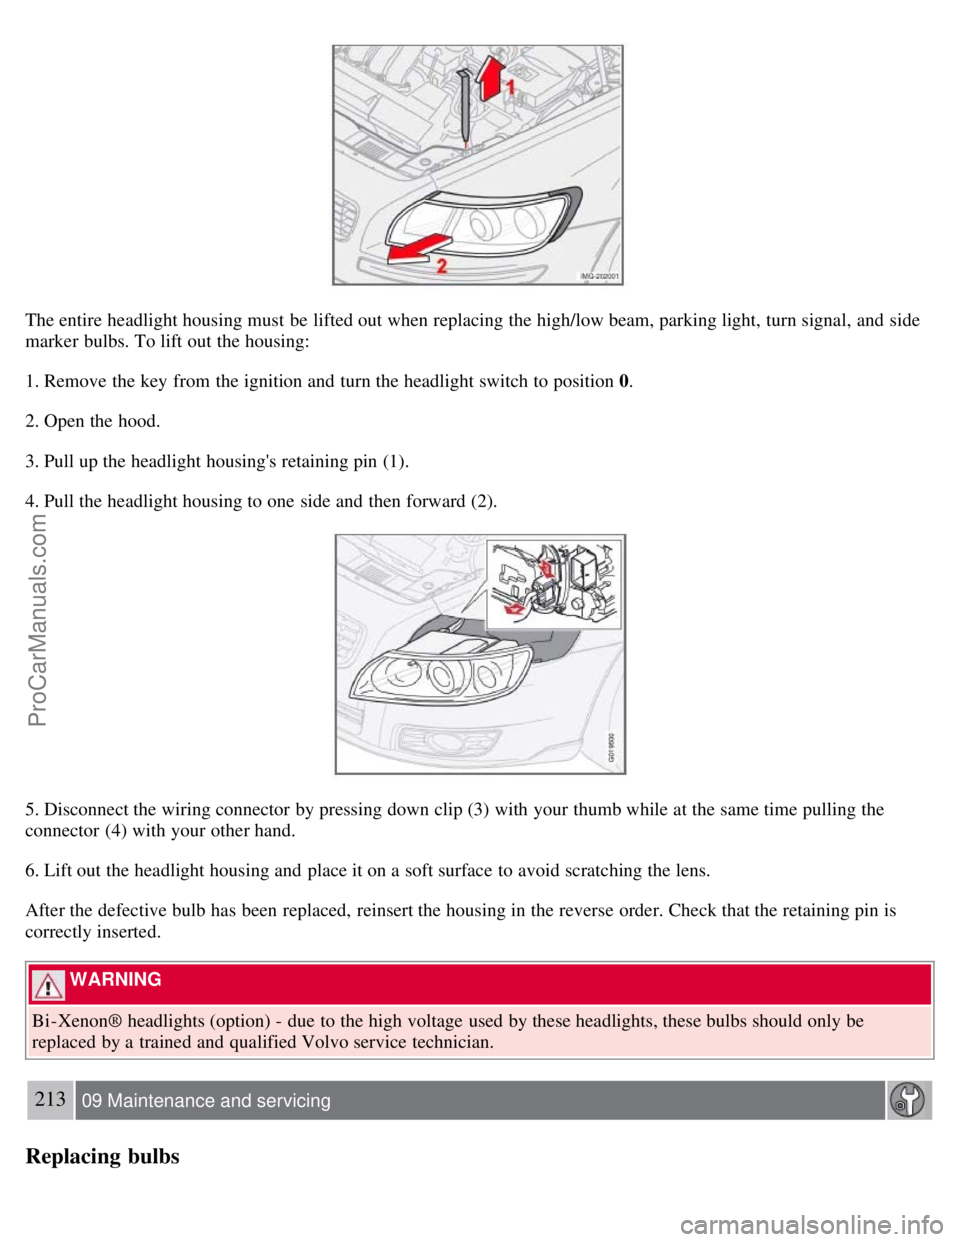
The entire headlight housing must be lifted out when replacing the high/low beam, parking light, turn signal, and side
marker bulbs. To lift out the housing:
1. Remove the key from the ignition and turn the headlight switch to position 0.
2. Open the hood.
3. Pull up the headlight housing's retaining pin (1).
4. Pull the headlight housing to one side and then forward (2).
5. Disconnect the wiring connector by pressing down clip (3) with your thumb while at the same time pulling the
connector (4) with your other hand.
6. Lift out the headlight housing and place it on a soft surface to avoid scratching the lens.
After the defective bulb has been replaced, reinsert the housing in the reverse order. Check that the retaining pin is
correctly inserted.
WARNING
Bi -Xenon® headlights (option) - due to the high voltage used by these headlights, these bulbs should only be
replaced by a trained and qualified Volvo service technician.
213 09 Maintenance and servicing
Replacing bulbs
ProCarManuals.com
Page 193 of 239
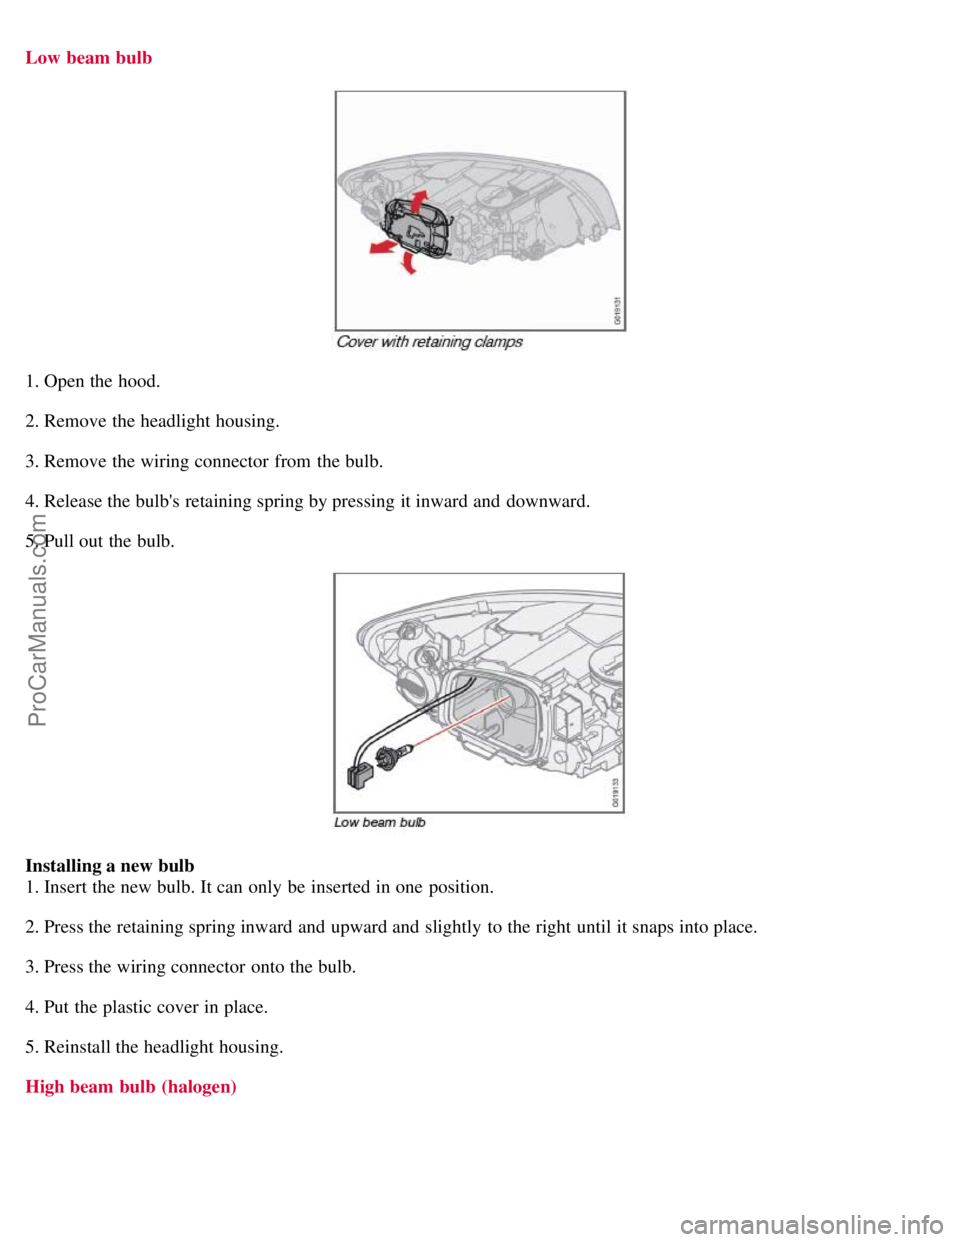
Low beam bulb
1. Open the hood.
2. Remove the headlight housing.
3. Remove the wiring connector from the bulb.
4. Release the bulb's retaining spring by pressing it inward and downward.
5. Pull out the bulb.
Installing a new bulb
1. Insert the new bulb. It can only be inserted in one position.
2. Press the retaining spring inward and upward and slightly to the right until it snaps into place.
3. Press the wiring connector onto the bulb.
4. Put the plastic cover in place.
5. Reinstall the headlight housing.
High beam bulb (halogen)
ProCarManuals.com
Page 194 of 239
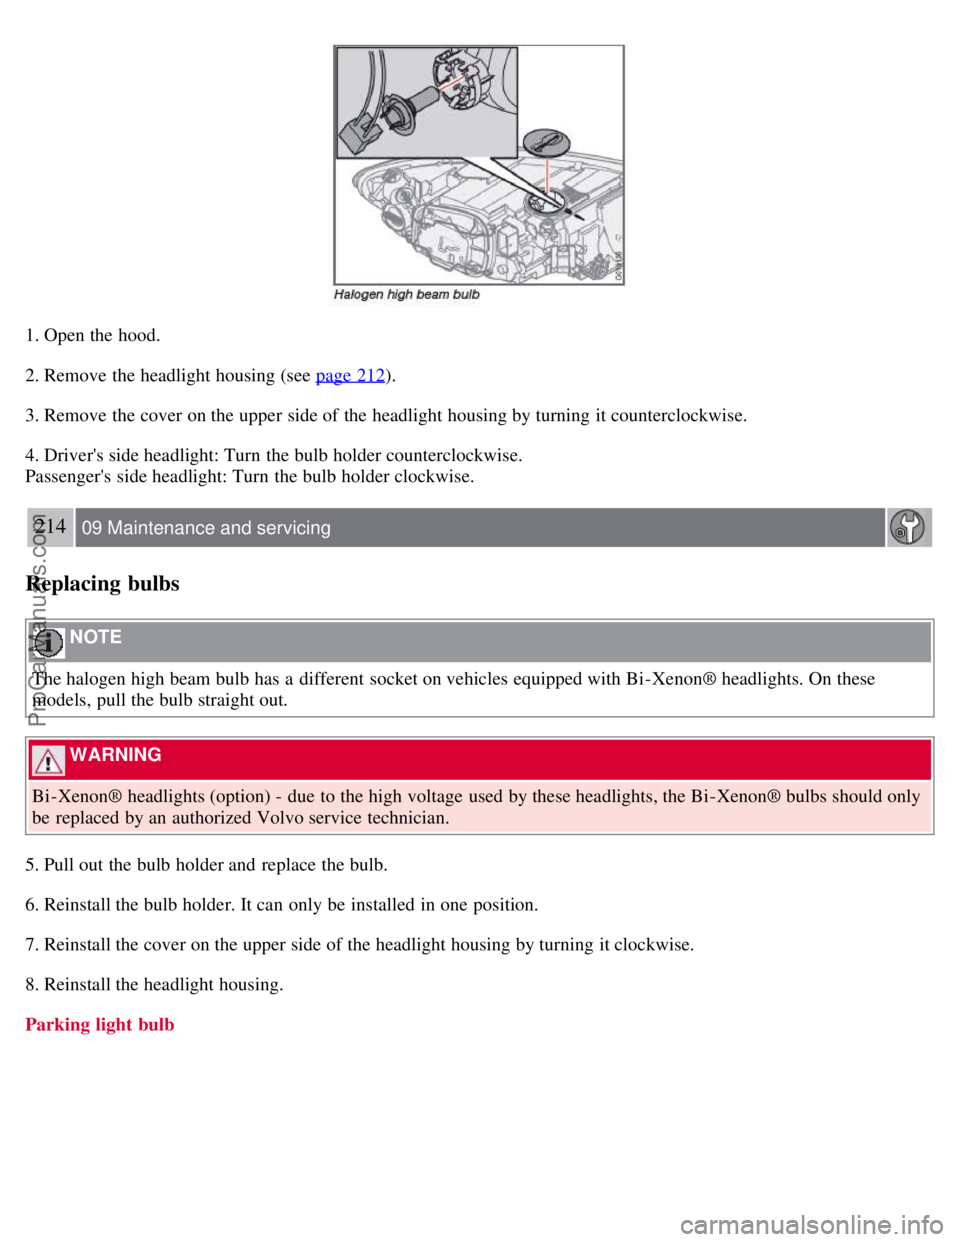
1. Open the hood.
2. Remove the headlight housing (see page 212
).
3. Remove the cover on the upper side of the headlight housing by turning it counterclockwise.
4. Driver's side headlight: Turn the bulb holder counterclockwise.
Passenger's side headlight: Turn the bulb holder clockwise.
214 09 Maintenance and servicing
Replacing bulbs
NOTE
The halogen high beam bulb has a different socket on vehicles equipped with Bi -Xenon® headlights. On these
models, pull the bulb straight out.
WARNING
Bi -Xenon® headlights (option) - due to the high voltage used by these headlights, the Bi -Xenon® bulbs should only
be replaced by an authorized Volvo service technician.
5. Pull out the bulb holder and replace the bulb.
6. Reinstall the bulb holder. It can only be installed in one position.
7. Reinstall the cover on the upper side of the headlight housing by turning it clockwise.
8. Reinstall the headlight housing.
Parking light bulb
ProCarManuals.com
Page 195 of 239
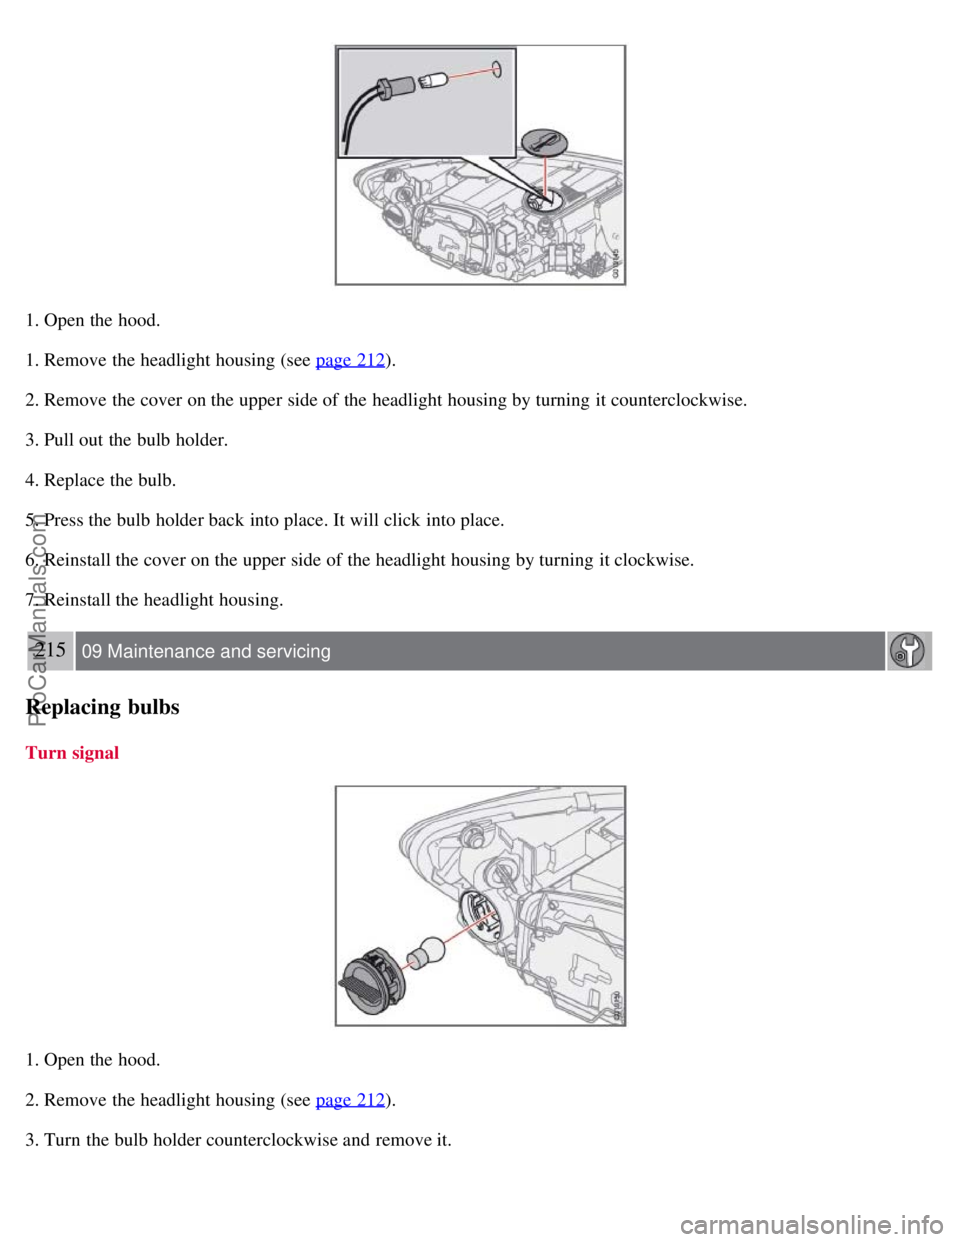
1. Open the hood.
1. Remove the headlight housing (see page 212
).
2. Remove the cover on the upper side of the headlight housing by turning it counterclockwise.
3. Pull out the bulb holder.
4. Replace the bulb.
5. Press the bulb holder back into place. It will click into place.
6. Reinstall the cover on the upper side of the headlight housing by turning it clockwise.
7. Reinstall the headlight housing.
215 09 Maintenance and servicing
Replacing bulbs
Turn signal
1. Open the hood.
2. Remove the headlight housing (see page 212
).
3. Turn the bulb holder counterclockwise and remove it.
ProCarManuals.com
Page 196 of 239
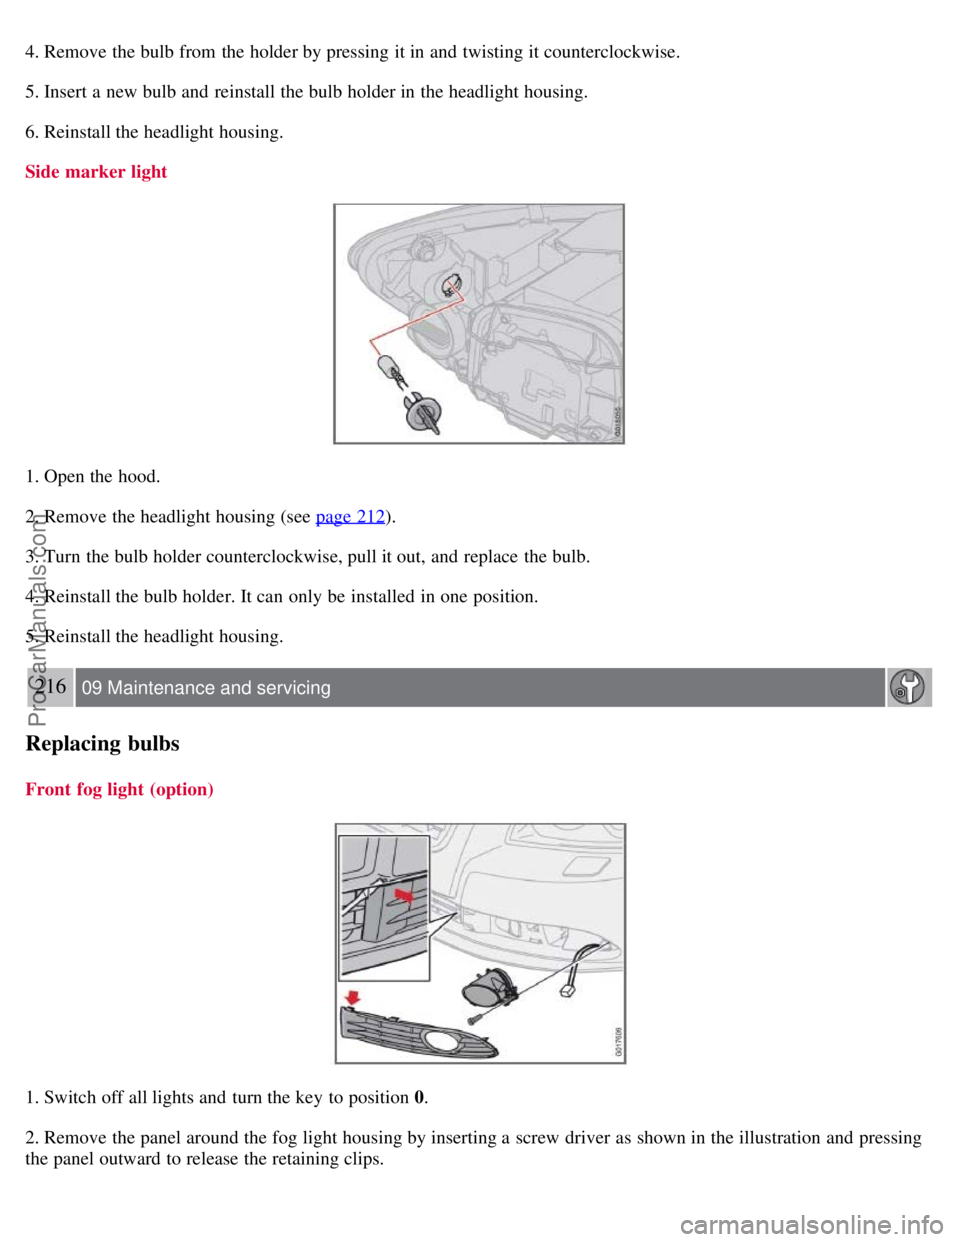
4. Remove the bulb from the holder by pressing it in and twisting it counterclockwise.
5. Insert a new bulb and reinstall the bulb holder in the headlight housing.
6. Reinstall the headlight housing.
Side marker light
1. Open the hood.
2. Remove the headlight housing (see page 212
).
3. Turn the bulb holder counterclockwise, pull it out, and replace the bulb.
4. Reinstall the bulb holder. It can only be installed in one position.
5. Reinstall the headlight housing.
216 09 Maintenance and servicing
Replacing bulbs
Front fog light (option)
1. Switch off all lights and turn the key to position 0.
2. Remove the panel around the fog light housing by inserting a screw driver as shown in the illustration and pressing
the panel outward to release the retaining clips.
ProCarManuals.com
Page 197 of 239
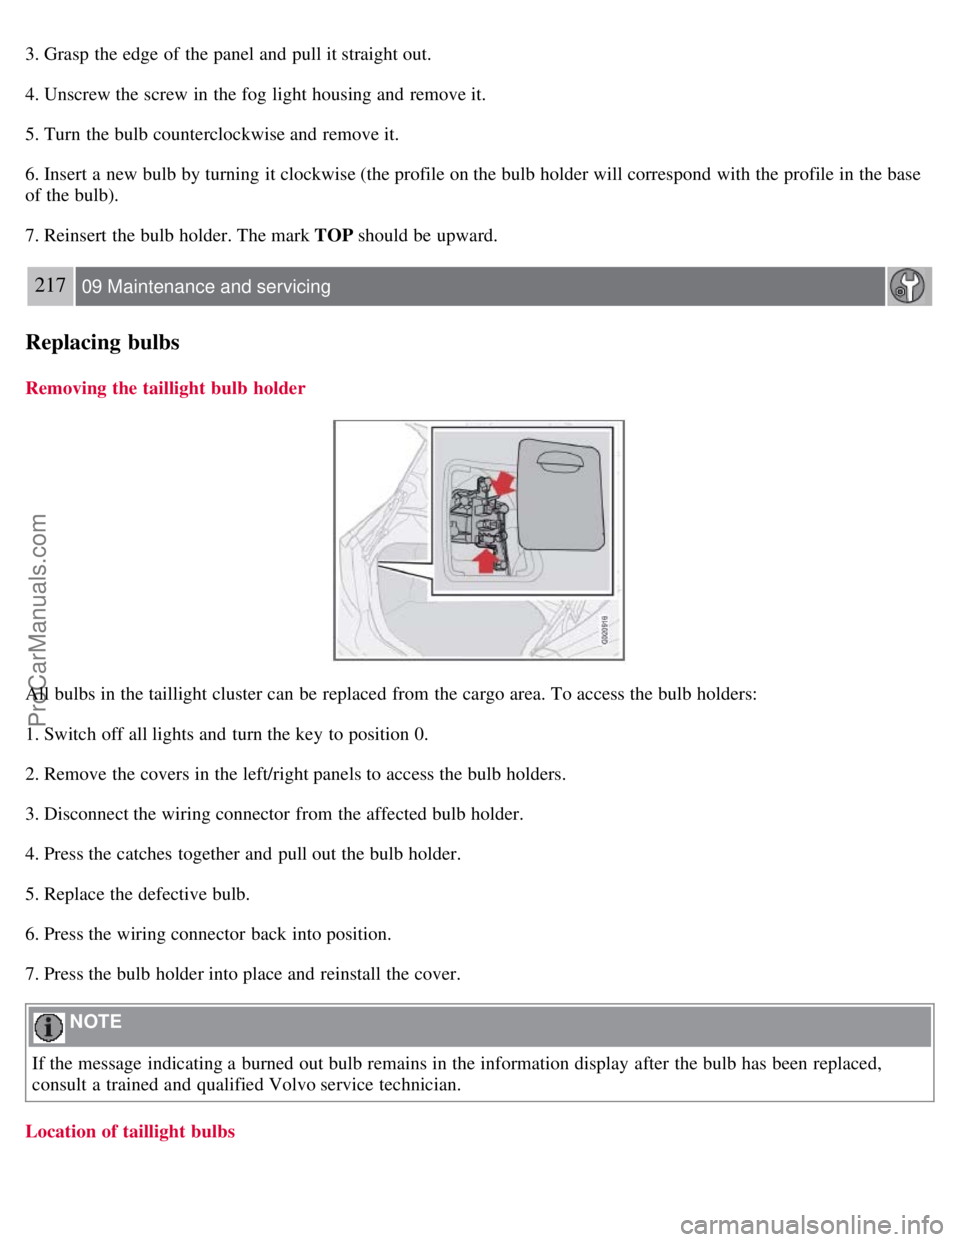
3. Grasp the edge of the panel and pull it straight out.
4. Unscrew the screw in the fog light housing and remove it.
5. Turn the bulb counterclockwise and remove it.
6. Insert a new bulb by turning it clockwise (the profile on the bulb holder will correspond with the profile in the base
of the bulb).
7. Reinsert the bulb holder. The mark TOP should be upward.
217 09 Maintenance and servicing
Replacing bulbs
Removing the taillight bulb holder
All bulbs in the taillight cluster can be replaced from the cargo area. To access the bulb holders:
1. Switch off all lights and turn the key to position 0.
2. Remove the covers in the left/right panels to access the bulb holders.
3. Disconnect the wiring connector from the affected bulb holder.
4. Press the catches together and pull out the bulb holder.
5. Replace the defective bulb.
6. Press the wiring connector back into position.
7. Press the bulb holder into place and reinstall the cover.
NOTE
If the message indicating a burned out bulb remains in the information display after the bulb has been replaced,
consult a trained and qualified Volvo service technician.
Location of taillight bulbs
ProCarManuals.com
Page 198 of 239
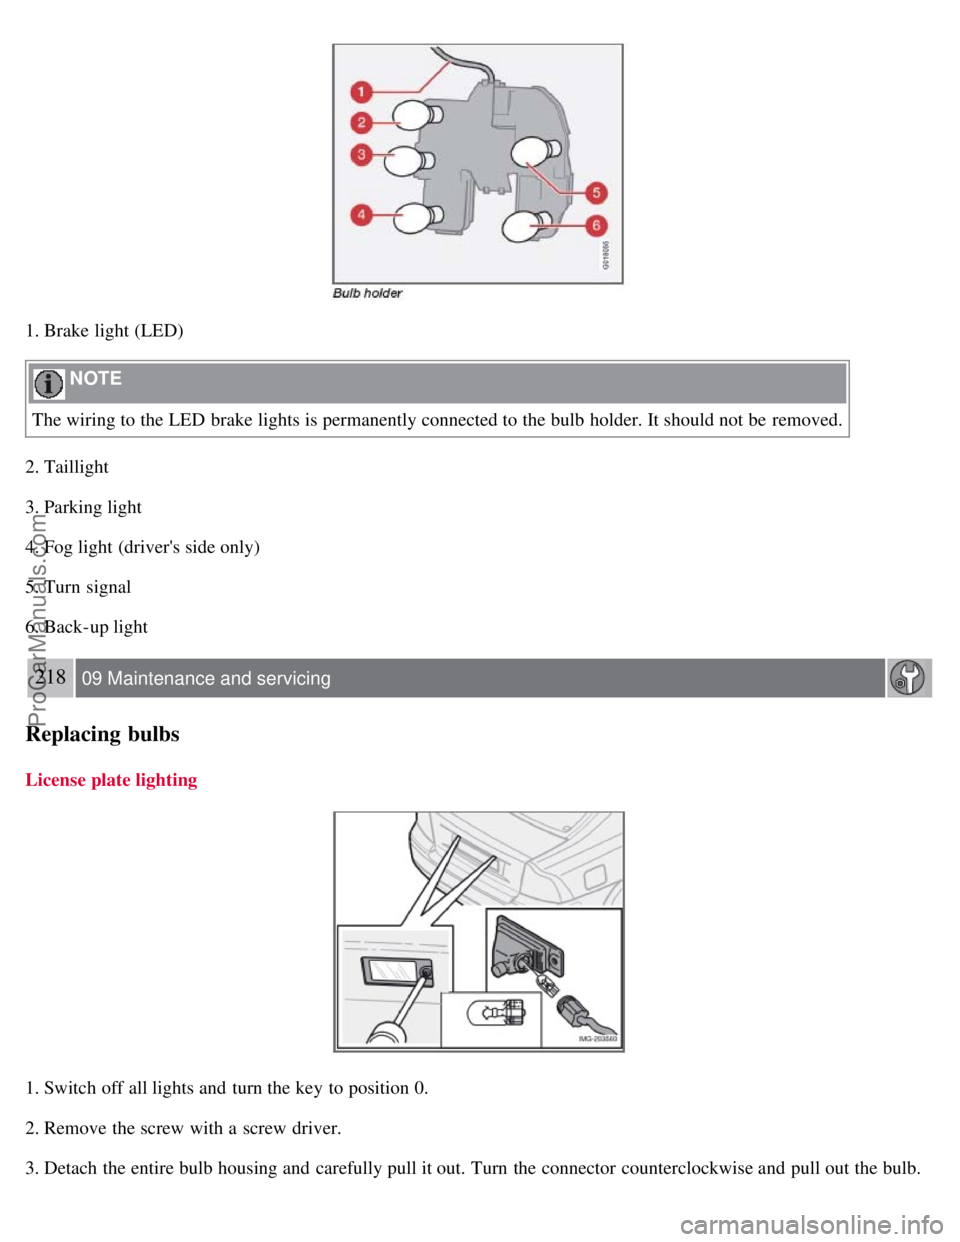
1. Brake light (LED)
NOTE
The wiring to the LED brake lights is permanently connected to the bulb holder. It should not be removed.
2. Taillight
3. Parking light
4. Fog light (driver's side only)
5. Turn signal
6. Back-up light
218 09 Maintenance and servicing
Replacing bulbs
License plate lighting
1. Switch off all lights and turn the key to position 0.
2. Remove the screw with a screw driver.
3. Detach the entire bulb housing and carefully pull it out. Turn the connector counterclockwise and pull out the bulb.
ProCarManuals.com
Page 199 of 239
4. Replace the bulb.
5. Reinstall the connector and turn it clockwise.
6. Reinstall the entire bulb housing and screw it into place.
Footwell lighting
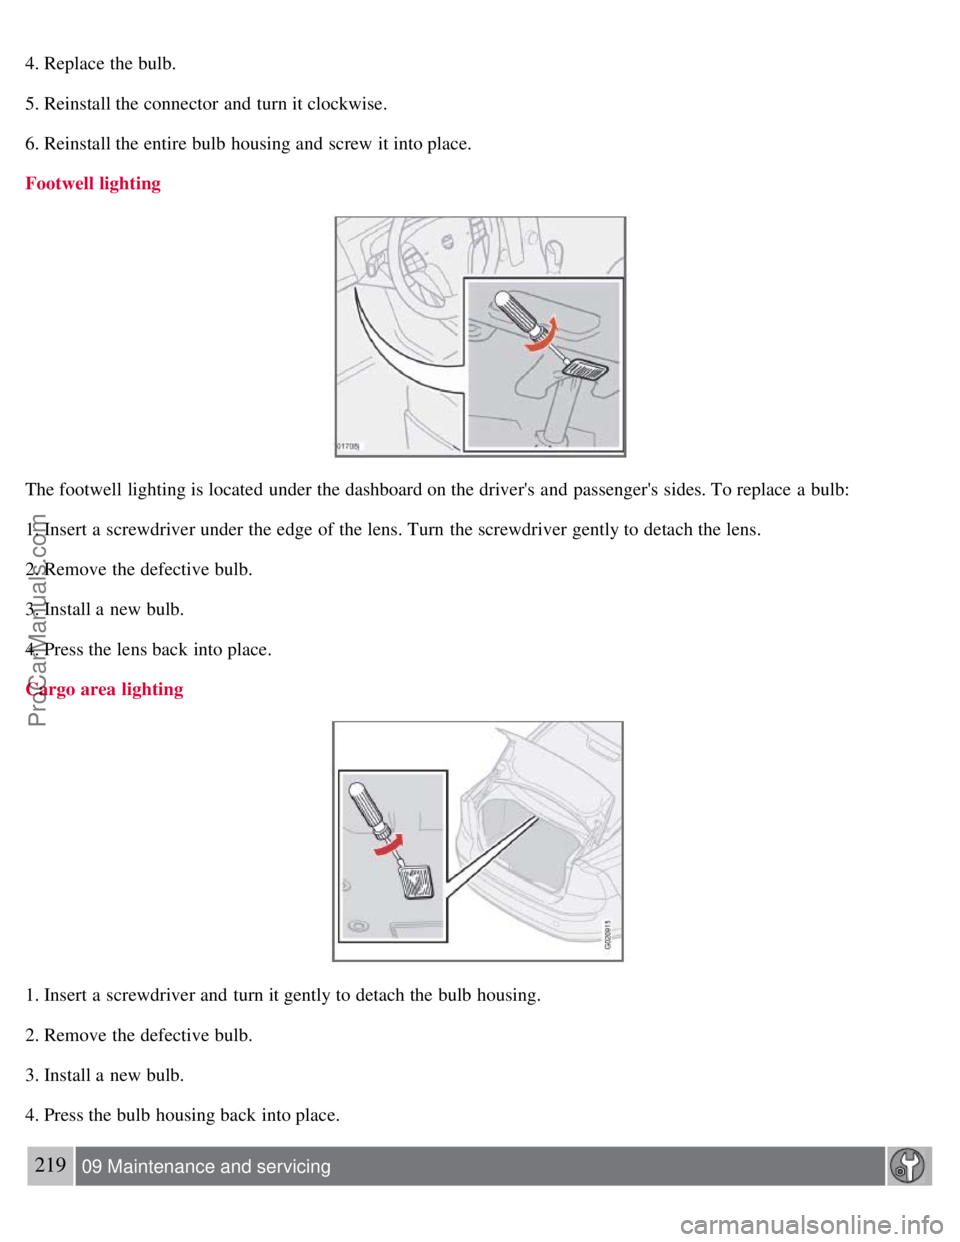
The footwell lighting is located under the dashboard on the driver's and passenger's sides. To replace a bulb:
1. Insert a screwdriver under the edge of the lens. Turn the screwdriver gently to detach the lens.
2. Remove the defective bulb.
3. Install a new bulb.
4. Press the lens back into place.
Cargo area lighting
1. Insert a screwdriver and turn it gently to detach the bulb housing.
2. Remove the defective bulb.
3. Install a new bulb.
4. Press the bulb housing back into place.
219 09 Maintenance and servicing
ProCarManuals.com
Page 200 of 239
Replacing bulbs
Vanity mirror lighting
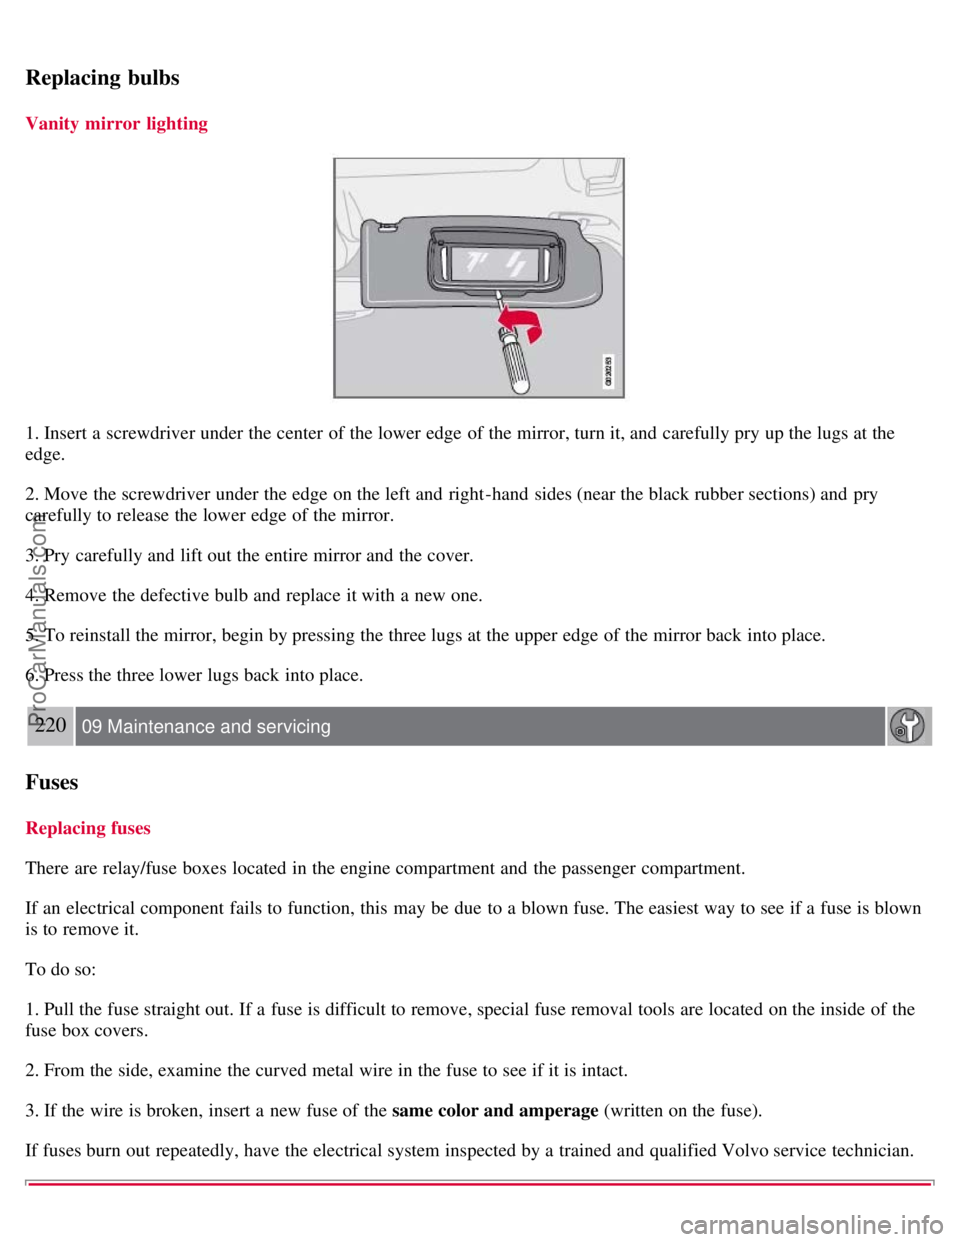
1. Insert a screwdriver under the center of the lower edge of the mirror, turn it, and carefully pry up the lugs at the
edge.
2. Move the screwdriver under the edge on the left and right-hand sides (near the black rubber sections) and pry
carefully to release the lower edge of the mirror.
3. Pry carefully and lift out the entire mirror and the cover.
4. Remove the defective bulb and replace it with a new one.
5. To reinstall the mirror, begin by pressing the three lugs at the upper edge of the mirror back into place.
6. Press the three lower lugs back into place.
220 09 Maintenance and servicing
Fuses
Replacing fuses
There are relay/fuse boxes located in the engine compartment and the passenger compartment.
If an electrical component fails to function, this may be due to a blown fuse. The easiest way to see if a fuse is blown
is to remove it.
To do so:
1. Pull the fuse straight out. If a fuse is difficult to remove, special fuse removal tools are located on the inside of the
fuse box covers.
2. From the side, examine the curved metal wire in the fuse to see if it is intact.
3. If the wire is broken, insert a new fuse of the same color and amperage (written on the fuse).
If fuses burn out repeatedly, have the electrical system inspected by a trained and qualified Volvo service technician.
ProCarManuals.com