wheel VOLVO S40 2008 Owner's Guide
[x] Cancel search | Manufacturer: VOLVO, Model Year: 2008, Model line: S40, Model: VOLVO S40 2008Pages: 239, PDF Size: 5.94 MB
Page 140 of 239
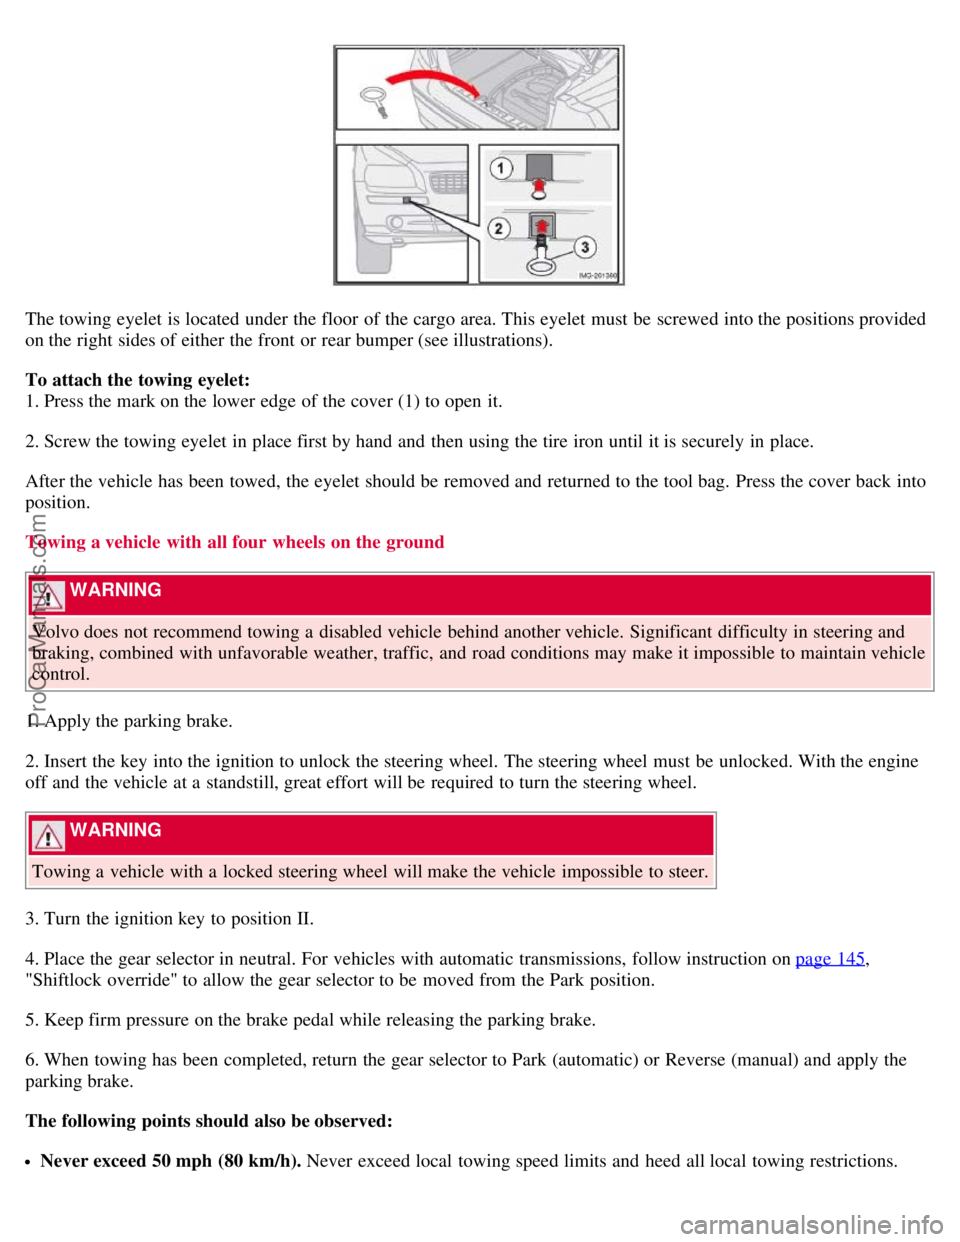
The towing eyelet is located under the floor of the cargo area. This eyelet must be screwed into the positions provided
on the right sides of either the front or rear bumper (see illustrations).
To attach the towing eyelet:
1. Press the mark on the lower edge of the cover (1) to open it.
2. Screw the towing eyelet in place first by hand and then using the tire iron until it is securely in place.
After the vehicle has been towed, the eyelet should be removed and returned to the tool bag. Press the cover back into
position.
Towing a vehicle with all four wheels on the ground
WARNING
Volvo does not recommend towing a disabled vehicle behind another vehicle. Significant difficulty in steering and
braking, combined with unfavorable weather, traffic, and road conditions may make it impossible to maintain vehicle
control.
1. Apply the parking brake.
2. Insert the key into the ignition to unlock the steering wheel. The steering wheel must be unlocked. With the engine
off and the vehicle at a standstill, great effort will be required to turn the steering wheel.
WARNING
Towing a vehicle with a locked steering wheel will make the vehicle impossible to steer.
3. Turn the ignition key to position II.
4. Place the gear selector in neutral. For vehicles with automatic transmissions, follow instruction on page 145
,
"Shiftlock override" to allow the gear selector to be moved from the Park position.
5. Keep firm pressure on the brake pedal while releasing the parking brake.
6. When towing has been completed, return the gear selector to Park (automatic) or Reverse (manual) and apply the
parking brake.
The following points should also be observed:
Never exceed 50 mph (80 km/h). Never exceed local towing speed limits and heed all local towing restrictions.
ProCarManuals.com
Page 141 of 239
Never tow farther than 50 miles (80 km).
Keep the tow rope taut at all times while the vehicle is in motion.
The disabled vehicle should be towed in the forward direction only.
152 06 Starting and driving
Towing
WARNING
Never allow a vehicle to be towed without a driver behind the wheel of the disabled vehicle.
Never remove the key from the ignition while the vehicle is moving. The steering wheel could lock, making it
impossible to steer the vehicle.
When the engine is not running, steering resistance and the effort needed to apply the brakes will be great.
Never attempt to tow a vehicle with a dead battery at night.
CAUTION
Check with state and local authorities before attempting this type of towing, as vehicles being towed are subject to
regulations regarding maximum towing speed, length and type of towing device, lighting, marker flags, etc.
Never attempt to push- or tow-start a vehicle with a dead battery. This would inject unburned fuel into the three-
way catalytic converter(s), causing overheating, backfiring, and damage. See page 153
for instructions on jump
starting the vehicle.
Towing vehicles with front wheel drive
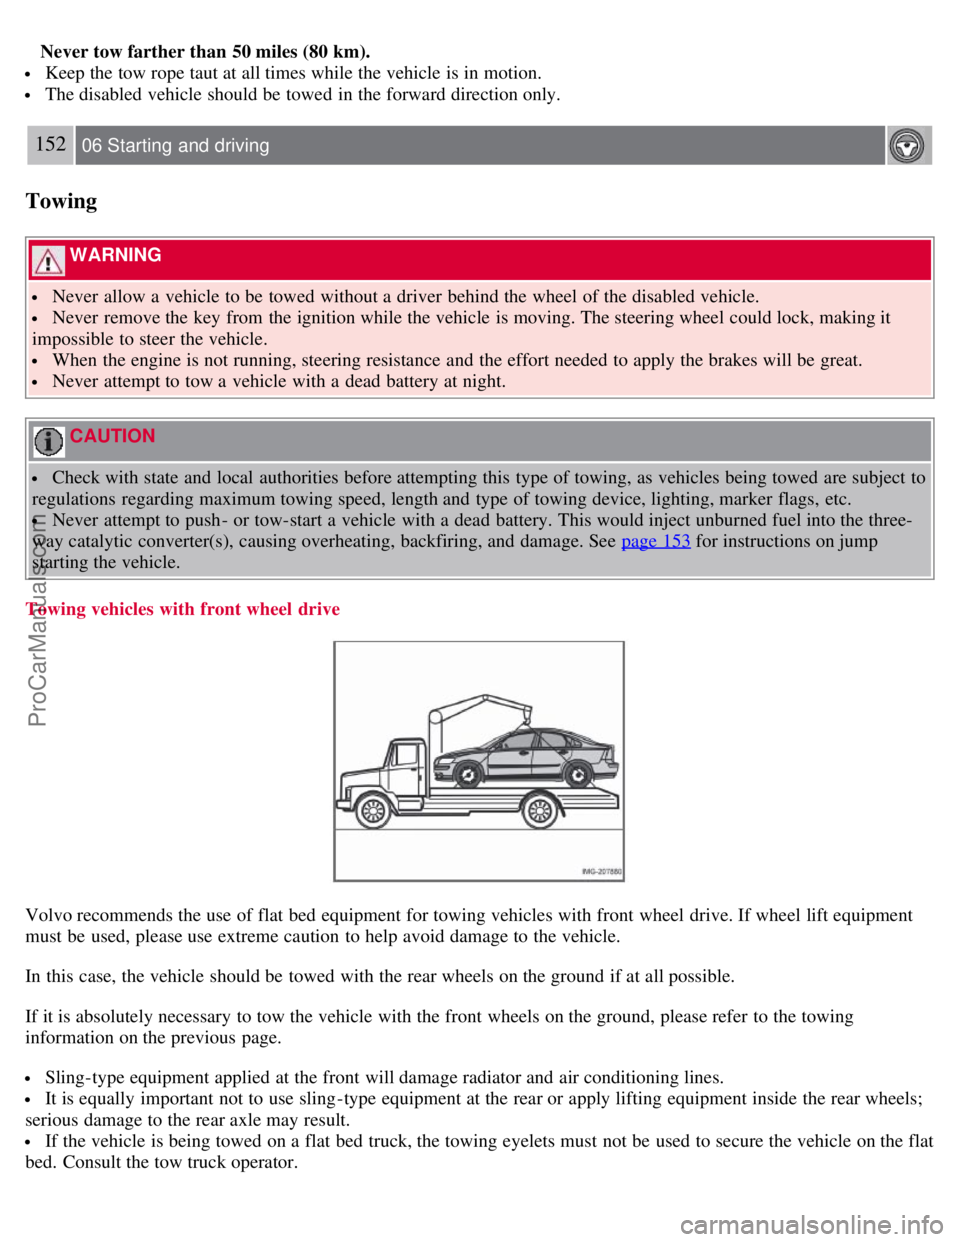
Volvo recommends the use of flat bed equipment for towing vehicles with front wheel drive. If wheel lift equipment
must be used, please use extreme caution to help avoid damage to the vehicle.
In this case, the vehicle should be towed with the rear wheels on the ground if at all possible.
If it is absolutely necessary to tow the vehicle with the front wheels on the ground, please refer to the towing
information on the previous page.
Sling-type equipment applied at the front will damage radiator and air conditioning lines.
It is equally important not to use sling -type equipment at the rear or apply lifting equipment inside the rear wheels;
serious damage to the rear axle may result.
If the vehicle is being towed on a flat bed truck, the towing eyelets must not be used to secure the vehicle on the flat
bed. Consult the tow truck operator.
ProCarManuals.com
Page 143 of 239
Do not connect the jumper cable to any part of the fuel system or to any moving parts. Avoid touching hot
manifolds.
Batteries generate hydrogen gas, which is flammable and explosive.
Battery fluid contains sulfuric acid. Do not allow battery fluid to contact eyes, skin, fabrics or painted surfaces. If
contact occurs, flush the affected area immediately with water. Obtain medical help immediately if eyes are affected.
Never expose the battery to open flame or electric spark.
Do not smoke near the battery.
Failure to follow the instructions for jump starting can lead to personal injury.
Do not touch the jumper cables during the attempt to start the vehicle. This could cause sparks.
154 06 Starting and driving
Towing a trailer
General information
Volvo recommends the use of Volvo trailer hitches that are specially designed for the vehicle.
CAUTION
Models equipped with the B5244S7 engine (engine code 39, which is the 6th and 7th digits from the left in your
vehicle's VIN number, see page 249
for the location of the VIN plate), may not be used to tow trailers or vehicles of
any kind. This could cause damage to the vehicle's emission control systems.
Maximum trailer weights recommended by Volvo are:
Trailers without brakes: 1,540 lbs (700 kg).
Trailers with brakes: 2,000 lbs (900 kg) Observe the legal requirements of the state/province in which the vehicles
are registered.
The maximum recommended hitch tongue load is 165 lbs (75 kg).
All Volvo models are equipped with energy-absorbing shock-mounted bumpers. Trailer hitch installation should not
interfere with the proper operation of this bumper system.
Trailer towing does not normally present any particular problems, but take into consideration:
Increase tire pressure to recommended full. See the chapter "Wheels and tires."
When your vehicle is new, avoid towing heavy trailers during the first 620 miles (1,000 km).
Maximum speed when towing a trailer: 50 m.p.h. (80 km/h).
Engine and transmission are subject to increased loads. Therefore, engine coolant temperature should be closely
watched when driving in hot climates or hilly terrain. Use a lower gear and turn off the air conditioner if the
temperature gauge needle enters the red range.
If the automatic transmission begins to overheat, a message will be displayed in the information display.
Avoid overload and other abusive operation.
Hauling a trailer affects handling, durability, and economy.
It is necessary to balance trailer brakes with the towing vehicle brakes to provide a safe stop (check and observe
state/local regulations).
Do not connect the trailer's brake system directly to the vehicle's brake system.
More frequent vehicle maintenance is required.
Remove the ball and drawbar assembly when the hitch is not being used.
Volvo recommends the use of synthetic engine oil when towing a trailer over long distances or in mountainous
areas.
ProCarManuals.com
Page 144 of 239
WARNING
Bumper-attached trailer hitches must not be used on Volvos, nor should safety chains be attached to the bumper.
Trailer hitches attaching to the vehicle's rear axle must not be used.
Never connect a trailer's hydraulic brake system directly to the vehicle brake system, nor a trailer's lighting system
directly to the vehicle lighting system. Consult your nearest trained and qualified Volvo service technician for correct
installation.
When towing a trailer, the trailer's safety wire must be correctly fastened to the hole or hook provided in the
trailer hitch on the vehicle. The safety wire should never be fastened to or wound around the drawbar ball.
155 06 Starting and driving
Towing a trailer
NOTE
When parking the vehicle with a trailer on a hill, apply the parking brake before putting the gear selector in Park
( P ) or in reverse on models with a manual transmission. Always follow the trailer manufacturer's recommendations
for wheel chocking.
If you use the manual (Geartronic) shift positions while towing a trailer, or if the vehicle is equipped with a
manual transmission, make sure the gear you select does not put too much strain on the engine (using too high a
gear).
The drawbar assembly/trailer hitch may be rated for trailers heavier than the vehicle is designed to tow. Please
adhere to Volvo's recommended trailer weights.
Avoid driving with a trailer on inclines exceeding 15%.
156 06 Starting and driving
Detachable trailer hitch
Installing the ball holder
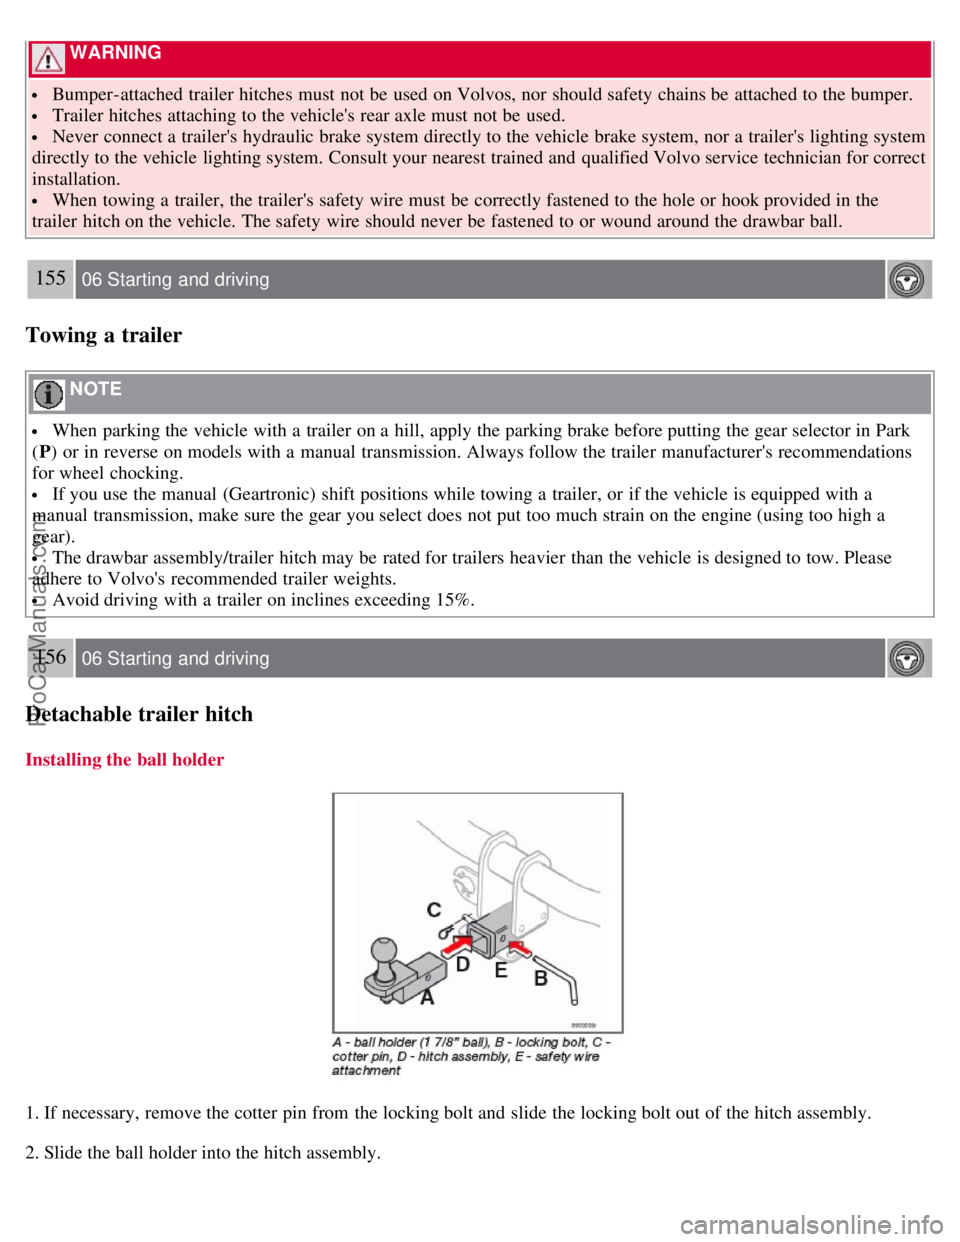
1. If necessary, remove the cotter pin from the locking bolt and slide the locking bolt out of the hitch assembly.
2. Slide the ball holder into the hitch assembly.
ProCarManuals.com
Page 145 of 239
3. Align the hole in the ball holder with the one in the hitch assembly.
4. Slide the locking bolt through the hitch assembly/ball holder.
5. Insert the cotter pin in the hole at the end of the locking bolt.
Removing the ball holder
1. Remove the cotter pin from the locking bolt and slide the locking bolt out of the ball holder/hitch assembly.
2. Pull the ball holder out of the hitch assembly.
NOTE
A cover for the hitch assembly is also included in the kit.
157 06 Starting and driving
Transporting loads
Loading the car
Your vehicle's load-carrying capacity is affected by factors such as:
the number of passengers
tire inflation
the amount of optional or accessory equipment installed
the amount of cargo
See the chapter "Wheels and tires" for more detailed information.
Before loading the car, turn off the engine, and apply the parking brake when loading or unloading long objects. The
gear selector can be inadvertently knocked out of position by long cargo, causing the car to move.
Keep the following in mind when loading the vehicle:
Load the cargo in the cargo area against the rear seat backrest.
Load heavy cargo as low as possible.
Center wide loads.
Secure all cargo with restraining straps anchored to the load securing eyelets.
Cover sharp edges on the load.
Seats can be folded down and head restraints removed to extend the cargo compartment. See page 107.
WARNING
Remember that an object weighing 44 lbs (20 kg) produces a force of 2,200 lbs (1,000 kg) in a head-on collision
at 30 m.p.h. (50 km/h)!
When the rear backrest(s) are folded down, the vehicle should not be loaded to a level higher than 2 in. (5 cm)
below the upper edge of the rear side windows. Objects placed higher than this level could impede the function of
the Volvo Inflatable Curtain.
Load carriers (accessory)
ProCarManuals.com
Page 154 of 239
2 0 0 8
VOLVO S40
166 07 Wheels and tires
General information 168
Tire inflation170
Tire designations174
Glossary of tire terminology176
Vehicle loading177
Uniform tire quality gradings179
Snow chains, snow tires, studded tires180
Temporary spare181
Wheel nuts182
Tire rotation183
Changing a wheel184
Tire Pressure Monitoring System (TPMS)187
167 07 Wheels and tires
168 07 Wheels and tires
General information
Your vehicle is equipped with tires according to the vehicle's tire information placard on the B-pillar (the structural
member at the side of the vehicle, at the rear of the driver's door opening), or on the inside of the fuel filler door on
Canadian models.
The tires have good road holding characteristics and offer good handling on dry and wet surfaces. It should be noted
however that the tires have been developed to give these features on snow/ice-free surfaces.
Certain models are equipped with "all-season" tires, which provide a somewhat higher degree of road holding on
slippery surfaces than tires without the "all-season" rating. However, for optimum road holding on icy or snow-
covered roads, we recommend suitable winter tires on all four wheels.
ProCarManuals.com
Page 155 of 239
When replacing tires, be sure that the new tires are the same size designation, type (radial) and preferably from the
same manufacturer, on all four wheels. Otherwise there is a risk of altering the car's roadholding and handling
characteristics.
Storing wheels and tires
When storing complete wheels (tires mounted on rims), they should be suspended off the floor or placed on their sides
on the floor.
Tires not mounted on rims should be stored on their sides or standing upright, but should not be suspended.
WARNING
Tires should preferably be stored in a cool, dry, dark place, and should never be stored in close proximity to
solvents, gasoline, oils, etc.
WARNING
The wheel and tire sizes for your Volvo are specified to meet stringent stability and handling requirements.
Unapproved wheel/tire size combinations can negatively affect your vehicle's stability and handling. Approved tire
sizes are shown in the Tire inflation pressure tables on pages 172 and 173
.
Any damage caused by installation of unapproved wheel/tire size combinations will not be covered by your new
vehicle warranty. Volvo assumes no responsibility for death, injury, or expenses that may result from such
installations.
Tread wear indicator
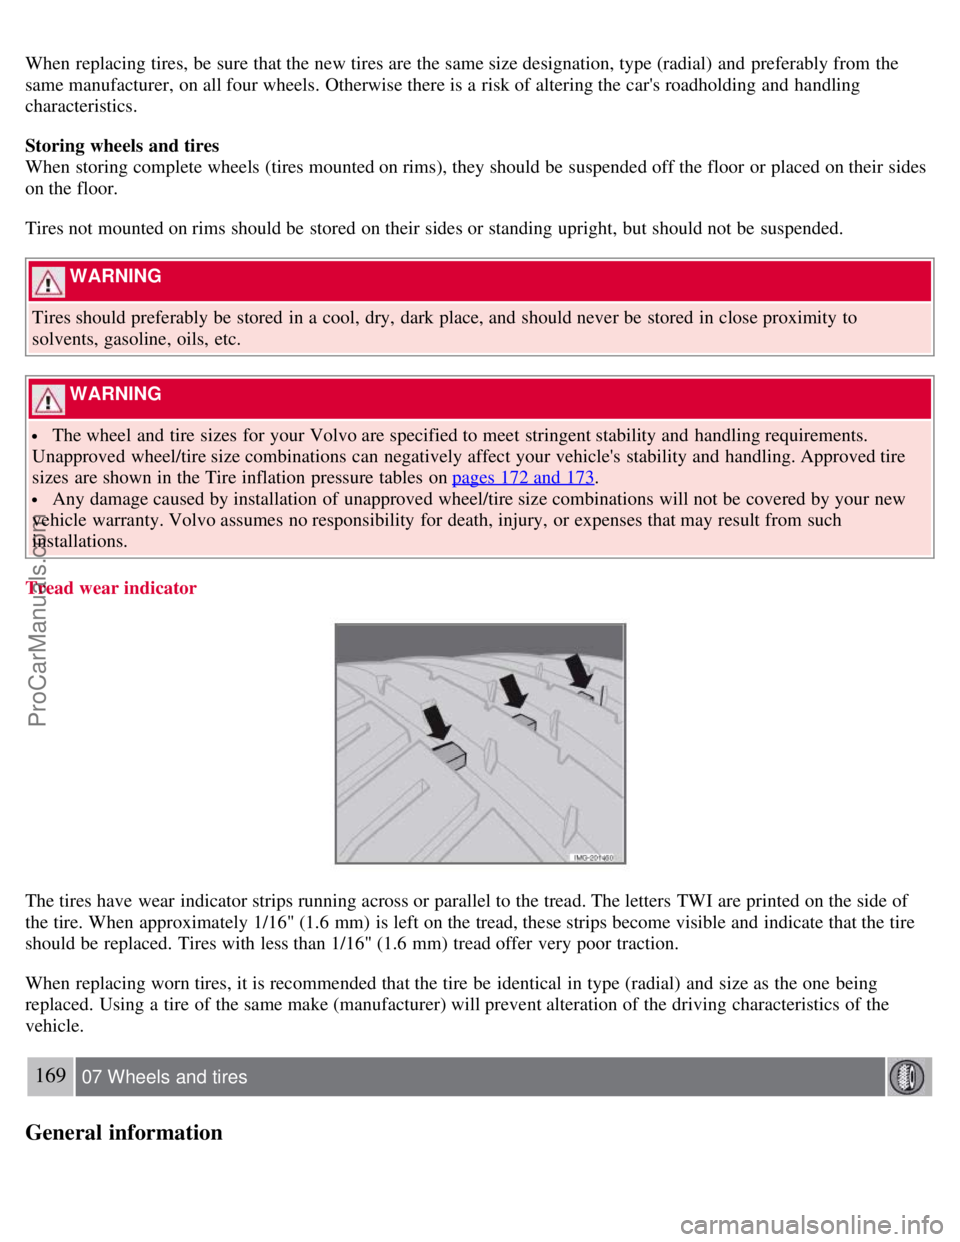
The tires have wear indicator strips running across or parallel to the tread. The letters TWI are printed on the side of
the tire. When approximately 1/16" (1.6 mm) is left on the tread, these strips become visible and indicate that the tire
should be replaced. Tires with less than 1/16" (1.6 mm) tread offer very poor traction.
When replacing worn tires, it is recommended that the tire be identical in type (radial) and size as the one being
replaced. Using a tire of the same make (manufacturer) will prevent alteration of the driving characteristics of the
vehicle.
169 07 Wheels and tires
General information
ProCarManuals.com
Page 156 of 239
New Tires
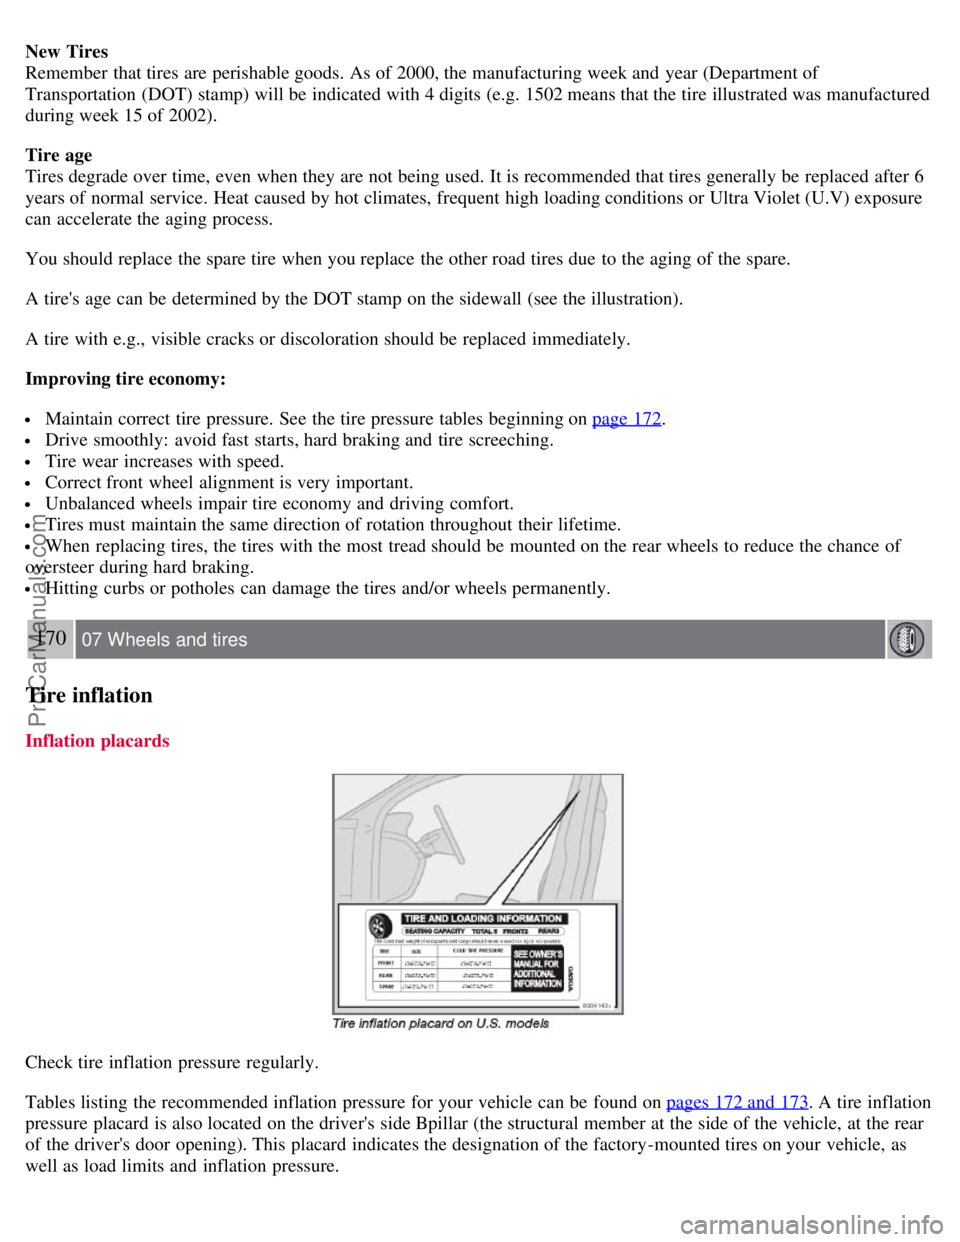
Remember that tires are perishable goods. As of 2000, the manufacturing week and year (Department of
Transportation (DOT) stamp) will be indicated with 4 digits (e.g. 1502 means that the tire illustrated was manufactured
during week 15 of 2002).
Tire age
Tires degrade over time, even when they are not being used. It is recommended that tires generally be replaced after 6
years of normal service. Heat caused by hot climates, frequent high loading conditions or Ultra Violet (U.V) exposure
can accelerate the aging process.
You should replace the spare tire when you replace the other road tires due to the aging of the spare.
A tire's age can be determined by the DOT stamp on the sidewall (see the illustration).
A tire with e.g., visible cracks or discoloration should be replaced immediately.
Improving tire economy:
Maintain correct tire pressure. See the tire pressure tables beginning on page 172.
Drive smoothly: avoid fast starts, hard braking and tire screeching.
Tire wear increases with speed.
Correct front wheel alignment is very important.
Unbalanced wheels impair tire economy and driving comfort.
Tires must maintain the same direction of rotation throughout their lifetime.
When replacing tires, the tires with the most tread should be mounted on the rear wheels to reduce the chance of
oversteer during hard braking.
Hitting curbs or potholes can damage the tires and/or wheels permanently.
170 07 Wheels and tires
Tire inflation
Inflation placards
Check tire inflation pressure regularly.
Tables listing the recommended inflation pressure for your vehicle can be found on pages 172 and 173
. A tire inflation
pressure placard is also located on the driver's side Bpillar (the structural member at the side of the vehicle, at the rear
of the driver's door opening). This placard indicates the designation of the factory-mounted tires on your vehicle, as
well as load limits and inflation pressure.
ProCarManuals.com
Page 157 of 239
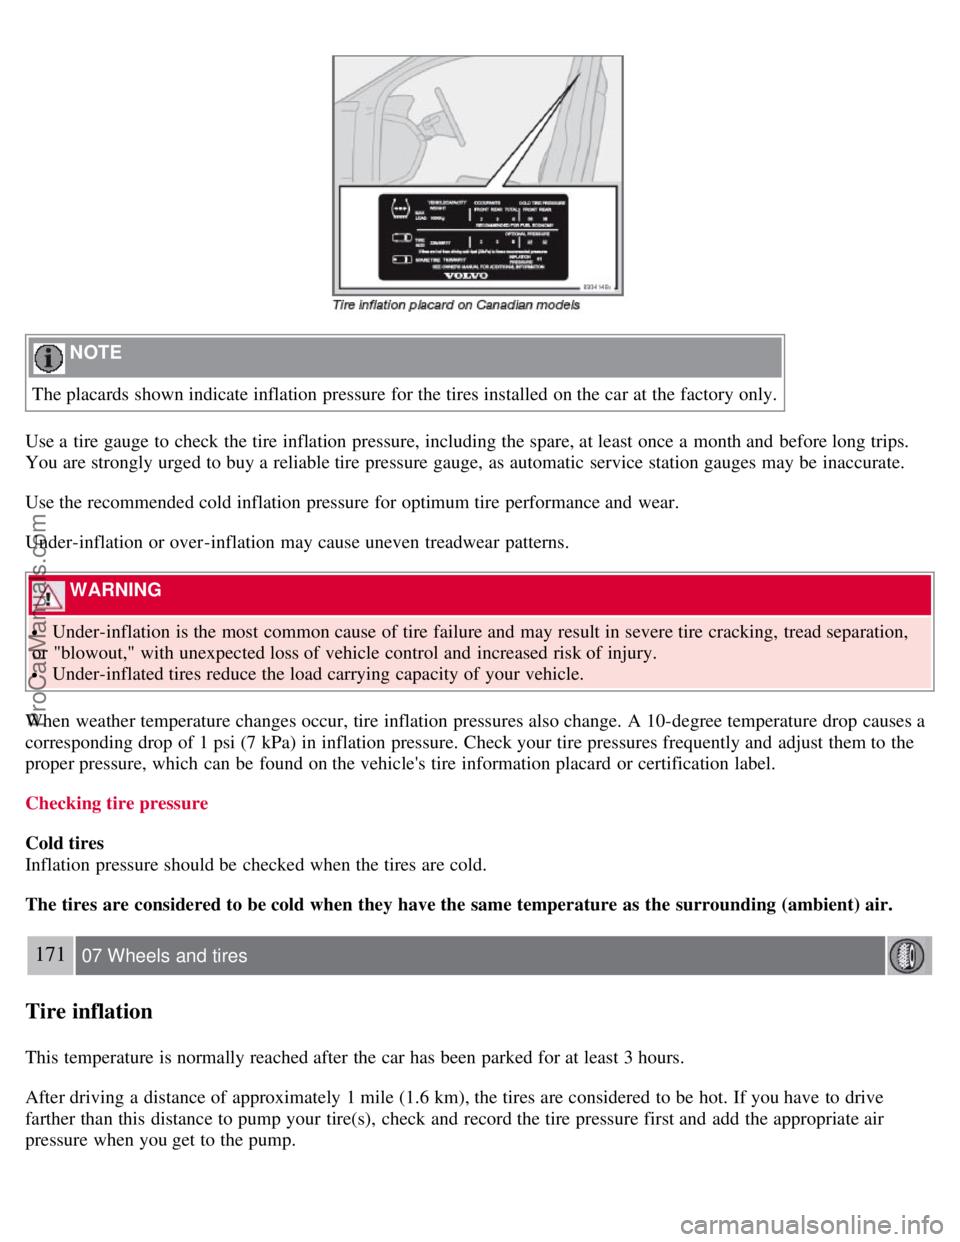
NOTE
The placards shown indicate inflation pressure for the tires installed on the car at the factory only.
Use a tire gauge to check the tire inflation pressure, including the spare, at least once a month and before long trips.
You are strongly urged to buy a reliable tire pressure gauge, as automatic service station gauges may be inaccurate.
Use the recommended cold inflation pressure for optimum tire performance and wear.
Under-inflation or over-inflation may cause uneven treadwear patterns.
WARNING
Under-inflation is the most common cause of tire failure and may result in severe tire cracking, tread separation,
or "blowout," with unexpected loss of vehicle control and increased risk of injury.
Under-inflated tires reduce the load carrying capacity of your vehicle.
When weather temperature changes occur, tire inflation pressures also change. A 10-degree temperature drop causes a
corresponding drop of 1 psi (7 kPa) in inflation pressure. Check your tire pressures frequently and adjust them to the
proper pressure, which can be found on the vehicle's tire information placard or certification label.
Checking tire pressure
Cold tires
Inflation pressure should be checked when the tires are cold.
The tires are considered to be cold when they have the same temperature as the surrounding (ambient) air.
171 07 Wheels and tires
Tire inflation
This temperature is normally reached after the car has been parked for at least 3 hours.
After driving a distance of approximately 1 mile (1.6 km), the tires are considered to be hot. If you have to drive
farther than this distance to pump your tire(s), check and record the tire pressure first and add the appropriate air
pressure when you get to the pump.
ProCarManuals.com
Page 158 of 239
If checking tire pressure when the tire is hot, never "bleed" or reduce air pressure. The tires are hot from driving and it
is normal for pressures to increase above recommended cold pressures. A hot tire at or below recommended cold
inflation pressure could be significantly under-inflated.
To check inflation pressure:
1. Remove the cap from the valve on one tire, then firmly press the tire gauge onto the valve.
2. Add air to reach the recommended air pressure
3. Replace the valve cap.
4. Repeat this procedure for each tire, including the spare.
5. Visually inspect the tires to make sure there are no nails or other objects embedded that could puncture the tire and
cause an air leak.
6. Check the sidewalls to make sure there are no gouges, cuts, bulges or other irregularities.
NOTE
If you overfill the tire, release air by pushing on the metal stem in the center of the valve. Then recheck the
pressure with your tire gauge.
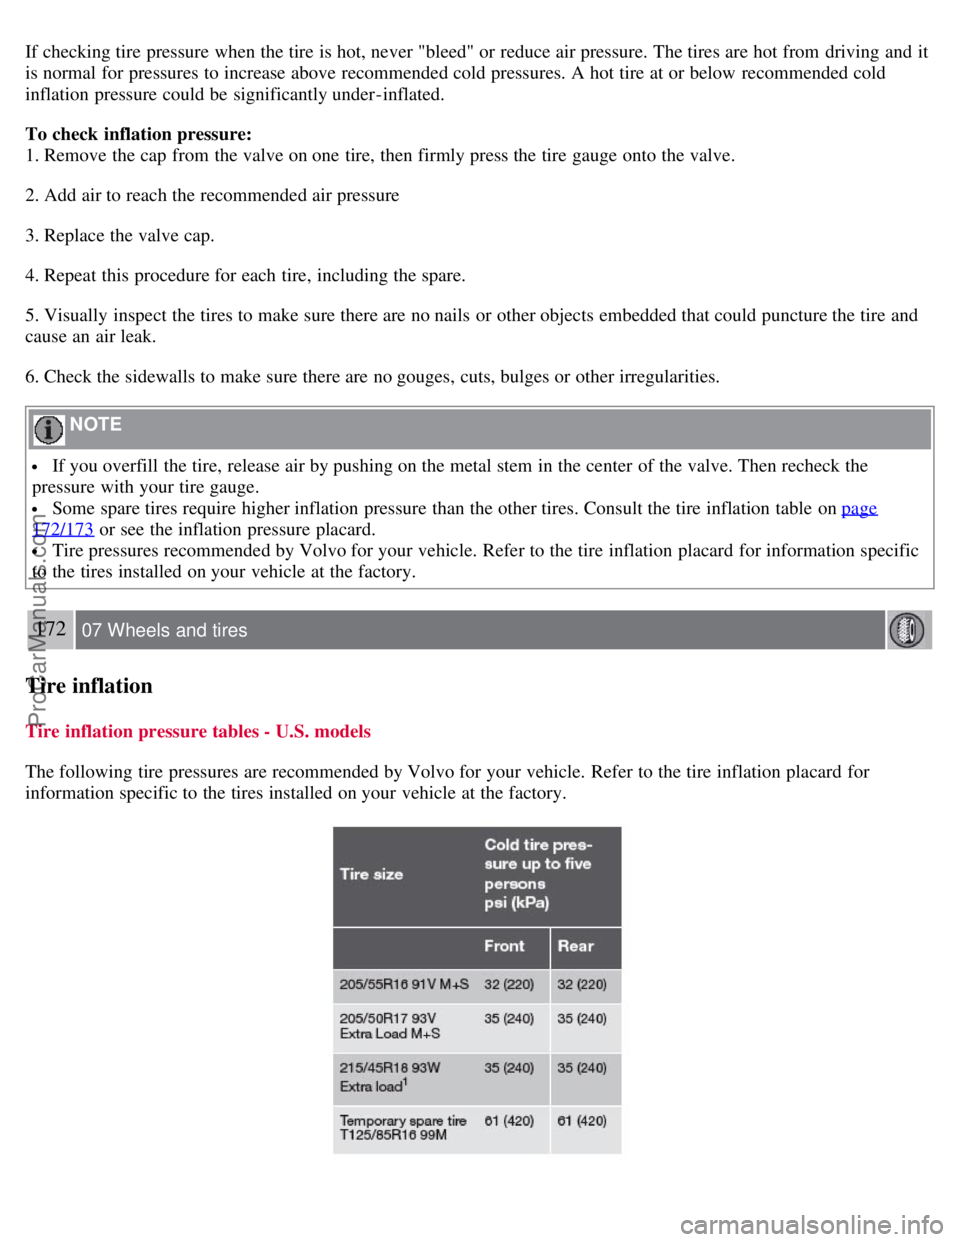
Some spare tires require higher inflation pressure than the other tires. Consult the tire inflation table on page
172/173 or see the inflation pressure placard.
Tire pressures recommended by Volvo for your vehicle. Refer to the tire inflation placard for information specific
to the tires installed on your vehicle at the factory.
172 07 Wheels and tires
Tire inflation
Tire inflation pressure tables - U.S. models
The following tire pressures are recommended by Volvo for your vehicle. Refer to the tire inflation placard for
information specific to the tires installed on your vehicle at the factory.
ProCarManuals.com