key VOLVO S40 2008 Workshop Manual
[x] Cancel search | Manufacturer: VOLVO, Model Year: 2008, Model line: S40, Model: VOLVO S40 2008Pages: 239, PDF Size: 5.94 MB
Page 196 of 239
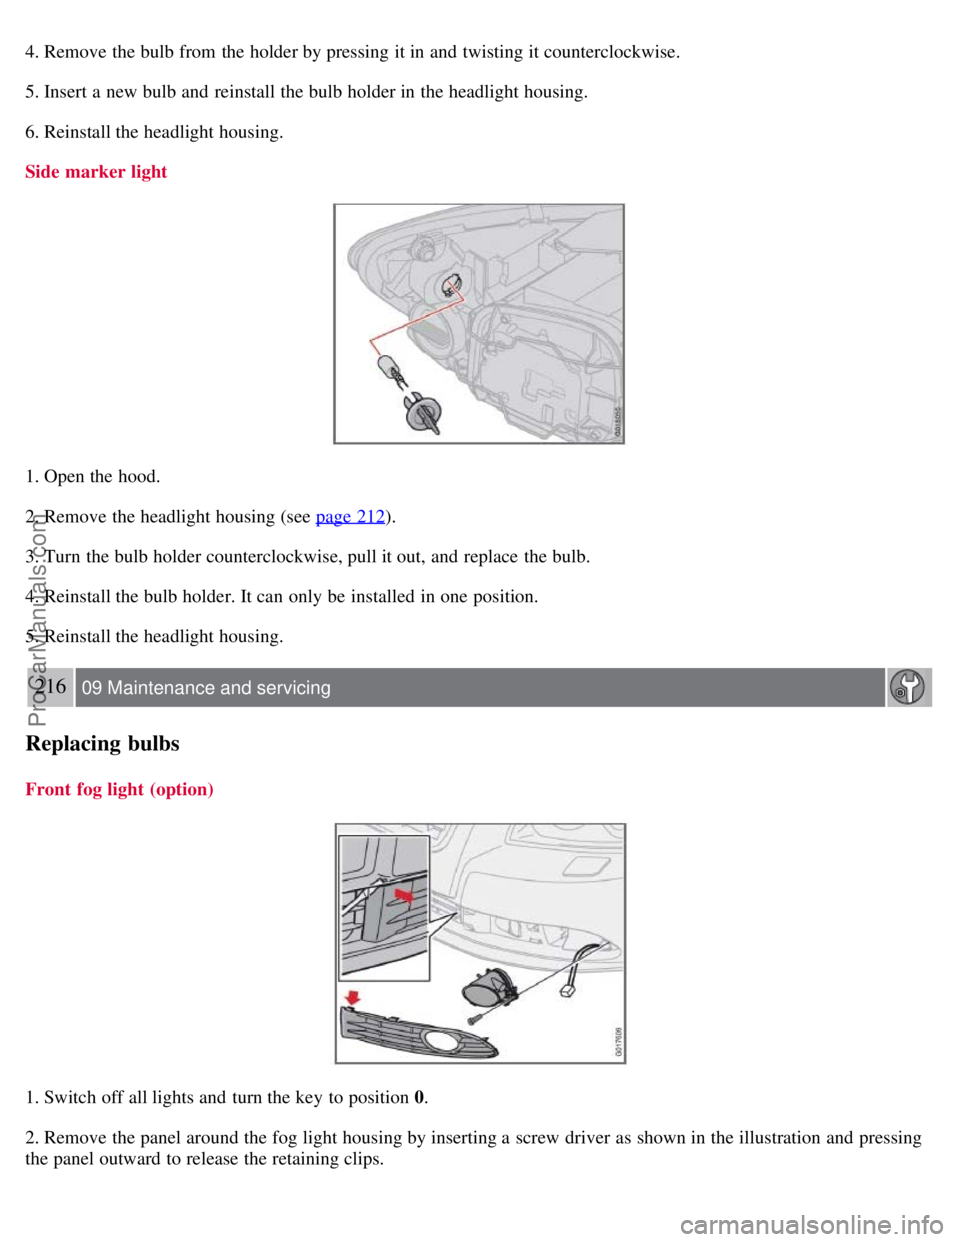
4. Remove the bulb from the holder by pressing it in and twisting it counterclockwise.
5. Insert a new bulb and reinstall the bulb holder in the headlight housing.
6. Reinstall the headlight housing.
Side marker light
1. Open the hood.
2. Remove the headlight housing (see page 212
).
3. Turn the bulb holder counterclockwise, pull it out, and replace the bulb.
4. Reinstall the bulb holder. It can only be installed in one position.
5. Reinstall the headlight housing.
216 09 Maintenance and servicing
Replacing bulbs
Front fog light (option)
1. Switch off all lights and turn the key to position 0.
2. Remove the panel around the fog light housing by inserting a screw driver as shown in the illustration and pressing
the panel outward to release the retaining clips.
ProCarManuals.com
Page 197 of 239
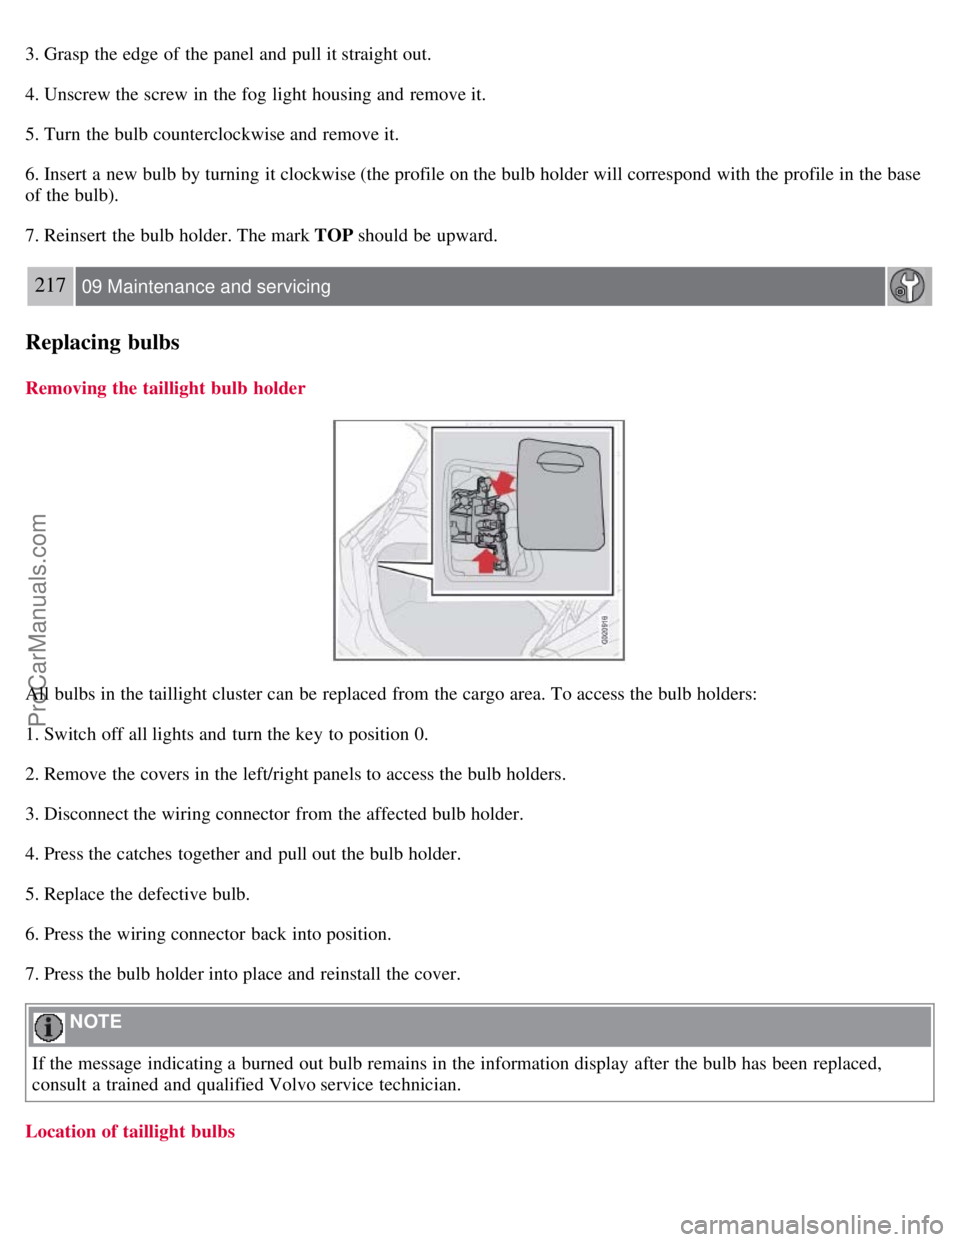
3. Grasp the edge of the panel and pull it straight out.
4. Unscrew the screw in the fog light housing and remove it.
5. Turn the bulb counterclockwise and remove it.
6. Insert a new bulb by turning it clockwise (the profile on the bulb holder will correspond with the profile in the base
of the bulb).
7. Reinsert the bulb holder. The mark TOP should be upward.
217 09 Maintenance and servicing
Replacing bulbs
Removing the taillight bulb holder
All bulbs in the taillight cluster can be replaced from the cargo area. To access the bulb holders:
1. Switch off all lights and turn the key to position 0.
2. Remove the covers in the left/right panels to access the bulb holders.
3. Disconnect the wiring connector from the affected bulb holder.
4. Press the catches together and pull out the bulb holder.
5. Replace the defective bulb.
6. Press the wiring connector back into position.
7. Press the bulb holder into place and reinstall the cover.
NOTE
If the message indicating a burned out bulb remains in the information display after the bulb has been replaced,
consult a trained and qualified Volvo service technician.
Location of taillight bulbs
ProCarManuals.com
Page 198 of 239
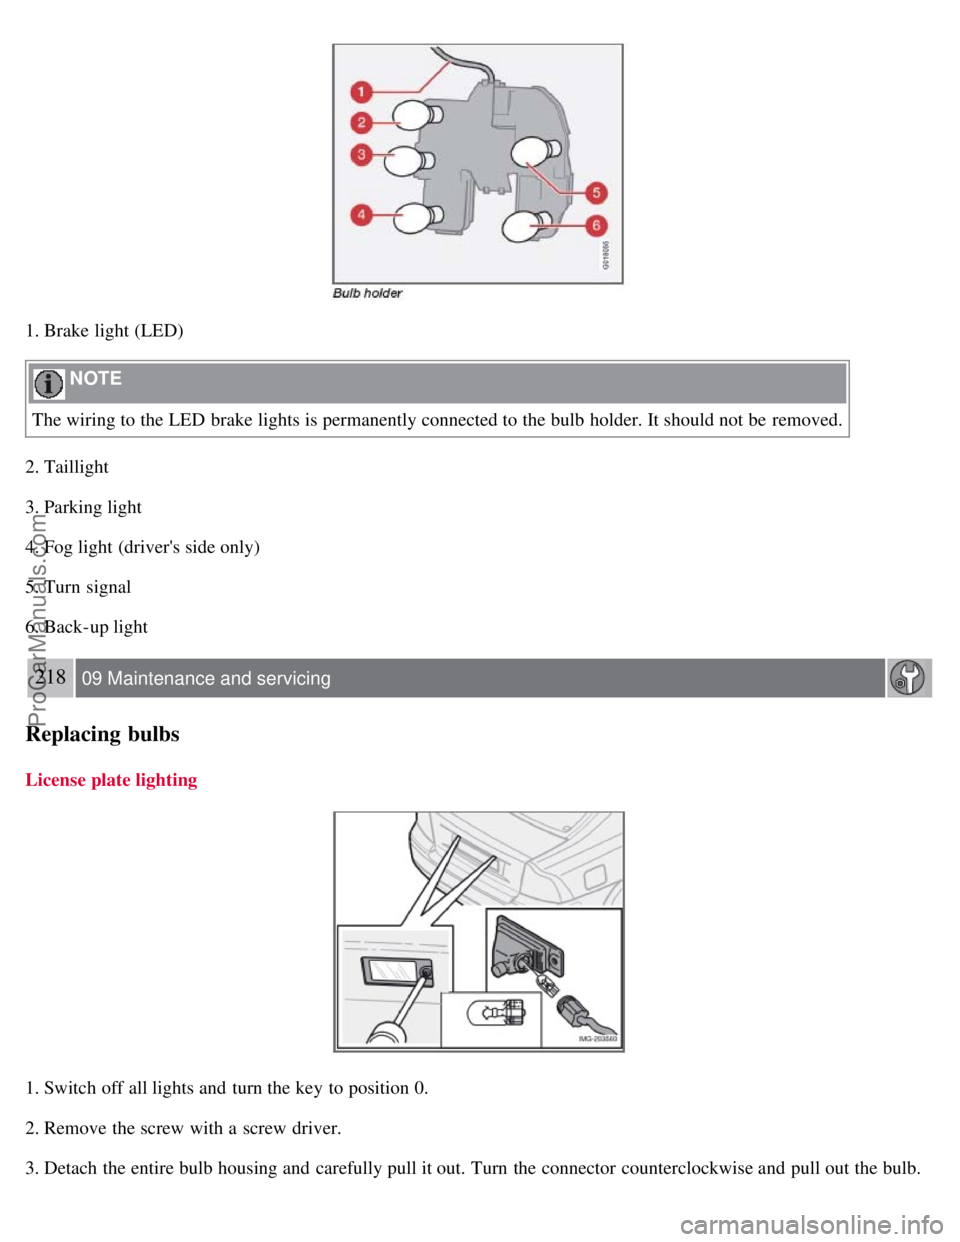
1. Brake light (LED)
NOTE
The wiring to the LED brake lights is permanently connected to the bulb holder. It should not be removed.
2. Taillight
3. Parking light
4. Fog light (driver's side only)
5. Turn signal
6. Back-up light
218 09 Maintenance and servicing
Replacing bulbs
License plate lighting
1. Switch off all lights and turn the key to position 0.
2. Remove the screw with a screw driver.
3. Detach the entire bulb housing and carefully pull it out. Turn the connector counterclockwise and pull out the bulb.
ProCarManuals.com
Page 207 of 239
Audio functions
7. If there is distortion, lower your music player's headphone volume until the distortion goes away.
8. Finally, exit the menu and adjust the audio volume to a comfortable level.
Volume
Use the volume dial (1) or the buttons in the optional steering wheel keypad to adjust the volume level. The volume
level is also adjusted automatically according to the vehicle's speed, see page 234
for more information on this
function.
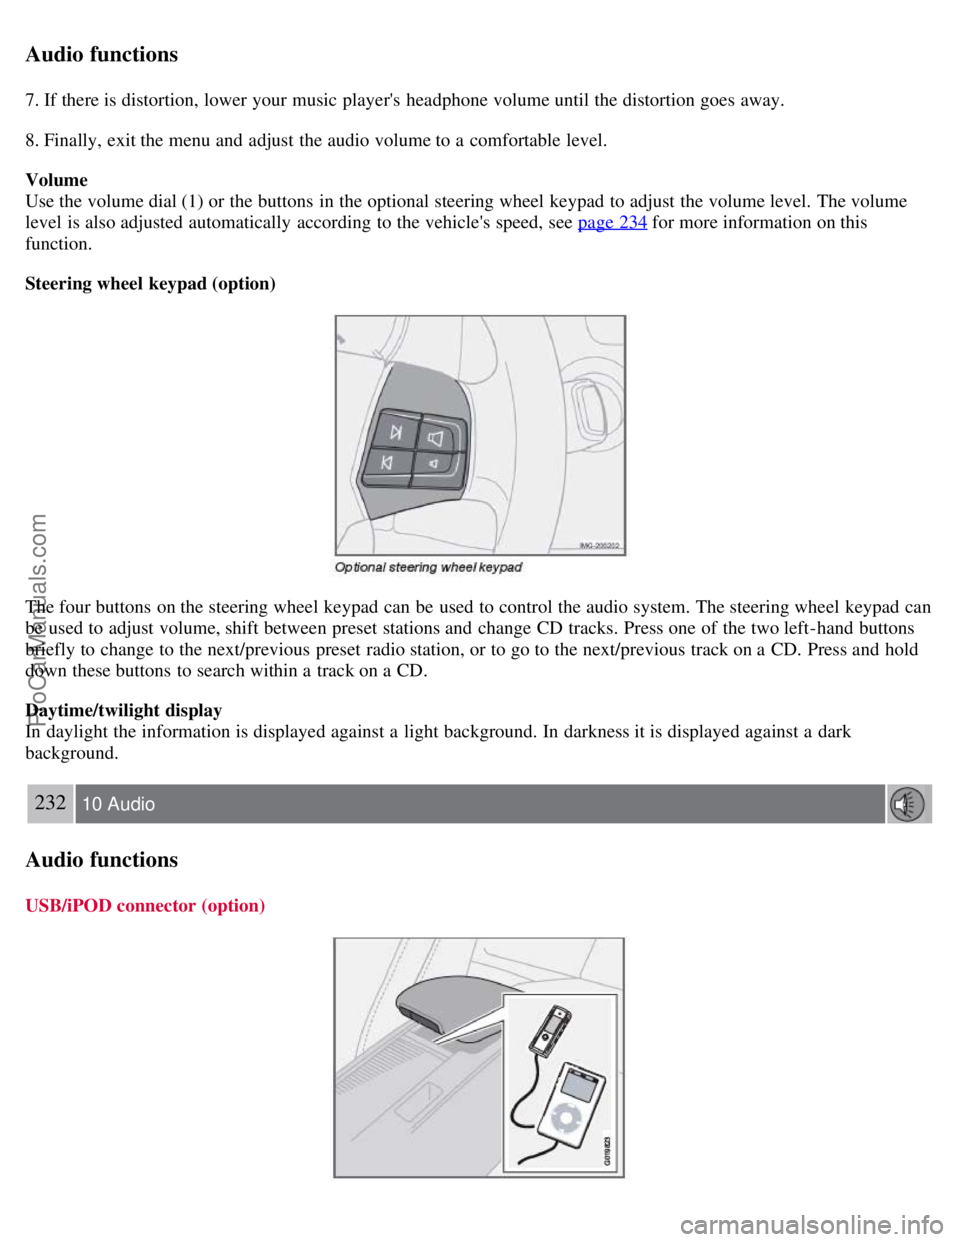
Steering wheel keypad (option)
The four buttons on the steering wheel keypad can be used to control the audio system. The steering wheel keypad can
be used to adjust volume, shift between preset stations and change CD tracks. Press one of the two left-hand buttons
briefly to change to the next/previous preset radio station, or to go to the next/previous track on a CD. Press and hold
down these buttons to search within a track on a CD.
Daytime/twilight display
In daylight the information is displayed against a light background. In darkness it is displayed against a dark
background.
232 10 Audio
Audio functions
USB/iPOD connector (option)
ProCarManuals.com
Page 208 of 239
An auxiliary device, such as an iPOD or a USB flash drive can be connected to the audio system via the connector in
the center console storage compartment.
A sound source must be chosen, depending on the device that has been connected:
1. Use MODE to select iPOD or USB. The text CONNECT DEVICE will be displayed.
2. Connect the device to the connector in the center console storage compartment (see the illustration).
The text LOADING will be displayed while the system indexes the files on the device. This may take a short time.
When indexing has been completed, track information will be displayed, and the desired track can then be selected.
Tracks can be selected in two ways:
Turn the Tuning knob (no. 4 in the illustration on page 230) clockwise or counterclockwise
Use the right or left arrow keys on the navigation control (no. 5 in the illustration on page 235) to select the desired
track. The arrow keys on the steering wheel keypad can also be used in the same way.
NOTE
The system supports playback of files in the most common versions of formats such as mp3, wma, and wav.
However, there may be versions of these formats that the system does not support.
USB flash drive
To simplify the use of a USB flash drive, it is advisable to only store music files on the drive. It will take considerably
longer for the system to index the files on the drive if it contains anything other than compatible music files.
MP3 player
Many mp3 players have a file indexing system that is not supported by the vehicle's audio system. In order to use an
mp3 player, the system must be set to USB Removable device/Mass Storage Device .
iPod
An iPod receives current and its battery is charged through the connecting cord. However, if the iPOD's battery is
completely drained, it should be recharged before the iPOD is connected to the audio system.
NOTE
When an iPOD is used as a sound source, the vehicle's audio system has a menu structure similar to the one in the
iPOD. See the iPOD's manual for detailed information.
For further information, refer to the accessory manual USB/iPOD Music Interface .
Sound settings
Optimal sound reproduction
The audio system is calibrated for optimal sound reproduction through the use of digital signal processing. This
calibration takes into account the speakers, amplifier, cabin
233 10 Audio
Audio functions
ProCarManuals.com
Page 211 of 239
4. Select LOW, MEDIUM, or HIGH and press ENTER .
235 10 Audio
Radio functions
Radio function controls
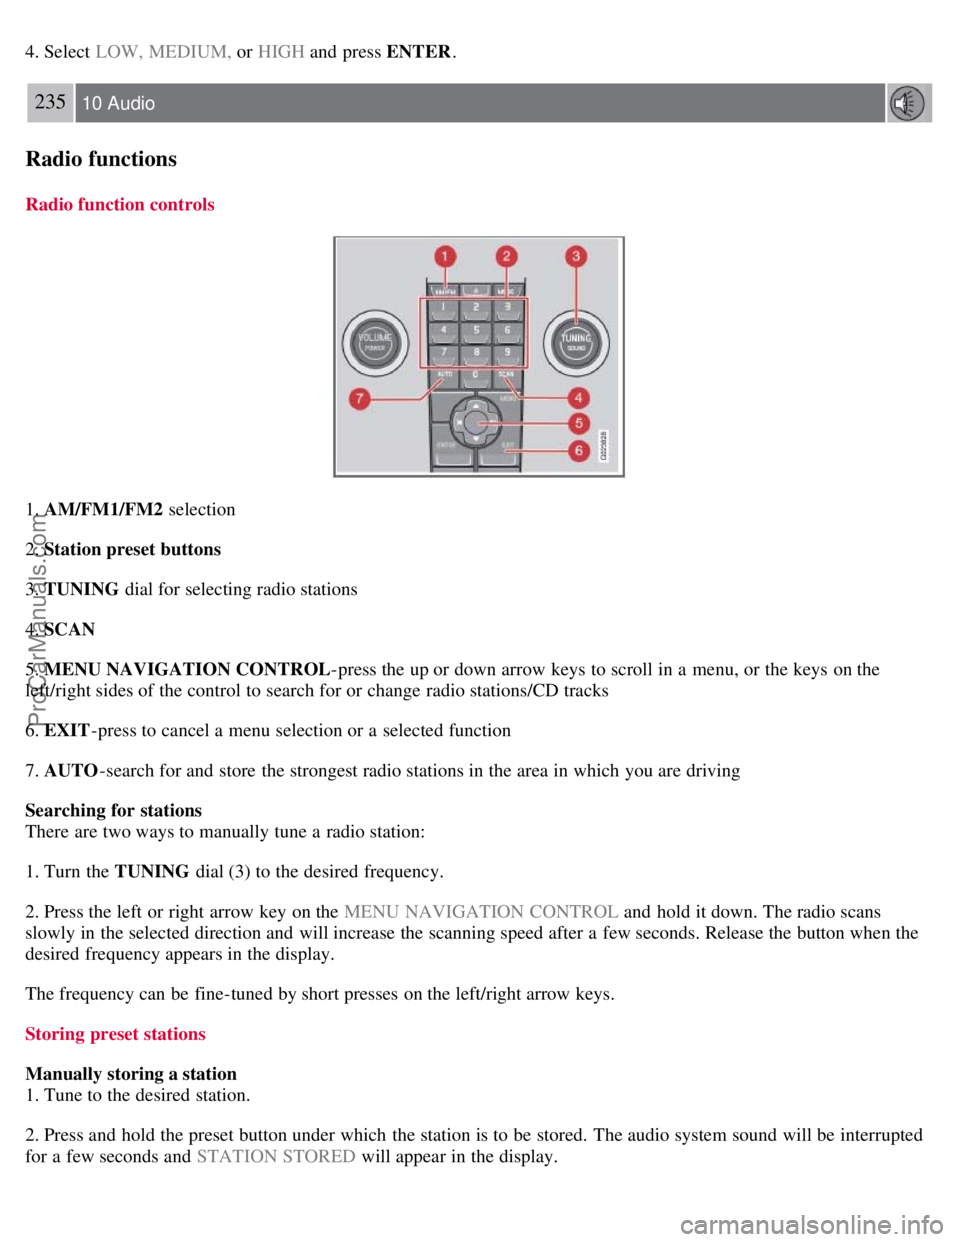
1. AM/FM1/FM2 selection
2. Station preset buttons
3. TUNING dial for selecting radio stations
4. SCAN
5. MENU NAVIGATION CONTROL -press the up or down arrow keys to scroll in a menu, or the keys on the
left/right sides of the control to search for or change radio stations/CD tracks
6. EXIT -press to cancel a menu selection or a selected function
7. AUTO -search for and store the strongest radio stations in the area in which you are driving
Searching for stations
There are two ways to manually tune a radio station:
1. Turn the TUNING dial (3) to the desired frequency.
2. Press the left or right arrow key on the MENU NAVIGATION CONTROL and hold it down. The radio scans
slowly in the selected direction and will increase the scanning speed after a few seconds. Release the button when the
desired frequency appears in the display.
The frequency can be fine-tuned by short presses on the left/right arrow keys.
Storing preset stations
Manually storing a station
1. Tune to the desired station.
2. Press and hold the preset button under which the station is to be stored. The audio system sound will be interrupted
for a few seconds and STATION STORED will appear in the display.
ProCarManuals.com
Page 214 of 239
SIRIUS ID
The SIRIUS ID is required when contacting the Sirius Call Center. It is used to activate your account and when making
any account transactions. The SIRIUS ID is sometimes referred to as the Electronic Serial Number (ESN).
Selecting a channel category
1. Select Sirius radio mode as described above.
2. Press ENTER.
3. Use the up/down arrow keys to scroll through the list of categories.
4. Press ENTER or the right arrow key to select a category.
5. Use the left or right arrow keys to select a channel in the currently chosen category.
6. Press ENTER to listen to a channel.
NOTE
The category "All" is default, which enables you to scroll through the entire list of available satellite channels.
The channel categories are automatically updated several times a year. This takes approximately two minutes and
will interrupt normal broadcasting. A message will be displayed while updating is in progress. Information on
channel or feature updates is available at www.sirius.com
.
Selecting a channel
There are three ways of tuning in a channel:
Using the left and right arrow keys
By turning the tuning control
Through direct channel entry
Direct channel entry
The Sirius satellite channels are numbered consecutively throughout all of the categories. To access a channel directly:
1. Press MENU and scroll to "Direct channel entry."
2. Use the numerical keypad to enter the channel's number.
3. Press ENTER . The radio will tune to this channel, even if it belongs to a category other than the currently selected
one.
238 10 Audio
Sirius satellite radio (option or retailer-installed accessory)
NOTE
The numbers of skipped or locked channels will not be displayed.
If a channel is locked, the access code must be entered before the channel can be selected. See "Unlocking a
channel" on page 239
.
Scanning
ProCarManuals.com
Page 215 of 239
NOTE
SCAN automatically searches through the list of satellite channels. See page 236
for more detailed information.
Storing a channel
A long press on one of the number keys stores the currently tuned channel on that key.
A short press on a number key while the radio is in Sirius 1 or 2 mode will tune to the preset satellite channel stored
on that button, regardless of the currently selected channel category.
Song Seek and Song Memory
The Song Seek and Song Memory functions provide both audio and visual notification when Sirius is broadcasting
your favorite songs. Song Seek enables you to store the name of the song for future advance notification when that
song is being played. The Song Memory feature makes it possible to view all of the current songs that are stored in
memory.
Song memory
Up to ten songs can be saved in the system's memory.
1. Press MENU .
2. Scroll to " ADD SONG TO SONG MEM. " and follow the instructions shown in the display.
If a new song is selected when the memory is full, you will be prompted to press ENTER to delete the last song on
the list.
NOTE
The remaining songs in the list will move down one position, and the newly added song will be placed at the top of
the list.
Song seek
When a satellite radio channel plays one of the songs stored in the song memory, the listener will be alerted by a text
message and an audible signal.
Press ENTER to listen to the song or EXIT to cancel.
To activate/deactivate the song seek function:
1. Press MENU
2. Scroll to " SONG SEEK"
3. Press ENTER to activate or deactivate the function.
NOTE
When the song has ended, the radio will remain tuned to the channel on which the song was played.
Radio text
The text that is displayed about the song that is currently playing can be changed. Use the AUTO button or the menu
to display the ARTIST, TITLE, COMPOSER , or switch RADIO TEXT OFF.
ProCarManuals.com
Page 216 of 239
239 10 Audio
Sirius satellite radio (option or retailer-installed accessory)
Advanced settings
This menu function enables you to make settings on certain Sirius satellite radio functions. To access this menu:
1. Press MENU.
2. Scroll to Sirius menu.
3. Select ADVANCED SIRIUS SETTINGS .
WARNING
Settings should be made when the vehicle is at a standstill.
The following settings can be made in the Sirius menu.
Songs can be added to the song list
Channel skip settings can be made
Channel lock settings can be made
The channel access code can be displayed or changed
Your Sirius ID can be displayed
Skip options
This function is used to remove a channel from the list of available channels.
Skip current
1. Select CHANNEL SKIP LIST and press ENTER.
2. Select a category in the list and press ENTER .
3. Skip channels in the list presented by pressing ENTER or right arrow key.
Unskip all channels
This permanently removes all channels from the skip list and makes them available for selection.
Temp. unskip all ch.
This function will temporarily unskip all channels and make them available for selection. The channels remain on the
skip list and will again be skipped the next time the ignition is switched on.
Channel lock
Access to specific channels can be restricted (locked). A locked channel will not provide audio, song titles, or artist
information.
NOTE
All channels are initially unlocked.
Locking a channel:
ProCarManuals.com
Page 218 of 239
241 10 Audio
CD player/CD changer (option)
CD function controls
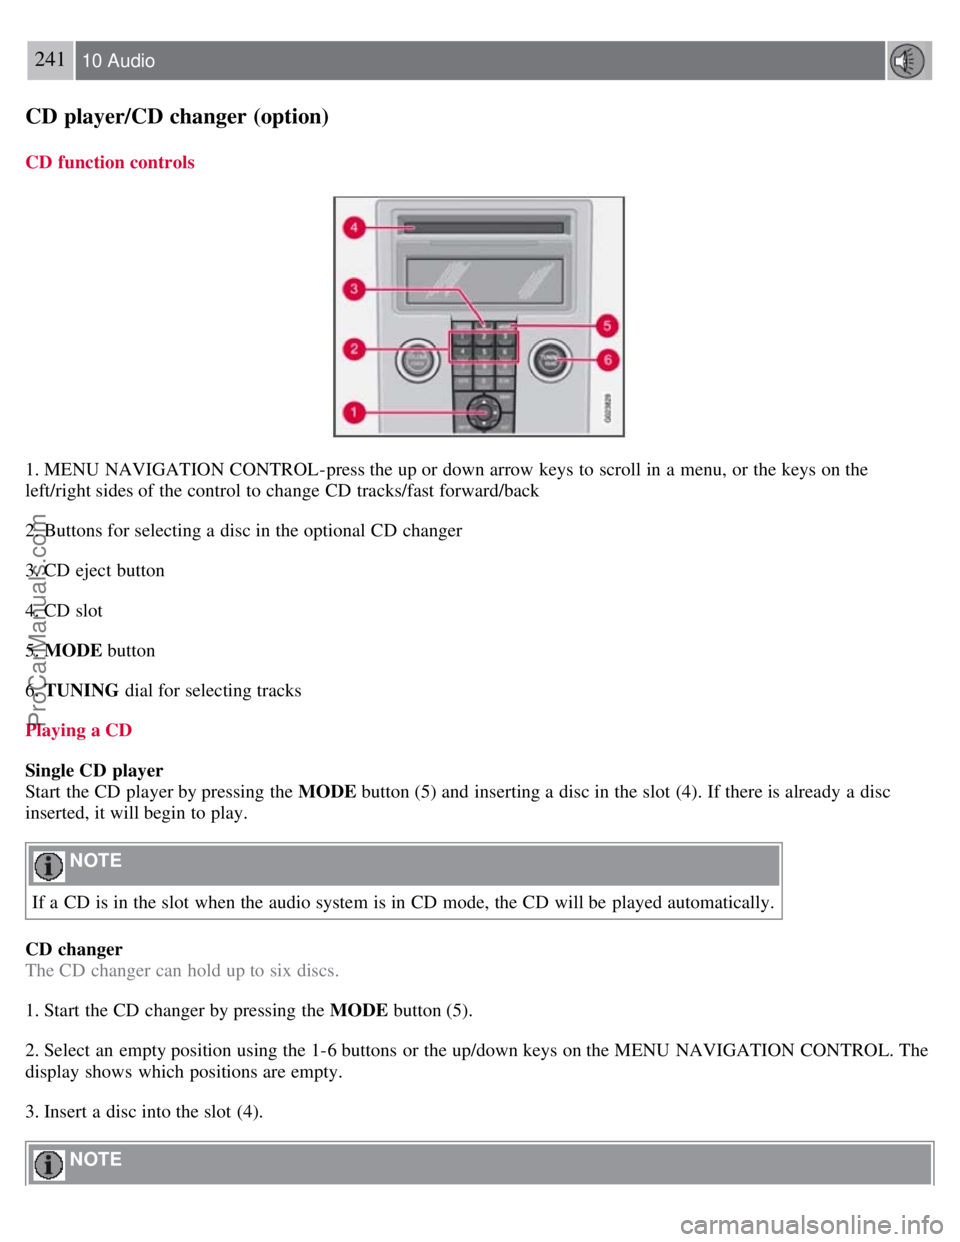
1. MENU NAVIGATION CONTROL-press the up or down arrow keys to scroll in a menu, or the keys on the
left/right sides of the control to change CD tracks/fast forward/back
2. Buttons for selecting a disc in the optional CD changer
3. CD eject button
4. CD slot
5. MODE button
6. TUNING dial for selecting tracks
Playing a CD
Single CD player
Start the CD player by pressing the MODE button (5) and inserting a disc in the slot (4). If there is already a disc
inserted, it will begin to play.
NOTE
If a CD is in the slot when the audio system is in CD mode, the CD will be played automatically.
CD changer
The CD changer can hold up to six discs.
1. Start the CD changer by pressing the MODE button (5).
2. Select an empty position using the 1-6 buttons or the up/down keys on the MENU NAVIGATION CONTROL. The
display shows which positions are empty.
3. Insert a disc into the slot (4).
NOTE
ProCarManuals.com