change wheel VOLVO S40 2008 Owners Manual
[x] Cancel search | Manufacturer: VOLVO, Model Year: 2008, Model line: S40, Model: VOLVO S40 2008Pages: 239, PDF Size: 5.94 MB
Page 53 of 239
NOTE
To make it easier to read the odometer, trip odometer, clock, and ambient temperature, these gauges illuminate when
the vehicle is unlocked and when the key has been removed from the ignition switch. The lighting will go out when
the vehicle is locked.
Move the thumb wheel (2) up to increase brightness or down to decrease brightness.
Unlocking the fuel filler door
With the ignition switched off, press button 4 to unlock the fuel filler door. Please note that
61 02 Instruments and controls
Lighting panel
the fuel filler door will remain unlocked until the car begins to move forward.
An audible click will be heard when the fuel filler door re-locks.
62 02 Instruments and controls
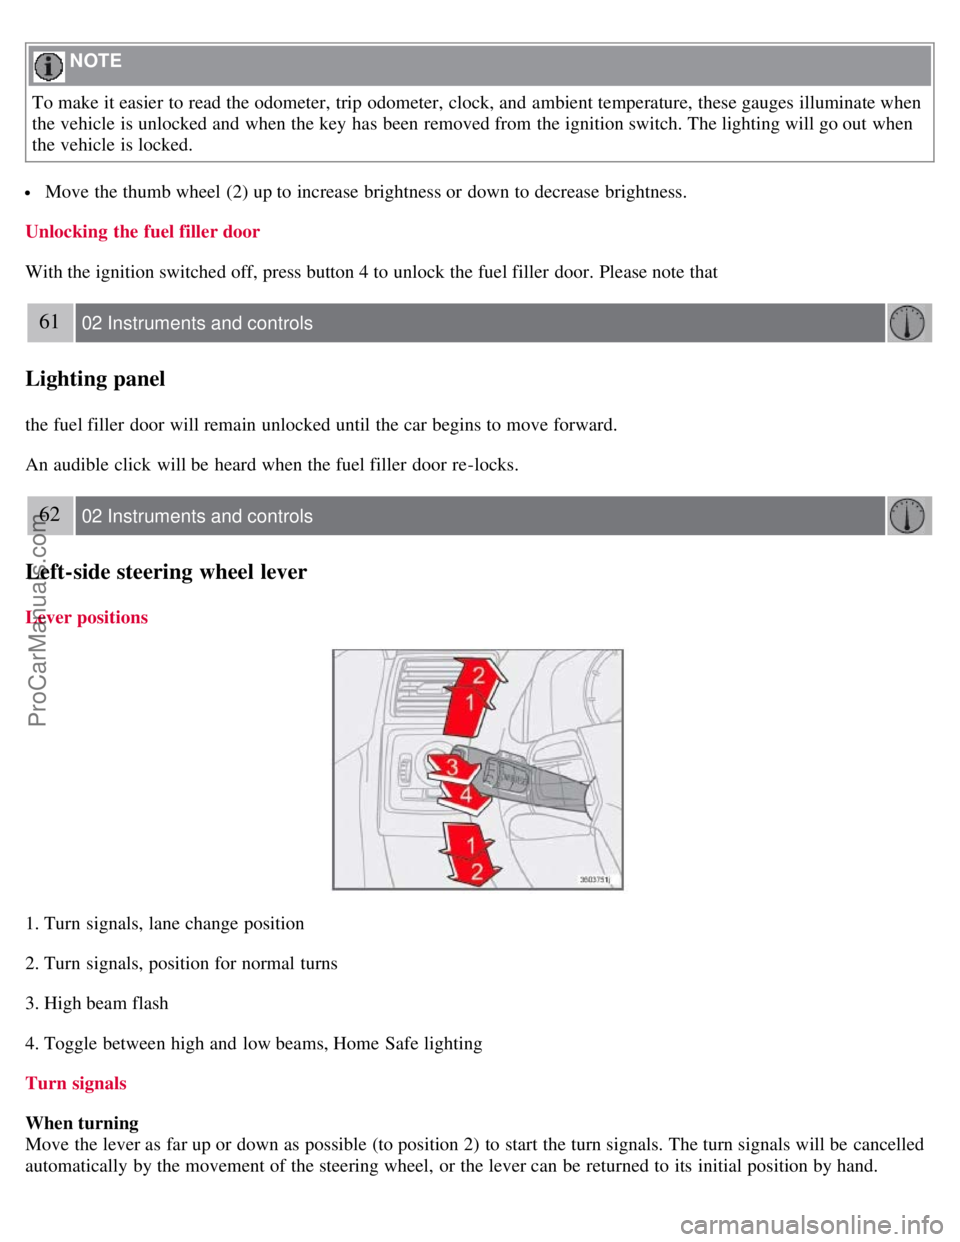
Left-side steering wheel lever
Lever positions
1. Turn signals, lane change position
2. Turn signals, position for normal turns
3. High beam flash
4. Toggle between high and low beams, Home Safe lighting
Turn signals
When turning
Move the lever as far up or down as possible (to position 2) to start the turn signals. The turn signals will be cancelled
automatically by the movement of the steering wheel, or the lever can be returned to its initial position by hand.
ProCarManuals.com
Page 54 of 239
When changing lanes
The driver can automatically flash the turn signals 3 times by:
Moving the turn signal lever up or down to position 1 and releasing it.
Moving the lever up or down to position 2 and immediately back to its original position.
NOTE
This automatic flashing sequence can be interrupted by immediately moving the lever in the opposite direction.
If the turn signal indicator flashes faster than normal, check for a burned-out turn signal bulb.
High/low beam headlights
Continuous high beams
1. Turn the ignition key to position II.
2. With the light switch (1) in position
, (see page 59) pull the turn signal lever toward the steering wheel (position
4) to toggle between high and low beams.
High beam flash
1. Turn the ignition key to position II.
2. Pull the turn signal lever to position
3. The high beams will remain on until the lever is released.
NOTE
The high beam flash only functions when the key is in the ignition.
Home safe lighting
When you leave your car at night, you can make use of the home safe lighting function to illuminate the area in front
of the car.
1. Remove the key from the ignition switch.
2. Pull the direction indicator lever as far as possible towards the steering wheel (to position 4) and release it.
3. Exit the car and lock the doors.
The headlights and parking lights will illuminate and remain on for 30
1, 60 or 90 seconds. The time interval can be
changed according to your preferences by using the Personal Settings function, see page 77
for more information.
1Factory setting
63 02 Instruments and controls
Trip computer
Trip computer (option)
ProCarManuals.com
Page 157 of 239
NOTE
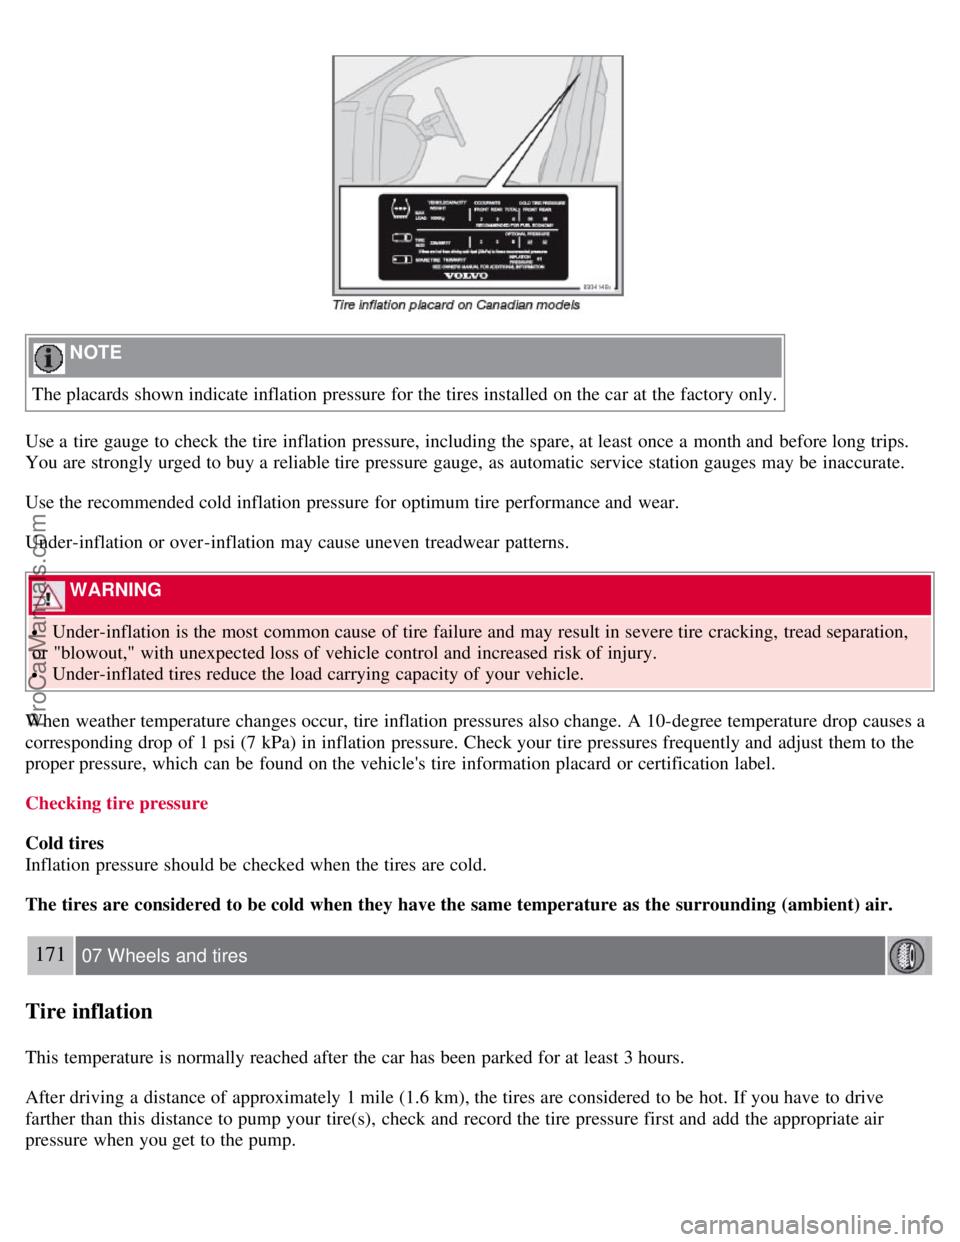
The placards shown indicate inflation pressure for the tires installed on the car at the factory only.
Use a tire gauge to check the tire inflation pressure, including the spare, at least once a month and before long trips.
You are strongly urged to buy a reliable tire pressure gauge, as automatic service station gauges may be inaccurate.
Use the recommended cold inflation pressure for optimum tire performance and wear.
Under-inflation or over-inflation may cause uneven treadwear patterns.
WARNING
Under-inflation is the most common cause of tire failure and may result in severe tire cracking, tread separation,
or "blowout," with unexpected loss of vehicle control and increased risk of injury.
Under-inflated tires reduce the load carrying capacity of your vehicle.
When weather temperature changes occur, tire inflation pressures also change. A 10-degree temperature drop causes a
corresponding drop of 1 psi (7 kPa) in inflation pressure. Check your tire pressures frequently and adjust them to the
proper pressure, which can be found on the vehicle's tire information placard or certification label.
Checking tire pressure
Cold tires
Inflation pressure should be checked when the tires are cold.
The tires are considered to be cold when they have the same temperature as the surrounding (ambient) air.
171 07 Wheels and tires
Tire inflation
This temperature is normally reached after the car has been parked for at least 3 hours.
After driving a distance of approximately 1 mile (1.6 km), the tires are considered to be hot. If you have to drive
farther than this distance to pump your tire(s), check and record the tire pressure first and add the appropriate air
pressure when you get to the pump.
ProCarManuals.com
Page 167 of 239
they may not be optimal. Further, tires that are rotated, but not on a regular basis, may actually cause more tire noise,
faster tire wear, and unpleasant changes in steering feel and vehicle handling.
A tire that can fully adapt to its position will provide better steering feel, lower tire noise, and better fuel economy.
Braking stability performance
Your vehicle is driven mainly by the front tires, which will wear faster. This can be beneficial. Having more tread on
the rear tires will help reduce oversteer. Oversteer is when a vehicle wants to keep turning because of momentum and
dynamic forces on its suspension.
Suspension wear diagnostics
Every suspension needs periodic inspection and maintenance. A tire's wear pattern can be an aid in detecting a
suspension problem. Each tire, if left in place, tells a story about the suspension. Tire rotation, on the other hand, could
make suspension wear harder to detect. Early detection is very important, because suspension problems can make tire
wear worse.
If you do rotate your tires...
Please follow the tire manufacturer's recommendations, as outlined in the tire manufacturers tire warranty pamphlet.
184 07 Wheels and tires
Changing a wheel
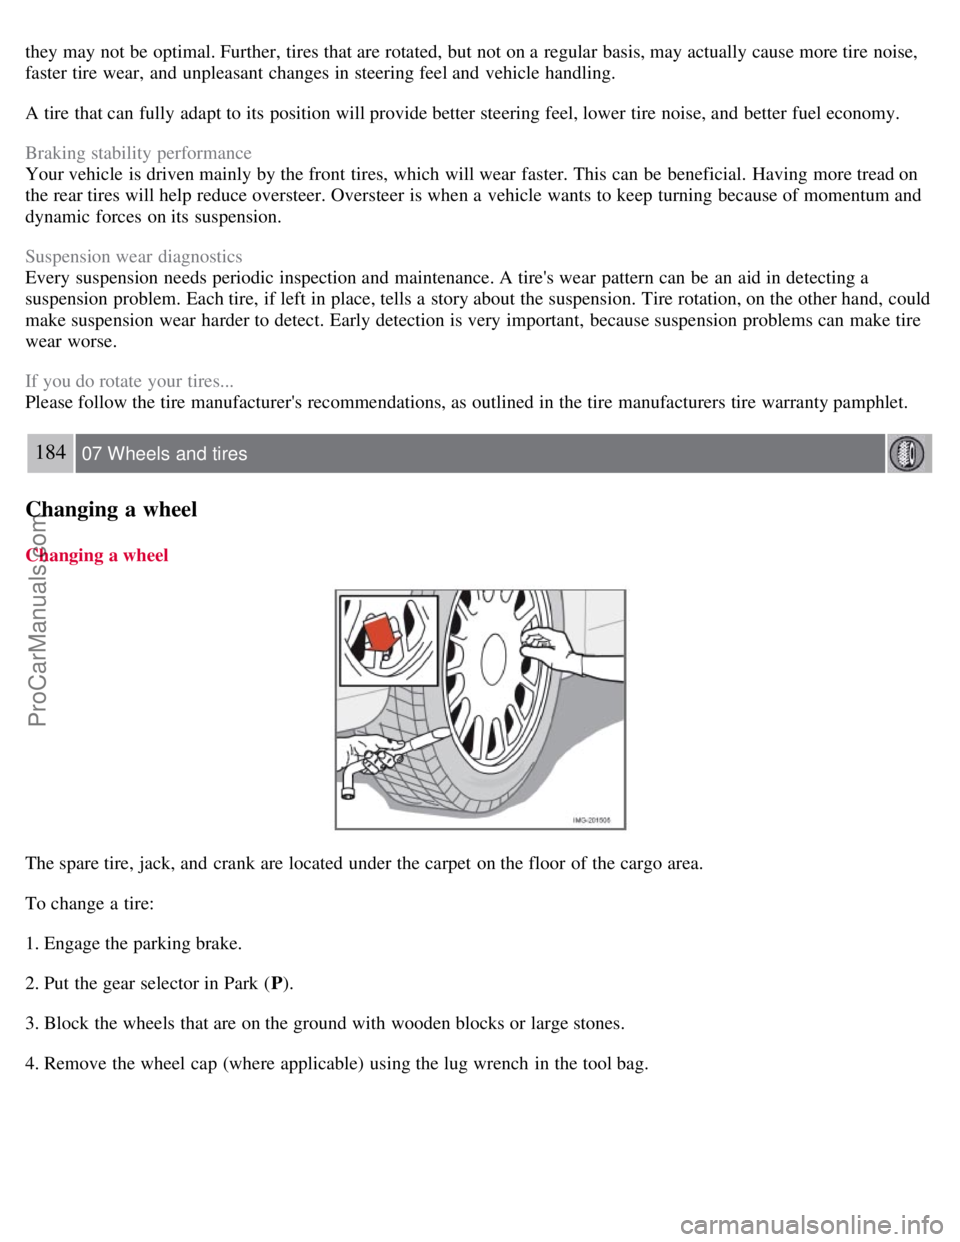
Changing a wheel
The spare tire, jack, and crank are located under the carpet on the floor of the cargo area.
To change a tire:
1. Engage the parking brake.
2. Put the gear selector in Park (P).
3. Block the wheels that are on the ground with wooden blocks or large stones.
4. Remove the wheel cap (where applicable) using the lug wrench in the tool bag.
ProCarManuals.com
Page 168 of 239
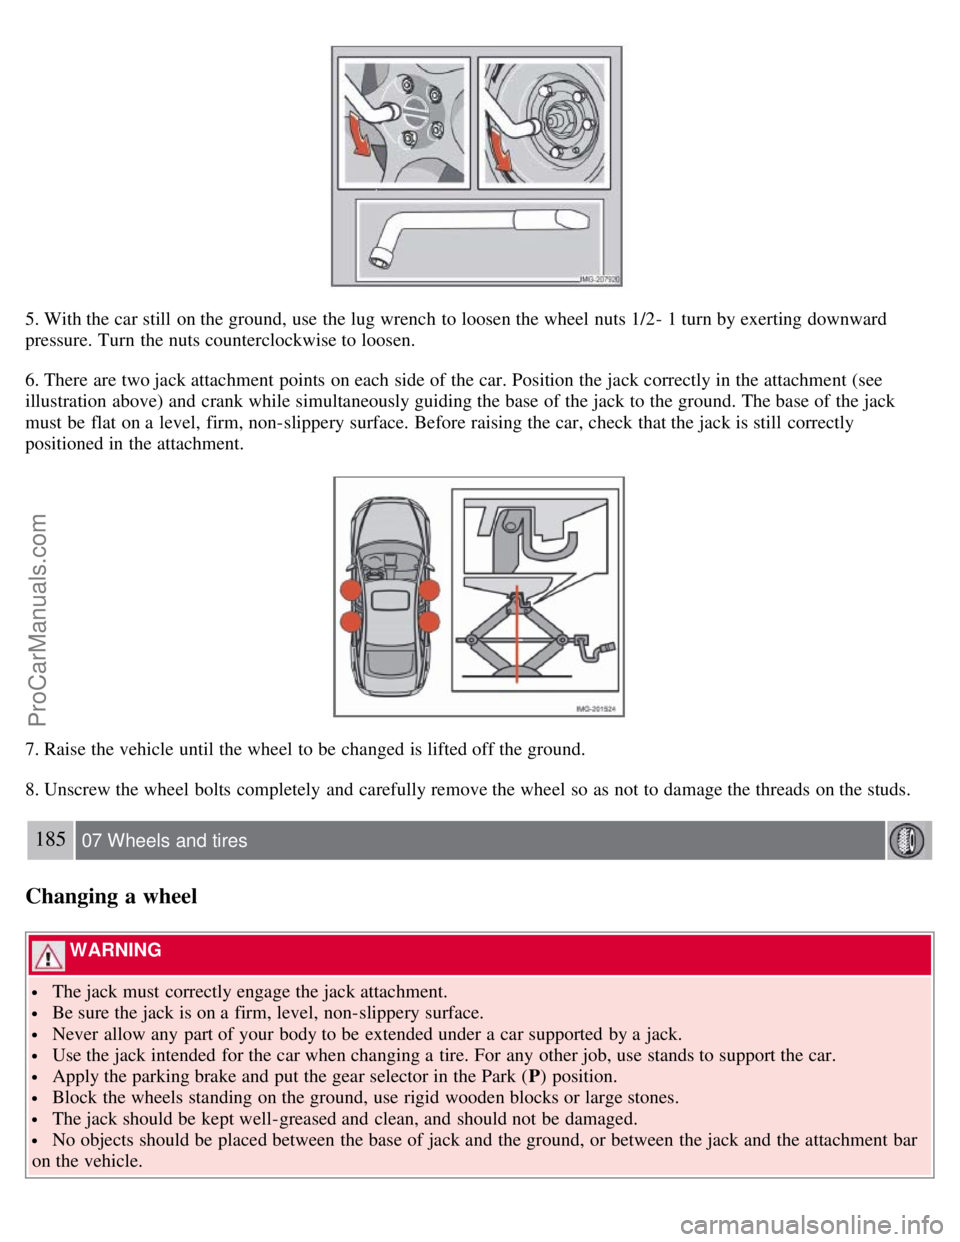
5. With the car still on the ground, use the lug wrench to loosen the wheel nuts 1/2- 1 turn by exerting downward
pressure. Turn the nuts counterclockwise to loosen.
6. There are two jack attachment points on each side of the car. Position the jack correctly in the attachment (see
illustration above) and crank while simultaneously guiding the base of the jack to the ground. The base of the jack
must be flat on a level, firm, non-slippery surface. Before raising the car, check that the jack is still correctly
positioned in the attachment.
7. Raise the vehicle until the wheel to be changed is lifted off the ground.
8. Unscrew the wheel bolts completely and carefully remove the wheel so as not to damage the threads on the studs.
185 07 Wheels and tires
Changing a wheel
WARNING
The jack must correctly engage the jack attachment.
Be sure the jack is on a firm, level, non-slippery surface.
Never allow any part of your body to be extended under a car supported by a jack.
Use the jack intended for the car when changing a tire. For any other job, use stands to support the car.
Apply the parking brake and put the gear selector in the Park (P) position.
Block the wheels standing on the ground, use rigid wooden blocks or large stones.
The jack should be kept well-greased and clean, and should not be damaged.
No objects should be placed between the base of jack and the ground, or between the jack and the attachment bar
on the vehicle.
ProCarManuals.com
Page 171 of 239
pressure, please refer to the tables beginning on page 172.
The tire pressure warning light will not identify which tire is under-inflated. Be sure to check all four tires.
A certain amount of air seepage from the tires occurs naturally and tire pressure fluctuates with seasonal changes
in temperature. Always check tire pressure regularly.
Erasing warning messages
When a low tire pressure warning message has been displayed, and the tire pressure warning light has come on:
1. Use a tire pressure gauge to check the inflation pressure of all four tires.
2. Re-inflate the tire(s) to the correct pressure (consult the tire pressure placard or the tables beginning on page 172
).
3. In certain cases, it may be necessary to drive the vehicle for several minutes at a speed of 20 mph (30 km/h) or
faster. This will erase the warning text and the warning light will go out.
WARNING
Incorrect inflation pressure could lead to tire failure, resulting in a loss of control of the vehicle.
Changing wheels with TPMS
Please note the following when changing or replacing the factory installed TPMS wheels/tires on the vehicle:
Only the factory-mounted wheels are equipped with TPMS sensors in the valves.
If the vehicle is equipped with a temporary spare tire, this tire does not have a TPMS sensor.
If wheels without TPMS sensors are mounted on the vehicle, TIRE PRESS SYST SERVICE REQUIRED will be
displayed each time the vehicle is driven above 25 mph (40 km/h) for 10 minutes or more.
Once TPMS sensors are properly installed, the warning message should not reappear. If the message is still
displayed, drive the vehicle for several minutes at a speed of 20 mph (30 km/h) or faster to erase the message.
Volvo recommends that TPMS sensors be fitted on all wheels used on the vehicle. Volvo does not recommend
moving sensors back and forth between sets of wheels.
NOTE
If you change to tires with a different recommended inflation pressure, the TPMS system must be recalibrated to
these tires. This must be done by a trained and qualified Volvo service technician.
If a tire is changed, or if the TPMS sensor is moved to another wheel, the sensor's seal, nut, and valve core should
be replaced.
When installing TPMS sensors, the vehicle must be parked for at least 15 minutes with the ignition off. if the
vehicle is driven within 15 minutes, a TPMS error message will be displayed.
CAUTION
When inflating tires with TPMS valves, press the pump's mouthpiece straight onto the valve to help avoid bending or
otherwise damaging the valve.
189 07 Wheels and tires
This page left intentionally blank.
ProCarManuals.com
Page 187 of 239
Fluid type: Volvo power steering fluid or equivalent.
Replace: No fluid change required.
WARNING
If a problem should occur in the power steering system or if the vehicle has no electrical current and must be towed,
it is still possible to steer the vehicle. However, keep in mind that greater effort will be required to turn the steering
wheel.
208 09 Maintenance and servicing
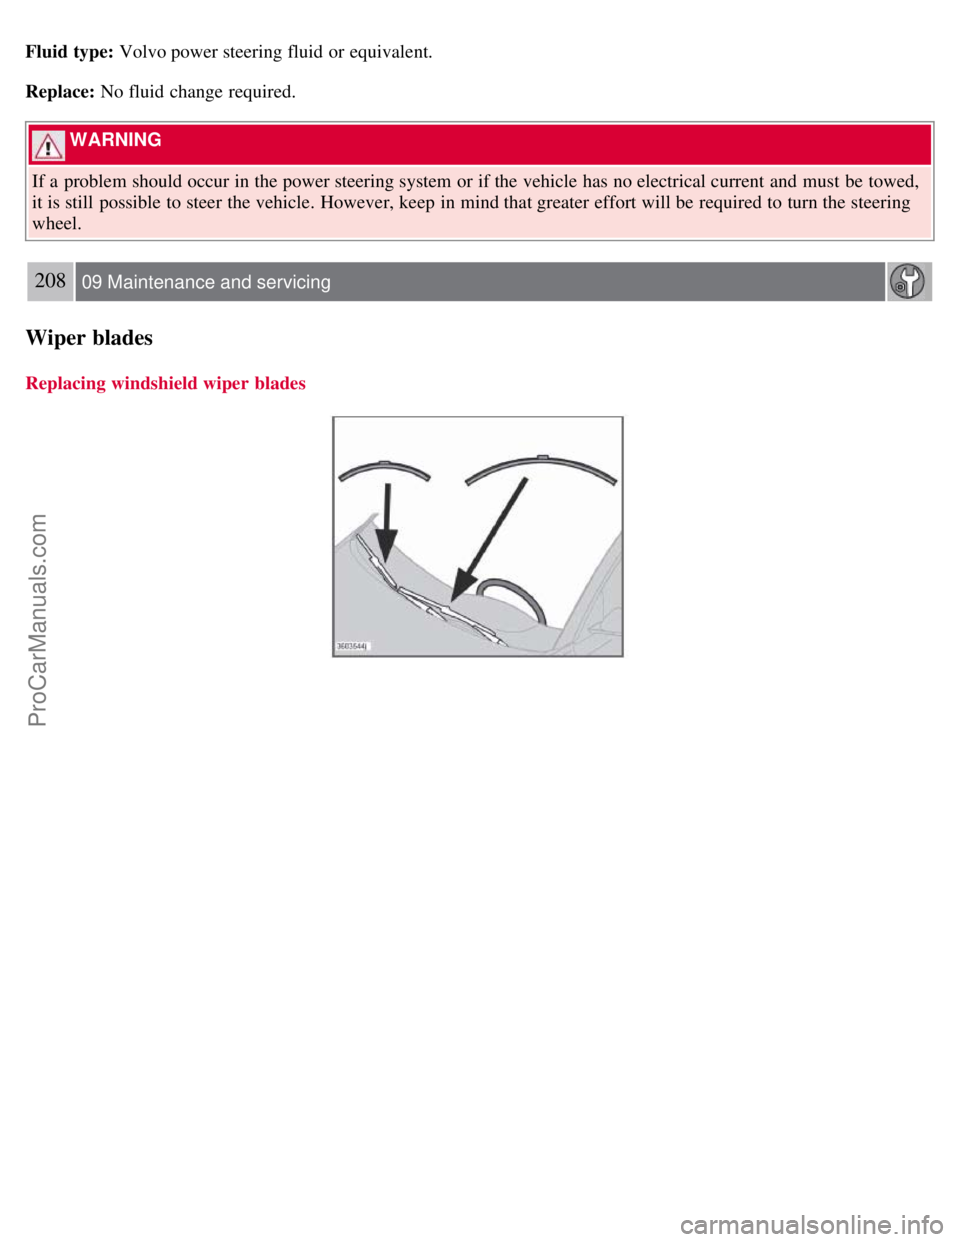
Wiper blades
Replacing windshield wiper blades
ProCarManuals.com
Page 207 of 239
Audio functions
7. If there is distortion, lower your music player's headphone volume until the distortion goes away.
8. Finally, exit the menu and adjust the audio volume to a comfortable level.
Volume
Use the volume dial (1) or the buttons in the optional steering wheel keypad to adjust the volume level. The volume
level is also adjusted automatically according to the vehicle's speed, see page 234
for more information on this
function.
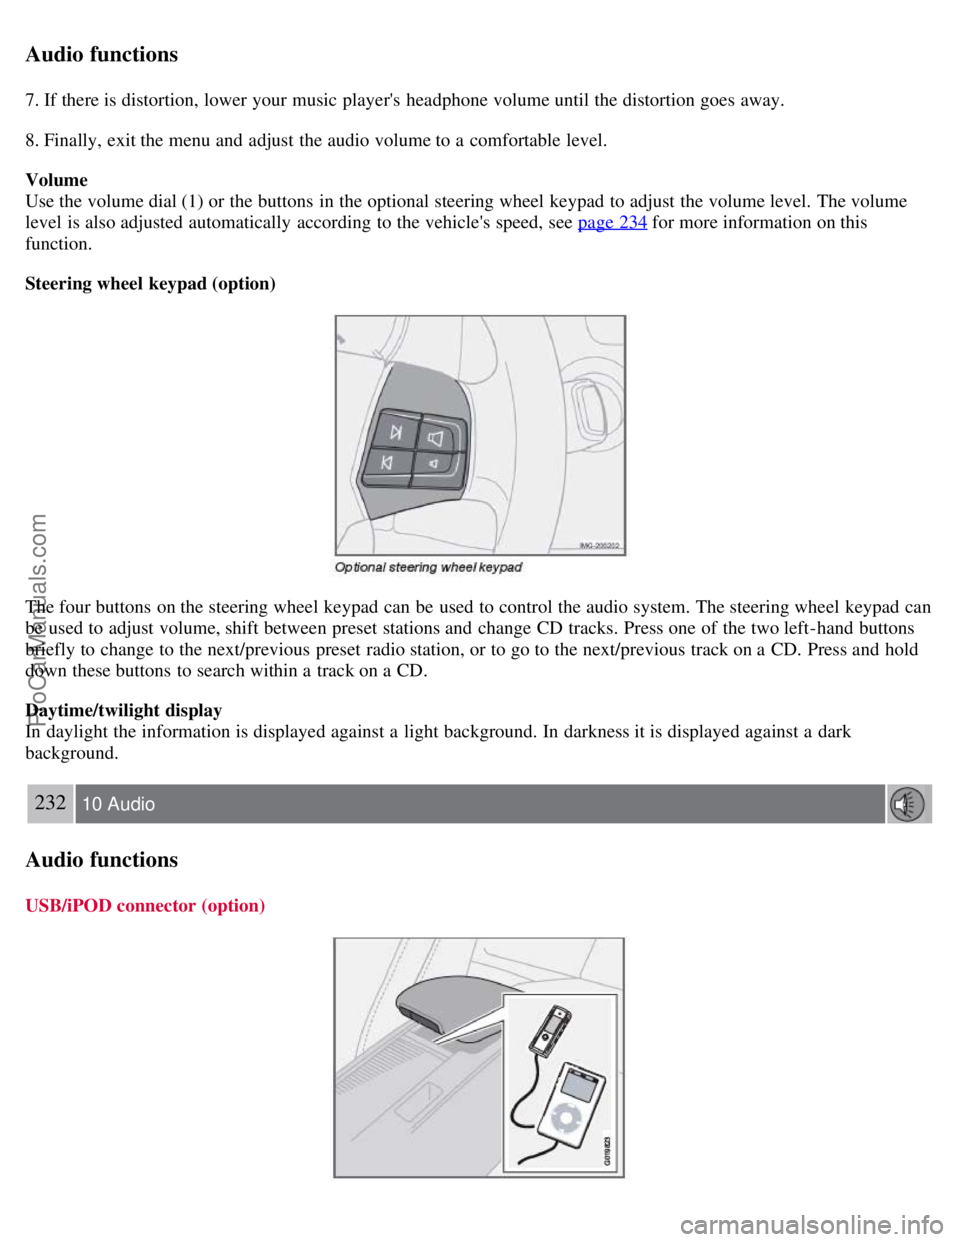
Steering wheel keypad (option)
The four buttons on the steering wheel keypad can be used to control the audio system. The steering wheel keypad can
be used to adjust volume, shift between preset stations and change CD tracks. Press one of the two left-hand buttons
briefly to change to the next/previous preset radio station, or to go to the next/previous track on a CD. Press and hold
down these buttons to search within a track on a CD.
Daytime/twilight display
In daylight the information is displayed against a light background. In darkness it is displayed against a dark
background.
232 10 Audio
Audio functions
USB/iPOD connector (option)
ProCarManuals.com
Page 220 of 239
Changing tracks
Briefly press the left or right arrow keys on the MENU NAVIGATION CONTROL to skip to the previous or next
track/file.
NOTE
The TUNING dial (6) (turn clockwise to go to the next track/file, or counterclockwise to go to the previous
track/file) or the optional steering wheel keypad can also be used for this purpose.
Fast forward/back
Press and hold down the left or right arrows keys in the MENU NAVIGATION CONTROL (or the corresponding
keys on the optional steering wheel keypad) to search within a track/file or the whole disc. The search continues for as
long as the buttons are held down.
Random play
This function plays the tracks/files on a CD (or on all of the CDs if the vehicle is equipped with the optional CD
changer) in random order (shuffle).
243 10 Audio
CD player/CD changer (option)
Activating/deactivating the random function-CD player
If a normal CD is being played:
1. Press MENU followed by ENTER .
2. Select Random and press ENTER .
If a CD with audio files is being played:
1. Press MENU followed by ENTER .
2. Select RANDOM and press ENTER.
3. Select DISC or FOLDER and press ENTER .
Activating/deactivating the random function-CD changer
If a normal CD is being played:
1. Press MENU followed by ENTER .
2. Select RANDOM and press ENTER.
3. Select SINGLE DISC or ALL DISCS and press ENTER .
If a CD with audio files is being played:
1. Press MENU followed by ENTER .
2. Select RANDOM and press ENTER.
3. Select SINGLE DISC or FOLDER and press ENTER .
NOTE
ProCarManuals.com
Page 226 of 239
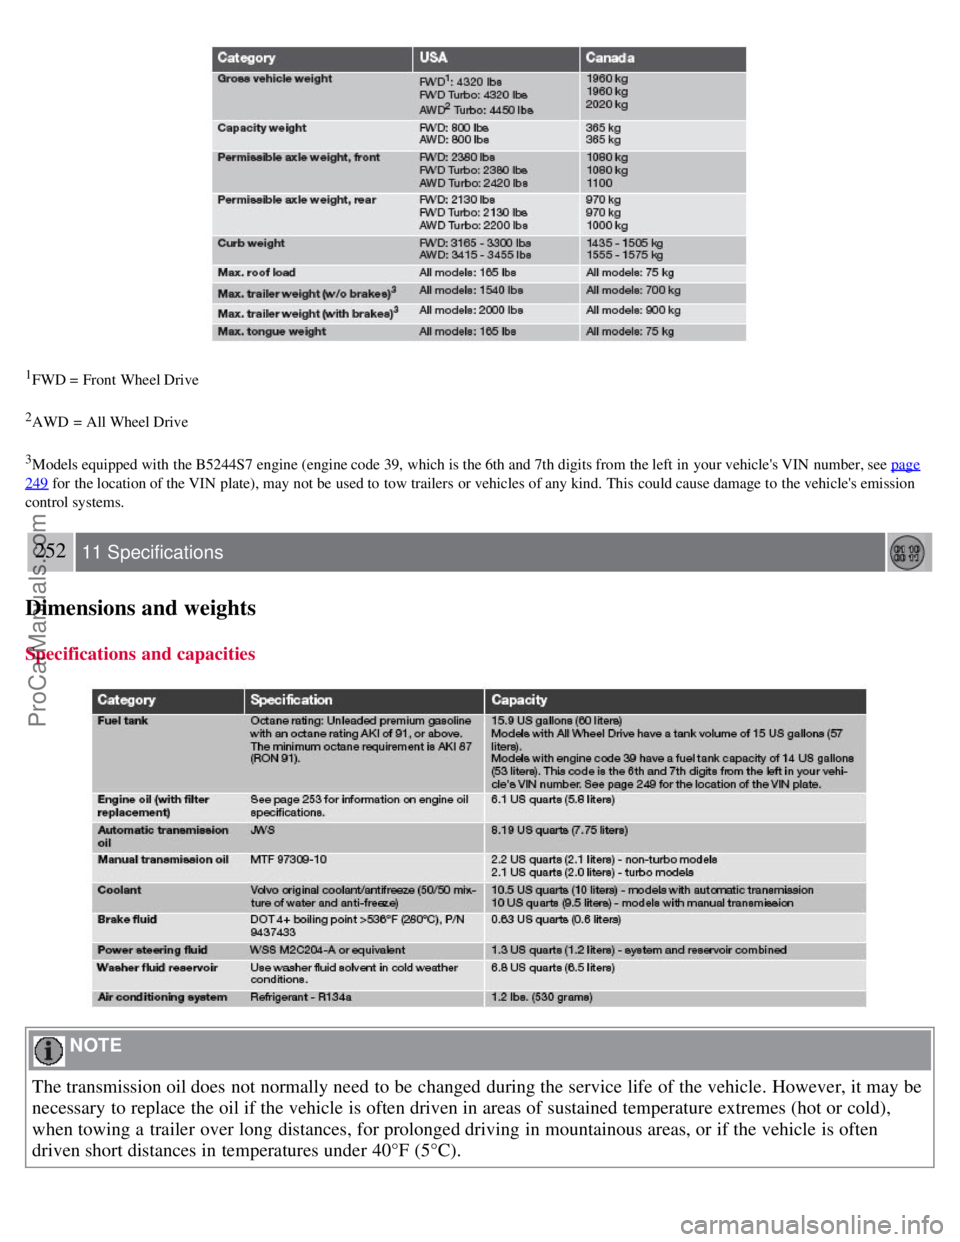
1FWD = Front Wheel Drive
2AWD = All Wheel Drive
3Models equipped with the B5244S7 engine (engine code 39, which is the 6th and 7th digits from the left in your vehicle's VIN number, see page
249 for the location of the VIN plate), may not be used to tow trailers or vehicles of any kind. This could cause damage to the vehicle's emission
control systems.
252 11 Specifications
Dimensions and weights
Specifications and capacities
NOTE
The transmission oil does not normally need to be changed during the service life of the vehicle. However, it may be
necessary to replace the oil if the vehicle is often driven in areas of sustained temperature extremes (hot or cold),
when towing a trailer over long distances, for prolonged driving in mountainous areas, or if the vehicle is often
driven short distances in temperatures under 40°F (5°C).
ProCarManuals.com