low beam VOLVO S40 2008 Owners Manual
[x] Cancel search | Manufacturer: VOLVO, Model Year: 2008, Model line: S40, Model: VOLVO S40 2008Pages: 239, PDF Size: 5.94 MB
Page 42 of 239
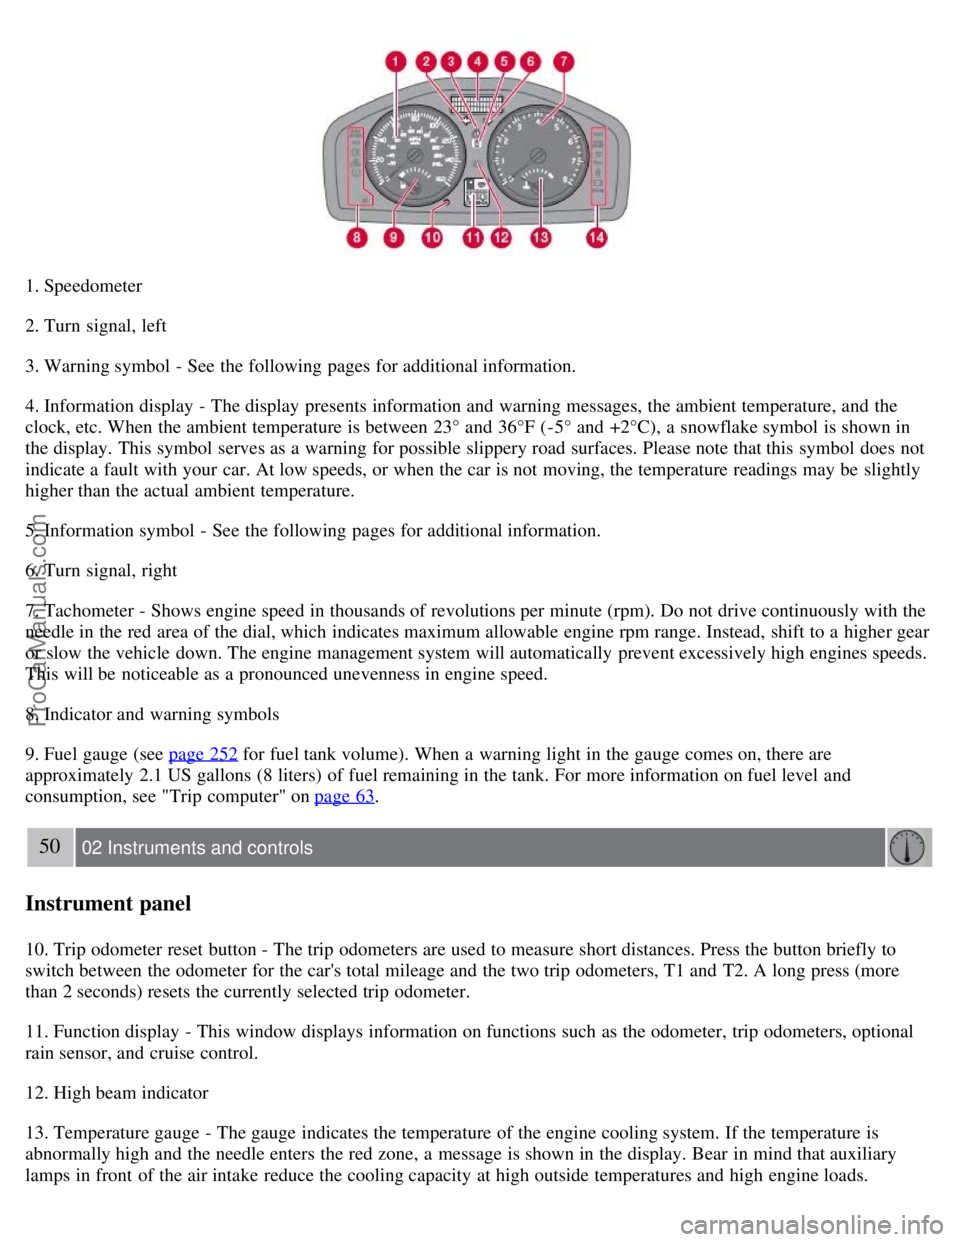
1. Speedometer
2. Turn signal, left
3. Warning symbol - See the following pages for additional information.
4. Information display - The display presents information and warning messages, the ambient temperature, and the
clock, etc. When the ambient temperature is between 23° and 36°F (-5° and +2°C), a snowflake symbol is shown in
the display. This symbol serves as a warning for possible slippery road surfaces. Please note that this symbol does not
indicate a fault with your car. At low speeds, or when the car is not moving, the temperature readings may be slightly
higher than the actual ambient temperature.
5. Information symbol - See the following pages for additional information.
6. Turn signal, right
7. Tachometer - Shows engine speed in thousands of revolutions per minute (rpm). Do not drive continuously with the
needle in the red area of the dial, which indicates maximum allowable engine rpm range. Instead, shift to a higher gear
or slow the vehicle down. The engine management system will automatically prevent excessively high engines speeds.
This will be noticeable as a pronounced unevenness in engine speed.
8. Indicator and warning symbols
9. Fuel gauge (see page 252
for fuel tank volume). When a warning light in the gauge comes on, there are
approximately 2.1 US gallons (8 liters) of fuel remaining in the tank. For more information on fuel level and
consumption, see "Trip computer" on page 63
.
50 02 Instruments and controls
Instrument panel
10. Trip odometer reset button - The trip odometers are used to measure short distances. Press the button briefly to
switch between the odometer for the car's total mileage and the two trip odometers, T1 and T2. A long press (more
than 2 seconds) resets the currently selected trip odometer.
11. Function display - This window displays information on functions such as the odometer, trip odometers, optional
rain sensor, and cruise control.
12. High beam indicator
13. Temperature gauge - The gauge indicates the temperature of the engine cooling system. If the temperature is
abnormally high and the needle enters the red zone, a message is shown in the display. Bear in mind that auxiliary
lamps in front of the air intake reduce the cooling capacity at high outside temperatures and high engine loads.
ProCarManuals.com
Page 51 of 239
The front and rear parking lights can be turned on even when the ignition is switched off.
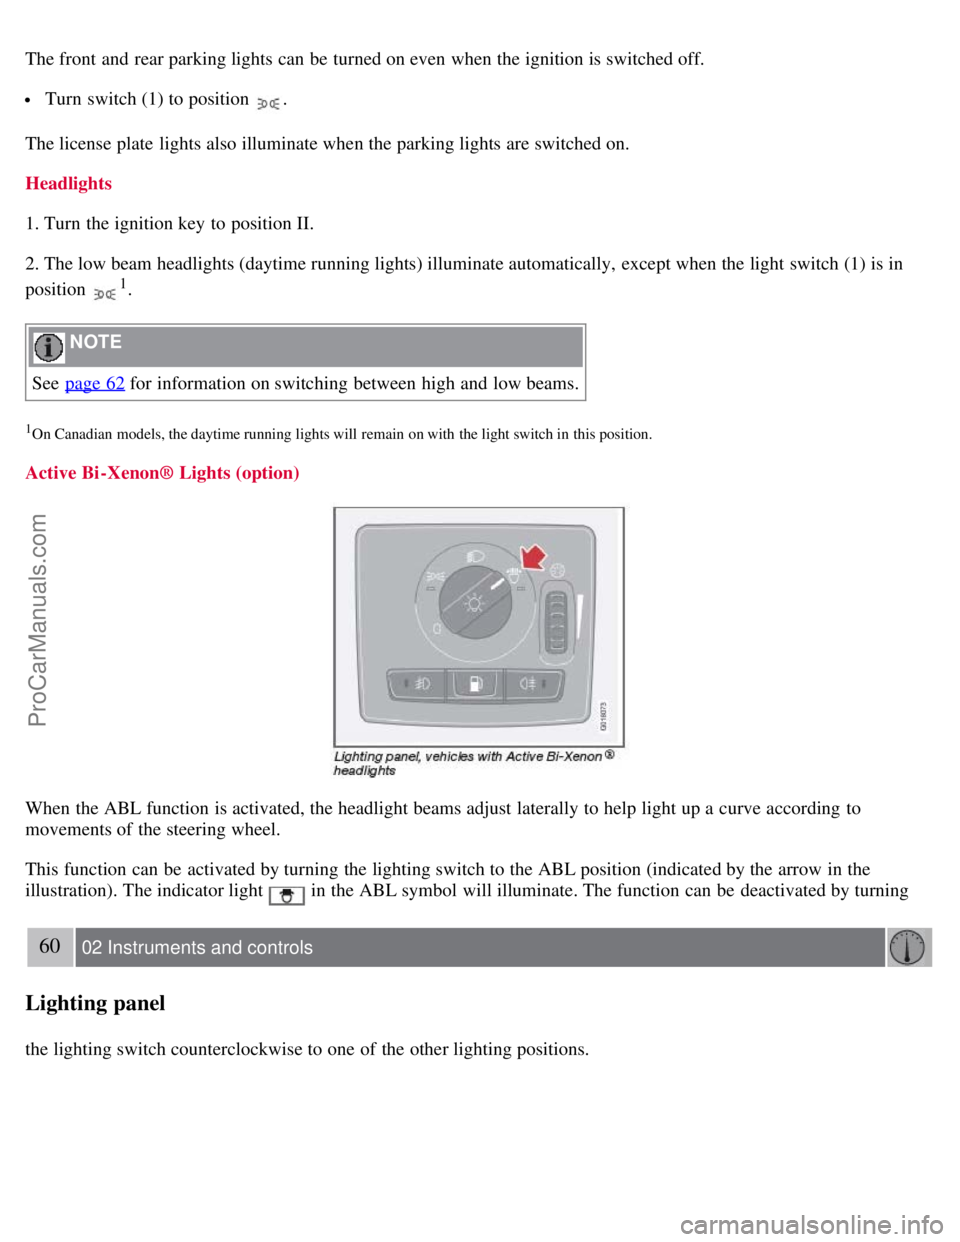
Turn switch (1) to position .
The license plate lights also illuminate when the parking lights are switched on.
Headlights
1. Turn the ignition key to position II.
2. The low beam headlights (daytime running lights) illuminate automatically, except when the light switch (1) is in
position
1.
NOTE
See page 62
for information on switching between high and low beams.
1On Canadian models, the daytime running lights will remain on with the light switch in this position.
Active Bi -Xenon® Lights (option)
When the ABL function is activated, the headlight beams adjust laterally to help light up a curve according to
movements of the steering wheel.
This function can be activated by turning the lighting switch to the ABL position (indicated by the arrow in the
illustration). The indicator light
in the ABL symbol will illuminate. The function can be deactivated by turning
60 02 Instruments and controls
Lighting panel
the lighting switch counterclockwise to one of the other lighting positions.
ProCarManuals.com
Page 52 of 239
NOTE
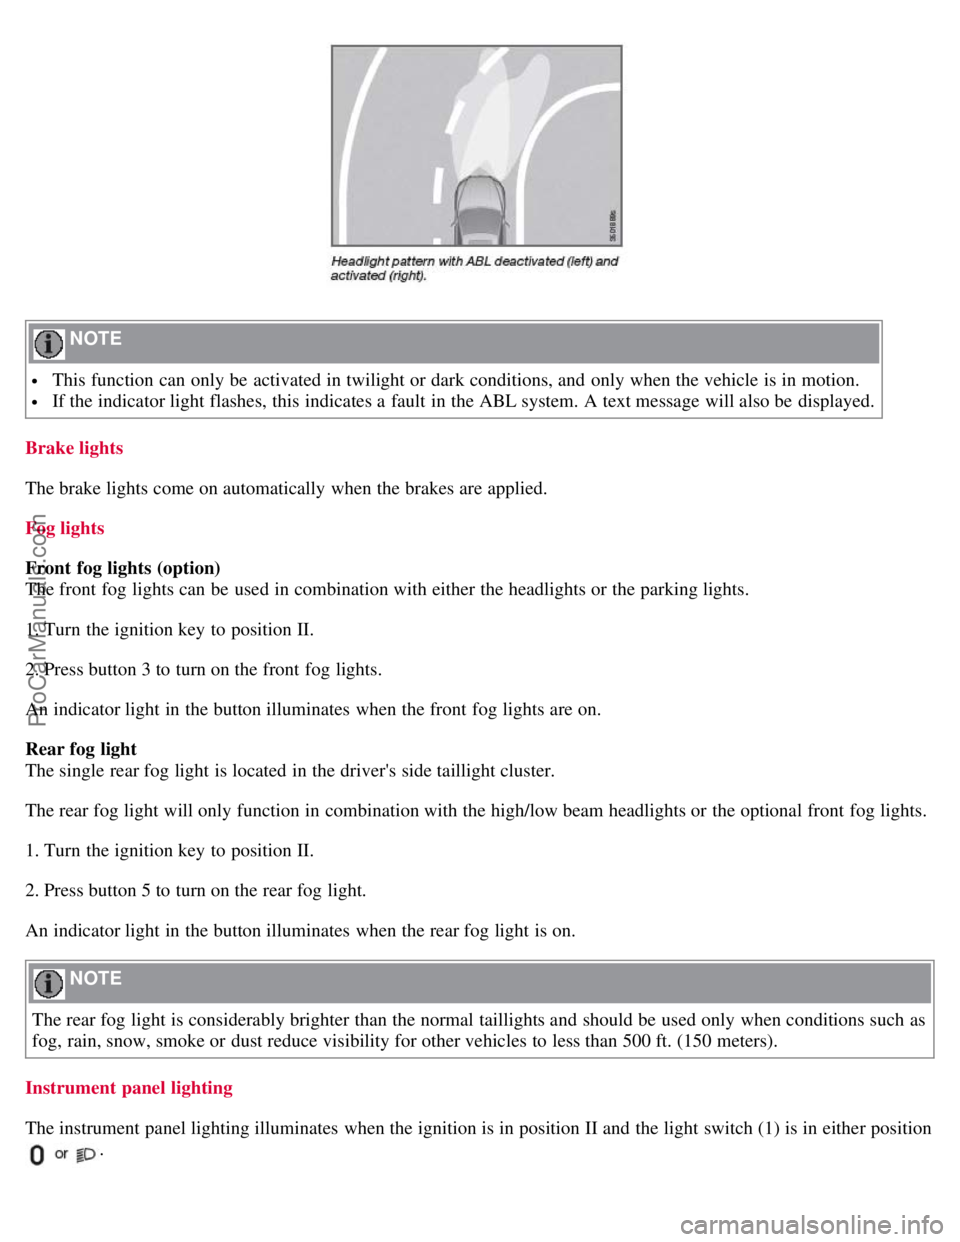
This function can only be activated in twilight or dark conditions, and only when the vehicle is in motion.
If the indicator light flashes, this indicates a fault in the ABL system. A text message will also be displayed.
Brake lights
The brake lights come on automatically when the brakes are applied.
Fog lights
Front fog lights (option)
The front fog lights can be used in combination with either the headlights or the parking lights.
1. Turn the ignition key to position II.
2. Press button 3 to turn on the front fog lights.
An indicator light in the button illuminates when the front fog lights are on.
Rear fog light
The single rear fog light is located in the driver's side taillight cluster.
The rear fog light will only function in combination with the high/low beam headlights or the optional front fog lights.
1. Turn the ignition key to position II.
2. Press button 5 to turn on the rear fog light.
An indicator light in the button illuminates when the rear fog light is on.
NOTE
The rear fog light is considerably brighter than the normal taillights and should be used only when conditions such as
fog, rain, snow, smoke or dust reduce visibility for other vehicles to less than 500 ft. (150 meters).
Instrument panel lighting
The instrument panel lighting illuminates when the ignition is in position II and the light switch (1) is in either position
.
ProCarManuals.com
Page 53 of 239
NOTE
To make it easier to read the odometer, trip odometer, clock, and ambient temperature, these gauges illuminate when
the vehicle is unlocked and when the key has been removed from the ignition switch. The lighting will go out when
the vehicle is locked.
Move the thumb wheel (2) up to increase brightness or down to decrease brightness.
Unlocking the fuel filler door
With the ignition switched off, press button 4 to unlock the fuel filler door. Please note that
61 02 Instruments and controls
Lighting panel
the fuel filler door will remain unlocked until the car begins to move forward.
An audible click will be heard when the fuel filler door re-locks.
62 02 Instruments and controls
Left-side steering wheel lever
Lever positions
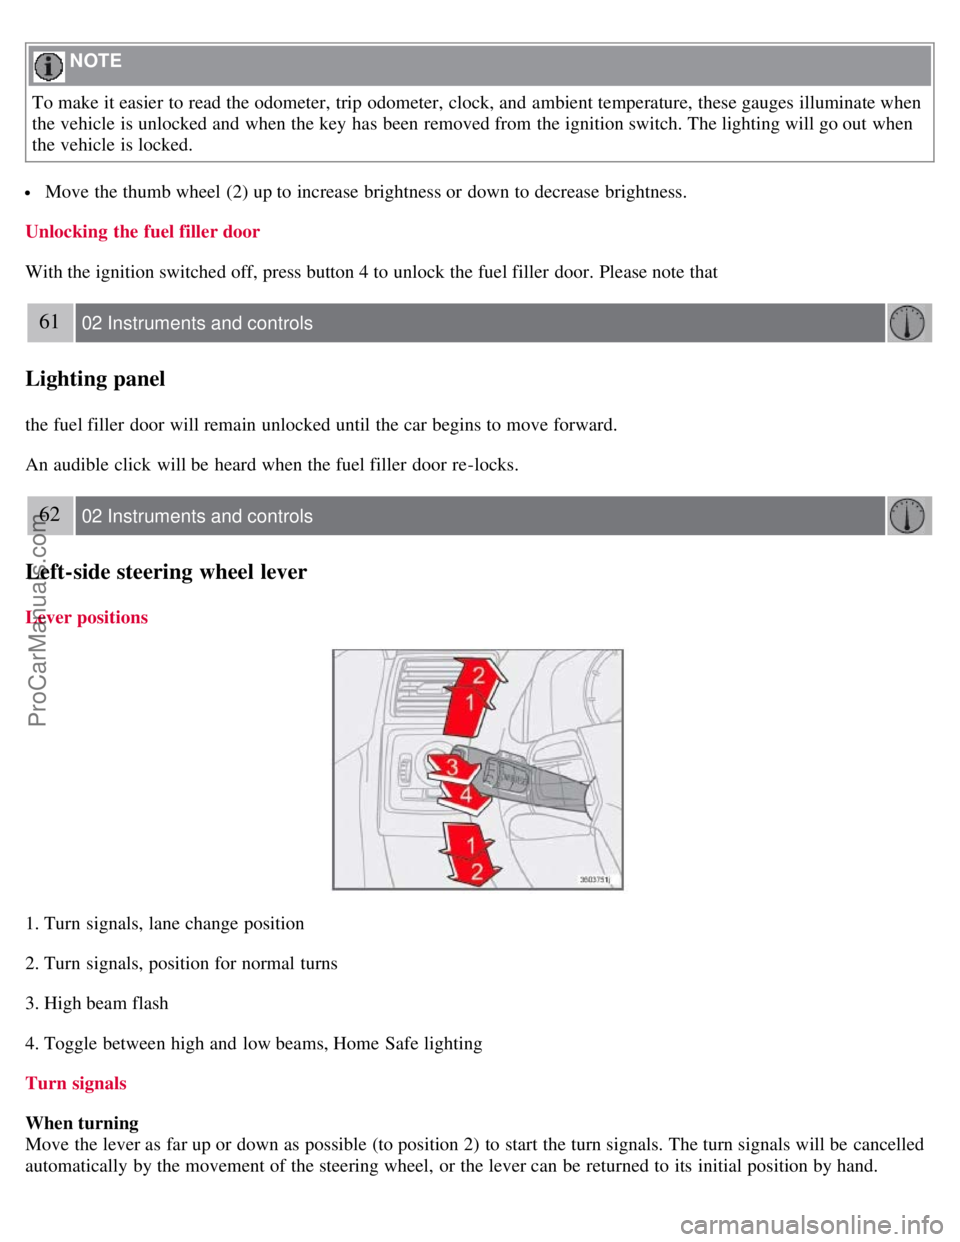
1. Turn signals, lane change position
2. Turn signals, position for normal turns
3. High beam flash
4. Toggle between high and low beams, Home Safe lighting
Turn signals
When turning
Move the lever as far up or down as possible (to position 2) to start the turn signals. The turn signals will be cancelled
automatically by the movement of the steering wheel, or the lever can be returned to its initial position by hand.
ProCarManuals.com
Page 54 of 239
When changing lanes
The driver can automatically flash the turn signals 3 times by:
Moving the turn signal lever up or down to position 1 and releasing it.
Moving the lever up or down to position 2 and immediately back to its original position.
NOTE
This automatic flashing sequence can be interrupted by immediately moving the lever in the opposite direction.
If the turn signal indicator flashes faster than normal, check for a burned-out turn signal bulb.
High/low beam headlights
Continuous high beams
1. Turn the ignition key to position II.
2. With the light switch (1) in position
, (see page 59) pull the turn signal lever toward the steering wheel (position
4) to toggle between high and low beams.
High beam flash
1. Turn the ignition key to position II.
2. Pull the turn signal lever to position
3. The high beams will remain on until the lever is released.
NOTE
The high beam flash only functions when the key is in the ignition.
Home safe lighting
When you leave your car at night, you can make use of the home safe lighting function to illuminate the area in front
of the car.
1. Remove the key from the ignition switch.
2. Pull the direction indicator lever as far as possible towards the steering wheel (to position 4) and release it.
3. Exit the car and lock the doors.
The headlights and parking lights will illuminate and remain on for 30
1, 60 or 90 seconds. The time interval can be
changed according to your preferences by using the Personal Settings function, see page 77
for more information.
1Factory setting
63 02 Instruments and controls
Trip computer
Trip computer (option)
ProCarManuals.com
Page 59 of 239
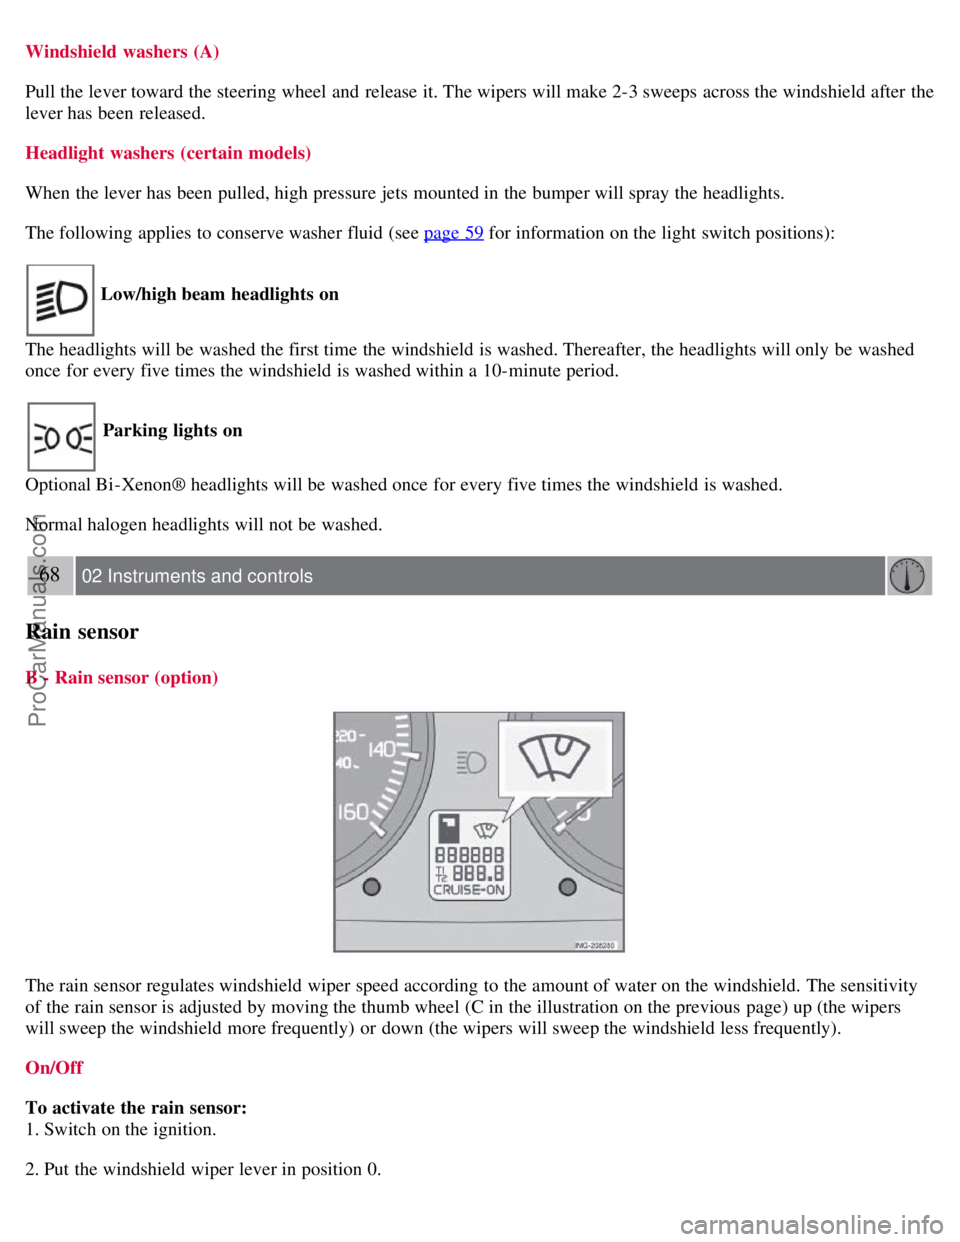
Windshield washers (A)
Pull the lever toward the steering wheel and release it. The wipers will make 2-3 sweeps across the windshield after the
lever has been released.
Headlight washers (certain models)
When the lever has been pulled, high pressure jets mounted in the bumper will spray the headlights.
The following applies to conserve washer fluid (see page 59
for information on the light switch positions):
Low/high beam headlights on
The headlights will be washed the first time the windshield is washed. Thereafter, the headlights will only be washed
once for every five times the windshield is washed within a 10-minute period.
Parking lights on
Optional Bi -Xenon® headlights will be washed once for every five times the windshield is washed.
Normal halogen headlights will not be washed.
68 02 Instruments and controls
Rain sensor
B - Rain sensor (option)
The rain sensor regulates windshield wiper speed according to the amount of water on the windshield. The sensitivity
of the rain sensor is adjusted by moving the thumb wheel (C in the illustration on the previous page) up (the wipers
will sweep the windshield more frequently) or down (the wipers will sweep the windshield less frequently).
On/Off
To activate the rain sensor:
1. Switch on the ignition.
2. Put the windshield wiper lever in position 0.
ProCarManuals.com
Page 72 of 239
Operating side windows
The following alternatives can be selected for opening and/or closing all side windows at the same time by pressing
and holding the Lock/Unlock switch in either of the front doors (see also page 122
for additional information) 1.
Auto close all windows On/Off
Auto open all windows On/Off
1This menu alternative also makes it possible to open all side windows by pressing and holding the Unlock button on the remote control for several
seconds.
NOTE
The ignition key must be in position I or higher (see page 135
) before all side windows can be opened/closed using
the switches in the front doors.
Approach lighting
This alternative determines the length of time for which the car's lights will remain on when the Approach light button
on the central locking system's remote control is pressed. Intervals of 30/60/90 seconds may be selected. See page 113
for more information.
Home safe lighting
This alternative determines the length of time for which the car's lights will remain on when the high beam lever on the
steering column is pulled toward the wheel with the ignition switched off. Intervals of 30/60/90 seconds may be
selected. See page 62
for information on using this function.
Information
VIN number - The VIN (Vehicle Identification Number) is the car's unique identity number.
Number of Keys - the number of keys registered for the car is displayed here.
Climate functions
Blower speed in AUTO mode - the blower speed can be set to AUTO mode in models equipped with ECC. Choose
between "Low", "Normal" and "High".
Timer for recirculation - when the timer is active, the air recirculates in the car for 3-12 minutes depending on the
ambient temperature. Select On/Off depending on whether the recirculation timer is to be active or not.
Keyless locking and unlocking (option as available)
The following alternatives can be selected for locking and unlocking the doors and trunk:
All doors - all doors are locked or unlocked at the same time.
Doors on the same side - front and rear doors on the same side are unlocked together.
Both front doors - both front doors are unlocked together.
One front door - either of the front doors can be unlocked separately2.
2Factory default
79 02 Instruments and controls
Personal settings
Reset to factory settings
Use this alternative to return to the default climate system settings.
ProCarManuals.com
Page 192 of 239
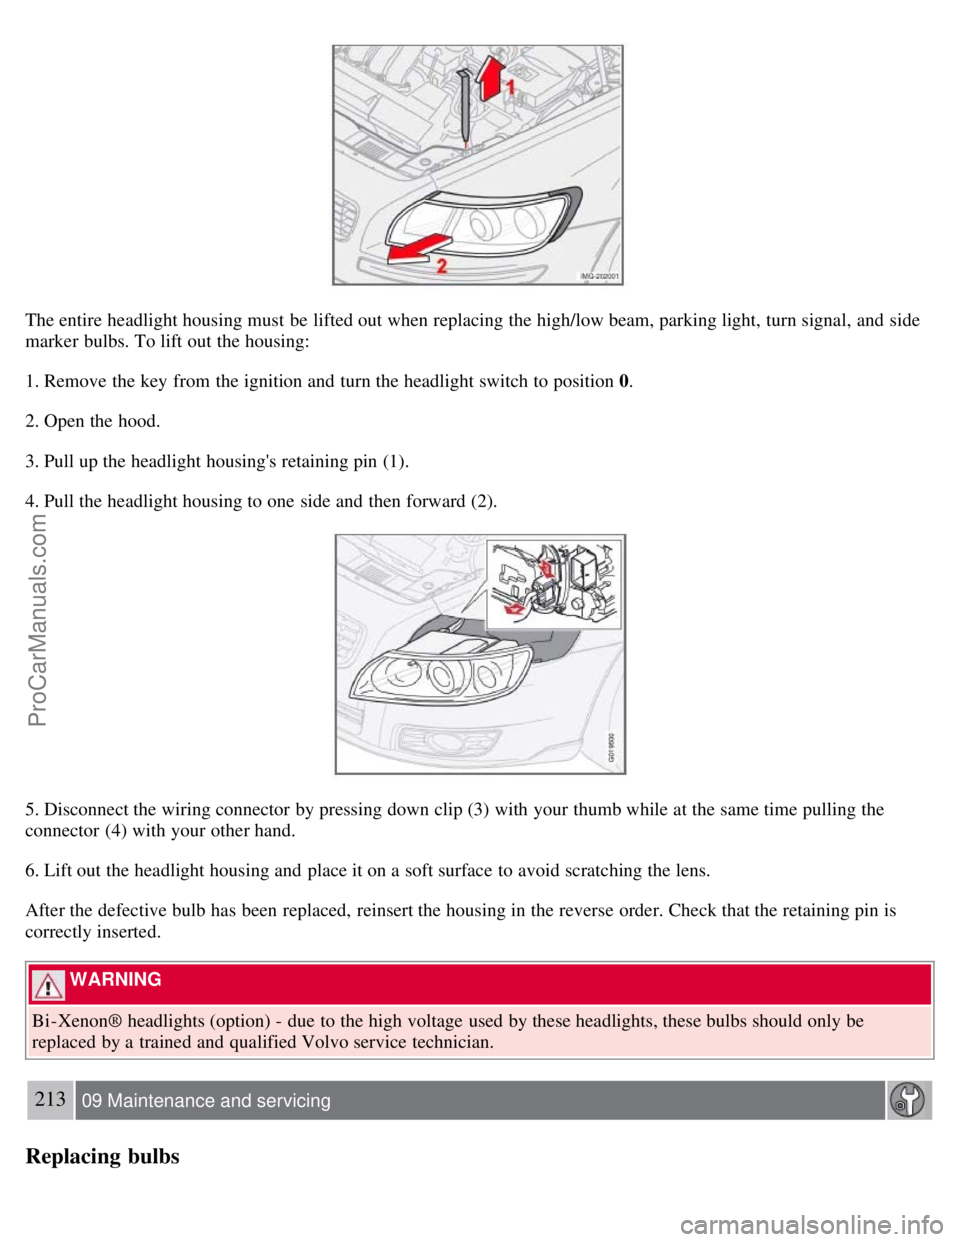
The entire headlight housing must be lifted out when replacing the high/low beam, parking light, turn signal, and side
marker bulbs. To lift out the housing:
1. Remove the key from the ignition and turn the headlight switch to position 0.
2. Open the hood.
3. Pull up the headlight housing's retaining pin (1).
4. Pull the headlight housing to one side and then forward (2).
5. Disconnect the wiring connector by pressing down clip (3) with your thumb while at the same time pulling the
connector (4) with your other hand.
6. Lift out the headlight housing and place it on a soft surface to avoid scratching the lens.
After the defective bulb has been replaced, reinsert the housing in the reverse order. Check that the retaining pin is
correctly inserted.
WARNING
Bi -Xenon® headlights (option) - due to the high voltage used by these headlights, these bulbs should only be
replaced by a trained and qualified Volvo service technician.
213 09 Maintenance and servicing
Replacing bulbs
ProCarManuals.com
Page 193 of 239
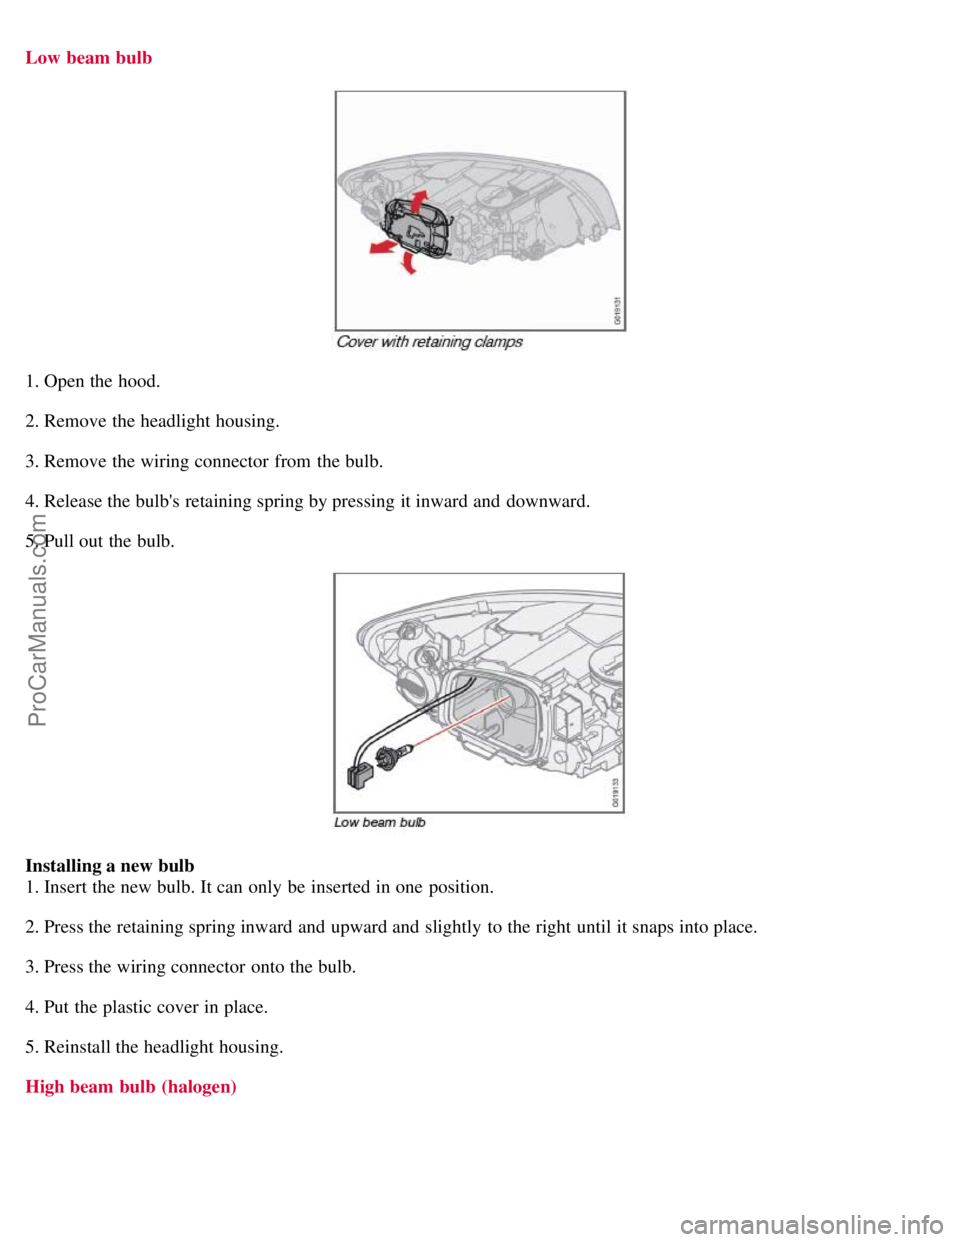
Low beam bulb
1. Open the hood.
2. Remove the headlight housing.
3. Remove the wiring connector from the bulb.
4. Release the bulb's retaining spring by pressing it inward and downward.
5. Pull out the bulb.
Installing a new bulb
1. Insert the new bulb. It can only be inserted in one position.
2. Press the retaining spring inward and upward and slightly to the right until it snaps into place.
3. Press the wiring connector onto the bulb.
4. Put the plastic cover in place.
5. Reinstall the headlight housing.
High beam bulb (halogen)
ProCarManuals.com
Page 235 of 239
Generator254
Generator warning light54
Glossary of tire terminology174
Glove compartment104
locking123
H
Hazard warning flashers69
Head restraints, rear seat107
Headlight housing, removing212
Headlights Active Bi -Xenon®59
Headlights, high and low beams62
High beam bulb, replacing213
High beam flash62
High beam indicator50
Home safe lighting62, 78
HomeLink® Universal Transceiver80
Hood, opening203
I
Ignition switch135
Immobilizer (start inhibitor)112, 136
Indicator and warning symbols49, 53
Infant seats35
Inflatable Curtain25
Inflation pressure table
Canadian models173
US models172
Information display49
Information display, messages57
Information symbol49, 51
Inspection readiness202
Instrument overview46
Instrument panel49
Instrument panel lighting60
iPOD connector (audio system)232
ISOFIX/LATCH anchors41
J
Jack, positioning correctly184
Jacket hanger104
Jump starting153
K
Key blade115
Keyless drive
location of antennas (pacemaker warning)121
starting the vehicle with138
ProCarManuals.com