ESP VOLVO S60 2003 Owners Manual
[x] Cancel search | Manufacturer: VOLVO, Model Year: 2003, Model line: S60, Model: VOLVO S60 2003Pages: 120, PDF Size: 2.43 MB
Page 27 of 120

When washing the car in an automatic car wash, etc move the windshield wiper lever to position 0 or switch off the
ignition completely to deactivate the rain sensor. If the sensor function is left on, the wipers will start inadvertently in
the car wash and could be damaged.
Wipers operate at "normal" speed
Wipers operate at "high" speed
3 - Windshield washer/headlight washer (certain models)
The wipers will make 2-3 sweeps across the windshield and headlights (certain models) after the lever is released.
pg. 34 Instruments and controls
Hazard warning flashers, rear window/sideview mirror defroster, heated
front seats
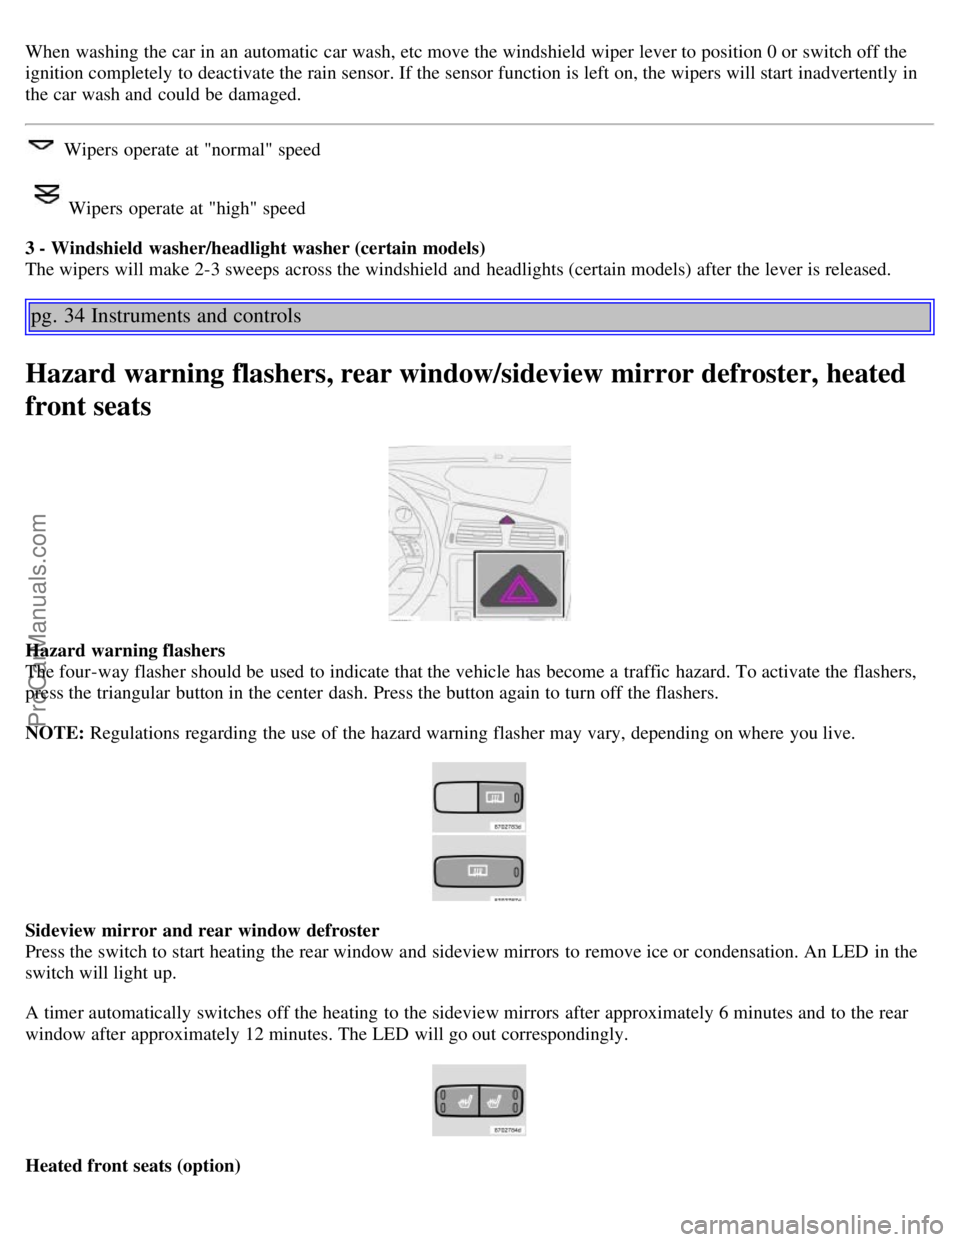
Hazard warning flashers
The four-way flasher should be used to indicate that the vehicle has become a traffic hazard. To activate the flashers,
press the triangular button in the center dash. Press the button again to turn off the flashers.
NOTE: Regulations regarding the use of the hazard warning flasher may vary, depending on where you live.
Sideview mirror and rear window defroster
Press the switch to start heating the rear window and sideview mirrors to remove ice or condensation. An LED in the
switch will light up.
A timer automatically switches off the heating to the sideview mirrors after approximately 6 minutes and to the rear
window after approximately 12 minutes. The LED will go out correspondingly.
Heated front seats (option)
ProCarManuals.com
Page 29 of 120

4. Average speed
This value indicates average speed since the last time the trip computer was reset (by pressing RESET, button C).
When the engine is switched off, information on average speed is stored and remains in system memory until the
RESET (button C) is pressed again.
5. Current speed in miles per hour (Canadian models only)
This function provides the driver with an instantaneous conversion of the car's current speed from km/h to mph.
*Five functions on Canadian models
**A sixth time on Canadian models
pg. 36 Instruments and controls
Cruise control
Cruise control
The cruise control panel is located on the left side of the steering wheel hub.
Engaging cruise control/setting speed
Press the CRUISE button
Press + or - to set the current speed
Increase or decrease speed as desired
NOTE: Cruise control will not function at speeds below 22 mph (35 km/h).
Braking
Cruise control is automatically disengaged when the brake pedal is depressed. The currently set speed is stored in
memory. Quickly pressing resume
will return the car to the previously set speed.
Acceleration
Momentary acceleration, such as when passing another car, does not affect cruise control operation. The car will
automatically return to the previously set speed when you release the accelerator pedal.
When the cruise control is already engaged, the car's speed can be increased or decreased by holding down + or -
until the car reaches the desired speed. One short press on either symbol corresponds to a speed change of
approximately 1 mph (1.6 km/h).
Disengaging cruise control
Cruise control can also be disengaged by:
Pressing the CRUISE button.
Putting the gear selector in (N)eutral.
ProCarManuals.com
Page 42 of 120

Blower
Blower speed can be increased or decreased by turning the knob. If the knob is set to 0, the air conditioning function is
automatically disengaged.
Temperature
Turn the control to set the temperature for the driver's and passenger's sides of the car. For cooler air, the air
conditioning function must be engaged.
Rear window and sideview mirror defrosters
This function defrosts/de-ices the rear window and sideview mirrors. The LED in the switch will light up to indicate
that the heating function is engaged. See page 34
for additional information on this function.
Never use ice scrapers made of metal as they can easily scratch the mirror surface.
Heated front seats (option)
Press the switch once for maximum seat heating. Both LEDs in the switch will be lit.
Press the switch a second time for comfort heating. One LED in the switch will be lit.
Press the switch a third time to turn the heating off completely. The LED will go off.
The seat heating for the passenger seat should be switched off when the seat is not occupied.
pg. 52 Climate control
Manual climate control with air conditioning, (A/C) (contd)
Recirculation
Recirculation can be used to shut out stale air, exhaust, etc. from the passenger compartment. The air in the passenger
compartment is then recirculated, i.e. no air from outside the car is taken into the car when this function is activated.
Recirculation (together with the air conditioning system) cools the passenger compartment more quickly in warm
weather.
If you allow the air in the car to recirculate, there is a risk of icing and fogging, especially in winter. The timer function
minimizes the risk of ice, misting and stale air.
Activate the timer function as follows:
Press for more than 3 seconds. The LED flashes for 5 seconds. The air recirculates in the car for 3-12 minutes
depending on the outside temperature.
The timer function is activated each time you press . To switch off the timer function:
Press again for more than 3 seconds. The LED lights for 5 seconds to confirm your selection.
ProCarManuals.com
Page 48 of 120

You unlock the car from the outside with the key or remote control.
You switch off the ignition (turn the key to position 0).
The courtesy light stays on for 10 minutes if one of the doors is left open after the car is unlocked.
The courtesy light switches off if:
The engine is started.
The car is locked from the outside with the key or remote control.
The courtesy light can be switched off or on in all situations by briefly pressing the button.
When you switch the light on, it remains lit for 10 minutes.
You can disconnect the automatic function by pressing the courtesy light button for more than 3 seconds. Briefly
pressing the courtesy light button again automatically reconnects the function.
The courtesy light timer periods can be changed. Contact your Volvo retailer.
Rear reading lights
Reading lights - front/rear
The reading lights can be switched on or off by pressing the respective buttons. These lights switch off automatically
after 10 minutes if the engine is not running. If the engine is running, the lights stay on indefinitely. The lights can be
switched off at any time by pressing the button.
pg. 59 Interior
Vanity mirror
ProCarManuals.com
Page 58 of 120

2 0 0 3
VOLVO S60
Starting and driving
pg. 77 Starting and driving
Refueling 78
Starting the car81
General information83
Manual transmission85
Automatic transmission (option)86
Geartronic (option)88
All Wheel Drive (option)90
Brake system91
Stability system93
Towing95
Jump starting97
Towing a trailer98
Detachable trailer hitch - installing100
Detachable trailer hitch - removing101
Attaching load carriers102
Cold weather precautions103
Before a long distance trip104
pg. 78 Starting and driving
Refueling
ENGINE OIL
Although some oil consumption occurs during normal engine operation, more oil is consumed when the engine is new
as the internal parts generate higher friction while wearing-in to each other. From the time the engine is new until the
first service is performed, the oil consumption could be higher than normal. For this reason, it is especially important
to check the oil every time you refuel your car during this period. See page 124
.
Fuel requirements
Octane rating
Volvo engines are designed for optimum performance on unleaded premium gasoline with an AKI octane rating of 91
or above. AKI (ANTI KNOCK INDEX) is an average of the Research Octane Number, RON, and the Motor Octane
Number, MON. (RON + MON/2). The minimum octane requirement is AKI 87 (RON 91).
Deposit control gasoline (detergent additives)
Volvo recommends the use of detergent gasoline to control engine deposits. Detergent gasoline is effective in keeping
injectors and intake valves clean. Consistent use of deposit control gasolines will help ensure good driveability and
ProCarManuals.com
Page 61 of 120

Do not use gasolines containing methanol (methyl alcohol, wood alcohol). This practice can result in vehicle
performance deterioration and can damage critical parts in the fuel system. Such damage may not be covered under the
New Vehicle Limited Warranty.
* If the fuel filler cap is not closed tightly or if the engine is running when the car is refueled, the Check Engine Light
(malfunction indicator lamp) may indicate a fault. However, your vehicle's performance will not be affected. Use only
Volvo original or approved fuel filler caps.
pg. 81 Starting and driving
Starting the car
Starting the engine
1. Fasten the seat belt.
WARNING!
Before starting, check that the seat, steering wheel and mirrors are adjusted properly. Make sure the brake pedal can
be depressed completely. Adjust the seat if necessary. See pages 54, 56.
2. Apply the parking brake (hand brake) if not already set. The gear selector (automatic transmission) is locked in the
(P)ark position (SHIFTLOCK).
Manual transmission: the clutch must be fully depressed.
3. Without touching the accelerator pedal, turn the ignition key* to the starting position. Allow the starter to operate for
up to 10 seconds. Release the key as soon as the engine starts. If the engine fails to start, repeat this step.
NOTE: On certain models, when the car is started, idle speed may be noticeably higher than normal for a short period,
depending on the temperature of the engine. This has been done to help bring components in the emission control
system to their normal operating temperature as quickly as possible, which enables them to function normally.
For cold starts at altitudes above 6000 ft (1800 meters), depress the accelerator pedal halfway and turn the key to the
starting position. Release the pedal slowly when the engine starts.
4. To release the gear selector from the ( P)ark position, the engine must be running (or the ignition key must be in
position II) and the brake pedal must be depressed.
5. Select the desired gear. The gear engages after a very slight delay which is especially noticeable when selecting R.
NOTE: Your car is equipped with a KEYLOCK system (automatic transmission). When the engine is switched off,
the gear selector must be in the ( P)ark position before the key can be removed from the ignition switch.
When starting in cold weather, the transmission may shift up at slightly higher engine speeds than normal until the
automatic transmission fluid reaches normal operating temperature.
CAUTION:
Automatic transmission
The engine should be idling when you move the gear selector. Never accelerate until after you feel the transmission
engage! Accelerating immediately after selecting a gear will cause harsh engagement and premature transmission wear.
Selecting P or N when idling at a standstill for prolonged periods of time will help prevent overheating of the
automatic transmission fluid.
ProCarManuals.com
Page 76 of 120

Vehicle loading The tires on your Volvo will perform to specifications at all normal loads when inflated as
recommended on the tire information label located on the inside of the fuel filler door. This label lists both tire and
vehicle design limits. Do not load your car beyond the load limits indicated.
WARNING!
Improperly inflated tires will reduce tire life, adversely affect vehicle handling and can possibly lead to failure
resulting in loss of vehicle control without prior warning.
Temporary Spare
The spare tire in your car is called a "Temporary Spare". It has the following designation: T125/80 R17.
Recommended tire pressure (see decal on Fuel filler door) should be maintained irrespective of which position on the
car the Temporary Spare tire is used on. In the event of damage to this tire, a new one can be purchased from your
Volvo retailer.
WARNING!
Current legislation prohibits the use of the "Temporary Spare" tire other than as a temporary replacement for a
punctured tire. It must be replaced as soon as possible by a standard tire. Road holding and handling may be affected
with the "Temporary Spare" in use. Do not exceed 50 mph (80 km/h). Do not drive farther than 50 miles (80 km) on
a temporary spare tire.
CAUTION:
The car must not be driven with wheels of different dimensions or with a spare tire other than the one that came with
the car. The use of different size wheels can seriously damage your car's transmission.
NOTE: Certain models may be equipped with a full-size spare tire. When used, it should be inflated to the same
pressure as the tire it is replacing.
pg. 109 Wheels and tires
Tread wear indicators
Tires have tread
wear indicators The tires have wear indicator strips running across or parallel to the tread.
When approx. 1/16" (1.6 mm) is left on the tread, these strips become visible and indicate that the tire should be
replaced.
Tires with less than 1/16" (1.6 mm) tread have a very poor grip in rain or snow.
When replacing worn tires, it is recommended that the tire be identical in type (radial) and size as the one being
replaced. Using a tire of the same make (manufacturer) will prevent alteration of the driving characteristics of the
ProCarManuals.com
Page 79 of 120

pg. 112 Wheels and tires
Uniform Tire Quality Grading
ALL PASSENGER CAR TIRES MUST CONFORM TO FEDERAL SAFETY REQUIREMENTS IN
ADDITION TO THESE GRADES
Quality grades can be found, where applicable, on the tire sidewall between the tread shoulder and maximum
section width. For example:
Treadwear 200 Traction AA Temperature A
TREADWEAR
The treadwear grade is a comparative rating based on the wear rate of the tire when tested under controlled conditions
on a specified government test course. For example, a tire graded 150 would wear one and one half (1 1/2) times as
well on the government course as a tire graded 100. The relative performance of tires depends upon the actual
conditions of their use, however, and many depart significantly from the norm due to variation in driving habits,
service practices and differences in road characteristics and climate.
TRACTION
The traction grades, from highest to lowest, are AA, A, B, and C, as measured under controlled conditions on specified
government test surfaces of asphalt and concrete. A tire marked C may have poor traction performance.
WARNING!
The traction grade assigned to this tire is based on braking (straight-ahead) traction tests and is not a measure of
cornering (turning) traction.
TEMPERATURE
The temperature grades are AA (the highest), A, B, and C, representing the tire's resistance to the generation of heat
and its ability to dissipate heat when tested under controlled conditions on a specified indoor laboratory test wheel.
Sustained high temperature can cause the material of the tire to degenerate and reduce tire life, and excessive
temperature can lead to sudden tire failure. The grade C corresponds to a minimum level of performance that all
passenger car tires must meet under the Federal Motor Safety Standard No. 109. Grades B and A represent higher
levels of performance on the laboratory test wheel than the minimum required by law.
WARNING!
The temperature grade for this tire is established for a tire that is properly inflated and not overloaded. Excessive
speed, under-inflation, or excessive loading, either separately or in combination, can cause heat buildup and possible
tire failure.
Contents | Top of Page
ProCarManuals.com
Page 81 of 120

Bumpers: Wash the bumpers with the same cleaning agent used on the rest of the car. Never clean the bumpers with
gasoline or paint thinner. Difficult spots can be removed with denatured alcohol. To avoid scratches, do not dry the
bumpers with paper.
NOTE: When washing the car, remember to remove dirt from the drain holes in the doors and sills.
Automatic car wash
An automatic car wash is a simple and quick way of washing the car. Bear in mind, however, that an automatic car
wash can never replace a proper handwashing. During the first months of the car's life - while the paint is still curing -
we recommend that you handwash the car.
WARNING!
When the car is driven immediately after being washed, apply the brakes several times in order to remove any
moisture from the brake linings.
Engine cleaning agents should not be used when the engine is warm. This constitutes a fire risk.
pg. 115 Car care
Automatic washing - simple and quick
We do NOT recommend washing your car in an automatic wash during the first six months (because the paint will
not have hardened sufficiently).
An automatic wash is a simple and quick way to clean your car, but it is worth remembering that it may not be as
thorough as when you yourself go over the car with sponge and water. Keeping the underbody clean is most important,
especially in the winter. Some automatic washers do not have facilities for washing the underbody.
Before driving into an automatic car wash, make sure that side view mirrors, auxiliary lamps, etc, are secure, and
that any antenna( s) are retracted or removed. Otherwise there is risk of the machine dislodging them.
Polishing and Waxing
Normally, polishing is not required during the first year after delivery, however, waxing may be beneficial.
Before applying polish or wax the car must be washed and dried. Tar spots can be removed with kerosene or tar
remover. Difficult spots may require a fine rubbing compound.
After polishing use liquid or paste wax.
Several commercially available products contain both polish and wax.
Waxing alone does not substitute for polishing a dull surface.
A wide range of polymer-based car waxes can be purchased today. These waxes are easy to use and produce a
long-lasting, high-gloss finish that protects the bodywork against oxidation, road dirt and fading.
Do not polish or wax your car in direct sunlight (the surface of the car should not be warmer than 113° F (45° C).
Cleaning the upholstery
The fabric can be cleaned with soapy water or a detergent. For more difficult spots caused by oil, ice cream, shoe
polish, grease, etc., use a clothing/fabric stain remover.
The plastic in the upholstery can be cleaned with a soft cloth and mild soap solution.
Leather upholstery/suede-like upholstery (alcanteraTM) can be cleaned with a soft cloth and mild soap solution. For
more difficult spots, Volvo offers a leather care kit.
Under no circumstances should gasoline, naphtha or similar cleaning agents be used on the plastic or the leather
since these can cause damage.
Cleaning the seat belts
Clean only with lukewarm water and a mild soap solution.
ProCarManuals.com
Page 82 of 120

Cleaning floor mats
The floor mats should be vacuumed or brushed clean regularly, especially during winter when they should be taken out
for drying. Spots on textile mats can be removed with a mild detergent.
Bear in mind
Take extra care when removing stains such as ink or lipstick since the coloring can spread.
Use solvents sparingly. Too much solvent can damage the seat padding.
Start from the outside of the stain and work toward the center.
pg. 116 Car care
Paint touch up
Paint damage requires immediate attention to avoid rusting. Make it a habit to check the finish regularly - when
washing the car for instance. Touch-up if necessary.
Paint repairs require special equipment and skill. Contact your Volvo retailer for any extensive damage.
Minor scratches can be repaired by using Volvo touch-up paint.
NOTE: When ordering touch-up paint from your Volvo retailer, use the paint code indicated on the model plate. The
plate is located in the engine compartment.
Color code
Make sure you have the right color. The color code number is on the data plate in the engine compartment.
Minor stone chips and scratches
Material:
Primer - can
Paint - touch-up pen
Brush
Masking tape
If the stone chip has not gone down to the bare metal and an undamaged color coat remains, you can add paint
immediately after removing dirt.
NOTE: When touching up the car, it should be clean and dry. The surface temperature should be above 60° F (15° C).
Minor scratches on the surface
If the stone chip has not penetrated down to the metal and an undamaged layer of paint remains, the touch-up paint can
be applied as soon as the spot has been cleaned.
Deep scratches
1. Place a strip of masking tape over the damaged surface. Pull the tape off so that any loose flakes of paint adhere to
it.
2. Thoroughly mix the primer and apply it with a small brush.
ProCarManuals.com