VOLVO S60 2005 Repair Manual
Manufacturer: VOLVO, Model Year: 2005, Model line: S60, Model: VOLVO S60 2005Pages: 120, PDF Size: 2.27 MB
Page 61 of 120

Please refer to the information on page 93.
Sport mode (R-models only)
R-models are equipped with a (S)port button that can be used to engage/disengage the Sport shifting mode. An
indicator light in the button will go on when Sport mode is engaged.
With Sport mode engaged, the transmission will shift up at higher rpm in first and second gears, and will also shift
down at higher rpm for more immediate engine response during acceleration and deceleration.
pg. 96 Starting and driving
All Wheel Drive (option)
All Wheel Drive (AWD) - general information
Your Volvo can be equipped with permanent All Wheel Drive, which means that power is distributed automatically
between the front and rear wheels. Under normal driving conditions, most engine's power is directed to the front
wheels. However, if there is any tendency for the front wheels to spin, an electronically controlled coupling distributes
power to the wheels that have the best traction.
Tire dimensions
Volvo recommends that you always drive on tires of the same brand, size, construction (radial), tread pattern, load-,
speed-, traction-, temperature-, and treadwear rating. Never drive on mixed tires, except for brief periods when the
temporary spare tire is in use.
Always use properly inflated tires of correct dimensions. Tire size and inflation pressures are shown on the tire
inflation pressure placards, located on the driver's side B-pillar (the structural member at the side of the vehicle, at the
rear of the driver's door opening), or on the inside of the fuel filler door on Canadian models.
Temporary Spare
The temporary spare tire is for temporary, low-speed, short-distance use only. Replace it with a full-size tire as soon as
possible. Do not drive on the temporary spare at speeds above 50 mph (80 km/h) or for distances greater than 50 miles
(80 km.)
Never install snow chains on a temporary spare.
pg. 97 Starting and driving
Four-C active chassis system
Four-C active chassis
ProCarManuals.com
Page 62 of 120

The FOUR-C (Continuously Controlled Chassis Concept) active chassis system, consisting of Comfort and Sport
modes, is available as an option.
NOTE:
The S60 R has a standard FOUR-C system consisting of Comfort, Sport, and Advanced sport modes. The buttons for
controlling these driving modes are located in center instrument panel, above the ventilation system panel vents, see
the illustration below. These buttons can be pressed at any time to change driving modes. An indicator light in the
selected button will come on to indicate the driving mode that is currently selected.
This system is based on a number of sensors that continuously monitor factors such as the car's lateral and vertical
movements, speed, and movements of the wheels. The sensors receive data up to 500 times per second, which is used
to provide extremely fast and precise adjustment of each shock absorber. The system adjusts the stiffness of the shock
absorbers approximately 100 times per second.
Comfort
The Comfort mode chassis setting offers the greatest amount of shock absorption and the softest ride. This mode is
recommended for long-distance driving, or when driving in slippery conditions. The indicator light in the button will
be off when this mode is selected.
If Comfort mode was selected when the engine was switched off, this mode will still be active when the engine is
restarted.
Sport
In this mode, shock absorption is stiffer to reduce the car's body sway during cornering and to provide more immediate
steering response. The indicator light in the button will come on to indicate that Sport mode has been selected.
If this setting was selected when the engine was switched off, Sport mode will still be active when the engine is
restarted.
S60 R buttons on the dashboard
Advanced Sport (S60R only)
In this mode, movement of the shock absorbers is minimal, response from pressure on the throttle pedal is more direct,
and body sway in curves or when cornering is sharply reduced.
If Advanced sport mode was selected when the engine was switched off, Sport mode will be active when the engine
is restarted.
ProCarManuals.com
Page 63 of 120

pg. 98 Starting and driving
Brake system
BRAKE Brake circuit malfunction
The brake system is a hydraulic system consisting of two master cylinders and two separate brake circuits. If a
problem should occur in one of these circuits, it is still possible to stop the car with the other brake circuit.
If the brake pedal must be depressed farther than normal and requires greater foot pressure, the stopping distance will
be longer.
A warning light in the instrument panel will light up to warn the driver that a fault has occurred.
If this light comes on while driving or braking, stop immediately and check the brake fluid level in the reservoir.
NOTE: Press the brake pedal hard and maintain pressure on the pedal - do not pump the brakes.
WARNING!
If the fluid level is below the MIN mark in the reservoir or if a "Brake failure - Service urgent" message is displayed
in the text window: DO NOT DRIVE. Have the car towed to a Volvo retailer and have the brake system inspected.
NOTE: When the car is at a standstill and the engine is idling, e.g. at a traffic light and the brake pedal is depressed,
the pedal may go down slightly. This is a normal function of the power-assisted brake system.
Power brakes function only when the engine is running
The power brakes utilize vacuum pressure which is only created when the engine is running. Never let the vehicle roll
to a stop with the engine switched off.
If the power brakes are not working, the brake pedal must be pressed approximately four times harder than usual to
make up for the lack of power assistance. This can happen for example when towing your vehicle or if the engine is
switched off when the vehicle is rolling. The brake pedal feels harder than usual.
Water on brake discs and brake pads affects braking
Driving in rain and slush or passing through an automatic car wash can cause water to collect on the brake discs and
pads. This will cause a delay in braking effect when the pedal is depressed. To avoid such a delay when the brakes are
needed, depress the pedal occasionally when driving through rain, slush etc. This will remove the water from the
brakes. Check that brake application feels normal. This should also be done after washing or starting in very damp or
cold weather.
Severe strain on the brake system
The brakes will be subject to severe strain when driving in mountains or hilly areas or towing. Vehicle speed is usually
slower, which means that the cooling of the brakes is less efficient than when driving on level roads. To reduce the
strain on the brakes, shift into a lower gear and let the engine help with the braking. Do not forget that, if you are
towing a trailer, the brakes will be subjected to a greater than normal load.
pg. 99 Starting and driving
Anti-lock brakes (ABS)
If the warning lamp lights up there is a malfunction of the ABS system (the standard braking system will however
function) and the vehicle should be driven cautiously to a Volvo retailer for inspection. The Anti-lock Braking System
ProCarManuals.com
Page 64 of 120

(ABS) helps to improve vehicle control (stopping and steering) during severe braking conditions by limiting brake
lockup. When the system "senses" impending lockup, braking pressure is automatically modulated in order to help
prevent lockup, which could lead to a skid.
The system performs a self -diagnostic test when the engine is started and when the vehicle first reaches a speed
of approximately 12 mph (20 km/h). The brake pedal will pulsate several times and a sound may be audible from the
ABS control module. This is normal.
To obtain optimal effect from the ABS system, constant pressure should be kept on the brake pedal. Do not pump the
brake pedal.
The switching of the ABS modulator will be audible and the brake pedal will pulsate during braking. Please be aware
that ABS does not increase the absolute braking potential of the vehicle. While control will be enhanced, ABS will not
shorten stopping distances on slippery surfaces.
ABS with EBD (Electronic Brake Force Distribution)
EBD is an integrated part of the ABS system. EBD regulates the hydraulic pressure to the rear brakes to help provide
optimal braking capacity. The brake pedal will pulsate during braking, which is normal.
If the BRAKE and ABS warning lights come on at the same time, this could indicate a fault in the brake system.
Stop the car in a suitable place and switch off the engine.
Restart the engine.
If both warning lights go off, no further action is required.
If both lights are still on after the engine has been restarted, switch off the engine again and check the brake fluid
level (see page 140
for the location of the brake fluid reservoir).
WARNING!
If the fluid level is below the MIN mark in the reservoir or if a "Brake failure - Service urgent" message is displayed
in the text window: DO NOT DRIVE. Have the car towed to a Volvo retailer and have the brake system inspected.
If the brake fluid level is above the MIN mark, drive carefully to an authorized Volvo retailer and have the brake
system inspected.
Contents | Top of Page
ProCarManuals.com
Page 65 of 120

2 0 0 5
VOLVO S60
Wheels and tires
pg. 113 Wheels and tires
General information 114
Tire inflation pressure tables117
Tire Pressure Monitoring System (TPMS) - option on certain U.S. models only118
Changing tires119
Tire designations120
Glossary of tire terminology121
Vehicle loading122
Uniform Tire Quality Grading123
Snow chains, snow tires, studded tires124
Temporary Spare125
Changing wheels126
pg. 114 Wheels and tires
General information
Your vehicle is equipped with tires according to the vehicle's tire information placard on the B-pillar (the structural
member at the side of the vehicle, at the rear of the driver's door opening), or on the inside of the fuel filler door on
Canadian models.
The tires have good road holding characteristics and offer good handling on dry and wet surfaces. It should be noted
however that the tires have been developed to give these features on snow/ice-free surfaces.
Certain models are equipped with "all-season" tires, which provide a somewhat higher degree of road holding on
slippery surfaces than tires without the "all-season" rating. However, for optimum road holding on icy or snow-
covered roads, we recommend suitable winter tires on all four wheels.
When replacing tires, be sure that the new tires are the same size designation, type (radial) and preferably from the
same manufacturer, on all four wheels. Otherwise there is a risk of altering the car's roadholding and handling
characteristics.
NOTE: When storing wheel/tire assemblies (e.g. winter tires and wheels), either stand the assemblies upright, or
suspend them off the ground. Laying wheel/tire assemblies on their sides for prolonged periods can cause wheel and/or
tire damage.
ProCarManuals.com
Page 66 of 120

Tread wear indicator
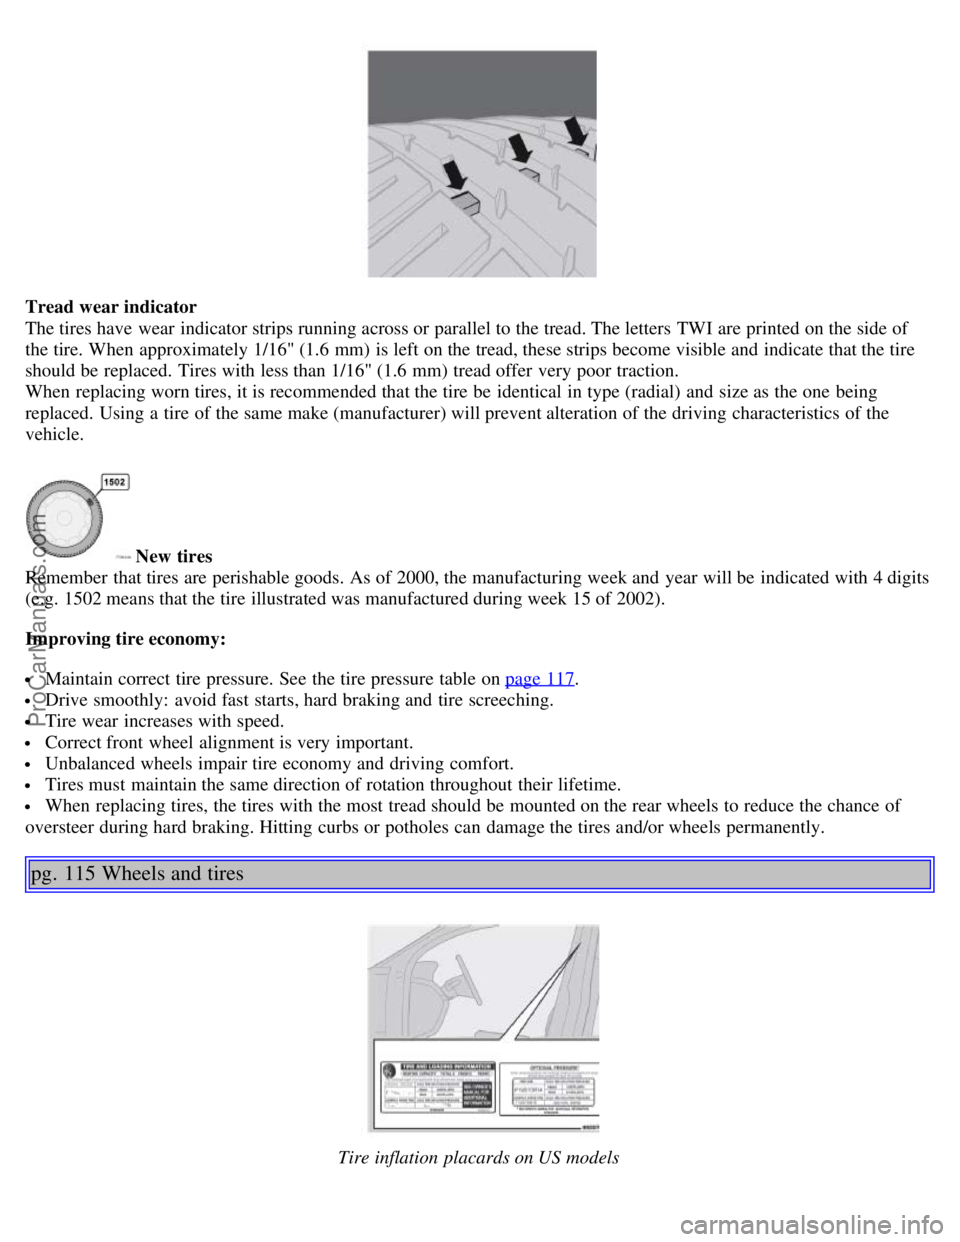
The tires have wear indicator strips running across or parallel to the tread. The letters TWI are printed on the side of
the tire. When approximately 1/16" (1.6 mm) is left on the tread, these strips become visible and indicate that the tire
should be replaced. Tires with less than 1/16" (1.6 mm) tread offer very poor traction.
When replacing worn tires, it is recommended that the tire be identical in type (radial) and size as the one being
replaced. Using a tire of the same make (manufacturer) will prevent alteration of the driving characteristics of the
vehicle.
New tires
Remember that tires are perishable goods. As of 2000, the manufacturing week and year will be indicated with 4 digits
(e.g. 1502 means that the tire illustrated was manufactured during week 15 of 2002).
Improving tire economy:
Maintain correct tire pressure. See the tire pressure table on page 117.
Drive smoothly: avoid fast starts, hard braking and tire screeching.
Tire wear increases with speed.
Correct front wheel alignment is very important.
Unbalanced wheels impair tire economy and driving comfort.
Tires must maintain the same direction of rotation throughout their lifetime.
When replacing tires, the tires with the most tread should be mounted on the rear wheels to reduce the chance of
oversteer during hard braking. Hitting curbs or potholes can damage the tires and/or wheels permanently.
pg. 115 Wheels and tires
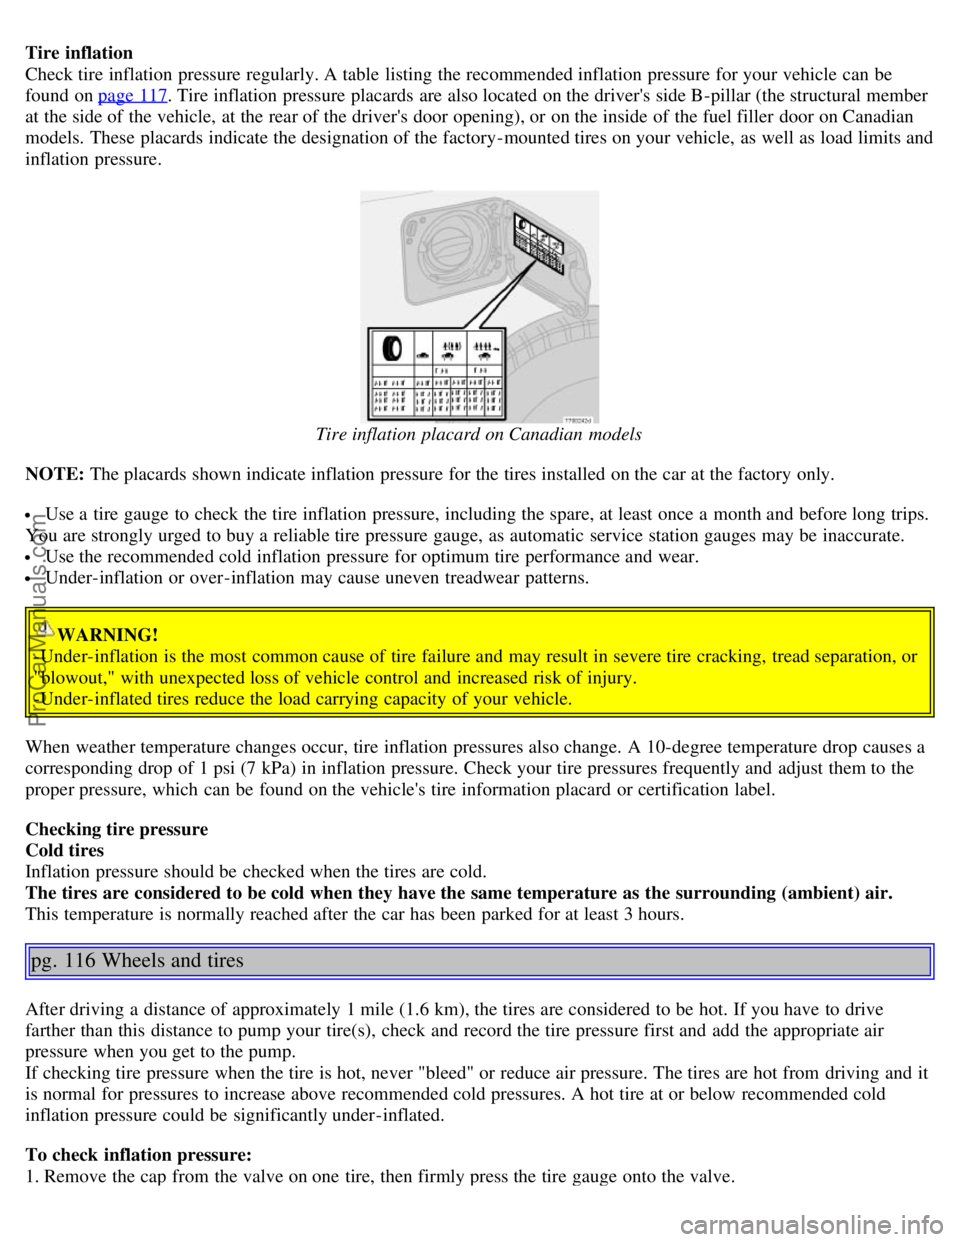
Tire inflation placards on US models
ProCarManuals.com
Page 67 of 120

Tire inflation
Check tire inflation pressure regularly. A table listing the recommended inflation pressure for your vehicle can be
found on page 117
. Tire inflation pressure placards are also located on the driver's side B-pillar (the structural member
at the side of the vehicle, at the rear of the driver's door opening), or on the inside of the fuel filler door on Canadian
models. These placards indicate the designation of the factory-mounted tires on your vehicle, as well as load limits and
inflation pressure.
Tire inflation placard on Canadian models
NOTE: The placards shown indicate inflation pressure for the tires installed on the car at the factory only.
Use a tire gauge to check the tire inflation pressure, including the spare, at least once a month and before long trips.
You are strongly urged to buy a reliable tire pressure gauge, as automatic service station gauges may be inaccurate.
Use the recommended cold inflation pressure for optimum tire performance and wear.
Under-inflation or over-inflation may cause uneven treadwear patterns.
WARNING!
-Under-inflation is the most common cause of tire failure and may result in severe tire cracking, tread separation, or
"blowout," with unexpected loss of vehicle control and increased risk of injury.
-Under-inflated tires reduce the load carrying capacity of your vehicle.
When weather temperature changes occur, tire inflation pressures also change. A 10-degree temperature drop causes a
corresponding drop of 1 psi (7 kPa) in inflation pressure. Check your tire pressures frequently and adjust them to the
proper pressure, which can be found on the vehicle's tire information placard or certification label.
Checking tire pressure
Cold tires
Inflation pressure should be checked when the tires are cold.
The tires are considered to be cold when they have the same temperature as the surrounding (ambient) air.
This temperature is normally reached after the car has been parked for at least 3 hours.
pg. 116 Wheels and tires
After driving a distance of approximately 1 mile (1.6 km), the tires are considered to be hot. If you have to drive
farther than this distance to pump your tire(s), check and record the tire pressure first and add the appropriate air
pressure when you get to the pump.
If checking tire pressure when the tire is hot, never "bleed" or reduce air pressure. The tires are hot from driving and it
is normal for pressures to increase above recommended cold pressures. A hot tire at or below recommended cold
inflation pressure could be significantly under-inflated.
To check inflation pressure:
1. Remove the cap from the valve on one tire, then firmly press the tire gauge onto the valve.
ProCarManuals.com
Page 68 of 120

2. Add air to reach the recommended air pressure.
3. Replace the valve cap.
4. Repeat this procedure for each tire, including the spare.
5. Visually inspect the tires to make sure there are no nails or other objects embedded that could puncture the tire and
cause an air leak.
6. Check the sidewalls to make sure there are no gouges, cuts, bulges or other irregularities.
NOTE:
If you overfill the tire, release air by pushing on the metal stem in the center of the valve. Then recheck the pressure
with your tire gauge.
Some spare tires require higher inflation pressure than the other tires. Consult the tire inflation table on page 117 or
see the inflation pressure placard.
pg. 117 Wheels and tires
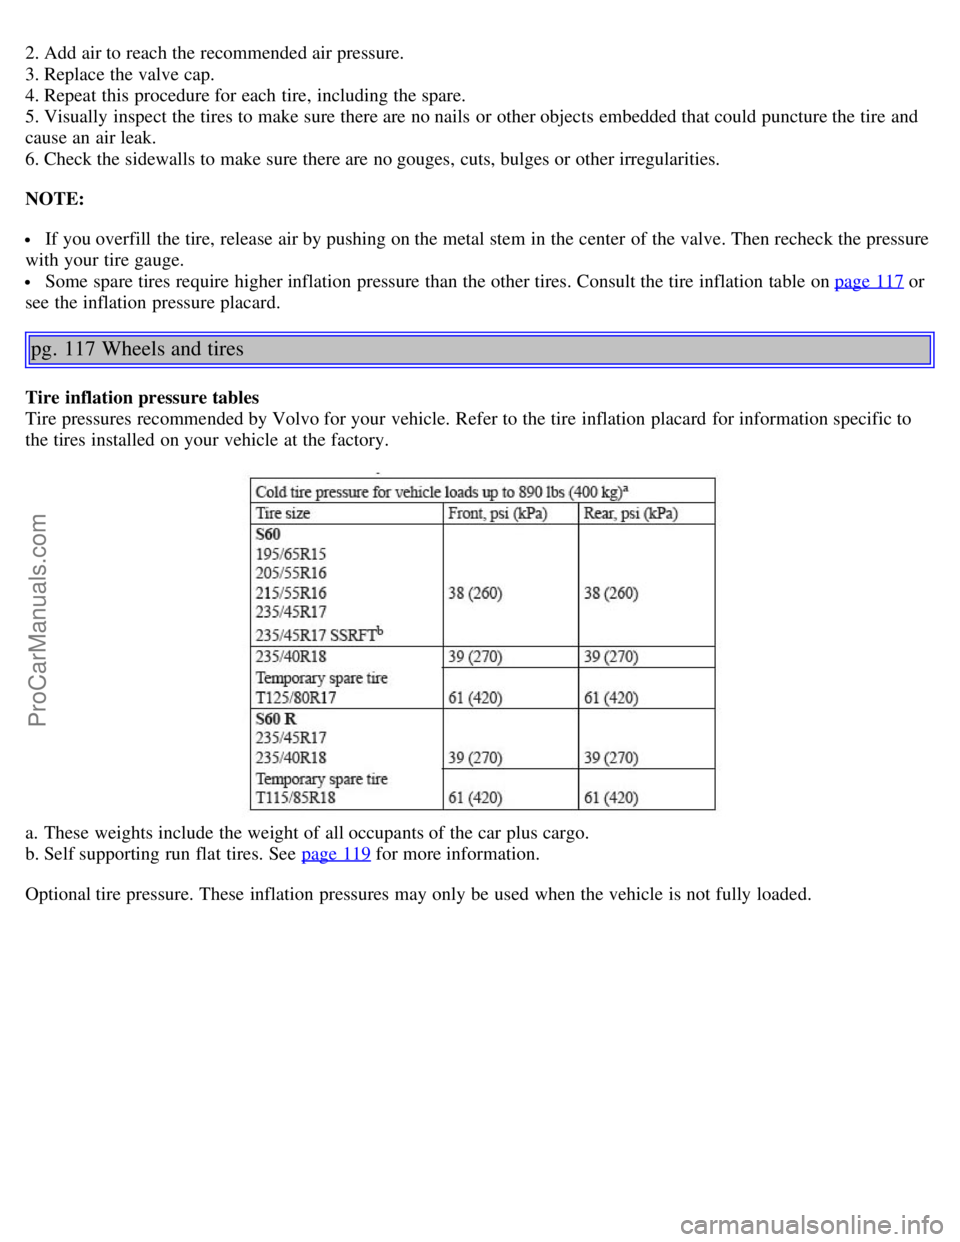
Tire inflation pressure tables
Tire pressures recommended by Volvo for your vehicle. Refer to the tire inflation placard for information specific to
the tires installed on your vehicle at the factory.
a. These weights include the weight of all occupants of the car plus cargo.
b. Self supporting run flat tires. See page 119
for more information.
Optional tire pressure. These inflation pressures may only be used when the vehicle is not fully loaded.
ProCarManuals.com
Page 69 of 120

pg. 118 Wheels and tires
Tire Pressure Monitoring System (TPMS) - option on certain U.S. models only
The tire pressure monitoring system uses sensors mounted in the tire valves to check inflation pressure levels. When
the vehicle is moving at a speed of 20 mph (30 km/h) or faster, these sensors transmit inflation pressure data to a
receiver located in the vehicle.
USA - FCC ID: MRXTG315AM04
This device complies with part 15 of the FCC rules. Operation is subject to the following conditions: (1) This device
may not cause harmful interference, and (2) this device must accept any interference received, including interference
that may cause undesired operation.
When low inflation pressure is detected, TPMS will light up the tire pressure warning light (
) in the instrument
panel, and will display a message in the text window. The wording of this message is determined by the degree of
inflation pressure loss.
When the tire pressure monitoring system warning light is on, one or more of your tires is significantly under-inflated.
You should stop and check your tires as soon as possible, and inflate them to the proper pressure as indicated on the
vehicle's tire information placard.
Driving on a significantly under-inflated tire causes the tire to overheat and can lead to tire failure. Under-inflation
also reduces fuel efficiency and tire tread life, and may affect the vehicle's handling and stopping ability. Each tire,
including the spare, should be checked monthly when cold and set to the recommended inflation pressure as specified
in the vehicle placard and owner's manual.
NOTE: TPMS indicates low tire pressure but does not replace normal tire maintenance. For information on correct tire
pressure, please refer to the table on page 117
, or consult your Volvo retailer.
Erasing warning messages
When a low tire pressure warning message has been displayed, and the tire pressure warning light has come on:
1. Use a tire pressure gauge to check the inflation pressure of all four tires.
2. Re-inflate the tire(s) to the correct pressure (consult the tire pressure placard or the table on page 117
).
3. Drive the car for at least one minute at a speed of 20 mph (30 km/h) or faster.
This will erase the warning text and the warning light will go out.
WARNING!
ProCarManuals.com
Page 70 of 120

Incorrect inflation pressure could lead to tire failure, resulting in a loss of control of the vehicle.
pg. 119 Wheels and tires
Changing tires
Please note the following when changing or replacing the factory installed TPMS wheels/tires on the vehicle:
Only the factory-mounted wheels are equipped with TPMS sensors in the valves.
If the vehicle is equipped with a temporary spare tire, this tire does not have a TPMS sensor.
If, for example, winter wheels/tires are used that are not equipped with TPMS sensors, the message TIRE PRESSURE
SYSTEM SERVICE REQUIRED will be displayed after the car has been driven for several minutes at approximately
35 mph (50 km/h) or faster.
This message will remain on until wheels with TPMS sensors are mounted on the vehicle and it has been driven for at
least one minute at a speed of 20 mph (30 km/h) or faster.
TPMS valves can be fitted on winter wheels or full-size spare wheels/tires. Consult your Volvo retailer.
CAUTION:
When inflating tires with TPMS valves, press the pump's mouthpiece straight onto the valve to help avoid bending or
otherwise damaging the valve.
Self supporting run flat tires (option)
Certain models equipped with the Tire Pressure Monitoring System (TPMS) can also be equipped with self supporting
run flat tires. Tires of this type have specially reinforced sidewalls that make it possible to continue driving in the
event of a drop in inflation pressure. Tires of this type are mounted on special rims.
NOTE: Self supporting run flat tires are only available in conjunction with TPMS. If a self supporting run flat tire
should lose inflation pressure, the yellow TPMS warning symbol (
) in the instrument panel lights up to alert the
driver, and a message will be shown in the text window in the instrument panel.
If this occurs, reduce vehicle speed to a maximum of 50 mph (80 km/h). The vehicle can be driven approximately 50
miles (80 km), or somewhat farther if the vehicle is not heavily loaded. The tire should be replaced as soon as
possible.
Hard braking and sudden steering maneuvers should be avoided.
In certain cases, it may be difficult to see which self supporting run flat tire is defective. To determine which tire is
damaged, check the inflation pressure of all four tires.
WARNING!
Only specially trained persons should mount self supporting run flat tires.
If self supporting run flat tires are mounted, the vehicle must be equipped with a Tire Pressure Monitoring
System.
After a low pressure warning has been displayed, do not exceed 50 mph (80 km/h).
Avoid severe cornering and hard braking, and minimize the distance traveled before replacing the self supporting
run flat tire.
Self supporting run flat tires cannot be repaired. They must be replaced if damaged or punctured.
ProCarManuals.com