high beam VOLVO S60 2006 Owners Manual
[x] Cancel search | Manufacturer: VOLVO, Model Year: 2006, Model line: S60, Model: VOLVO S60 2006Pages: 132, PDF Size: 2.33 MB
Page 4 of 132
PremAir is a registered trademark of Engelhard Corporation.
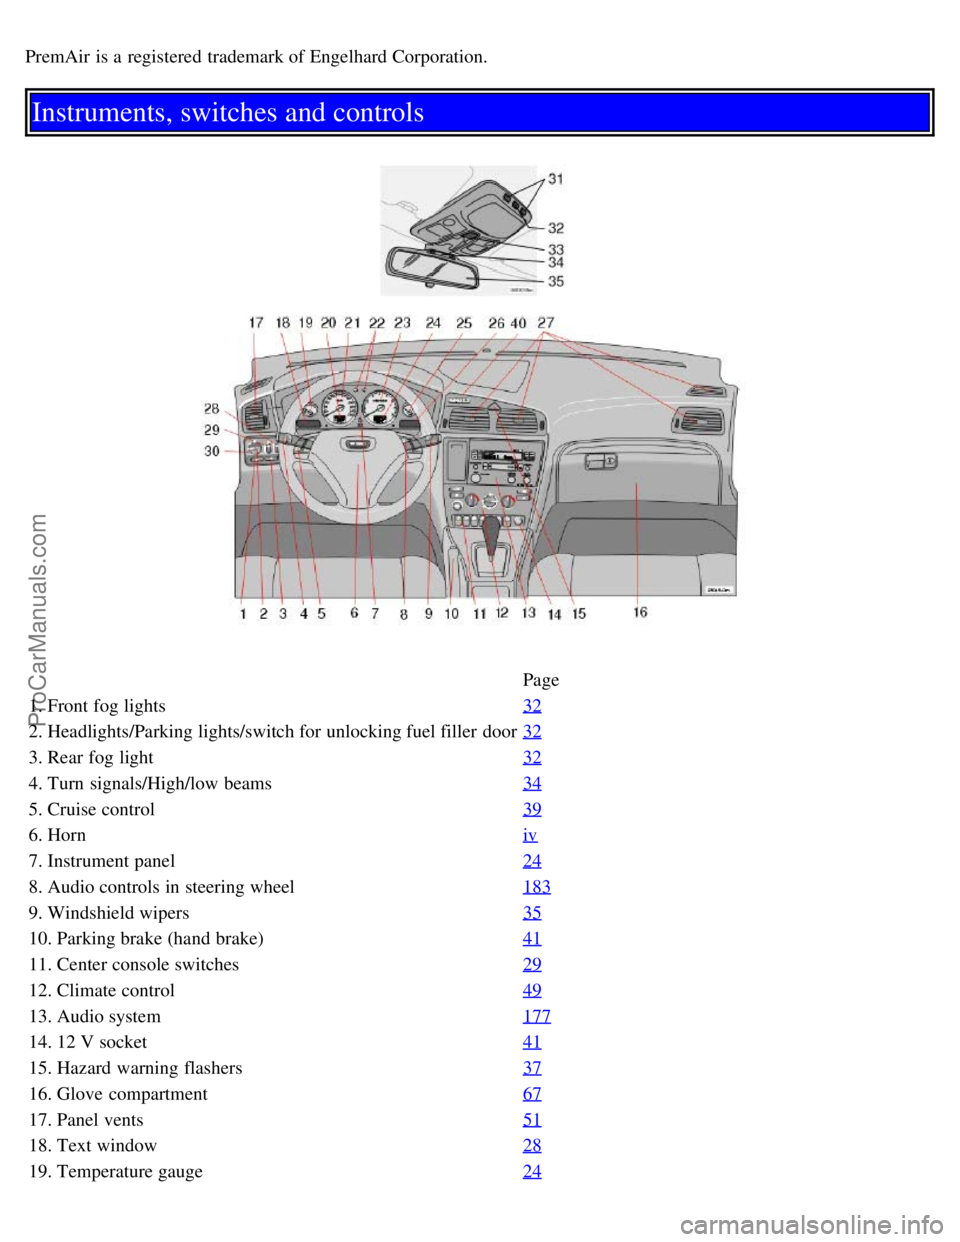
Instruments, switches and controls
Page
1. Front fog lights 32
2. Headlights/Parking lights/switch for unlocking fuel filler door32
3. Rear fog light32
4. Turn signals/High/low beams34
5. Cruise control39
6. Horniv
7. Instrument panel24
8. Audio controls in steering wheel183
9. Windshield wipers35
10. Parking brake (hand brake)41
11. Center console switches29
12. Climate control49
13. Audio system177
14. 12 V socket41
15. Hazard warning flashers37
16. Glove compartment67
17. Panel vents51
18. Text window28
19. Temperature gauge24
ProCarManuals.com
Page 18 of 132
on. The text window will provide you with additional information. If the engine temperature remains high, check
coolant level - see page 140.
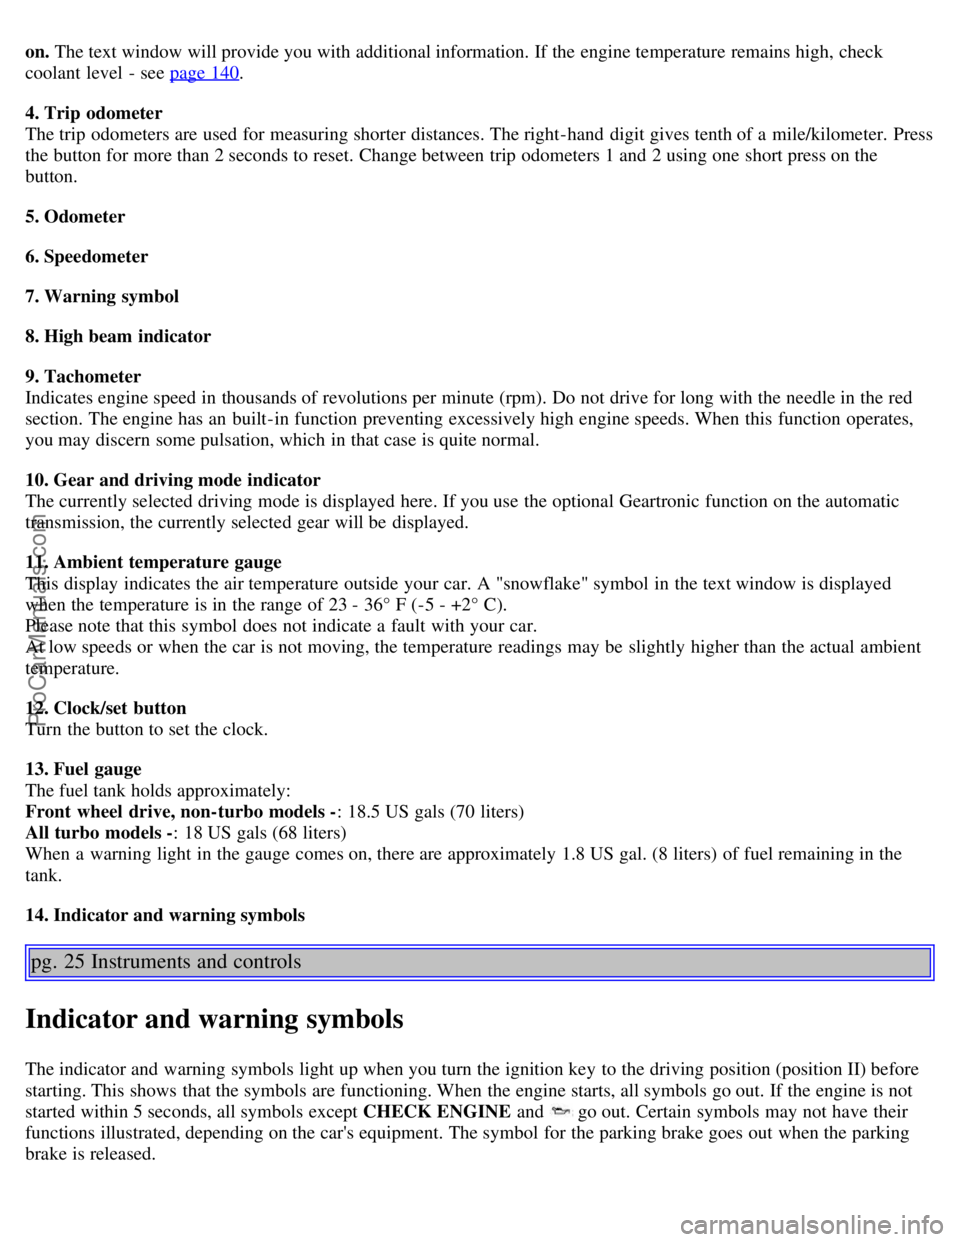
4. Trip odometer
The trip odometers are used for measuring shorter distances. The right-hand digit gives tenth of a mile/kilometer. Press
the button for more than 2 seconds to reset. Change between trip odometers 1 and 2 using one short press on the
button.
5. Odometer
6. Speedometer
7. Warning symbol
8. High beam indicator
9. Tachometer
Indicates engine speed in thousands of revolutions per minute (rpm). Do not drive for long with the needle in the red
section. The engine has an built-in function preventing excessively high engine speeds. When this function operates,
you may discern some pulsation, which in that case is quite normal.
10. Gear and driving mode indicator
The currently selected driving mode is displayed here. If you use the optional Geartronic function on the automatic
transmission, the currently selected gear will be displayed.
11. Ambient temperature gauge
This display indicates the air temperature outside your car. A "snowflake" symbol in the text window is displayed
when the temperature is in the range of 23 - 36° F (-5 - +2° C).
Please note that this symbol does not indicate a fault with your car.
At low speeds or when the car is not moving, the temperature readings may be slightly higher than the actual ambient
temperature.
12. Clock/set button
Turn the button to set the clock.
13. Fuel gauge
The fuel tank holds approximately:
Front wheel drive, non-turbo models - : 18.5 US gals (70 liters)
All turbo models - : 18 US gals (68 liters)
When a warning light in the gauge comes on, there are approximately 1.8 US gal. (8 liters) of fuel remaining in the
tank.
14. Indicator and warning symbols
pg. 25 Instruments and controls
Indicator and warning symbols
The indicator and warning symbols light up when you turn the ignition key to the driving position (position II) before
starting. This shows that the symbols are functioning. When the engine starts, all symbols go out. If the engine is not
started within 5 seconds, all symbols except CHECK ENGINE and
go out. Certain symbols may not have their
functions illustrated, depending on the car's equipment. The symbol for the parking brake goes out when the parking
brake is released.
ProCarManuals.com
Page 25 of 132
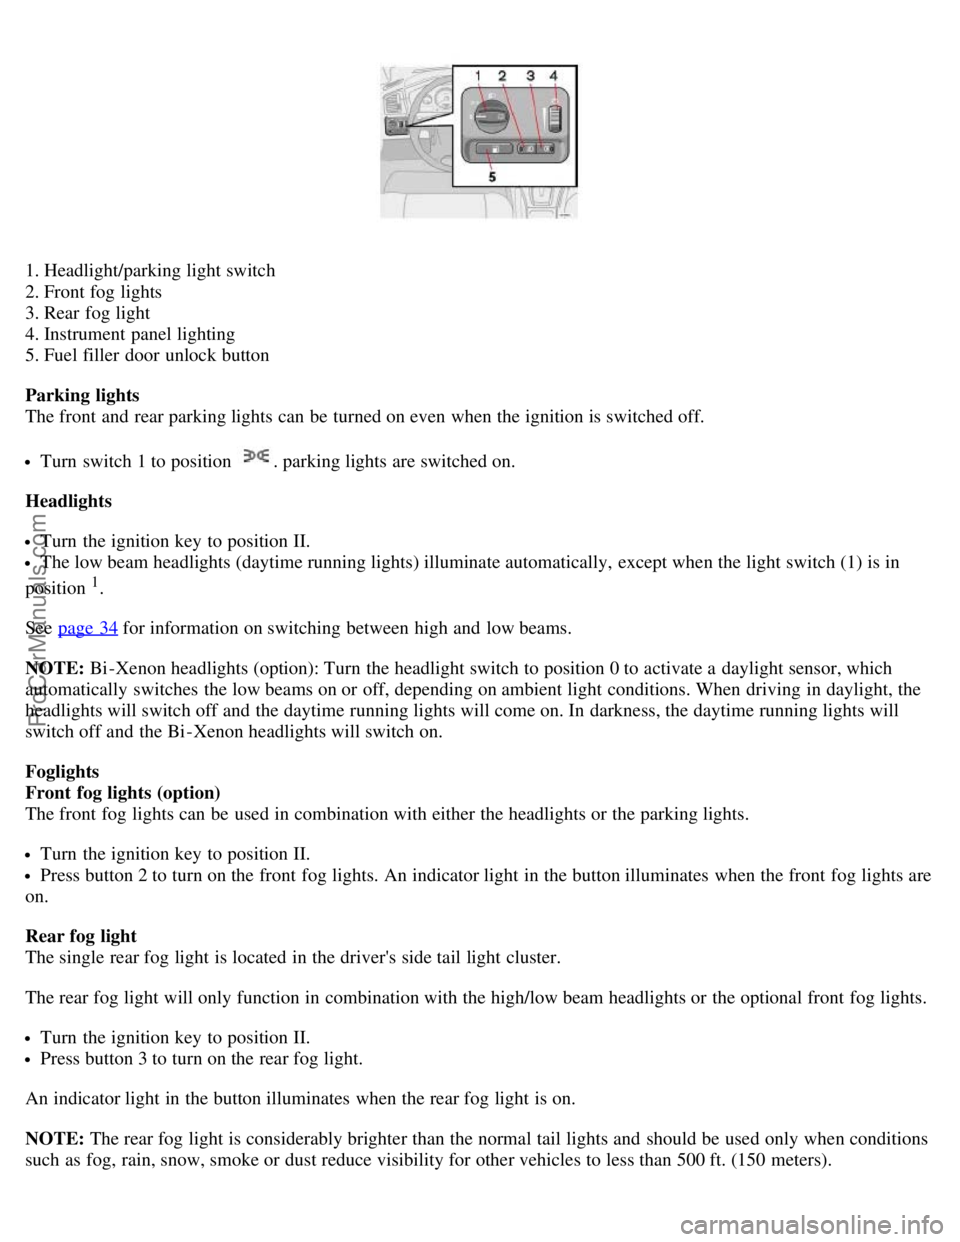
1. Headlight/parking light switch
2. Front fog lights
3. Rear fog light
4. Instrument panel lighting
5. Fuel filler door unlock button
Parking lights
The front and rear parking lights can be turned on even when the ignition is switched off.
Turn switch 1 to position . parking lights are switched on.
Headlights
Turn the ignition key to position II.
The low beam headlights (daytime running lights) illuminate automatically, except when the light switch (1) is in
position
1.
See page 34
for information on switching between high and low beams.
NOTE: Bi -Xenon headlights (option): Turn the headlight switch to position 0 to activate a daylight sensor, which
automatically switches the low beams on or off, depending on ambient light conditions. When driving in daylight, the
headlights will switch off and the daytime running lights will come on. In darkness, the daytime running lights will
switch off and the Bi -Xenon headlights will switch on.
Foglights
Front fog lights (option)
The front fog lights can be used in combination with either the headlights or the parking lights.
Turn the ignition key to position II.
Press button 2 to turn on the front fog lights. An indicator light in the button illuminates when the front fog lights are
on.
Rear fog light
The single rear fog light is located in the driver's side tail light cluster.
The rear fog light will only function in combination with the high/low beam headlights or the optional front fog lights.
Turn the ignition key to position II.
Press button 3 to turn on the rear fog light.
An indicator light in the button illuminates when the rear fog light is on.
NOTE: The rear fog light is considerably brighter than the normal tail lights and should be used only when conditions
such as fog, rain, snow, smoke or dust reduce visibility for other vehicles to less than 500 ft. (150 meters).
ProCarManuals.com
Page 27 of 132

pg. 33 Instruments and controls
Manually unlocking the fuel filler door
at a speed of at least 5 mph (8 km/h), stop the car, and press the button again.
See the information to the right on unlocking the fuel filler door manually.
Manually unlocking the fuel filler door
The electric motor that controls the fuel filler door locking mechanism is located on the inside of the rear fender on the
passenger side of the car, just behind the fuel filler door. To unlock this door manually:
1. Turn the knob (A) 1/4 turn counterclockwise to release the cover panel (B).
2. Fold down the cover panel to access the electric motor (C).
3. Press the catch (D) rearward to unlock the fuel filler door, or forward to lock the door.
pg. 34 Instruments and controls
Left-side steering wheel lever
Lever positions
1. Turn signals, lane change position
2. Turn signals, position for normal turns
3. High beam flash
4. Toggle between high and low beams, Home Safe lighting
Turn signals
When turning
Move the lever as far up or down as possible (to position 2) to start the turn signals. The turn signals will be cancelled
automatically by the movement of the steering wheel, or the lever can be returned to its initial position by hand.
When changing lanes
The driver can flash the turn signals by moving the turn signal lever up or down to position 1 and releasing it. The turn
ProCarManuals.com
Page 28 of 132
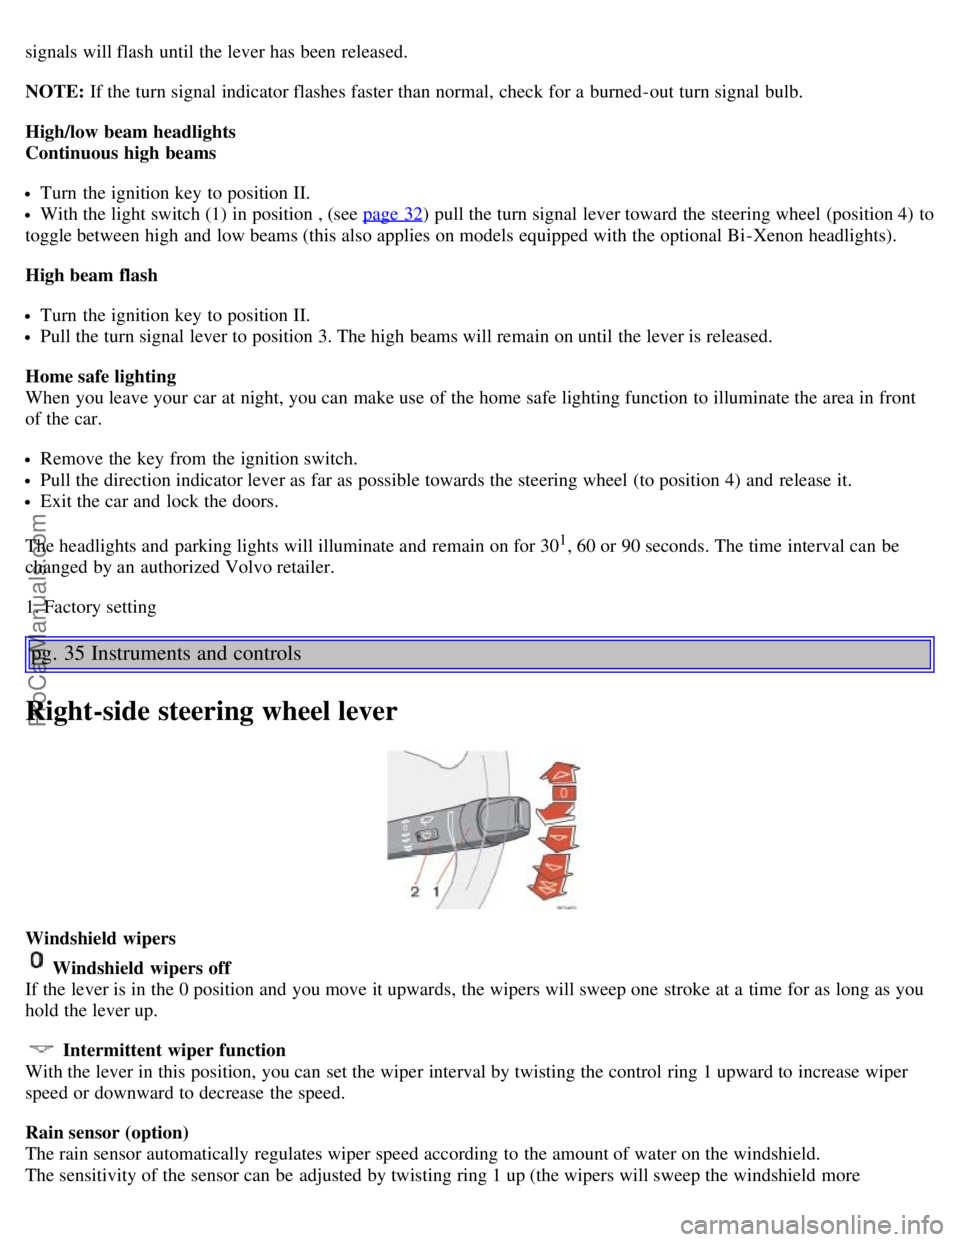
signals will flash until the lever has been released.
NOTE: If the turn signal indicator flashes faster than normal, check for a burned-out turn signal bulb.
High/low beam headlights
Continuous high beams
Turn the ignition key to position II.
With the light switch (1) in position , (see page 32) pull the turn signal lever toward the steering wheel (position 4) to
toggle between high and low beams (this also applies on models equipped with the optional Bi -Xenon headlights).
High beam flash
Turn the ignition key to position II.
Pull the turn signal lever to position 3. The high beams will remain on until the lever is released.
Home safe lighting
When you leave your car at night, you can make use of the home safe lighting function to illuminate the area in front
of the car.
Remove the key from the ignition switch.
Pull the direction indicator lever as far as possible towards the steering wheel (to position 4) and release it.
Exit the car and lock the doors.
The headlights and parking lights will illuminate and remain on for 30
1, 60 or 90 seconds. The time interval can be
changed by an authorized Volvo retailer.
1. Factory setting
pg. 35 Instruments and controls
Right-side steering wheel lever
Windshield wipers
Windshield wipers off
If the lever is in the 0 position and you move it upwards, the wipers will sweep one stroke at a time for as long as you
hold the lever up.
Intermittent wiper function
With the lever in this position, you can set the wiper interval by twisting the control ring 1 upward to increase wiper
speed or downward to decrease the speed.
Rain sensor (option)
The rain sensor automatically regulates wiper speed according to the amount of water on the windshield.
The sensitivity of the sensor can be adjusted by twisting ring 1 up (the wipers will sweep the windshield more
ProCarManuals.com
Page 111 of 132
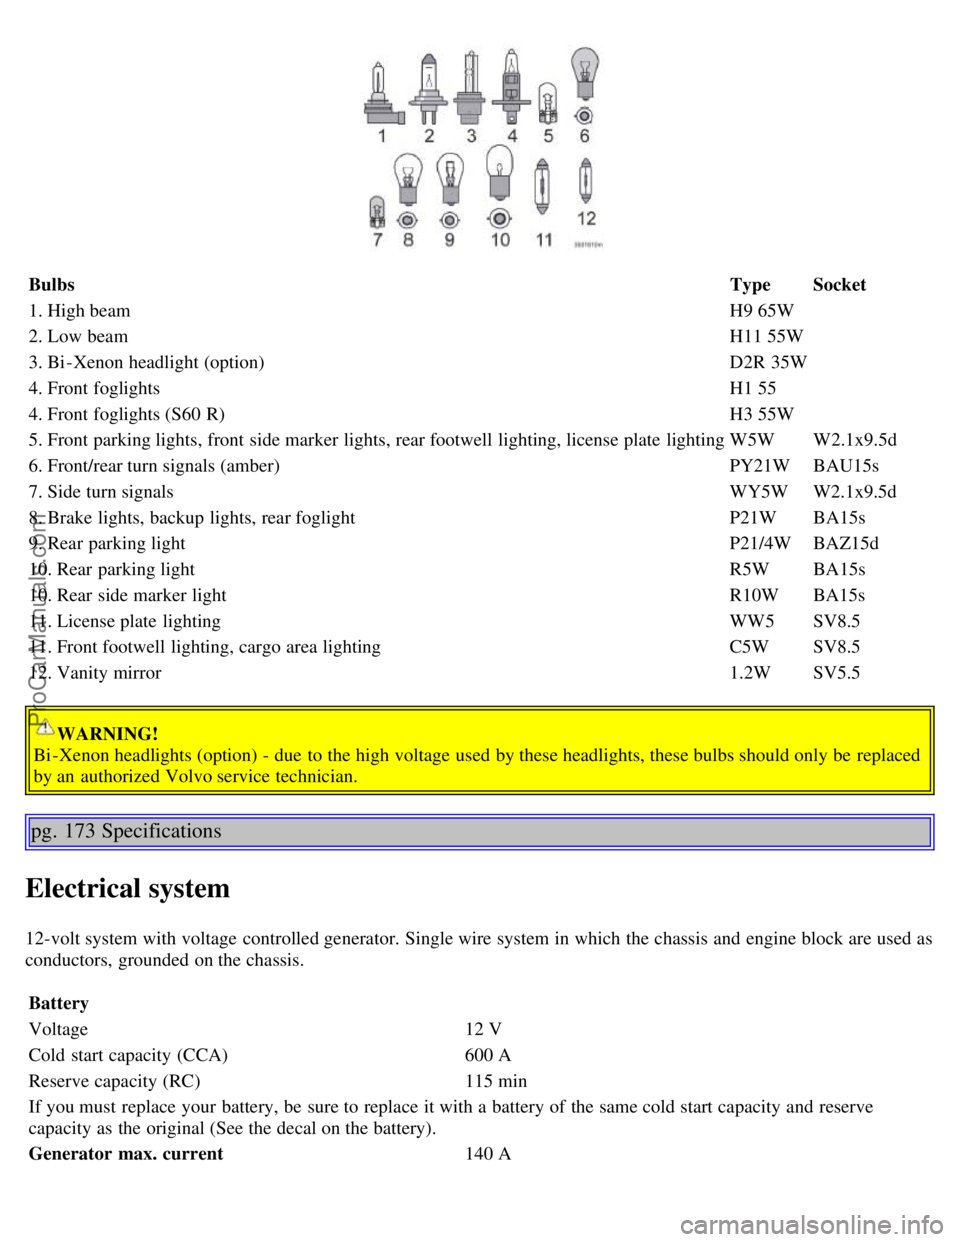
BulbsTypeSocket
1. High beam H9 65W
2. Low beam H11 55W
3. Bi -Xenon headlight (option) D2R 35W
4. Front foglights H1 55
4. Front foglights (S60 R) H3 55W
5. Front parking lights, front side marker lights, rear footwell lighting, license plate lighting W5WW2.1x9.5d
6. Front/rear turn signals (amber) PY21WBAU15s
7. Side turn signals WY5WW2.1x9.5d
8. Brake lights, backup lights, rear foglight P21WBA15s
9. Rear parking light P21/4WBAZ15d
10. Rear parking light R5WBA15s
10. Rear side marker light R10WBA15s
11. License plate lighting WW5SV8.5
11. Front footwell lighting, cargo area lighting C5WSV8.5
12. Vanity mirror 1.2WSV5.5
WARNING!
Bi -Xenon headlights (option) - due to the high voltage used by these headlights, these bulbs should only be replaced
by an authorized Volvo service technician.
pg. 173 Specifications
Electrical system
12-volt system with voltage controlled generator. Single wire system in which the chassis and engine block are used as
conductors, grounded on the chassis.
Battery
Voltage 12 V
Cold start capacity (CCA) 600 A
Reserve capacity (RC) 115 min
If you must replace your battery, be sure to replace it with a battery of the same cold start capacity and reserve
capacity as the original (See the decal on the battery).
Generator max. current 140 A
ProCarManuals.com
Page 124 of 132
Engine specifications174
Environmentiii
F
Federal Clean Air Act136
FIX NEXT SERVICE28
Floor mats63
Fluids169
Fog light27
Fog light, rear154
Front fog light, changing153
Front park assist109
Front seat - backrest59
Front seats58
Front seats - heated37
Front seats - manual adjustment58
Front seats - power60
Front suspension171
Fuel82
Fuel filler capii , 84
Fuel filler doorii , 84
Fuel Formulations83
Fuel gauge24
Fuel tank, capacity167
Fuses157
G
Gasoline82
Gear position89
Geartronic92
Geartronic - manual shifting93
General informationii
Generator173
Generator warning light27
Glossary of tire terminology120
Glove compartment67
Grocery bag holder69
Gross vehicle weight (GVW)121
H
Handling88
Hazard warning flashers37
Head restraint - center, rear69
Headlight wiper blades146
Headlights34
Heated front seats37 , 54
High beam flash34
ProCarManuals.com
Page 125 of 132
High beam headlights34
High beam indicator24
Hoisting the car139
Home safe lighting34
HomeLink® Universal Transceiver194
Hood - opening141
I
Ignition switch86
Immobilizer (start inhibitor)72
Indicator and warning symbols24 , 25
Inflation pressure tables116
Inflation pressure, checking115
Inspection, preparing for138
Instrument panel24
Integrated booster cushion19
Interior57
Interior lighting62
Introductioni
ISOFIX/LATCH anchors20
J
Jack126
Jack, location of70
Jump starting102
K
Keylockii
, 85
Keys71
Kickdown91
L
LATCH (ISOFIX) anchors20
Lighting panel32
Load carriers106
Locking steering wheel86
Locking the car75
Locks71
Long distance trips108
Long loads - carrying69
Low beam bulb, changing151
Low beam headlights34
M
Maintenance service136
Maintenance, periodic137
Malfunction indicator light27
Manual transmission89
Messages in the display28
ProCarManuals.com
Page 132 of 132
1Direction indicator/parking light
2Low beam
3 High beam
4 Fog light (option)
*H3 on R-models
5 Fog light
6 Tail/parking light
7 Brake light
8 Side marker light
9 Direction indicator
10 Backup light
See pages 149-155
for more information on replacing bulbs.
Contents | Top of Page
ProCarManuals.com