remote start VOLVO S60 2007 Owners Manual
[x] Cancel search | Manufacturer: VOLVO, Model Year: 2007, Model line: S60, Model: VOLVO S60 2007Pages: 200, PDF Size: 4.03 MB
Page 43 of 200
locked/unlocked using the master key or the remote control.
To use this function:
- Turn the master key to position II.
- Press the "Valet lock" button. An LED in the button will light up and "VALET LOCK
pg. 51 Instruments and controls
Switches in the center console
ON" will be displayed in the text window to indicate that this function is activated.
- The function can be turned off (deactivated) by turning the ignition key to position II and pressing the "Valet lock"
button again (the LED in the button will go out and VALET LOCK OFF" will be displayed in the text window).
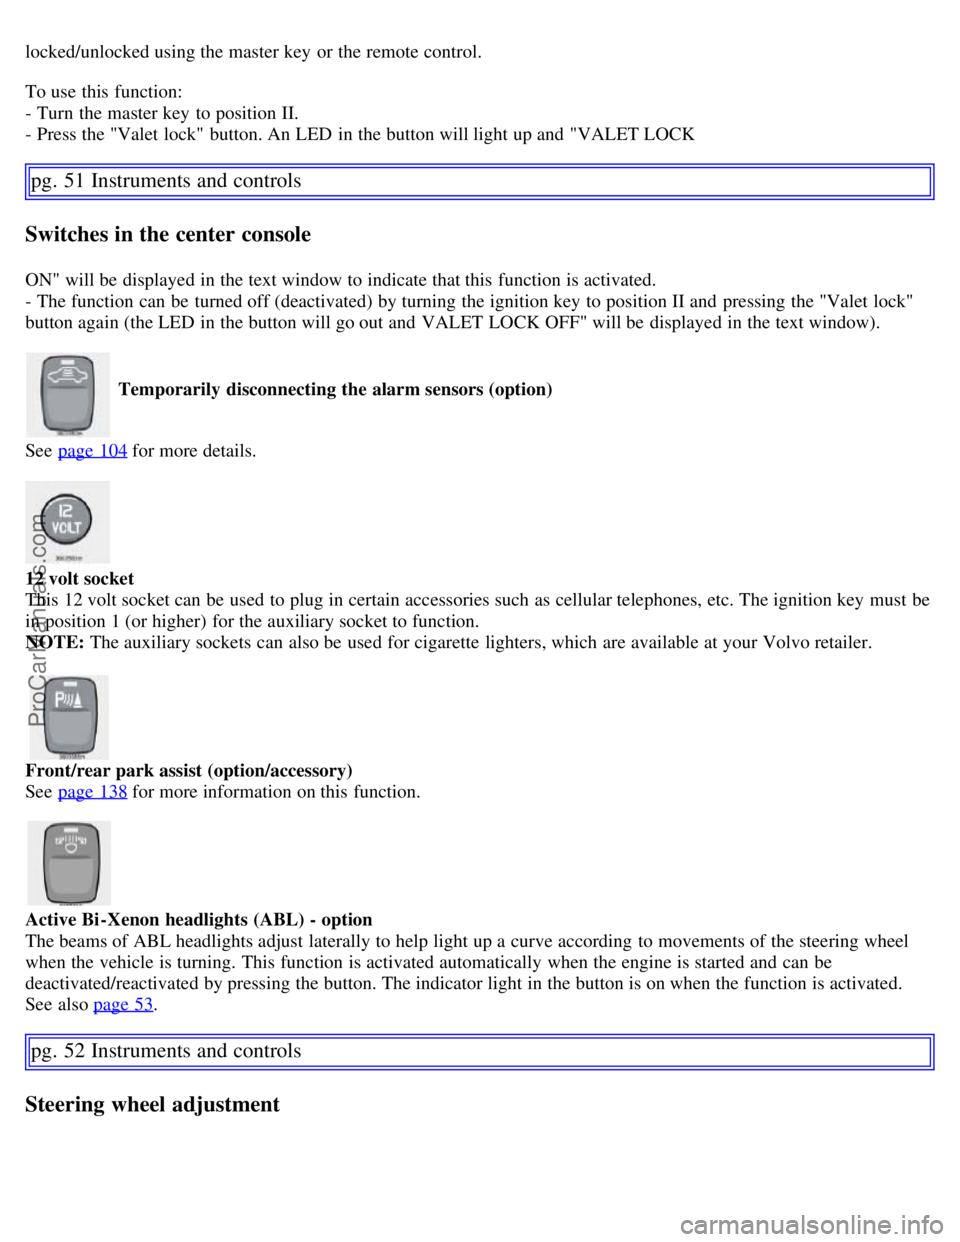
Temporarily disconnecting the alarm sensors (option)
See page 104
for more details.
12 volt socket
This 12 volt socket can be used to plug in certain accessories such as cellular telephones, etc. The ignition key must be
in position 1 (or higher) for the auxiliary socket to function.
NOTE: The auxiliary sockets can also be used for cigarette lighters, which are available at your Volvo retailer.
Front/rear park assist (option/accessory)
See page 138
for more information on this function.
Active Bi -Xenon headlights (ABL) - option
The beams of ABL headlights adjust laterally to help light up a curve according to movements of the steering wheel
when the vehicle is turning. This function is activated automatically when the engine is started and can be
deactivated/reactivated by pressing the button. The indicator light in the button is on when the function is activated.
See also page 53
.
pg. 52 Instruments and controls
Steering wheel adjustment
ProCarManuals.com
Page 59 of 200
The mirrors should always be adjusted prior to driving. Objects seen in the passenger's side wide -angle sideview
mirror are closer than they appear to be.
Remote central locking and sideview mirror memory-option
If you lock the vehicle and later unlock it with the same remote control and open the driver's door, the sideview
mirrors (and the driver's seat) will automatically move to the position they were in when you left the vehicle. This
feature will work in the same way with all of the remote control transmitters (up to 3) that you use with your vehicle.
This feature will not function if you lock your vehicle with the key.
Water repellent glass-option on certain models
The side door windows can be treated with a water repellent coating. The symbol to the left indicates
these windows have this coating. The optional laminated side windows always have this coating.
The coating improves vision by causing the water to run off quickly.
See page 163
for information on cleaning this type of glass.
CAUTION!
Use only suitable plastic scrapers to remove ice or snow from the windows. Using a metal ice scraper could damage
the water repellent coating.
pg. 68 Instruments and controls
Power moonroof (option)
Power moonroof
To operate the moonroof, turn the ignition key to position I or II, or start the engine. The moonroof can be operated in
two ways:
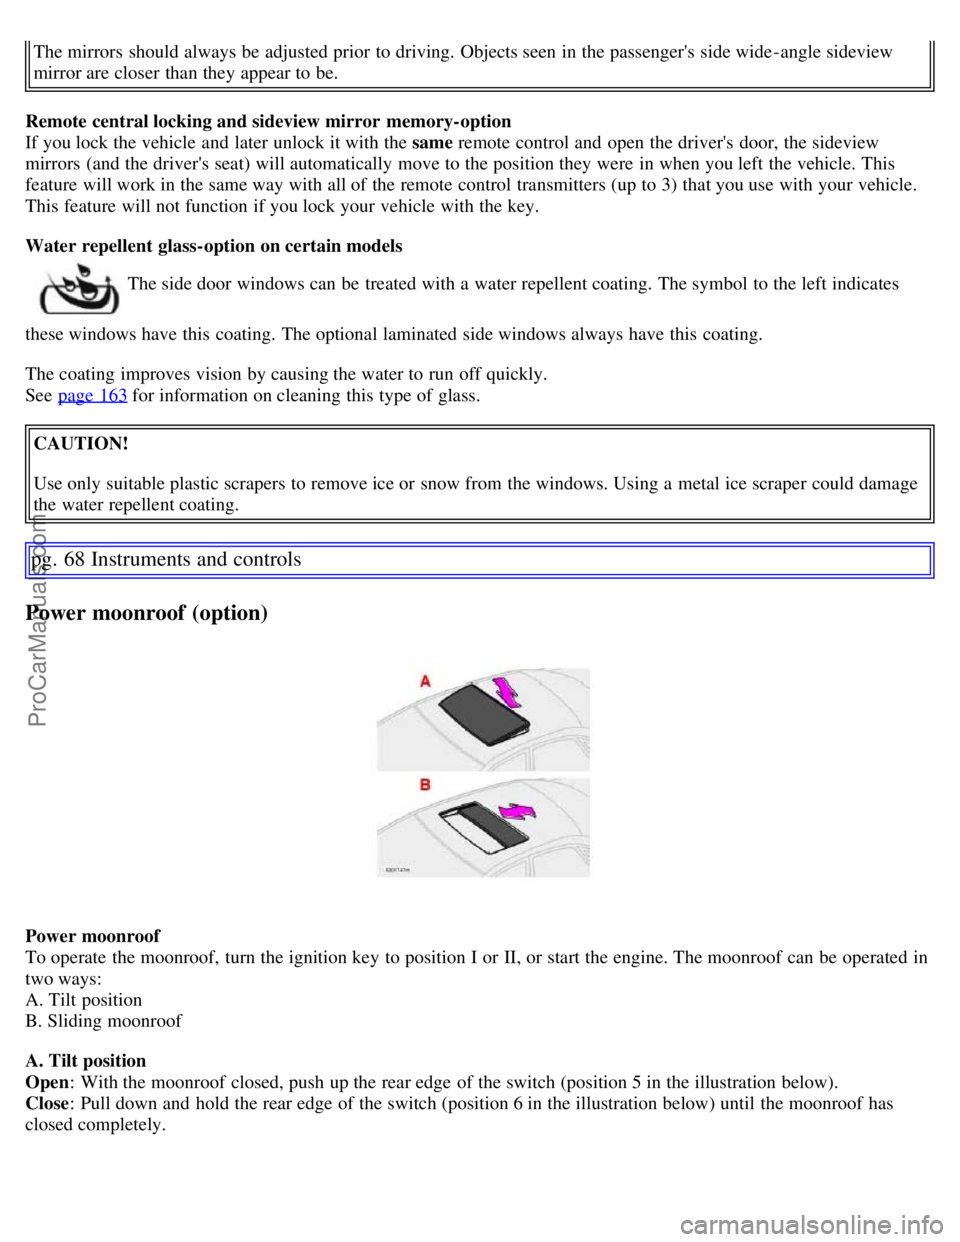
A. Tilt position
B. Sliding moonroof
A. Tilt position
Open : With the moonroof closed, push up the rear edge of the switch (position 5 in the illustration below).
Close : Pull down and hold the rear edge of the switch (position 6 in the illustration below) until the moonroof has
closed completely.
ProCarManuals.com
Page 73 of 200
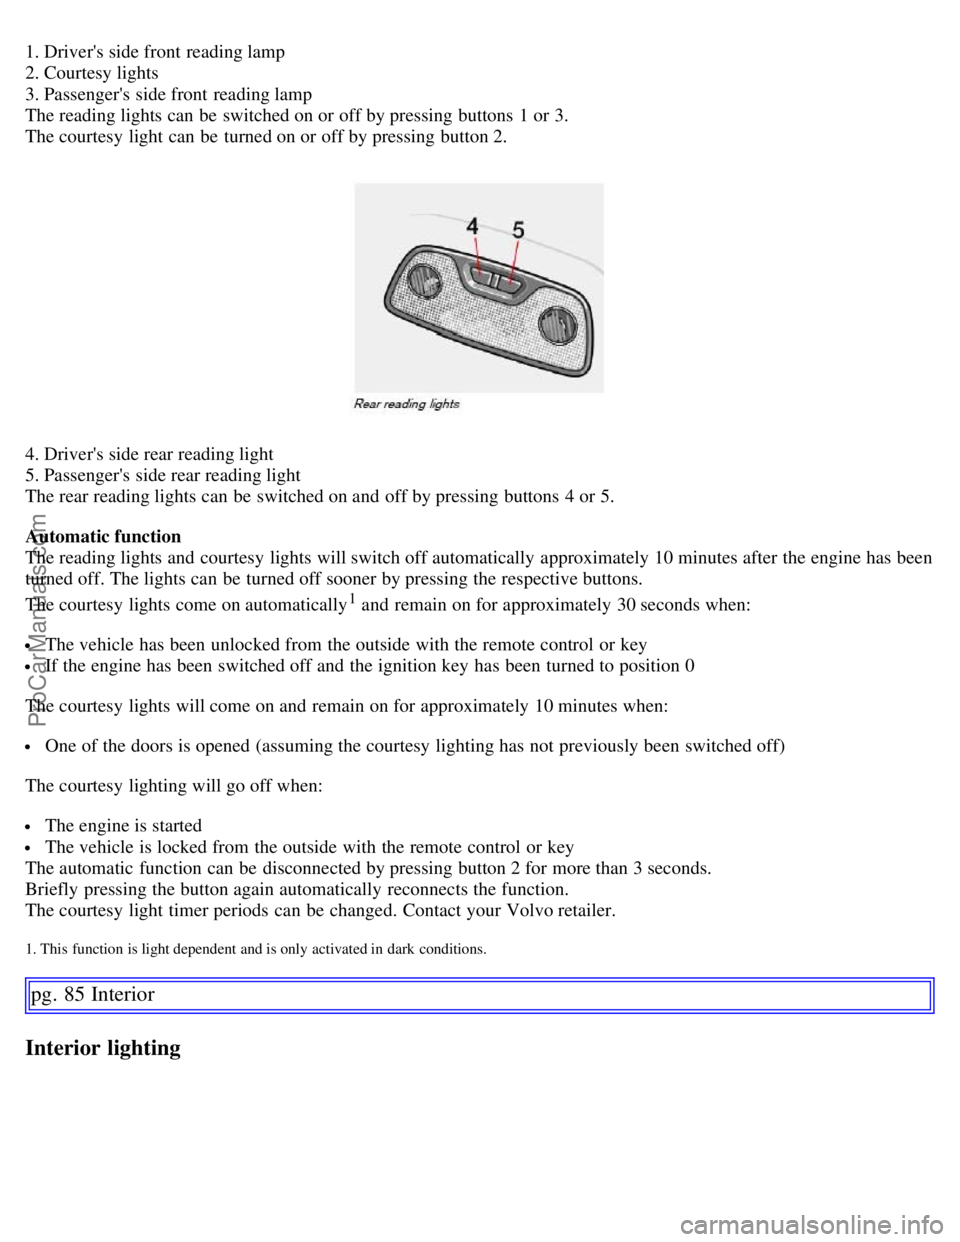
1. Driver's side front reading lamp
2. Courtesy lights
3. Passenger's side front reading lamp
The reading lights can be switched on or off by pressing buttons 1 or 3.
The courtesy light can be turned on or off by pressing button 2.
4. Driver's side rear reading light
5. Passenger's side rear reading light
The rear reading lights can be switched on and off by pressing buttons 4 or 5.
Automatic function
The reading lights and courtesy lights will switch off automatically approximately 10 minutes after the engine has been
turned off. The lights can be turned off sooner by pressing the respective buttons.
The courtesy lights come on automatically
1 and remain on for approximately 30 seconds when:
The vehicle has been unlocked from the outside with the remote control or key
If the engine has been switched off and the ignition key has been turned to position 0
The courtesy lights will come on and remain on for approximately 10 minutes when:
One of the doors is opened (assuming the courtesy lighting has not previously been switched off)
The courtesy lighting will go off when:
The engine is started
The vehicle is locked from the outside with the remote control or key
The automatic function can be disconnected by pressing button 2 for more than 3 seconds.
Briefly pressing the button again automatically reconnects the function.
The courtesy light timer periods can be changed. Contact your Volvo retailer.
1. This function is light dependent and is only activated in dark conditions.
pg. 85 Interior
Interior lighting
ProCarManuals.com
Page 82 of 200
Turn the key again (within 10 seconds) to unlock all doors and the trunk.
One turn with the key towards lock in the drivers door locks all doors and the trunk.
Use the switch on the driver's door armrest to lock/unlock the vehicle from the inside.
WARNING!
If the doors are locked while driving, this may hinder rapid access to the occupants of the vehicle in the event of an
accident. (Also see information on "Child safety locks")
NOTE: To help prevent accidentally locking the keys in the vehicle, the central locking system is designed to unlock
the doors immediately if the key is left in the ignition switch, the vehicle is locked using the lock button on the door
and the door is then closed. A sound from the lock will be audible at this time.
Please note that this function will not unlock the doors if the engine is running.
Immobilizer (start inhibitor)
Each of the keys supplied with your vehicle contains a coded transmitter. The code in the key is transmitted to an
antenna in the ignition switch where it is compared to the code stored in the start inhibitor module. The vehicle will
start only with a properly coded key.
Each key has a unique code, which your Volvo retailer uses if new keys are required. A maximum of six remote
controls/keys can be programmed and used for one vehicle. If you misplace a key, take the other keys to an authorized
Volvo retailer for reprogramming as an antitheft measure.
NOTE: This device complies with part 15 of the FCC rules. Operation is subject to the following condition: (1) This
device may not cause harmful interference, and (2) this device must accept any interference received, including
interference that may cause undesired operation.
pg. 97 Locks and alarm
Remote control
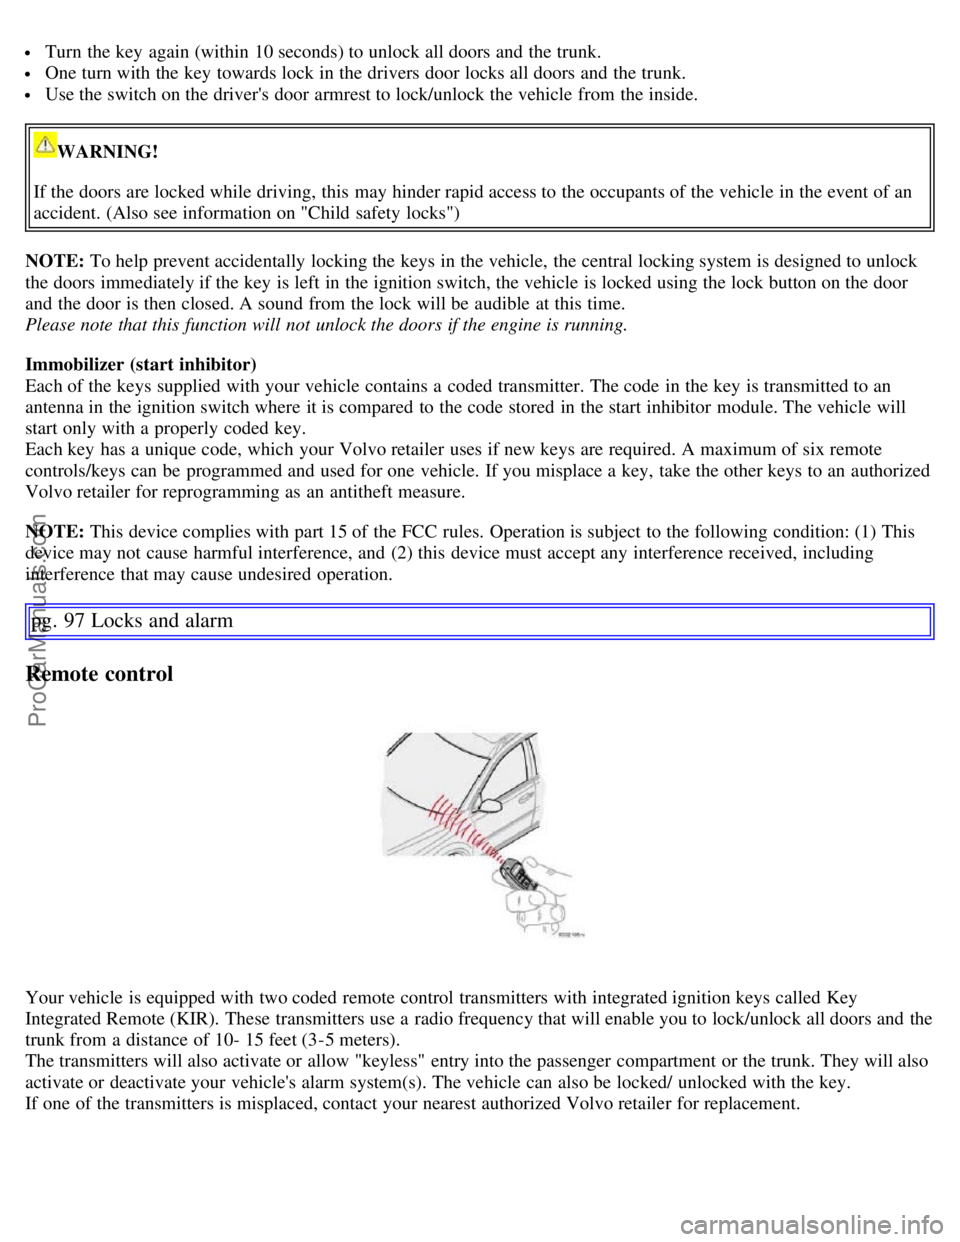
Your vehicle is equipped with two coded remote control transmitters with integrated ignition keys called Key
Integrated Remote (KIR). These transmitters use a radio frequency that will enable you to lock/unlock all doors and the
trunk from a distance of 10- 15 feet (3-5 meters).
The transmitters will also activate or allow "keyless" entry into the passenger compartment or the trunk. They will also
activate or deactivate your vehicle's alarm system(s). The vehicle can also be locked/ unlocked with the key.
If one of the transmitters is misplaced, contact your nearest authorized Volvo retailer for replacement.
ProCarManuals.com
Page 83 of 200
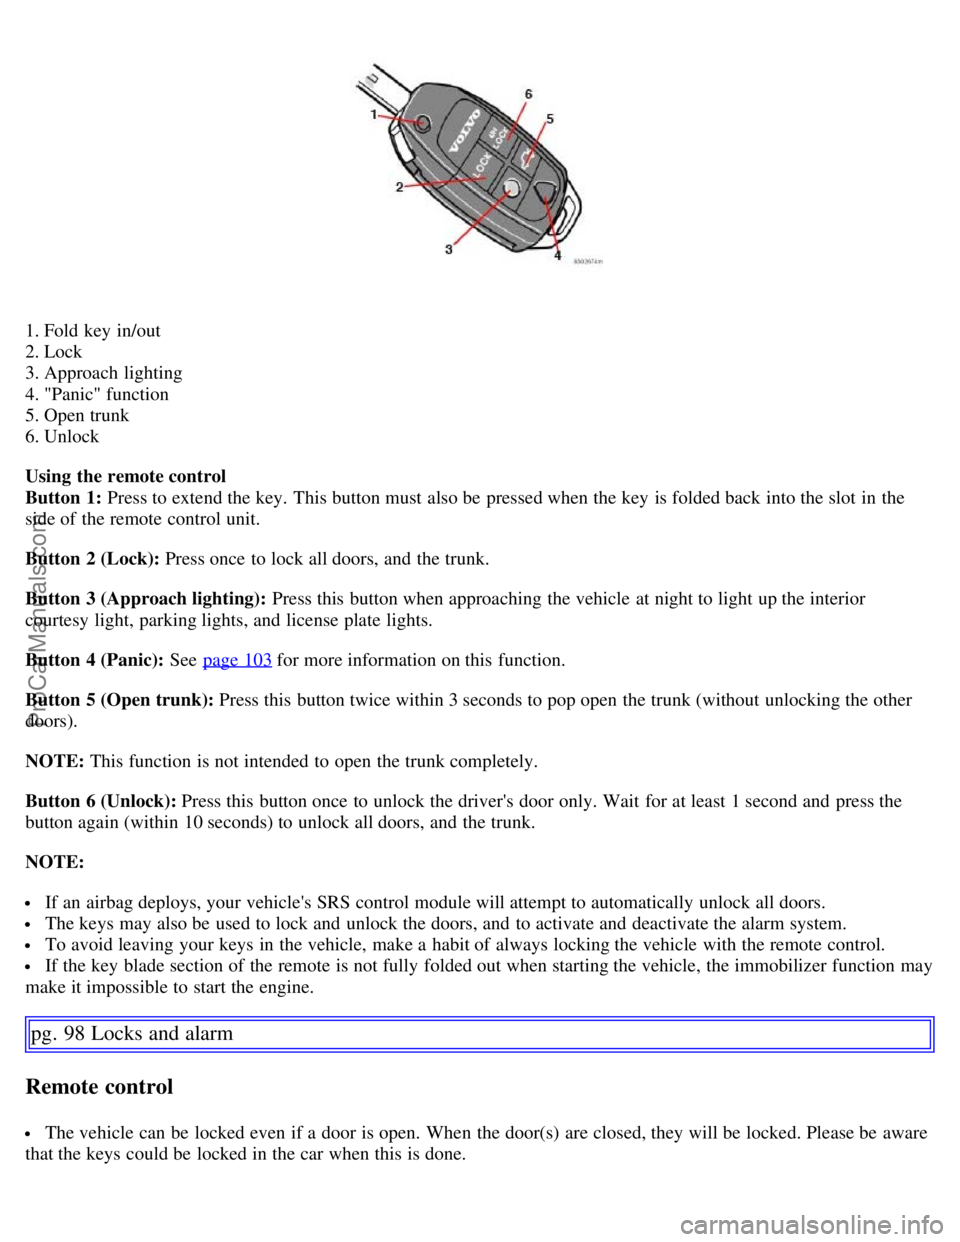
1. Fold key in/out
2. Lock
3. Approach lighting
4. "Panic" function
5. Open trunk
6. Unlock
Using the remote control
Button 1: Press to extend the key. This button must also be pressed when the key is folded back into the slot in the
side of the remote control unit.
Button 2 (Lock): Press once to lock all doors, and the trunk.
Button 3 (Approach lighting): Press this button when approaching the vehicle at night to light up the interior
courtesy light, parking lights, and license plate lights.
Button 4 (Panic): See page 103
for more information on this function.
Button 5 (Open trunk): Press this button twice within 3 seconds to pop open the trunk (without unlocking the other
doors).
NOTE: This function is not intended to open the trunk completely.
Button 6 (Unlock): Press this button once to unlock the driver's door only. Wait for at least 1 second and press the
button again (within 10 seconds) to unlock all doors, and the trunk.
NOTE:
If an airbag deploys, your vehicle's SRS control module will attempt to automatically unlock all doors.
The keys may also be used to lock and unlock the doors, and to activate and deactivate the alarm system.
To avoid leaving your keys in the vehicle, make a habit of always locking the vehicle with the remote control.
If the key blade section of the remote is not fully folded out when starting the vehicle, the immobilizer function may
make it impossible to start the engine.
pg. 98 Locks and alarm
Remote control
The vehicle can be locked even if a door is open. When the door(s) are closed, they will be locked. Please be aware
that the keys could be locked in the car when this is done.
ProCarManuals.com
Page 95 of 200
Refueling
CAUTION!
- Do not refuel with the engine running
1. Turn the ignition off or to position I. If the ignition is on, an incorrect
reading could occur in the fuel gauge.
- After refueling, close the fuel filler cap by turning it clockwise until it clicks into place.
1
- Avoid overfilling the fuel tank. Do not press the handle on the filler nozzle more than one extra time. Too much
fuel in the tank in hot weather conditions can cause the fuel to overflow. Overfilling could also cause damage to the
emission control systems.
- Avoid spilling gasoline during refueling. In addition to causing damage to the environment, gasolines containing
alcohol can cause damage to painted surfaces, which may not be covered under the New Vehicle Limited Warranty.
- Do not use gasolines containing methanol (methyl alcohol, wood alcohol). This practice can result in vehicle
performance deterioration and can damage critical parts in the fuel system. Such damage may not be covered under
the New Vehicle Limited Warranty.
1. If the fuel filler cap is not closed tightly or if the engine is running when the vehicle is refueled, the Check Engine Light (malfunction indicator
lamp) may indicate a fault. However, your vehicle's performance will not be affected. Use only Volvo original or approved fuel filler caps.
pg. 111 Starting and driving
Starting the vehicle
Starting the engine
- Fasten the seat belt.
WARNING!
Before starting, check that the seat, steering wheel and mirrors are adjusted properly. Make sure the brake pedal can
be depressed completely. Adjust the seat if necessary. See pages 80
and 82.
- Apply the parking brake (hand brake) if not already set. The gear selector (automatic transmission) is locked in the
( P )ark position ( SHIFTLOCK ). Manual transmission: the clutch must be fully depressed.
- Without touching the accelerator pedal, turn the ignition key
1 to the starting position. Allow the starter to operate for
up to 10 seconds. Release the key as soon as the engine starts. If the engine fails to start, repeat this step.
NOTE:
If the key blade section of the remote is not fully folded out when starting the vehicle, the immobilizer function may
make it impossible to start the engine.
After a cold start, idle speed may be noticeably higher than normal for a short period. This is done to help bring
components in the emission control system to their normal operating temperature as quickly as possible, which enables
them to control emissions and help reduce the vehicle's impact on the environment.
For cold starts at altitudes above 6000 ft (1800 meters), depress the accelerator pedal halfway and turn the key to the
starting position. Release the pedal slowly when the engine starts.
- To release the gear selector from the ( P)ark position, the engine must be running (or the ignition key must be in
position II) and the brake pedal must be depressed.
- Select the desired gear. The gear engages after a very slight delay which is especially noticeable when selecting R.
NOTE : Your vehicle is equipped with a KEYLOCK system (automatic transmission). When the engine is switched
ProCarManuals.com
Page 191 of 200
Radio frequency range
AM: 530 - 1710 kHz
FM: 87.7 - 107.9 MHz
1. The HU- 850 must be connected to an external amplifier.
Alarm
"Alarm!" is displayed when an alarm message is sent. The function is used to warn the driver of a serious accident
or disaster situation.
CAUTION!
The optional supplementary amplifier (HU-850) may be mounted under the front passenger's seat. If the floor of the
vehicle has become soaked for any reason, do not turn on the radio. This would cause damage to the amplifier.
Contact a Volvo retailer.
Low battery voltage
If the level of battery voltage is low, a message will be displayed. The vehicle's energy conservation function may
switch off the audio system. Recharge the battery by starting the engine.
pg. 229 Specifications
HomeLink® Universal Transceiver (option)
HomeLink® Universal Transceiver
HomeLink® is an advanced system that can be programmed to learn the codes of three different remote controlled-
devices (e.g., garage door openers, remote lighting, entry door lock). HomeLink®'s sun visor-mounted transceiver,
powered by your vehicle's electrical system, may then be used in place of your hand -held remote controls.
NOTE: For your security, the HomeLink® Universal Transceiver is designed to not function if you lock your vehicle
from the outside.
Programming the transceiver
- The ignition switch must be turned to the "accessory" position (II) before programming the HomeLink® Universal
Transceiver.
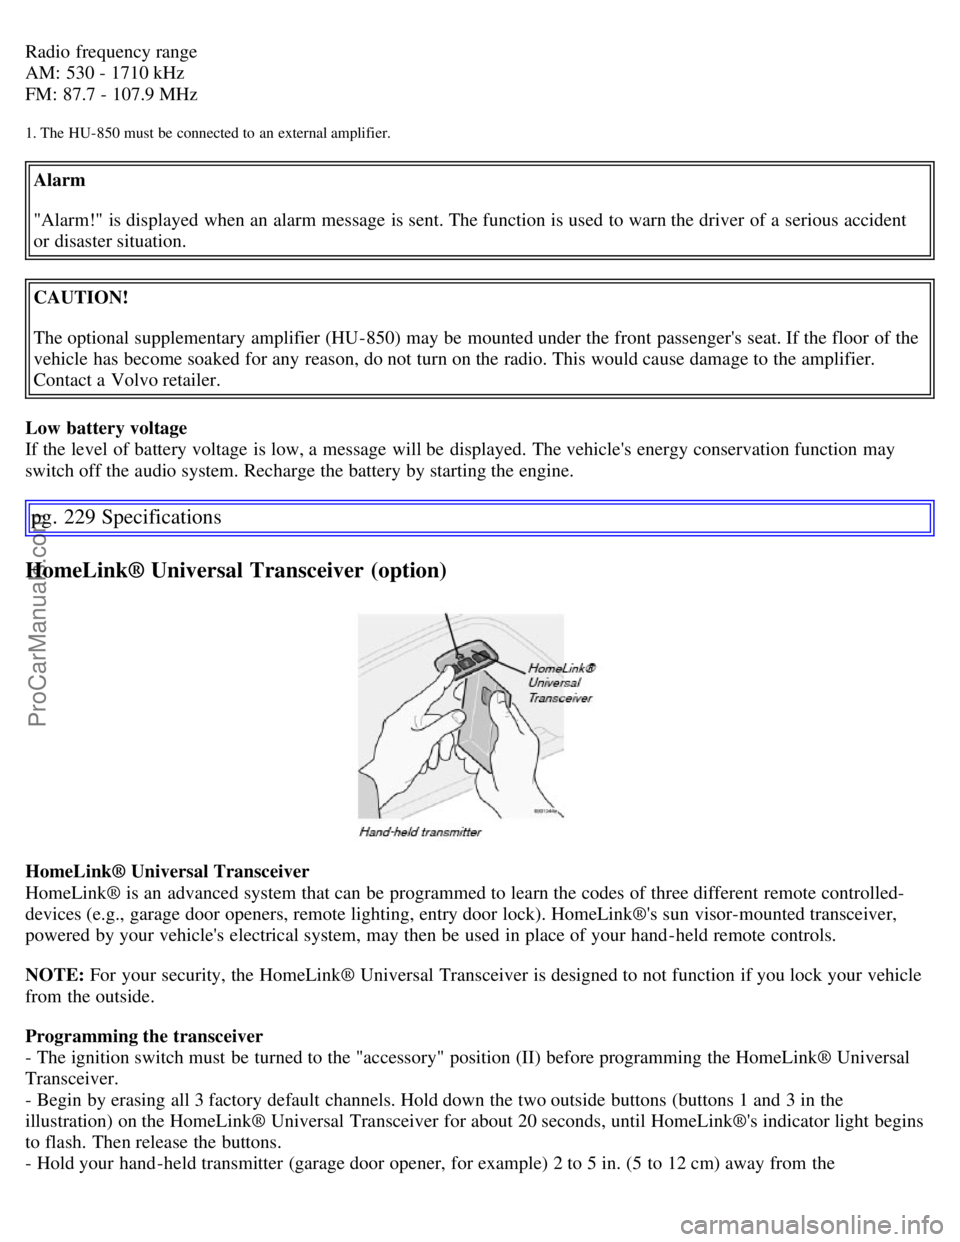
- Begin by erasing all 3 factory default channels. Hold down the two outside buttons (buttons 1 and 3 in the
illustration) on the HomeLink® Universal Transceiver for about 20 seconds, until HomeLink®'s indicator light begins
to flash. Then release the buttons.
- Hold your hand -held transmitter (garage door opener, for example) 2 to 5 in. (5 to 12 cm) away from the
ProCarManuals.com
Page 195 of 200
C
Capacities202
Capacity weight153
Carbon Monoxide - Important Warning107
Catalytic converter205
Central locking system - remote control97
Changing coolant172
Check Engine warning light46
Child safety child restraints31
Child safety lock102
Climate system72
Clock44
Coat hanger89
Cold weather precautions136
Coolant176
changing172
checking level of172
Coolant - changing176
Cooling system204
Courtesy light84
Cruise control60
Cup holders
center console88
rear seat
87
Curb weight153
Current fuel consumption59
D
Defroster75
Detachable trailer hitch133
Door mirror defroster58
Door mirrors51
Driver distraction5
Driving economically113
DSTC50
Dynamic Stability and Traction Control (DSTC)50
E
Economical driving113
Electric socket51
Electrical system207
Electrically operated moonroof68
Emission inspection170
Engine - starting111
Engine compartment173
Engine oil174, 203
ProCarManuals.com