steering wheel VOLVO S60 2007 Owners Manual
[x] Cancel search | Manufacturer: VOLVO, Model Year: 2007, Model line: S60, Model: VOLVO S60 2007Pages: 200, PDF Size: 4.03 MB
Page 9 of 200
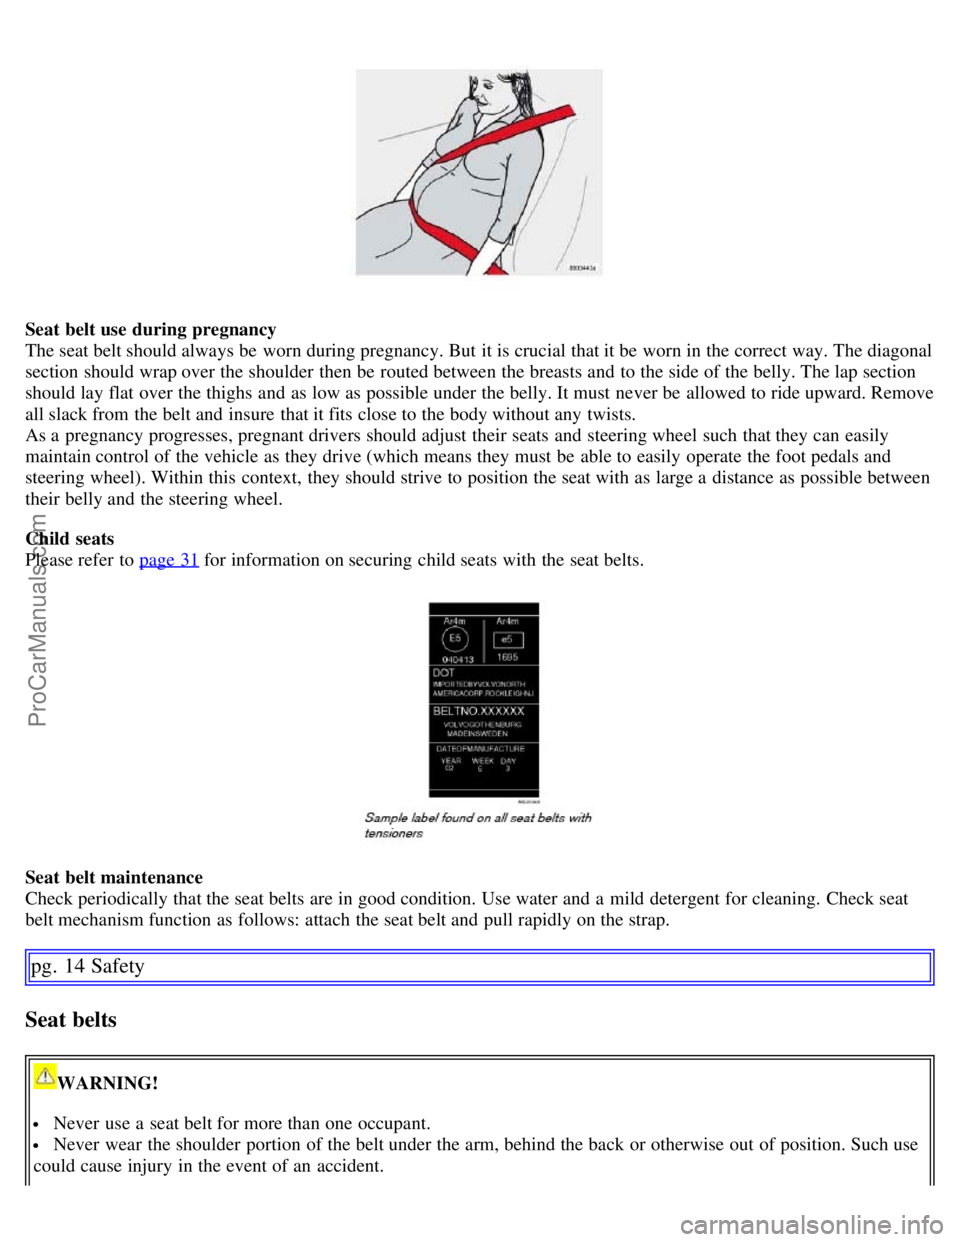
Seat belt use during pregnancy
The seat belt should always be worn during pregnancy. But it is crucial that it be worn in the correct way. The diagonal
section should wrap over the shoulder then be routed between the breasts and to the side of the belly. The lap section
should lay flat over the thighs and as low as possible under the belly. It must never be allowed to ride upward. Remove
all slack from the belt and insure that it fits close to the body without any twists.
As a pregnancy progresses, pregnant drivers should adjust their seats and steering wheel such that they can easily
maintain control of the vehicle as they drive (which means they must be able to easily operate the foot pedals and
steering wheel). Within this context, they should strive to position the seat with as large a distance as possible between
their belly and the steering wheel.
Child seats
Please refer to page 31
for information on securing child seats with the seat belts.
Seat belt maintenance
Check periodically that the seat belts are in good condition. Use water and a mild detergent for cleaning. Check seat
belt mechanism function as follows: attach the seat belt and pull rapidly on the strap.
pg. 14 Safety
Seat belts
WARNING!
Never use a seat belt for more than one occupant.
Never wear the shoulder portion of the belt under the arm, behind the back or otherwise out of position. Such use
could cause injury in the event of an accident.
ProCarManuals.com
Page 11 of 200
Automatic transmission:
Before attempting to tow the vehicle, use the following procedure to override the shiftlock system to move the gear
selector to the neutral position:
Switch off the ignition for at least 10 minutes and disconnect the battery.
Wait at least one minute.
Insert the key in the ignition and turn it to position II.
Press firmly on the brake pedal.
Move the gear selector from (P)ark to the (N)eutral position.
pg. 16 Safety
Front airbags
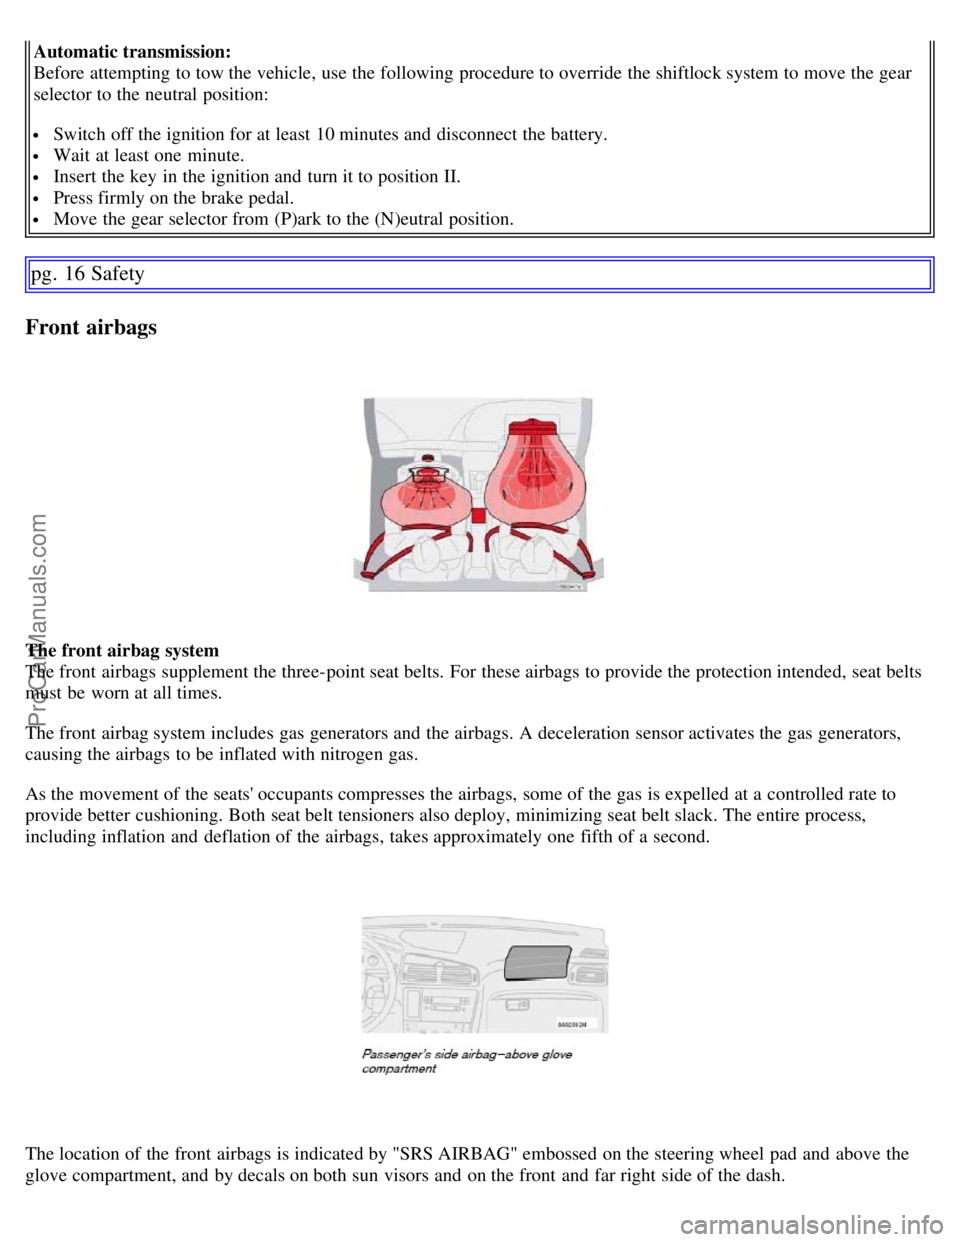
The front airbag system
The front airbags supplement the three-point seat belts. For these airbags to provide the protection intended, seat belts
must be worn at all times.
The front airbag system includes gas generators and the airbags. A deceleration sensor activates the gas generators,
causing the airbags to be inflated with nitrogen gas.
As the movement of the seats' occupants compresses the airbags, some of the gas is expelled at a controlled rate to
provide better cushioning. Both seat belt tensioners also deploy, minimizing seat belt slack. The entire process,
including inflation and deflation of the airbags, takes approximately one fifth of a second.
The location of the front airbags is indicated by "SRS AIRBAG" embossed on the steering wheel pad and above the
glove compartment, and by decals on both sun visors and on the front and far right side of the dash.
ProCarManuals.com
Page 12 of 200
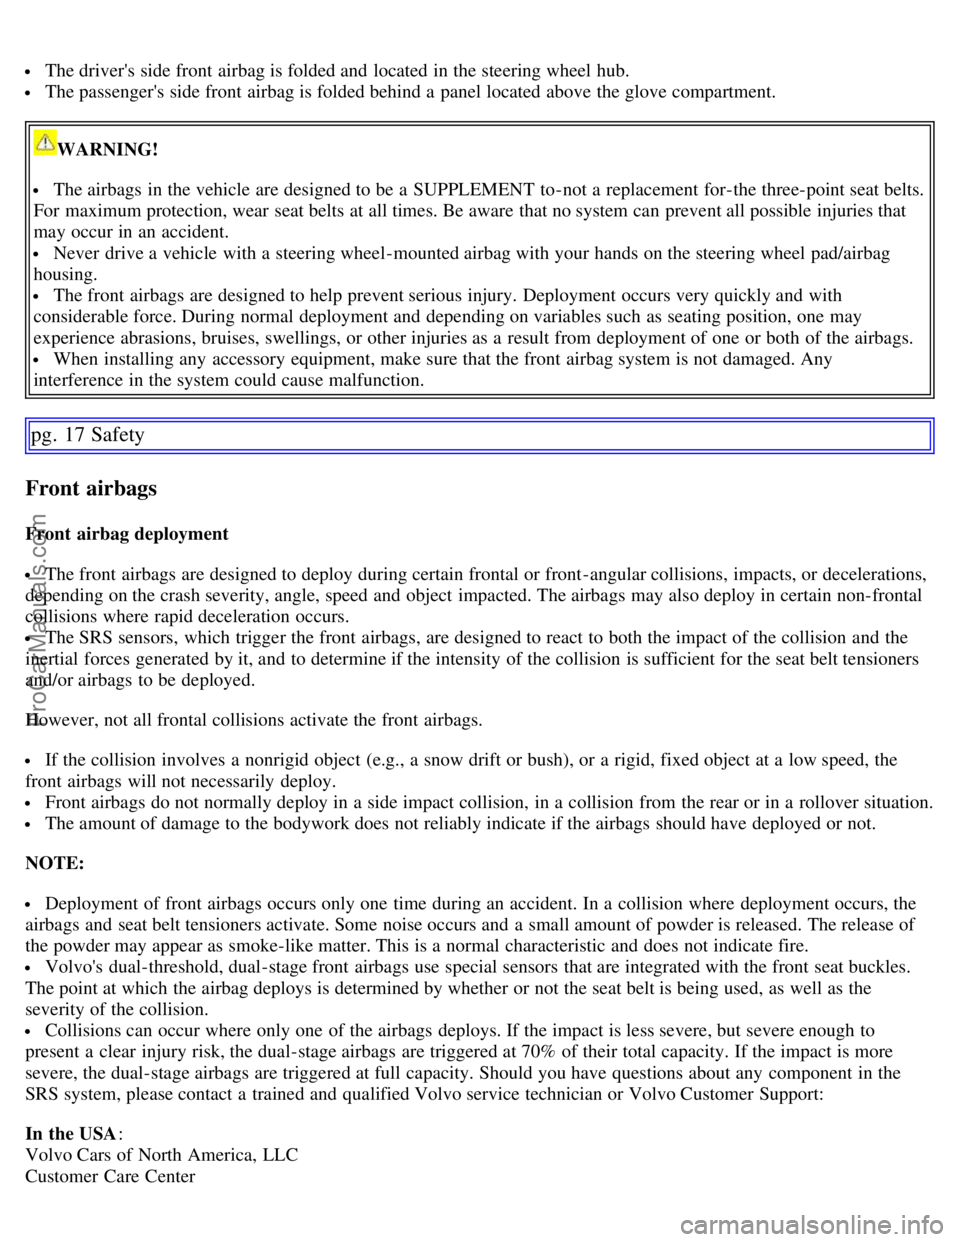
The driver's side front airbag is folded and located in the steering wheel hub.
The passenger's side front airbag is folded behind a panel located above the glove compartment.
WARNING!
The airbags in the vehicle are designed to be a SUPPLEMENT to-not a replacement for-the three-point seat belts.
For maximum protection, wear seat belts at all times. Be aware that no system can prevent all possible injuries that
may occur in an accident.
Never drive a vehicle with a steering wheel-mounted airbag with your hands on the steering wheel pad/airbag
housing.
The front airbags are designed to help prevent serious injury. Deployment occurs very quickly and with
considerable force. During normal deployment and depending on variables such as seating position, one may
experience abrasions, bruises, swellings, or other injuries as a result from deployment of one or both of the airbags.
When installing any accessory equipment, make sure that the front airbag system is not damaged. Any
interference in the system could cause malfunction.
pg. 17 Safety
Front airbags
Front airbag deployment
The front airbags are designed to deploy during certain frontal or front -angular collisions, impacts, or decelerations,
depending on the crash severity, angle, speed and object impacted. The airbags may also deploy in certain non-frontal
collisions where rapid deceleration occurs.
The SRS sensors, which trigger the front airbags, are designed to react to both the impact of the collision and the
inertial forces generated by it, and to determine if the intensity of the collision is sufficient for the seat belt tensioners
and/or airbags to be deployed.
However, not all frontal collisions activate the front airbags.
If the collision involves a nonrigid object (e.g., a snow drift or bush), or a rigid, fixed object at a low speed, the
front airbags will not necessarily deploy.
Front airbags do not normally deploy in a side impact collision, in a collision from the rear or in a rollover situation.
The amount of damage to the bodywork does not reliably indicate if the airbags should have deployed or not.
NOTE:
Deployment of front airbags occurs only one time during an accident. In a collision where deployment occurs, the
airbags and seat belt tensioners activate. Some noise occurs and a small amount of powder is released. The release of
the powder may appear as smoke-like matter. This is a normal characteristic and does not indicate fire.
Volvo's dual-threshold, dual-stage front airbags use special sensors that are integrated with the front seat buckles.
The point at which the airbag deploys is determined by whether or not the seat belt is being used, as well as the
severity of the collision.
Collisions can occur where only one of the airbags deploys. If the impact is less severe, but severe enough to
present a clear injury risk, the dual-stage airbags are triggered at 70% of their total capacity. If the impact is more
severe, the dual-stage airbags are triggered at full capacity. Should you have questions about any component in the
SRS system, please contact a trained and qualified Volvo service technician or Volvo Customer Support:
In the USA :
Volvo Cars of North America, LLC
Customer Care Center
ProCarManuals.com
Page 14 of 200
pg. 19 Safety
Front airbags
WARNING!
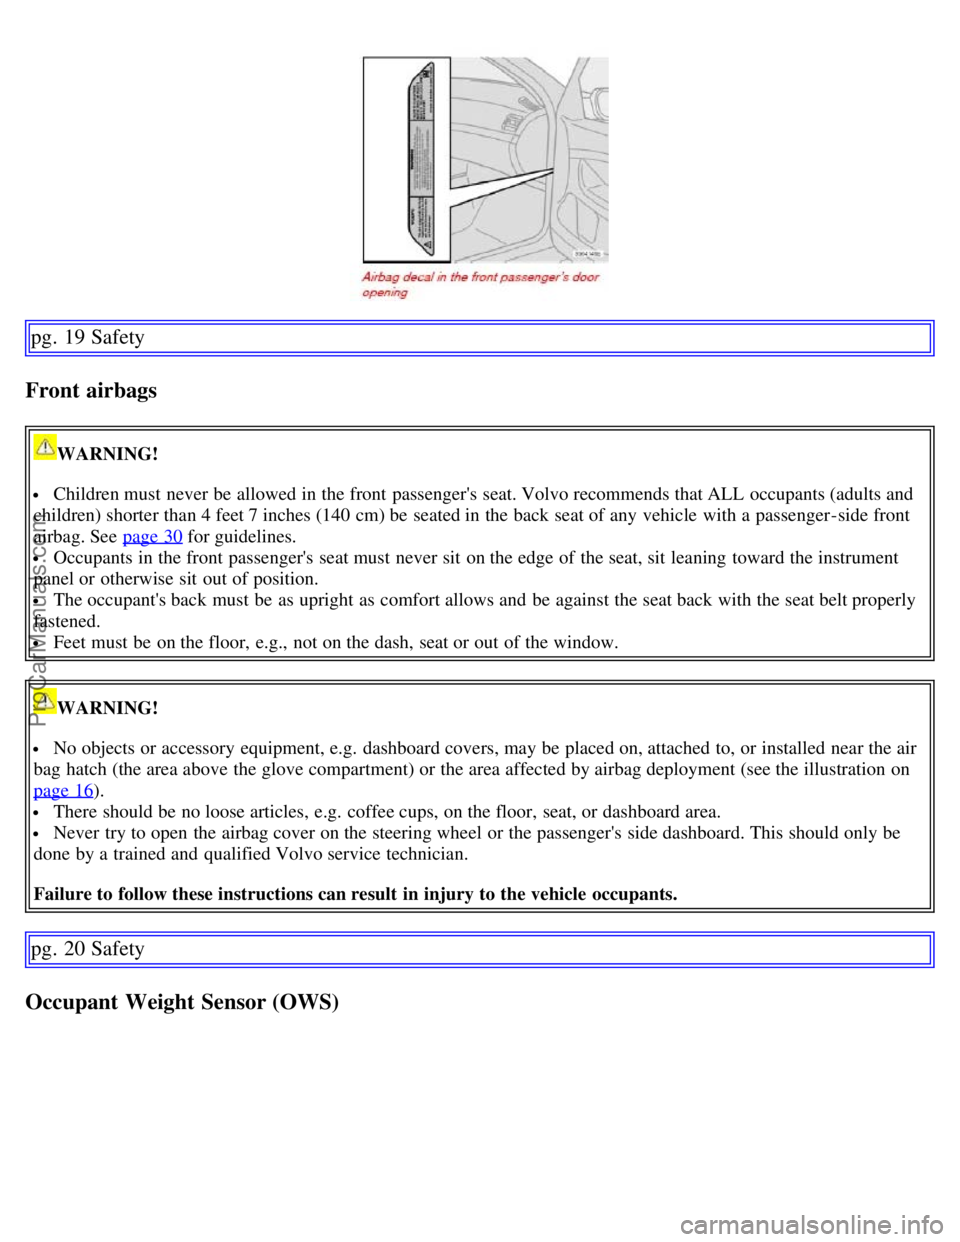
Children must never be allowed in the front passenger's seat. Volvo recommends that ALL occupants (adults and
children) shorter than 4 feet 7 inches (140 cm) be seated in the back seat of any vehicle with a passenger -side front
airbag. See page 30
for guidelines.
Occupants in the front passenger's seat must never sit on the edge of the seat, sit leaning toward the instrument
panel or otherwise sit out of position.
The occupant's back must be as upright as comfort allows and be against the seat back with the seat belt properly
fastened.
Feet must be on the floor, e.g., not on the dash, seat or out of the window.
WARNING!
No objects or accessory equipment, e.g. dashboard covers, may be placed on, attached to, or installed near the air
bag hatch (the area above the glove compartment) or the area affected by airbag deployment (see the illustration on
page 16
).
There should be no loose articles, e.g. coffee cups, on the floor, seat, or dashboard area.
Never try to open the airbag cover on the steering wheel or the passenger's side dashboard. This should only be
done by a trained and qualified Volvo service technician.
Failure to follow these instructions can result in injury to the vehicle occupants.
pg. 20 Safety
Occupant Weight Sensor (OWS)
ProCarManuals.com
Page 34 of 200
2 0 0 7
VOLVO S60
Instruments and controls
pg. 41 Instruments and controls
Instrument overview 42
Instrument panel44
Indicator and warning symbols45
Switches in the center console50
Steering wheel adjustment52
Lighting panel53
Left-side steering wheel lever55
Right-side steering wheel lever56
Hazard warning flashers, rear window/sideview mirror defroster58
Trip computer59
Cruise control60
Parking brake, auxiliary socket/cigarette lighter62
Power windows63
Rearview mirror/sideview mirrors65
Power moonroof (option)68
pg. 42 Instruments and controls
Instrument overview
ProCarManuals.com
Page 35 of 200
pg. 43 Instruments and controls
Instrument overview
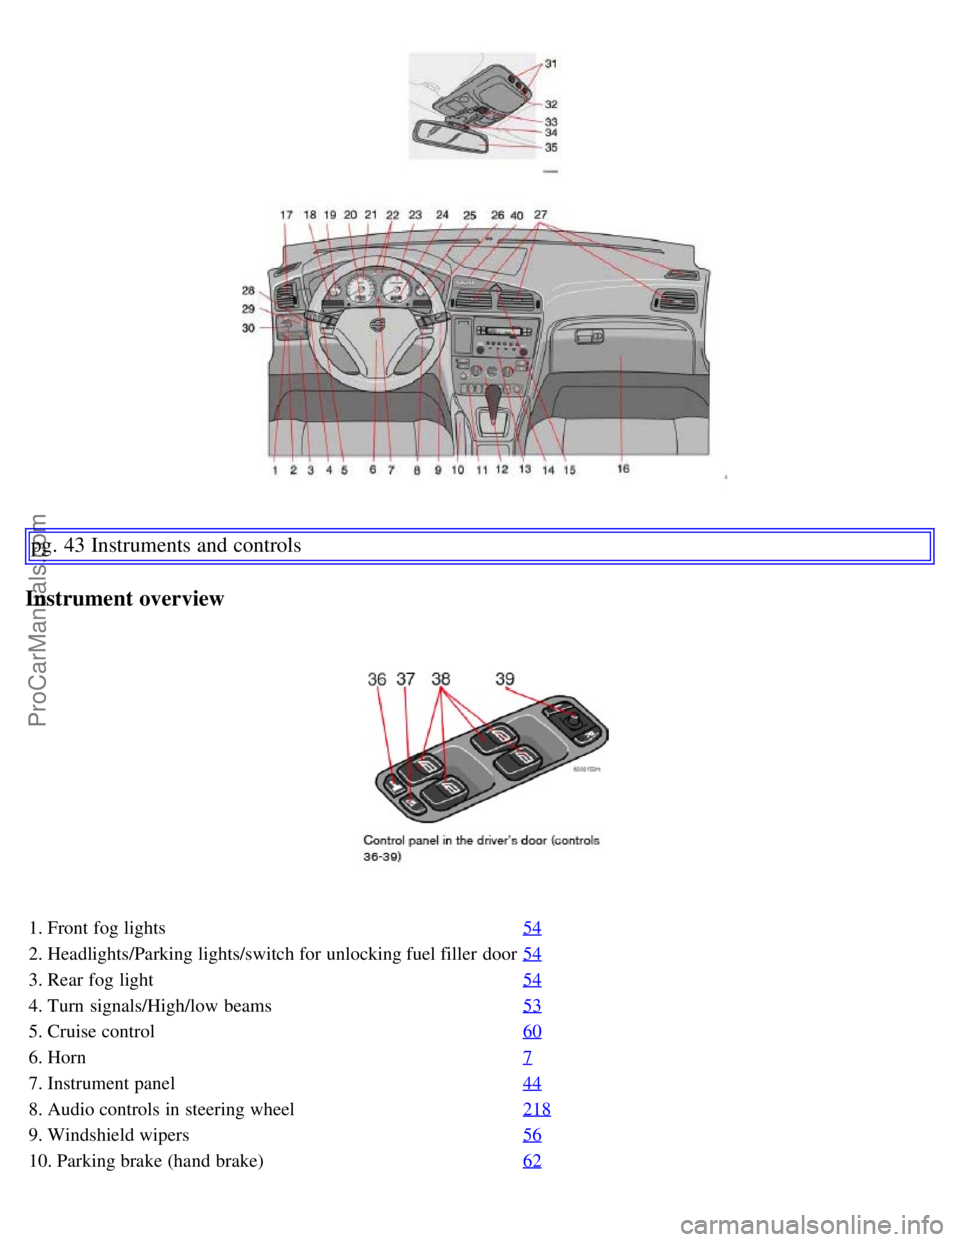
1. Front fog lights54
2. Headlights/Parking lights/switch for unlocking fuel filler door54
3. Rear fog light54
4. Turn signals/High/low beams53
5. Cruise control60
6. Horn7
7. Instrument panel44
8. Audio controls in steering wheel218
9. Windshield wipers56
10. Parking brake (hand brake)62
ProCarManuals.com
Page 42 of 200
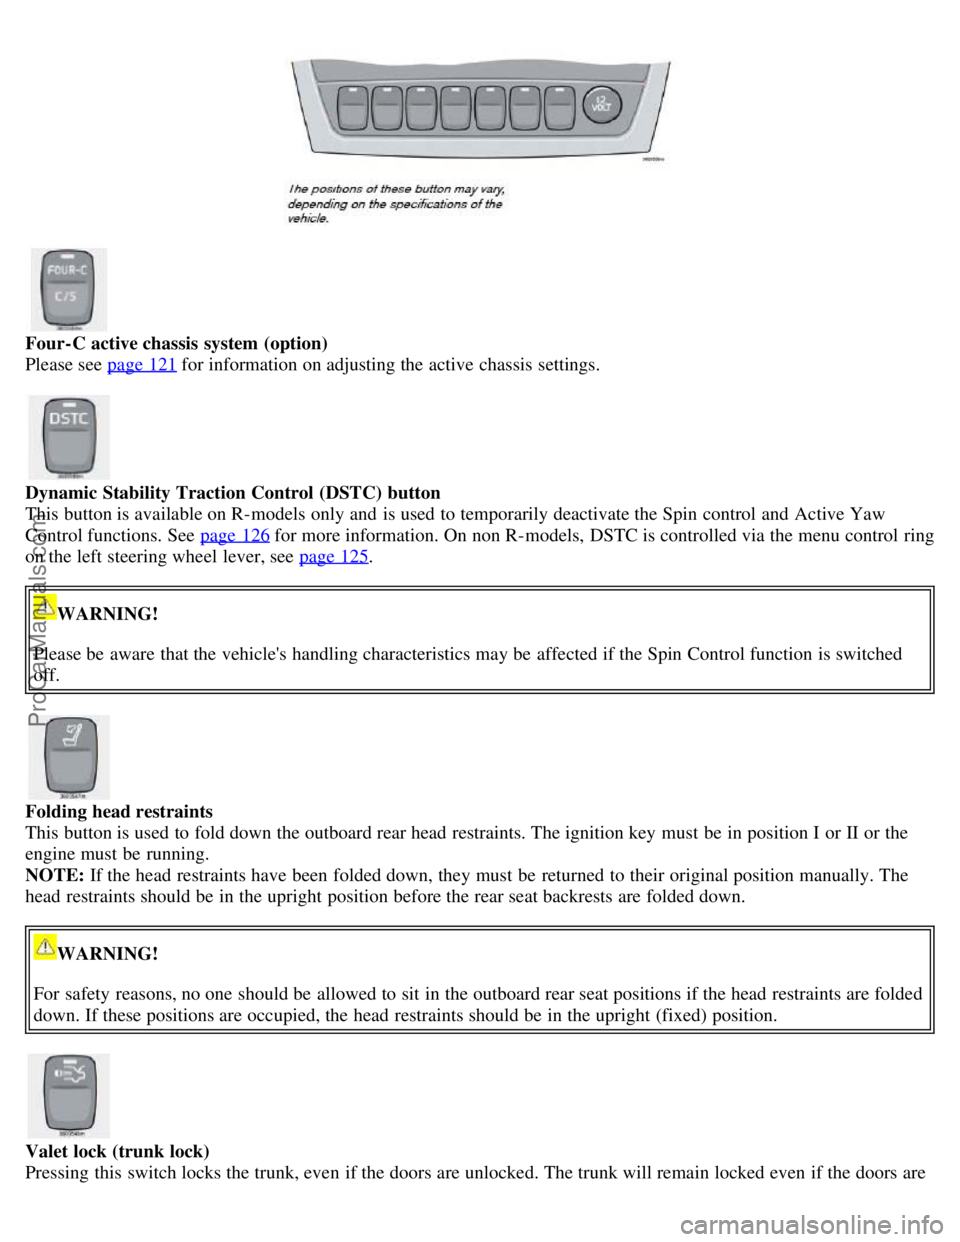
Four-C active chassis system (option)
Please see page 121
for information on adjusting the active chassis settings.
Dynamic Stability Traction Control (DSTC) button
This button is available on R-models only and is used to temporarily deactivate the Spin control and Active Yaw
Control functions. See page 126
for more information. On non R-models, DSTC is controlled via the menu control ring
on the left steering wheel lever, see page 125
.
WARNING!
Please be aware that the vehicle's handling characteristics may be affected if the Spin Control function is switched
off.
Folding head restraints
This button is used to fold down the outboard rear head restraints. The ignition key must be in position I or II or the
engine must be running.
NOTE: If the head restraints have been folded down, they must be returned to their original position manually. The
head restraints should be in the upright position before the rear seat backrests are folded down.
WARNING!
For safety reasons, no one should be allowed to sit in the outboard rear seat positions if the head restraints are folded
down. If these positions are occupied, the head restraints should be in the upright (fixed) position.
Valet lock (trunk lock)
Pressing this switch locks the trunk, even if the doors are unlocked. The trunk will remain locked even if the doors are
ProCarManuals.com
Page 43 of 200
locked/unlocked using the master key or the remote control.
To use this function:
- Turn the master key to position II.
- Press the "Valet lock" button. An LED in the button will light up and "VALET LOCK
pg. 51 Instruments and controls
Switches in the center console
ON" will be displayed in the text window to indicate that this function is activated.
- The function can be turned off (deactivated) by turning the ignition key to position II and pressing the "Valet lock"
button again (the LED in the button will go out and VALET LOCK OFF" will be displayed in the text window).
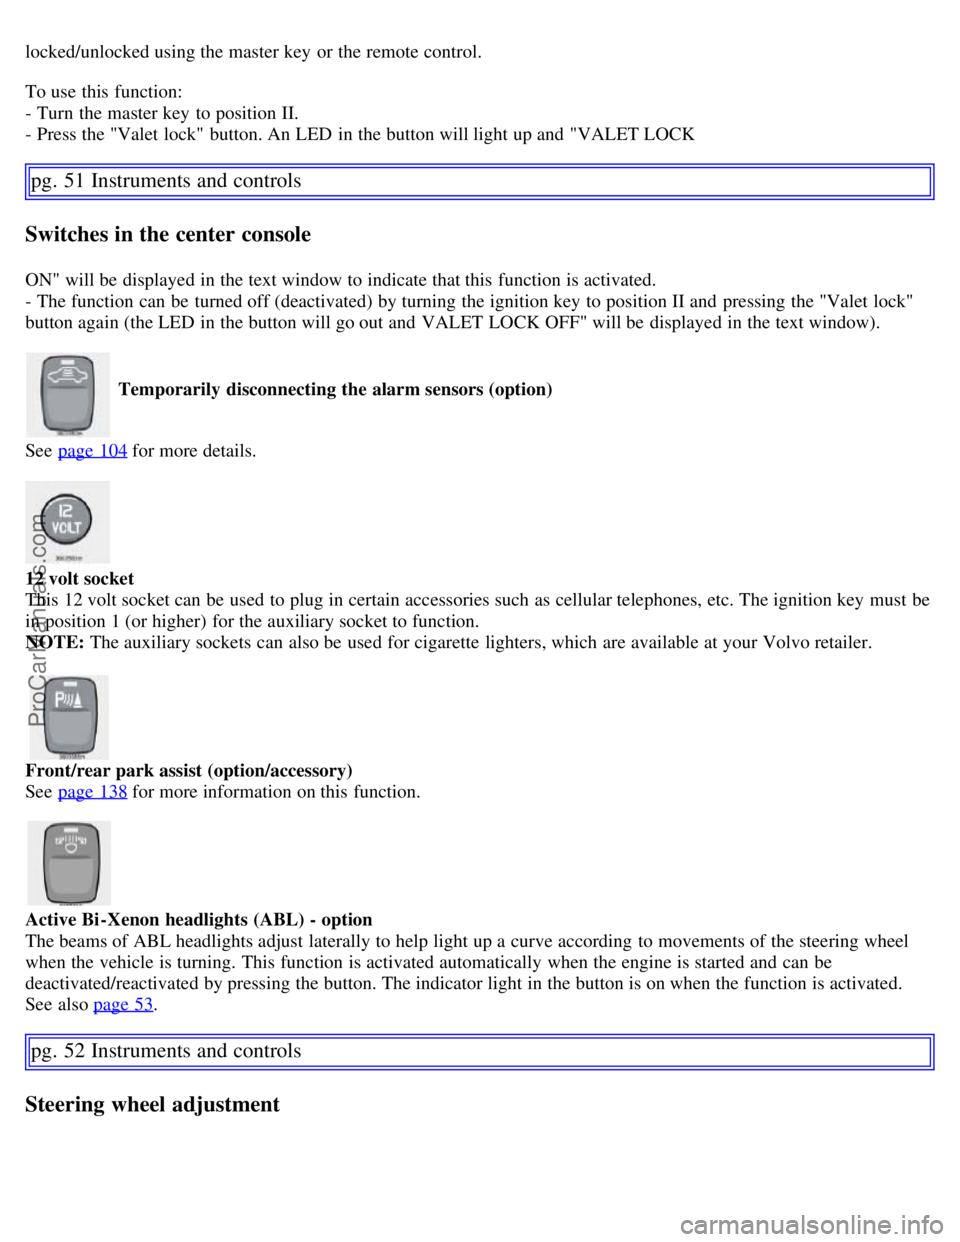
Temporarily disconnecting the alarm sensors (option)
See page 104
for more details.
12 volt socket
This 12 volt socket can be used to plug in certain accessories such as cellular telephones, etc. The ignition key must be
in position 1 (or higher) for the auxiliary socket to function.
NOTE: The auxiliary sockets can also be used for cigarette lighters, which are available at your Volvo retailer.
Front/rear park assist (option/accessory)
See page 138
for more information on this function.
Active Bi -Xenon headlights (ABL) - option
The beams of ABL headlights adjust laterally to help light up a curve according to movements of the steering wheel
when the vehicle is turning. This function is activated automatically when the engine is started and can be
deactivated/reactivated by pressing the button. The indicator light in the button is on when the function is activated.
See also page 53
.
pg. 52 Instruments and controls
Steering wheel adjustment
ProCarManuals.com
Page 44 of 200
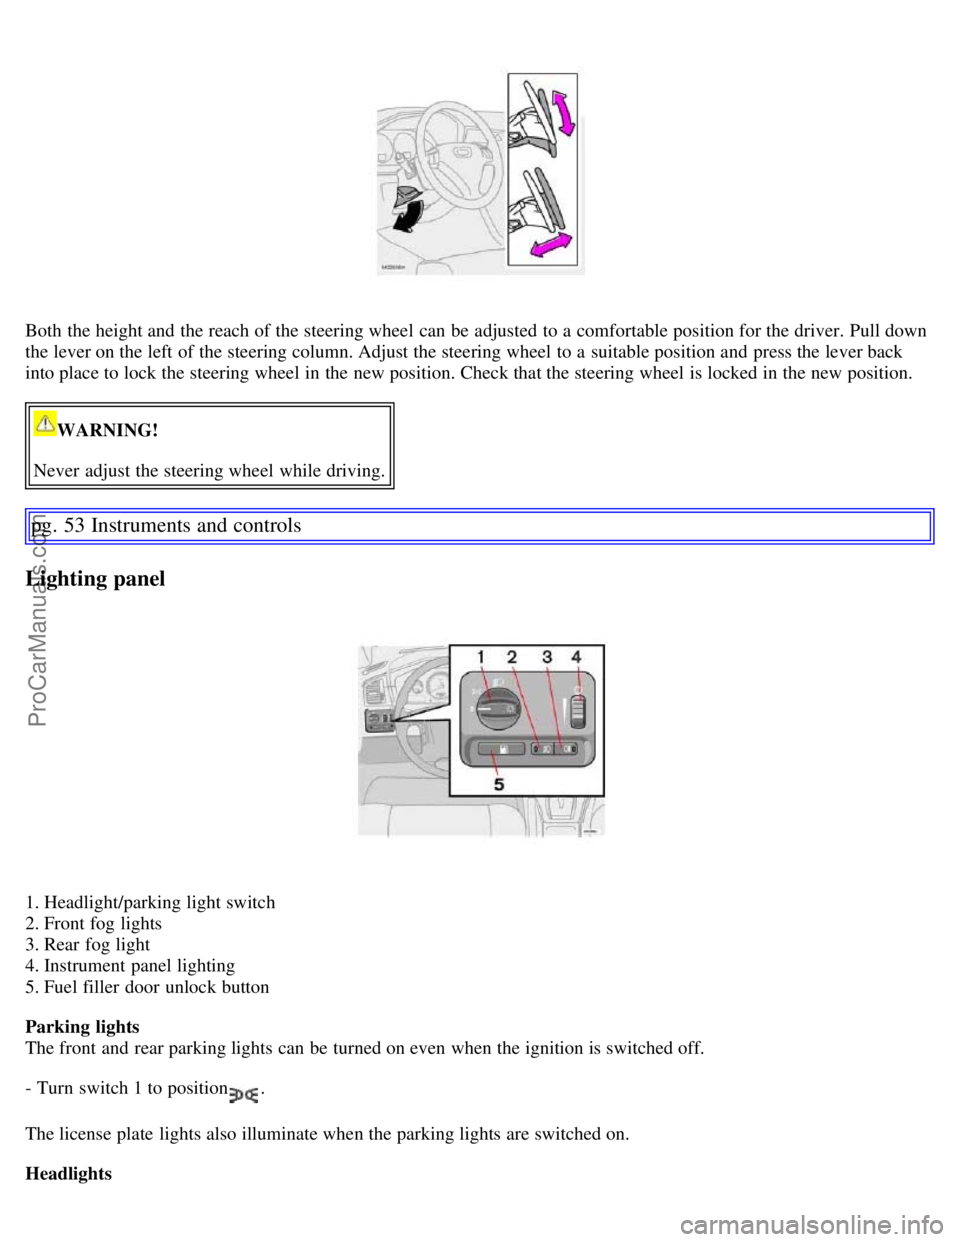
Both the height and the reach of the steering wheel can be adjusted to a comfortable position for the driver. Pull down
the lever on the left of the steering column. Adjust the steering wheel to a suitable position and press the lever back
into place to lock the steering wheel in the new position. Check that the steering wheel is locked in the new position.
WARNING!
Never adjust the steering wheel while driving.
pg. 53 Instruments and controls
Lighting panel
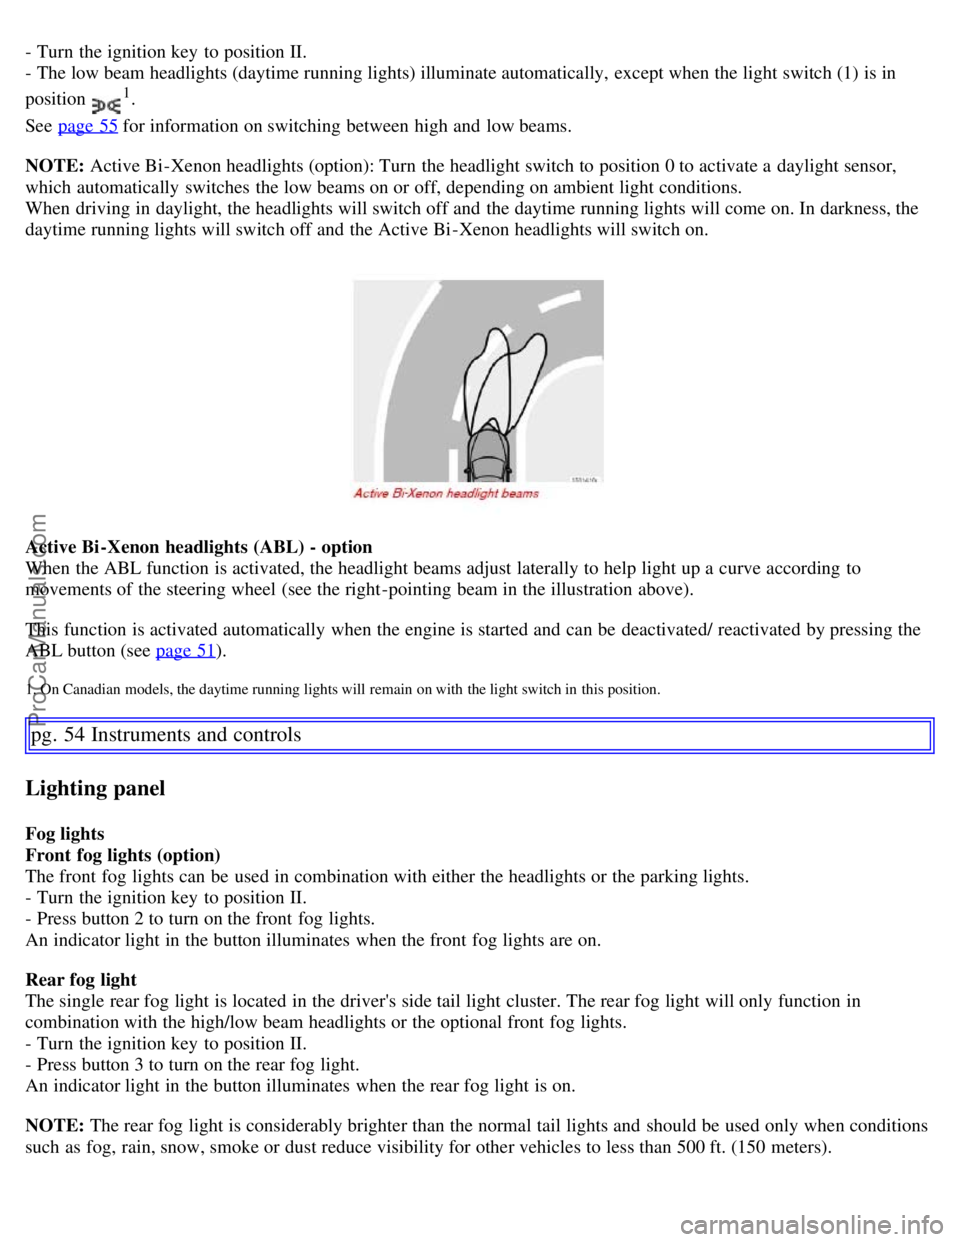
1. Headlight/parking light switch
2. Front fog lights
3. Rear fog light
4. Instrument panel lighting
5. Fuel filler door unlock button
Parking lights
The front and rear parking lights can be turned on even when the ignition is switched off.
- Turn switch 1 to position
.
The license plate lights also illuminate when the parking lights are switched on.
Headlights
ProCarManuals.com
Page 45 of 200
- Turn the ignition key to position II.
- The low beam headlights (daytime running lights) illuminate automatically, except when the light switch (1) is in
position
1.
See page 55
for information on switching between high and low beams.
NOTE: Active Bi -Xenon headlights (option): Turn the headlight switch to position 0 to activate a daylight sensor,
which automatically switches the low beams on or off, depending on ambient light conditions.
When driving in daylight, the headlights will switch off and the daytime running lights will come on. In darkness, the
daytime running lights will switch off and the Active Bi -Xenon headlights will switch on.
Active Bi -Xenon headlights (ABL) - option
When the ABL function is activated, the headlight beams adjust laterally to help light up a curve according to
movements of the steering wheel (see the right-pointing beam in the illustration above).
This function is activated automatically when the engine is started and can be deactivated/ reactivated by pressing the
ABL button (see page 51
).
1. On Canadian models, the daytime running lights will remain on with the light switch in this position.
pg. 54 Instruments and controls
Lighting panel
Fog lights
Front fog lights (option)
The front fog lights can be used in combination with either the headlights or the parking lights.
- Turn the ignition key to position II.
- Press button 2 to turn on the front fog lights.
An indicator light in the button illuminates when the front fog lights are on.
Rear fog light
The single rear fog light is located in the driver's side tail light cluster. The rear fog light will only function in
combination with the high/low beam headlights or the optional front fog lights.
- Turn the ignition key to position II.
- Press button 3 to turn on the rear fog light.
An indicator light in the button illuminates when the rear fog light is on.
NOTE: The rear fog light is considerably brighter than the normal tail lights and should be used only when conditions
such as fog, rain, snow, smoke or dust reduce visibility for other vehicles to less than 500 ft. (150 meters).
ProCarManuals.com