warning VOLVO S60 2008 Service Manual
[x] Cancel search | Manufacturer: VOLVO, Model Year: 2008, Model line: S60, Model: VOLVO S60 2008Pages: 230, PDF Size: 5.33 MB
Page 60 of 230
will light up.
A timer automatically switches off the heating after approximately 12 minutes. The LED will go out correspondingly.
If the vehicle's speed is increased by using the accelerator pedal for more than 1 minute.
64 02 Instruments and controls
Trip computer
The trip computer stores information gathered from several systems in your vehicle and has four menus that can be
displayed in the text window.
Driving distance on current fuel reserve
Average fuel consumption
Current fuel consumption
Average speed
Current speed in mph (Canadian models only)
DSTC (see page 139 for detailed information)
NOTE
Warning messages from the vehicle's monitoring systems will override the trip computer function. If a warning
message is displayed in the text window while you are using the trip computer, you must acknowledge the message by
pressing button A. Press button A again to return to the trip computer function.
Trip computer controls and functions
The trip computer functions can be accessed by twisting INFO (B) one step at a time in either direction. Twisting a final
time returns you to the original function.
The trip computer can be reset (current data will be erased from system memory) by pressing RESET (button C).
1. Driving distance on current fuel reserve
This function shows the approximate distance that can be driven on the fuel remaining in the tank. This calculation is
based on average fuel consumption during the last 20 miles (30 km) of driving and the amount of fuel remaining in the
tank when the reading was taken.
When the driving distance on current fuel reserve is less than 12 miles (20 km), "----" will be displayed in the text
window.
2. Average fuel consumption
This value indicates fuel consumption since the last time the trip computer was reset (by pressing RESET, button C).
When the engine is switched off, information on fuel consumption is stored and remains in system memory until the
RESET (button C) is pressed again.
3. Current fuel consumption
This value indicates the current fuel consumption, based on readings taken once per second. When the vehicle is not
moving, "----" will be displayed.
4. Average speed
This value indicates average speed since the last time the trip computer was reset (by pressing RESET, button C). When
the engine is switched off, information on average speed is stored and remains in system memory until the RESET
(button C) is pressed again.
ProCarManuals.com
Page 63 of 230
Press 0 to temporarily disengage cruise control. CRUISE will be displayed in the information window in the
instrument panel.
Press the brake pedal.
Press "resume"
to return to the previously set speed.
WARNING
Cruise control should not be used in heavy traffic or when driving on wet or slippery roads, or when driving on
unpaved or uneven road surfaces. Cruise control may not maintain set speed on steep downgrades.
68 02 Instruments and controls
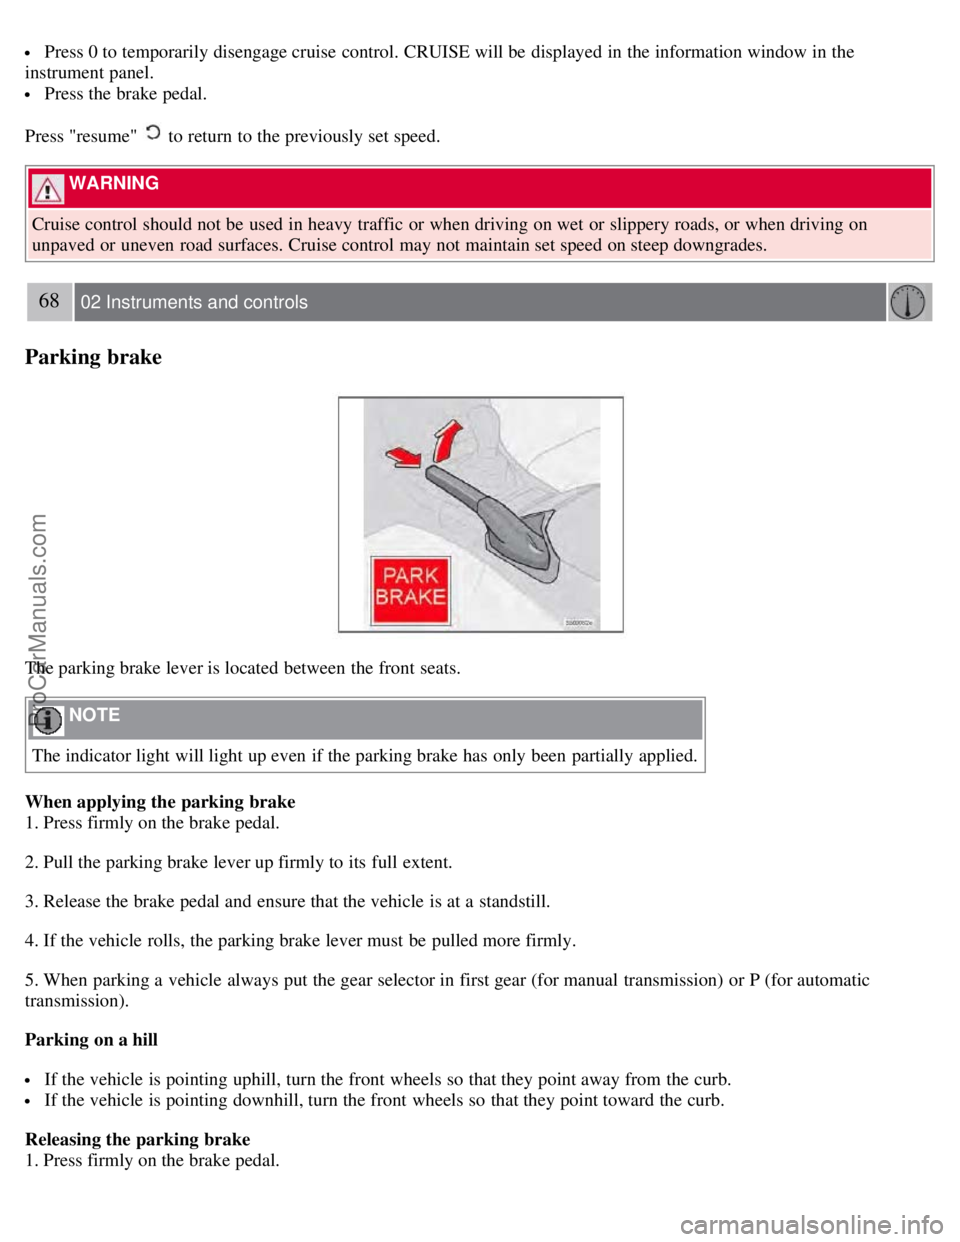
Parking brake
The parking brake lever is located between the front seats.
NOTE
The indicator light will light up even if the parking brake has only been partially applied.
When applying the parking brake
1. Press firmly on the brake pedal.
2. Pull the parking brake lever up firmly to its full extent.
3. Release the brake pedal and ensure that the vehicle is at a standstill.
4. If the vehicle rolls, the parking brake lever must be pulled more firmly.
5. When parking a vehicle always put the gear selector in first gear (for manual transmission) or P (for automatic
transmission).
Parking on a hill
If the vehicle is pointing uphill, turn the front wheels so that they point away from the curb.
If the vehicle is pointing downhill, turn the front wheels so that they point toward the curb.
Releasing the parking brake
1. Press firmly on the brake pedal.
ProCarManuals.com
Page 64 of 230
2. Pull the lever up slightly, press the button at the end of the lever and lower the lever completely.
WARNING
Pull up the parking brake lever up firmly to its full extent.
69 02 Instruments and controls
12-volt socket
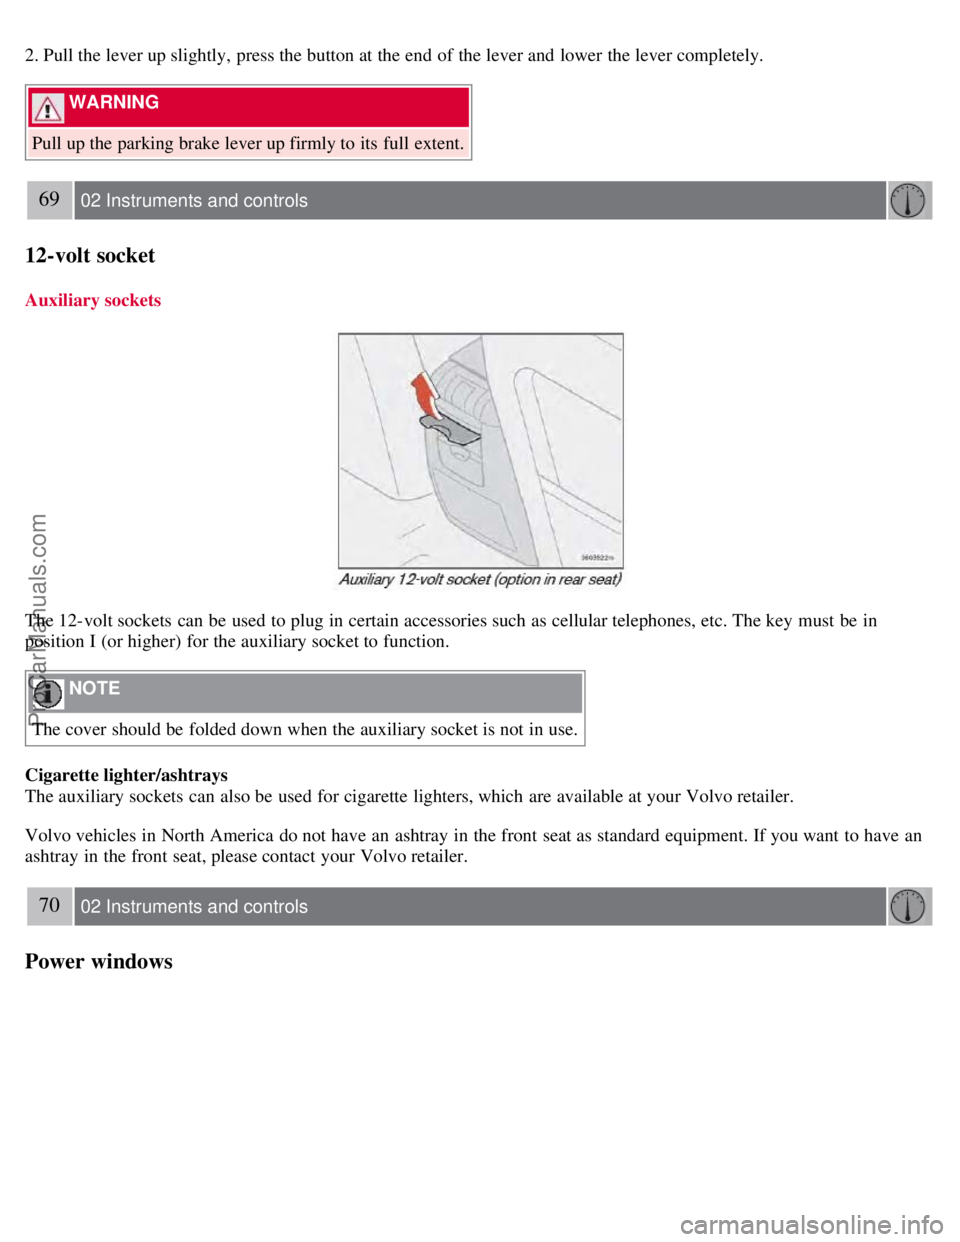
Auxiliary sockets
The 12-volt sockets can be used to plug in certain accessories such as cellular telephones, etc. The key must be in
position I (or higher) for the auxiliary socket to function.
NOTE
The cover should be folded down when the auxiliary socket is not in use.
Cigarette lighter/ashtrays
The auxiliary sockets can also be used for cigarette lighters, which are available at your Volvo retailer.
Volvo vehicles in North America do not have an ashtray in the front seat as standard equipment. If you want to have an
ashtray in the front seat, please contact your Volvo retailer.
70 02 Instruments and controls
Power windows
ProCarManuals.com
Page 65 of 230

The power windows are controlled by buttons in the arm rests. The ignition switch must be ON1 (ignition key in position
I, II or the engine running) for the electrically operated windows to function.
To lower: Press down the front edge of the button to the first detent ("stop").
To raise: Lightly pull up the front edge of the button to the first detent ("stop").
1The power windows will also function after the ignition has been switched off as long as neither of the front doors has been opened.
NOTE
To reduce buffeting wind noise if the rear windows are opened, also open the front windows slightly.
Auto up/down function (front doors only)
Either front door window can be opened or closed automatically.
Auto down
Press the front part of the button as far down as possible and release it immediately. To stop the window at any time, pull
the button up.
Auto up
Pull the front part of the button up as far as possible and release it immediately. To stop the window at any time, press
the button down.
NOTE
The electrically operated windows in the front seat have an overload protecting circuit breaker which reverses
movement of the electrically operated windows to their starting points if they are obstructed in any way. Thereafter the
windows will operate normally again.
WARNING
Always remove the ignition key when the vehicle is unattended.
Make sure that the windows are completely unobstructed before they are operated. Never leave children unattended in
the vehicle.
71 02 Instruments and controls
ProCarManuals.com
Page 70 of 230
After you have adjusted the mirror(s), press the L or R switch again (the LED will go out) to deactivate the adjustment
control.
75 02 Instruments and controls
Mirrors
WARNING
The mirrors should always be adjusted prior to driving. Objects seen in the passenger's side wide -angle door mirror are
closer than they appear to be.
Remote central locking and door mirror memory-option
If you lock the vehicle and later unlock it with the same remote control and open the driver's door, the door mirrors (and
the driver's seat) will automatically move to the position they were in when you left the vehicle. This feature will work in
the same way with all of the remote control transmitters (up to 3) that you use with your vehicle. This feature will not
function if you lock your vehicle with the key.
76 02 Instruments and controls
Power moonroof (option)
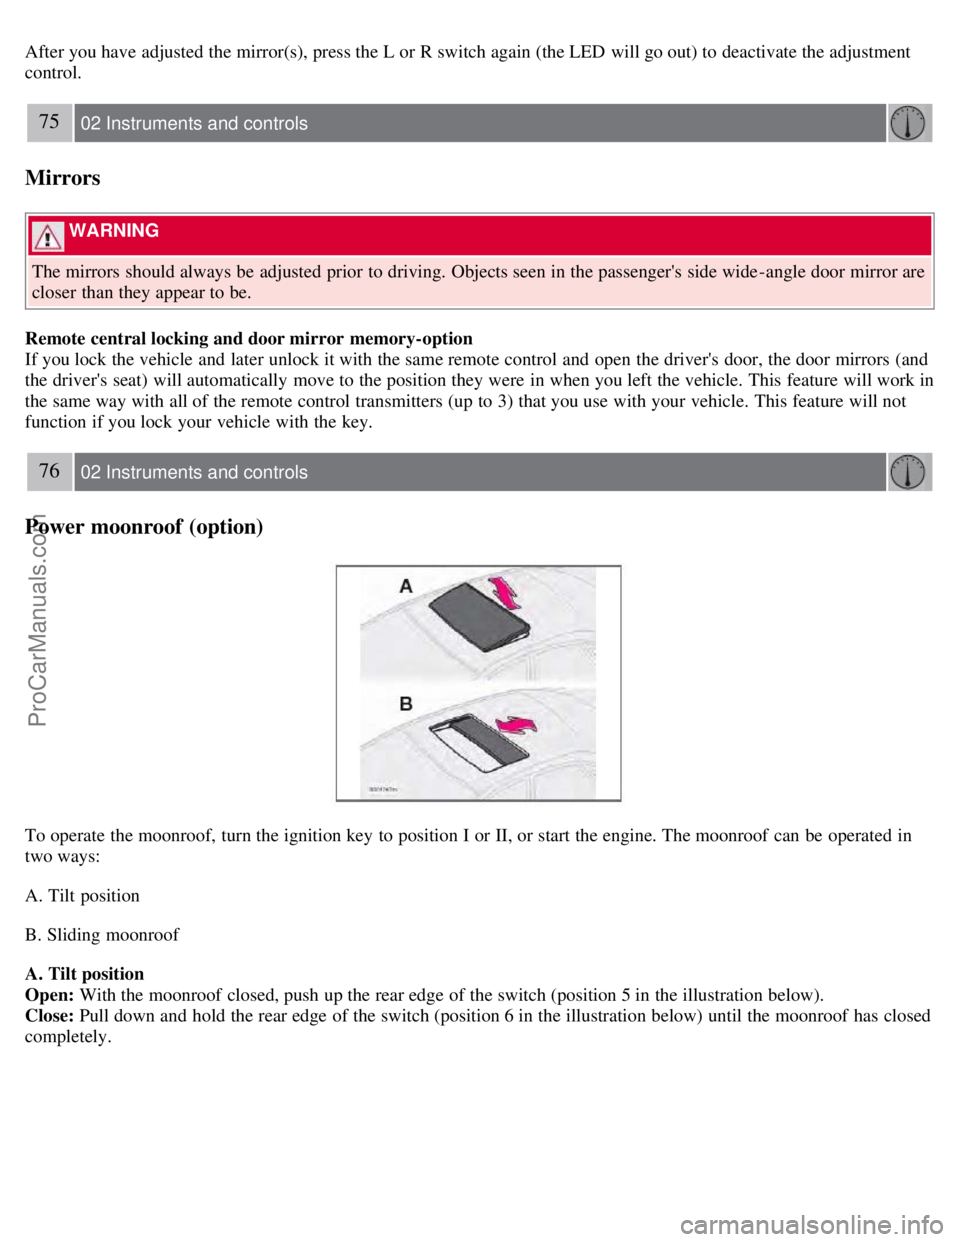
To operate the moonroof, turn the ignition key to position I or II, or start the engine. The moonroof can be operated in
two ways:
A. Tilt position
B. Sliding moonroof
A. Tilt position
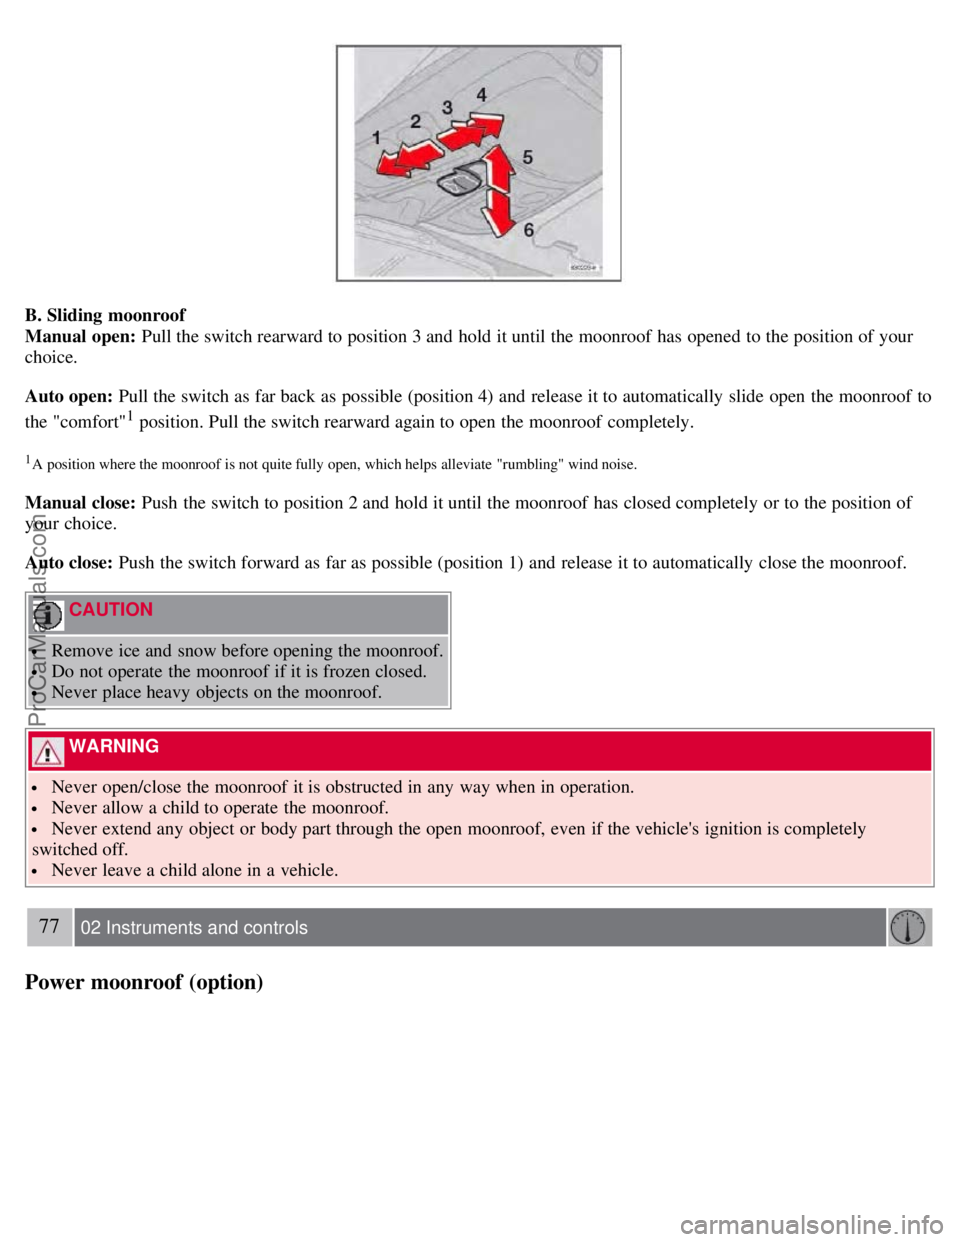
Open: With the moonroof closed, push up the rear edge of the switch (position 5 in the illustration below).
Close: Pull down and hold the rear edge of the switch (position 6 in the illustration below) until the moonroof has closed
completely.
ProCarManuals.com
Page 71 of 230
B. Sliding moonroof
Manual open: Pull the switch rearward to position 3 and hold it until the moonroof has opened to the position of your
choice.
Auto open: Pull the switch as far back as possible (position 4) and release it to automatically slide open the moonroof to
the "comfort"
1 position. Pull the switch rearward again to open the moonroof completely.
1A position where the moonroof is not quite fully open, which helps alleviate "rumbling" wind noise.
Manual close: Push the switch to position 2 and hold it until the moonroof has closed completely or to the position of
your choice.
Auto close: Push the switch forward as far as possible (position 1) and release it to automatically close the moonroof.
CAUTION
Remove ice and snow before opening the moonroof.
Do not operate the moonroof if it is frozen closed.
Never place heavy objects on the moonroof.
WARNING
Never open/close the moonroof it is obstructed in any way when in operation.
Never allow a child to operate the moonroof.
Never extend any object or body part through the open moonroof, even if the vehicle's ignition is completely
switched off.
Never leave a child alone in a vehicle.
77 02 Instruments and controls
Power moonroof (option)
ProCarManuals.com
Page 72 of 230
Sun visor
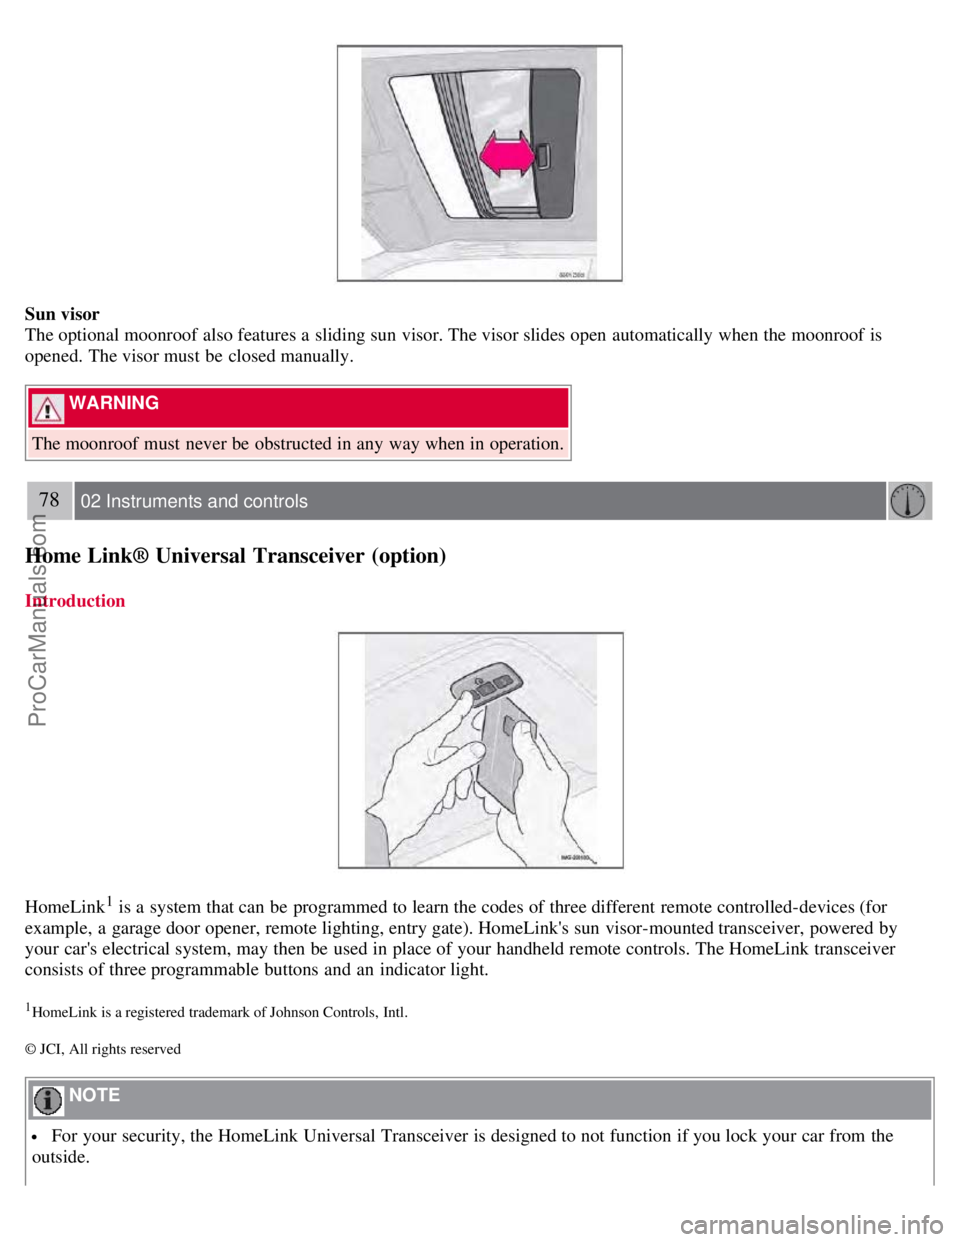
The optional moonroof also features a sliding sun visor. The visor slides open automatically when the moonroof is
opened. The visor must be closed manually.
WARNING
The moonroof must never be obstructed in any way when in operation.
78 02 Instruments and controls
Home Link® Universal Transceiver (option)
Introduction
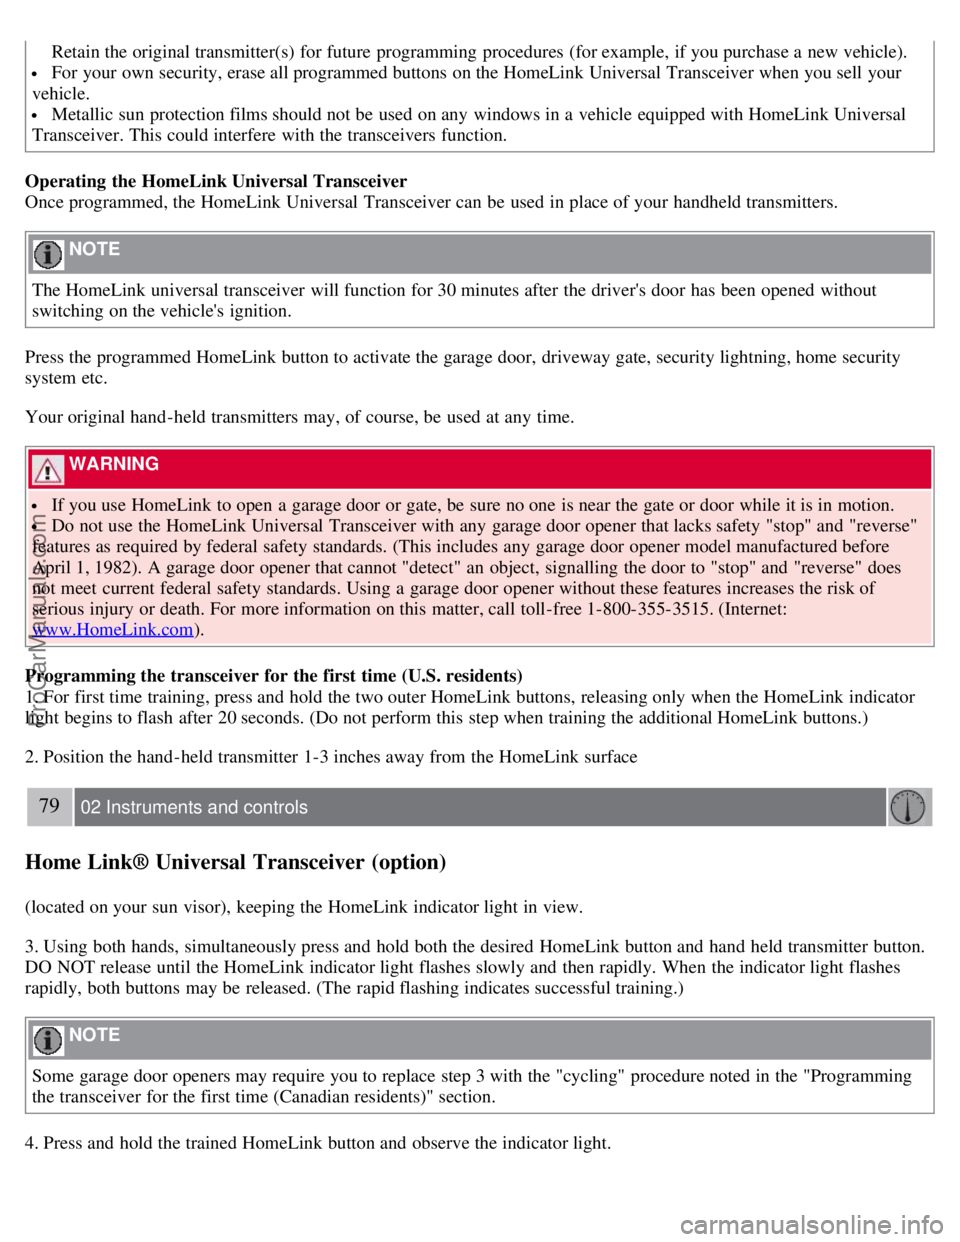
HomeLink1 is a system that can be programmed to learn the codes of three different remote controlled-devices (for
example, a garage door opener, remote lighting, entry gate). HomeLink's sun visor-mounted transceiver, powered by
your car's electrical system, may then be used in place of your handheld remote controls. The HomeLink transceiver
consists of three programmable buttons and an indicator light.
1HomeLink is a registered trademark of Johnson Controls, Intl.
© JCI, All rights reserved
NOTE
For your security, the HomeLink Universal Transceiver is designed to not function if you lock your car from the
outside.
ProCarManuals.com
Page 73 of 230
Retain the original transmitter(s) for future programming procedures (for example, if you purchase a new vehicle).
For your own security, erase all programmed buttons on the HomeLink Universal Transceiver when you sell your
vehicle.
Metallic sun protection films should not be used on any windows in a vehicle equipped with HomeLink Universal
Transceiver. This could interfere with the transceivers function.
Operating the HomeLink Universal Transceiver
Once programmed, the HomeLink Universal Transceiver can be used in place of your handheld transmitters.
NOTE
The HomeLink universal transceiver will function for 30 minutes after the driver's door has been opened without
switching on the vehicle's ignition.
Press the programmed HomeLink button to activate the garage door, driveway gate, security lightning, home security
system etc.
Your original hand -held transmitters may, of course, be used at any time.
WARNING
If you use HomeLink to open a garage door or gate, be sure no one is near the gate or door while it is in motion.
Do not use the HomeLink Universal Transceiver with any garage door opener that lacks safety "stop" and "reverse"
features as required by federal safety standards. (This includes any garage door opener model manufactured before
April 1, 1982). A garage door opener that cannot "detect" an object, signalling the door to "stop" and "reverse" does
not meet current federal safety standards. Using a garage door opener without these features increases the risk of
serious injury or death. For more information on this matter, call toll-free 1-800-355-3515. (Internet:
www.HomeLink.com
).
Programming the transceiver for the first time (U.S. residents)
1. For first time training, press and hold the two outer HomeLink buttons, releasing only when the HomeLink indicator
light begins to flash after 20 seconds. (Do not perform this step when training the additional HomeLink buttons.)
2. Position the hand -held transmitter 1-3 inches away from the HomeLink surface
79 02 Instruments and controls
Home Link® Universal Transceiver (option)
(located on your sun visor), keeping the HomeLink indicator light in view.
3. Using both hands, simultaneously press and hold both the desired HomeLink button and hand held transmitter button.
DO NOT release until the HomeLink indicator light flashes slowly and then rapidly. When the indicator light flashes
rapidly, both buttons may be released. (The rapid flashing indicates successful training.)
NOTE
Some garage door openers may require you to replace step 3 with the "cycling" procedure noted in the "Programming
the transceiver for the first time (Canadian residents)" section.
4. Press and hold the trained HomeLink button and observe the indicator light.
ProCarManuals.com
Page 86 of 230
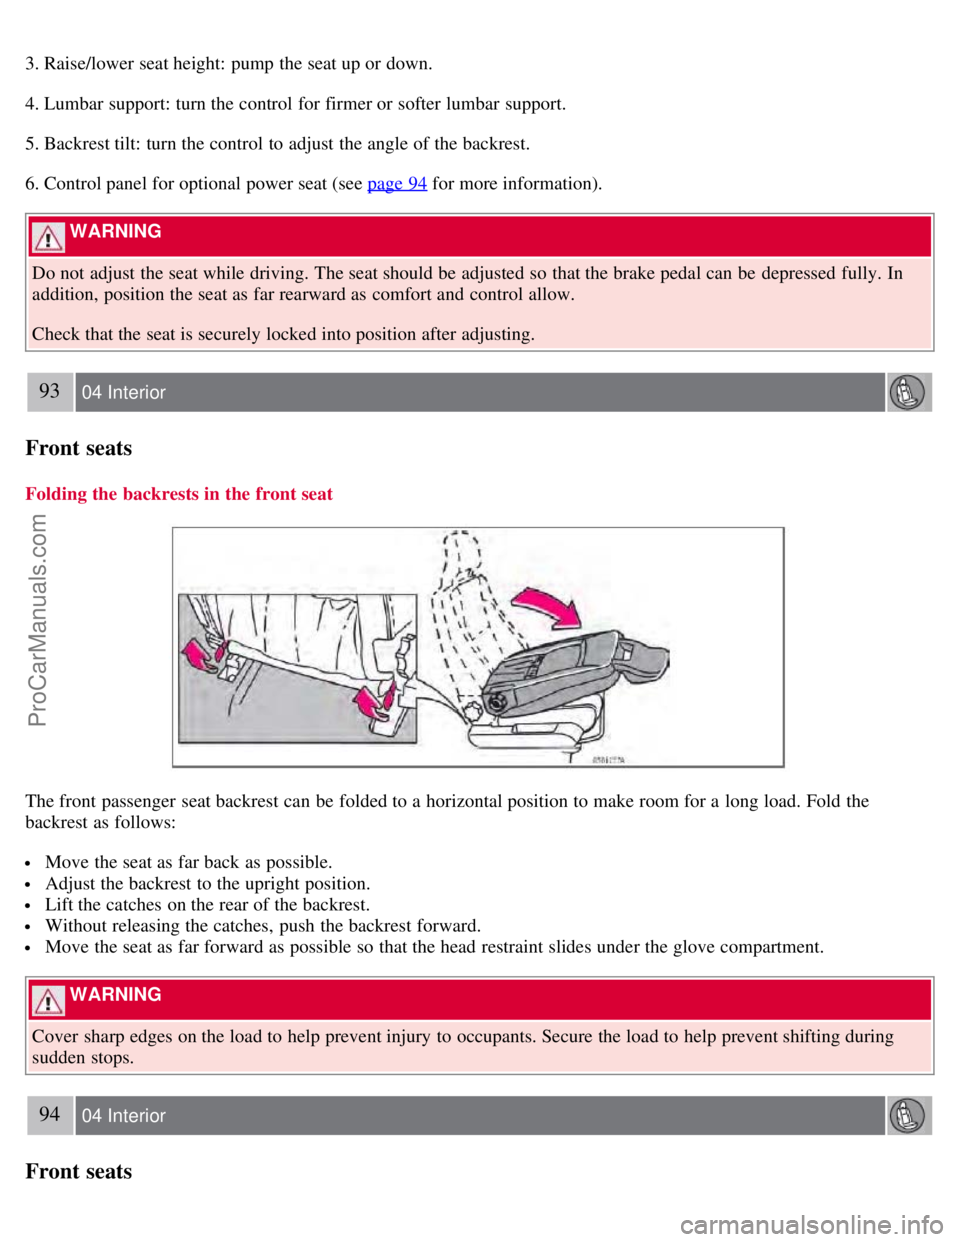
3. Raise/lower seat height: pump the seat up or down.
4. Lumbar support: turn the control for firmer or softer lumbar support.
5. Backrest tilt: turn the control to adjust the angle of the backrest.
6. Control panel for optional power seat (see page 94
for more information).
WARNING
Do not adjust the seat while driving. The seat should be adjusted so that the brake pedal can be depressed fully. In
addition, position the seat as far rearward as comfort and control allow.
Check that the seat is securely locked into position after adjusting.
93 04 Interior
Front seats
Folding the backrests in the front seat
The front passenger seat backrest can be folded to a horizontal position to make room for a long load. Fold the
backrest as follows:
Move the seat as far back as possible.
Adjust the backrest to the upright position.
Lift the catches on the rear of the backrest.
Without releasing the catches, push the backrest forward.
Move the seat as far forward as possible so that the head restraint slides under the glove compartment.
WARNING
Cover sharp edges on the load to help prevent injury to occupants. Secure the load to help prevent shifting during
sudden stops.
94 04 Interior
Front seats
ProCarManuals.com
Page 88 of 230
The position of the seat is now stored in the remote control.
Automatic seat adjustment
To move the seat to the position in which you left it:
1. Unlock the driver's door with the same remote control (the one used to lock the doors)
95 04 Interior
Front seats
2. Open the driver's door within 2 minutes.
The driver's seat will automatically move to the position in which you left it.
NOTE
The seat will move to this position even if someone else has moved it to a different seating position and locked the
vehicle with a different remote control.
This feature will work in the same way with all of the remote control transmitters (up to 3) that you use with your
vehicle.
This feature will not function if you lock your vehicle with the key.
WARNING
Because the driver's seat can be adjusted with the ignition off, children should never be left unattended in the
vehicle.
Movement of the seat can be STOPPED at any time by pressing any button on the power seat control panel.
Do not adjust the seat while driving. The seat should be adjusted so that the brake pedal can be depressed fully. In
addition, position the seat as far rearward as comfort and control allow.
The seat rails on the floor must not be obstructed in any way when the seat is in motion.
Programming the memory (option)
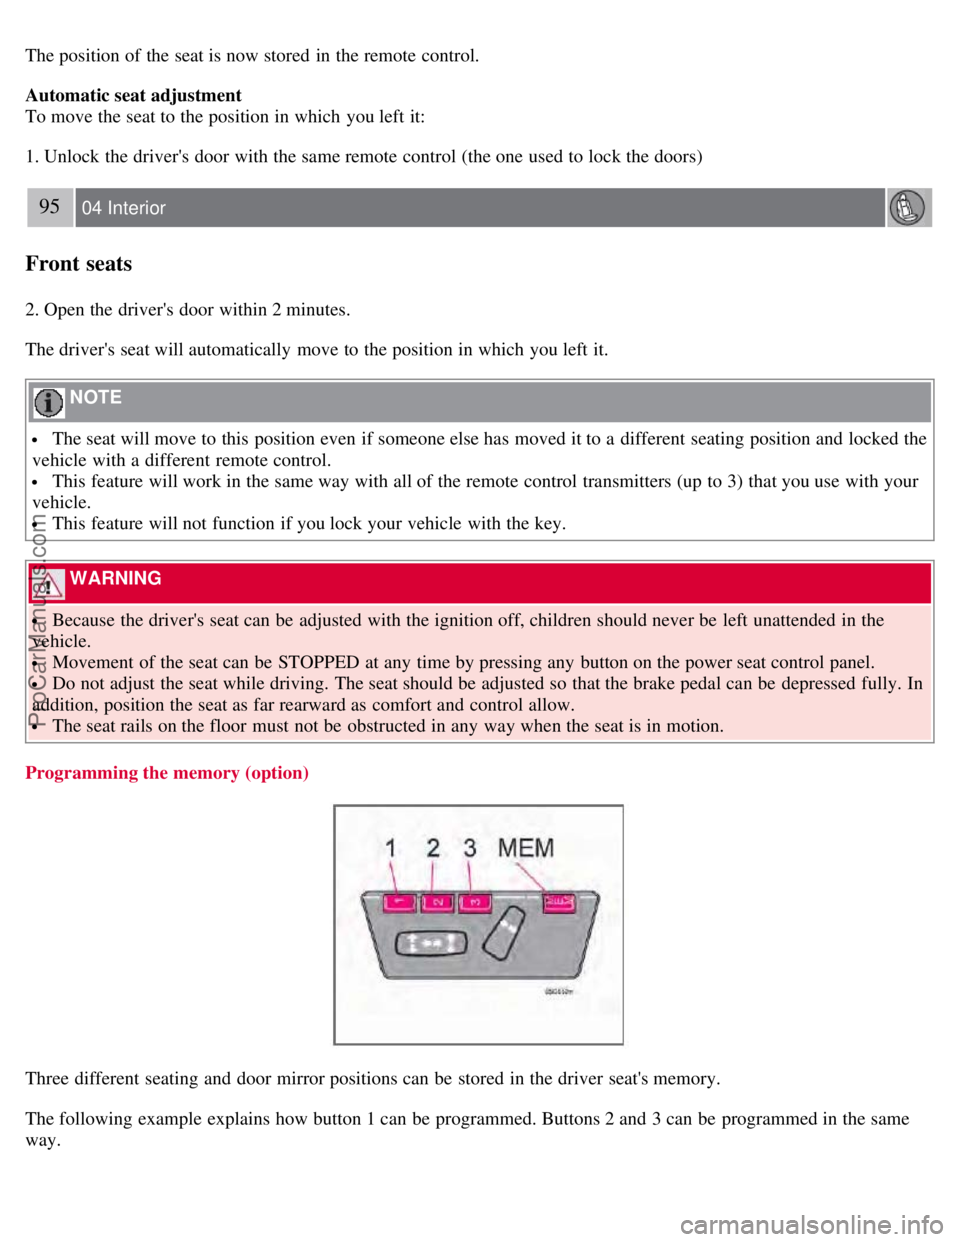
Three different seating and door mirror positions can be stored in the driver seat's memory.
The following example explains how button 1 can be programmed. Buttons 2 and 3 can be programmed in the same
way.
ProCarManuals.com