center console VOLVO S60 2011 Quick Guide
[x] Cancel search | Manufacturer: VOLVO, Model Year: 2011, Model line: S60, Model: VOLVO S60 2011Pages: 8, PDF Size: 2.61 MB
Page 4 of 8

1
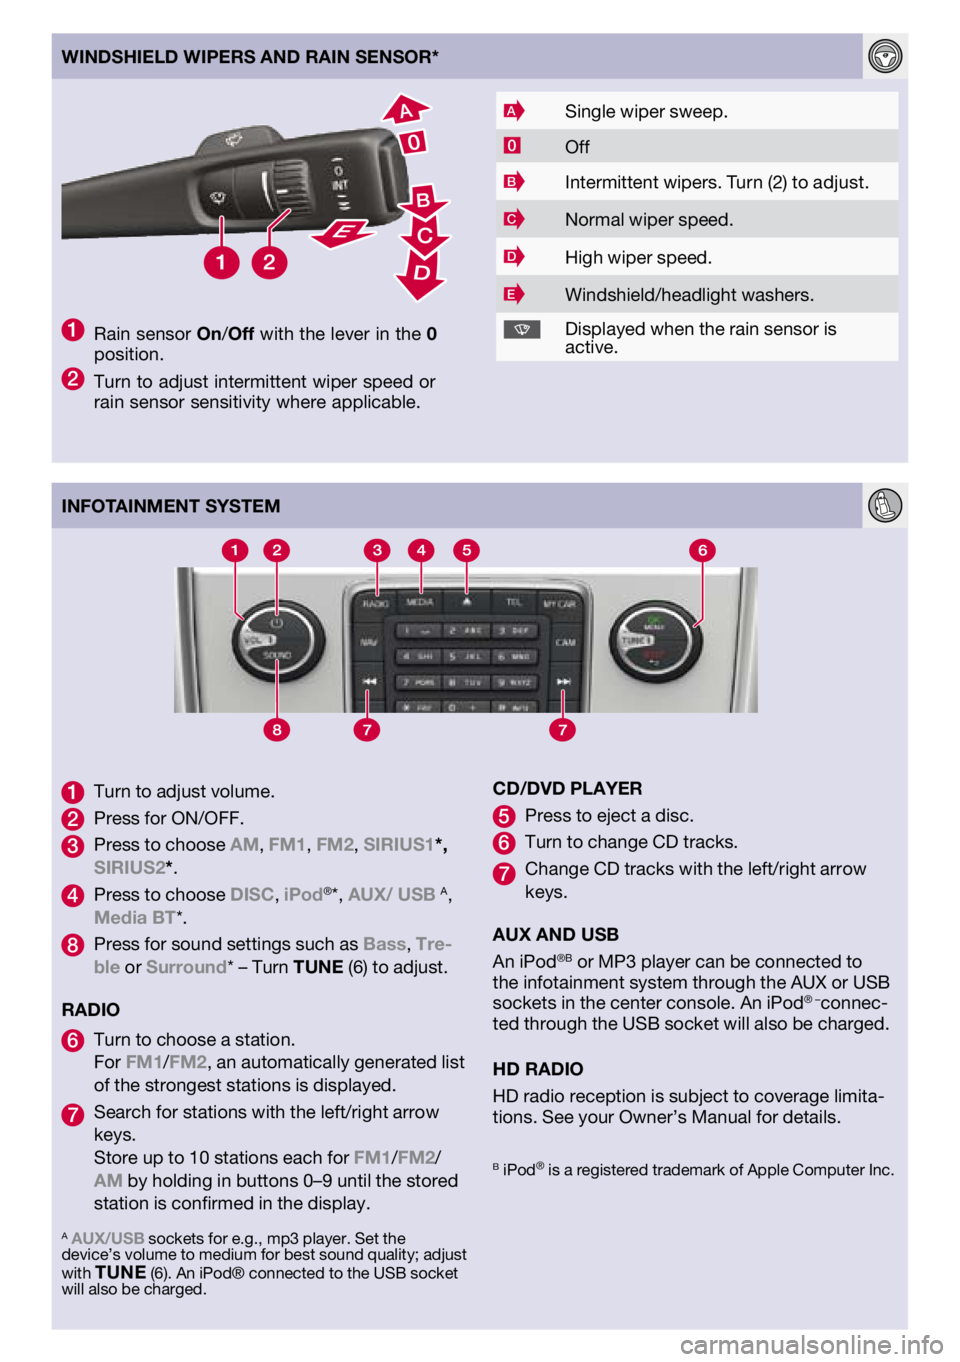
Turn to adjust volume .
2 Press for ON/OFF .
3 Press to choose AM, FM1, FM2, SIRIuS1*, SIRIuS2*.
4 Press to choose DISC, iPod®*, AuX/ uSB A, Media BT*.
Press for sound settings such as
Bass, Tre-ble or Surround* – Turn TuNE (6) to adjust.
RADIO
6 Turn to choose a station.
For FM1/FM2, an automatically generated list
of the strongest stations is displayed.
Search for stations with the left/right arrow keys.
Store up to 10 stations each for FM1/FM2/AM by holding in buttons 0–9 until the stored
station is confirmed in the display. CD/DvD
PlAYER
5 Press to eject a disc.
6 Turn to change CD tracks.
Change CD tracks with the left/right arrow keys.
AuX AND uSB
An iPod
®B or MP3 player can be connected to
the infotainment system through the AUX or USB
sockets in the center console. An iPod
® –connec-
ted through the USB socket will also be charged.
HD RADIO
HD radio reception is subject to coverage limita
-
tions. See your Owner’s Manual for details.
A AuX/uSB sockets for e.g., mp3 player. Set the
device’s volume to medium for best sound quality; adjust
with
T u NE (6). An iPod® connected to the USB socket
will also be charged.
B iPod® is a registered trademark of Apple Computer Inc.
8
7
7
WINDSHIElD WIPERS AND RAIN SENSOR*
1 Rain sensor On/Off with the lever in the 0 position.
2 Turn to adjust intermittent wiper speed or
rain sensor sensitivity where applicable.
ASingle wiper sweep.
0Off
BIntermittent wipers. Turn (2) to adjust.
CNormal wiper speed.
DHigh wiper speed.
EWindshield/headlight washers.
Displayed
when the rain sensor is active.
INFOTAINMENT SYSTEM
Page 6 of 8

89
7
1
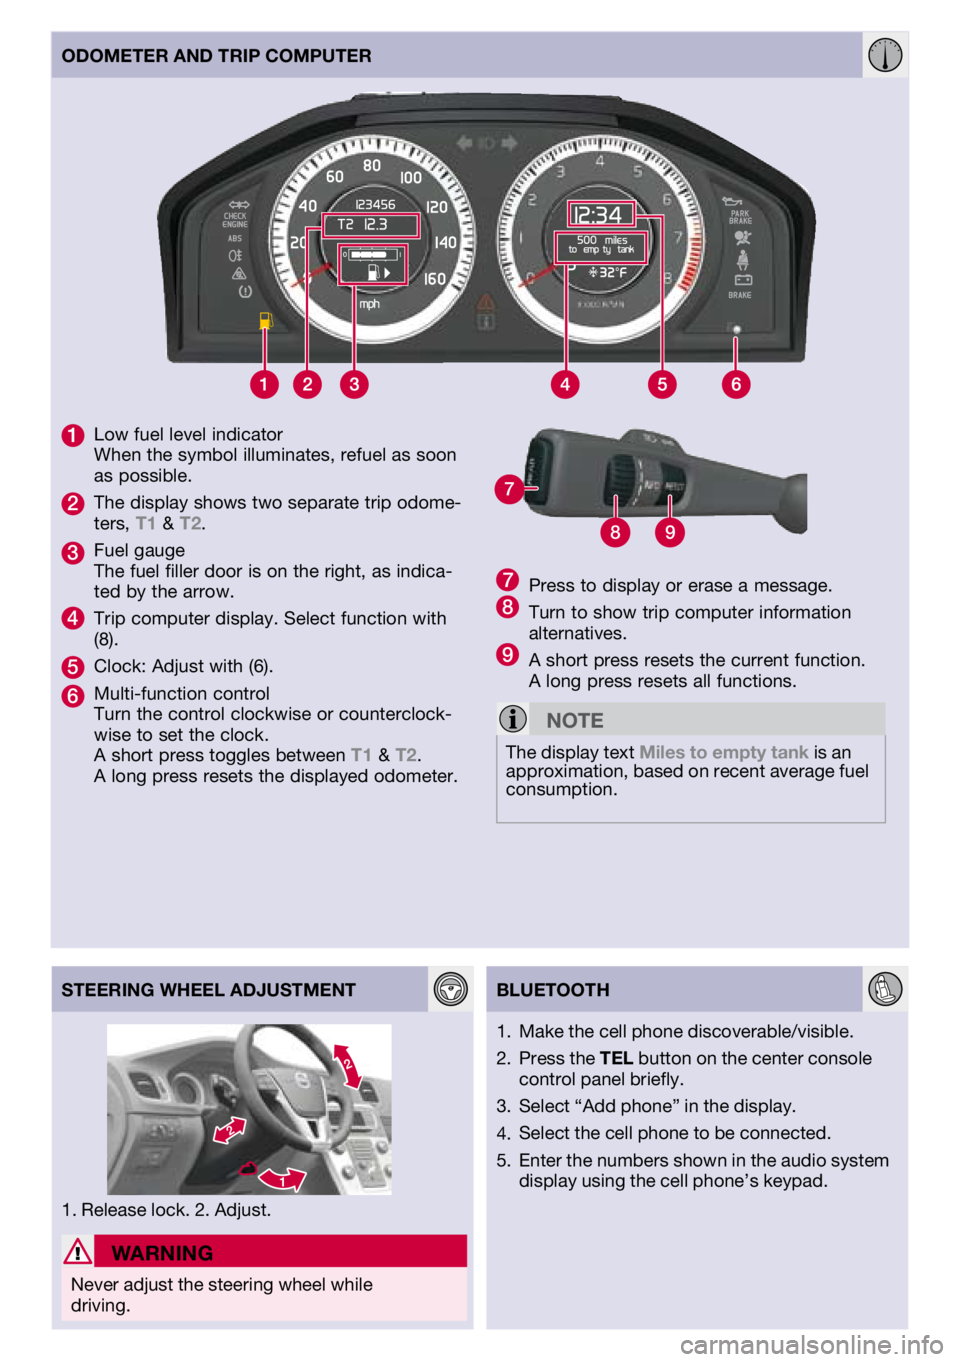
Low fuel level indicator
When the symbol illuminates, refuel as soon
as possible.
2 The display shows two separate trip odome-
ters, T1 & T2.
3 Fuel gauge
The fuel filler door is on the right, as indica-
ted by the arrow.
4 Trip computer display. Select function with (8).
5 Clock: Adjust with (6).
6 Multi-function control
Turn the control clockwise or counterclock-
wise to set the clock.
A short press toggles between T1 & T2.
A long press resets the displayed odometer.
ODOMETER AND TRIP COMPuTER
STEERING WHEEl ADjuSTMENT
BluETOOTH
W
ARNING
Never adjust the steering wheel while driving. Make
the cell phone discoverable/visible.
Press the TEl button on the center console
control panel briefly.
Select “Add phone” in the display.
Select the cell phone to be connected.
Enter the numbers shown in the audio system
display using the cell phone’s keypad.
1.
2.
3.
4.
5.
7 Press to display or erase a message.8 Turn to show trip computer information alternatives.9 A short press resets the current function.
A long press resets all functions.
NOTE
The display text Miles to empty tank is an
approximation, based on recent average fuel
consumption.
1. Release lock. 2. Adjust.