odometer VOLVO S60 2014 Owner´s Manual
[x] Cancel search | Manufacturer: VOLVO, Model Year: 2014, Model line: S60, Model: VOLVO S60 2014Pages: 386, PDF Size: 11.24 MB
Page 86 of 386
03 Your driving environment
Instruments and controls
03
84* Option/accessory, for more information, see Introduction.
Ambient temperature sensor
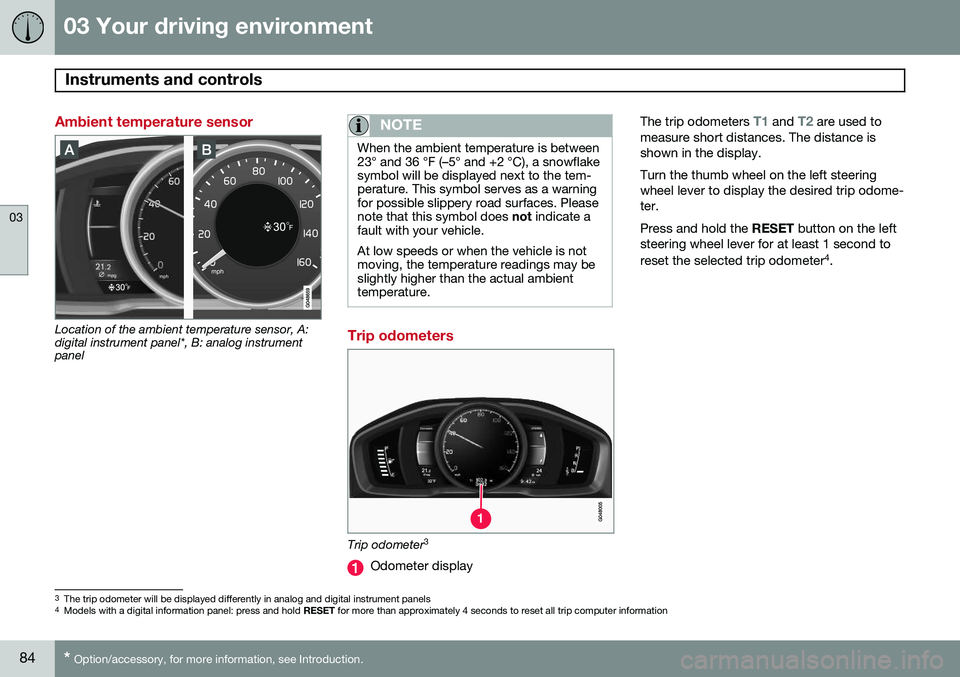
Location of the ambient temperature sensor, A: digital instrument panel*, B: analog instrumentpanel
NOTE
When the ambient temperature is between 23° and 36 °F (–5° and +2 °C), a snowflakesymbol will be displayed next to the tem-perature. This symbol serves as a warningfor possible slippery road surfaces. Pleasenote that this symbol does not indicate a
fault with your vehicle. At low speeds or when the vehicle is not moving, the temperature readings may beslightly higher than the actual ambienttemperature.
Trip odometers
Trip odometer 3
Odometer display The trip odometers
T1 and T2 are used to
measure short distances. The distance is shown in the display. Turn the thumb wheel on the left steering wheel lever to display the desired trip odome-ter. Press and hold the RESET button on the left
steering wheel lever for at least 1 second to reset the selected trip odometer 4
.
3 The trip odometer will be displayed differently in analog and digital instrument panels
4 Models with a digital information panel: press and hold RESET for more than approximately 4 seconds to reset all trip computer information
Page 88 of 386
03 Your driving environment
Ignition modes
03
86* Option/accessory, for more information, see Introduction.
Inserting and removing the remote key
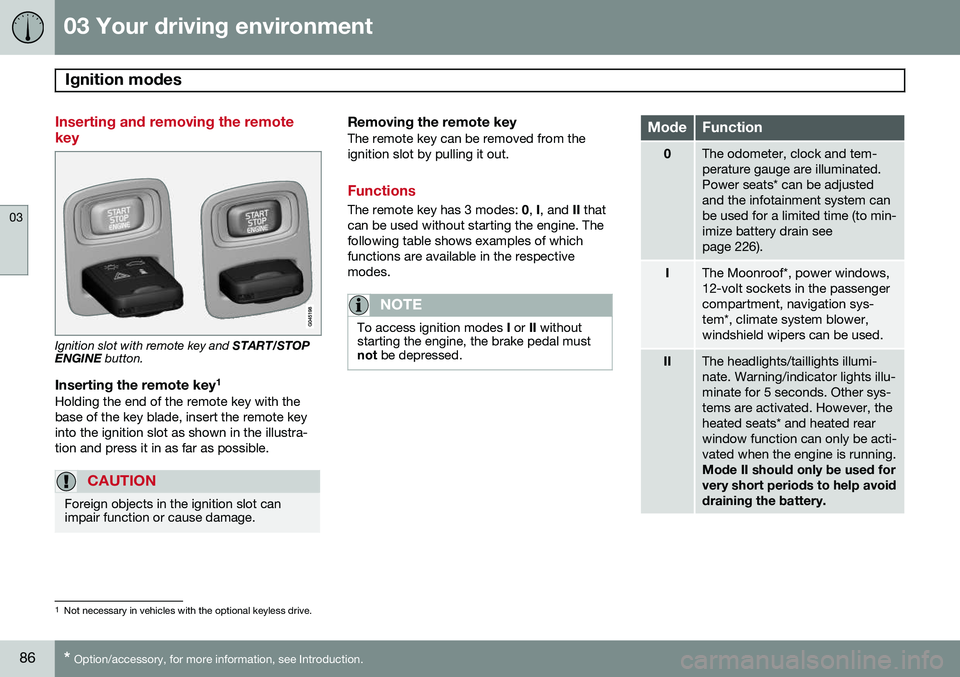
Ignition slot with remote key and START/STOP
ENGINE button.
Inserting the remote key 1Holding the end of the remote key with the base of the key blade, insert the remote keyinto the ignition slot as shown in the illustra-tion and press it in as far as possible.
CAUTION
Foreign objects in the ignition slot can impair function or cause damage.
Removing the remote keyThe remote key can be removed from the ignition slot by pulling it out.
Functions
The remote key has 3 modes:
0, I, and II that
can be used without starting the engine. The following table shows examples of whichfunctions are available in the respectivemodes.
NOTE
To access ignition modes I or II without
starting the engine, the brake pedal must not be depressed.
ModeFunction
0The odometer, clock and tem- perature gauge are illuminated.Power seats* can be adjustedand the infotainment system canbe used for a limited time (to min-imize battery drain seepage 226).
IThe Moonroof*, power windows, 12-volt sockets in the passengercompartment, navigation sys-tem*, climate system blower,windshield wipers can be used.
IIThe headlights/taillights illumi- nate. Warning/indicator lights illu-minate for 5 seconds. Other sys-tems are activated. However, theheated seats* and heated rearwindow function can only be acti-vated when the engine is running. Mode II should only be used for very short periods to help avoiddraining the battery.
1
Not necessary in vehicles with the optional keyless drive.
Page 215 of 386
05 Comfort and driving pleasure
Trip computer
05
}}
213
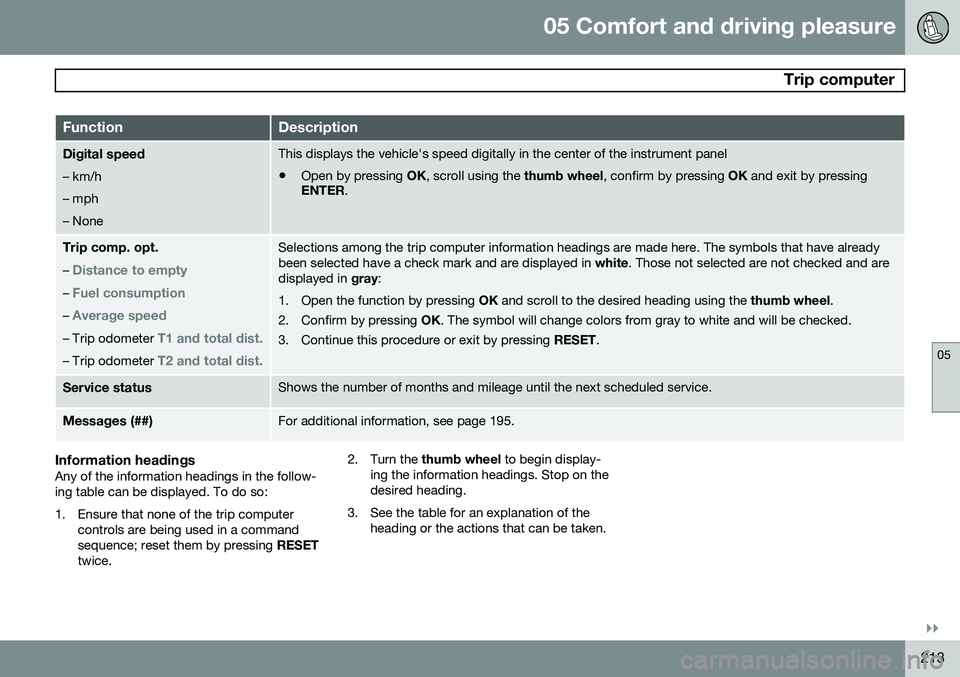
FunctionDescription
Digital speed – km/h – mph– NoneThis displays the vehicle's speed digitally in the center of the instrument panel
• Open by pressing
OK, scroll using the thumb wheel, confirm by pressing OK and exit by pressing
ENTER .
Trip comp. opt.
–
Distance to empty
– Fuel consumption
– Average speed
– Trip odometer T1 and total dist.
– Trip odometer T2 and total dist.
Selections among the trip computer information headings are made here. The symbols that have already been selected have a check mark and are displayed in white. Those not selected are not checked and are
displayed in gray:
1. Open the function by pressing OK and scroll to the desired heading using the thumb wheel.
2. Confirm by pressing OK. The symbol will change colors from gray to white and will be checked.
3. Continue this procedure or exit by pressing RESET.
Service statusShows the number of months and mileage until the next scheduled service.
Messages (##)For additional information, see page 195.
Information headingsAny of the information headings in the follow- ing table can be displayed. To do so:
1. Ensure that none of the trip computer
controls are being used in a command sequence; reset them by pressing RESET
twice. 2. Turn the
thumb wheel to begin display-
ing the information headings. Stop on thedesired heading.
3. See the table for an explanation of the heading or the actions that can be taken.
Page 216 of 386
05 Comfort and driving pleasure
Trip computer
05
214
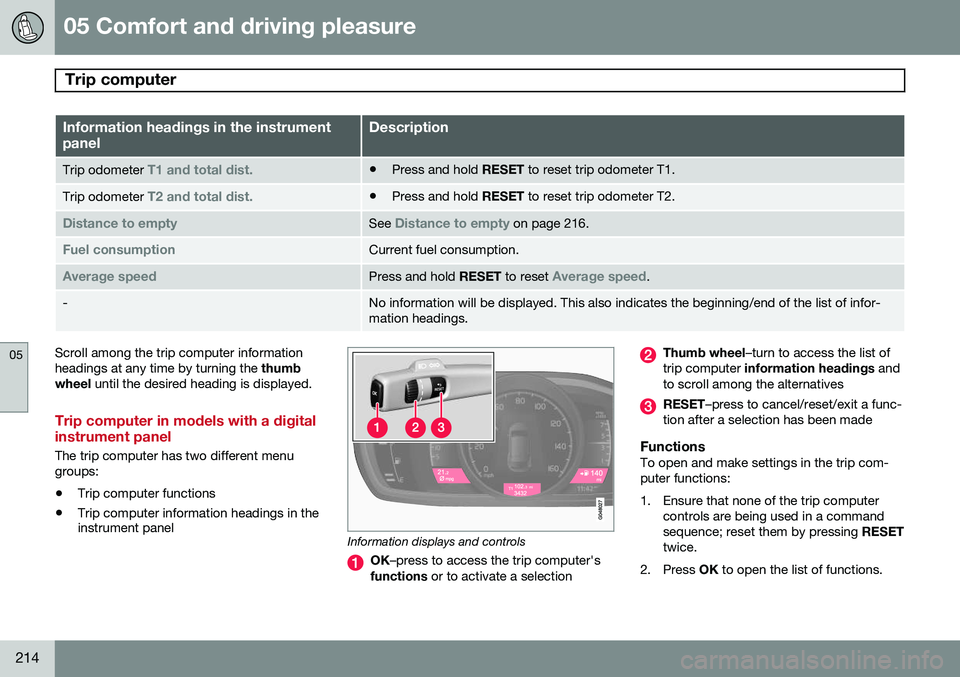
Information headings in the instrument panelDescription
Trip odometer T1 and total dist.•Press and hold
RESET to reset trip odometer T1.
Trip odometer T2 and total dist.•Press and hold
RESET to reset trip odometer T2.
Distance to emptySee Distance to empty on page 216.
Fuel consumptionCurrent fuel consumption.
Average speedPress and hold RESET to reset Average speed.
-No information will be displayed. This also indicates the beginning/end of the list of infor- mation headings.
Scroll among the trip computer information headings at any time by turning the thumb
wheel until the desired heading is displayed.
Trip computer in models with a digital instrument panel
The trip computer has two different menu groups:
• Trip computer functions
• Trip computer information headings in the instrument panel
Information displays and controls
OK
–press to access the trip computer's
functions or to activate a selection
Thumb wheel –turn to access the list of
trip computer information headings and
to scroll among the alternatives
RESET –press to cancel/reset/exit a func-
tion after a selection has been made
FunctionsTo open and make settings in the trip com- puter functions:
1. Ensure that none of the trip computer controls are being used in a command sequence; reset them by pressing RESET
twice.
2. Press OK to open the list of functions.
Page 217 of 386

05 Comfort and driving pleasure
Trip computer
05
}}
* Option/accessory, for more information, see Introduction.215
3. Use the
thumb wheel to scroll among the
functions and select/confirm your choice by pressing OK. 4. After completing your selection, exit by
pressing RESET twice. The following table lists the digital trip com-puter's functions:
FunctionDescription
Trip computer reset
– Average fuel consumption – Average speedNOTE: This function does not reset the trip odometers, see page 217 for a description of how this is done.
MessagesFor additional information, see page 195.
ThemesSet the way in which information is displayed in the instrument panel, see page 78.
Settings *Select Auto On or Off.
Contrast mode /Color modeAdjust the instrument panel's contrast and color.
Service statusShows the number of months and mileage until the next scheduled service.
Information headingsThree trip computer headings can be dis- played at the same time; one in each of thedisplays (see the previous illustration). One ofthe combinations of information headings inthe following table can be displayed. To doso: 1. Ensure that none of the trip computer
controls are being used in a commandsequence; reset them by pressing RESET
twice.
2. Turn the thumb wheel to begin display-
ing the combinations of information head-ings. Stop on the desired combination. 3. See the table for an explanation of the
heading or the actions that can be taken.
Scroll among the combinations of trip com-puter information headings at any time byturning the thumb wheel until the desired
combination is displayed.
Page 218 of 386
05 Comfort and driving pleasure
Trip computer
05
216* Option/accessory, for more information, see Introduction.
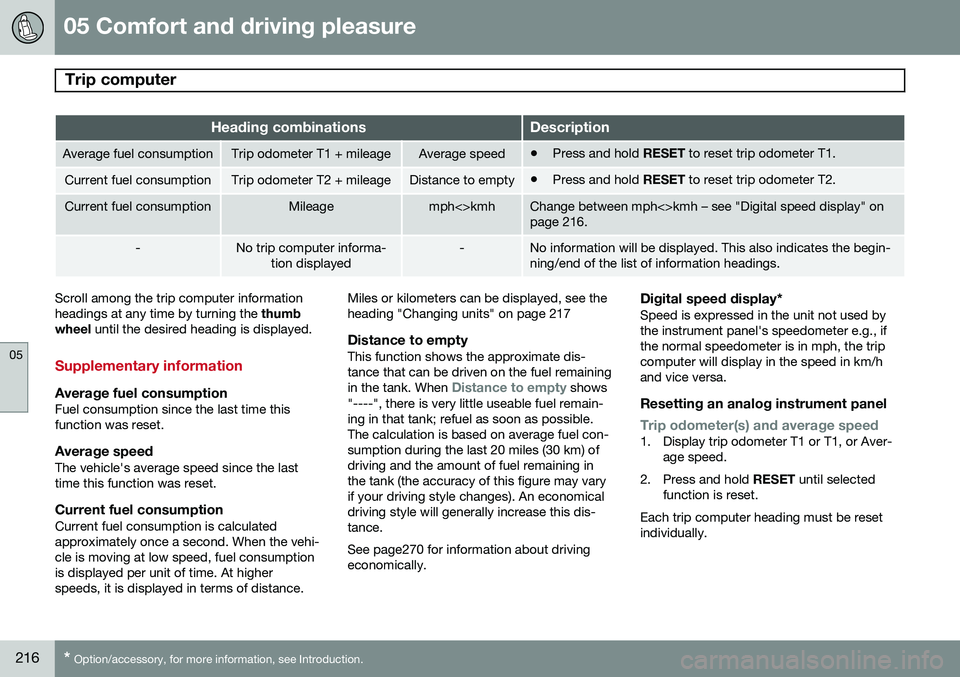
Heading combinationsDescription
Average fuel consumptionTrip odometer T1 + mileageAverage speed• Press and hold
RESET to reset trip odometer T1.
Current fuel consumptionTrip odometer T2 + mileageDistance to empty•Press and hold
RESET to reset trip odometer T2.
Current fuel consumptionMileagemph<>kmhChange between mph<>kmh – see "Digital speed display" on page 216.
-No trip computer informa-
tion displayed-No information will be displayed. This also indicates the begin- ning/end of the list of information headings.
Scroll among the trip computer information headings at any time by turning the thumb
wheel until the desired heading is displayed.
Supplementary information
Average fuel consumptionFuel consumption since the last time this function was reset.
Average speedThe vehicle's average speed since the lasttime this function was reset.
Current fuel consumptionCurrent fuel consumption is calculatedapproximately once a second. When the vehi-cle is moving at low speed, fuel consumptionis displayed per unit of time. At higherspeeds, it is displayed in terms of distance. Miles or kilometers can be displayed, see theheading "Changing units" on page 217
Distance to emptyThis function shows the approximate dis-tance that can be driven on the fuel remaining in the tank. When
Distance to empty shows
"----", there is very little useable fuel remain- ing in that tank; refuel as soon as possible.The calculation is based on average fuel con-sumption during the last 20 miles (30 km) ofdriving and the amount of fuel remaining inthe tank (the accuracy of this figure may varyif your driving style changes). An economicaldriving style will generally increase this dis-tance. See page270 for information about driving economically.
Digital speed display*Speed is expressed in the unit not used bythe instrument panel's speedometer e.g., ifthe normal speedometer is in mph, the tripcomputer will display in the speed in km/hand vice versa.
Resetting an analog instrument panel
Trip odometer(s) and average speed1. Display trip odometer T1 or T1, or Aver- age speed.
2. Press and hold RESET until selected
function is reset.
Each trip computer heading must be reset individually.
Page 219 of 386

05 Comfort and driving pleasure
Trip computer
05
* Option/accessory, for more information, see Introduction.217
Resetting a digital instrument panel
Trip odometer1. Turn the thumb wheel to select the com-
bination of headings containing the trip odometer to be reset.
2. Press and hold RESET until selected trip
odometer is reset.
Average speed and fuel consumption1. Select Trip computer reset and press
OK .
2. Select one of the following alternatives using the thumb wheel and press OK:
• mpg
• mph
• Reset both
3. Finish by pressing RESET.
Changing unitsTo change the unit (miles/km) used to meas- ure distance and speed, go to
MY CAR
SettingsSystem optionsDistance
and fuel units.
NOTE
In addition to changing units in the trip computer, this also changes the units usedin the Volvo Navigation System (VNS)*.
Trip statistics*
Trip information from previous trips regarding average fuel consumption and average speedis stored and can be displayed in the form ofa bar chart.
Function
Trip statistics 2
Each bar represents a driving distance of 1 mile or 10 miles, depending on the current scale; the bar at the far right shows the valuefor the current mile/10 miles. Use
TUNE to change between 1 mile and
10 miles; the marker at the right will also change according to the scale selected.
SettingsSettings can be made in the MY CAR menu
system as follows:
MY CARMy S60Trip statistics:
•
Start new trip: press ENTER to erase all
pervious statistics. Exit the menu by pressing EXIT.
•
Reset for every driving cycle: select by
pressing ENTER. Exit the menu by press-
ing EXIT .
Selecting
Reset for every driving cycle era-
ses all trip statistics automatically if the igni- tion is switched off for at least 4 hours. Whenthe engine is restarted, new statistics will bestored. To get new statistics if the engine is restarted before 4 hours have elapsed, the existingones have to be erased manually by selecting
Start new trip.
For additional information, see page 195.
2 The illustration is generic; certain details may vary from model to model
Page 380 of 386
11 Index
11
378
K
Key blade................................. 54, 60, 63, 64private locking...................................... 63
valet locking.......................................... 63
Keyless drive general description............................... 64
starting the vehicle............................. 118
L
Labelslist of................................................... 361
location of........................................... 360
LATCH anchors......................................... 48
Leather care............................................. 354
Lighting panel............................................ 96
Load anchoring eyelets........................... 279
Loading the vehicle.......................... 279, 301 roof loads............................................ 281
Locking...................................................... 67
Locking the vehicle.................................... 57
Locks, child safety..................................... 51
Low beams................................................ 97 Low oil pressure warning light................... 81
M
Main instrument panel............................. 195
Maintenance............................................ 322
hoisting the vehicle............................. 323
performed by the owner..................... 323
Malfunction indicator light......................... 80
Media player (infotainment system)......... 244
Menu........................................................ 197
Messages in the instrument panel........... 195Mirrors defroster............................................. 109
power door......................................... 108
rearview, auto-dim function................ 109
retractable........................................... 108
vanity.................................................. 222
Moonroof................................................. 113 Motor oil checking............................................. 326
volumes.............................................. 367
MY CAR................................................... 197
O
Occupant safety........................................ 16
Occupant weight sensor...................... 27, 28
Octane recommendations....................... 275
Odometer, trip........................................... 84Oil checking............................................. 326
volumes.............................................. 367
Oil quality................................................. 366
OK button................................................ 195
On Call Roadside Assistance.................. 372
Outside temperature sensor...................... 84
Overhead courtesy lighting...................... 102
Overheating, engine................................... 82
Oxygen sensors, heated.......................... 278
P
Paint, touching up.................................... 355
Park assist....................................... 178, 180
Park Assist Camera................................. 182
Page 383 of 386
11 Index
11
381
storing................................................. 292
studded............................................... 304
tire pressure monitoring system......... 316
tire sealing system.............................. 306
tread wear indicator............................ 291
uniform tire quality grading................. 303
Tire sealing system.................................. 306 Top tether anchors (child restraint sys-
tems).......................................................... 50
Touching up paint.................................... 355
Towing a trailer................................ 282, 283
Towing the vehicle................................... 285
Traction control........................................ 138
Trailer towing................................... 282, 283Transmission general description..................... 123, 124
Hill Start Assist................................... 123
oil........................................................ 367
shiftlock override................................ 126
Tread wear indicator................................ 291
Trip computer.......................................... 212
Trip odometers.......................................... 84
Trips, long distance................................. 271 Trunk
changing bulbs................................... 335
driving with it open............................. 270
opening manually................................. 69
Tunnel detection........................................ 99
Turn signals............................................. 101 indicator lights...................................... 81
U
Uniform Tire Quality Grading................... 303
Unlocking the vehicle.......................... 57, 67
Upholstery care....................................... 353
V
Valet locking.............................................. 63
Vanity mirror............................................ 222 changing bulbs................................... 335
Vehicle Event Data....................................... 9
Vehicle loading................................ 279, 301 roof loads............................................ 281
Vehicle maintenance................................ 322 performed by the owner..................... 323 Vehicle weights........................................ 364Voice control
cell phones......................................... 263
Volvo and the environment........................ 12
Volvo maintenance.................................. 322
Volvo On Call Roadside Assistance........ 372
Volvo programs....................................... 372
Volvo Sensus........................................... 194
W
Warning flashers, hazard......................... 101
Warning lights................................ 77, 79, 81
Warning symbol......................................... 83
Warning system, collision................ 164, 165
Warranties................................................ 322
Washer fluid..................................... 338, 367Washers headlight............................................. 105
windshield........................................... 104
Water, driving through............................. 271
Waxing..................................................... 353
Weights.................................................... 364