USB VOLVO S60 2015 Owner´s Manual
[x] Cancel search | Manufacturer: VOLVO, Model Year: 2015, Model line: S60, Model: VOLVO S60 2015Pages: 406, PDF Size: 11.26 MB
Page 6 of 406
Contents
4* Option/accessory, for more information, see Introduction.
06
06 Infotainment
Introduction............................................. 244
Radio....................................................... 253
Media player........................................... 262
AUX/USB sockets................................... 267 Bluetooth ®
media ................................... 270
Bluetooth ®
hands-free connection ........ 272
Cell phone voice control*........................ 281
07
07 During your trip
Driving recommendations....................... 288
Refueling................................................. 292
Loading................................................... 297
Towing a trailer....................................... 300
Emergency towing.................................. 302
08
08 Wheels and tires
General information ............................... 306
Tire inflation............................................. 309
Inflation pressure ................................... 312
Tire designations .................................... 314
Glossary of tire terminology ................... 316
Vehicle loading ....................................... 317
Uniform Tire Quality Grading ................. 319
Snow chains, snow tires, studded tires . 320
Temporary Spare ................................... 321
Tire Sealing System*............................... 322
Changing a wheel .................................. 328
Tire Pressure Monitoring System (TPMS) 332
Page 241 of 406
05 Comfort and driving pleasure
Passenger compartment convenience
05
}}
239
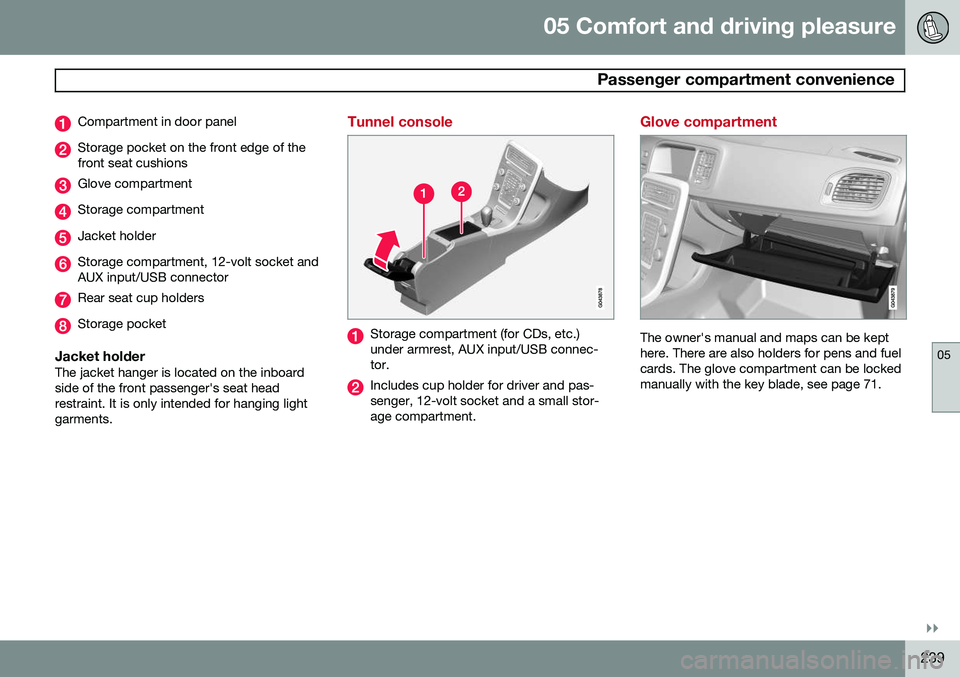
Compartment in door panel
Storage pocket on the front edge of the front seat cushions
Glove compartment
Storage compartment
Jacket holder
Storage compartment, 12-volt socket and AUX input/USB connector
Rear seat cup holders
Storage pocket
Jacket holderThe jacket hanger is located on the inboard side of the front passenger's seat headrestraint. It is only intended for hanging lightgarments.
Tunnel console
Storage compartment (for CDs, etc.) under armrest, AUX input/USB connec-tor.
Includes cup holder for driver and pas- senger, 12-volt socket and a small stor-age compartment.
Glove compartment
The owner's manual and maps can be kept here. There are also holders for pens and fuelcards. The glove compartment can be lockedmanually with the key blade, see page 71.
Page 244 of 406
242* Option/accessory, for more information, see Introduction. Introduction........................................................................................... 244 Radio..................................................................................................... 253Media player......................................................................................... 262
AUX/USB sockets................................................................................. 267 Bluetooth
®
media ................................................................................. 270
Bluetooth ®
hands-free connection ....................................................... 272
Cell phone voice control*...................................................................... 281
Page 247 of 406
06 Infotainment
Introduction
06
}}
245
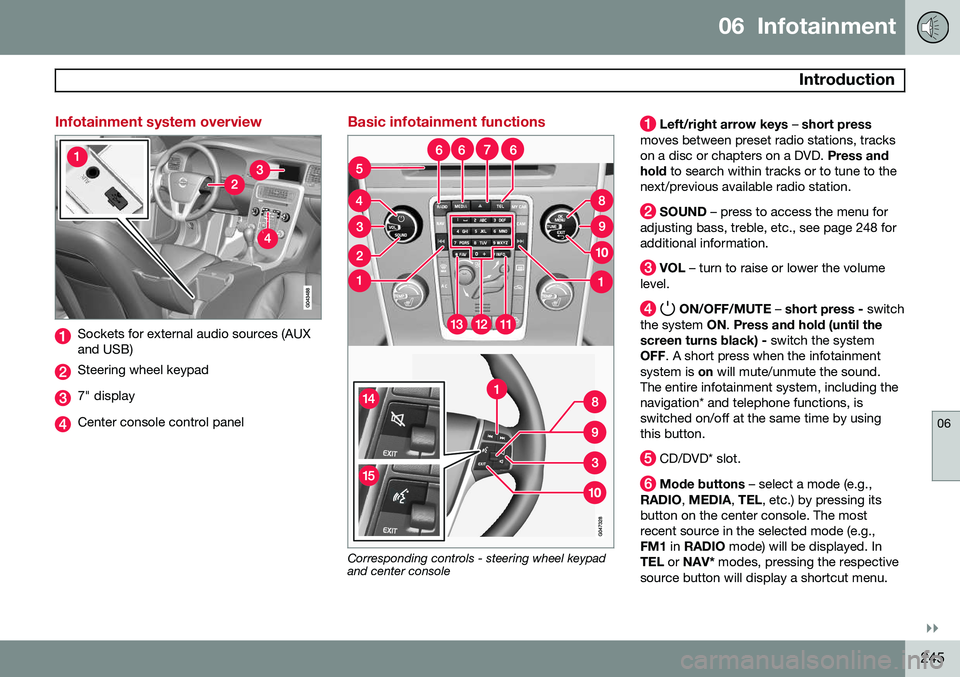
Infotainment system overview
Sockets for external audio sources (AUX and USB)
Steering wheel keypad
7" display
Center console control panel
Basic infotainment functions
Corresponding controls - steering wheel keypad and center console
Left/right arrow keys – short press
moves between preset radio stations, tracks on a disc or chapters on a DVD. Press and
hold to search within tracks or to tune to the
next/previous available radio station.
SOUND – press to access the menu for
adjusting bass, treble, etc., see page 248 for additional information.
VOL – turn to raise or lower the volume
level.
ON/OFF/MUTE – short press - switch
the system ON. Press and hold (until the
screen turns black) - switch the system
OFF . A short press when the infotainment
system is on will mute/unmute the sound.
The entire infotainment system, including the navigation* and telephone functions, isswitched on/off at the same time by usingthis button.
CD/DVD* slot.
Mode buttons – select a mode (e.g.,
RADIO , MEDIA , TEL , etc.) by pressing its
button on the center console. The most recent source in the selected mode (e.g.,FM1 in RADIO mode) will be displayed. In
TEL or NAV* modes, pressing the respective
source button will display a shortcut menu.
Page 250 of 406
06 Infotainment
Introduction
06
248* Option/accessory, for more information, see Introduction.
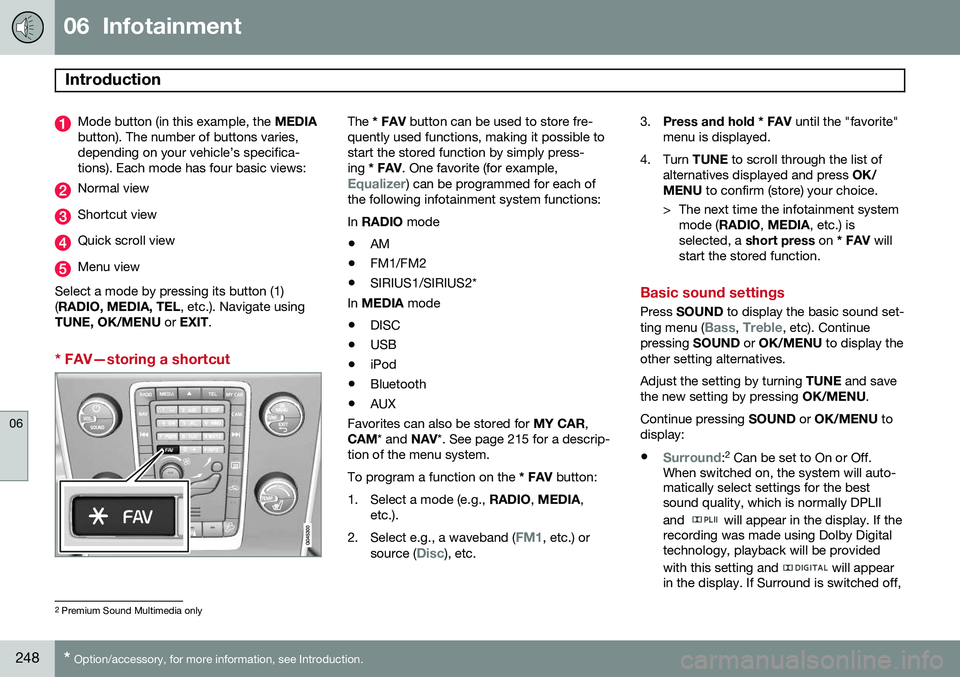
Mode button (in this example, the MEDIA
button). The number of buttons varies, depending on your vehicle’s specifica-tions). Each mode has four basic views:
Normal view
Shortcut view
Quick scroll view
Menu view
Select a mode by pressing its button (1) ( RADIO, MEDIA, TEL , etc.). Navigate using
TUNE, OK/MENU or EXIT .
* FAV—storing a shortcut
The * FAV button can be used to store fre-
quently used functions, making it possible to start the stored function by simply press-ing * FAV . One favorite (for example,
Equalizer) can be programmed for each of
the following infotainment system functions: In RADIO mode
• AM
• FM1/FM2
• SIRIUS1/SIRIUS2*
In MEDIA mode
• DISC
• USB
• iPod
• Bluetooth
• AUX
Favorites can also be stored for MY CAR,
CAM * and NAV*. See page 215 for a descrip-
tion of the menu system.To program a function on the * FAV button:
1. Select a mode (e.g., RADIO, MEDIA ,
etc.).
2. Select e.g., a waveband (
FM1, etc.) or
source (Disc), etc. 3.
Press and hold * FAV until the "favorite"
menu is displayed.
4. Turn TUNE to scroll through the list of
alternatives displayed and press OK/
MENU to confirm (store) your choice.
> The next time the infotainment system mode ( RADIO , MEDIA , etc.) is
selected, a short press on * FAV will
start the stored function.
Basic sound settings
Press SOUND to display the basic sound set-
ting menu (Bass, Treble, etc). Continue
pressing SOUND or OK/MENU to display the
other setting alternatives. Adjust the setting by turning TUNE and save
the new setting by pressing OK/MENU.
Continue pressing SOUND or OK/MENU to
display: •
Surround: 2
Can be set to On or Off.
When switched on, the system will auto- matically select settings for the bestsound quality, which is normally DPLII and
will appear in the display. If the
recording was made using Dolby Digital technology, playback will be provided with this setting and
will appear
in the display. If Surround is switched off,
2 Premium Sound Multimedia only
Page 253 of 406
06 Infotainment
Introduction
06
}}
251
Advanced SIRIUS settings
Skip optionsChannel skip list
Lock options Channel lock list Unlock all channelsTemporarily unlock all channels Change code
Audio settings 6
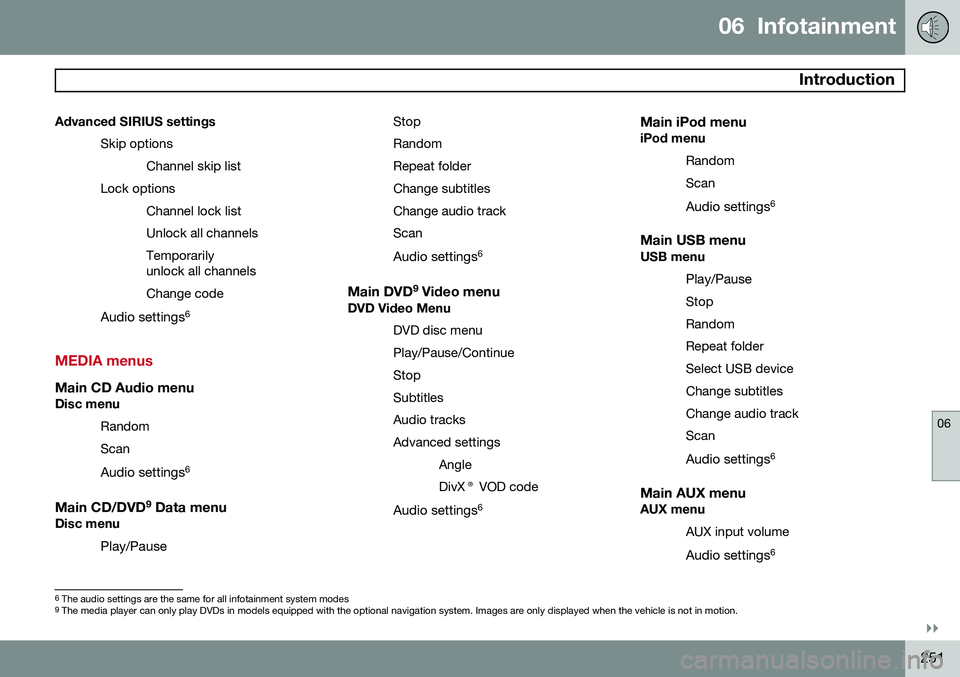
MEDIA menus
Main CD Audio menuDisc menu
Random Scan
Audio settings 6
Main CD/DVD 9
Data menuDisc menu
Play/Pause StopRandomRepeat folderChange subtitlesChange audio trackScan
Audio settings 6
Main DVD9
Video menuDVD Video Menu
DVD disc menuPlay/Pause/ContinueStopSubtitlesAudio tracksAdvanced settingsAngleDivX® VOD code
Audio settings 6
Main iPod menuiPod menu
RandomScan
Audio settings 6
Main USB menuUSB menu
Play/Pause
StopRandomRepeat folderSelect USB deviceChange subtitlesChange audio trackScan
Audio settings 6
Main AUX menuAUX menu
AUX input volume
Audio settings 6
6
The audio settings are the same for all infotainment system modes9
The media player can only play DVDs in models equipped with the optional navigation system. Images are only displayed when the vehicle is not in motion.
Page 266 of 406
06 Infotainment
Media player
06
264
Random3This function plays the tracks in random order (shuffle). The random tracks/sound files canbe scrolled through in the normal way. To lis-ten to tracks in random order:
1. Press
OK/MENU ,
2. Scroll to
Random
3. Press OK/MENU to activate/deactivate
the random play function.
Press the
/ buttons on the center
console or steering wheel keypad to change tracks/audio files.
Repeat folder 4This function makes it possible to play files ina folder repeatedly. When the last file hasbeen played, the first file will begin again. Toactivate:
1. Press
OK/MENU .
2. Turn TUNE to
Repeat folder.
3. Press OK/MENU to activate/deactivate
the function.
Playing video DVDs
PlayWhen playing a video DVD, a disc menu may appear on the display, giving you access toextra functions and settings such as choice ofsubtitle and language, scene selection, etc.
NOTE
Video images will only be visible when the vehicle is not moving. When the vehicle istraveling faster than approximately 4 mph (6 km/h),
No visual media available
while driving will be displayed. Sound
from the film will still be audible and video images will be shown again when the vehi-cle stops.
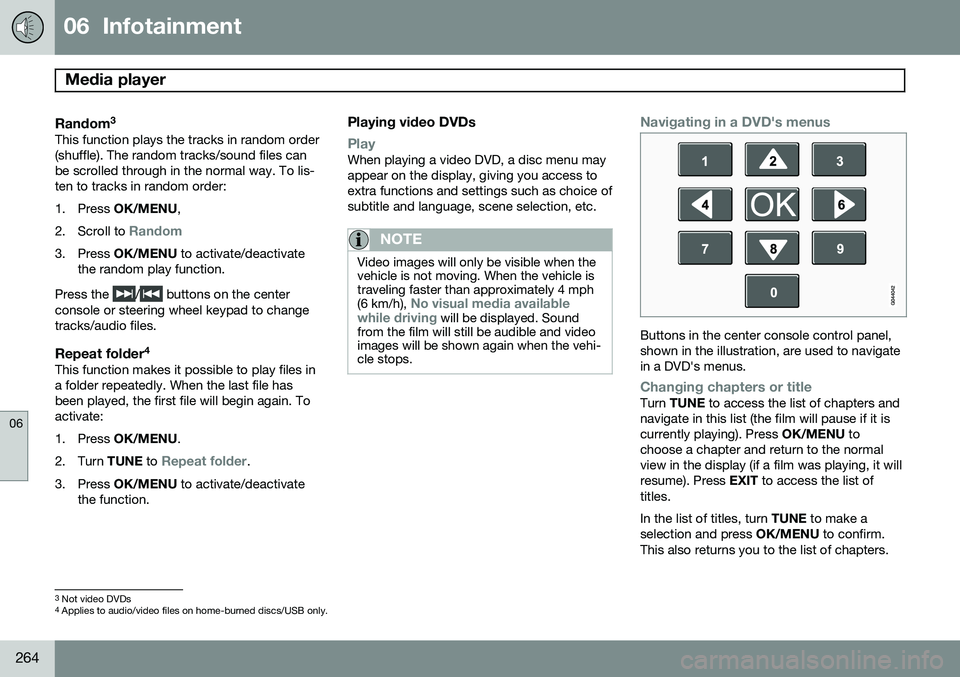
Navigating in a DVD's menus
Buttons in the center console control panel, shown in the illustration, are used to navigatein a DVD's menus.
Changing chapters or titleTurn TUNE to access the list of chapters and
navigate in this list (the film will pause if it is currently playing). Press OK/MENU to
choose a chapter and return to the normalview in the display (if a film was playing, it willresume). Press EXIT to access the list of
titles. In the list of titles, turn TUNE to make a
selection and press OK/MENU to confirm.
This also returns you to the list of chapters.
3 Not video DVDs
4 Applies to audio/video files on home-burned discs/USB only.
Page 267 of 406
06 Infotainment
Media player
06
}}
265
Press
EXIT to cancel and return to the normal
view (without having made a selection). It is also possible to change chapters by pressing
/ on the center console
control panel or on the steering wheel key- pad.
Advanced settings
AngleIf the DVD supports this function, it is possi- ble to select a camera angle for a certainscene. This can be done in DVD mode under
DVD
disc menu
Advanced settingsAngle.
DivX® Video On Demand
The media player can be registered to play DivX VOD files from home-burned discs orUSB. The registration code can be found bypressing the MY CAR button, and going to
SettingsInformationDivX® VOD
code. See page 215 for more information
about the menu system.
DivX Certified ®
to play DivX ®
video. DivX ®
,
DivX Certified ®
and associated logos are
registered trademarks of DivX, Inc. and are used under license. ABOUT DIVX VIDEO: DivX ®
is a digital video format created by
DivX, Inc. This is an official DivX Certified device that plays DivX video. Visitwww.divx.com for more information and
software tools to convert your files into DivXvideo. ABOUT DIVX VIDEO-ON-DEMAND: This DivX Certified ®
device must be registered in order
to play DivX Video-on-Demand (VOD) content. To generate the registration code,locate the DivX VOD section in the devicesetup menu. Go to http://vod.divx.com with
this code to complete the registrationprocess and learn more about DivX VOD.Covered by one or more of the following U.S.Patents: 7,295,673; 7,460,668; 7,515,710;7,519,274. See also www.divx.com/vod for more infor-mation.
Screen settingsScreen settings can be made (when the vehi-cle is not moving) for:
• Brightness
• Contrast
1. Press OK/MENU and choose
Image
settings and confirm by pressing OK/
MENU .
2. Turn TUNE to the desired setting and
press OK/MENU .
3. Change the setting by turning TUNE and
confirm the change by pressing OK/
MENU .
Press OK/MENU or EXIT to return to the
screen settings list. To return to the factory settings, select
Reset .
Compatible formatsThe media player can play a number of differ- ent types of files and disc formats, and iscompatible with the formats listed in the fol-lowing table.
Page 269 of 406
06 Infotainment
AUX/USB sockets
06
}}
267
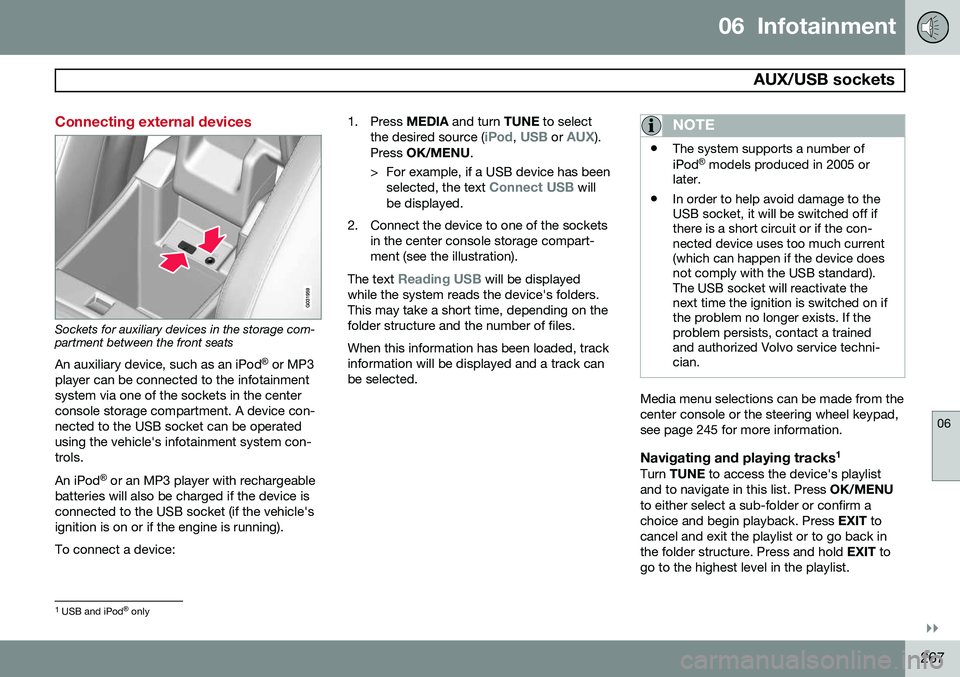
Connecting external devices
Sockets for auxiliary devices in the storage com- partment between the front seatsAn auxiliary device, such as an iPod ®
or MP3
player can be connected to the infotainment system via one of the sockets in the centerconsole storage compartment. A device con-nected to the USB socket can be operatedusing the vehicle's infotainment system con-trols. An iPod ®
or an MP3 player with rechargeable
batteries will also be charged if the device is connected to the USB socket (if the vehicle'signition is on or if the engine is running). To connect a device: 1. Press
MEDIA and turn TUNE to select
the desired source (
iPod, USB or AUX).
Press OK/MENU .
> For example, if a USB device has been selected, the text
Connect USB will
be displayed.
2. Connect the device to one of the sockets in the center console storage compart- ment (see the illustration).
The text
Reading USB will be displayed
while the system reads the device's folders. This may take a short time, depending on thefolder structure and the number of files. When this information has been loaded, track information will be displayed and a track canbe selected.
NOTE
• The system supports a number of iPod ®
models produced in 2005 or
later.
• In order to help avoid damage to the USB socket, it will be switched off ifthere is a short circuit or if the con-nected device uses too much current(which can happen if the device doesnot comply with the USB standard).The USB socket will reactivate thenext time the ignition is switched on ifthe problem no longer exists. If theproblem persists, contact a trainedand authorized Volvo service techni-cian.
Media menu selections can be made from the center console or the steering wheel keypad,see page 245 for more information.
Navigating and playing tracks 1Turn
TUNE to access the device's playlist
and to navigate in this list. Press OK/MENU
to either select a sub-folder or confirm achoice and begin playback. Press EXIT to
cancel and exit the playlist or to go back inthe folder structure. Press and hold EXIT to
go to the highest level in the playlist.
1 USB and iPod ®
only
Page 270 of 406
06 Infotainment
AUX/USB sockets
06
268
The / buttons on the center console
or steering wheel keypad can also be used to change tracks/files. The following symbols are used in the dis- play: •
- audio files
•
- video files
•
- folders
When a file has been played, the player will continue to play the rest of the files (of thesame type) in the current folder. When all ofthe files in the folder have been played, the player will automatically go to the next folder 1
(unless
Repeat folder is activated) and play
the files in it. The system automatically detects and changes settings if a device containing onlyaudio or only video files is connected to theUSB socket and will play these files. How-ever, the system will not change settings ifthe device contains both audio and video filesand will continue to play the current type offile.
Fast forward/reverse 1For information, see page 263.
Scan1For information, see page 263.
Random
1For information, see page 264.
Search1The keypad in the center console can beused to search for a file in the currentlyselected folder. Start the search by either turning
TUNE (to
access the folders) or by pressing one of the character keys to enter a letter/number. Pos-sible search results will be displayed as char-acters are entered. Play the file by pressing OK/MENU.
Repeat2This function makes it possible to play files in a folder repeatedly. When the last file hasbeen played, the first file will begin again. Forinformation, see page 264.
PauseWhen the infotainment system volume isturned off completely or the sound is muted,the player will pause. It will resume playingwhen the volume is turned up again or if the sound is unmuted.
Pause is also available via
the menu system, select
Play/Pause.
External sound sources
USB flash driveTo simplify the use of a USB flash drive, it is advisable to only store music files on thedrive. It will take considerably longer for thesystem to index the files on the drive if it con-tains anything other than compatible musicfiles.
NOTE
• The system supports removable media that uses the USB 2.0 standard andthe FAT32 file system. It can index upto 1,000 folders and a maximum of254 sub-folders/files for each folder.However, the highest folder level cansupport up to 1,000 sub-folders/files.
• When using a longer type of USBdevice, connecting it with a USBadapter cable will help reducemechanical wear on the USB socketand on the device.
1
USB and iPod ®
only2 USB only