remove VOLVO S60 2016 Owner´s Manual
[x] Cancel search | Manufacturer: VOLVO, Model Year: 2016, Model line: S60, Model: VOLVO S60 2016Pages: 392, PDF Size: 10.04 MB
Page 14 of 392
||
01 Introduction
01
12
3. To switch from letter entry mode to theentry mode for numbers or special char- acters, or to go view surf history, turnTUNE to one of the selections (see the
explanation in the following table) in thelist for switching character entry mode (2)and press OK/MENU .
123/A
BCToggle between letters and num- bers by pressing OK/MENU.
=>This leads to surf history. Turn TUNE to select a web address
and press OK/MENU to go to the
website.
GoGo to the website by pressing OK/MENU .
a|AToggle between upper and lower case letters by pressing OK/
MENU .
| | }Switch from the text wheel to theAddress: field. Use TUNE to
move the cursor and erase char- acters by pressing EXIT. Press
OK/MENU to return to the text
wheel. The number/letter keys on the center console can also be used to edit the
Address: field.
Press EXIT briefly to erase a single character.
Press and hold EXIT to erase all characters.
Pressing a number key on the center console while the text wheel is displayed (see the pre-vious illustration) will display a list of charac-ters. Press the desired key repeatedly toenter the desired letter and continue to thenext letter, etc. To enter a number, press and hold the but- ton.
CategoriesThe articles in the on-board owner's manualare divided into main categories and sub-cat-egories. The same article may be listed inseveral applicable categories to help makesearches easier. Turn TUNE to navigate in the category struc-
ture and press OK/MENU to open a category
(indicated by the
symbol) or an article
(indicated by the
symbol). Press EXIT to
return to the previous view.
FavoritesArticles that have been marked as favorites can be found here. For information aboutmarking an article as a favorite, see "Navigat-ing in an article" below. Turn TUNE to navigate in the list of favorites
and press OK/MENU to open an article.
Press EXIT to return to the previous view.
Quick GuideThis is a selection of articles that will help you become familiar with some of the vehicle'smost common functions. These articles canalso be found in their respective categoriesbut are listed here for quick access. Turn TUNE to navigate in the Quick Guide
and press OK/MENU to open an article.
Press EXIT to return to the previous view.
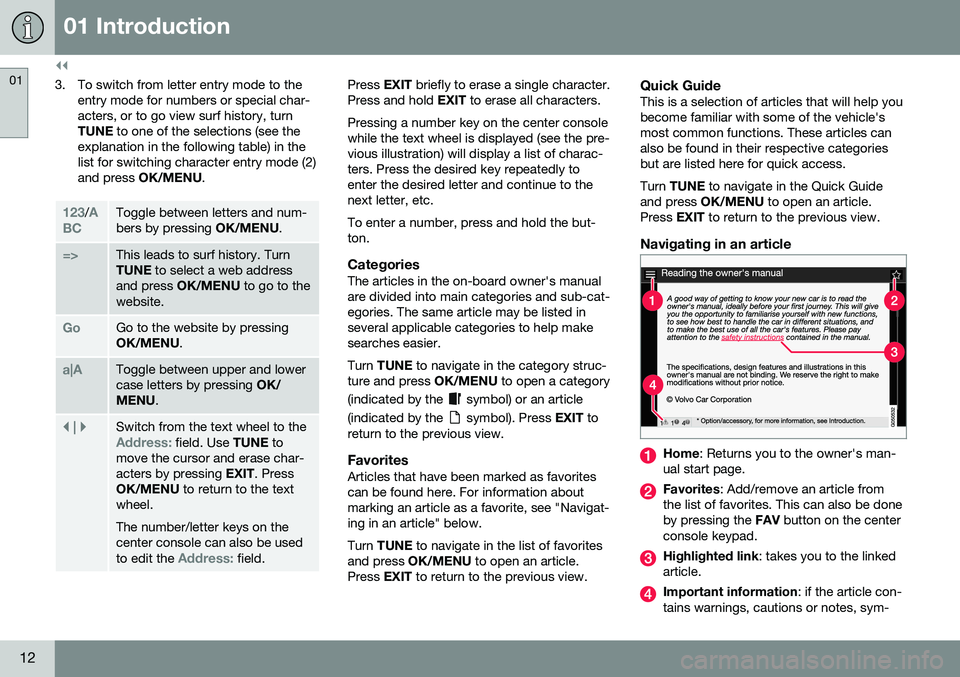
Navigating in an article
Home : Returns you to the owner's man-
ual start page.
Favorites : Add/remove an article from
the list of favorites. This can also be done by pressing the FAV button on the center
console keypad.
Highlighted link : takes you to the linked
article.
Important information : if the article con-
tains warnings, cautions or notes, sym-
Page 31 of 392
02 Safety
02
}}
29
Seat belts – buckling/unbuckling
Seat belts should be used by all occupants in the vehicle when it is in motion.
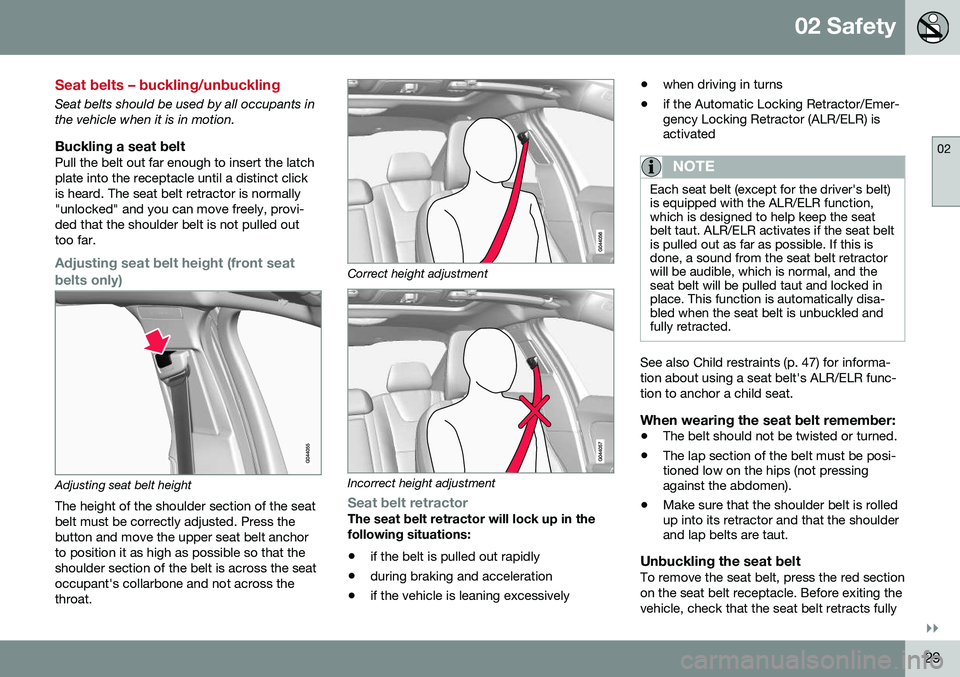
Buckling a seat beltPull the belt out far enough to insert the latchplate into the receptacle until a distinct clickis heard. The seat belt retractor is normally"unlocked" and you can move freely, provi-ded that the shoulder belt is not pulled outtoo far.
Adjusting seat belt height (front seatbelts only)
Adjusting seat belt height
The height of the shoulder section of the seat belt must be correctly adjusted. Press thebutton and move the upper seat belt anchorto position it as high as possible so that theshoulder section of the belt is across the seatoccupant's collarbone and not across thethroat.
Correct height adjustment
Incorrect height adjustment
Seat belt retractorThe seat belt retractor will lock up in the following situations:
• if the belt is pulled out rapidly
• during braking and acceleration
• if the vehicle is leaning excessively •
when driving in turns
• if the Automatic Locking Retractor/Emer- gency Locking Retractor (ALR/ELR) isactivated
NOTE
Each seat belt (except for the driver's belt) is equipped with the ALR/ELR function,which is designed to help keep the seatbelt taut. ALR/ELR activates if the seat beltis pulled out as far as possible. If this isdone, a sound from the seat belt retractorwill be audible, which is normal, and theseat belt will be pulled taut and locked inplace. This function is automatically disa-bled when the seat belt is unbuckled andfully retracted.
See also Child restraints (p. 47) for informa- tion about using a seat belt's ALR/ELR func-tion to anchor a child seat.
When wearing the seat belt remember:
• The belt should not be twisted or turned.
• The lap section of the belt must be posi- tioned low on the hips (not pressingagainst the abdomen).
• Make sure that the shoulder belt is rolledup into its retractor and that the shoulderand lap belts are taut.
Unbuckling the seat beltTo remove the seat belt, press the red section on the seat belt receptacle. Before exiting thevehicle, check that the seat belt retracts fully
Page 33 of 392
02 Safety
02
}}
* Option/accessory, for more information, see Introduction.31
Seat belts – pregnancy
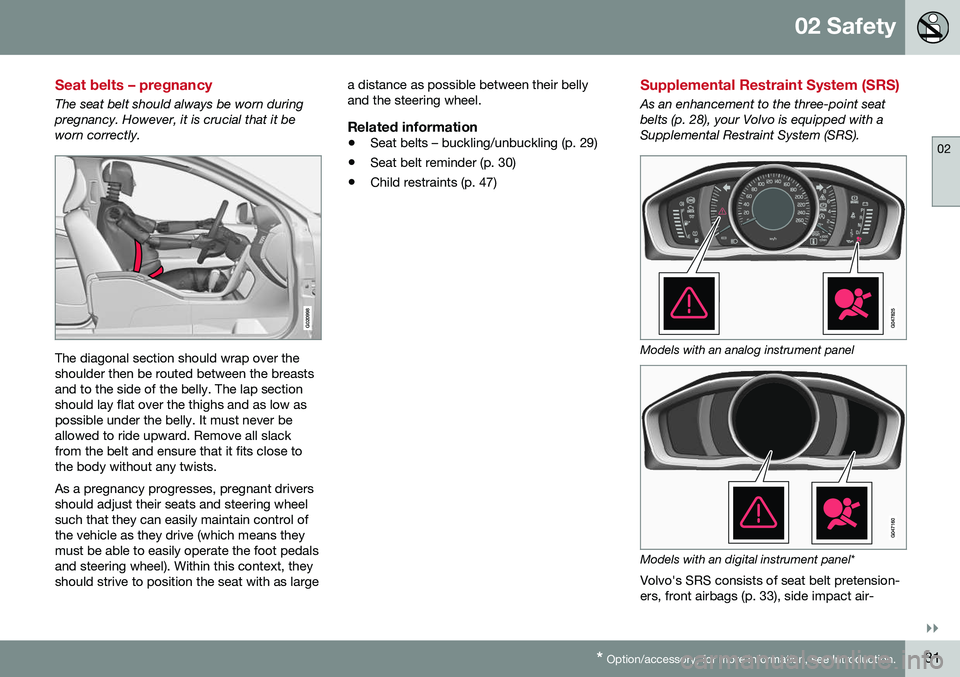
The seat belt should always be worn during pregnancy. However, it is crucial that it beworn correctly.
G020998
The diagonal section should wrap over the shoulder then be routed between the breastsand to the side of the belly. The lap sectionshould lay flat over the thighs and as low aspossible under the belly. It must never beallowed to ride upward. Remove all slackfrom the belt and ensure that it fits close tothe body without any twists. As a pregnancy progresses, pregnant drivers should adjust their seats and steering wheelsuch that they can easily maintain control ofthe vehicle as they drive (which means theymust be able to easily operate the foot pedalsand steering wheel). Within this context, theyshould strive to position the seat with as large a distance as possible between their bellyand the steering wheel.
Related information
•
Seat belts – buckling/unbuckling (p. 29)
• Seat belt reminder (p. 30)
• Child restraints (p. 47)
Supplemental Restraint System (SRS)
As an enhancement to the three-point seat belts (p. 28), your Volvo is equipped with aSupplemental Restraint System (SRS).
Models with an analog instrument panel
Models with an digital instrument panel*
Volvo's SRS consists of seat belt pretension- ers, front airbags (p. 33), side impact air-
Page 39 of 392
02 Safety
02
}}
37
NOTE
When the ignition is switched on, the OWS indicator light will go on for up to 10 sec-onds while the system performs a self-diagnostic test.
However, if a fault is detected in the system:• The OWS indicator light will stay on
• The SRS warning light (p. 31) will come on and stay on
• The message
Pass. Airbag OFF Service
urgent will be displayed in the informa-
tion display.
WARNING
If a fault in the system is detected and indicated as described, be aware that thepassenger's side front airbag will notdeploy in the event of a collision. In thiscase, the SRS system and OccupantWeight Sensor should be inspected by atrained and qualified Volvo service techni-cian as soon as possible.
WARNING
• Never try to open, remove, or repair any components in the OWS system.This could result in system malfunc-tion. Maintenance or repairs shouldonly be carried out by an a trained andqualified Volvo service technician.
• The front passenger's seat should notbe modified in any way. This couldreduce pressure on the seat cushion,which might interfere with the OWSsystem's function.
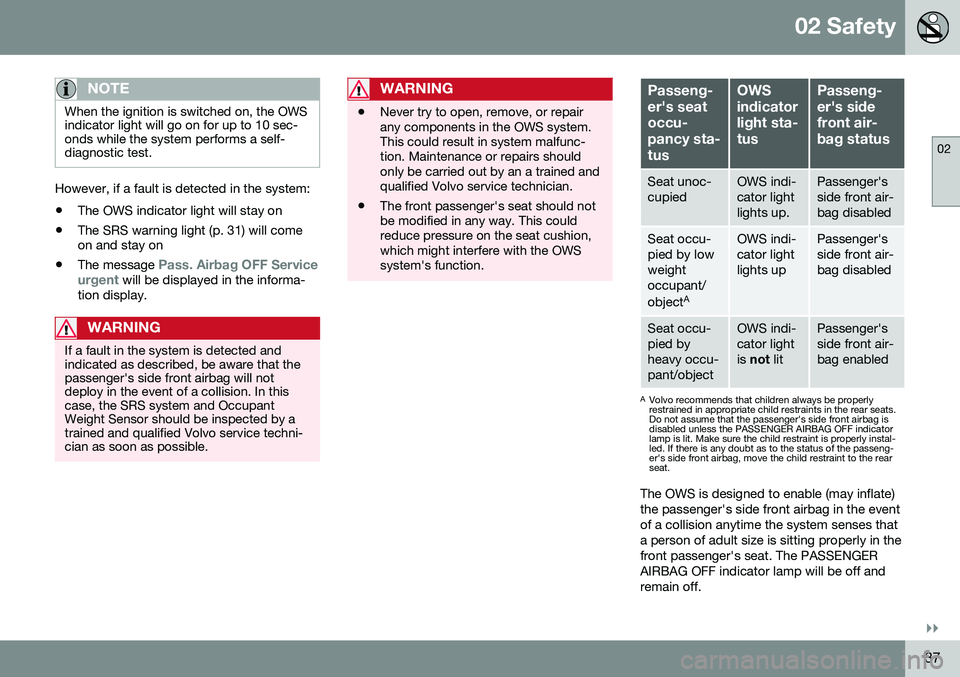
Passeng- er's seatoccu-pancy sta-tusOWS indicatorlight sta-tusPasseng- er's sidefront air-bag status
Seat unoc- cupiedOWS indi- cator lightlights up.Passenger's side front air-bag disabled
Seat occu- pied by lowweightoccupant/ object AOWS indi- cator lightlights upPassenger's side front air-bag disabled
Seat occu- pied byheavy occu-pant/objectOWS indi- cator lightis
not litPassenger's side front air-bag enabled
A
Volvo recommends that children always be properly restrained in appropriate child restraints in the rear seats.Do not assume that the passenger's side front airbag isdisabled unless the PASSENGER AIRBAG OFF indicatorlamp is lit. Make sure the child restraint is properly instal-led. If there is any doubt as to the status of the passeng-er's side front airbag, move the child restraint to the rearseat.
The OWS is designed to enable (may inflate) the passenger's side front airbag in the eventof a collision anytime the system senses thata person of adult size is sitting properly in thefront passenger's seat. The PASSENGERAIRBAG OFF indicator lamp will be off andremain off.
Page 47 of 392
02 Safety
02
45
WARNING
•Never attempt to repair the vehicle yourself or to reset the electrical sys-tem after the vehicle has displayed
Safety mode See manual. This could
result in injury or improper system function.
• Restoring the vehicle to normal operat-ing status should only be done by atrained and qualified Volvo servicetechnician.
• After
Safety mode See manual has
been displayed, if you detect the odor of fuel vapor, or see any signs of fuelleakage, do not attempt to start thevehicle. Leave the vehicle immediately.
Related information
• Crash mode – starting the vehicle (p. 45)
• Crash mode – moving the vehicle(p. 45)
Crash mode – starting the vehicle
If Crash mode has been set Crash mode (p. 44)) and damage to the vehicle isminor and there is no fuel leakage, you mayattempt to start the engine. To do so:
1. Remove the remote key from the ignition
slot and open the driver's door. If a mes- sage is displayed that the ignition is on,press the start button.
2. Close the driver's door and reinsert the remote key in the ignition slot.
3. Try to start the vehicle.
WARNING
If the message Safety mode See manualis still displayed, the vehicle should not be driven and must be towed. Concealedfaults may make the vehicle difficult tocontrol.
Related information
• Crash mode – general information (p. 44)
• Crash mode – moving the vehicle (p. 45)
Crash mode – moving the vehicle
If the message Normal mode appears after
an attempt has been made to start the engine, Starting the vehicle after a crash (p. 45), thevehicle may be moved carefully from its pres-ent position, if for example, it is blocking traf-fic. It should, however, not be moved fartherthan is absolutely necessary.
WARNING
Even if the vehicle appears to be drivable after Crash mode has been set, it shouldnot be driven or towed (pulled by anothervehicle). There may be concealed damagethat could make it difficult or impossible tocontrol. The vehicle should be transportedon a flatbed tow truck to a trained andqualified Volvo service technician forinspection/repairs.
Related information
• Crash mode – general information (p. 44)
Page 50 of 392
||
02 Safety
02
48
G022847
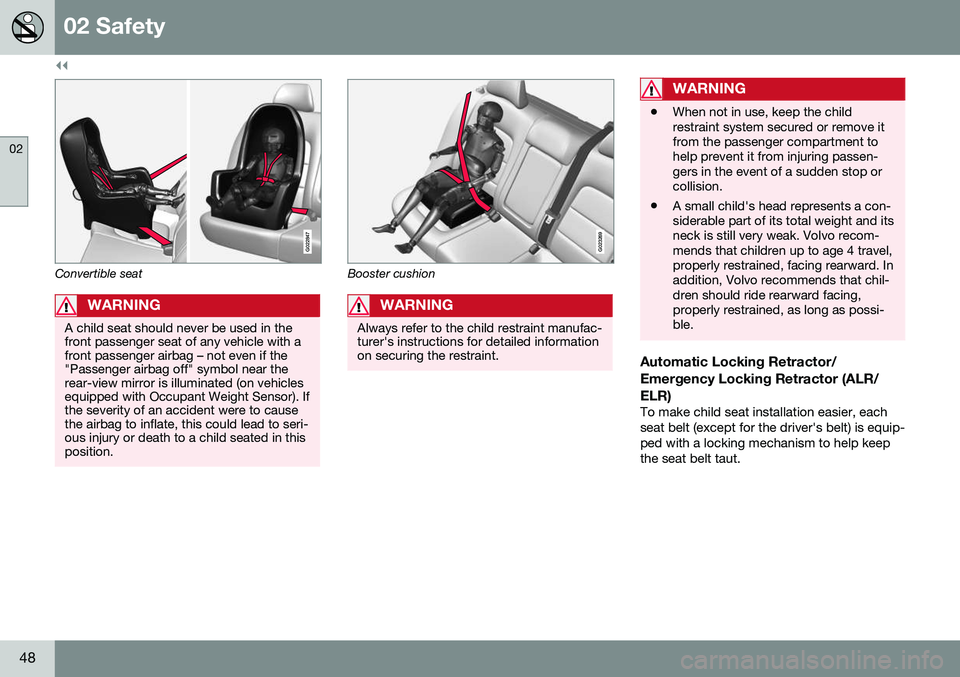
Convertible seat
WARNING
A child seat should never be used in the front passenger seat of any vehicle with afront passenger airbag – not even if the"Passenger airbag off" symbol near therear-view mirror is illuminated (on vehiclesequipped with Occupant Weight Sensor). Ifthe severity of an accident were to causethe airbag to inflate, this could lead to seri-ous injury or death to a child seated in thisposition.
G023269
Booster cushion
WARNING
Always refer to the child restraint manufac- turer's instructions for detailed informationon securing the restraint.
WARNING
•When not in use, keep the child restraint system secured or remove itfrom the passenger compartment tohelp prevent it from injuring passen-gers in the event of a sudden stop orcollision.
• A small child's head represents a con-siderable part of its total weight and itsneck is still very weak. Volvo recom-mends that children up to age 4 travel,properly restrained, facing rearward. Inaddition, Volvo recommends that chil-dren should ride rearward facing,properly restrained, as long as possi-ble.
Automatic Locking Retractor/ Emergency Locking Retractor (ALR/ELR)
To make child seat installation easier, each seat belt (except for the driver's belt) is equip-ped with a locking mechanism to help keepthe seat belt taut.
Page 53 of 392
02 Safety
02
}}
51
NOTE
The locking retractor will automatically release when the seat belt is unbuckledand allowed to retract fully.
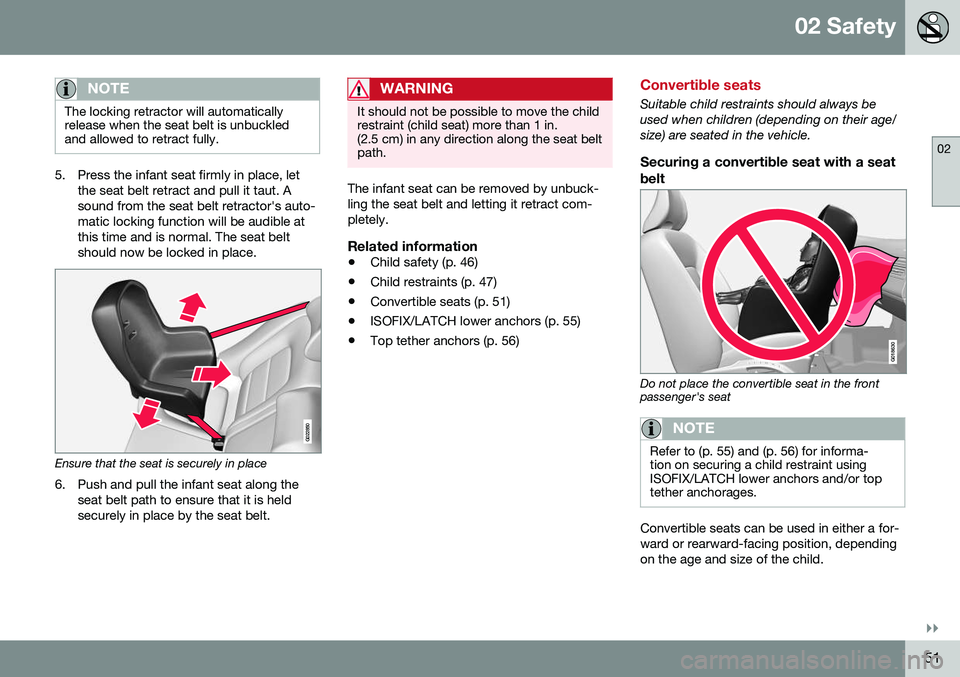
5. Press the infant seat firmly in place, letthe seat belt retract and pull it taut. A sound from the seat belt retractor's auto-matic locking function will be audible atthis time and is normal. The seat beltshould now be locked in place.
G022850
Ensure that the seat is securely in place
6. Push and pull the infant seat along the seat belt path to ensure that it is held securely in place by the seat belt.
WARNING
It should not be possible to move the child restraint (child seat) more than 1 in.(2.5 cm) in any direction along the seat beltpath.
The infant seat can be removed by unbuck- ling the seat belt and letting it retract com-pletely.
Related information
• Child safety (p. 46)
• Child restraints (p. 47)
• Convertible seats (p. 51)
• ISOFIX/LATCH lower anchors (p. 55)
• Top tether anchors (p. 56)
Convertible seats
Suitable child restraints should always be used when children (depending on their age/size) are seated in the vehicle.
Securing a convertible seat with a seat
belt
G018630
Do not place the convertible seat in the front passenger's seat
NOTE
Refer to (p. 55) and (p. 56) for informa- tion on securing a child restraint usingISOFIX/LATCH lower anchors and/or toptether anchorages.
Convertible seats can be used in either a for- ward or rearward-facing position, dependingon the age and size of the child.
Page 55 of 392
02 Safety
02
53
NOTE
The locking retractor will automatically release when the seat belt is unbuckledand allowed to retract fully.
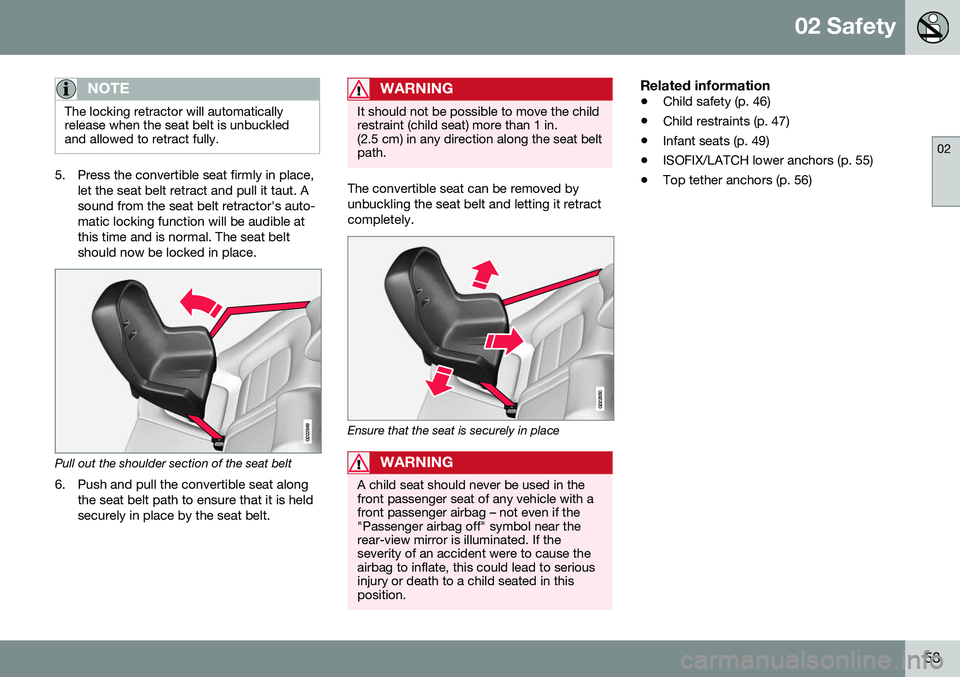
5. Press the convertible seat firmly in place,let the seat belt retract and pull it taut. A sound from the seat belt retractor's auto-matic locking function will be audible atthis time and is normal. The seat beltshould now be locked in place.
G022849
Pull out the shoulder section of the seat belt
6. Push and pull the convertible seat along the seat belt path to ensure that it is held securely in place by the seat belt.
WARNING
It should not be possible to move the child restraint (child seat) more than 1 in.(2.5 cm) in any direction along the seat beltpath.
The convertible seat can be removed by unbuckling the seat belt and letting it retractcompletely.
G022850
Ensure that the seat is securely in place
WARNING
A child seat should never be used in the front passenger seat of any vehicle with afront passenger airbag – not even if the"Passenger airbag off" symbol near therear-view mirror is illuminated. If theseverity of an accident were to cause theairbag to inflate, this could lead to seriousinjury or death to a child seated in thisposition.
Related information
• Child safety (p. 46)
• Child restraints (p. 47)
• Infant seats (p. 49)
• ISOFIX/LATCH lower anchors (p. 55)
• Top tether anchors (p. 56)
Page 67 of 392
03 Instruments and controls
03
}}
* Option/accessory, for more information, see Introduction.65
Eco Guide* and Power Meter*
Eco guide and Power guide are two gauges in the instrument panel that help improve drivingeconomy. The vehicle also stores driving-related statis- tics in the form of a bar graph, see Trip com-puter – Trip statistics (p. 116).
Introduction
To display or remove these functions from theinstrument panel, select the "Eco" theme (seeInformation displays – introduction (p. 62)). Driving statistics are also stored and can be displayed in the form of a bar chart (see Tripcomputer – Trip statistics (p. 116)).
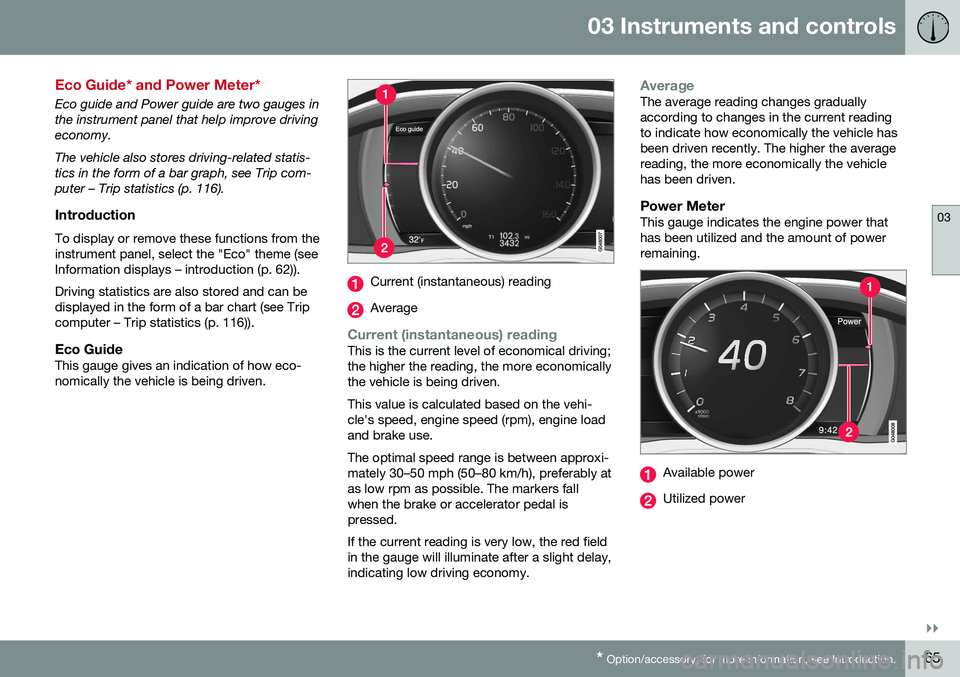
Eco GuideThis gauge gives an indication of how eco-nomically the vehicle is being driven.
Current (instantaneous) reading
Average
Current (instantaneous) readingThis is the current level of economical driving; the higher the reading, the more economicallythe vehicle is being driven. This value is calculated based on the vehi- cle's speed, engine speed (rpm), engine loadand brake use. The optimal speed range is between approxi- mately 30–50 mph (50–80 km/h), preferably atas low rpm as possible. The markers fallwhen the brake or accelerator pedal ispressed. If the current reading is very low, the red field in the gauge will illuminate after a slight delay,indicating low driving economy.
AverageThe average reading changes gradually according to changes in the current readingto indicate how economically the vehicle hasbeen driven recently. The higher the averagereading, the more economically the vehiclehas been driven.
Power MeterThis gauge indicates the engine power thathas been utilized and the amount of powerremaining.
Available power
Utilized power
Page 75 of 392
03 Instruments and controls
03
}}
* Option/accessory, for more information, see Introduction.73
Removing the remote keyThe remote key can be removed from the ignition slot by pulling it out.
Related information
• Ignition modes (p. 73)
Ignition modes
The vehicle's ignition has 3 modes:
0, I, and II
that can be used without starting the engine. The following table shows examples of whichfunctions are available in the respectivemodes.
NOTE
To access ignition modes I or II without
starting the engine, the brake pedal must not be depressed.
ModeFunction
0The odometer, clock and tem- perature gauge are illuminated.Power seats* can be adjustedand the infotainment system canbe used for a limited time (to min-imize battery drain, see the Sen-sus Infotainment Supplement).
IThe Moonroof*, power windows, 12-volt sockets in the passengercompartment, navigation sys-tem*, climate system blower,windshield wipers can be used.
IIThe headlights/taillights illumi- nate. Warning/indicator lights illu-minate for 5 seconds. Other sys-tems are activated. However, theheated seats* and heated rearwindow function can only be acti-vated when the engine is running. Mode II should only be used for very short periods to help avoiddraining the battery.
Ignition modes
Ignition mode 0–The vehicle is unlocked.