headlights VOLVO S60 CROSS COUNTRY 2018 Owner´s Manual
[x] Cancel search | Manufacturer: VOLVO, Model Year: 2018, Model line: S60 CROSS COUNTRY, Model: VOLVO S60 CROSS COUNTRY 2018Pages: 394, PDF Size: 9.41 MB
Page 96 of 394

INSTRUMENTS AND CONTROLS
* Option/accessory.
94
Rain sensor *
The rain sensor automatically regulates wiper speed according to the amount of water on thewindshield.
The sensitivity of the rain sensor can be adjusted moving the thumb wheel up (the wipers willsweep the windshield more frequently) or down(the wipers will sweep the windshield less fre-quently).
NOTE
The wipers will make an extra sweep each time the thumb wheel is adjusted upward.
When the rain sensor is activated, the symbol
will illuminate in the instrument panel.
Activating and setting the sensitivity
When activating the rain sensor, the vehicle must be running or in ignition mode II and the wind-
shield wiper lever must be in position 0 or in the
single sweep position. Activate the rain sensor by pressing the button
. The windshield wipers will make one
sweep. Press the lever up for the wipers to make an extra sweep. The rain sensor returns to activemode when the stalk is released back to position 0 .
Deactivating
Deactivate the rain sensor by pressing the button
or press the lever down to another wiper
position. The rain sensor is automatically deactivated when the key is removed from the ignition slot or fiveminutes after the ignition has been switched off.
CAUTION
The rain sensor should be deactivated when washing the car in an automatic car wash, etc.If the rain sensor function is left on, the wip-ers will start inadvertently in the car wash andcould be damaged.
Windshield washer
Move the lever toward the steering wheel to start the windshield and headlight washers. After thelever is released the wipers make several extrasweeps.
Washing function
Heated washer nozzles *The washer nozzles are heated automatically in cold weather to help prevent the washer fluidfrom freezing.
High-pressure headlight washing *High-pressure headlight washing consumes alarge quantity of washer fluid. To save fluid, theheadlights are washed using two alternatives:
• Low/high beam headlights on.
The head-
lights will be washed the first time the wind-shield is washed. Thereafter, the headlightswill only be washed once for every five times
Page 97 of 394

INSTRUMENTS AND CONTROLS
95
the windshield is washed within a 10-minute period.
• Parking lights on.
Optional Active Bending
Lights will be washed once for every fivetimes the windshield is washed. Normal halo-gen headlights will not be washed.
CAUTION
• Use ample washer fluid when washing the windshield. The windshield should bethoroughly wet when the wipers are inoperation.
• When approx. 1 US quart (1 liter) ofwasher fluid remains in the reservoir, theheadlights will no longer be washed. Atext message will also be displayed toremind the driver to fill the washer fluidreservoir.
Related information
•Engine compartment – washer fluid (p. 344)
Tailgate wiper/washer
The tailgate wiper operates at two speeds: inter- mittent and continuous.
NOTE
The rear wiper is equipped with a cut-off function, which means that it will not operateif its electric motor overheats. The wiper willfunction again after a cool-down period(30 seconds or longer, depending on the heatof the motor and ambient temperature condi-tions).
Tailgate wiper and reverse gearIf the windshield wipers are on and the transmis- sion is put into reverse gear, the tailgate wiper will go into intermittent wiping function 16
. This
function is deactivated when a different gear is selected.
NOTE
On vehicles with the optional rain sensor, the tailgate wiper will be activated when reverseis selected, if the rain sensor is activated andit is raining.
If the tailgate wiper is in the normal (continuous) wiping mode, selecting different gears will notaffect its function.
Related information
• Engine compartment – washer fluid (p. 344)
16
Consult your Volvo retailer if you would like to have this function deactivated.
Page 102 of 394
INSTRUMENTS AND CONTROLS
* Option/accessory.
100
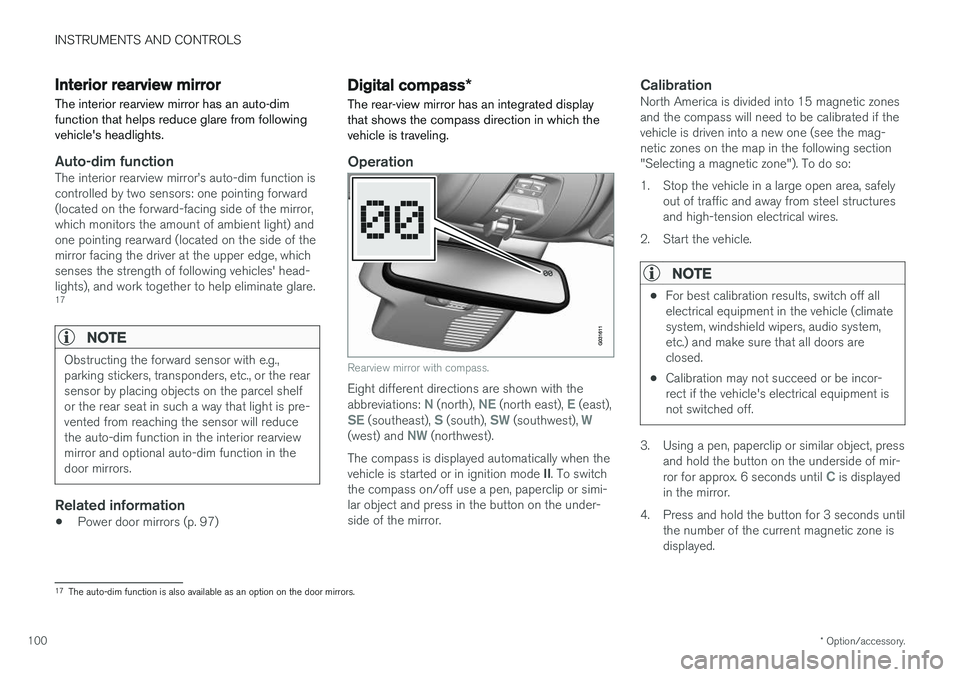
Interior rearview mirror The interior rearview mirror has an auto-dim function that helps reduce glare from followingvehicle's headlights.
Auto-dim functionThe interior rearview mirror
Page 187 of 394

DRIVER SUPPORT
}}
185
Radar sensor
The radar sensor is designed to help detect cars or larger vehicles driving in the same direction asyour vehicle, in the same lane.
The radar sensor and its limitationsIn addition to being used by the Adaptive Cruise Control (ACC), the radar sensor is also used byDistance Alert (see Distance Alert – introduction(p. 190)) and Collision Warning with Full Auto-brake and Pedestrian Detection (see Collisionwarning – introduction (p. 201)).
WARNING
• If there is visible damage to the front grille or you suspect that the radar sensormay be damaged in any way, contact atrained and qualified Volvo service techni-cian as soon as possible. The radar sen-sor may only function partially (or not atall) if it is damaged or is not securely fas-tened in place.
• Accessories or other objects, such asextra headlights, must not be installed infront of the grille.
• Modification of the radar sensor couldmake its use illegal.
The radar sensor's capacity to detect vehiclesahead is impeded: •
if the radar sensor is obstructed and cannotdetect other vehicles, for example in heavyrain, or if snow or other objects are obscuringthe radar sensor.
NOTE
Keep the area in front of the radar sensor clean.
•
if the speed of vehicles ahead is significantly different from your own speed.
Related information
•Adaptive Cruise Control – introduction(p. 175)
• Collision warning – introduction (p. 201)
• Distance Alert – introduction (p. 190)
Adaptive Cruise Control – limitations
The ACC cannot cover all driving situations and traffic, weather and road conditions.
Situations where ACC may not function optimally
WARNING
• The radar sensor has a limited field of vision. In some situations it may detect avehicle later than expected or not detectother vehicles at all.
• If ACC is not functioning properly, cruisecontrol will also be disabled.
Page 255 of 394
STARTING AND DRIVING
* Option/accessory.253
Engine Remote Start (ERS) * –
starting the engine
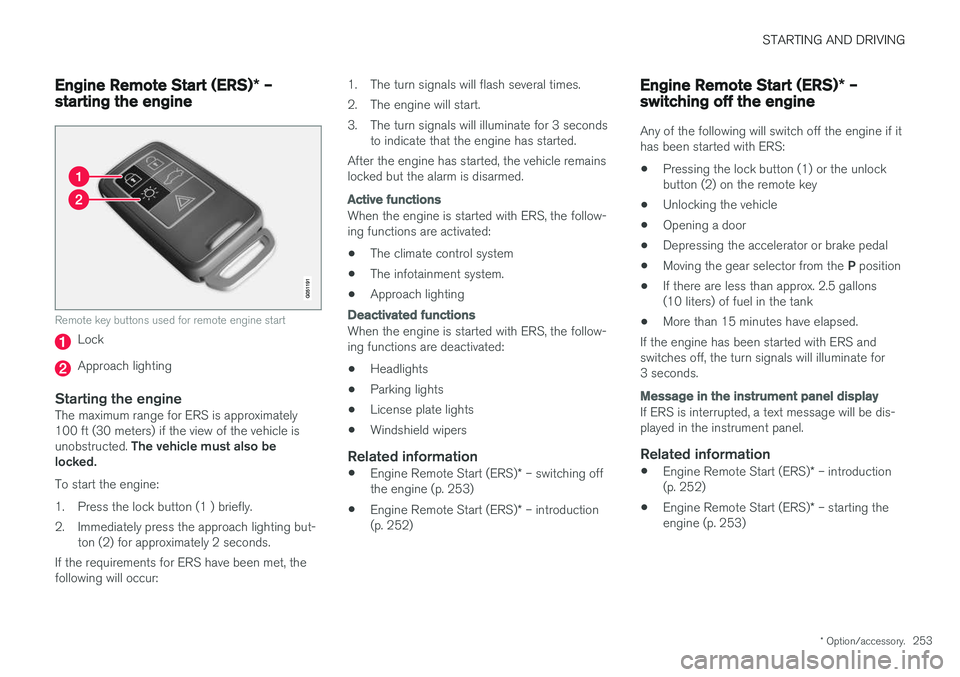
Remote key buttons used for remote engine start
Lock
Approach lighting
Starting the engineThe maximum range for ERS is approximately 100 ft (30 meters) if the view of the vehicle is unobstructed. The vehicle must also be
locked. To start the engine:
1. Press the lock button (1 ) briefly.
2. Immediately press the approach lighting but- ton (2) for approximately 2 seconds.
If the requirements for ERS have been met, the following will occur: 1. The turn signals will flash several times.
2. The engine will start.
3. The turn signals will illuminate for 3 seconds
to indicate that the engine has started.
After the engine has started, the vehicle remains locked but the alarm is disarmed.
Active functions
When the engine is started with ERS, the follow- ing functions are activated: • The climate control system
• The infotainment system.
• Approach lighting
Deactivated functions
When the engine is started with ERS, the follow- ing functions are deactivated: •
Headlights
• Parking lights
• License plate lights
• Windshield wipers
Related information
•
Engine Remote Start (ERS)
* – switching off
the engine (p. 253)
• Engine Remote Start (ERS)
* – introduction
(p. 252)
Engine Remote Start (ERS) * –
switching off the engine
Any of the following will switch off the engine if it has been started with ERS: • Pressing the lock button (1) or the unlock button (2) on the remote key
• Unlocking the vehicle
• Opening a door
• Depressing the accelerator or brake pedal
• Moving the gear selector from the
P position
• If there are less than approx. 2.5 gallons(10 liters) of fuel in the tank
• More than 15 minutes have elapsed.
If the engine has been started with ERS andswitches off, the turn signals will illuminate for3 seconds.
Message in the instrument panel display
If ERS is interrupted, a text message will be dis- played in the instrument panel.
Related information
• Engine Remote Start (ERS)
* – introduction
(p. 252)
• Engine Remote Start (ERS)
* – starting the
engine (p. 253)
Page 325 of 394
MAINTENANCE AND SERVICING
323
Maintenance – owner maintenance
Periodic maintenance requirements and intervals are described in your vehicle's Warranty andService Records Information booklet. The following points can be carried out between the normally scheduled maintenance services.
Owner maintenance
Each time the car is refueled:
• Check the engine oil level.
• Clean the windshield, windshield wipers, headlights, and taillights.
Monthly:
• Check cold tire pressure in all tires. Inspect the tires for wear.
• Check that engine coolant and other fluidlevels are between the indicated "min" and"max" markings.
• Clean interior glass surfaces with a glasscleaner and soft paper towels.
• Wipe driver information displays with a softcloth.
• Visually inspect battery terminals for corro-sion. Corrosion may indicate a loose terminalconnector, or a battery near the end of itsuseful service life. Consult your Volvo retailerfor additional information.
As needed:
Wash the car, including the undercarriage, to reduce wear that can be caused by a buildup of dirt, and corrosion that can be caused by salt res-idues. Clean leaves and twigs from air intake vents at the base of the windshield, and from other placeswhere they may collect.
NOTE
Complete service information for qualified technicians is available online for purchase orsubscription at www.volvotechinfo.com.
Related information
•
Maintenance – opening/closing hood (p. 327)
• Engine compartment – overview (p. 328)
• Engine compartment – coolant (p. 332)
• Engine compartment – engine oil (p. 329)
• Engine compartment – power steering fluid(p. 333)
• Engine compartment – washer fluid (p. 344)
• Cleaning the interior (p. 361)
• Washing the vehicle (p. 359)
• Tire inflation – checking pressure (p. 299)
• Tires – tread wear indicator (p. 292)
Page 336 of 394
MAINTENANCE AND SERVICING
334
CAUTION
Keep the area around the power steering fluid reservoir clean when checking.
Bulbs – introduction
Certain bulbs can be replaced by the vehicle's owner. However, the bulbs on the following listshould only be replaced by a trained and quali-fied Volvo service technician.
All bulb specifications are listed in Bulbs – speci-
fications (p. 341).
• Active Bending Lights
• Front parking lights
• Front side marker lights
• Cornering lights
• Turn signals in the door mirrors
• Approach lighting in the door mirrors
• Interior lighting (except for the front footwelllighting)
• Rear parking lights
• LED bulbs
NOTE
• For information regarding any bulbs not mentioned in this section, please contactyour Volvo retailer or a trained andauthorized Volvo service technician.
• Always switch off the ignition before star-ting to replace a bulb.
• If an error message remains in the dis-play after a faulty bulb has been replaced,contact an authorized Volvo workshop.
• Condensation may form temporarily onthe inside of the lenses of exterior lightssuch as headlights, fog lights, or taillights.This is normal and the lights aredesigned to withstand moisture. Normally,condensation will dissipate after thelights have been on for a short time.
• The optional Active Bending Light bulbscontain trace amounts of mercury. Thesebulbs should always be disposed of by atrained and qualified Volvo service techni-cian.
CAUTION
Never touch the glass of bulbs with your fin- gers. Grease and oils from your fingers vapor-ize in the heat and will leave a deposit on thereflector, which will damage it.
Page 337 of 394
MAINTENANCE AND SERVICING
}}
* Option/accessory.335
WARNING
•The engine should not be running when changing bulbs.
• If the engine has been running just priorto replacing bulbs in the headlight hous-ing, please keep in mind that componentsin the engine compartment will be hot.
WARNING
•
Active Bending Lights
* – due to the high
voltage used by these headlights, these bulbs should only be replaced by atrained and qualified Volvo service techni-cian.
• Turn off the lights and remove the remotekey from the ignition before changing anybulbs.
Related information
•Bulbs – headlight housing (p. 335)
• Bulbs – taillight housing (p. 340)
• Bulbs – vanity mirror lighting (p. 341)
• Bulbs – license plate lighting (p. 340)
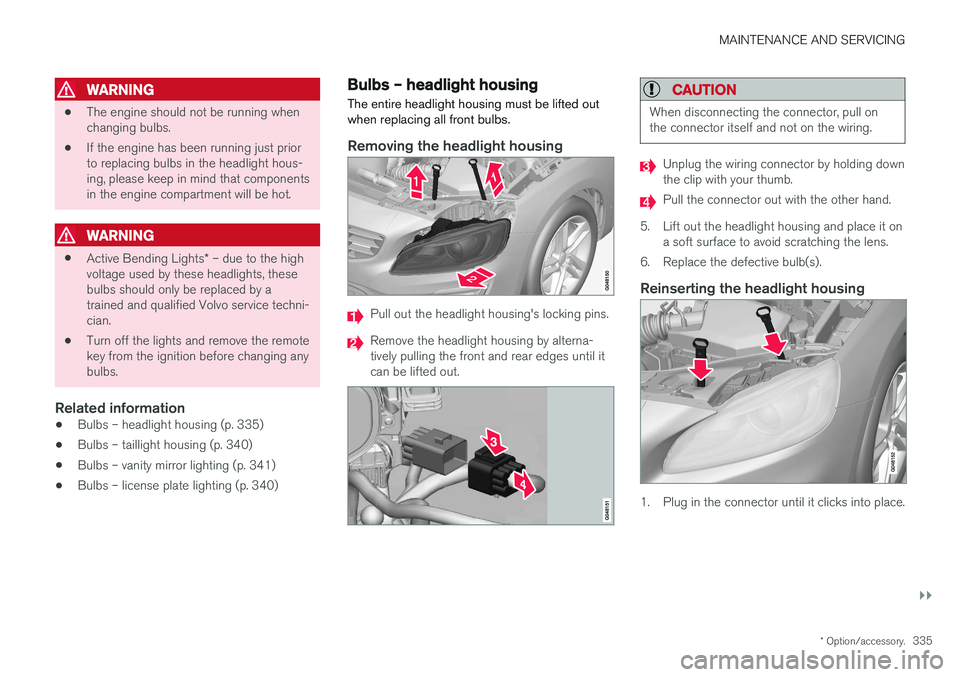
Bulbs – headlight housing
The entire headlight housing must be lifted out when replacing all front bulbs.
Removing the headlight housing
Pull out the headlight housing's locking pins.
Remove the headlight housing by alterna- tively pulling the front and rear edges until itcan be lifted out.
CAUTION
When disconnecting the connector, pull on the connector itself and not on the wiring.
Unplug the wiring connector by holding down the clip with your thumb.
Pull the connector out with the other hand.
5. Lift out the headlight housing and place it on a soft surface to avoid scratching the lens.
6. Replace the defective bulb(s).
Reinserting the headlight housing
1. Plug in the connector until it clicks into place.
Page 346 of 394
MAINTENANCE AND SERVICING
344
Engine compartment – washer fluid
Washer fluid helps keep the windshield and headlights clean. During cold weather, the reser-voir should be filled with windshield washer sol-vent containing antifreeze. Use Volvo OriginalWasher Fluid or the equivalent with a recom-mended pH value between 6 and 8.
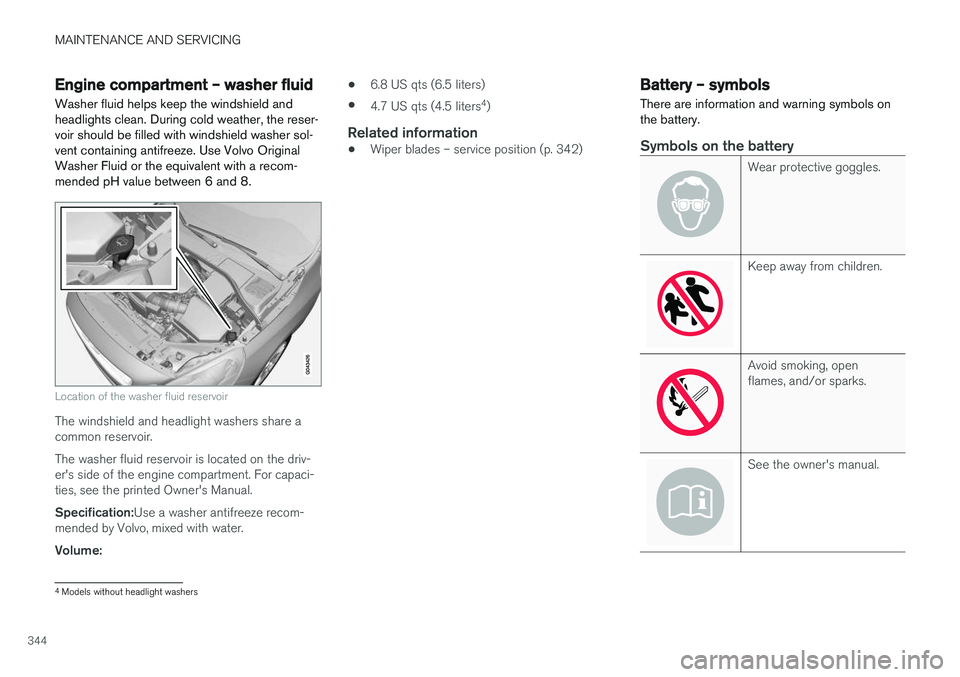
Location of the washer fluid reservoir
The windshield and headlight washers share a common reservoir. The washer fluid reservoir is located on the driv- er's side of the engine compartment. For capaci-ties, see the printed Owner's Manual. Specification: Use a washer antifreeze recom-
mended by Volvo, mixed with water.Volume: •
6.8 US qts (6.5 liters)
• 4.7 US qts (4.5 liters 4
)
Related information
• Wiper blades – service position (p. 342)
Battery – symbols
There are information and warning symbols on the battery.
Symbols on the battery
Wear protective goggles.
Keep away from children.
Avoid smoking, open flames, and/or sparks.
See the owner's manual.
4 Models without headlight washers
Page 361 of 394
MAINTENANCE AND SERVICING
}}
* Option/accessory.359
Washing the vehicle
The vehicle should be washed at regular inter- vals since dirt, dust, insects and tar spotsadhere to the paint and may cause damage. Tohelp prevent corrosion, it is particularly importantto wash the car frequently in the wintertime.
The following points should be kept in mind when washing and cleaning the car:
CAUTION
Avoid using car washing detergents with a pH value lower than 3.5 or higher than 11.5.Doing so could result in discoloring of ano-dized aluminum surfaces on e.g., roof rails orthe frames around the side windows.
• Avoid washing your car in direct sunlight. Doing so may cause detergents and wax todry out and become abrasive. To avoidscratching, use lukewarm water to soften thedirt before you wash with a soft sponge, andplenty of sudsy water.
• Bird droppings
: Remove from paintwork as
soon as possible. Otherwise the finish maybe permanently damaged.
• A detergent can be used to facilitate thesoftening of dirt and oil.
• Dry the car with a clean chamois andremember to clean the drain holes in thedoors and rocker panels. •
Tar spots can be removed with tar removerafter the car has been washed.
• A stiff-bristle brush and lukewarm soapywater can be used to clean the wiper blades.Frequent cleaning of the windshield andwiper blades improves visibility considerablyand also helps prolong the service life of thewiper blades.
• Wash off the dirt from the underside (wheelhousings, fenders, etc).
• In areas of high industrial fallout, more fre-quent washing is recommended.
NOTE
When washing the vehicle, remember to remove dirt from the drain holes in the doorsand sills.
CAUTION
•
During high pressure washing, the spray mouthpiece must never be closer to thevehicle than 13" (30 cm). Do not sprayinto the locks.
• Dirt, snow, etc., on the headlights canreduce lighting capacity considerably.Clean the headlights regularly, for exam-ple when refueling.
Special moonroof cautions:
• Always close the moonroof and sunshade before washing your vehicle.
• Never use abrasive cleaning agents onthe moonroof.
• Never use wax on the rubber sealsaround the moonroof.
Exterior componentsVolvo recommends the use of special cleaning products, available at your Volvo retailer, forcleaning colored plastic, rubber, or ornamentalcomponents such as chromed strips on the exte-rior of your vehicle. The instructions for usingthese products should be followed carefully. Sol-vents or stain removers should not be used. The frames around the side windows, roof rails and door frames near the windows
* are made of
anodized aluminum and should only be washed