steering VOLVO S60 CROSS COUNTRY 2018 Owner´s Manual
[x] Cancel search | Manufacturer: VOLVO, Model Year: 2018, Model line: S60 CROSS COUNTRY, Model: VOLVO S60 CROSS COUNTRY 2018Pages: 394, PDF Size: 9.41 MB
Page 321 of 394
WHEELS AND TIRES
}}
* Option/accessory.319
WARNING
If heavy vibrations, unsteady steering behavior, or noises should occur while driving, reducespeed and park the vehicle in a safe place.Recheck the tire for bumps, cracks, or othervisible damage, and recheck its inflation pres-sure. If the pressure is below 19 psi (1.3 bar),do not continue driving. Have the vehicletowed to a trained and qualified Volvo servicetechnician.
Tire sealing system – checking inflation pressure The tire sealing system can also be used to check the tires' inflation pressure.
Stage 2: Checking inflation pressure1. Reconnect the tire sealing system's hose to
the tire's inflation valve as described in stage
1 , see Tire sealing system * – sealing a hole
(p. 317).
2. Refer to the inflation pressure table in this chapter for the correct inflation pressure. If the tire needs to be inflated, start the tiresealing system
Page 325 of 394
MAINTENANCE AND SERVICING
323
Maintenance – owner maintenance
Periodic maintenance requirements and intervals are described in your vehicle's Warranty andService Records Information booklet. The following points can be carried out between the normally scheduled maintenance services.
Owner maintenance
Each time the car is refueled:
• Check the engine oil level.
• Clean the windshield, windshield wipers, headlights, and taillights.
Monthly:
• Check cold tire pressure in all tires. Inspect the tires for wear.
• Check that engine coolant and other fluidlevels are between the indicated "min" and"max" markings.
• Clean interior glass surfaces with a glasscleaner and soft paper towels.
• Wipe driver information displays with a softcloth.
• Visually inspect battery terminals for corro-sion. Corrosion may indicate a loose terminalconnector, or a battery near the end of itsuseful service life. Consult your Volvo retailerfor additional information.
As needed:
Wash the car, including the undercarriage, to reduce wear that can be caused by a buildup of dirt, and corrosion that can be caused by salt res-idues. Clean leaves and twigs from air intake vents at the base of the windshield, and from other placeswhere they may collect.
NOTE
Complete service information for qualified technicians is available online for purchase orsubscription at www.volvotechinfo.com.
Related information
•
Maintenance – opening/closing hood (p. 327)
• Engine compartment – overview (p. 328)
• Engine compartment – coolant (p. 332)
• Engine compartment – engine oil (p. 329)
• Engine compartment – power steering fluid(p. 333)
• Engine compartment – washer fluid (p. 344)
• Cleaning the interior (p. 361)
• Washing the vehicle (p. 359)
• Tire inflation – checking pressure (p. 299)
• Tires – tread wear indicator (p. 292)
Page 330 of 394
MAINTENANCE AND SERVICING
328
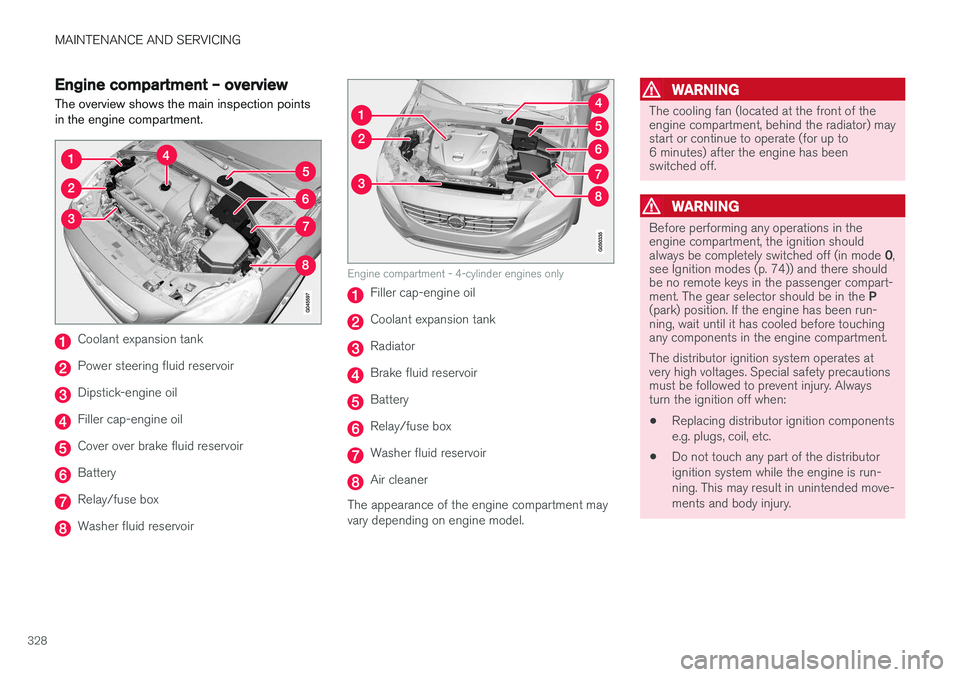
Engine compartment – overviewThe overview shows the main inspection points in the engine compartment.
Coolant expansion tank
Power steering fluid reservoir
Dipstick-engine oil
Filler cap-engine oil
Cover over brake fluid reservoir
Battery
Relay/fuse box
Washer fluid reservoir
Engine compartment - 4-cylinder engines only
Filler cap-engine oil
Coolant expansion tank
Radiator
Brake fluid reservoir
Battery
Relay/fuse box
Washer fluid reservoir
Air cleaner
The appearance of the engine compartment may vary depending on engine model.
WARNING
The cooling fan (located at the front of the engine compartment, behind the radiator) maystart or continue to operate (for up to6 minutes) after the engine has beenswitched off.
WARNING
Before performing any operations in the engine compartment, the ignition should always be completely switched off (in mode 0,
see Ignition modes (p. 74)) and there should be no remote keys in the passenger compart- ment. The gear selector should be in the P
(park) position. If the engine has been run- ning, wait until it has cooled before touchingany components in the engine compartment. The distributor ignition system operates at very high voltages. Special safety precautionsmust be followed to prevent injury. Alwaysturn the ignition off when:
• Replacing distributor ignition components e.g. plugs, coil, etc.
• Do not touch any part of the distributorignition system while the engine is run-ning. This may result in unintended move-ments and body injury.
Page 333 of 394
MAINTENANCE AND SERVICING
* Option/accessory.331
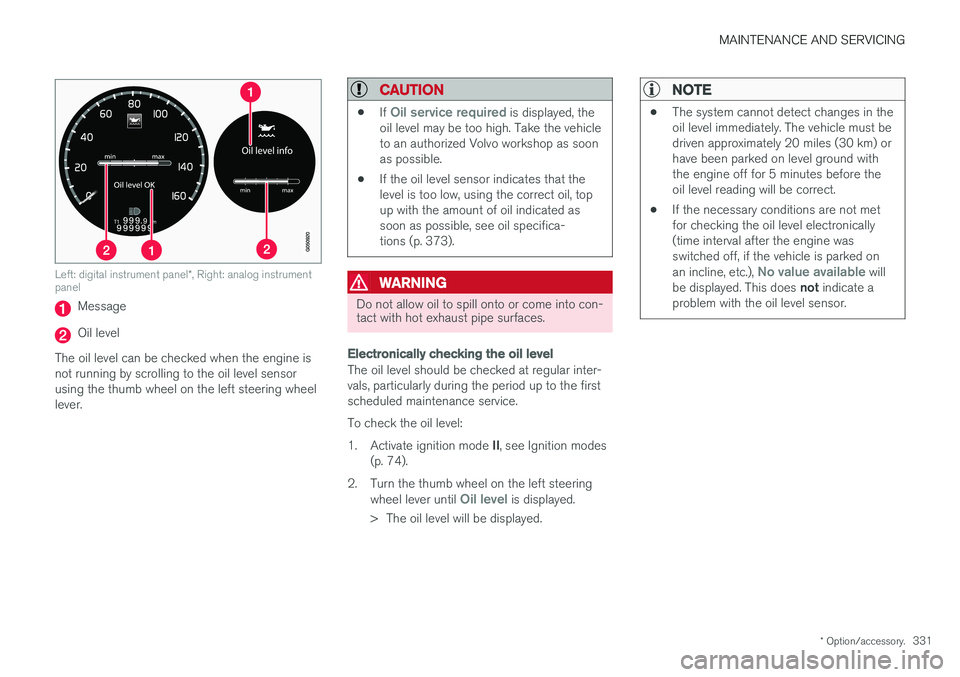
Left: digital instrument panel *, Right: analog instrument
panel
Message
Oil level
The oil level can be checked when the engine is not running by scrolling to the oil level sensorusing the thumb wheel on the left steering wheellever.
CAUTION
• If Oil service required is displayed, the
oil level may be too high. Take the vehicle to an authorized Volvo workshop as soonas possible.
• If the oil level sensor indicates that thelevel is too low, using the correct oil, topup with the amount of oil indicated assoon as possible, see oil specifica-tions (p. 373).
WARNING
Do not allow oil to spill onto or come into con- tact with hot exhaust pipe surfaces.
Electronically checking the oil level
The oil level should be checked at regular inter- vals, particularly during the period up to the firstscheduled maintenance service. To check the oil level:1.
Activate ignition mode II, see Ignition modes
(p. 74).
2. Turn the thumb wheel on the left steering wheel lever until
Oil level is displayed.
> The oil level will be displayed.
NOTE
• The system cannot detect changes in the oil level immediately. The vehicle must bedriven approximately 20 miles (30 km) orhave been parked on level ground withthe engine off for 5 minutes before theoil level reading will be correct.
• If the necessary conditions are not metfor checking the oil level electronically(time interval after the engine wasswitched off, if the vehicle is parked on an incline, etc.),
No value available will
be displayed. This does not indicate a
problem with the oil level sensor.
Page 335 of 394
MAINTENANCE AND SERVICING
}}
333
Engine compartment – brake fluid
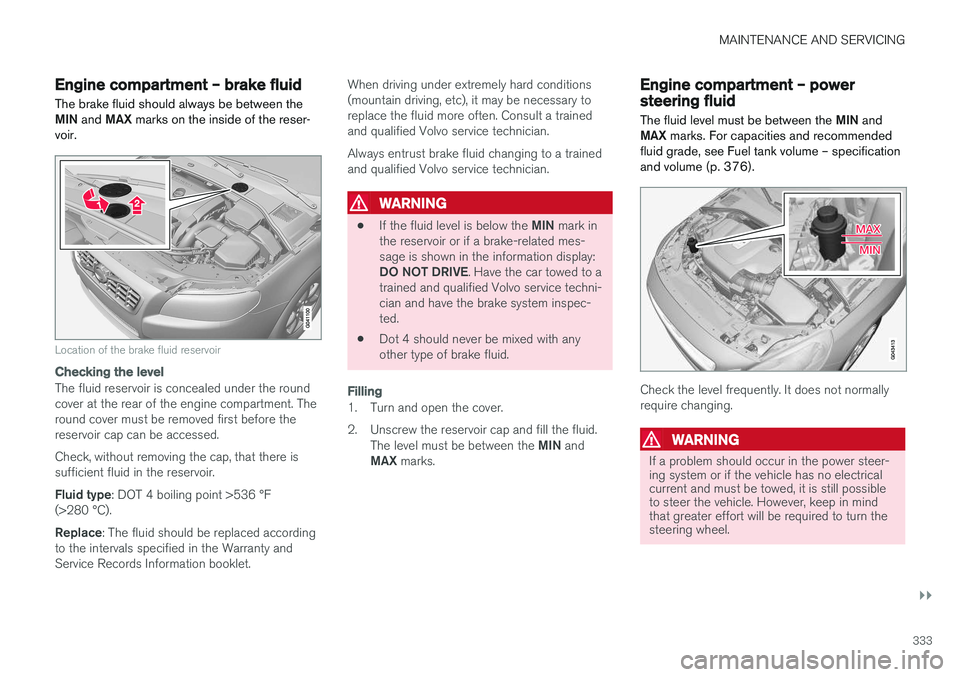
The brake fluid should always be between the MIN and MAX marks on the inside of the reser-
voir.
Location of the brake fluid reservoir
Checking the level
The fluid reservoir is concealed under the round cover at the rear of the engine compartment. Theround cover must be removed first before thereservoir cap can be accessed. Check, without removing the cap, that there is sufficient fluid in the reservoir. Fluid type : DOT 4 boiling point >536 °F
(>280 °C).Replace : The fluid should be replaced according
to the intervals specified in the Warranty and Service Records Information booklet. When driving under extremely hard conditions(mountain driving, etc), it may be necessary toreplace the fluid more often. Consult a trainedand qualified Volvo service technician. Always entrust brake fluid changing to a trained and qualified Volvo service technician.
WARNING
•
If the fluid level is below the
MIN mark in
the reservoir or if a brake-related mes- sage is shown in the information display: DO NOT DRIVE . Have the car towed to a
trained and qualified Volvo service techni- cian and have the brake system inspec-ted.
• Dot 4 should never be mixed with anyother type of brake fluid.
Filling
1. Turn and open the cover.
2. Unscrew the reservoir cap and fill the fluid.
The level must be between the MIN and
MAX marks.
Engine compartment – power steering fluid
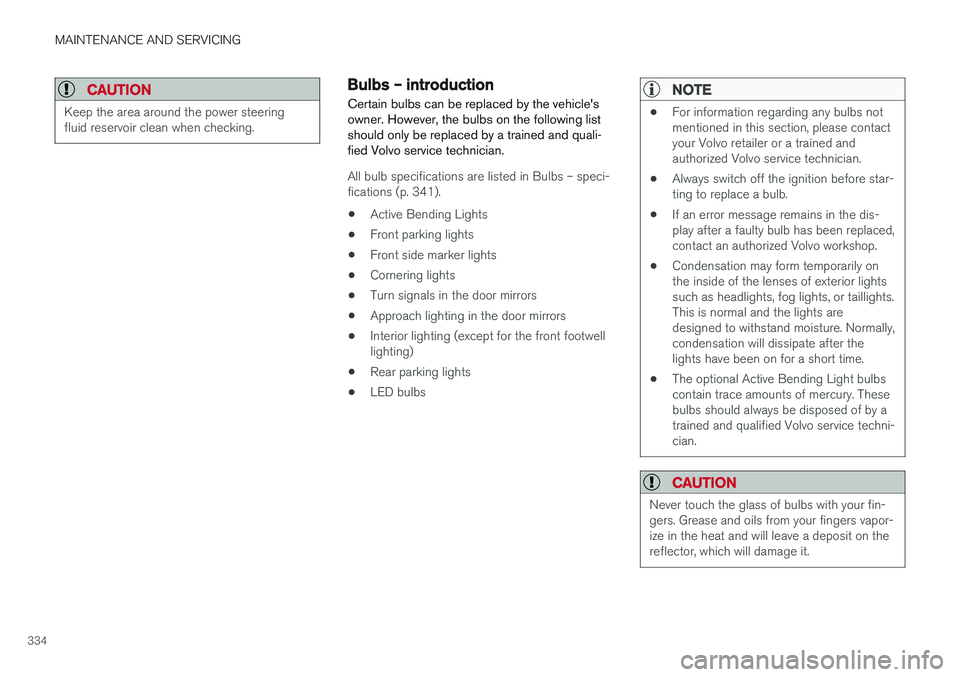
The fluid level must be between the MIN and
MAX marks. For capacities and recommended
fluid grade, see Fuel tank volume – specification and volume (p. 376).
Check the level frequently. It does not normally require changing.
WARNING
If a problem should occur in the power steer- ing system or if the vehicle has no electricalcurrent and must be towed, it is still possibleto steer the vehicle. However, keep in mindthat greater effort will be required to turn thesteering wheel.
Page 336 of 394
MAINTENANCE AND SERVICING
334
CAUTION
Keep the area around the power steering fluid reservoir clean when checking.
Bulbs – introduction
Certain bulbs can be replaced by the vehicle's owner. However, the bulbs on the following listshould only be replaced by a trained and quali-fied Volvo service technician.
All bulb specifications are listed in Bulbs – speci-
fications (p. 341).
• Active Bending Lights
• Front parking lights
• Front side marker lights
• Cornering lights
• Turn signals in the door mirrors
• Approach lighting in the door mirrors
• Interior lighting (except for the front footwelllighting)
• Rear parking lights
• LED bulbs
NOTE
• For information regarding any bulbs not mentioned in this section, please contactyour Volvo retailer or a trained andauthorized Volvo service technician.
• Always switch off the ignition before star-ting to replace a bulb.
• If an error message remains in the dis-play after a faulty bulb has been replaced,contact an authorized Volvo workshop.
• Condensation may form temporarily onthe inside of the lenses of exterior lightssuch as headlights, fog lights, or taillights.This is normal and the lights aredesigned to withstand moisture. Normally,condensation will dissipate after thelights have been on for a short time.
• The optional Active Bending Light bulbscontain trace amounts of mercury. Thesebulbs should always be disposed of by atrained and qualified Volvo service techni-cian.
CAUTION
Never touch the glass of bulbs with your fin- gers. Grease and oils from your fingers vapor-ize in the heat and will leave a deposit on thereflector, which will damage it.
Page 353 of 394
MAINTENANCE AND SERVICING
}}
* Option/accessory.351
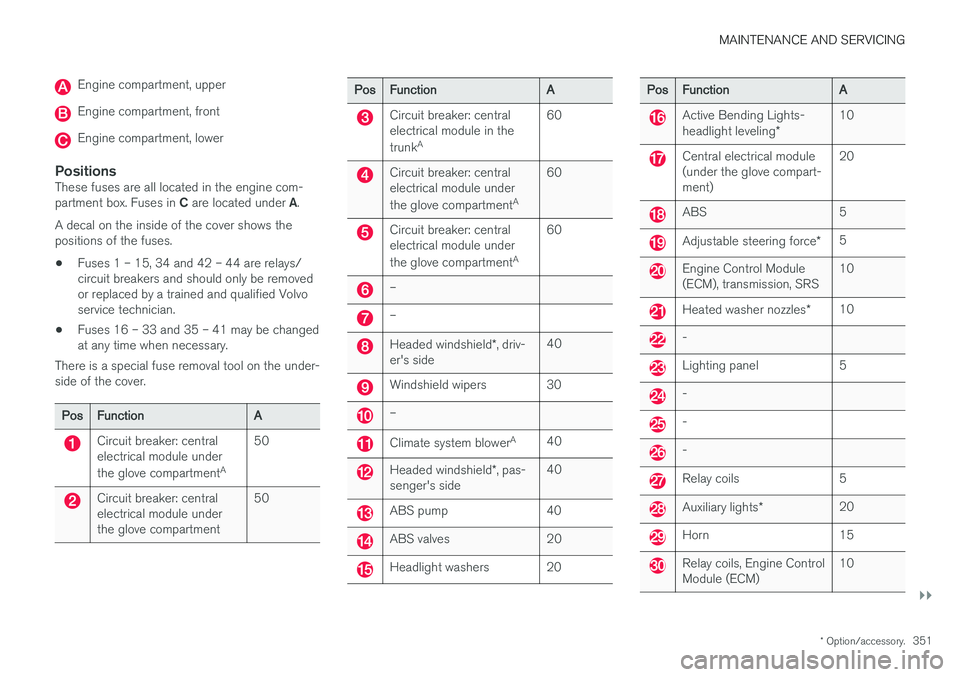
Engine compartment, upper
Engine compartment, front
Engine compartment, lower
PositionsThese fuses are all located in the engine com- partment box. Fuses in C are located under A.
A decal on the inside of the cover shows the positions of the fuses. • Fuses 1 – 15, 34 and 42 – 44 are relays/ circuit breakers and should only be removedor replaced by a trained and qualified Volvoservice technician.
• Fuses 16 – 33 and 35 – 41 may be changedat any time when necessary.
There is a special fuse removal tool on the under-side of the cover.
Pos Function A
Circuit breaker: central electrical module under the glove compartmentA50
Circuit breaker: central electrical module underthe glove compartment 50
Pos
Function A
Circuit breaker: central electrical module in the trunkA 60
Circuit breaker: central electrical module under the glove compartment
A60
Circuit breaker: central electrical module under the glove compartment
A60
–
–
Headed windshield
*, driv-
er's side 40
Windshield wipers 30
–
Climate system blower
A
40
Headed windshield *, pas-
senger's side 40
ABS pump 40
ABS valves 20
Headlight washers 20
Pos
Function A
Active Bending Lights- headlight leveling*10
Central electrical module (under the glove compart-ment) 20
ABS 5
Adjustable steering force
*5
Engine Control Module (ECM), transmission, SRS 10
Heated washer nozzles
*10
-
Lighting panel 5
-
-
-
Relay coils 5
Auxiliary lights
* 20
Horn 15
Relay coils, Engine Control Module (ECM) 10
Page 354 of 394
||
MAINTENANCE AND SERVICING
352
PosFunction A
Control module - auto- matic transmission15
A/C compressor (not 4- cyl. engines)15
Relay-coils A/C, relay coils in engine compartmentcold zone for Start/Stop5
Starter motor relay
A
30
Engine control module (4- cyl. engines) Ignition coils (5 cyl. engines) 20
Engine Control Module (4- cyl. engines)
20
Engine Control Module (5-cyl. engines) 10
4-cyl. engines: mass air meter, thermostat, EVAPvalve10
5-cyl. engines: Injectionsystem, engine controlmodule 15
Pos
Function A
A/C compressor (5-cyl. engines), engine valves, oillevel sensor (5-cyl. only)10
Engine valves/oil pump/center heated oxygensensor (4-cyl. engines) 15
Front/rear heated oxygen sensors (4-cyl. engines),EVAP valve (5-cyl.engines), heated oxygensensors (5-cyl. engines)15
Oil pump/crankcase venti- lation heater/coolantpump (5-cyl. engines)
10
Ignition coils (4-cyl.engines) 15
Fuel leakage detection (5- cyl. engines), control mod-ule for radiator shutter (5-cyl. engines)5
Fuel leakage detection,A/C solenoid (4-cyl.engines) 7.5
Coolant pump (4-cyl. engines)
50
Pos
Function A
Cooling fan 60 or 80
(4-cyl. engines) 60 (5-cyl. engines)
Power steering 100
AThis position is not used on vehicles with the optional Start/ Stop function, refer to the table "Engine compartment coldzone" in Fuses – engine compartment cold zone (Start/Stoponly) (p. 357).
Related information
• Fuses – glove compartment (p. 353)
• Fuses – cargo area/trunk (p. 356)
Page 356 of 394
||
MAINTENANCE AND SERVICING
* Option/accessory.
354
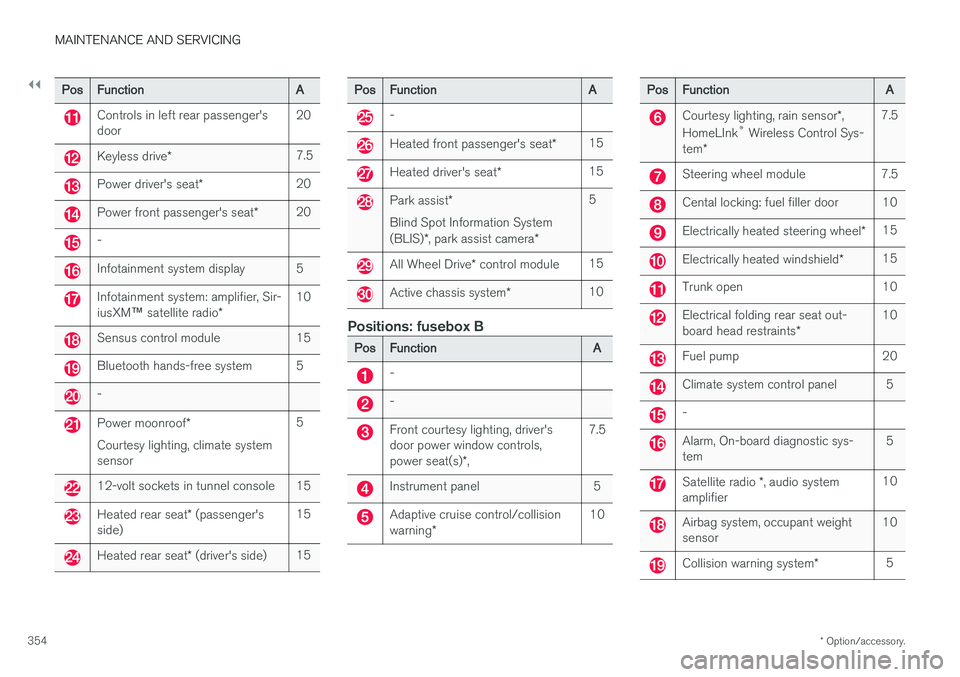
Pos Function A
Controls in left rear passenger's door20
Keyless drive
* 7.5
Power driver's seat
*20
Power front passenger's seat
*20
-
Infotainment system display 5
Infotainment system: amplifier, Sir- iusXM
™ satellite radio * 10
Sensus control module 15
Bluetooth hands-free system 5
-
Power moonroof
*
Courtesy lighting, climate system sensor 5
12-volt sockets in tunnel console 15
Heated rear seat
* (passenger's
side) 15
Heated rear seat
* (driver's side) 15
Pos
Function A
-
Heated front passenger's seat*15
Heated driver's seat
*15
Park assist
*
Blind Spot Information System (BLIS) *, park assist camera *5
All Wheel Drive
* control module 15
Active chassis system
*10
Positions: fusebox B
Pos
Function A
-
-
Front courtesy lighting, driver's door power window controls, power seat(s)*, 7.5
Instrument panel 5
Adaptive cruise control/collision warning
* 10
Pos
Function A
Courtesy lighting, rain sensor*,
HomeLInk ®
Wireless Control Sys-
tem * 7.5
Steering wheel module 7.5
Cental locking: fuel filler door 10
Electrically heated steering wheel
*15
Electrically heated windshield
*15
Trunk open 10
Electrical folding rear seat out- board head restraints
*10
Fuel pump 20
Climate system control panel 5
-
Alarm, On-board diagnostic sys- tem
5
Satellite radio
*, audio system
amplifier 10
Airbag system, occupant weight sensor
10
Collision warning system
*5
Page 364 of 394
||
MAINTENANCE AND SERVICING
362
Leather care
Volvo's leather upholstery is manufactured with a protectant to repel soiling. Over time, sunlight,grease and dirt can break down the protection.Staining, cracking, scuffing, and fading can result. Volvo offers an easy-to-use, non-greasy leather care kit formulated to clean and beautify yourvehicle's leather, and to renew the protectivequalities of its finish. The cleaner removes dirtand oil buildup. The light cream protectantrestores a barrier against soil and sunlight. Volvo also offers a special leather softener that should be applied after the cleaner and protec-tant. It leaves leather soft and smooth, andreduces friction between leather and other fin-ishes in the vehicle. Volvo recommends cleaning, protecting and con- ditioning your vehicle's leather two to four times ayear. Ask your Volvo retailer about Leather CareKit 951 0251 and Leather Softener 943 7429.
Cleaning leather upholstery
1. Pour leather cleaner on a damp sponge andsqueeze it until the cleaner foams.
2. Apply the foam to the stain by moving the sponge with circular movements.
3. Dampen the stain thoroughly with the sponge. Let the sponge absorb the stain, do not rub.
4. Dry the stain with soft paper towels or a towel, and allow the leather to dry completely.
Protecting leather upholstery
1. Put a small amount of protectant cream on acloth and apply a thin coating of cream to the upholstery with light circular movements.
2. Allow the leather to dry for 20 minutes. This will help the leather resist staining and pro- tect against sunlight's harmful UV rays.
CAUTION
• Under no circumstances should gasoline, naphtha or similar cleaning agents beused on the plastic or the leather sincethese can cause damage.
• Take extra care when removing stainssuch as ink or lipstick since the coloringcan spread.
• Use solvents sparingly. Too much solventcan damage the seat padding.
• Start from the outside of the stain andwork toward the center.
• Sharp objects (e.g. pencils or pens in apocket) or Velcro fasteners on clothingmay damage the textile upholstery.
• Clothing that is not colorfast, such asnew jeans or suede garments, may stainthe upholstery.
Cleaning a leather-covered steering wheel
• Remove soil, dust, etc., with a damp sponge and a neutral soap solution.
• Leather should be allowed to breath. Nevercover the steering wheel with a plastic pro-tector.
• Volvo recommends cleaning, protecting andconditioning the steering wheel with Volvo'sLeather Care Kit 951 0251 and LeatherSoftener 943 7429.
If there are stains on the steering wheel: Type 1 (ink, wine, coffee, milk, sweat or blood)
–Use a soft cloth or sponge. Wipe the wheel with a solution with 5% ammonia. For bloodstains, mix approx. 1 cup (2 dl) of water andone ounce (25g) of salt and wipe the stain.
Type 2 (fat, oil, sauces, or chocolate)
1. Same procedure as for type I stains.
2. Finish by rubbing the wheel with absorbent paper or a towel.
Type 3 (dry soil or dust)
1. Remove the soil/dust with a soft brush.
2. Same procedure as for type I stains.
CAUTION
Sharp objects, such as rings, could damage the leather on the steering wheel.