start stop button VOLVO S60 CROSS COUNTRY 2018 Owner´s Manual
[x] Cancel search | Manufacturer: VOLVO, Model Year: 2018, Model line: S60 CROSS COUNTRY, Model: VOLVO S60 CROSS COUNTRY 2018Pages: 394, PDF Size: 9.41 MB
Page 64 of 394

||
INSTRUMENTS AND CONTROLS
* Option/accessory.
62
Function See
Controls for menus and messages, turn signals,high/low beams, tripcomputer(p. 71),(p. 90),(p. 83),(p. 110)
Paddles for manually shifting gears
*(p. 257)
Cruise control (p. 172)
Horn, airbag (p. 82),
(p. 33)
Main instrument panel (p. 63)
Infotainment system/ Bluetooth hands-freecontrolsSensus Info-tainment sup-plement
START/STOP ENGINE button
(p. 73)
Ignition slot (p. 73)
Display for infotainment system functions andmenus(p. 108), Sen-sus Infotain-ment supple-ment
Door handle -
Function
See
In-door control panels (power windows, mir-rors, central locking but-ton)(p. 96),(p. 97),(p. 158)
Hazard warning flashers (p. 89)
Controls for the info- tainment system andmenus
(p. 71),(p. 125), Sen-sus Infotain-ment supple-ment
Climate system controls (p. 125)
Gear selector (p. 255)
Not in use -
Wipers and washers (p. 93),
(p. 94)
Steering wheel adjust- ment(p. 82)
Hood opening control (p. 327)
Parking brake (p. 271)
Function
See
Power seat* adjustment
controls (p. 76)
Lighting panel, buttons for opening fuel fillerdoor and unlocking andopening the trunk(p. 83),(p. 280),(p. 160)
Related information
•
Information displays – ambient temperature sensor (p. 72)
• Information displays – trip odometer andclock (p. 73)
Page 70 of 394
||
INSTRUMENTS AND CONTROLS
* Option/accessory.
68
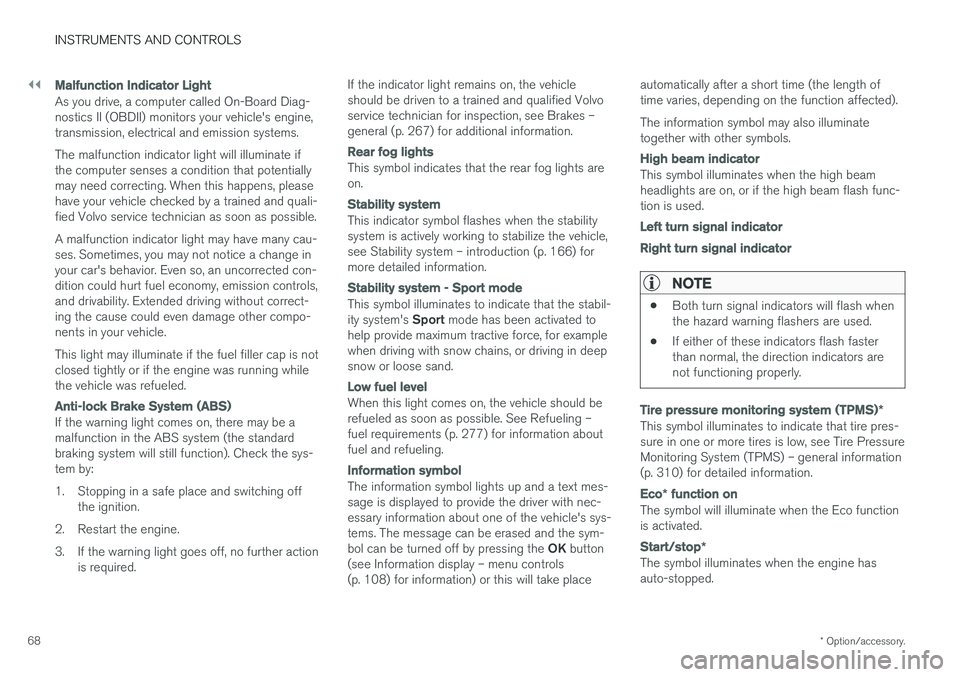
Malfunction Indicator Light
As you drive, a computer called On-Board Diag- nostics II (OBDII) monitors your vehicle's engine,transmission, electrical and emission systems. The malfunction indicator light will illuminate if the computer senses a condition that potentiallymay need correcting. When this happens, pleasehave your vehicle checked by a trained and quali-fied Volvo service technician as soon as possible. A malfunction indicator light may have many cau- ses. Sometimes, you may not notice a change inyour car's behavior. Even so, an uncorrected con-dition could hurt fuel economy, emission controls,and drivability. Extended driving without correct-ing the cause could even damage other compo-nents in your vehicle. This light may illuminate if the fuel filler cap is not closed tightly or if the engine was running whilethe vehicle was refueled.
Anti-lock Brake System (ABS)
If the warning light comes on, there may be a malfunction in the ABS system (the standardbraking system will still function). Check the sys-tem by:
1. Stopping in a safe place and switching off
the ignition.
2. Restart the engine.
3. If the warning light goes off, no further action is required. If the indicator light remains on, the vehicle should be driven to a trained and qualified Volvoservice technician for inspection, see Brakes –general (p. 267) for additional information.
Rear fog lights
This symbol indicates that the rear fog lights are on.
Stability system
This indicator symbol flashes when the stability system is actively working to stabilize the vehicle,see Stability system – introduction (p. 166) formore detailed information.
Stability system - Sport mode
This symbol illuminates to indicate that the stabil- ity system's
Sport mode has been activated to
help provide maximum tractive force, for example when driving with snow chains, or driving in deepsnow or loose sand.
Low fuel level
When this light comes on, the vehicle should be refueled as soon as possible. See Refueling –fuel requirements (p. 277) for information aboutfuel and refueling.
Information symbol
The information symbol lights up and a text mes- sage is displayed to provide the driver with nec-essary information about one of the vehicle's sys-tems. The message can be erased and the sym- bol can be turned off by pressing the OK button
(see Information display – menu controls (p. 108) for information) or this will take place automatically after a short time (the length oftime varies, depending on the function affected). The information symbol may also illuminate together with other symbols.
High beam indicator
This symbol illuminates when the high beam headlights are on, or if the high beam flash func-tion is used.
Left turn signal indicator Right turn signal indicator
NOTE
•
Both turn signal indicators will flash when the hazard warning flashers are used.
• If either of these indicators flash fasterthan normal, the direction indicators arenot functioning properly.
Tire pressure monitoring system (TPMS)
*
This symbol illuminates to indicate that tire pres- sure in one or more tires is low, see Tire PressureMonitoring System (TPMS) – general information(p. 310) for detailed information.
Eco* function on
The symbol will illuminate when the Eco function is activated.
Start/stop *
The symbol illuminates when the engine has auto-stopped.
Page 72 of 394

||
INSTRUMENTS AND CONTROLS
70
Engine temperature
Engine overheating can result from low oil or coolant levels, towing or hard driving at high heatand altitude, or mechanical malfunction. Engineoverheating will be signaled with text and a redwarning triangle in the middle of the instrumentdisplay. The exact text will depend on the degree of overheating. It may range from
High engine
temp Reduce speed to High engine temp
Stop engine. If appropriate, other messages,
such as Coolant level low, Stop safely will
also be displayed. If your engine does overheat so that you must stop the engine, always allowthe engine to cool before attempting to check oiland coolant levels. See Engine compartment – coolant (p. 332) for more information.
Fault in brake system
If this symbol lights, the brake fluid level may be too low. Stop the vehicle in a safe place andcheck the level in the brake fluid reservoir, seeEngine compartment – brake fluid (p. 333). If the level in the reservoir is below MIN, the vehicle
should be transported to an authorized Volvo workshop to have the brake system checked. If the
and symbols come on at
the same time, there may be a fault in the brake force distribution system. 1. Stop the vehicle in a safe place and turn off
the engine.
2. Restart the engine.
• If both symbols extinguish, continue driving.
• If the symbols remain on, check the level inthe brake fluid reservoir, see Engine com-partment – brake fluid (p. 333). If the brakefluid level is normal but the symbols are stilllit, the vehicle can be driven, with great care,to an authorized Volvo workshop to have thebrake system checked.
• If the level in the reservoir is below
MIN, the
vehicle should be transported to an author-ized Volvo workshop to have the brake sys-tem checked.
WARNING
• If the fluid level is below the
MIN mark in
the reservoir or if a warning message is displayed in the text window: DO NOT
DRIVE . Have the vehicle towed to a
trained and qualified Volvo service techni- cian and have the brake system inspec-ted.
• If the
and symbols are
on at the same time, there is a risk of reduced vehicle stability.
Warning symbol
The red warning symbol lights up to indicate a problem related to safety and/or drivability. Amessage will also appear in the instrument panel.The symbol remains visible until the fault hasbeen rectified but the text message can be cleared with the OK button, see Information dis-
play – menu controls (p. 108). The warning sym- bol can also come on in conjunction with othersymbols. Action:
1. Stop in a safe place. Do not drive the vehicle further.
2. Read the information on the display. Imple- ment the action in accordance with the mes- sage in the display. Clear the message using OK.
Page 75 of 394

INSTRUMENTS AND CONTROLS
}}
* Option/accessory.73
Information displays – trip odometer and clock The trip odometers
T1 and T2 and clock are dis-
played in the instrument panel.
Trip odometers
Trip odometer 4
Odometer display
Turn the thumb wheel on the left steering wheel lever to display the desired trip odometer. Press and hold the RESET button on the left
steering wheel lever for at least 1 second to reset the selected trip odometer 5
.
Clock
Clock, digital instrument panel *
Display6
Setting the clock
The clock can be set in the
MY CAR menu sys-
tem. See My Car – introduction (p. 71) for addi- tional information about these menus. Go to
SettingsSystem optionsTime
settings. Set Auto time to ON (check the box)
and select the correct time zone under Location.
Related information
• Information displays – introduction (p. 63)
Inserting/removing remote key The remote key is used to start the engine or to use various electrical functions without startingthe engine.
Inserting and removing the remote key
Ignition slot with remote key and
START/STOP
ENGINE button.
Inserting the remote key 7Holding the end of the remote key with the base of the key blade, insert the remote key into theignition slot as shown in the illustration and pressit in as far as possible.
4
The trip odometer will be displayed differently in analog and digital instrument panels
5 Models with a digital information panel: press and hold RESET for more than approximately 4 seconds to reset all trip computer information
6 Models with an analog instrument panel: the time will be displayed in the center of the instrument panel
7
Not necessary in vehicles with the optional keyless drive.
Page 77 of 394

INSTRUMENTS AND CONTROLS
* Option/accessory.75
Ignition mode I
–With the remote key fully pressed into the ignition slot8
, press START/STOP ENGINE
briefly.
Ignition mode II
–With the remote key fully pressed into the ignition slot 8
, press START/STOP ENGINE
for approximately 2 seconds.
Returning to mode 0
To return to mode 0 from mode II or I, press
START/STOP ENGINE briefly.
Starting and stopping the engineSee Starting the engine (p. 250) and Switching off the engine (p. 252) for information on star-ting the engine and switching it off.
Emergency towingSee Towing the vehicle (p. 286) for importantinformation about the remote key when the vehi-cle is being towed.
Related information
•Inserting/removing remote key (p. 73)
Front seats
The front seats can be adjusted in a number of ways to help provide the most comfortable seat-ing position.
Raise/lower the seat, pump up/down.
Front-rear adjustment: lift the bar and move the seat to the position of your choice.
Raise/lower front edge of seat cushion, pump up/down.
Backrest tilt: turn the control to adjust the angle of the backrest.
Electronic lumbar support *. Press the button
to adjust.
Control panel for power seat *, see Front
seats – power seat (p. 76).
WARNING
• Do not adjust the seat while driving. The seat should be adjusted so that the brakepedal can be depressed fully. In addition,position the seat as far rearward as com-fort and control allow.
• Check that the seat is securely lockedinto position after adjusting.
Related information
• Front seats – power seat (p. 76)
• Rear seats – folding backrest (p. 81)
• Rear seats – head restraints (p. 79)
8
Not necessary in vehicles with the optional keyless drive.
Page 166 of 394
LOCKS AND ALARM
164
Alarm – turning off
The alarm system provides a warning if an attempt is made to break into the vehicle.
If the alarm is sounding, it can be stopped by pressing the Unlock button on the remote key orby inserting the remote key in the ignition slot.Two short flashes from the car's turn signals con-firm that the alarm has been turned off.
Related information
• Alarm indicator (p. 162)
• Alarm – arming/disarming (p. 163)
• Remote key – replacing the battery (p. 151)
Alarm-related functions
The following is general information regarding the alarm system in your vehicle.
Automatic re-armingIf the doors are unlocked, the locks will automati- cally re-engage (re-lock) and the alarm will re-arm after 2 minutes unless a door or the trunkhas been opened.
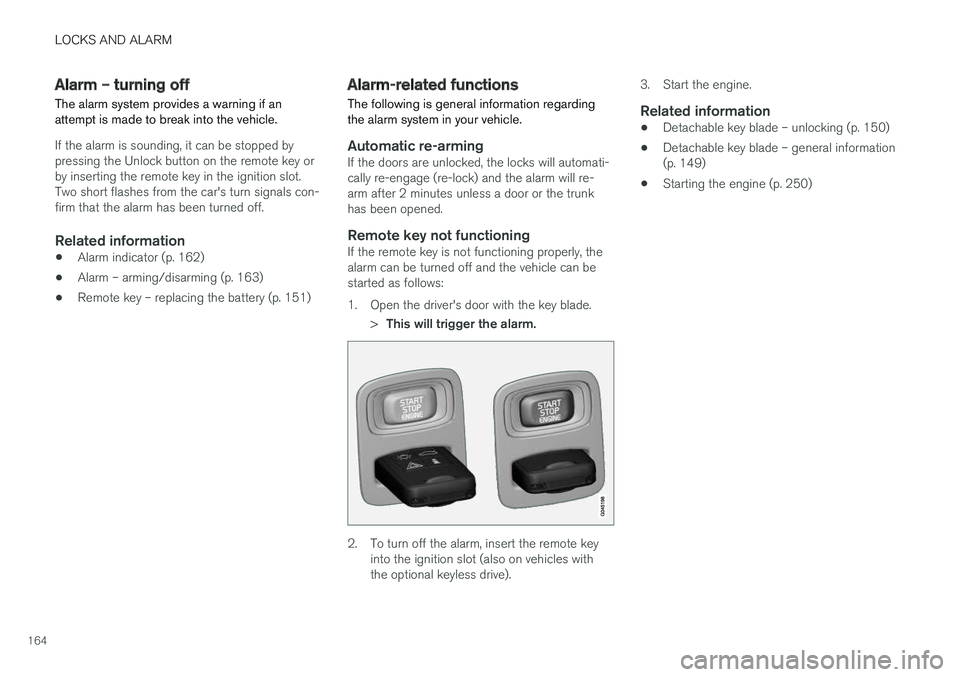
Remote key not functioningIf the remote key is not functioning properly, thealarm can be turned off and the vehicle can bestarted as follows:
1. Open the driver's door with the key blade.
>This will trigger the alarm.
2. To turn off the alarm, insert the remote key
into the ignition slot (also on vehicles with the optional keyless drive). 3. Start the engine.
Related information
•
Detachable key blade – unlocking (p. 150)
• Detachable key blade – general information(p. 149)
• Starting the engine (p. 250)
Page 170 of 394
DRIVER SUPPORT
168
Stability system – symbols and messages
Symbols and messages in the maininstrument panel
A text message can be erased by pressing briefly the OK button on the turn signal lever.
Symbol Message Description
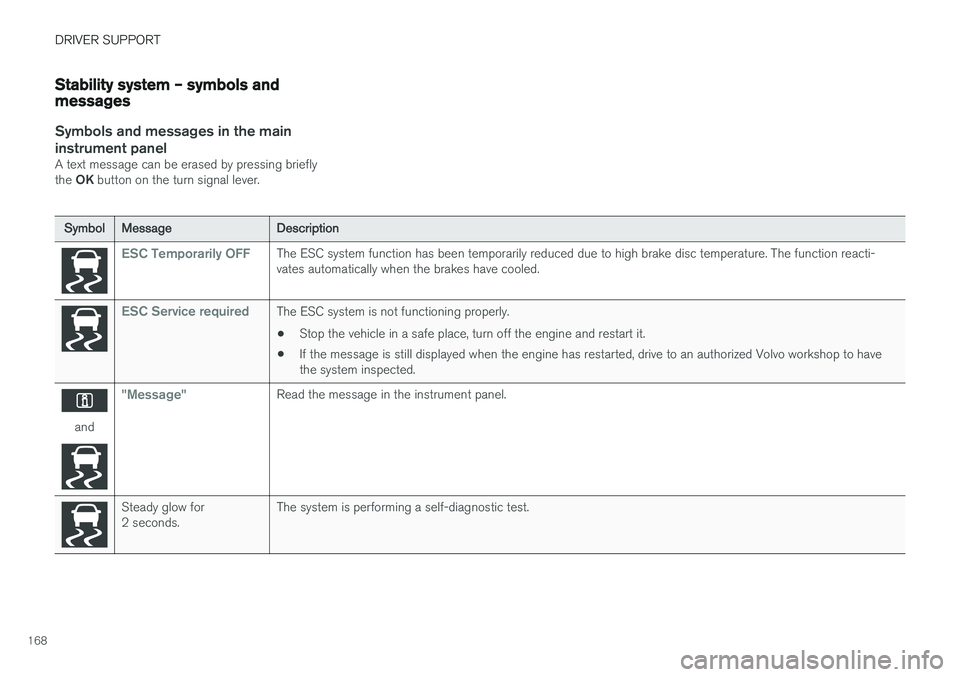
ESC Temporarily OFFThe ESC system function has been temporarily reduced due to high brake disc temperature. The function reacti- vates automatically when the brakes have cooled.
ESC Service requiredThe ESC system is not functioning properly.
• Stop the vehicle in a safe place, turn off the engine and restart it.
• If the message is still displayed when the engine has restarted, drive to an authorized Volvo workshop to have the system inspected.
and
"Message"Read the message in the instrument panel.
Steady glow for 2 seconds. The system is performing a self-diagnostic test.
Page 237 of 394
DRIVER SUPPORT
}}
* Option/accessory.235
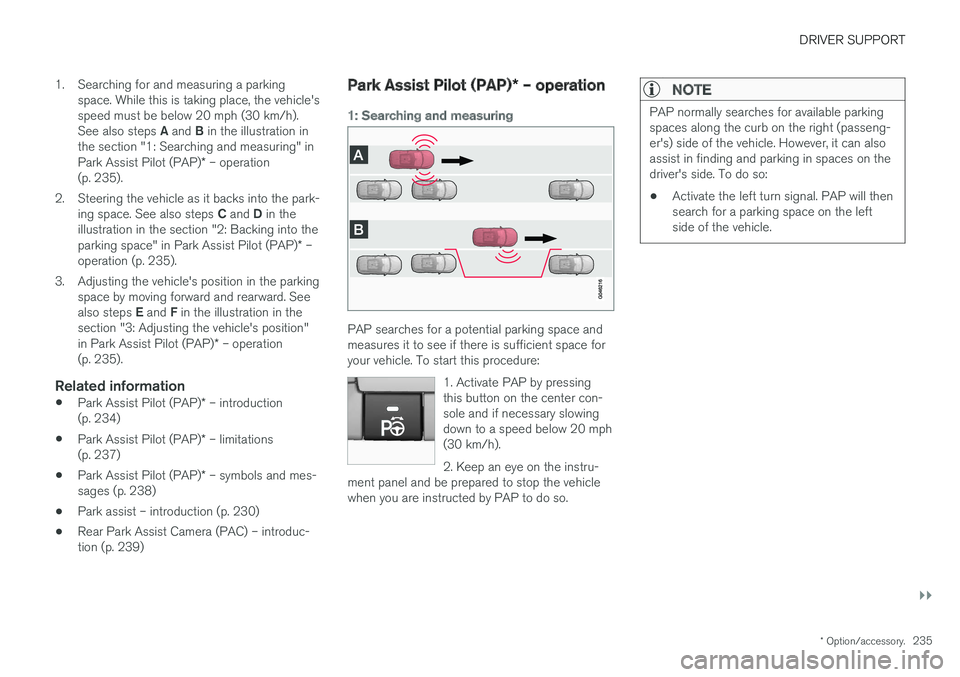
1. Searching for and measuring a parking
space. While this is taking place, the vehicle's speed must be below 20 mph (30 km/h). See also steps A and B in the illustration in
the section "1: Searching and measuring" in Park Assist Pilot (PAP) * – operation
(p. 235).
2. Steering the vehicle as it backs into the park- ing space. See also steps C and D in the
illustration in the section "2: Backing into theparking space" in Park Assist Pilot (PAP) * –
operation (p. 235).
3. Adjusting the vehicle's position in the parking space by moving forward and rearward. See also steps E and F in the illustration in the
section "3: Adjusting the vehicle's position" in Park Assist Pilot (PAP) * – operation
(p. 235).
Related information
• Park Assist Pilot (PAP)
* – introduction
(p. 234)
• Park Assist Pilot (PAP)
* – limitations
(p. 237)
• Park Assist Pilot (PAP)
* – symbols and mes-
sages (p. 238)
• Park assist – introduction (p. 230)
• Rear Park Assist Camera (PAC) – introduc- tion (p. 239)
Park Assist Pilot (PAP)
* – operation
1: Searching and measuring
PAP searches for a potential parking space and measures it to see if there is sufficient space foryour vehicle. To start this procedure:
1. Activate PAP by pressingthis button on the center con-sole and if necessary slowingdown to a speed below 20 mph(30 km/h). 2. Keep an eye on the instru-
ment panel and be prepared to stop the vehicle when you are instructed by PAP to do so.
NOTE
PAP normally searches for available parking spaces along the curb on the right (passeng-er's) side of the vehicle. However, it can alsoassist in finding and parking in spaces on thedriver's side. To do so:
• Activate the left turn signal. PAP will thensearch for a parking space on the leftside of the vehicle.
Page 252 of 394
STARTING AND DRIVING
* Option/accessory.
250
Starting the engine
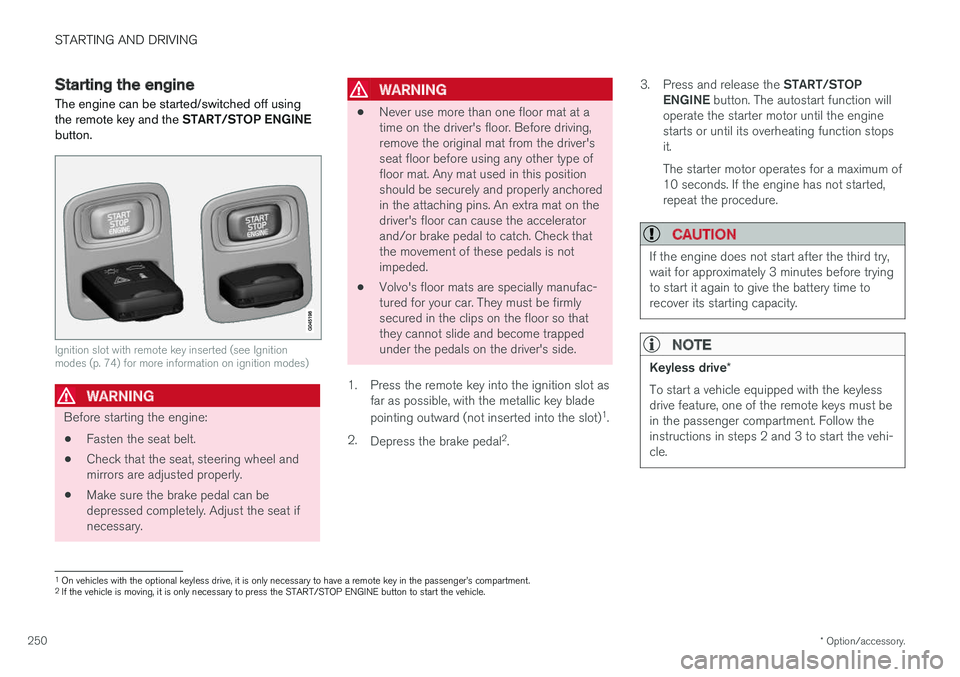
The engine can be started/switched off using the remote key and the START/STOP ENGINE
button.
Ignition slot with remote key inserted (see Ignition modes (p. 74) for more information on ignition modes)
WARNING
Before starting the engine:
• Fasten the seat belt.
• Check that the seat, steering wheel and mirrors are adjusted properly.
• Make sure the brake pedal can bedepressed completely. Adjust the seat ifnecessary.
WARNING
•Never use more than one floor mat at a time on the driver's floor. Before driving,remove the original mat from the driver'sseat floor before using any other type offloor mat. Any mat used in this positionshould be securely and properly anchoredin the attaching pins. An extra mat on thedriver's floor can cause the acceleratorand/or brake pedal to catch. Check thatthe movement of these pedals is notimpeded.
• Volvo's floor mats are specially manufac-tured for your car. They must be firmlysecured in the clips on the floor so thatthey cannot slide and become trappedunder the pedals on the driver's side.
1. Press the remote key into the ignition slot as far as possible, with the metallic key blade pointing outward (not inserted into the slot) 1
.
2. Depress the brake pedal 2
. 3.
Press and release the START/STOP
ENGINE button. The autostart function will
operate the starter motor until the engine starts or until its overheating function stopsit. The starter motor operates for a maximum of 10 seconds. If the engine has not started,repeat the procedure.
CAUTION
If the engine does not start after the third try, wait for approximately 3 minutes before tryingto start it again to give the battery time torecover its starting capacity.
NOTE
Keyless drive *
To start a vehicle equipped with the keyless drive feature, one of the remote keys must bein the passenger compartment. Follow theinstructions in steps 2 and 3 to start the vehi-cle.
1 On vehicles with the optional keyless drive, it is only necessary to have a remote key in the passenger
Page 254 of 394
STARTING AND DRIVING
* Option/accessory.
252
Switching off the engine Switch off the engine by pressing the START/
STOP ENGINE button.
If the gear selector is not in the P position or if
the vehicle is moving, press the START/STOP
ENGINE button twice or press and hold it in until
the engine switches off.
Related information
• Ignition modes (p. 74)
Engine Remote Start (ERS)
* –
introduction
ERS is a feature that makes it possible to remotely start the engine using the remote key tocool or heat the passenger compartment beforedriving.
The climate system will start using automatic set- tings. When the engine is started using ERS, it will run for a maximum of 15 minutes before automati-cally switching off again. After 2 ERS starts, theengine must be started in the normal way beforeERS can be used again.
NOTE
• Always adhere to applicable State, Prov- ince and/or Local laws regarding engineidling when using ERS.
• The service life of the remote key's bat-tery is affected by ERS use. If this featureis used frequently, the battery should bereplaced once a year, see Remote key –replacing the battery (p. 151).
WARNING
Keep the following in mind before using ERS:
• The vehicle should be in view.
• The vehicle should be unoccupied.
• The vehicle must not be parked indoors or in an enclosed area. Exhaust fumes areharmful to the health.
Related information
•
Engine Remote Start (ERS)
* – starting the
engine (p. 253)
• Engine Remote Start (ERS)
* – switching off
the engine (p. 253)