check engine light VOLVO S60 INSCRIPTION 2016 Owner´s Manual
[x] Cancel search | Manufacturer: VOLVO, Model Year: 2016, Model line: S60 INSCRIPTION, Model: VOLVO S60 INSCRIPTION 2016Pages: 344, PDF Size: 7.24 MB
Page 241 of 344
08 Starting and driving
08
239
Refueling – fuel requirements
Volvo recommends the use of detergent gas- oline to control engine deposits.
Deposit control gasoline (detergentadditives)
Detergent gasoline is effective in keepinginjectors and intake valves clean. Consistentuse of deposit control gasolines will helpensure good drivability and fuel economy. Ifyou are not sure whether the gasoline con-tains deposit control additives, check with theservice station operator.
NOTE
Volvo does not recommend the use of external fuel injector cleaning systems.
Unleaded fuelEach Volvo has a three-way catalytic con- verter and must use only unleaded gasoline.U.S. and Canadian regulations require thatpumps delivering unleaded gasoline belabeled "UNLEADED". Only these pumpshave nozzles which fit your vehicle's fillerinlet. It is unlawful to dispense leaded fuelinto a vehicle labeled "unleaded gasolineonly". Leaded gasoline damages the three-way catalytic converter and the heated oxy-gen sensor system. Repeated use of leadedgasoline will lessen the effectiveness of theemission control system (p. 242) and could result in loss of emission warranty coverage.State and local vehicle inspection programswill make detection of misfueling easier, pos-sibly resulting in emission test failure for mis-fueled vehicles.
NOTE
Some U.S. and Canadian gasolines con- tain an octane enhancing additive calledmethyl-cyclopentadienyl manganese tri-carbonyl (MMT). If such fuels are used,your Emission Control System perform-ance may be affected, and the CheckEngine Light (malfunction indicator light)located on your instrument panel maylight. If this occurs, please return yourvehicle to a trained and qualified Volvoservice technician for service.
Gasoline containing alcohol and ethers, "Oxygenated fuels"
Some fuel suppliers sell gasoline containing "oxygenates" which are usually alcohols orethers. In some areas, state or local lawsrequire that the service pump be marked indi-cating use of alcohols or ethers. However,there are areas in which the pumps areunmarked. If you are not sure whether there isalcohol or ethers in the gasoline you buy,check with the service station operator. Tomeet seasonal air quality standards, someareas require the use of "oxygenated" fuel.
Volvo allows the use of the following "oxy-genated" fuels; however, the octane rat-ings (p. 240) listed must still be met.
Alcohol – EthanolFuels containing up to 10% ethanol by vol- ume may be used. Ethanol may also be refer-red to as Ethyl alcohol, or "Gasohol". Ethers – MTBE: Fuels containing up to 15% MTBE may be used.
MethanolDo not use gasolines containing methanol(methyl alcohol, wood alcohol). This practicecan result in vehicle performance deteriora-tion and can damage critical parts in the fuelsystem. Such damage may not be coveredunder the New Vehicle Limited Warranty.
Page 244 of 344
08 Starting and driving
08
242
Refueling – opening/closing fuel cap
If necessary, the fuel filler door can be opened manually.
Opening/closing the fuel capFuel vapor expands in hot weather. Open thefiller cap slowly. After refueling, close the fuel filler cap by turning it clockwise until it clicks into place.
CAUTION
•Do not refuel with the engine run- ning 13
. Turn the ignition off or to posi-
tion I. If the ignition is on, an incorrect
reading could occur in the fuel gauge.
• Avoid overfilling the fuel tank. Do not press the handle on the filler nozzlemore than one extra time. Too muchfuel in the tank in hot weather condi-tions can cause the fuel to overflow.Overfilling could also cause damage tothe emission control systems.
Related information
•
Refueling – fuel requirements (p. 239)
• Refueling – octane rating (p. 240)
Emission controls
Three-way catalytic converter
•Keep your engine properly tuned. Certain engine malfunctions, particularly involvingthe electrical, fuel or distributor ignitionsystems, may cause unusually high three-way catalytic converter temperatures. Donot continue to operate your vehicle ifyou detect engine misfire, noticeable lossof power or other unusual operating con-ditions, such as engine overheating orbackfiring. A properly tuned engine willhelp avoid malfunctions that could dam-age the three-way catalytic converter.
• Do not park your vehicle over combusti-ble materials, such as grass or leaves,which can come into contact with the hotexhaust system and cause such materialsto ignite under certain wind and weatherconditions.
• Excessive starter cranking (in excess ofone minute), or an intermittently firing orflooded engine can cause three-way cat-alytic converter or exhaust system over-heating.
• Remember that tampering or unauthor-ized modifications to the engine, theEngine Control Module, or the vehiclemay be illegal and can cause three-waycatalytic converter or exhaust systemoverheating. This includes: altering fuel injection settings or components, alteringemission system components or locationor removing components, and/or repea-ted use of leaded fuel.
NOTE
Unleaded fuel is required for vehicles with three-way catalytic converters.
Heated oxygen sensorsThe heated oxygen sensors monitor the oxy- gen content of the exhaust gases. Readingsare fed into a control module that continu-ously monitors engine functions and controlsfuel injection. The ratio of fuel to air into theengine is continuously adjusted for efficientcombustion to help reduce harmful emis-sions.
Related information
•
Information displays – warning symbols (p. 64)
• Engine and cooling system (p. 237)
13
If the fuel filler cap is not closed tightly or if the engine is running when the vehicle is refueled, the Check Engine Light (malfunction indicator lamp) may indicate a fault. However, your vehicle's performance will not be affected. Use only Volvo original or approved fuel filler caps.
Page 247 of 344
08 Starting and driving
08
}}
245
Trailer Stability Assist (TSA)
Trailer Stability Assist is a system designed to help stabilize a vehicle that is towing a trailerwhen the vehicle and trailer have begun tosway and is part of the stability system. Forinformation on the stability system, see Stabil-ity system – introduction (p. 141)
FunctionA vehicle towing a trailer may begin to swayfor various reasons. Normally this only occursat high speeds but, for example, if the traileris overloaded or if the load is unevenly dis-tributed in the trailer, there is risk of swayingat speeds between approximately 45-55 mph(70-90 km/h). Swaying may be caused by factors such as: •The vehicle and trailer are hit by a sud- den, strong crosswind
• The vehicle and trailer are traveling on anuneven road surface or drive over a bump
• Sudden movements of the steering wheel
Facts about TSA
• TSA intervenes at speeds above approxi-mately 40 mph (60 km/h)
• The stability system symbol in the instru-ment panel will flash when TSA is working
• If the driver switches off the stability sys-tem's Spin Control function, TSA will alsobe switched off (but will be on again thenext time the engine is started) •
TSA may not intervene when the vehicleand trailer begin to sway if the driver triesto compensate for the swaying motion bymoving the steering wheel rapidly
How TSA worksOnce swaying has begun, it can be very diffi- cult to stop, which makes it difficult to controlthe vehicle and trailer. The TSA system continuously monitors the vehicle's movements, particularly lateralmovement. If the system detects a tendencyto sway, the brakes are applied individuallyon the front wheels, which has a stabilizingeffect on the vehicle and trailer. This is oftenenough to enable the driver to regain controlof the vehicle. If this is not adequate to stop the swaying motion, the brakes are applied to all of thewheels on the vehicle and on the trailer if it isequipped with brakes, and engine power istemporarily reduced. As the swaying motionbegins to decrease and the vehicle-trailerhave once again become stable, TSA will nowstop regulating the brakes/engine power andthe driver regains control of the vehicle.
Related information
•Towing a trailer (p. 243)
• Loading – general (p. 120)
Towing the vehicle
Always check with state and local authorities before attempting to tow another vehiclebecause this type of towing is subject to reg-ulations regarding maximum towing speed,length and type of towing device, lighting, etc.
Page 248 of 344
||
08 Starting and driving
08
246
1. With the remote key fully pressed into theignition slot 14
, press START/STOP
ENGINE for approximately 2 seconds to
activate ignition mode II.
2. The remote key must remain in the igni- tion slot 15
for the entire time that the vehi-
cle is being towed.
3. Keep the tow rope taut when the towing vehicle slows down by applying light pressure on the brake pedal. This willhelp prevent jarring movements of thevehicle being towed.
4. Be prepared to apply the brakes to stop the vehicle being towed.CAUTION
General towing precautions:
• Please check with state and local authorities before attempting this typeof towing, as vehicles being towed aresubject to regulations regarding maxi-mum towing speed, length and type oftowing device, lighting, etc.
• If the vehicle's battery is dead, seeJump starting (p. 215) to provide cur-rent for releasing the electric parkingbrake and to move the gear selectorfrom the
P position to N. If this is not
possible, see Transmission – shiftlockoverride (p. 220) for information aboutmanually overriding the shiftlock sys-tem to move the gear selector from P
to N.
• Maximum speed: 50 mph (80 km/h).Do not exceed the maximum allowabletowing speed.
• Maximum distance with front wheelson ground: 50 miles (80 km).
• The vehicle should only be towed inthe forward direction.
Related information
•
Towing eyelet (p. 246)
• Remote key – functions (p. 127)
Towing eyelet
When used, the towing eyelet should always be securing attached.
Attaching the towing eyelet
There are two different types of covers over the openings for the towing eyeletand they have to be opened differently.
• If the cover has a notch, insert a coin, etc., into the notch and pry open theedge of the cover. Open the covercompletely and remove it.
• If the cover has a mark along one edgeor in a corner, press the mark whileprying out the opposite side/cornerusing a coin, etc. Open the cover andremove it.
Screw the towing eyelet in place, first by hand and then using the tire iron until it issecurely in place. After the vehicle has been towed, the eyelet should be removed and returned to its stor-age location. Press the cover for the attachment point back into position.
14 Not necessary in vehicles with the optional keyless drive.
15 For vehicles with the optional keyless drive, the remote key must be in the vehicle.
Page 272 of 344
09 Wheels and tires
09
270
Tire Monitor - introduction
Tire Monitor uses the rotational speed of the tires in combination with signal analysis of theABS sensor signals to determine if they areproperly inflated. When a tire is under-inflated, its diameter (and consequently also its rotational speed)changes. By comparing the individual tireswith each other it is possible to determine ifone or more tires are under inflated. When low inflation pressure is detected or if the system is not functioning properly, TireMonitor will light up the tire pressure warning light (
) (also referred to as a telltale) in
the instrument panel and will display one of the following messages in the text window, for example:
Tire pressure low Check rear
right tire4 or Tire press. syst Service
required.
If two or more tires have low pressure or if the system cannot determine which tire has low pressure, a general text (
Tire pressure low
Check tires) will be displayed.
NOTE
If a malfunction occurs in the system, the tire pressure warning light will flash forapproximately 1 minute and then remain illuminated.
Tire press. syst Service
required will be displayed.
NOTE
The system indicates low tire pressure but does not replace normal tire maintenance.For information on correct tire pressure,please refer to the tire inflation pressuretable (see Tire inflation – pressure table(p. 260)), the tire inflation pressure placardlocated on the driver's side B-pillar (thestructural member at the side of the vehi-cle, at the rear of the driver's door open-ing) or consult your Volvo retailer.
Related information
• Tire pressure monitoring - introduction (p. 265)
Calibrating Tire Monitor
In order for Tire Monitor to work correctly, tire pressure reference values must be set. Thismust be done each time wheels or tire pres-sures are changed.
Calibration1. Switch off the engine.
2. Inflate the tires to the desired pressure
(consult tire pressure placard located on the driver's side B-pillar (the structuralmember at the side of the vehicle) andput the ignition in mode II, see Ignition
modes (p. 69).
3. Press the MY CAR button on the center
console control panel and select
Settings
Car settingsTire monitoring.
4. Press OK/MENU , select
Calibrate tire
pressure and press OK/MENU again.
5. Drive away. > The calibration process will be comple-ted while driving and will be interrupted if the vehicle is parked and the engineis switched off. Calibration continuesautomatically when driving resumes.The system will not give any confirma-tion when calibration is finishedalthough it will state if calibration fails.
4That last part of this message varies, depending on the tire(s) effected.
Page 284 of 344
10 Maintenance and servicing
10
282
Maintenance – owner maintenance
Periodic maintenance requirements and inter- vals are described in your vehicle's Warrantyand Service Records Information booklet. The following points can be carried out between the normally scheduled maintenanceservices.
Owner maintenance
Each time the car is refueled:
•Check the engine oil level.
• Clean the windshield, windshield wipers, headlights, and taillights.
Monthly:
• Check cold tire pressure in all tires. Inspect the tires for wear.
• Check that engine coolant and other fluidlevels are between the indicated "min"and "max" markings.
• Clean interior glass surfaces with a glasscleaner and soft paper towels.
• Wipe driver information displays with asoft cloth.
• Visually inspect battery terminals for cor-rosion. Corrosion may indicate a looseterminal connector, or a battery near theend of its useful service life. Consult yourVolvo retailer for additional information.
As needed:Wash the car, including the undercarriage, to reduce wear that can be caused by a buildup of dirt, and corrosion that can be caused bysalt residues. Clean leaves and twigs from air intake vents at the base of the windshield, and from otherplaces where they may collect.
NOTE
Complete service information for qualified technicians is available online for purchaseor subscription at www.volvotechinfo.com.
Related information
•
Maintenance – opening/closing hood (p. 285)
• Engine compartment – overview (p. 285)
• Engine compartment – coolant (p. 288)
• Engine compartment – engine oil (p. 286)
• Engine compartment – power steeringfluid (p. 289)
• Engine compartment – washer fluid(p. 295)
• Cleaning the interior (p. 310)
• Washing the car (p. 308)
• Tire inflation – checking pressure (p. 256)
• Tires – tread wear indicator (p. 251)
Maintenance – hoisting
When the vehicle is hoisted, the jack or garage lift must be positioned in the correctlifting points.
Hoisting the vehicleIf a garage jack is used to lift the vehicle, itshould be placed: Front:
under either of the two reinforced
areas under the front section of the vehicle, not under to jack attachment points (the outermost points shown in the illustration) .
Rear : Under the jack attachment points.
Ensure that the jack is positioned so that the vehicle cannot slide off it. Always use axlestands or similar structures.
Related information
• Changing a wheel – removing wheel (p. 252)
Page 285 of 344
10 Maintenance and servicing
10
}}
* Option/accessory, for more information, see Introduction.283
Onboard Diagnostic System
OBD II is part of your vehicle's computerized engine management system. It stores diag-nostic information about your vehicle's emis-sion controls. It can light the Check Enginelight (MIL) if it detects an emission control"fault." A "fault" is a component or systemthat is not performing within an expectedrange. A fault may be permanent or tempo-rary. OBD II will store a message about anyfault.
Emission inspection readiness
How do states use OBD II for emission inspections?
Many states connect a computer directly to a vehicle's OBD II system. The inspector canthen read "faults." In some states, this type ofinspection has replaced the tailpipe emissiontest.
How can my vehicle fail OBD II emission
inspection?
Your vehicle can fail OBD II emission inspec- tion for any of the following reasons.
• If your Check Engine (MIL) light is lit, your vehicle may fail inspection.
• If your vehicle's Check Engine light waslit, but went out without any action onyour part, OBD II will still have a recordedfault. Your vehicle may pass or fail,depending on the inspection practices inyour area. •
If you had recent service that requireddisconnecting the battery, OBD II diag-nostic information may be incompleteand "not ready" for inspection. A vehiclethat is not ready may fail inspection.
How can I prepare for my next OBD II
emission inspection?
• If your Check Engine (MIL) light is lit – or was lit but went out without service, haveyour vehicle diagnosed and, if necessary,serviced by a qualified Volvo technician.
• If you recently had service for a lit CheckEngine light, or if you had service thatrequired disconnecting the battery, aperiod of driving is necessary to bring theOBD II system to "ready" for inspection.Two half-hour trips of mixed stop-and-go/highway driving are typically neededto allow OBD II to reach readiness. YourVolvo retailer can provide you with moreinformation on planning a trip.
• Maintain your vehicle in accordance withyour vehicle's maintenance schedule.
Booking service and repairs
Connected Service Booking (CSB) makes set- ting up a time for service, maintenance and/orrepairs directly from the vehicle quick andconvenient.
Prerequisites
• The owner (primary driver) must have a valid Volvo ID. See Volvo ID (p. 21) foradditional information.
• The vehicle must be connected to the Internet using a paired Bluetooth ®
cell
phone. See your Sensus Infotainment supplement for information on pairing acell phone. On models equipped withVolvo On Call (VOC)*, you can connect tothe Internet using your separate VOCdata plan. Refer to your separate VolvoOn Call manual.
• By default, the retailer where you pur-chased your vehicle will be your preferred(primary) retailer/Volvo authorized work-shop who will perform service and repairson your vehicle. To change the preferredretailer, go to Dealer Locator atvolvocars.com and select a retailer, clickon Service Scheduler and book anappointment at the new preferred retailer.
• In order to be guided through the on-screen steps, the menu alternative
Display notifications must be activated.
CSB menu accessOnce the prerequisites have been estab- lished, all CSB-related menus can be
Page 286 of 344
||
10 Maintenance and servicing
10
284
accessed in MY CAR by pressing OK/MENU
and then selecting Maintenance & repair.
Booking information and data from the vehicle
If you request an appointment from your vehi- cle, with your consent, booking information and data about your vehicle 1
will be transmit-
ted to your preferred retailer.
Using the serviceOnce the prerequisites have been estab- lished, all CSB-related menus can beaccessed in MY CAR by pressing OK/MENU
and then selecting
Maintenance & repair.
If the time for the next regularly scheduled service is approaching, if the vehicle requirescertain types of repairs or if a system needsto be checked, a message will be displayed.You will then by guided through the stepsrequired to book service or repairs.
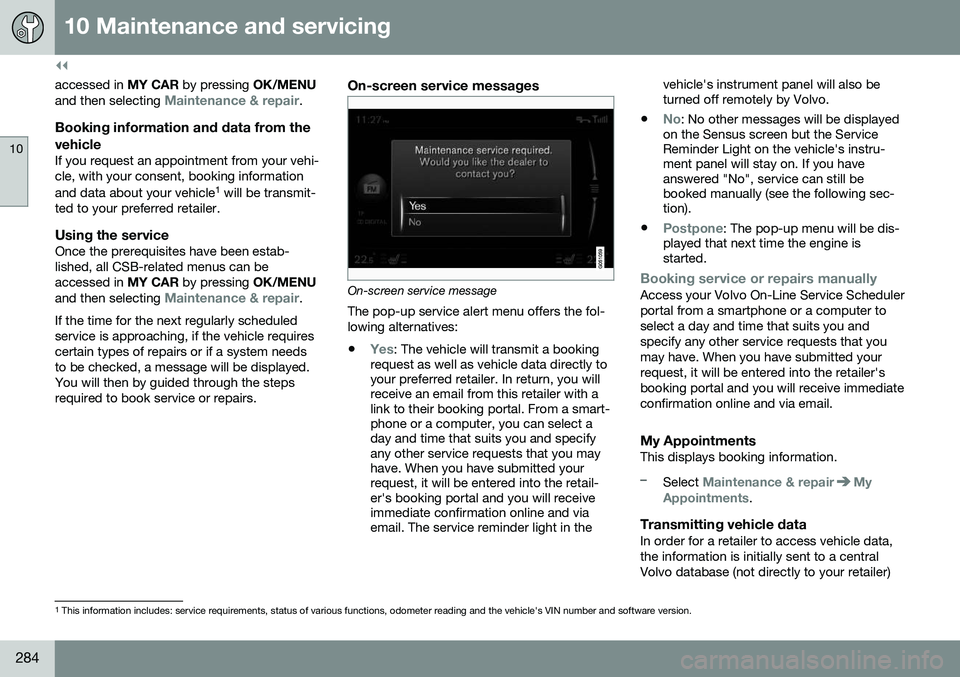
On-screen service messages
On-screen service message The pop-up service alert menu offers the fol- lowing alternatives:
•
Yes: The vehicle will transmit a booking
request as well as vehicle data directly to your preferred retailer. In return, you willreceive an email from this retailer with alink to their booking portal. From a smart-phone or a computer, you can select aday and time that suits you and specifyany other service requests that you mayhave. When you have submitted yourrequest, it will be entered into the retail-er's booking portal and you will receiveimmediate confirmation online and viaemail. The service reminder light in the vehicle's instrument panel will also beturned off remotely by Volvo.
•
No: No other messages will be displayed
on the Sensus screen but the Service Reminder Light on the vehicle's instru-ment panel will stay on. If you haveanswered "No", service can still bebooked manually (see the following sec-tion).
•
Postpone: The pop-up menu will be dis-
played that next time the engine is started.
Booking service or repairs manuallyAccess your Volvo On-Line Service Scheduler portal from a smartphone or a computer toselect a day and time that suits you andspecify any other service requests that youmay have. When you have submitted yourrequest, it will be entered into the retailer'sbooking portal and you will receive immediateconfirmation online and via email.
My AppointmentsThis displays booking information.
–Select Maintenance & repairMy
Appointments.
Transmitting vehicle dataIn order for a retailer to access vehicle data, the information is initially sent to a centralVolvo database (not directly to your retailer)
1 This information includes: service requirements, status of various functions, odometer reading and the vehicle's VIN number and software version.
Page 287 of 344
10 Maintenance and servicing
10
}}
285
where any retailer can access or search for this information using your vehicle's VIN num-ber. This number can be found in your war-ranty booklet or on the dashboard at thelower left corner of the windshield.
–Select Maintenance & repairSend
vehicle data.
Booking information and vehicle dataWhen you opt to book service from your vehi- cle, booking information and vehicle data willbe transmitted. Vehicle data consists of anumber of parameters in the following areas:
• Service requirements
• Function status
• Fluid levels
• Odometer reading (mileage)
• Vehicle Identification Number (VIN)
• The vehicle's software version
Related information
•Volvo ID (p. 21)
Maintenance – opening/closing hood
The hood is opened by first releasing the lock from the passenger compartment and thenpressing the release control.
Opening and closing the hood
Lift the hood slightly. Press the release control (located under the right front edgeof the hood) to the left, and lift the hood.
WARNING
Check that the hood locks properly when closed.
Related information
•Maintenance – owner maintenance (p. 282)
• Engine compartment – overview (p. 285)
Engine compartment – overview
The overview shows the main inspection points in the engine compartment. The appearance of the engine compartment may vary depending on engine model.
WARNING
The cooling fan (located at the front of the engine compartment, behind the radiator)may start or continue to operate (for up to6 minutes) after the engine has beenswitched off.
Page 299 of 344
10 Maintenance and servicing
10
297
Related information
•Battery – changing (p. 298)
• Battery – maintenance (p. 297)
• Battery – symbols (p. 295)
Battery – maintenance
Proper battery maintenance can help prolong its service life.
Maintenance
•Use a screw driver to open the caps or cover and a flashlight to inspect the level.
• If necessary, add distilled water. The levelshould never be above the indicator.
• The fluid level should be checked if thebattery has been recharged.
• After inspection, be sure the cap overeach battery cell or the cover is securelyin place.
• Check that the battery cables are cor-rectly connected and properly tightened.
• Never disconnect the battery when theengine is running, or when the key is inthe ignition. This could damage the vehi-cle's electrical system.
• The battery should be disconnected fromthe vehicle when a battery charger isused directly on the battery.
• To help keep the battery in good condi-tion, the vehicle should be driven for atleast 15 minutes a week or connected toa charger with an automatic chargingfunction.
• If the battery is fully discharged a numberof times, this may shorten its service life.Keeping the battery fully charged helpsprolong its service life. •
The service life of a battery is affected byfactors such as driving conditions and cli-mate. Extreme cold may also furtherdecrease the battery’s starting capacity.
• Because the battery’s starting capacitydecreases with time, it may be necessaryto recharge it if the vehicle is not drivenfor an extended period of time or if thevehicle is usually only driven short dis-tances.
CAUTION
•Always use distilled or deionized water (battery water).
• Never fill above the level mark in thecell.
Related information
•
Battery – changing (p. 298)
• Battery – handling (p. 296)
• Battery – symbols (p. 295)