door lock VOLVO S60 INSCRIPTION 2016 Owner´s Manual
[x] Cancel search | Manufacturer: VOLVO, Model Year: 2016, Model line: S60 INSCRIPTION, Model: VOLVO S60 INSCRIPTION 2016Pages: 344, PDF Size: 7.24 MB
Page 133 of 344
06 Locks and alarm
06
}}
* Option/accessory, for more information, see Introduction.131
Keyless drive*– locking/unlocking
This system makes it possible to unlock and lock the vehicle without having to press anybuttons on the remote key. It is only neces-sary to have a keyless drive remote key inyour possession to operate the central lockingsystem.
NOTE
• The gear selector must in the
P posi-
tion before the vehicle can be locked and the alarm can be armed.
• The buttons on the keyless driveremote key can also be used to lockand unlock the vehicle. For more infor-mation, see Remote key and key blade(p. 124).
Both of the remote keys provided with the vehicle have the keyless function, and addi-tional ones can be ordered. The system canaccommodate up to six remote keys. The red rings in the illustration indicate the area around the vehicle that is within range ofthe keyless drive antennas.
Locking the vehicle
NOTE
Unlocking the vehicleThe number of doors that are unlocked at the same time can be set in the vehicle's menusystem. Press
MY CAR and go to
Car
settings
Lock settingsKeyless entry.
For a description of the menu system, see My Car – introduction (p. 66).
Related information
• Alarm indicator (p. 137)
Keyless drive* – unlocking with key blade
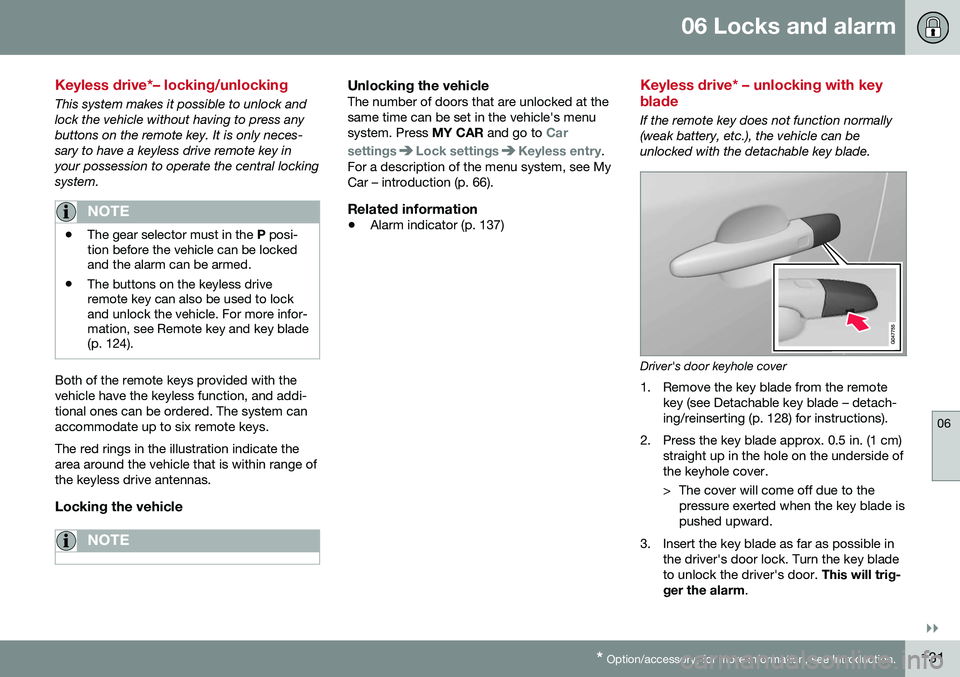
If the remote key does not function normally (weak battery, etc.), the vehicle can beunlocked with the detachable key blade.
Driver's door keyhole cover
1. Remove the key blade from the remote
key (see Detachable key blade – detach- ing/reinserting (p. 128) for instructions).
2. Press the key blade approx. 0.5 in. (1 cm) straight up in the hole on the underside ofthe keyhole cover.
> The cover will come off due to thepressure exerted when the key blade is pushed upward.
3. Insert the key blade as far as possible in the driver's door lock. Turn the key bladeto unlock the driver's door. This will trig-
ger the alarm .
Page 134 of 344

||
06 Locks and alarm
06
132* Option/accessory, for more information, see Introduction.
4. To turn off the alarm , insert the remote
key in the ignition slot. This also applies to vehicles equipped with the optionalkeyless drive.
5. Press the cover back into place after the door has been unlocked.
Related information
• Keyless drive*– locking/unlocking (p. 131)
• Alarm – general information (p. 136)
Keyless drive* – key memory
When you leave the vehicle with a remote key in your possession and lock any door, the position of the driver's seat 2
and door mirrors
will be stored in the remote key's memory. The next time a door is opened by a person with the same remote key in his/her posses-
sion, the driver's seat and door mirrors willautomatically move to the position that theywere in when the door was most recentlylocked.
NOTE
If several people carrying remote keys approach the vehicle at the same time, thedriver's seat and door mirrors will assumethe positions they were in for the personwho opens the driver's door.
See also power seats (p. 71) for information on adjusting and storing the seat's position inthe seat memory.
NOTE
If the vehicle is locked by pressing the but- ton on one of the door handles or bypressing the lock button on the remotekey, or if it is left unlocked for more than30 minutes, the key memory function willbe deactivated. To reactivate the key's memory: • Unlock the vehicle by pulling a door handle with the remote key in yourpossession or by pressing the unlockbutton on the remote key.
Related information
•
Keyless drive*– locking/unlocking (p. 131)
• Remote key – functions (p. 127)
2
Power seats only
Page 135 of 344

06 Locks and alarm
06
* Option/accessory, for more information, see Introduction.133
Keyless drive* – messages
If all of the remote keys are removed from the vehicle while the engine is running or if theignition modes (p. 69) is in mode II and all of
the doors are closed, a message will appearin the instrument panel display and an audiblesignal will sound. When at least one remote key has been returned to the car, the message will beerased in the display and the audible signalwill stop when:
• A door has been opened and closed
• The remote key has been inserted in the ignition slot
• The
OK button has been pressed. For the
location of this button, see Informationdisplay – menu controls (p. 96)
CAUTION
• Keyless drive remote keys should never be left in the vehicle. In the eventof a break-in, a remote found in thevehicle could make it possible to startthe engine.
• Electromagnetic fields or metalobstructions can interfere with thekeyless drive system. The remote keyshould never be placed closer thanapproximately 4-6 in. (10-15 cm) tocell phones, metallic objects or e.g.,stored in a metal briefcase.
USA – FCC ID:KR55WK48952, KR55WK48964 NOTEThis device complies with part 15 of the FCC Rules. Operation is subject to the followingtwo conditions: (1) This device may not causeharmful interference, and (2) this device mustaccept interference received, including inter-ference that may cause undesired operation. CAUTIONChanges or modifications not expressly approved by the manufacturer could void theuser's authority to operate the equipment. Siemens VDO5WK48891Tested To Comply With FCC StandardsFor Automobile UseCanada – IC:267T-5WK48952, 267T-5WK48964, 267T-5WK48891 NOTEThis device complies with RSS -210 of Indus- try Canada. Operation is subject to the fol-lowing two conditions: (1) This device maynot cause harmful interference, and (2) thisdevice must accept interference received,including interference that may cause unde-sired operation. CAUTION Changes or modifications not expressly approved by the manufacturer could void theuser's authority to operate the equipment.
Page 136 of 344
06 Locks and alarm
06
134* Option/accessory, for more information, see Introduction.
Keyless drive* – antenna locations
The keyless drive system has a number of antennas located at various points in the vehi-cle.
WARNING
People with implanted pacemakers should not allow the pacemaker to come closerthan 9 inches (22 cm) to any of the keylessdrive system's antennas. This is to helpprevent interference between the pace-maker and the keyless drive system.
Related information
• Keyless drive*– locking/unlocking (p. 131)
Locking/unlocking – from the outside
Related information
•Locking/unlocking – from inside (p. 135)
Manual locking
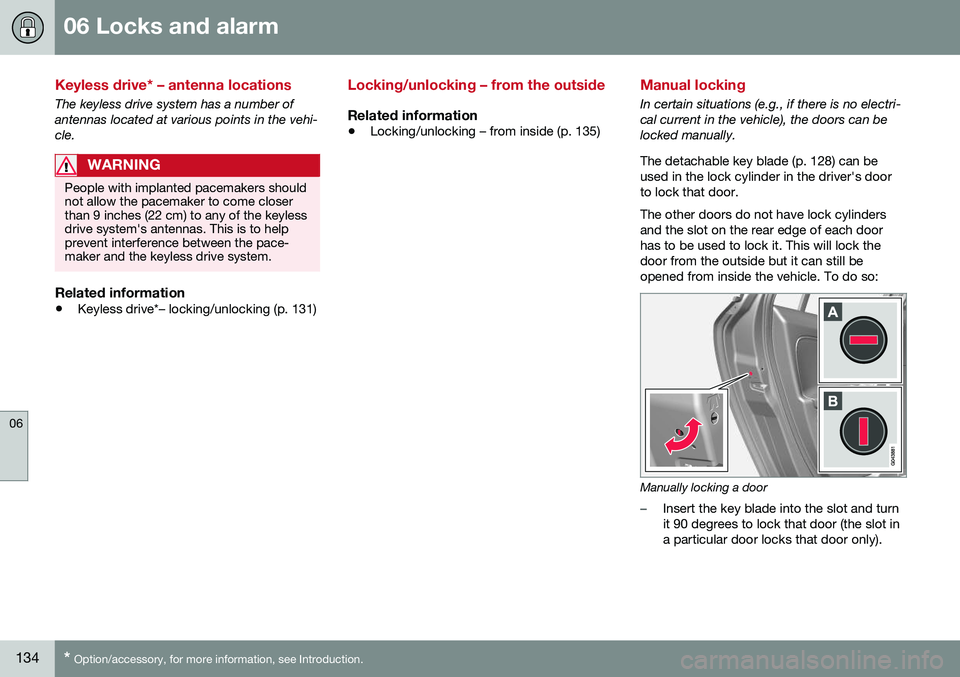
In certain situations (e.g., if there is no electri- cal current in the vehicle), the doors can belocked manually. The detachable key blade (p. 128) can be used in the lock cylinder in the driver's doorto lock that door. The other doors do not have lock cylinders and the slot on the rear edge of each doorhas to be used to lock it. This will lock thedoor from the outside but it can still beopened from inside the vehicle. To do so:
Manually locking a door
–Insert the key blade into the slot and turn it 90 degrees to lock that door (the slot ina particular door locks that door only).
Page 137 of 344
06 Locks and alarm
06
135
In the horizontal position, the door cannot be opened from the outside.
In the vertical position, the door can be opened from the inside and the outside.
NOTE
If the manual child safety lock (p. 56) is activated for a rear side door and that dooris also locked manually, the door cannotbe opened from the outside or inside. Thedoor can only be unlocked with the remotekey or the central locking button.
Related information
•Remote key – replacing the battery (p. 129)
Locking/unlocking – from inside
From inside the vehicle (central locking
button)
UnlockingThe vehicle can be unlocked from inside the vehicle in two ways:
• By pressing the unlock button
.
Locking
• Press the lock button after the front
doors have been closed.
• Each door can be locked individually with the lock button on the respective doors.The door must be closed first.
Alternative locking when parkingThe central locking button on the driver's door can also be used to lock the vehiclewhen you leave it. To do so:
1. Open the door.
2. Press the lock section of the button.
3. Close the door. This will lock the vehicle
completely and arm the alarm.
NOTE
Please be aware that locking the vehicle in this way makes it possible to lock theremote key in the passenger compartment.To help avoid this, lock the vehicle fromthe outside by pressing the lock button onthe remote key. If the vehicle is locked using the central locking button, be sure that the remote keyis in your possession before closing thedoor.
Automatic relocking Automatic lockingRelated information
• Locking/unlocking – from the outside (p. 134)
• Alarm – general information (p. 136)
• Remote key – functions (p. 127)
Page 138 of 344
06 Locks and alarm
06
136
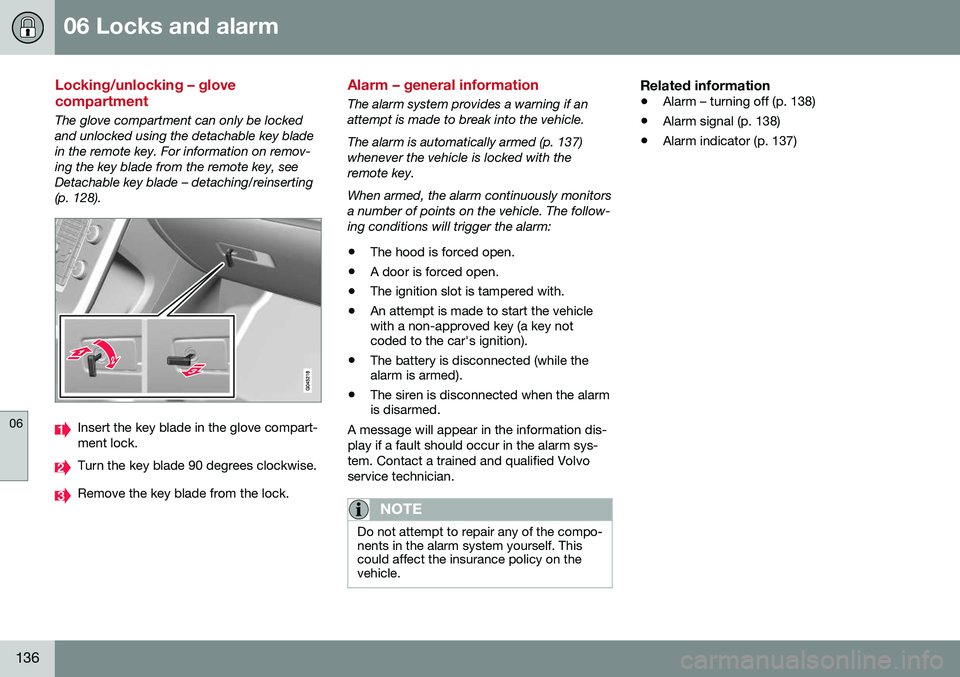
Locking/unlocking – glove compartment
The glove compartment can only be locked and unlocked using the detachable key bladein the remote key. For information on remov-ing the key blade from the remote key, seeDetachable key blade – detaching/reinserting(p. 128).
Insert the key blade in the glove compart- ment lock.
Turn the key blade 90 degrees clockwise.
Remove the key blade from the lock.
Alarm – general information
The alarm system provides a warning if an attempt is made to break into the vehicle. The alarm is automatically armed (p. 137) whenever the vehicle is locked with theremote key. When armed, the alarm continuously monitors a number of points on the vehicle. The follow-ing conditions will trigger the alarm:• The hood is forced open.
• A door is forced open.
• The ignition slot is tampered with.
• An attempt is made to start the vehicle with a non-approved key (a key notcoded to the car's ignition).
• The battery is disconnected (while thealarm is armed).
• The siren is disconnected when the alarmis disarmed.
A message will appear in the information dis- play if a fault should occur in the alarm sys-tem. Contact a trained and qualified Volvoservice technician.
NOTE
Do not attempt to repair any of the compo- nents in the alarm system yourself. Thiscould affect the insurance policy on thevehicle.
Related information
• Alarm – turning off (p. 138)
• Alarm signal (p. 138)
• Alarm indicator (p. 137)
Page 139 of 344
06 Locks and alarm
06
137
Alarm indicator
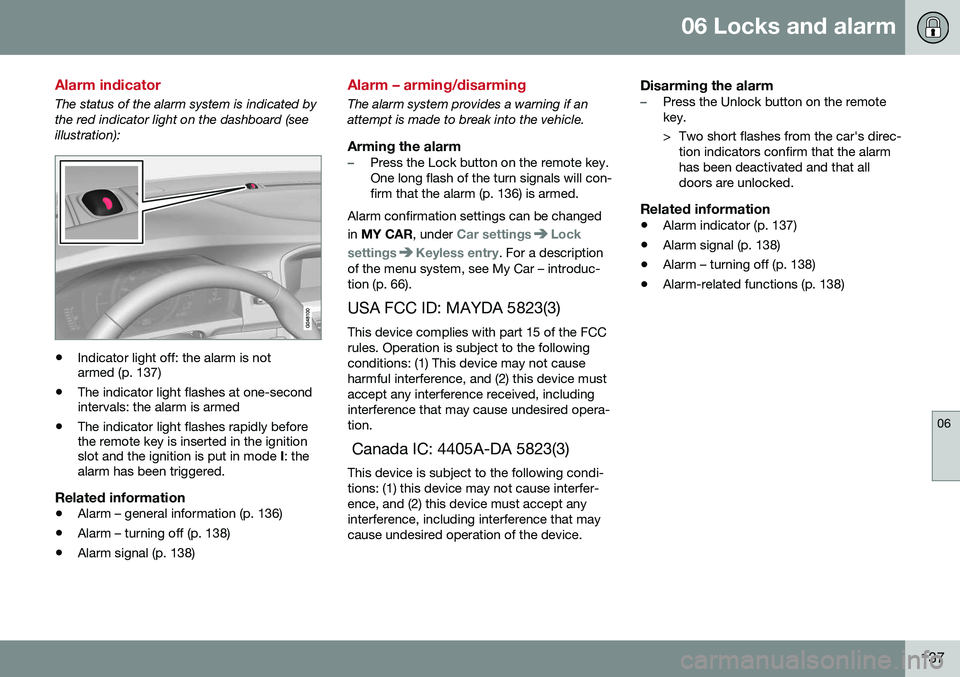
The status of the alarm system is indicated by the red indicator light on the dashboard (seeillustration):
•Indicator light off: the alarm is not armed (p. 137)
• The indicator light flashes at one-secondintervals: the alarm is armed
• The indicator light flashes rapidly beforethe remote key is inserted in the ignitionslot and the ignition is put in mode
I: the
alarm has been triggered.
Related information
• Alarm – general information (p. 136)
• Alarm – turning off (p. 138)
• Alarm signal (p. 138)
Alarm – arming/disarming
The alarm system provides a warning if an attempt is made to break into the vehicle.
Arming the alarm–Press the Lock button on the remote key. One long flash of the turn signals will con-firm that the alarm (p. 136) is armed.
Alarm confirmation settings can be changed in MY CAR , under
Car settingsLock
settings
Keyless entry. For a description
of the menu system, see My Car – introduc- tion (p. 66).
USA FCC ID: MAYDA 5823(3) This device complies with part 15 of the FCCrules. Operation is subject to the followingconditions: (1) This device may not causeharmful interference, and (2) this device mustaccept any interference received, includinginterference that may cause undesired opera-tion. Canada IC: 4405A-DA 5823(3) This device is subject to the following condi- tions: (1) this device may not cause interfer-ence, and (2) this device must accept anyinterference, including interference that maycause undesired operation of the device.
Disarming the alarm–Press the Unlock button on the remote key.
> Two short flashes from the car's direc- tion indicators confirm that the alarm has been deactivated and that alldoors are unlocked.
Related information
• Alarm indicator (p. 137)
• Alarm signal (p. 138)
• Alarm – turning off (p. 138)
• Alarm-related functions (p. 138)
Page 140 of 344
06 Locks and alarm
06
138
Alarm signal
An audible (p. 136) signal is given by a battery powered siren. The alarm cycle lasts for30 seconds. The visual alarm signal is given by flashing all turn signals for approximately 5 minutes oruntil the alarm is turned off.
Related information
•Alarm indicator (p. 137)
• Alarm – arming/disarming (p. 137)
• Alarm – turning off (p. 138)
Alarm – turning off
The alarm system provides a warning if an attempt is made to break into the vehicle. If the alarm is sounding, it can be stopped by pressing the Unlock button on the remote keyor by inserting the remote key in the ignitionslot. Two short flashes from the car's turn sig-nals confirm that the alarm has been turnedoff.
Related information
•Alarm indicator (p. 137)
• Alarm – arming/disarming (p. 137)
• Remote key – replacing the battery (p. 129)
Alarm-related functions
The following is general information regarding the alarm system in your vehicle.
Automatic re-arming
Remote key not functioning
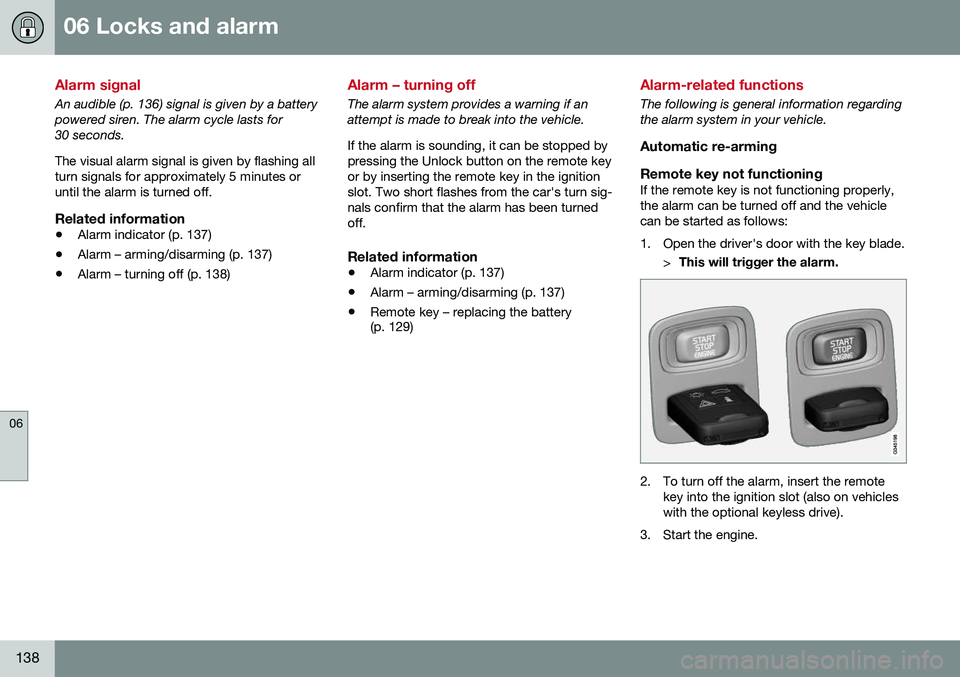
If the remote key is not functioning properly,the alarm can be turned off and the vehiclecan be started as follows:
1. Open the driver's door with the key blade. >This will trigger the alarm.
2. To turn off the alarm, insert the remote
key into the ignition slot (also on vehicles with the optional keyless drive).
3. Start the engine.
Page 216 of 344
08 Starting and driving
08
214* Option/accessory, for more information, see Introduction.
Engine Remote Start (ERS)* – starting the engine
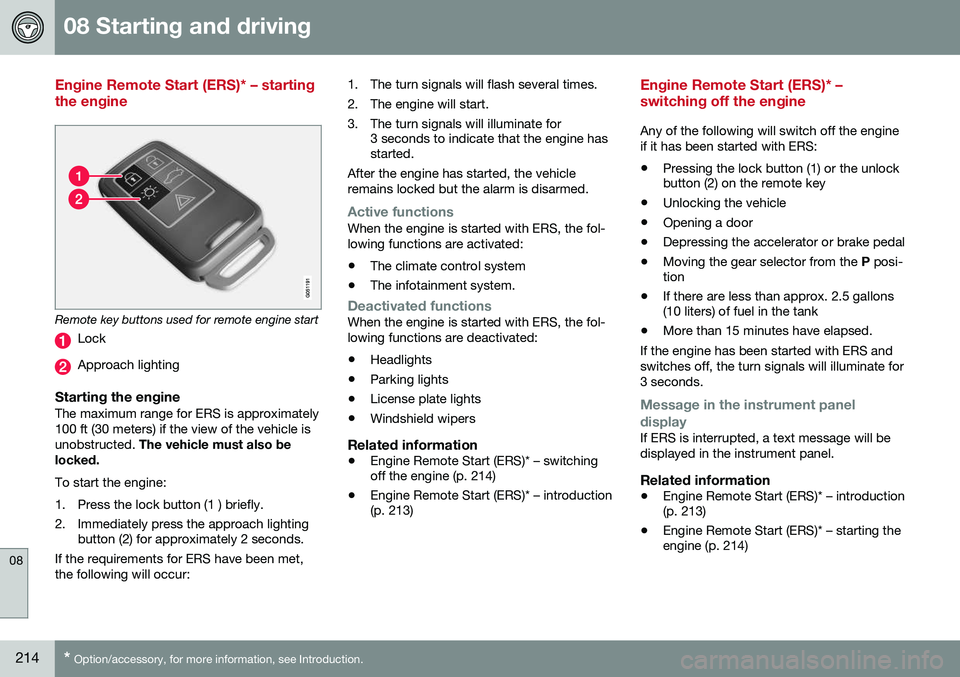
Remote key buttons used for remote engine start
Lock
Approach lighting
Starting the engineThe maximum range for ERS is approximately 100 ft (30 meters) if the view of the vehicle isunobstructed. The vehicle must also be
locked. To start the engine:
1. Press the lock button (1 ) briefly.
2. Immediately press the approach lighting button (2) for approximately 2 seconds.
If the requirements for ERS have been met, the following will occur: 1. The turn signals will flash several times.
2. The engine will start.
3. The turn signals will illuminate for
3 seconds to indicate that the engine has started.
After the engine has started, the vehicle remains locked but the alarm is disarmed.
Active functionsWhen the engine is started with ERS, the fol- lowing functions are activated: • The climate control system
• The infotainment system.
Deactivated functionsWhen the engine is started with ERS, the fol- lowing functions are deactivated: •Headlights
• Parking lights
• License plate lights
• Windshield wipers
Related information
•
Engine Remote Start (ERS)* – switching off the engine (p. 214)
• Engine Remote Start (ERS)* – introduction(p. 213)
Engine Remote Start (ERS)* – switching off the engine
Any of the following will switch off the engine if it has been started with ERS:
• Pressing the lock button (1) or the unlock button (2) on the remote key
• Unlocking the vehicle
• Opening a door
• Depressing the accelerator or brake pedal
• Moving the gear selector from the
P posi-
tion
• If there are less than approx. 2.5 gallons(10 liters) of fuel in the tank
• More than 15 minutes have elapsed.
If the engine has been started with ERS and switches off, the turn signals will illuminate for3 seconds.
Message in the instrument panel
display
If ERS is interrupted, a text message will be displayed in the instrument panel.
Related information
• Engine Remote Start (ERS)* – introduction (p. 213)
• Engine Remote Start (ERS)* – starting theengine (p. 214)
Page 238 of 344
08 Starting and driving
08
236
Driving through water
The vehicle should be driven with extreme caution if it is necessary to drive throughstanding water. The vehicle can be driven through water up to a depth of approximately 10 in. (25 cm) atwalking speed to help prevent water fromentering the differential and the transmission.This reduces the oil's lubricating capacity andmay shorten the service life of these compo-nents.
• Take particular care when driving through flowing water.
• Clean the electrical connections for trailerwiring after driving in mud or water.
• When driving through water, maintain lowspeed and do not stop in the water.WARNING
• Avoid driving through standing or rushing water. Doing so can be dan-gerous and it may also be difficult todetermine the actual depth of thewater.
• If water cannot be avoided, after driv-ing through the water, press lightly onthe brake pedal to ensure that thebrakes are functioning normally. Wateror mud can make the brake liningsslippery, resulting in delayed brakingeffect.
CAUTION
•
Engine damage will occur if water is drawn into the air cleaner.
• If the vehicle is driven through waterdeeper than 10 in (25 cm), water mayenter the differential and the transmis-sion. This reduces the oil's lubricatingcapacity and may shorten the servicelife of these components.
• Damage to any components, theengine, transmission, turbo-charger,differential or its internal componentscaused by flooding, vapor lock orinsufficient oil is not covered underwarranty.
• Do not allow the vehicle to stand inwater up to the door sills longer thanabsolutely necessary. This could resultin electrical malfunctions.
• If the engine has been stopped whilethe vehicle is in water, do not attemptto restart it. Have the vehicle towedout of the water.
Related information
•
Towing the vehicle (p. 245)
• Towing by tow truck (p. 247)