four wheel drive VOLVO S60 INSCRIPTION 2016 Owner´s Manual
[x] Cancel search | Manufacturer: VOLVO, Model Year: 2016, Model line: S60 INSCRIPTION, Model: VOLVO S60 INSCRIPTION 2016Pages: 344, PDF Size: 7.24 MB
Page 143 of 344
07 Driver support
07
}}
* Option/accessory, for more information, see Introduction.141
Active chassis* (Four C)
Active chassis, Four-C (Continuously Controlled Chassis Concept), regulates thecharacteristics of the shock absorbers so thatthe vehicle's driving characteristics can beadjusted. There are three settings: Comfort,Sport and Advanced.
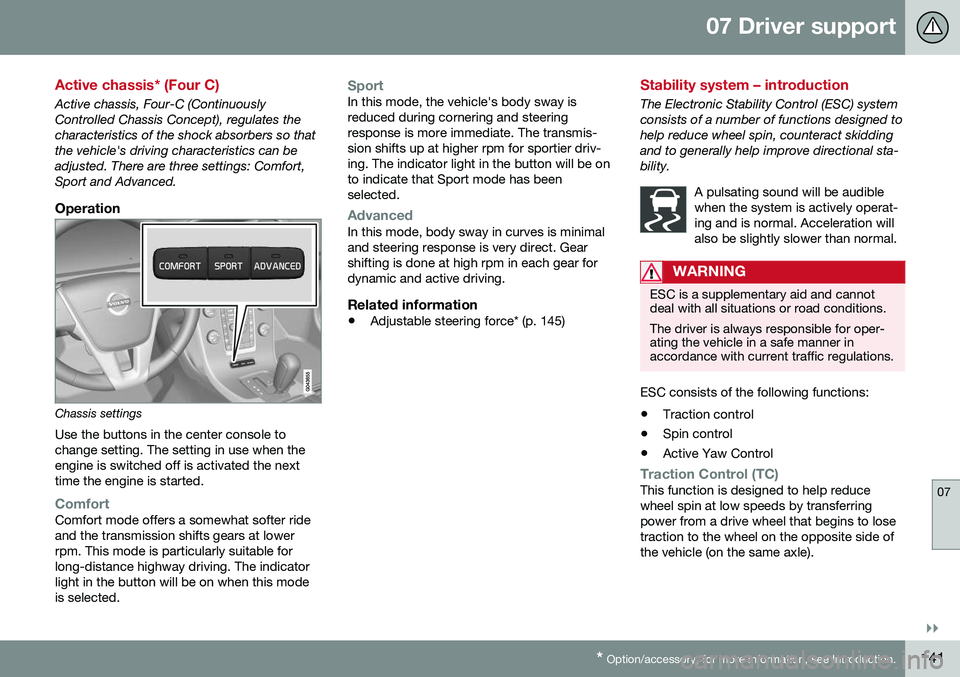
Operation
Chassis settings
Use the buttons in the center console to change setting. The setting in use when theengine is switched off is activated the nexttime the engine is started.
ComfortComfort mode offers a somewhat softer ride and the transmission shifts gears at lowerrpm. This mode is particularly suitable forlong-distance highway driving. The indicatorlight in the button will be on when this modeis selected.
SportIn this mode, the vehicle's body sway is reduced during cornering and steeringresponse is more immediate. The transmis-sion shifts up at higher rpm for sportier driv-ing. The indicator light in the button will be onto indicate that Sport mode has beenselected.
AdvancedIn this mode, body sway in curves is minimal and steering response is very direct. Gearshifting is done at high rpm in each gear fordynamic and active driving.
Related information
• Adjustable steering force* (p. 145)
Stability system – introduction
The Electronic Stability Control (ESC) system consists of a number of functions designed tohelp reduce wheel spin, counteract skiddingand to generally help improve directional sta-bility.
A pulsating sound will be audiblewhen the system is actively operat-ing and is normal. Acceleration willalso be slightly slower than normal.
WARNING
ESC is a supplementary aid and cannot deal with all situations or road conditions. The driver is always responsible for oper- ating the vehicle in a safe manner inaccordance with current traffic regulations.
ESC consists of the following functions:
• Traction control
• Spin control
• Active Yaw Control
Traction Control (TC)This function is designed to help reduce wheel spin at low speeds by transferringpower from a drive wheel that begins to losetraction to the wheel on the opposite side ofthe vehicle (on the same axle).
Page 147 of 344
07 Driver support
07
* Option/accessory, for more information, see Introduction.145
Adjustable steering force*
Steering force increases with the speed of the vehicle to give the driver enhanced sense ofcontrol and stability. At low speed the vehicleis easy to steer in order to facilitate parking,etc.
Adjustable steering force*Steering force can be changed under MY
CAR
Car settingsSteering wheel
force
. Select Low, Medium or High. For a
description of the menu system, My Car – introduction (p. 66).
NOTE
This steering force level menu function cannot be accessed when the vehicle is inmotion.
NOTE
In certain situations, the power steering may become too warm and will have to betemporarily cooled down. While this ishappening, the power steering effect willbe reduced slightly and somewhat moreeffort may be required to turn the steeringwheel. If this occurs, a message will be displayed in the instrument panel.
Related information
• Active chassis* (Four C) (p. 141)
Road Sign Information (RSI)* – introduction
RSI is a feature that helps the driver see road signs with the posted speed limit.
Introduction
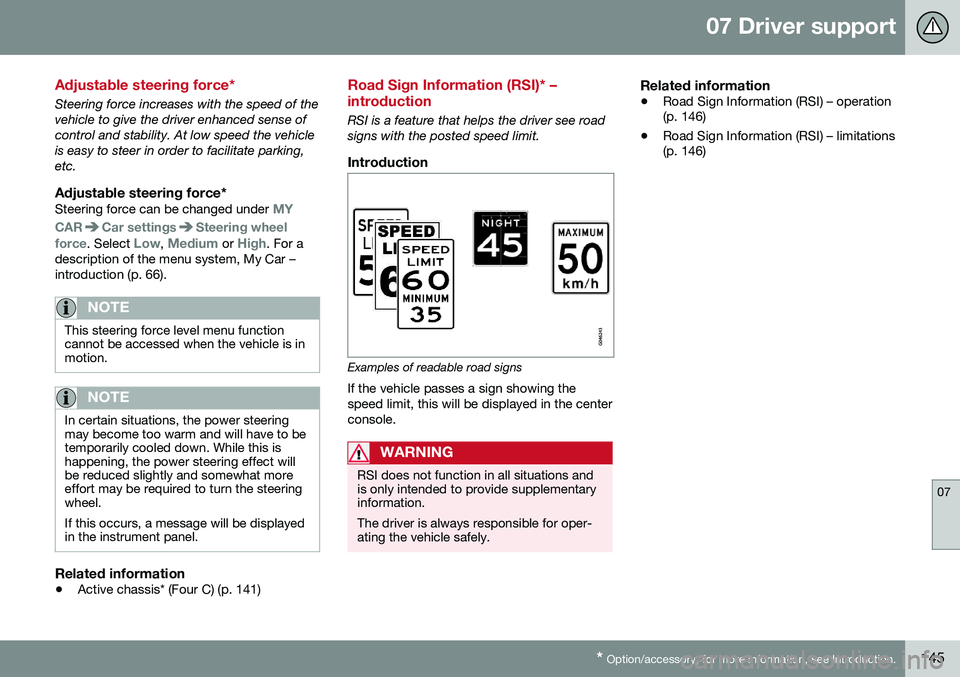
Examples of readable road signs If the vehicle passes a sign showing the speed limit, this will be displayed in the centerconsole.
WARNING
RSI does not function in all situations and is only intended to provide supplementaryinformation. The driver is always responsible for oper- ating the vehicle safely.
Related information
•Road Sign Information (RSI) – operation (p. 146)
• Road Sign Information (RSI) – limitations(p. 146)
Page 240 of 344
||
08 Starting and driving
08
238
drive in countries where it may be difficult to obtain the correct fuel.
• Consider your destination. If you will bedriving through an area where snow or iceare likely to occur, consider snowtires (p. 265).
Related information
•Changing a wheel – removing wheel(p. 252)
• Bulbs – introduction (p. 290)
Driving in cold weather
Check your vehicle before the approach of cold weather. The following advice is worth noting:
• Make sure that the engine cool- ant (p. 288) contains 50 percent anti-freeze. Any other mixture will reducefreeze protection. This gives protectionagainst freezing down to –31 °F (–35 °C).The use of "recycled" antifreeze is notapproved by Volvo. Different types ofantifreeze must not be mixed.
• Volvo recommends using only genuineVolvo antifreeze in your vehicle's radiator.
• Try to keep the fuel tank well filled – thishelps prevent the formation of condensa-tion in the tank. In addition, in extremelycold weather conditions it is worthwhileto add fuel line de-icer before refueling.
• The viscosity of the engine oil is impor-tant. Oil with low viscosity (thinner oil)improves cold-weather starting as well asdecreasing fuel consumption while theengine is warming up. Full synthetic0W-30 oil is recommended for driving inareas with sustained low temperatures.
• The load placed on the battery is greaterduring the winter since the windshieldwipers, lighting, etc., are used moreoften. Moreover, the capacity of the bat-tery decreases as the temperature drops.In very cold weather, a poorly chargedbattery can freeze and be damaged. It is therefore advisable to check the state ofcharge more frequently and spray an anti-rust oil on the battery posts.
• Volvo recommends the use of snow tireson all four wheels for winter driving, seeSnow tires/studded tires (p. 265).
• To prevent the washer fluid (p. 295)reser-voir from freezing, add washer solventscontaining antifreeze. This is importantsince dirt is often splashed on the wind-shield during winter driving, requiring thefrequent use of the washers and wipers.Volvo Washer Solvent should be dilutedas follows: Down to 14 °F (–10 °C): 1 partwasher solvent and 4 parts water Downto 5 °F (–15 °C): 1 part washer solventand 3 parts water Down to 0 °F (–18 °C):1 part washer solvent and 2 parts waterDown to –18 °F (–28 °C): 1 part washersolvent and 1 part water.
• Use Volvo Teflon Lock Spray in the locks.
• Avoid using de-icing sprays as they cancause damage to the locks.
Page 251 of 344
09 Wheels and tires
09
249
Tires – general information
Your vehicle is equipped with tires according to the vehicle's tire information placard on theB-pillar (the structural member at the side ofthe vehicle, at the rear of the driver's dooropening).
Introduction
CAUTION
Some Volvo models are equipped with an Ultra High Performance tire and wheelcombination designed to provide maxi-mum dry pavement performance with con-sideration for hydroplaning resistance.They may be more susceptible to roadhazard damage and, depending on drivingconditions, may achieve a tread life of lessthan 20,000 miles (30,000 km). Even if thisvehicle is equipped with Volvo’s advancedAWD or stability system, these tires are notdesigned for winter driving, and should bereplaced with winter tires when weatherconditions dictate.
The tires have good road holding characteris- tics and offer good handling on dry and wetsurfaces. It should be noted however that thetires have been developed to give these fea-tures on snow/ice-free surfaces. Most models are equipped with "all-season" tires, which provide a somewhat higherdegree of road holding on slippery surfacesthan tires without the "all-season" rating.However, for optimum road holding on icy orsnow-covered roads, we recommend suitablewinter tires on all four wheels. When replacing tires, be sure that the new tires are the same size designation, type(radial) and preferably from the same manu-facturer, on all four wheels. Otherwise there isa risk of altering the car's roadholding andhandling characteristics.
Tire rotationYour vehicle has no required tire rotation. Tirewear is affected by a number of factors suchas tire inflation, ambient temperature, drivingstyle, etc.
NOTE
•
If the tires are rotated, they should only be moved from front to rear orvice versa. They should never be rota-ted left to right/right to left.
• Ideally, tire rotation should be done thefirst time after approximately 3,000miles (5,000 km) and thereafter at6,000-mile (10,000-km) intervals.Some customers find that tire rotationmay help to get extra mileage from tirelife.
• Tire rotation should only be performedif front/rear tire wear is fairly even andtread height is above 1/16" (1.6 mm).
Related information
•
Tire inflation – pressure table (p. 260)
• Tire specifications (p. 257)
• Changing a wheel – direction of rotation (p. 252)
• Tires – tread wear indicator (p. 251)
Page 260 of 344
||
09 Wheels and tires
09
258
Information on the sidewall
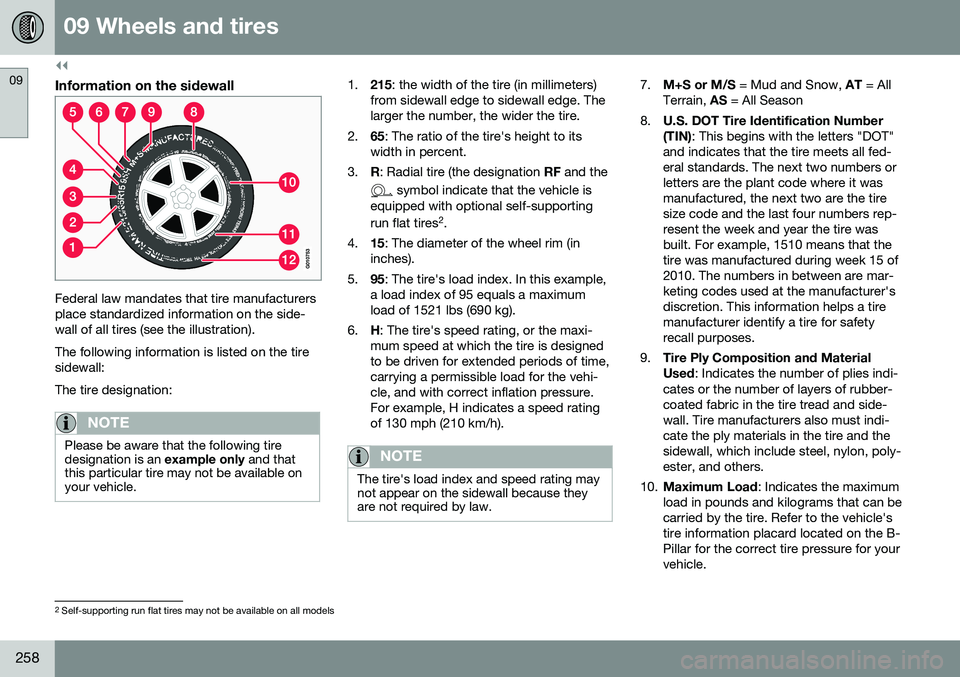
Federal law mandates that tire manufacturers place standardized information on the side-wall of all tires (see the illustration). The following information is listed on the tire sidewall: The tire designation:
NOTE
Please be aware that the following tire designation is an example only and that
this particular tire may not be available onyour vehicle.
1. 215: the width of the tire (in millimeters)
from sidewall edge to sidewall edge. The larger the number, the wider the tire.
2. 65: The ratio of the tire's height to its
width in percent.
3. R: Radial tire (the designation RF and the
symbol indicate that the vehicle is
equipped with optional self-supporting run flat tires 2
.
4. 15: The diameter of the wheel rim (in
inches).
5. 95: The tire's load index. In this example,
a load index of 95 equals a maximum load of 1521 lbs (690 kg).
6. H: The tire's speed rating, or the maxi-
mum speed at which the tire is designedto be driven for extended periods of time,carrying a permissible load for the vehi-cle, and with correct inflation pressure.For example, H indicates a speed ratingof 130 mph (210 km/h).
NOTE
The tire's load index and speed rating may not appear on the sidewall because theyare not required by law.
7. M+S or M/S = Mud and Snow, AT = All
Terrain, AS = All Season
8. U.S. DOT Tire Identification Number (TIN)
: This begins with the letters "DOT"
and indicates that the tire meets all fed- eral standards. The next two numbers orletters are the plant code where it wasmanufactured, the next two are the tiresize code and the last four numbers rep-resent the week and year the tire wasbuilt. For example, 1510 means that thetire was manufactured during week 15 of2010. The numbers in between are mar-keting codes used at the manufacturer'sdiscretion. This information helps a tiremanufacturer identify a tire for safetyrecall purposes.
9. Tire Ply Composition and Material Used
: Indicates the number of plies indi-
cates or the number of layers of rubber- coated fabric in the tire tread and side-wall. Tire manufacturers also must indi-cate the ply materials in the tire and thesidewall, which include steel, nylon, poly-ester, and others.
10. Maximum Load : Indicates the maximum
load in pounds and kilograms that can becarried by the tire. Refer to the vehicle'stire information placard located on the B-Pillar for the correct tire pressure for yourvehicle.
2 Self-supporting run flat tires may not be available on all models
Page 267 of 344
09 Wheels and tires
09
}}
265
Snow tires/studded tires3
Owners who live in or regularly commute through areas with sustained periods of snowor icy driving conditions are strongly advisedto fit suitable winter tires to help retain thehighest degree of traction.
Tires for winter use:
•
It is important to install winter tires on all four wheels to help retain traction duringcornering, braking, and accelerating. Fail-ure to do so could reduce traction to anunsafe level or adversely affect handling.
• Do not mix tires of different design as thiscould also negatively affect overall tireroad grip.
• Winter tires wear more quickly on dryroads in warm weather. They should beremoved when the winter driving seasonhas ended.
• Studded tires should be run-in 300 – 600 miles (500 – 1000 km) during whichthe vehicle should be driven as smoothlyas possible to give the studs the opportu-nity to seat properly in the tires. The tiresshould have the same rotational directionthroughout their entire lifetime.
NOTE
Please consult state or provincial regula- tions restricting the use of studded wintertires before installing such tires.
Tire pressure monitoring - introduction
Volvo provides two different systems to moni- tor tire pressure: Tire Pressure MonitoringSystem (TPMS) or Tire Monitor.
Determining which tire monitoring system is in your vehicle
To see which system is installed in your vehi- cle, press the
MY CAR button on the center
console. Go to
SettingsCar settings.
• If your vehicle has a menu called
Tire
monitoring, see Tire Monitor - introduc-
tion (p. 270).
• If your vehicle has a menu called
Tire
pressure, see Tire Pressure Monitoring
System (TPMS) – general information (p. 266).
IntroductionEach tire, including the spare (if provided), should be checked monthly when cold andinflated to the inflation pressure recom-mended by the vehicle manufacturer on thevehicle placard or tire inflation pressure label.(If your vehicle has tires of a different sizethan the size indicated on the vehicle placardor tire inflation pressure label, you shoulddetermine the proper tire inflation pressure forthose tires.) As an added safety feature, your vehicle hasbeen equipped with a tire pressure monitor-ing system that illuminates a low tire pressure telltale (
) when one or more of your tires
is significantly under-inflated. Accordingly, when the low tire pressure telltale illuminates,you should stop and check your tires as soonas possible, and inflate them to the properpressure. Driving on a significantly under-inflated tire causes the tire to overheat and can lead totire failure. Under-inflation also reduces fuelefficiency and tire tread life, and may affectthe vehicle's handling and stopping ability.Please note that a tire pressure monitoringsystem is not a substitute for proper tiremaintenance, and it is the driver's responsi-bility to maintain correct tire pressure, even ifunder-inflation has not reached the level totrigger illumination of the system's low tirepressure telltale. Your vehicle has also been equipped with a TPMS malfunction indicator to indicate whenthe system is not operating properly. Themonitoring system's malfunction indicator iscombined with the low tire pressure telltale. When the system detects a malfunction, the telltale will flash for approximately one minuteand then remain continuously illuminated.This sequence will continue upon subsequentvehicle start-ups as long as the malfunction
3 Where permitted
Page 271 of 344
09 Wheels and tires
09
269
Tire Pressure Monitoring System (TPMS) – messages
Erasing warning messagesWhen a low tire pressure warning message has been displayed and the tire pressure warning light in the instrument panell (
)
has come on:
1. Use a tire pressure gauge to check the inflation pressure of all four tires.
2. Re-inflate the tire(s) to the correct pres- sure (consult the tire pressure placard located on the driver's side B-pillar (thestructural member at the side of the vehi-cle, at the rear of the driver's door open-ing) or the inflation pressure table, seeTire inflation – pressure table (p. 260).
3. In certain cases, it may be necessary to drive the vehicle for several minutes at aspeed of 20 mph (30 km/h) or faster. Thiswill erase the warning text and the telltalewill go out.
NOTE
•Tire monitoring systems use a tem- perature compensated pressure value.This pressure value is dependent ontire temperature and ambient tempera-ture, which can differ from the recom-mended cold tire pressure in the tireinflation table and on the tire pressureplacard located on the driver's side B-pillar (the structural member at theside of the vehicle, at the rear of thedriver's door opening). This meansthat it may sometimes be necessary toinflate them slightly above the recom-mended cold pressure value(approx. 3-4 psi or 0.2-0.3 bar) in orderto reset a low tire pressure warning.
• To help avoid incorrect tire inflationpressure, if possible only inflate thetires when they are cold. The tires areconsidered to be cold when they havethe same temperature as the sur-rounding (ambient) air. This tempera-ture is normally reached after the vehi-cle has been parked for at least3 hours. After driving a distance ofapproximately 1 mile (1.6 km), the tiresare considered to be hot.
CAUTION
•
After inflating the tires, always reinstall the valve cap to help avoid damage tothe valve from dirt, gravel, etc.
• Use plastic valve caps only. Metalcaps could corrode and become diffi-cult to remove.
WARNING
•Incorrect inflation pressure could lead to tire failure, resulting in a loss of con-trol of the vehicle.
• Tire monitoring systems cannot indi-cate sudden tire damage caused byexternal factors (e.g., a blowout) inadvance.
Related information
•
Tire Pressure Monitoring System (TPMS) – general information (p. 266)
• Tire Pressure Monitoring System (TPMS)– recalibrating (p. 268)
• Tire Pressure Monitoring System (TPMS)– activating/deactivating (p. 268)
• Tire Pressure Monitoring System (TPMS)– changing wheels (p. 267)
• Tire pressure monitoring - introduction(p. 265)
• Tire inflation – pressure table (p. 260)
Page 274 of 344
09 Wheels and tires
09
272
Tire Monitor – messages
When low tire pressure has been detected, a message will be displayed and the tire pres-sure warning telltale in the instrument panel
will illuminate.
Erasing warning messagesTo erase a low tire pressure message and turn off the telltale:
1. Use a tire pressure gauge to check theinflation pressure of all four tires (see the article "Tire inflation – checking pres-sure").
2. Re-inflate the tires to the correct pressure (consult the tire pressure placard locatedon the driver's side B-pillar (the structuralmember at the side of the vehicle, at therear of the driver's door opening) or theinflation pressure table, see Tire inflation –pressure table (p. 260).
3. Recalibrate Tire Monitor, see Calibrating Tire Monitor (p. 270).
NOTE
To help avoid incorrect tire inflation pres- sure, only inflate the tires when they arecold. The tires are considered to be coldwhen they have the same temperature asthe surrounding (ambient) air. This tem-perature is normally reached after the vehi-cle has been parked for at least 3 hours.After driving a distance of approximately1 mile (1.6 km), the tires are considered tobe hot.
CAUTION
•After inflating the tires, always reinstall the valve cap to help avoid damage tothe valve from dirt, gravel, etc.
• Use plastic valve caps only. Metalcaps could corrode and become diffi-cult to remove.
WARNING
•
Incorrect inflation pressure could lead to tire failure, resulting in a loss of con-trol of the vehicle.
• Tire monitoring systems cannot indi-cate sudden tire damage caused byexternal factors (e.g., a blowout) inadvance.
Related information
•
Tire Monitor – messages (p. 272)
• Tire inflation – checking pressure (p. 256)
• Tire inflation – pressure table (p. 260)