climate control VOLVO S60 RECHARGE 2021 Quick Guide
[x] Cancel search | Manufacturer: VOLVO, Model Year: 2021, Model line: S60 RECHARGE, Model: VOLVO S60 RECHARGE 2021Pages: 48, PDF Size: 8.61 MB
Page 11 of 48
INTERIOR OVERVIEW
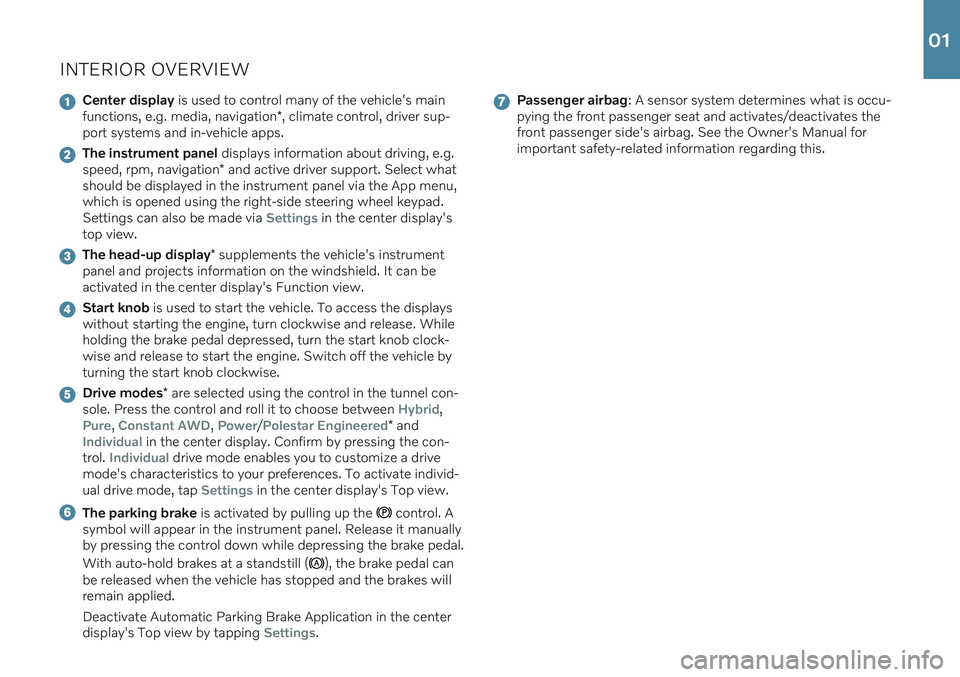
Center display is used to control many of the vehicle's main
functions, e.g. media, navigation *, climate control, driver sup-
port systems and in-vehicle apps.
The instrument panel displays information about driving, e.g.
speed, rpm, navigation * and active driver support. Select what
should be displayed in the instrument panel via the App menu, which is opened using the right-side steering wheel keypad.Settings can also be made via
Settings in the center display's
top view.
The head-up display * supplements the vehicle's instrument
panel and projects information on the windshield. It can be activated in the center display's Function view.
Start knob is used to start the vehicle. To access the displays
without starting the engine, turn clockwise and release. While holding the brake pedal depressed, turn the start knob clock-wise and release to start the engine. Switch off the vehicle byturning the start knob clockwise.
Drive modes * are selected using the control in the tunnel con-
sole. Press the control and roll it to choose between Hybrid,
Pure, Constant AWD, Power/Polestar Engineered* andIndividual in the center display. Confirm by pressing the con-
trol. Individual drive mode enables you to customize a drive
mode's characteristics to your preferences. To activate individ- ual drive mode, tap
Settings in the center display's Top view.
The parking brake is activated by pulling up the control. A
symbol will appear in the instrument panel. Release it manually by pressing the control down while depressing the brake pedal. With auto-hold brakes at a standstill (
), the brake pedal can
be released when the vehicle has stopped and the brakes will remain applied. Deactivate Automatic Parking Brake Application in the center display's Top view by tapping
Settings.
Passenger airbag : A sensor system determines what is occu-
pying the front passenger seat and activates/deactivates the front passenger side's airbag. See the Owner's Manual forimportant safety-related information regarding this.
01
Page 13 of 48
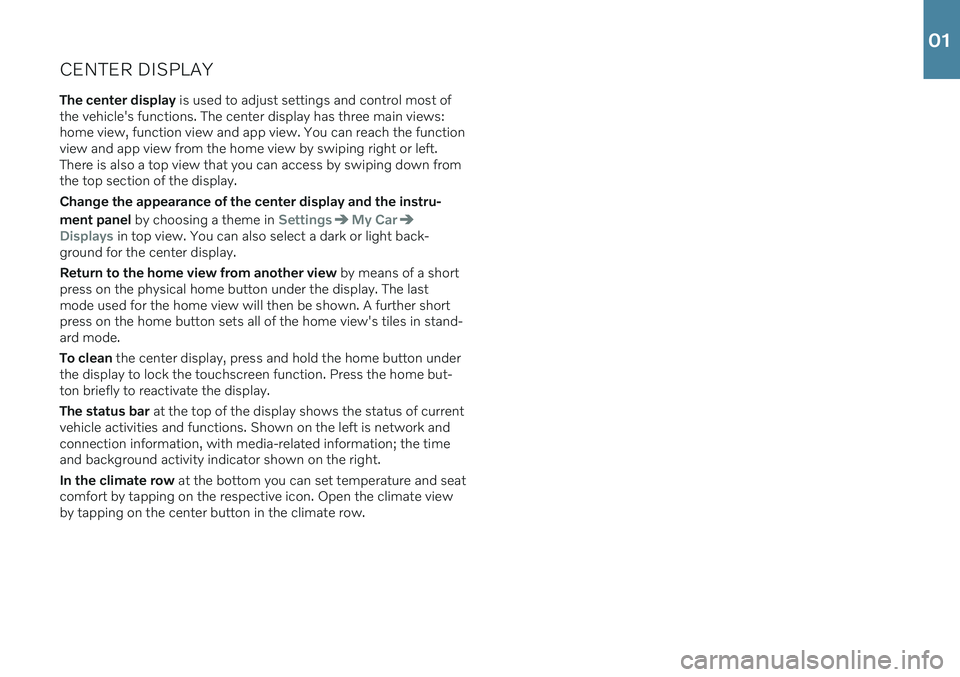
CENTER DISPLAYThe center display is used to adjust settings and control most of
the vehicle's functions. The center display has three main views: home view, function view and app view. You can reach the functionview and app view from the home view by swiping right or left.There is also a top view that you can access by swiping down fromthe top section of the display. Change the appearance of the center display and the instru- ment panel by choosing a theme in
SettingsMy Car
Displays in top view. You can also select a dark or light back-
ground for the center display. Return to the home view from another view by means of a short
press on the physical home button under the display. The last mode used for the home view will then be shown. A further shortpress on the home button sets all of the home view's tiles in stand-ard mode. To clean the center display, press and hold the home button under
the display to lock the touchscreen function. Press the home but- ton briefly to reactivate the display. The status bar at the top of the display shows the status of current
vehicle activities and functions. Shown on the left is network and connection information, with media-related information; the timeand background activity indicator shown on the right. In the climate row at the bottom you can set temperature and seat
comfort by tapping on the respective icon. Open the climate view by tapping on the center button in the climate row.
01
Page 21 of 48
Pressing also resumes the stored speed for the selected func-
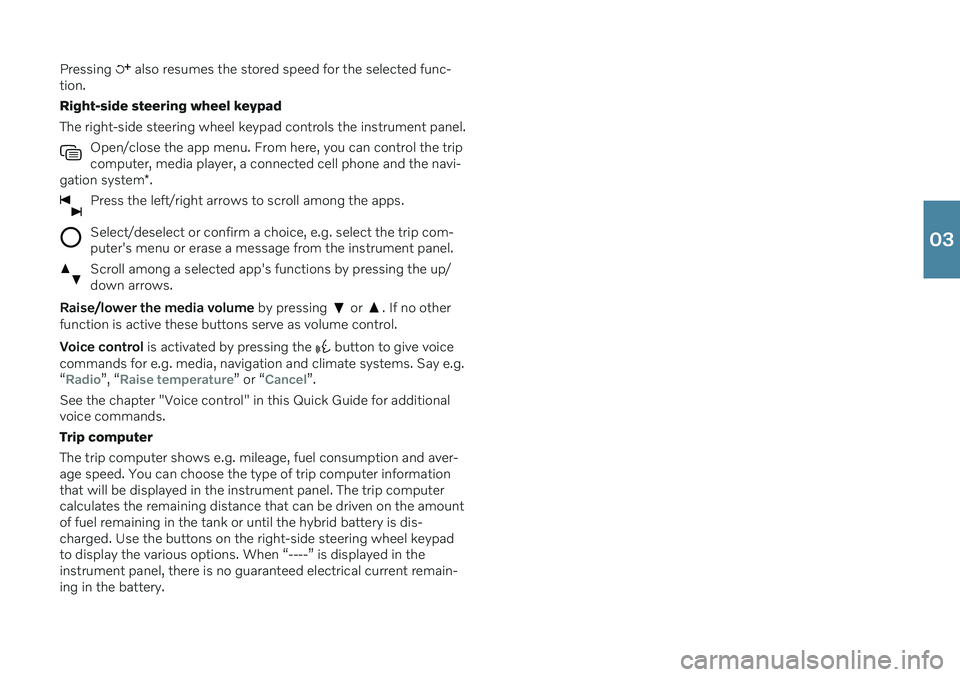
tion. Right-side steering wheel keypadThe right-side steering wheel keypad controls the instrument panel.
Open/close the app menu. From here, you can control the trip computer, media player, a connected cell phone and the navi-
gation system *.
Press the left/right arrows to scroll among the apps.
Select/deselect or confirm a choice, e.g. select the trip com- puter's menu or erase a message from the instrument panel.
Scroll among a selected app's functions by pressing the up/ down arrows.
Raise/lower the media volume by pressing or . If no other
function is active these buttons serve as volume control. Voice control is activated by pressing the
button to give voice
commands for e.g. media, navigation and climate systems. Say e.g. “
Radio”, “Raise temperature” or “Cancel”.
See the chapter "Voice control" in this Quick Guide for additional voice commands. Trip computerThe trip computer shows e.g. mileage, fuel consumption and aver- age speed. You can choose the type of trip computer information that will be displayed in the instrument panel. The trip computer calculates the remaining distance that can be driven on the amountof fuel remaining in the tank or until the hybrid battery is dis-charged. Use the buttons on the right-side steering wheel keypadto display the various options. When “----” is displayed in theinstrument panel, there is no guaranteed electrical current remain-ing in the battery.
03
Page 25 of 48
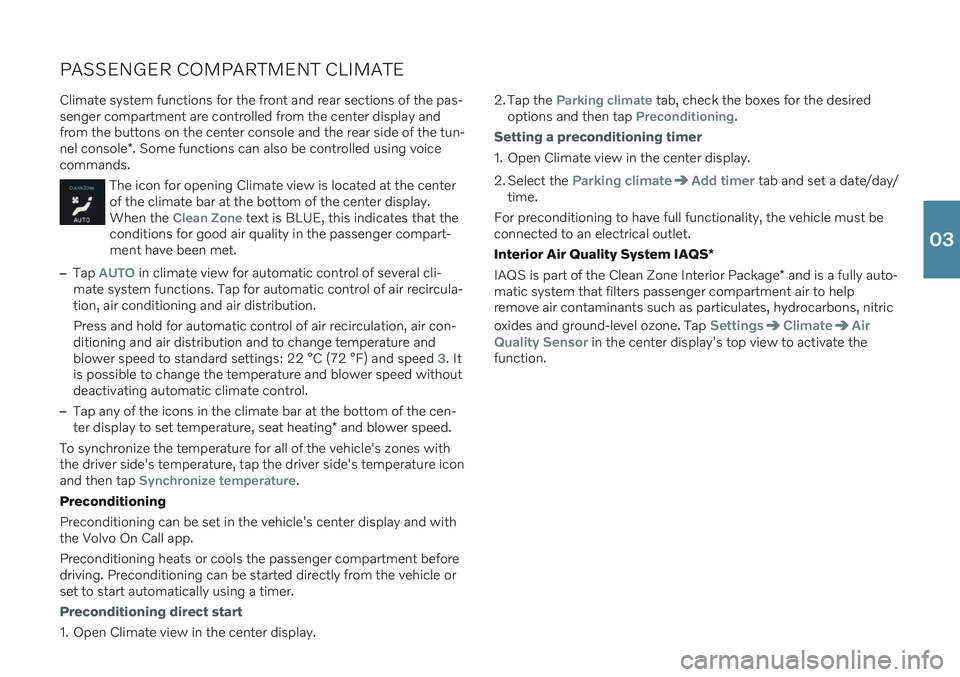
PASSENGER COMPARTMENT CLIMATEClimate system functions for the front and rear sections of the pas- senger compartment are controlled from the center display andfrom the buttons on the center console and the rear side of the tun- nel console *. Some functions can also be controlled using voice
commands.
The icon for opening Climate view is located at the center of the climate bar at the bottom of the center display.When the
Clean Zone text is BLUE, this indicates that the
conditions for good air quality in the passenger compart- ment have been met.
–Tap AUTO in climate view for automatic control of several cli-
mate system functions. Tap for automatic control of air recircula- tion, air conditioning and air distribution. Press and hold for automatic control of air recirculation, air con- ditioning and air distribution and to change temperature andblower speed to standard settings: 22 °C (72 °F) and speed
3. It
is possible to change the temperature and blower speed without deactivating automatic climate control.
–Tap any of the icons in the climate bar at the bottom of the cen- ter display to set temperature, seat heating * and blower speed.
To synchronize the temperature for all of the vehicle's zones with the driver side's temperature, tap the driver side's temperature iconand then tap
Synchronize temperature.
Preconditioning Preconditioning can be set in the vehicle's center display and with the Volvo On Call app. Preconditioning heats or cools the passenger compartment before driving. Preconditioning can be started directly from the vehicle orset to start automatically using a timer.
Preconditioning direct start
1. Open Climate view in the center display. 2. Tap the
Parking climate tab, check the boxes for the desired
options and then tap Preconditioning.
Setting a preconditioning timer
1. Open Climate view in the center display.
2. Select the
Parking climateAdd timer tab and set a date/day/
time.
For preconditioning to have full functionality, the vehicle must be connected to an electrical outlet. Interior Air Quality System IAQS *
IAQS is part of the Clean Zone Interior Package * and is a fully auto-
matic system that filters passenger compartment air to help remove air contaminants such as particulates, hydrocarbons, nitric oxides and ground-level ozone. Tap
SettingsClimateAir
Quality Sensor
in the center display's top view to activate the
function.
03
Page 42 of 48
VOICE COMMANDSThe voice control system makes it possible to control certain func- tions in the media player, Bluetooth-connected phones, climate system and the Volvo navigation system * using predefined voice
commands 13
. To activate voice control, press the voice control but-
ton in the right-side steering wheel keypad. The following commands can usually be used in any situation:
Repeat: Repeats the most recent voice command in the current
dialog.
Help: initiates a help dialog. The system responds with com-
mands that can be used in the current situation, an instruction or an example.
Cancel: Cancels the dialog 14
. Cell phone voice commands
Call [contact]
Call [phone number]
Recent calls
Read message
Message to [contact]
Radio and media voice commands
Media
Play [artist]
Play [song title]
Play [song title] from [album]
Play [radio station]
Tune to [frequency]
Tune to [frequency] [waveband]
Radio
Radio FM
SiriusXM*
USB
iPod
Bluetooth
Similar music
Climate system voice commands
Climate
Set temperature to X degrees
Raise temperature/Lower temperature
Sync temperature
Air on feet/Air on body
Air on feet off/Air on body off
06
Page 45 of 48
suggested by Park Assist Pilot is suitable for parking. Park Assist Camera is supplementary driver
support intended to assist when parking the vehicle. The function is never a substitute for thedriver's attention and judgment. The camerashave dead/blind spots where objects cannot bedetected. Pay particular attention to people andanimals near the vehicle. Bear in mind that thefront end of the vehicle may swing out towardsoncoming traffic during the parking maneuver. Before driving your vehicle, read all sections of the Owner's Manual concerning driver supportsystems in the vehicle. VOICE COMMANDS The driver is always responsible for ensuring that the vehicle is operated in a safe manner and thatall applicable traffic regulations are followed.
CAUTION
INTERIOR OVERVIEW Start knob – The vehicle cannot be started if the
charging cable is still plugged in. Make sure that the charging cable is removed from the chargingsocket before starting the vehicle. The information is projected from a head-up
display unit * located in the dashboard. To help
prevent damage to the display unit's glass cover, do not place any objects on the glass and pre-vent objects from falling onto it. CENTER DISPLAY When cleaning the center display, use a micro-
fiber cloth that is free from sand and similar deb- ris. When cleaning the center display, apply onlylight pressure to the display. Pressing too hardcould damage the display. Do not spray liquid or corrosive chemicals directly onto the center display. Do not use win-dow cleaners, cleaning agents, aerosol sprays,solvents, alcohol, ammonia or detergents thatcontain abrasives. Never use abrasive cloths,paper towels or tissue paper, as these mayscratch the display. CHARGING THE HYBRID BATTERY Charging cable
- Never connect the charging
cable if there is a risk of a thunderstorm or there is lightning. Never detach the charging cablefrom the 120/240-volt outlet while charging isin progress – the 120/240-volt outlet could bedamaged in such circumstances. Always inter-rupt charging first and then disconnect thecharging cable – first from the vehicle's chargingsocket and then from the 120/240 V outlet. Power strips, extension cords, surge protectors or similar devices must not be used togetherwith the charging cable since this may involve arisk of fire, electric shocks, etc. An adapter maynot be used between the 120/240-volt outletand the charging cable. Control unit – Avoid exposing the control unit
and its plug to direct sunlight. In such cases, the overheating protection in the plug could reduceor cut off charging of the hybrid battery. Check that the 120/240-volt outlet has a power supply sufficient for charging electric vehicles –if uncertain, you should have the outlet checkedby a professional. Wipe the charging cable with a clean cloth lightly moistened with water or a mild detergent.Do not use chemicals or solvents. Do not sub-merge the charging cable. Only use the charging cable provided with your vehicle or a replacement cable purchased from aVolvo retailer.
Check the capacity of the socket.
Other electronic equipment connected on thesame fuse circuit must be disconnected if thetotal load is exceeded.
Do not connect the charging cable if thesocket is damaged.
Make sure that the fuse to the wall outlet canhandle the current specified for the chargingcable.
FOLDING THE BACKRESTS IN THE REAR SEAT When the backrest is folded down, make sure there are no objects in the rear seat, and the seatbelts are not buckled. The armrest
* on the center seating position must
be in the stowed position. RIGHT-SIDE STEERING WHEEL LEVER Wiper blades in service position - Before plac-
ing the wipers in service position, ensure that they have not frozen to the windshield. If thewiper arms in service position are raised fromthe windshield, they must be folded backagainst the windshield before activating wiping,washing or rain sensor as well as before depar-ture. This is to prevent scratching the paint onthe hood. CONNECTIONS Electrical outlet – Each 12-volt socket can sup-
ply a maximum of 120 W (10 A).
NOTE
EXTERIOR OVERVIEW Foot-operated trunk lid - There is a risk of
reduced or lost function if there are large amounts of snow, ice, dirt, etc. on the rearbumper. Make sure to keep the bumper clean. Please note that the function for foot-operated opening * of the trunk lid is only available in com-
bination with the keyless locking/unlockingfunction *.
Please note that the system could be inadver- tently activated in a car wash or similar if theremote key is within range. Electromagnetic fields and obstructing objects may interfere with remote key functions . Avoid
storing the remote key near metal objects orelectronic devices, e.g. cell phones, tablets, lap-tops or chargers – preferably no closer than10-15 cm (4-6 in.). INTERIOR OVERVIEW With a cold start , idling speed may be consider-
ably higher than normal for certain engine types. This is done to get the emissions system up tonormal operating temperature as quickly as pos-sible, which minimizes exhaust emissions andprotects the environment. Head-up display * – When a City Safety function
is activated, the information in the head-up dis- play will be replaced by a City Safety graphic. This graphic will illuminate even if the head-updisplay is turned off. The driver's ability to see information in the head-up display may be impeded by the use ofe.g. polarizing sunglasses, a driving posture inwhich the driver is not centered in the seat,objects on the display unit's glass cover and/orunfavorable lighting conditions. People with cer-tain types of vision problems may experienceheadaches or eye strain when using the head-updisplay. STEERING WHEEL Trip computer
- Calculation of driving range
may vary if your driving style changes. PASSENGER COMPARTMENT CLIMATE Heating/cooling cannot be accelerated by choosing a higher/lower temperature than thedesired temperature. Preconditioning is only available when the vehi-
cle is connected to an electrical outlet. A charg- ing post that is not always active, for examplebecause of a timer, can cause loss of function forpreconditioning. If the vehicle is not connectedto an electrical socket it is still possible in awarm climate to achieve brief cooling of the pas-senger compartment by direct starting precondi-tioning. The vehicle doors and windows shouldbe closed during preconditioning of the passen-ger compartment. CONNECTIONS Vehicle modem – Please note that the SIM
card used for Internet connection via P-SIM must have a different phone number than theSIM card used by the cellular phone. If the cardshave the same number, calls will not be con-nected correctly to the phone. Use a SIM cardwith a separate phone number for the Internetconnection or a data card that does not handlephone calls and therefore cannot interfere withphone function. Internet - Data (data traffic) is transfered when
using the Internet, which can incur additional costs. Activating data roaming and Wi-Fi hot-spots can incur additional charges. Contact your
07