light VOLVO S60 TWIN ENGINE 2019 Owners Manual
[x] Cancel search | Manufacturer: VOLVO, Model Year: 2019, Model line: S60 TWIN ENGINE, Model: VOLVO S60 TWIN ENGINE 2019Pages: 645, PDF Size: 13.96 MB
Page 407 of 645

STARTING AND DRIVING
* Option/accessory.405
Hill Start Assist
The function for assisting when starting the vehi-
cle on inclines (HSA4) helps prevent the vehiclefrom rolling backward when starting on an uphillgradient. When backing up a hill, HSA helpsprevent the vehicle from rolling forward.
The function retains pressure from the brakepedal in the brake system for several secondsafter the brake pedal has been released.
This temporary braking effect is released after afew seconds or when the driver begins driving.
Hill Start Assist is available even when the Auto-hold brake function is switched off.
Related information
Auto-hold brakes (p. 403)
Brakes (p. 397)
Braking assist after a collision
In a collision in which the activation level isreached for the pyrotechnic seat belt tensionersor airbags, or if a collision with a large animal isdetected, the vehicle's brakes will be automati-cally activated. This function is intended to helpprevent or reduce the effects of any subsequentcollision.
After a serious collision, it may no longer be pos-sible to control and steer the vehicle. In order toavoid or mitigate a possible further collision witha vehicle or an object in the vehicle's path, thebrake assist system is activated automatically tohelp stop the vehicle safely.
The brake lights and hazard warning flashers areactivated during braking. When the vehicle hasstopped, the hazard warning flashers will con-tinue to flash and the parking brake will beapplied.
If braking is not appropriate, e.g. if there is a riskof being hit by passing traffic, the driver can over-ride the system by depressing the acceleratorpedal.
This function assumes that the brake system isintact after a collision.
Brake assist is part of the Rear Collision Warningand Blind Spot Information safety systems.
Related information
Rear Collision Warning (p. 320)
BLIS* (p. 321)
Brake functions (p. 396)
4Hill Start Assist
Page 415 of 645

STARTING AND DRIVING
}}
413
Hybrid
This is the default mode in which the electricmotor and combustion engine work together.
The vehicle starts in Hybrid mode. The controlsystem uses both the electric motor and the gas-oline engine - separately or in tandem - and cal-culates optimal utilization with regard to perform-ance, fuel consumption and comfort. Drivingcapacity on the electric motor alone is deter-mined by factors such as the hybrid battery'scharge level, the need for heat or cooling in thepassenger compartment, etc.
If there is sufficient charge in the battery, it ispossible to drive solely on electric power. Whenthe accelerator pedal is pressed, only the electricmotor will be activated until the battery reaches acertain charge level. Above this level, the currentin the battery cannot supply the power requestedby the accelerator pedal and the combustionengine will start.
When the hybrid battery's charge level is low, thecombustion engine will start more frequently tosave the remaining current in the battery. Chargethe hybrid battery from a 120-240 volt outletusing a charging cable, or activate Charge inFunction view to reset the option of only usingthe electric motor.
This drive mode is designed for low energy con-sumption with an optimized mix between theelectric motor and gasoline engine, without com-promising on climate comfort or driving experi-
ence. When faster acceleration is requested bythe driver, the electric driveline will be utilized tohelp provide maximum additional power.
The vehicle also monitors the driving conditionsand automatically engages all-wheel drive if nec-essary. All-wheel drive and extra electric powerare always available regardless of the battery'scharging status.
Information in the instrument panel
When driving in Hybrid mode, a hybrid gauge willbe displayed in the instrument panel. The gaugewill indicate the amount of electrical currentrequired when the driver depresses the accelera-tor pedal. The marker between the lightning andthe drop shows how much current is available.
The instrument panel gauge when both the electricmotor and the combustion engine are being used.
The instrument panel also shows howmuch current is being restored to thebattery (regenerated) during light brak-ing.
Pure
Uses the electric motor only, with the lowestpossible energy consumption and carbondioxide emissions.
This drive mode maximizes the use of the hybridbattery. Certain climate system functions arereduced to provide the longest distance usingonly electricity.
Pure mode is available when the hybrid battery issufficiently charged. Even in Pure mode, thecombustion engine will start if the charge level inthe battery gets too low. The combustion enginewill also start
if the vehicle's speed goes above 125 km/h(78 mph)
if the driver requests more power than theelectric motor can provide
if factors such as cold weather affect thesystem or components.
Page 416 of 645

||
STARTING AND DRIVING
414
This drive mode is optimized for maximum drivingdistance with electric propulsion and is primarilyintended for use in city driving. Pure helps pro-vide the lowest possible consumption even whenthe hybrid battery is fully discharged. ECO climateis activated to control the climate in the passen-ger compartment, and in slippery road conditionsslightly more wheel spin may be permitted beforeall-wheel drive is automatically activated.
ECO Climate
In Pure mode, ECO climate is automatically acti-vated in the passenger compartment to helpreduce energy consumption.
NOTE
When the Pure drive mode is activated, set-tings for certain climate system and electricityconsuming functions are reduced. Some ofthese settings can be reset manually, but fullfunctionality will only be restored by leavingPure mode or adapting the Individual drivemode to full climate system functionality.
If condensation forms on the windows, tap themax defroster button, which will function normally.
Constant AWD
Improves the vehicle's traction and handlingby increasing all-wheel drive.
This drive mode locks the vehicle in all-wheeldrive. An optimal distribution between front andrear axle torque helps provide the best possible
control, stability and traction, e.g. on slipperyroads or when towing a heavy trailer or anothervehicle. The Constant AWD drive mode isalways available regardless of the hybrid battery'scharge status.
Both the combustion engine and the electricmotor are engaged to enable all-wheel drive,which results in higher fuel consumption.
In the other drive modes, the vehicle automati-cally adapts the need for all-wheel drive accord-ing to the road surface, and can activate the elec-tric motor or start the combustion engine as nee-ded.
Power
The vehicle gets sportier driving characteris-tics and a faster acceleration response.
This drive mode maximizes the combined powerfrom the combustion engine and the electricmotor by providing power to both the front andrear wheels. Gear shifting will be faster and moredistinct and the transmission will prioritize gearswith a higher traction force. Steering response isfaster and suspension is stiffer.
Both the combustion engine and the electricmotor are engaged to enable all-wheel drive,which results in higher fuel consumption.
This drive mode is optimized for maximum per-formance and throttle response. It changes thethrottle response, gear shifting program andturbo boost system. Chassis settings and steer-ing and brake response are also optimized. The
Power drive mode is always available regardlessof the hybrid battery's charge status.
Page 426 of 645

STARTING AND DRIVING
424
Preparing for a long trip
It is important to have the vehicle's systems andequipment checked carefully before driving longdistances.
Check that
the engine is running properly and that fuelconsumption is normal
there are no leaks (fuel, oil or other fluid)
the brake pedal is functioning optimally
all lights are working ‒ adjust the headlightheight if the vehicle is carrying a heavy load
tire tread depth and air pressure are at cor-rect levels. Change to snow tires when driv-ing in areas where there is a risk of snowy oricy roads
the start battery is sufficiently charged
the wiper blades are in good condition
Related information
Checking tire pressure (p. 519)
Filling washer fluid (p. 609)
Winter driving (p. 424)
Economical driving (p. 420)
Vehicle modem settings (p. 497)
Loading recommendations (p. 551)
Driving with a trailer (p. 434)
Pilot Assist (p. 281)
Tire sealing system (p. 534)
Winter driving
It is important to check the vehicle before drivingin cold/snowy conditions to make sure it can bedriven safely.
Before the cold season arrives:
Make sure the engine coolant contains 50%antifreeze. This mixture helps protect theengine from frost erosion down toapprox. -35 °C (-31 °F). Do not mix differenttypes of antifreeze as this could pose ahealth risk.
Keep the fuel tank well filled to prevent con-densation from forming.
Check the viscosity of the engine oil. Oil withlow viscosity (thinner oil) improves cold-weather starting and reduces fuel consump-tion when driving with a cold engine.
CAUTION
Low-viscosity oil should not be used with harddriving or in hot weather.
Check the condition and charge level of thestart battery. Cold weather places greaterdemands on the start battery and reduces itscapacity.
Use washer fluid containing antifreeze tohelp prevent ice from forming in the washerfluid reservoir.
Slippery driving conditions
For optimal traction and roadholding, Volvo rec-ommends using snow tires on all wheels when-ever there is a risk of snow or ice on the road.
NOTE
Certain countries require use of winter tiresby law. Not all countries permit the use ofstudded tires.
Practice driving on slippery surfaces under con-trolled conditions to learn how the vehicle reacts.
Related information
Snow tires (p. 533)
Snow chains (p. 533)
Braking on salted roads (p. 399)
Braking on wet roads (p. 399)
Filling washer fluid (p. 609)
Start battery (p. 574)
Replacing windshield wiper blades (p. 607)
Refilling coolant (p. 571)
Page 427 of 645

STARTING AND DRIVING
}}
425
Driving through standing water
It may be necessary to drive the vehicle throughstanding water, e.g. deep puddles or flooding onthe road. This must be done with great caution.
To help prevent damage to the vehicle when driv-ing through water:
Do not drive in water higher than the floor ofthe vehicle. If possible, check the depth ofthe water at its deepest point before drivingthrough it. Be particularly careful when driv-ing through flowing water.
Do not drive faster than walking speed.
Do not stop the vehicle in the water. Drivecarefully forward or back the vehicle out ofthe water.
Remember that waves created by passingvehicles could cause the water level to riseabove the vehicle's floor level.
Avoid driving through salt water to help avoidthe risk of corrosion.
CAUTION
Parts of the vehicle (e.g. engine, transmission,driveline, electrical components, etc.) can bedamaged if the vehicle is driven through waterhigher than its floor level. Damage to anycomponents caused by flooding, vapor lock orinsufficient oil is not covered under warranty.
If the engine stalls while the vehicle is inwater, do not attempt to restart it. Have thevehicle towed on the bed of a tow truck to aworkshop - an authorized Volvo workshop isrecommended.
CAUTION
Because it can be difficult to determine thewater depth, avoid driving through standing orrunning water.
When you have passed the water, press lightly onthe brake pedal and check that the brakes arefunctioning properly. Water, mud, slush, etc. canmake the brake linings slippery, resulting indelayed braking effect.
If the vehicle is equipped with a trailer couplingcontact, clean the contact after driving in water ormud.
Related information
Recovery (p. 440)
Opening/closing the fuel filler door
A button on the instrument panel is used tounlock the fuel filler door.
An arrow next to the fuel pumpsymbol in the instrument panelindicates the side of the vehicleon which the fuel filler door islocated.
Page 428 of 645

||
STARTING AND DRIVING
426
1. Press the button on the dashboard.
>Pressure equalization in the fuel tank cau-ses a slight delay before the fuel fillerdoor opens. Fuel tank Fuel lid isopening will be displayed in the instru-ment panel, followed by Fuel tank Readyfor refueling.
NOTE
Refueling must be done within approximately15 minutes of opening the fuel filler door.After this time, the valve opened by pushingthe button for opening the fuel filler door willclose and it will no longer be possible torefuel without the pump's nozzle switching off.
If the valve is closed before refueling is com-plete - press the button again and wait untilthe driver display shows the message Fueltank Ready for refueling.
2. After refueling, press the fuel filler doorlightly to close it.
Related information
Refueling (p. 426)
Refueling
The fuel tank is equipped with a fuel filling sys-tem without a cover.
Refueling the vehicle at a service
station
It is important to insert the pump's nozzle past both ofthe two flaps in the fuel filler pipe before beginning fuel-ing.
Page 430 of 645

STARTING AND DRIVING
428
Fuel
Volvo recommends the use of detergent gaso-line to control engine deposits.
Deposit control gasoline (gasoline with
detergent additives)
Detergent gasoline is effective in keeping injec-tors and intake valves clean. Consistent use ofdeposit control gasolines will help ensure gooddriveability and fuel economy. If you are not surewhether the gasoline contains deposit controladditives, check with the service station operator.
NOTE
Volvo recommends not using external fuelinjector cleaning systems, e.g. do not adddetergent additives to gasoline before or afterrefueling.
Unleaded fuel
All Volvo vehicles have a three-way catalytic con-verter and must only use unleaded gasoline. USand Canadian regulations require that pumpsdelivering unleaded gasoline are labeled"UNLEADED". Only the nozzles of these pumpswill fit in your vehicle's fuel filler inlet. It is unlaw-ful to dispense leaded fuel into a vehicle labeled"unleaded gasoline only". Leaded gasoline dam-ages the three-way catalytic converter and theheated oxygen sensor system. Repeated use ofleaded gasoline will lessen the effectiveness of
the emission control system and could result inloss of emission warranty coverage. State andlocal vehicle inspection programs will makedetection of misfueling easier, possibly resultingin emission test failure for misfueled vehicles.
NOTE
Some U.S. and Canadian gasolines contain anoctane enhancing additive called methyl-cyclopentadienyl manganese tricarbonyl(MMT). If such fuels are used, your EmissionControl System performance may be affected,and the Check Engine Light (malfunctionindicator light) located on your instrumentpanel may light. If this occurs, please returnyour vehicle to a trained and qualified Volvoservice technician for service.
Gasoline containing alcohol and ethers,
"Oxygenated fuels"
Some fuel suppliers sell gasoline containing"oxygenates" which are usually alcohols orethers. In some areas, state or local laws requirethat the service pump be marked indicating useof alcohols or ethers. However, there are areas inwhich the pumps are unmarked. If you are notsure whether there is alcohol or ethers in thegasoline you buy, check with the service stationoperator. To meet seasonal air quality standards,some areas require the use of "oxygenated" fuel.
Volvo permits the use of the following "oxygen-ated" fuels. However, the specified octane ratingsmust still be met.
Alcohol - Ethanol
Fuels containing up to 10% ethanol by volumemay be used. Ethanol may also be referred to asEthyl alcohol, or "Gasohol".
Ethers - MTBE/ETBE: Fuels containing up to22% MTBE/ETBE by volume may be used.
Methanol
Do not use gasolines containing methanol(methyl alcohol, wood alcohol). This practice canresult in vehicle performance deterioration andcan damage critical parts in the fuel system. Suchdamage may not be covered under the NewVehicle Limited Warranty.
Related information
Octane rating (p. 429)
Opening/closing the fuel filler door (p. 425)
Refueling (p. 426)
Emission controls (p. 430)
Page 433 of 645

STARTING AND DRIVING
}}
431
or location or removing components, and/orrepeated use of leaded fuel.
NOTE
Unleaded fuel is required for vehicles withthree-way catalytic converters.
Heated oxygen sensors
The heated oxygen sensors monitor the oxygencontent of the exhaust gases. Readings are fedinto a control module that continuously monitorsengine functions and controls fuel injection. Theratio of fuel to air into the engine is continuouslyadjusted for efficient combustion to help reduceharmful emissions.
Related information
Octane rating (p. 429)
Fuel (p. 428)
Overheating of engine andtransmission
In certain driving conditions, such as driving inmountainous areas or hot weather, there is a riskof the engine or transmission overheating, espe-cially when carrying heavy loads.
Engine power may be temporarily limited.
Remove any auxiliary lights mounted in frontof the grille when driving in hot weather.
If the temperature in the engine's coolingsystem becomes too high, a warning symbolwill appear in the instrument panel along withthe message Engine temperature Hightemperature Stop safely. Pull over to asafe location and let the engine idle for a fewminutes to cool down.
If the message Engine temperature Hightemperature Turn off engine or Enginecoolant Level low, turn off engine is dis-played, stop the vehicle and turn off theengine.
If the transmission begins to overheat, analternative gear shifting program will beselected. An integrated protective functionwill also be activated, the warning symbol willilluminate and the message Transmissionwarm Reduce speed to lowertemperature or Transmission hot Stopsafely, wait for cooling will be displayed inthe instrument panel. Follow the recommen-dations given by reducing speed or stopping
the vehicle safely and letting the engine idlefor a few minutes to let the transmissioncool.
If the vehicle begins to overheat, the air con-ditioning may be temporarily switched off.
After a prolonged period of driving indemanding conditions, do not turn off theengine immediately after stopping.
NOTE
It is normal for the engine's cooling fan tooperate for a short time after the engine isswitched off.
Symbols in the instrument panel
SymbolMeaning
High engine temperature. Followthe recommendations provided.
Low coolant level. Follow the rec-ommendations provided.
Transmission hot/overheated/cool-ing. Follow the recommendationsprovided.
Page 434 of 645

||
STARTING AND DRIVING
432
Related information
Refilling coolant (p. 571)
Driving with a trailer (p. 434)
Preparing for a long trip (p. 424)
Battery drain
The electrical functions in the vehicle drain thebattery to varying degrees. Avoid using ignitionmode II when the engine is switched off. Useignition mode I instead, as this uses less electri-cal current.
Note that certain accessories may also drainpower from the electrical system. Do not usefunctions that use a lot of electrical current whenthe engine is turned off. Examples of such func-tions are:
blower
headlights
windshield wipers
audio system (especially at high volume).
If the starter battery voltage is low, a message isshown in the driver display. The vehicle's energy-saving function will then turn off or reduce certainfunctions, such as the blower and/or the audiosystem.
–Charge the battery by starting the engineand let it run for at least 15 minutes (drivingcharges the battery faster than letting theengine idle).
Related information
Start battery (p. 574)
Ignition modes (p. 395)
Jump starting using another battery
If the start battery is discharged, current fromanother battery can be used to start the vehicle.
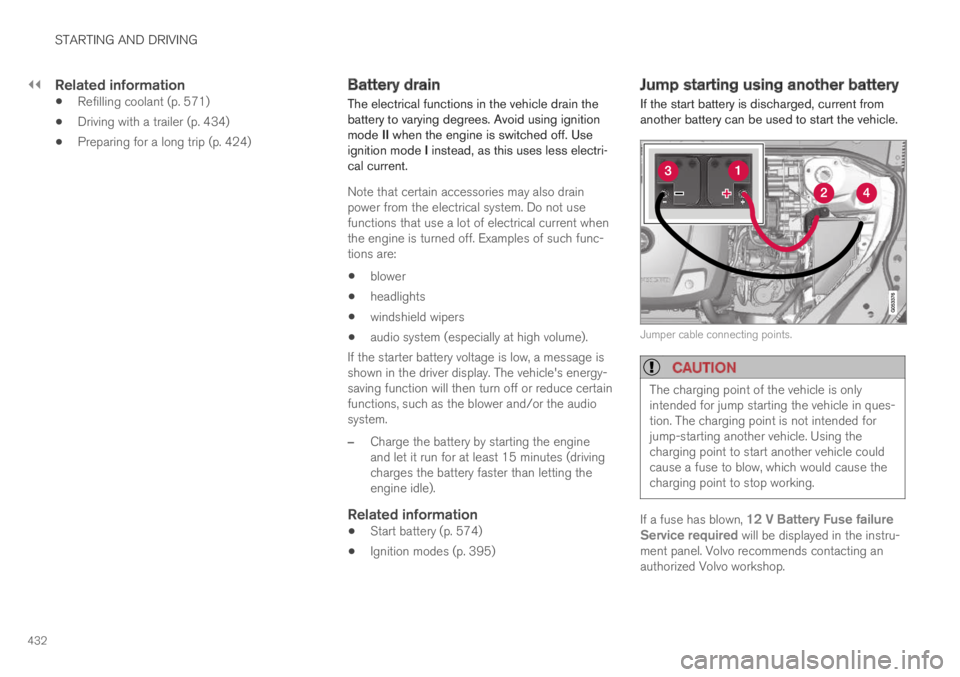
Jumper cable connecting points.
CAUTION
The charging point of the vehicle is onlyintended for jump starting the vehicle in ques-tion. The charging point is not intended forjump-starting another vehicle. Using thecharging point to start another vehicle couldcause a fuse to blow, which would cause thecharging point to stop working.
If a fuse has blown, 12 V Battery Fuse failureService required will be displayed in the instru-ment panel. Volvo recommends contacting anauthorized Volvo workshop.
Page 435 of 645

STARTING AND DRIVING
}}}}
433
To avoid short circuits or other damage, the fol-lowing steps are recommended when jump star-ting the battery:
1.Put the ignition in mode 0.
2.Make sure the auxiliary battery (the batteryused to jump start the discharged battery)has a voltage of 12 volts.
3. If the auxiliary battery is in another vehicle,turn off that vehicle's engine and make surethat the vehicles are not touching each other.
4. Clamp the red jumper cable onto the auxiliarybattery's positive (+) terminal (1).
CAUTION
Connect the jump cable carefully to preventshort circuits with other components in theengine compartment.
5. Fold back the cover over your vehicle's posi-tive (+) jump start terminal (2).
6.Clamp the other end of the red jumper cableto your vehicle's positive (+) jump start termi-nal (2).
7. Clamp the black jumper cable onto the auxili-ary battery's negative (-) terminal (3).
8. Clamp the other end of the black jumpercable to your vehicle's negative (-) groundpoint (4).
9. Make sure the jumper cables are securelyattached to help prevent sparks while jumpstarting.
10. Start the engine of the assisting vehicle andlet it run for a few minutes at a higher idlingspeed than normal, about 1500 rpm.
11. Start your vehicle's engine. If the enginedoes not start, allow an additional 10minutes of charging time and then try to startthe engine again.
NOTE
When the engine is started under normalconditions, the vehicle's electrical drive motoris prioritized – the gasoline engine remainsoff. This means that after the start knob hasbeen turned clockwise, the electric motor has"started" and the vehicle is ready to be driven.Start of the electric motor is indicated by theindicator lights on the instrument panel goingout and its preselected theme illuminating.
CAUTION
Do not touch the connections between thecable and the vehicle during the start attempt.Risk of sparking.
12. Remove the jumper cables in the reverseorder ‒ first the black cables and then thered cables.
Make sure that none of the clamps of theblack jumper cables come into contact witheither vehicle's positive (+) jump start termi-nals or either of the red jumper cable's con-nected clamps.
WARNING
PROPOSITION 65 WARNING! Battery posts,terminals, and related accessories containlead and lead compounds, chemicals knownto the state of California to cause cancer andreproductive harm. Wash hands after han-dling.
WARNING
Batteries generate hydrogen gas, whichis flammable and explosive.
Do not connect the jumper cable to anypart of the fuel system or to any movingparts. Avoid touching hot manifolds.
Battery fluid contains sulfuric acid. Do notallow battery fluid to contact eyes, skin,fabrics or painted surfaces.