buttons VOLVO S60 TWIN ENGINE 2019 User Guide
[x] Cancel search | Manufacturer: VOLVO, Model Year: 2019, Model line: S60 TWIN ENGINE, Model: VOLVO S60 TWIN ENGINE 2019Pages: 645, PDF Size: 13.96 MB
Page 128 of 645
||
DISPLAYS AND VOICE CONTROL
126
Row showing suggestions for words or char-
acters10. The suggested words change asnew letters are entered. Scroll through thelist of suggested words by tapping the rightor left arrows. Tap a suggestion to select it.Please note that this function is not availablein all languages. When unavailable, this rowwill not be shown on the keyboard.
Available characters are adapted to the lan-guage selected for the keyboard (see num-ber 7 below). Tap a character to enter it.
Different buttons are displayed here depend-ing on the context in which the keyboard isused, e.g. @ to enter an email address or thereturn key to start a new line.
This button hides the keyboard. In caseswhere this is not possible, the button will notbe displayed.
Used to enter uppercase letters. Tap once toenter one uppercase letter and then con-tinue with lowercase letters. Tap twice forcaps lock (all text will be entered in upper-case letters). Tap again to return the key-board to lowercase letters. In this mode, thefirst letter after a period, exclamation point orquestion mark will be automatically enteredin uppercase form. The first letter entered intext fields will also be uppercase. In textfields intended for names or addresses, eachword will be automatically started with an
uppercase letter. In text fields intended forpasswords, website addresses or emailaddresses, all letters will automatically belowercase unless uppercase is selected.
Used to enter numbers. The number key-
board (2) will then be displayed. Tap ,
which is shown instead of in numbermode, to return to the keyboard with letters,
or to display the keyboard with specialcharacters.
Used to change the keyboard language, e.g.EN. The available characters and word sug-gestions (1) vary depending on the selectedlanguage. In order to toggle between key-board languages, the languages must first beadded under Settings.
Space bar.
Delete. Tap to delete characters one at atime. Press and hold to delete multiple char-acters quickly.
Used to change to handwriting mode.
Tap the confirm button over the keyboard (notshown in illustration) once to confirm the text thathas been entered. The button's appearance dif-fers depending on the context.
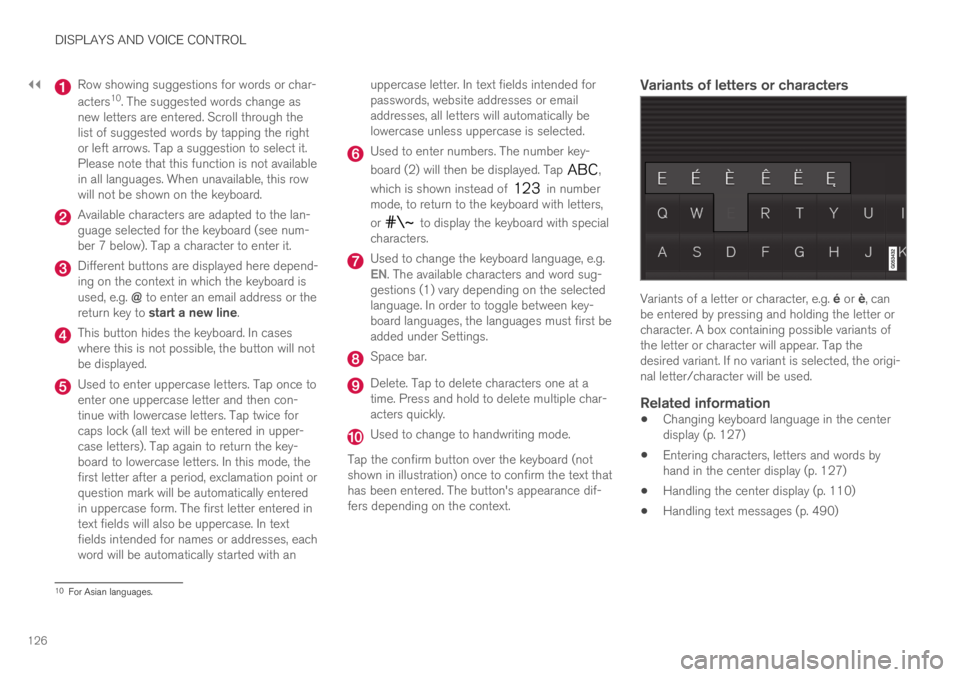
Variants of letters or characters
Variants of a letter or character, e.g. é or è, canbe entered by pressing and holding the letter orcharacter. A box containing possible variants ofthe letter or character will appear. Tap thedesired variant. If no variant is selected, the origi-nal letter/character will be used.
Related information
Changing keyboard language in the centerdisplay (p. 127)
Entering characters, letters and words byhand in the center display (p. 127)
Handling the center display (p. 110)
Handling text messages (p. 490)
10For Asian languages.
Page 140 of 645
DISPLAYS AND VOICE CONTROL
138
Messages in the center display
The center display shows messages in certaincircumstances to inform or assist the driver.
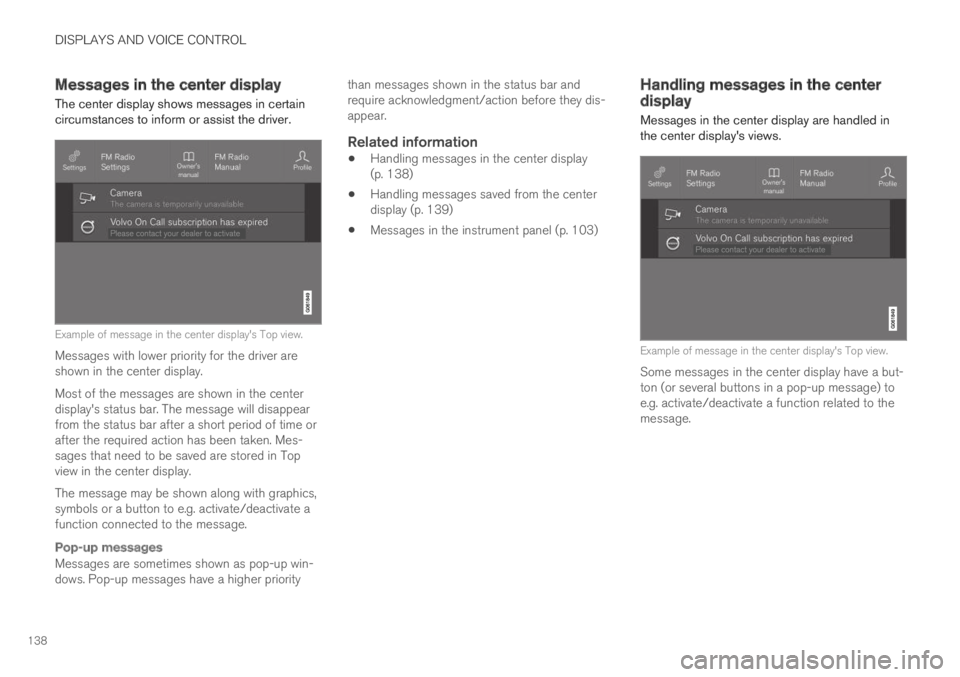
Example of message in the center display's Top view.
Messages with lower priority for the driver areshown in the center display.
Most of the messages are shown in the centerdisplay's status bar. The message will disappearfrom the status bar after a short period of time orafter the required action has been taken. Mes-sages that need to be saved are stored in Topview in the center display.
The message may be shown along with graphics,symbols or a button to e.g. activate/deactivate afunction connected to the message.
Pop-up messages
Messages are sometimes shown as pop-up win-dows. Pop-up messages have a higher priority
than messages shown in the status bar andrequire acknowledgment/action before they dis-appear.
Related information
Handling messages in the center display(p. 138)
Handling messages saved from the centerdisplay (p. 139)
Messages in the instrument panel (p. 103)
Handling messages in the centerdisplay
Messages in the center display are handled inthe center display's views.
Example of message in the center display's Top view.
Some messages in the center display have a but-ton (or several buttons in a pop-up message) toe.g. activate/deactivate a function related to themessage.
Page 141 of 645
DISPLAYS AND VOICE CONTROL
139
Handling new messages
For messages with buttons:
–Tap the button to perform the action or letthe message automatically time-out after ashort period.
>The message will disappear from the sta-tus bar.
For messages without buttons:
–Close the message by tapping it or let themessage automatically time-out after a shortperiod.
>The message will disappear from the sta-tus bar.
Messages that need to be saved are stored inTop view in the center display.
Related information
Messages in the center display (p. 138)
Handling messages saved from the centerdisplay (p. 139)
Messages in the instrument panel (p. 103)
Handling messages saved from thecenter display
Messages saved from the instrument panel andcenter displays are handled in the center display.
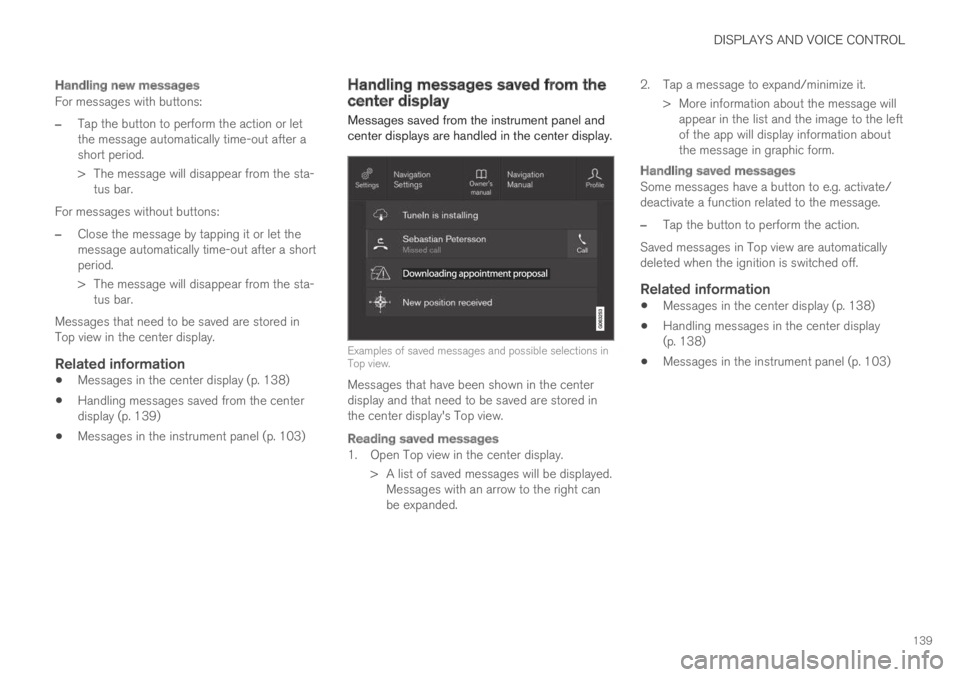
Examples of saved messages and possible selections inTop view.
Messages that have been shown in the centerdisplay and that need to be saved are stored inthe center display's Top view.
Reading saved messages
1. Open Top view in the center display.
> A list of saved messages will be displayed.Messages with an arrow to the right canbe expanded.
2. Tap a message to expand/minimize it.
> More information about the message willappear in the list and the image to the leftof the app will display information aboutthe message in graphic form.
Handling saved messages
Some messages have a button to e.g. activate/deactivate a function related to the message.
–Tap the button to perform the action.
Saved messages in Top view are automaticallydeleted when the ignition is switched off.
Related information
Messages in the center display (p. 138)
Handling messages in the center display(p. 138)
Messages in the instrument panel (p. 103)
Page 146 of 645
||
DISPLAYS AND VOICE CONTROL
* Option/accessory.144
ses from the system. The voice control systemuses the same microphone as devices connectedwith Bluetooth, and the voice control systemresponds through the vehicle's loudspeakers. Incertain cases, text messages will also be dis-played in the instrument panel. The functions arecontrolled using the right-side steering wheelkeypad and settings are made in the center dis-play.
System updates
The voice control system is continuouslyimproved. For optimal functionality, always down-load the latest update at support.volvocars.com.
Related information
Using voice commands (p. 144)
Voice control for cellular phones (p. 145)
Voice control for radio and media (p. 146)
Climate control system voice commands(p. 197)
Voice control settings (p. 147)
Using voice commands16
Press the button for voice con-
trol on the right-sidesteering wheel keypad to acti-vate the system and initiate avoice command dialog.
These may include:
Wait until after the tone, and then speak inyour normal voice at a normal speed.
Do not speak while the system is responding(the system is unable to process commandsduring this time).
Avoid background noises in the passengercompartment by keeping doors, windows andthe panoramic roof* closed.
Voice control can be canceled by:
pressing briefly and saying "Cancel".
pressing and holding the steering wheel key-
pad's voice command button until twoaudible signals are given.
To speed up the voice command dialog and skipsystem responses, press the voice command but-
ton while the system is responding and giveyour next command.
To change the audio volume of the system, turnthe volume knob while the voice is speaking. It ispossible to use other buttons while voice com-mands are being given. However, because otheraudio is silenced during dialog with the system, itis not possible to perform any functions con-nected to audio using the buttons.
Voice command examples
Press , say "Call [First name] [Last name][number category]" - calls the selected contactfrom the phone book. If the contact has severalphone numbers (e.g. home, cell, work), the rightcategory must also be given.
Press and say "Call Robyn Smithcellular".
Commands/phrases
The following commands can usually be used inany situation:
"Repeat" - repeats the most recent voicecommand in the current dialog.
"Cancel" - cancels the dialog.
"Help" - initiates a help dialog. The systemresponds with commands that can be usedin the current situation, an instruction or anexample.
15Certain markets only.16Certain markets only.
Page 170 of 645
WINDOWS, GLASS AND MIRRORS
* Option/accessory.168
Rearview/door mirrors
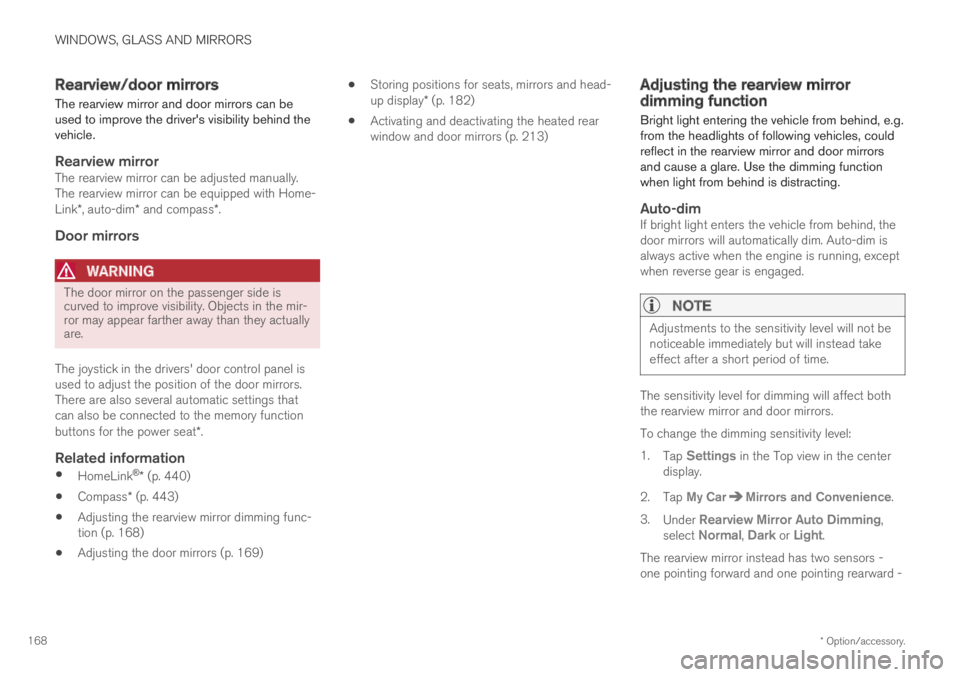
The rearview mirror and door mirrors can beused to improve the driver's visibility behind thevehicle.
Rearview mirror
The rearview mirror can be adjusted manually.The rearview mirror can be equipped with Home-Link*, auto-dim* and compass*.
Door mirrors
WARNING
The door mirror on the passenger side iscurved to improve visibility. Objects in the mir-ror may appear farther away than they actuallyare.
The joystick in the drivers' door control panel isused to adjust the position of the door mirrors.There are also several automatic settings thatcan also be connected to the memory functionbuttons for the power seat*.
Related information
HomeLink®* (p. 440)
Compass* (p. 443)
Adjusting the rearview mirror dimming func-tion (p. 168)
Adjusting the door mirrors (p. 169)
Storing positions for seats, mirrors and head-up display* (p. 182)
Activating and deactivating the heated rearwindow and door mirrors (p. 213)
Adjusting the rearview mirrordimming function
Bright light entering the vehicle from behind, e.g.from the headlights of following vehicles, couldreflect in the rearview mirror and door mirrorsand cause a glare. Use the dimming functionwhen light from behind is distracting.
Auto-dim
If bright light enters the vehicle from behind, thedoor mirrors will automatically dim. Auto-dim isalways active when the engine is running, exceptwhen reverse gear is engaged.
NOTE
Adjustments to the sensitivity level will not benoticeable immediately but will instead takeeffect after a short period of time.
The sensitivity level for dimming will affect boththe rearview mirror and door mirrors.
To change the dimming sensitivity level:
1.Tap Settings in the Top view in the centerdisplay.
2.Tap My CarMirrors and Convenience.
3.Under Rearview Mirror Auto Dimming,select Normal, Dark or Light.
The rearview mirror instead has two sensors -one pointing forward and one pointing rearward -
Page 171 of 645
WINDOWS, GLASS AND MIRRORS
}}
* Option/accessory.169
which work together to identify and eliminateglare. The forward-pointing sensor monitorsambient light, while the rearward-pointing sensormonitors light from the headlights of followingvehicles.
For the door mirrors to be equipped with auto-dim, the rearview mirror must also be equippedwith auto-dim.
NOTE
If the sensors are obstructed by e.g. a parkingpermit, transponder, sunshade or objects onthe seats or parcel shelf in a way that pre-vents light from reaching the sensors, theauto-dim function in the rearview and doormirrors will be reduced.
Related information
Rearview/door mirrors (p. 168)
Adjusting the door mirrors (p. 169)
Adjusting the door mirrors
To improve visibility to the rear, the door mirrorsneed to be adjusted to the driver's height andseating position. There are several automaticsettings that can also be connected to the mem-ory function buttons for the power seat*.
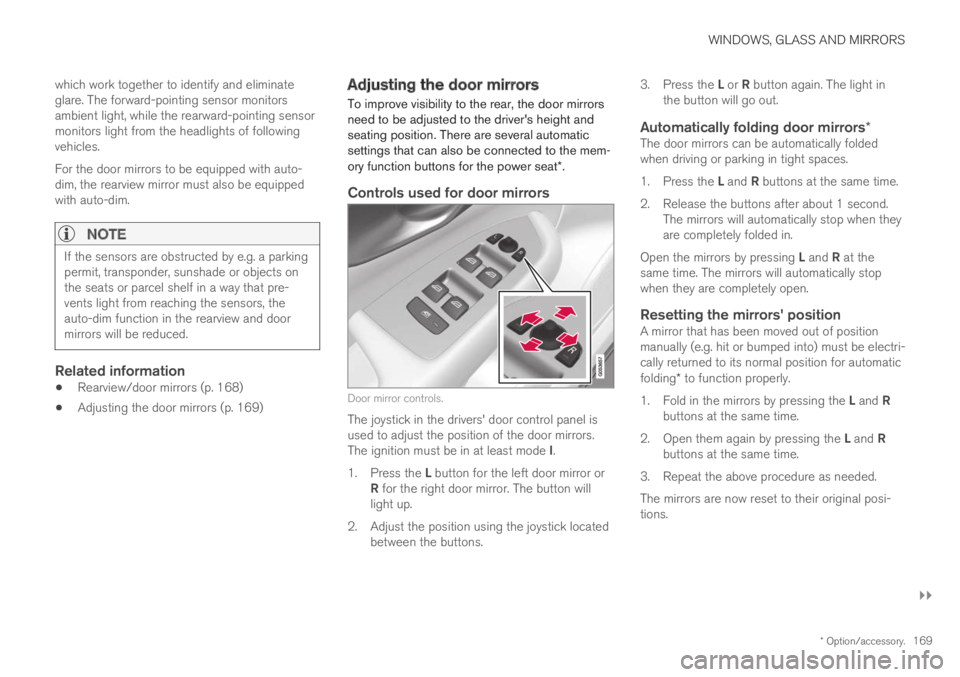
Controls used for door mirrors
Door mirror controls.
The joystick in the drivers' door control panel isused to adjust the position of the door mirrors.The ignition must be in at least mode I.
1.Press the L button for the left door mirror orR for the right door mirror. The button willlight up.
2.Adjust the position using the joystick locatedbetween the buttons.
3.Press the L or R button again. The light inthe button will go out.
Automatically folding door mirrors *
The door mirrors can be automatically foldedwhen driving or parking in tight spaces.
1.Press the L and R buttons at the same time.
2. Release the buttons after about 1 second.The mirrors will automatically stop when theyare completely folded in.
Open the mirrors by pressing L and R at thesame time. The mirrors will automatically stopwhen they are completely open.
Resetting the mirrors' position
A mirror that has been moved out of positionmanually (e.g. hit or bumped into) must be electri-cally returned to its normal position for automaticfolding* to function properly.
1.Fold in the mirrors by pressing the L and Rbuttons at the same time.
2.Open them again by pressing the L and Rbuttons at the same time.
3. Repeat the above procedure as needed.
The mirrors are now reset to their original posi-tions.
Page 172 of 645
||
WINDOWS, GLASS AND MIRRORS
* Option/accessory.170
Tilting when parking 3
The door mirrors can be tilted down to help givethe driver a better view along the sides of thevehicle, e.g. of the curb when parking.
–Select reverse gear and press the L or R mir-ror button.
Please note that the button may need to bepressed twice depending on settings. When thedoor mirror is tilted down, the light in the buttonwill flash. When reverse gear is engaged, thedoor mirrors will automatically start to move after3 seconds and will reach their original positionafter about 8 seconds.
Automatically tilting when parking 3
With this setting, the door mirrors will automati-cally tilt down when reverse gear is engaged. Thefolded position is preset and cannot be adjusted.To immediately return the door mirrors to theiroriginal position, press the L or R button twice.
1.Tap Settings in the center display's Topview.
2.Tap My CarMirrors and Convenience.
3.Under Exterior Mirror Tilt at Reverse,select Off, Driver, Passenger or Both toactivate/deactivate and to select which mir-ror to tilt.
Automatic folding when the vehicle is
locked *
The door mirrors can automatically fold in whenthe vehicle is locked and open when the vehicleis unlocked using the remote key.
1.Tap Settings in the center display's Topview.
2.Tap My CarMirrors and Convenience.
3.Select Fold Mirror When Locked to acti-vate/deactivate.
Related information
Rearview/door mirrors (p. 168)
Adjusting the rearview mirror dimming func-tion (p. 168)
Storing positions for seats, mirrors and head-up display* (p. 182)
Activating and deactivating the heated rearwindow and door mirrors (p. 213)
Panoramic roof*
The panoramic roof is divided into two glasssections. The front section can be opened verti-cally at the rear edge (ventilation position) or hor-izontally (open position). The rear section cannotbe moved.
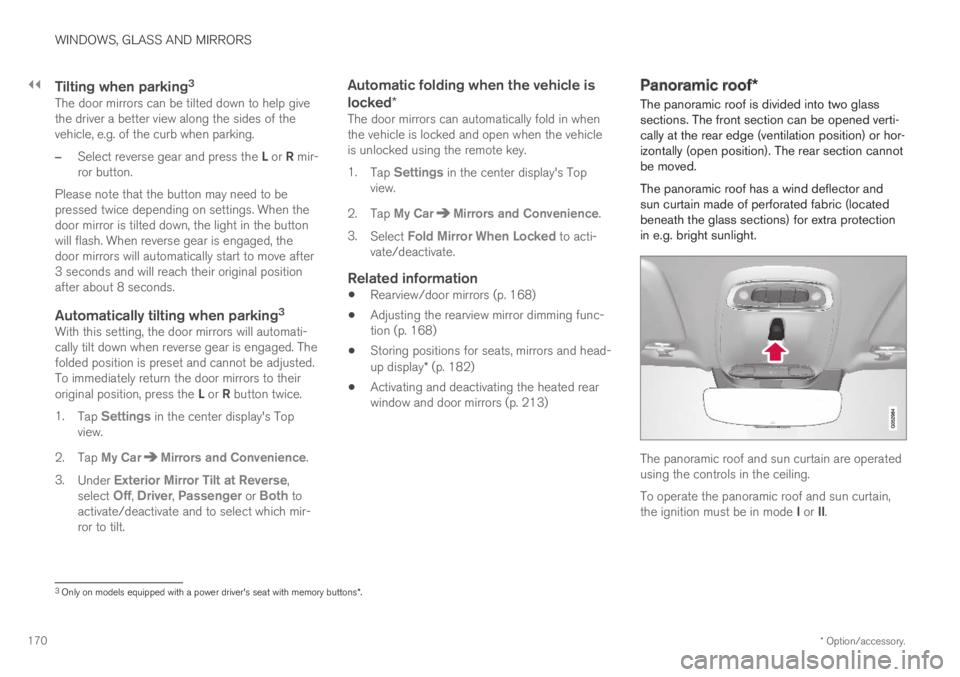
The panoramic roof has a wind deflector andsun curtain made of perforated fabric (locatedbeneath the glass sections) for extra protectionin e.g. bright sunlight.
The panoramic roof and sun curtain are operatedusing the controls in the ceiling.
To operate the panoramic roof and sun curtain,the ignition must be in mode I or II.
3
Only on models equipped with a power driver's seat with memory buttons * .
Page 184 of 645
||
SEATS AND STEERING WHEEL
* Option/accessory.182
Raise/lower the seat by moving the controlup/down.
Move the seat forward/rearward by movingthe control forward/rearward.
Change the backrest tilt by moving the con-trol forward/backward.
Only one movement (forward/rearward/up/down) can be performed at a time.
The front seat backrests cannot be folded downcompletely.
Related information
Manual front seats (p. 180)
Power* front seats (p. 181)
Storing positions for seats, mirrors and head-up display* (p. 182)
Using stored positions for seats, mirrors andhead-up display* (p. 183)
Adjusting front seat massage settings*(p. 185)
Adjusting* front seat cushion length (p. 185)
Front seat massage* settings (p. 184)
Adjusting front seat side bolster settings*(p. 186)
Adjusting front seat lumbar support* (p. 187)
Adjusting the passenger seat from the driv-er's seat* (p. 188)
Storing positions for seats, mirrors
and head-up display*
Adjustment settings for the power* seat, doormirrors and head-up display* can be stored inthe memory buttons.
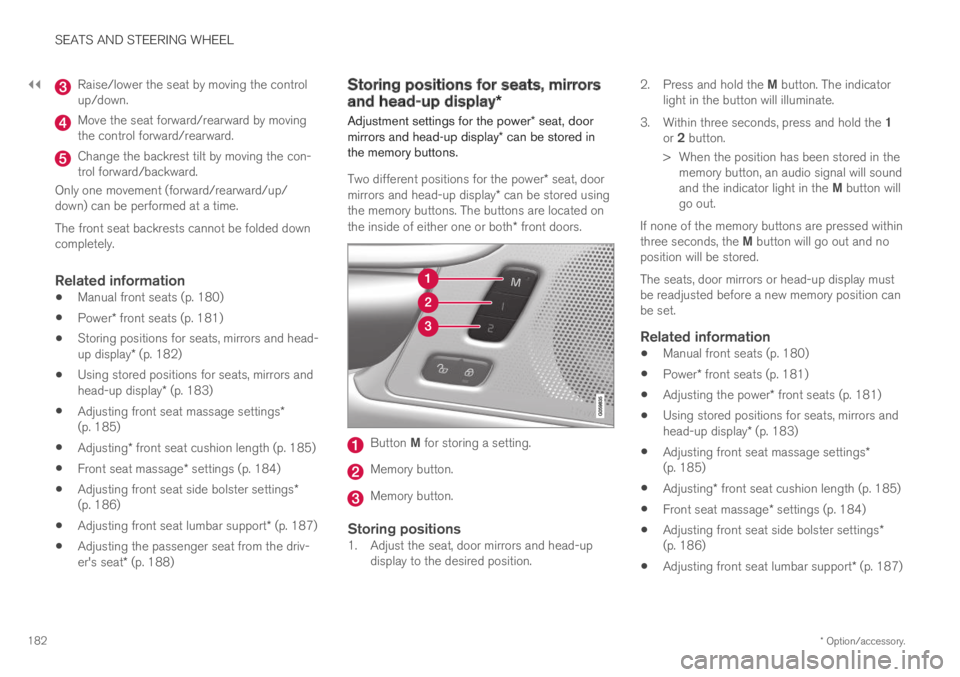
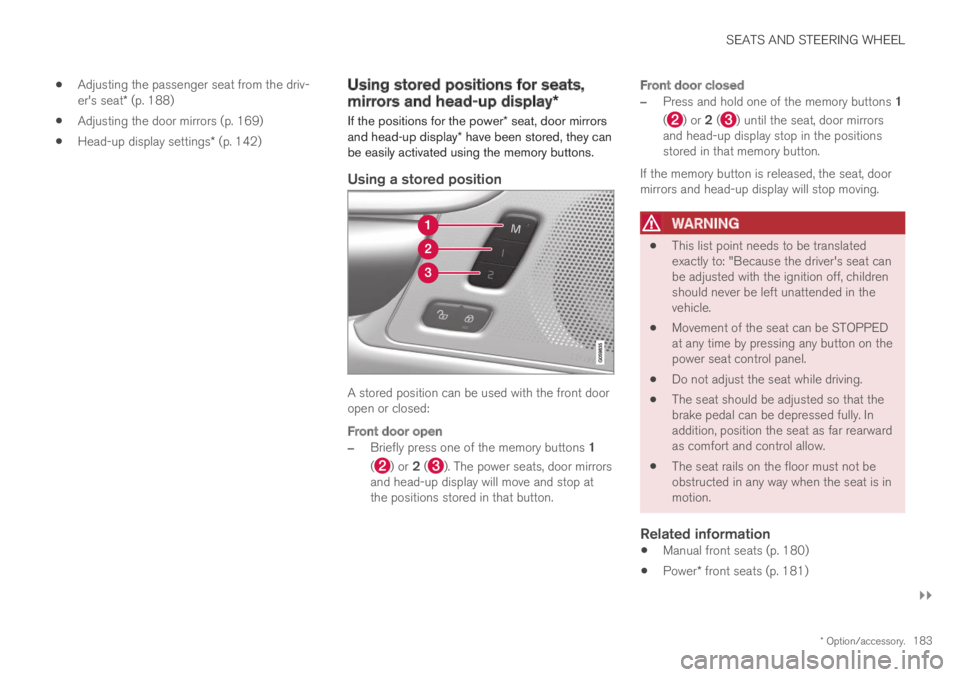
Two different positions for the power* seat, doormirrors and head-up display* can be stored usingthe memory buttons. The buttons are located onthe inside of either one or both* front doors.
Button M for storing a setting.
Memory button.
Memory button.
Storing positions
1. Adjust the seat, door mirrors and head-updisplay to the desired position.
2.Press and hold the M button. The indicatorlight in the button will illuminate.
3.Within three seconds, press and hold the 1or 2 button.
> When the position has been stored in thememory button, an audio signal will soundand the indicator light in the M button willgo out.
If none of the memory buttons are pressed withinthree seconds, the M button will go out and noposition will be stored.
The seats, door mirrors or head-up display mustbe readjusted before a new memory position canbe set.
Related information
Manual front seats (p. 180)
Power* front seats (p. 181)
Adjusting the power* front seats (p. 181)
Using stored positions for seats, mirrors andhead-up display* (p. 183)
Adjusting front seat massage settings*(p. 185)
Adjusting* front seat cushion length (p. 185)
Front seat massage* settings (p. 184)
Adjusting front seat side bolster settings*(p. 186)
Adjusting front seat lumbar support* (p. 187)
Page 185 of 645
SEATS AND STEERING WHEEL
}}
* Option/accessory.183
Adjusting the passenger seat from the driv-er's seat* (p. 188)
Adjusting the door mirrors (p. 169)
Head-up display settings* (p. 142)
Using stored positions for seats,
mirrors and head-up display*
If the positions for the power* seat, door mirrorsand head-up display* have been stored, they canbe easily activated using the memory buttons.
Using a stored position
A stored position can be used with the front dooropen or closed:
Front door open
–Briefly press one of the memory buttons 1
() or 2 (). The power seats, door mirrorsand head-up display will move and stop atthe positions stored in that button.
Front door closed
–Press and hold one of the memory buttons 1
() or 2 () until the seat, door mirrorsand head-up display stop in the positionsstored in that memory button.
If the memory button is released, the seat, doormirrors and head-up display will stop moving.
WARNING
This list point needs to be translatedexactly to: "Because the driver's seat canbe adjusted with the ignition off, childrenshould never be left unattended in thevehicle.
Movement of the seat can be STOPPEDat any time by pressing any button on thepower seat control panel.
Do not adjust the seat while driving.
The seat should be adjusted so that thebrake pedal can be depressed fully. Inaddition, position the seat as far rearwardas comfort and control allow.
The seat rails on the floor must not beobstructed in any way when the seat is inmotion.
Related information
Manual front seats (p. 180)
Power* front seats (p. 181)
Page 187 of 645
SEATS AND STEERING WHEEL
}}
* Option/accessory.185
Adjusting front seat massage
settings*
The settings for the multifunctional seats can beadjusted using either the mutifunction control onthe seat or the center display. The adjustmentsettings are shown in the center display.
Adjusting front seat massage settings
The front seat backrests have a massage func-tion. Air-filled cushions provide the massagingaction and a number of settings are available.
The massage function can only be activatedwhen the engine is running.
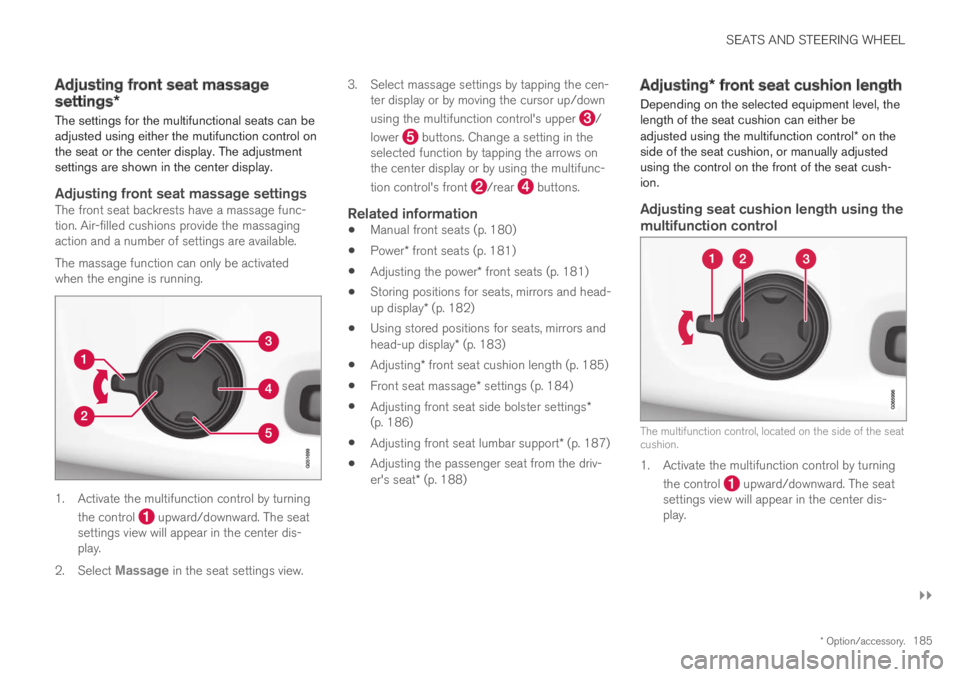
1. Activate the multifunction control by turning
the control upward/downward. The seatsettings view will appear in the center dis-play.
2.Select Massage in the seat settings view.
3.Select massage settings by tapping the cen-ter display or by moving the cursor up/down
using the multifunction control's upper /
lower buttons. Change a setting in theselected function by tapping the arrows onthe center display or by using the multifunc-
tion control's front /rear buttons.
Related information
Manual front seats (p. 180)
Power* front seats (p. 181)
Adjusting the power* front seats (p. 181)
Storing positions for seats, mirrors and head-up display* (p. 182)
Using stored positions for seats, mirrors andhead-up display* (p. 183)
Adjusting* front seat cushion length (p. 185)
Front seat massage* settings (p. 184)
Adjusting front seat side bolster settings*(p. 186)
Adjusting front seat lumbar support* (p. 187)
Adjusting the passenger seat from the driv-er's seat* (p. 188)
Adjusting* front seat cushion length
Depending on the selected equipment level, thelength of the seat cushion can either beadjusted using the multifunction control* on theside of the seat cushion, or manually adjustedusing the control on the front of the seat cush-ion.
Adjusting seat cushion length using the
multifunction control
The multifunction control, located on the side of the seatcushion.
1. Activate the multifunction control by turning
the control upward/downward. The seatsettings view will appear in the center dis-play.