mirror VOLVO S60 TWIN ENGINE 2019 User Guide
[x] Cancel search | Manufacturer: VOLVO, Model Year: 2019, Model line: S60 TWIN ENGINE, Model: VOLVO S60 TWIN ENGINE 2019Pages: 645, PDF Size: 13.96 MB
Page 135 of 645
DISPLAYS AND VOICE CONTROL
}}
* Option/accessory.133
Table of settings in the centerdisplay
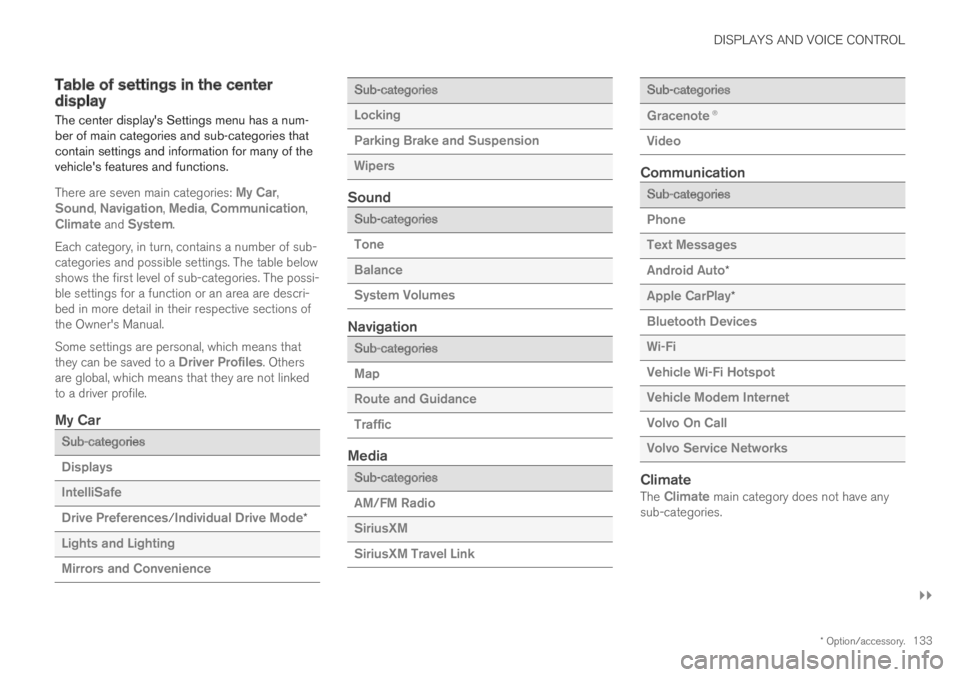
The center display's Settings menu has a num-ber of main categories and sub-categories thatcontain settings and information for many of thevehicle's features and functions.
There are seven main categories: My Car,Sound, Navigation, Media, Communication,Climate and System.
Each category, in turn, contains a number of sub-categories and possible settings. The table belowshows the first level of sub-categories. The possi-ble settings for a function or an area are descri-bed in more detail in their respective sections ofthe Owner's Manual.
Some settings are personal, which means thatthey can be saved to a Driver Profiles. Othersare global, which means that they are not linkedto a driver profile.
My Car
Sub-categories
Displays
IntelliSafe
Drive Preferences/Individual Drive Mode*
Lights and Lighting
Mirrors and Convenience
Sub-categories
Locking
Parking Brake and Suspension
Wipers
Sound
Sub-categories
Tone
Balance
System Volumes
Navigation
Sub-categories
Map
Route and Guidance
Traffic
Media
Sub-categories
AM/FM Radio
SiriusXM
SiriusXM Travel Link
Sub-categories
Gracenote®
Video
Communication
Sub-categories
Phone
Text Messages
Android Auto*
Apple CarPlay*
Bluetooth Devices
Wi-Fi
Vehicle Wi-Fi Hotspot
Vehicle Modem Internet
Volvo On Call
Volvo Service Networks
Climate
The Climate main category does not have anysub-categories.
Page 136 of 645

||
DISPLAYS AND VOICE CONTROL
* Option/accessory.134
System
Sub-categories
Driver Profile
Date and Time
System Languages and Units
Privacy and Data
Keyboard Layouts
Voice Control*
Factory Reset
System Information
Related information
Center display overview (p. 107)
Changing settings in the center display's Topview (p. 130)
Resetting center display settings (p. 132)
Driver profiles
Many of the vehicle's settings can be custom-ized to the driver's personal preferences andsaved in one or more driver profiles.
These personal settings are automatically savedin the active driver profile. Each key can be linkedto one driver profile. When the linked key is used,the vehicle is customized to the specific settingsof that driver profile.
Which settings are saved in driver
profiles?
Many of the settings made in the vehicle will beautomatically stored in the active driver profile ifthe profile is not protected. The vehicle has set-tings that can be made either personal or global.The personal settings are saved in driver profiles.
Settings that can be saved in a driver profileinclude, among other things, screens, mirrors,front seats, navigation*, audio and media system,language and voice control.
Some settings are global settings. These settingscan be changed but are not saved to a specificdriver profile. Changes to global settings affect allprofiles.
Global settings
Global settings and parameters do not changewhen driver profiles are changed. They remainthe same regardless of which driver profile is cur-rently active.
Keyboard layout is an example of a global setting.If driver profile X is used to add additional key-board languages, these languages will also beavailable for driver profile Y. The settings for key-board layout are not saved to a specific driverprofile - the settings are global.
Personal settings
If driver profile X has been used to e.g., set thebrightness for the center display, driver profile Ywill not be affected by this setting. It will only besaved to driver profile X because brightness set-ting is a personal setting.
Related information
Selecting a driver profile (p. 135)
Changing a driver profile's name (p. 135)
Linking a remote key to a driver profile(p. 136)
Protecting a driver profile (p. 136)
Resetting driver profile settings (p. 137)
Table of settings in the center display(p. 133)
Page 145 of 645
DISPLAYS AND VOICE CONTROL
}}
* Option/accessory.143
Calibrating the horizontal position
If the windshield or display unit has beenreplaced, the head-up display's horizontal posi-tion may need to be calibrated. Calibration meansthat the projected image is rotated clockwise orcounterclockwise.
1.Tap Settings in the center display's Topview.
2.Select My CarDisplaysHead-Up
Display OptionsHead-Up DisplayCalibration.
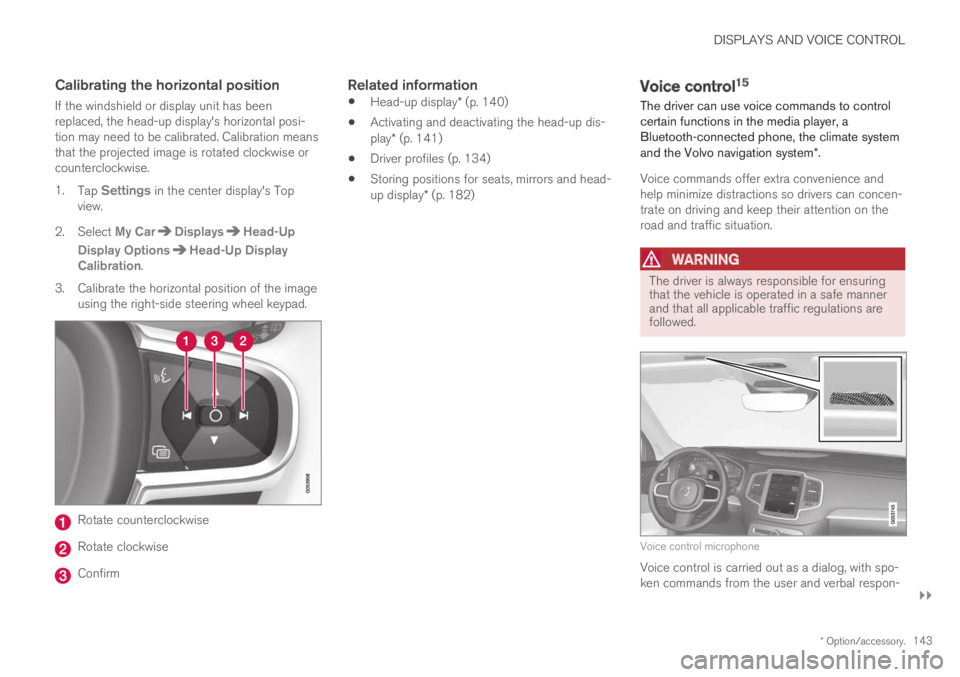
3.Calibrate the horizontal position of the imageusing the right-side steering wheel keypad.
Rotate counterclockwise
Rotate clockwise
Confirm
Related information
Head-up display* (p. 140)
Activating and deactivating the head-up dis-play* (p. 141)
Driver profiles (p. 134)
Storing positions for seats, mirrors and head-up display* (p. 182)
Voice control15
The driver can use voice commands to controlcertain functions in the media player, aBluetooth-connected phone, the climate systemand the Volvo navigation system*.
Voice commands offer extra convenience andhelp minimize distractions so drivers can concen-trate on driving and keep their attention on theroad and traffic situation.
WARNING
The driver is always responsible for ensuringthat the vehicle is operated in a safe mannerand that all applicable traffic regulations arefollowed.
Voice control microphone
Voice control is carried out as a dialog, with spo-ken commands from the user and verbal respon-
Page 163 of 645
LIGHTING
}}
* Option/accessory.161
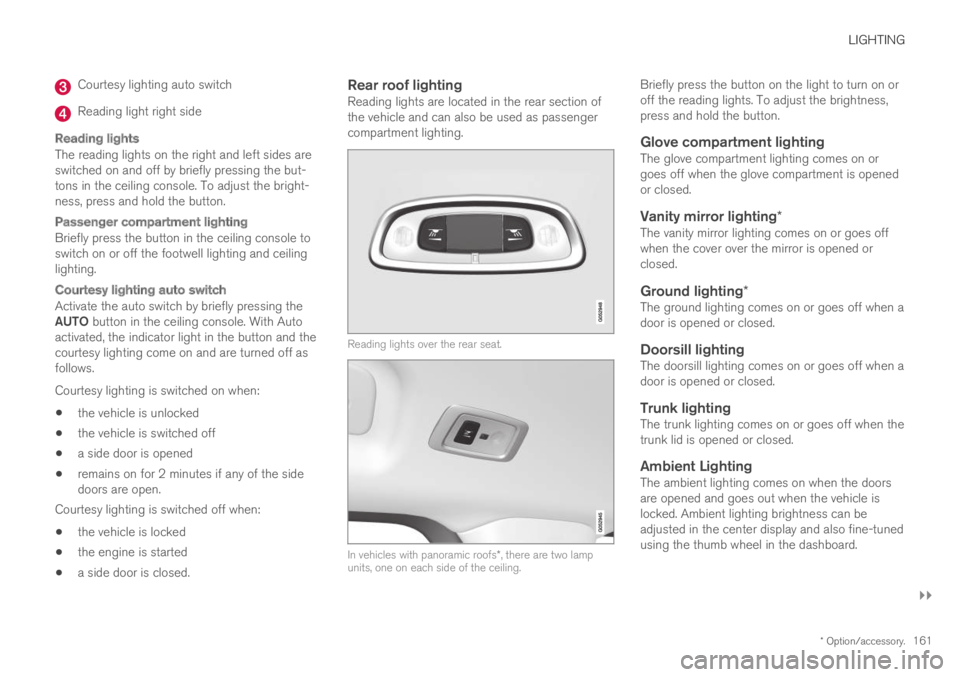
Courtesy lighting auto switch
Reading light right side
Reading lights
The reading lights on the right and left sides areswitched on and off by briefly pressing the but-tons in the ceiling console. To adjust the bright-ness, press and hold the button.
Passenger compartment lighting
Briefly press the button in the ceiling console toswitch on or off the footwell lighting and ceilinglighting.
Courtesy lighting auto switch
Activate the auto switch by briefly pressing theAUTO button in the ceiling console. With Autoactivated, the indicator light in the button and thecourtesy lighting come on and are turned off asfollows.
Courtesy lighting is switched on when:
the vehicle is unlocked
the vehicle is switched off
a side door is opened
remains on for 2 minutes if any of the sidedoors are open.
Courtesy lighting is switched off when:
the vehicle is locked
the engine is started
a side door is closed.
Rear roof lighting
Reading lights are located in the rear section ofthe vehicle and can also be used as passengercompartment lighting.
Reading lights over the rear seat.
In vehicles with panoramic roofs*, there are two lampunits, one on each side of the ceiling.
Briefly press the button on the light to turn on oroff the reading lights. To adjust the brightness,press and hold the button.
Glove compartment lighting
The glove compartment lighting comes on orgoes off when the glove compartment is openedor closed.
Vanity mirror lighting *
The vanity mirror lighting comes on or goes offwhen the cover over the mirror is opened orclosed.
Ground lighting *
The ground lighting comes on or goes off when adoor is opened or closed.
Doorsill lighting
The doorsill lighting comes on or goes off when adoor is opened or closed.
Trunk lighting
The trunk lighting comes on or goes off when thetrunk lid is opened or closed.
Ambient Lighting
The ambient lighting comes on when the doorsare opened and goes out when the vehicle islocked. Ambient lighting brightness can beadjusted in the center display and also fine-tunedusing the thumb wheel in the dashboard.
Page 166 of 645
WINDOWS, GLASS AND MIRRORS
* Option/accessory.164
Windows, glass and mirrors
The vehicle is equipped with controls for win-dows, glass and mirrors. Some of the windowsin the car are laminated.
Laminated glass
The windshield has laminated glass. Laminatedglass is also available as on option for someother glass surfaces. Laminated glass is rein-forced, which provides better protection againstbreak-ins and improved soundproofing in thepassenger compartment.
The panoramic roof* also has laminated glass.
The symbol shows the windows containing laminatedglass1
Related information
Pinch protection for windows and sun cur-tains (p. 164)
Panoramic roof* (p. 170)
Power windows (p. 165)
Rearview/door mirrors (p. 168)
Using sun curtains* (p. 167)
Head-up display* (p. 140)
Using the windshield wipers (p. 175)
Using the windshield and headlight washers(p. 177)
Activating and deactivating the heated rearwindow and door mirrors (p. 213)
Pinch protection for windows andsun curtains
All power windows and sun curtains* have apinch protection function that is triggered if any-thing blocks them while they are opening orclosing.
If pinch protection is activated, movement willstop and then retract automatically to approx.50 mm (2 inches) from the point at which it wasblocked (or to full ventilation position).
It is still possible to override pinch protectionwhen closing is interrupted (e.g. due to ice) bypressing and holding down the control in thesame direction.
If there is any problem with the pinch protection,a rest procedure can be tested.
WARNING
If the starter battery is disconnected, the func-tion for automatic opening and closing mustbe reset to function correctly. A reset isrequired in order for the pinch protection towork.
Related information
Reset procedure for pinch protection(p. 165)
Operating the power windows (p. 166)
1Does not apply to windshield and panoramic roof*, which are always laminated and therefore do not have this symbol.
Page 167 of 645
WINDOWS, GLASS AND MIRRORS
}}
* Option/accessory.165
Using sun curtains* (p. 167)
Panoramic roof* (p. 170)
Reset procedure for pinchprotection
If you experience any problems with the electri-cal functions for the power windows, you can tryto perform a reset.
WARNING
If the starter battery is disconnected, the func-tion for automatic opening and closing mustbe reset to function correctly. A reset isrequired in order for the pinch protection towork.
If the problem persists or if it affects the panor-
amic roof or sunroof, contact a workshop2.
Resetting a power window
1. Start with the window in the closed position.
2. Then move the control in manual mode threetimes upward toward the closed position.
> The system will be automatically activated.
Related information
Pinch protection for windows and sun cur-tains (p. 164)
Operating the power windows (p. 166)
Using sun curtains* (p. 167)
Power windows
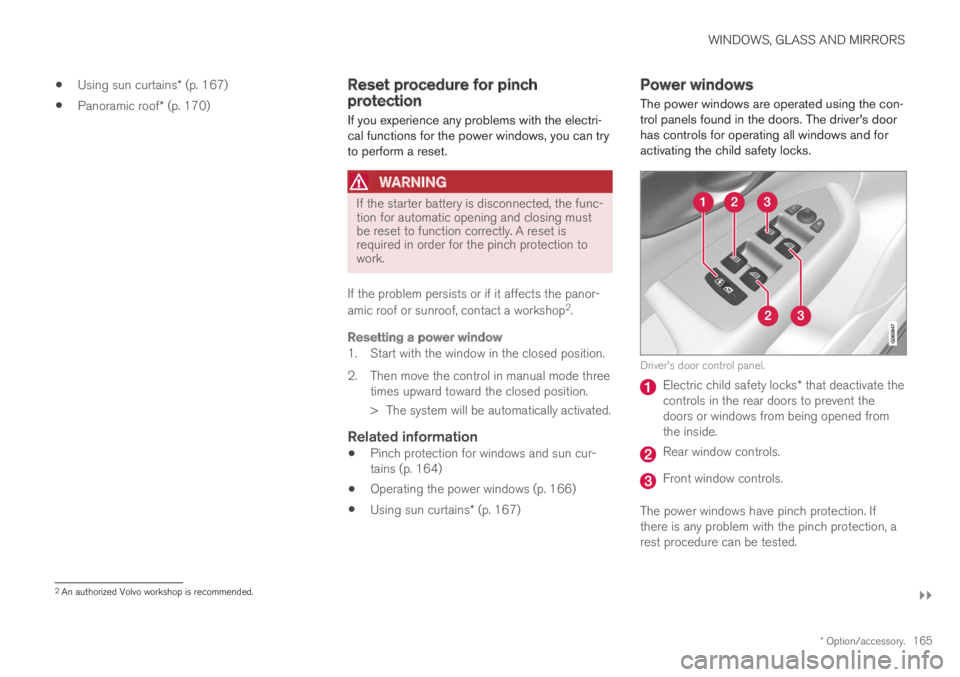
The power windows are operated using the con-trol panels found in the doors. The driver's doorhas controls for operating all windows and foractivating the child safety locks.
Driver's door control panel.
Electric child safety locks* that deactivate thecontrols in the rear doors to prevent thedoors or windows from being opened fromthe inside.
Rear window controls.
Front window controls.
The power windows have pinch protection. Ifthere is any problem with the pinch protection, arest procedure can be tested.
2An authorized Volvo workshop is recommended.
Page 168 of 645

||
WINDOWS, GLASS AND MIRRORS
* Option/accessory.166
WARNING
Children, other passengers or objects can betrapped by the moving parts.
Always operate the windows with caution.
Do not allow children to play with theoperating controls.
Never leave a child alone in the vehicle.
Remember to always cut the current tothe power windows by setting the vehi-cle's electrical system to ignition mode 0and then taking the remote key with youwhen leaving the vehicle.
Never stick objects or body parts outthrough the windows, even if the vehicleelectrical system is completely turned off.
Related information
Operating the power windows (p. 166)
Pinch protection for windows and sun cur-tains (p. 164)
Reset procedure for pinch protection(p. 165)
Operating the power windows
All power windows can be operated using thecontrol panel in the driver's door. The controlpanels in the other doors can be used to oper-ate that particular door.
The power windows have pinch protection. Ifthere is any problem with the pinch protection, arest procedure can be tested.
WARNING
Children, other passengers or objects can betrapped by the moving parts.
Always operate the windows with caution.
Do not allow children to play with theoperating controls.
Never leave a child alone in the vehicle.
Remember to always cut the current tothe power windows by setting the vehi-cle's electrical system to ignition mode 0and then taking the remote key with youwhen leaving the vehicle.
Never stick objects or body parts outthrough the windows, even if the vehicleelectrical system is completely turned off.
Operating the power windows.
Operating manually. Move one of the controlsslightly up or down. The power windows goup or down while the control is held in posi-tion.
Operating with automatic controls. Move oneof the controls up or down to its end positionand release it. The window moves automati-cally to its fully closed/open position.
To use the power windows, the ignition must bein at least mode I or II. After the ignition hasbeen switched off, the power windows can beoperated for several minutes or until a door isopened. Only one control can be operated at atime.
It can also be operated using keyless opening*with the door handle.
Page 169 of 645

WINDOWS, GLASS AND MIRRORS
* Option/accessory.167
WARNING
Make sure that no child or other passengercomes into contact with the windows as theyare closing with keyless closing*.
NOTE
One way to reduce the pulsating wind noiseheard when the rear windows are open is toalso open the front windows slightly.
NOTE
The windows cannot be opened at speedsover approx. 180 km/h (ca112 mph), but theycan be closed.
The driver is always responsible for followingapplicable traffic regulations.
NOTE
It may not be possible to operate the windowsin low temperatures.
Related information
Power windows (p. 165)
Pinch protection for windows and sun cur-tains (p. 164)
Reset procedure for pinch protection(p. 165)
Keyless locking and unlocking* (p. 245)
Locking and unlocking using the remote key(p. 232)
Using sun curtains*
There is a sun curtain in the parcel shelf in therear window.
–Pull up the sun curtain and hook it into theceiling bracket using the two hooks on thesun curtain.
>The spring force in the curtain keeps thehooks hanging in place.
When the sun curtain is not being used, graspand unhook it and let the curtain slowly retractwhile still holding it.
Related information
Pinch protection for windows and sun cur-tains (p. 164)
Reset procedure for pinch protection(p. 165)
Power windows (p. 165)
Page 170 of 645
WINDOWS, GLASS AND MIRRORS
* Option/accessory.168
Rearview/door mirrors
The rearview mirror and door mirrors can beused to improve the driver's visibility behind thevehicle.
Rearview mirror
The rearview mirror can be adjusted manually.The rearview mirror can be equipped with Home-Link*, auto-dim* and compass*.
Door mirrors
WARNING
The door mirror on the passenger side iscurved to improve visibility. Objects in the mir-ror may appear farther away than they actuallyare.
The joystick in the drivers' door control panel isused to adjust the position of the door mirrors.There are also several automatic settings thatcan also be connected to the memory functionbuttons for the power seat*.
Related information
HomeLink®* (p. 440)
Compass* (p. 443)
Adjusting the rearview mirror dimming func-tion (p. 168)
Adjusting the door mirrors (p. 169)
Storing positions for seats, mirrors and head-up display* (p. 182)
Activating and deactivating the heated rearwindow and door mirrors (p. 213)
Adjusting the rearview mirrordimming function
Bright light entering the vehicle from behind, e.g.from the headlights of following vehicles, couldreflect in the rearview mirror and door mirrorsand cause a glare. Use the dimming functionwhen light from behind is distracting.
Auto-dim
If bright light enters the vehicle from behind, thedoor mirrors will automatically dim. Auto-dim isalways active when the engine is running, exceptwhen reverse gear is engaged.
NOTE
Adjustments to the sensitivity level will not benoticeable immediately but will instead takeeffect after a short period of time.
The sensitivity level for dimming will affect boththe rearview mirror and door mirrors.
To change the dimming sensitivity level:
1.Tap Settings in the Top view in the centerdisplay.
2.Tap My CarMirrors and Convenience.
3.Under Rearview Mirror Auto Dimming,select Normal, Dark or Light.
The rearview mirror instead has two sensors -one pointing forward and one pointing rearward -
Page 171 of 645
WINDOWS, GLASS AND MIRRORS
}}
* Option/accessory.169
which work together to identify and eliminateglare. The forward-pointing sensor monitorsambient light, while the rearward-pointing sensormonitors light from the headlights of followingvehicles.
For the door mirrors to be equipped with auto-dim, the rearview mirror must also be equippedwith auto-dim.
NOTE
If the sensors are obstructed by e.g. a parkingpermit, transponder, sunshade or objects onthe seats or parcel shelf in a way that pre-vents light from reaching the sensors, theauto-dim function in the rearview and doormirrors will be reduced.
Related information
Rearview/door mirrors (p. 168)
Adjusting the door mirrors (p. 169)
Adjusting the door mirrors
To improve visibility to the rear, the door mirrorsneed to be adjusted to the driver's height andseating position. There are several automaticsettings that can also be connected to the mem-ory function buttons for the power seat*.
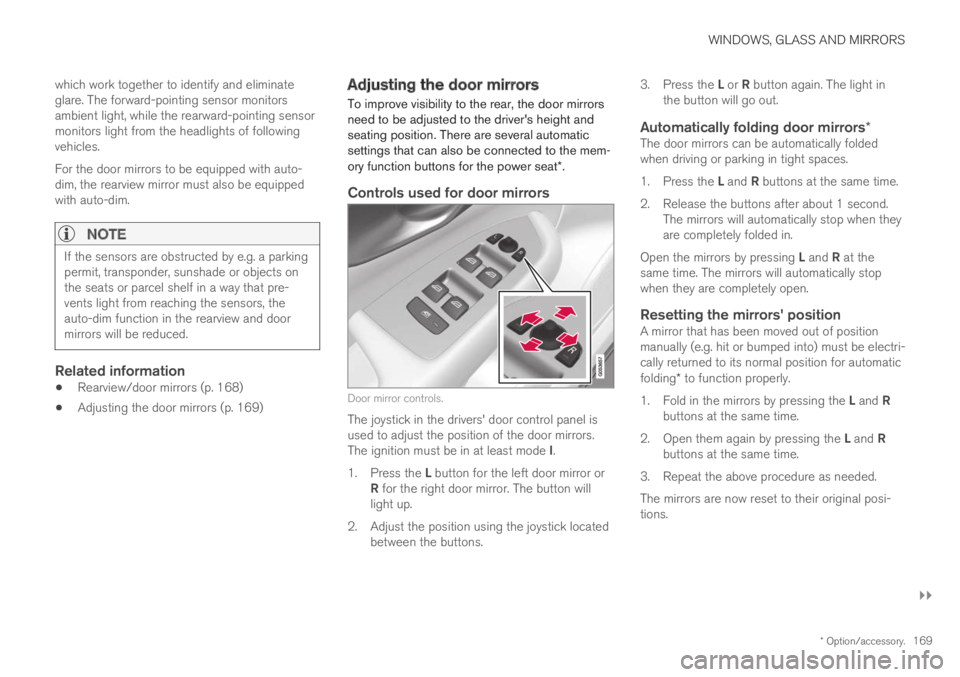
Controls used for door mirrors
Door mirror controls.
The joystick in the drivers' door control panel isused to adjust the position of the door mirrors.The ignition must be in at least mode I.
1.Press the L button for the left door mirror orR for the right door mirror. The button willlight up.
2.Adjust the position using the joystick locatedbetween the buttons.
3.Press the L or R button again. The light inthe button will go out.
Automatically folding door mirrors *
The door mirrors can be automatically foldedwhen driving or parking in tight spaces.
1.Press the L and R buttons at the same time.
2. Release the buttons after about 1 second.The mirrors will automatically stop when theyare completely folded in.
Open the mirrors by pressing L and R at thesame time. The mirrors will automatically stopwhen they are completely open.
Resetting the mirrors' position
A mirror that has been moved out of positionmanually (e.g. hit or bumped into) must be electri-cally returned to its normal position for automaticfolding* to function properly.
1.Fold in the mirrors by pressing the L and Rbuttons at the same time.
2.Open them again by pressing the L and Rbuttons at the same time.
3. Repeat the above procedure as needed.
The mirrors are now reset to their original posi-tions.