center console VOLVO S60 TWIN ENGINE 2019 Owners Manual
[x] Cancel search | Manufacturer: VOLVO, Model Year: 2019, Model line: S60 TWIN ENGINE, Model: VOLVO S60 TWIN ENGINE 2019Pages: 645, PDF Size: 13.96 MB
Page 14 of 645

12
Tire sealing system534
Using the tire sealing system535
Inflate tires with the compressorincluded in the tire sealing system539
Determining the vehicle's permittedweight540
LOADING, STORAGE AND
PASSENGER COMPARTMENT
Passenger compartment interior544
Tunnel console545
Electrical outlets546
Using the electrical outlets548
Using the glove compartment549
Sun visors550
Cargo compartment551
Loading recommendations551
Roof loads and load carriers552
Grocery bag holders553
Load anchoring eyelets553
Rear seat ski hatch*554
MAINTENANCE AND SERVICE
Volvo's service program556
Data transfer between vehicle andworkshop over Wi-Fi558
Download Center559
Handling system updates via Down-load Center559
Vehicle status560
Scheduling service and repairs561
Sending vehicle information to theworkshop562
Hoisting the vehicle564
Climate control system service566
Replacing a windshield with head-updisplay*566
Opening and closing the hood566
Engine compartment overview568
Engine oil569
Checking and filling engine oil570
Refilling coolant571
Replacing bulbs572
Start battery574
Hybrid battery578
Battery symbols579
Battery recycling579
Fuses and fuseboxes580
Replacing fuses580
Page 61 of 645

SAFETY
59
WARNING
No objects that add to the total weight onthe seat should be placed on the frontpassenger's seat. If a child is seated inthe front passenger's seat with any addi-tional weight, this extra weight couldcause the OWS system to enable the air-bag, which might cause it to deploy in theevent of a collision, thereby injuring thechild.
The seat belt should never be wrappedaround an object on the front passeng-er's seat. This could interfere with theOWS system's function.
The front passenger's seat belt shouldnever be used in a way that exerts morepressure on the passenger than normal.This could increase the pressure exertedon the weight sensor by a child, andcould result in the airbag being enabled,which might cause it to deploy in theevent of a collision, thereby injuring thechild.
WARNING
Keep the following points in mind withrespect to the OWS system. Failure tofollow these instructions could adverselyaffect the system's function and result inserious injury to the occupant of the frontpassenger's seat:
The full weight of the front seat passen-ger should always be on the seat cushion.The passenger should never lift him/herself off the seat cushion using thearmrest in the door or the center console,by pressing the feet on the floor, by sit-ting on the edge of the seat cushion, orby pressing against the backrest in a waythat reduces pressure on the seat cush-ion. This could cause OWS to disable thefront, passenger's side airbag.
WARNING
Do not place any type of object on thefront passenger's seat in such a way thatjamming, pressing, or squeezing occursbetween the object and the front seat,other than as a direct result of the correctuse of the Automatic Locking Retractor/Emergency Locking Retractor (ALR/ELR)seat belt.
No objects should be placed under thefront passenger's seat. This could inter-fere with the OWS system's function.
Related information
Driver/passenger-side airbags (p. 53)
Page 82 of 645

DISPLAYS AND VOICE CONTROL
* Option/accessory.80
Instruments and controls in left-hand drive vehicles
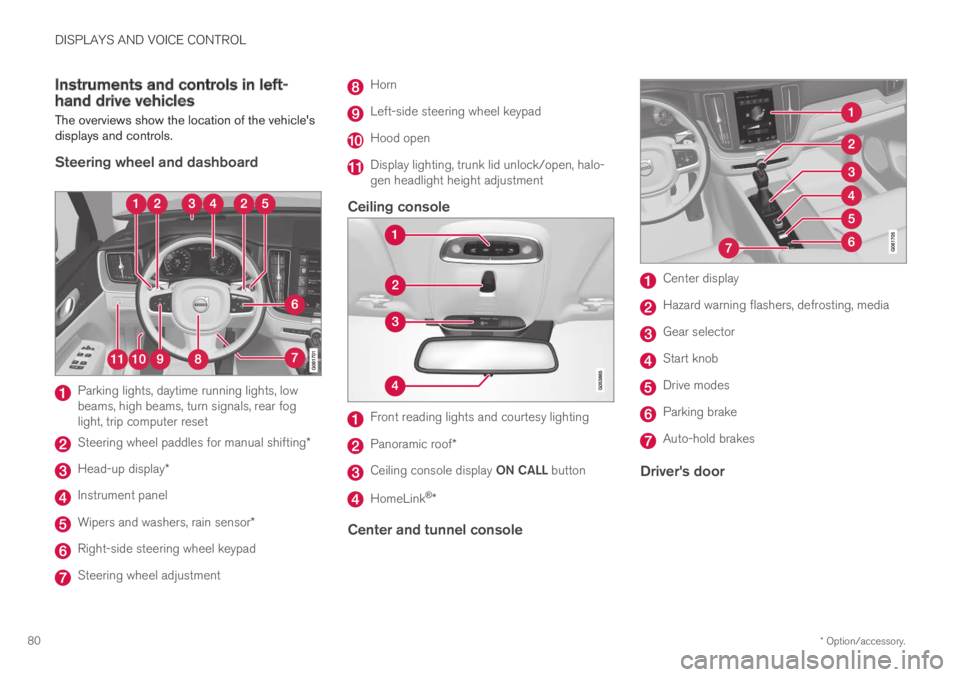
The overviews show the location of the vehicle'sdisplays and controls.
Steering wheel and dashboard
Parking lights, daytime running lights, lowbeams, high beams, turn signals, rear foglight, trip computer reset
Steering wheel paddles for manual shifting*
Head-up display*
Instrument panel
Wipers and washers, rain sensor*
Right-side steering wheel keypad
Steering wheel adjustment
Horn
Left-side steering wheel keypad
Hood open
Display lighting, trunk lid unlock/open, halo-gen headlight height adjustment
Ceiling console
Front reading lights and courtesy lighting
Panoramic roof*
Ceiling console display ON CALL button
HomeLink®*
Center and tunnel console
Center display
Hazard warning flashers, defrosting, media
Gear selector
Start knob
Drive modes
Parking brake
Auto-hold brakes
Driver's door
Page 139 of 645

DISPLAYS AND VOICE CONTROL
137
2. Tap SystemDriver Profiles.
3. Mark the desired profile. The display willreturn to Home view. The Guest profile can-not be linked to a remote key.
4.Pull down Top view again and tap Settings
SystemDriver ProfilesEditProfile.
5.Select Connect key to link the profile withthe key. A driver profile can only be linked tothe key currently being used in the vehicle. Ifthere are any other keys in the vehicle, Morethan one key is found, put the key youwant to connect on backup reader will bedisplayed.
Location of the backup reader in the tunnel console.>When Profile connected to key is dis-played, the key and driver profile havebeen linked.
6.Tap OK.
>The key used is now linked to the driverprofile and will remain so as long as theConnect key box is not deselected.
Related information
Driver profiles (p. 134)
Changing a driver profile's name (p. 135)
Remote key (p. 230)
Resetting driver profile settings
Settings that have been saved for one or moredriver profiles can be reset when the vehicle isstationary.
NOTE
Factory Reset is only possible when thevehicle is stationary.
1.Tap Settings in the Top view.
2.Tap SystemFactory ResetResetPersonal Settings.
3.Select option Reset for the active profile,Reset for all profiles or Cancel.
Related information
Driver profiles (p. 134)
Resetting center display settings (p. 132)
Page 162 of 645

LIGHTING
* Option/accessory.160
Using home safe lighting
Some of the exterior lights remain on to illumi-nate the area around the vehicle. This is calledhome safe lighting.
To activate home safe lighting:
1.Switch off the ignition.
2. Push the left-side steering wheel levertoward the dashboard and release.
3. Exit the vehicle and lock the doors.
When the function is activated, a symbol will beshown in the instrument panel and the parkinglights, outer door handle lights* and the licenseplate lights will be illuminated.
The length of time home safe lighting remainsilluminated can be set in the center display.
Related information
Adjusting light functions via the center dis-play (p. 151)
Welcome Light (p. 160)
Welcome Light
Approach lighting is activated when the vehicleis unlocked and can be used to provide light asyou walk toward the vehicle.
The function is activated when the remote key isused for unlocking. The parking lights, outer doorhandle lights*, license plate lights, interior ceilinglights, footwell lighting and trunk/cargo compart-ment lighting will be illuminated. If a door isopened while the function is activated, the light-ing in the outer door handle* and the interiorlighting will remain illuminated for a longer periodof time.
This function can be activated and deactivated inthe center display.
Related information
Adjusting light functions via the center dis-play (p. 151)
Using home safe lighting (p. 160)
Remote key (p. 230)
Interior Lighting
The interior is equipped with several differenttypes of lighting to improve the experience. Thisincludes reading lamps, glove box lighting andground lighting.
All lighting in the passenger compartment can beturned on and off manually within 5 minutesafter:
the engine has been switched off and theignition is in mode 0.
the vehicle is unlocked but the engine hasnot been started.
Front ceiling lighting
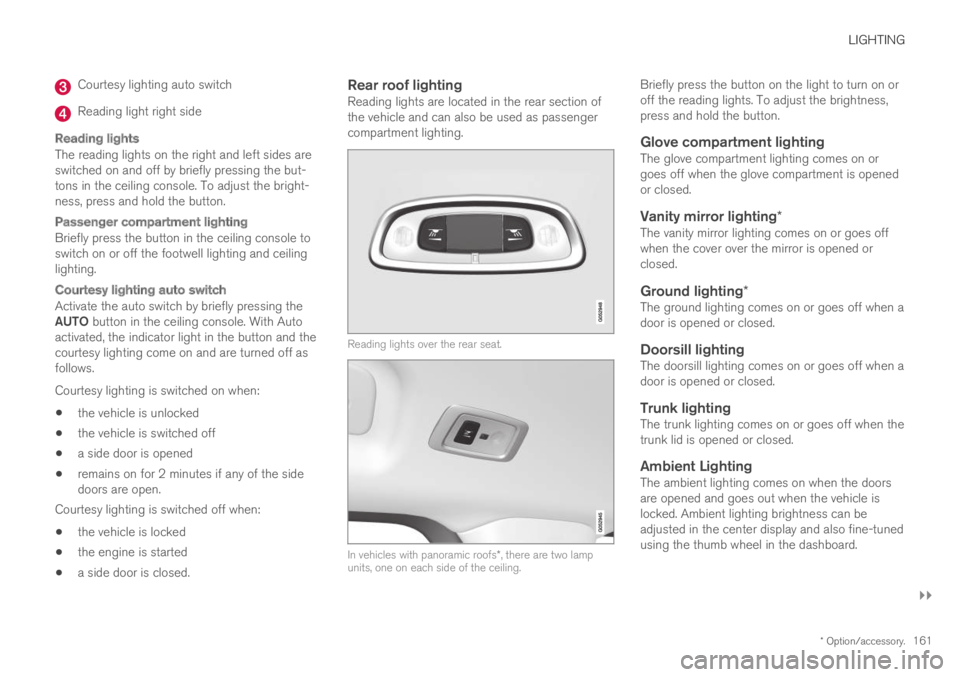
The controls in the ceiling console for the front readinglights and courtesy lighting.
Reading light left side
Passenger compartment lighting
Page 163 of 645

LIGHTING
}}
* Option/accessory.161
Courtesy lighting auto switch
Reading light right side
Reading lights
The reading lights on the right and left sides areswitched on and off by briefly pressing the but-tons in the ceiling console. To adjust the bright-ness, press and hold the button.
Passenger compartment lighting
Briefly press the button in the ceiling console toswitch on or off the footwell lighting and ceilinglighting.
Courtesy lighting auto switch
Activate the auto switch by briefly pressing theAUTO button in the ceiling console. With Autoactivated, the indicator light in the button and thecourtesy lighting come on and are turned off asfollows.
Courtesy lighting is switched on when:
the vehicle is unlocked
the vehicle is switched off
a side door is opened
remains on for 2 minutes if any of the sidedoors are open.
Courtesy lighting is switched off when:
the vehicle is locked
the engine is started
a side door is closed.
Rear roof lighting
Reading lights are located in the rear section ofthe vehicle and can also be used as passengercompartment lighting.
Reading lights over the rear seat.
In vehicles with panoramic roofs*, there are two lampunits, one on each side of the ceiling.
Briefly press the button on the light to turn on oroff the reading lights. To adjust the brightness,press and hold the button.
Glove compartment lighting
The glove compartment lighting comes on orgoes off when the glove compartment is openedor closed.
Vanity mirror lighting *
The vanity mirror lighting comes on or goes offwhen the cover over the mirror is opened orclosed.
Ground lighting *
The ground lighting comes on or goes off when adoor is opened or closed.
Doorsill lighting
The doorsill lighting comes on or goes off when adoor is opened or closed.
Trunk lighting
The trunk lighting comes on or goes off when thetrunk lid is opened or closed.
Ambient Lighting
The ambient lighting comes on when the doorsare opened and goes out when the vehicle islocked. Ambient lighting brightness can beadjusted in the center display and also fine-tunedusing the thumb wheel in the dashboard.
Page 164 of 645

||
LIGHTING
* Option/accessory.162
Mood lighting *
The vehicle is equipped with LEDs that providefaint lighting in various colors. This lighting is onwhen the engine is running. Mood lighting can beadjusted in the center display and also fine-tunedusing the thumb wheel in the dashboard.
Lighting in the door storage
compartments
Lighting in the door storage compartmentscomes on when the doors are opened and goesout when the vehicle is locked. The brightnesscan be adjusted using the thumb wheel in thedashboard.
Lighting in the tunnel console's front
cup holder
The lighting in front console cup holdersswitches on when the vehicle is unlocked and offwhen the vehicle is locked. The brightness canbe adjusted using the thumb wheel in the dash-board.
Related information
Adjusting interior lighting (p. 162)
Lighting control and panel (p. 150)
Ignition modes (p. 395)
Passenger compartment interior (p. 544)
Adjusting interior lighting
Illumination in the vehicle varies depending onignition mode. The interior lighting can beadjusted with a thumb wheel in the dashboardand certain light functions can also be adjustedvia the center display.
The thumb wheel on the dash-board to the left of the steeringwheel can be used to adjustthe brightness of the displaylighting, instrument lights,ambient lighting and moodlighting*.
Adjust ambient decor lighting
1.Tap Settings in the Top view in the centerdisplay.
2.Tap My CarLights and LightingInterior Lighting.
3. Choose from among the following settings:
Under Ambient Light Intensity, selectOff, Low or High.
Under Ambient Light Level, selectReduced or Full.
Adjusting mood lighting *
The vehicle is equipped with several LEDs thatprovide faint lighting in various colors. This light-ing is on when the engine is running.
Changing the brightness
1.Tap Settings in the Top view in the centerdisplay.
2.Tap My CarLights and Lighting
Interior LightingInterior Mood Lighting.
3.Under Interior Mood Light Intensity, selectOff, Low or High.
Changing the color of the light
1.Tap Settings in the Top view in the centerdisplay.
2.Tap My CarLights and Lighting
Interior LightingInterior Mood Lighting.
3.Choose By Temperature or By Color tochange the color of the light.
If By Temperature is selected, the light willchange according to the temperature set forthe passenger compartment.
If By Color is selected, the subcategoryTheme Colors can be used to make furtheradjustments.
Related information
Interior Lighting (p. 160)
Adjusting light functions via the center dis-play (p. 151)
Ignition modes (p. 395)
Page 198 of 645

CLIMATE CONTROL
* Option/accessory.196
Climate
The vehicle is equipped with electronic climatecontrol. The climate system cools, heats anddehumidifies the air in the passenger compart-ment.
All of the climate system functions are controlledfrom the center display and the buttons on thecenter console.
Certain rear seat functions can also be controlledfrom the climate controls* on the rear of the tun-nel console.
Related information
Climate zones (p. 196)
Climate control sensors (p. 196)
Perceived temperature (p. 197)
Climate control system voice commands(p. 197)
Parking climate (p. 217)
Heater (p. 224)
Air quality (p. 198)
Air distribution (p. 201)
Climate system controls (p. 207)
Climate zones
The vehicle is divided into climate zones to makeit possible to set different temperatures for dif-ferent parts of the passenger compartment.
2-zone climate system
Climate zones with 2-zone climate system.
In 2-zone climate systems, the passenger com-partment temperature can be set separately forthe left and right sides of the vehicle.
Related information
Climate (p. 196)
Climate control sensors
The climate system has a number of sensors tohelp regulate the climate settings in the vehicle.
Location of the sensors
Sunlight sensors - on the upper side of thedashboard.
Humidity sensor - in the rearview mirror con-sole.
Ambient temperature sensor - in the right-side door mirror.
Passenger compartment temperature sensor- near the buttons in the center console.
NOTE
Do not cover or block the sensors with cloth-ing or other objects.
Page 209 of 645

CLIMATE CONTROL
}}
* Option/accessory.207
Climate system controls
The climate system functions are controlled fromphysical buttons on the center console, the cen-ter display, and the climate panel on the rearside of the tunnel console*.
Physical buttons in the center console
Button for max defroster.
Button for heated rear window and door mir-rors.
Climate bar in the center display
The most common climate system functions canbe controlled from the climate bar.
Temperature controls for driver and passen-ger side.
Controls for heated* and ventilated* driverand front passenger seat, as well as heatedsteering wheel*.
Button for opening Climate view. The graphicin the button shows activated climate systemsettings.
Climate view in the center display
Tap the symbol in the center of the cli-mate bar to open Climate view.
Depending on equipment level, Climateview may be divided into several tabs.Toggle between the tabs by swiping the screento the left/right or by tapping the desired head-ing.
Main climate
In addition to the functions in the climate bar,other main climate system functions can be con-trolled from the Main climate tab.
Max, Rear – Controls for defrosting windowsand door mirrors.
AC - Air conditioning controls.
Recirc - Air recirculation controls.
Air distribution controls.
Page 210 of 645

||
CLIMATE CONTROL
* Option/accessory.208
Blower control.
AUTO - Automatic climate control.
Parking climate
Parking climate functions can be controlled fromthe Parking climate tab.
Climate controls on the rear side of the
tunnel console *
If the vehicle is equipped with heated rear seats*,there are physical buttons on the rear side of thetunnel console to control this function.
Related information
Climate (p. 196)
Activating and deactivating power frontseats* (p. 208)
Activating and deactivating the heated rearseats* (p. 209)
Activating and deactivating front seat ventila-tion* (p. 209)
Activating and deactivating the heated steer-ing wheel* (p. 210)
Activating auto climate control (p. 211)
Activating and deactivating recirculation(p. 211)
Activating and deactivating max defroster(p. 212)
Activating and deactivating the heated rearwindow and door mirrors (p. 213)
Setting the blower speed for the front seats(p. 214)
Synchronize temperature (p. 216)
Activating and deactivating air conditioning(p. 216)
Activating and deactivating power
front seats*
The seats can be heated for added comfort forthe driver and passengers in cold weather.
1. Tap the left- or right-side steering wheel andseat button in the center display's climatebar to open the controls for steering wheeland seat heating.
If the vehicle is not equipped with ventilatedseats or heated steering wheel (for the driv-er's side), the button for seat heating isdirectly accessible in the climate bar.
2. Tap the seat heating button repeatedly toselect one of the four levels: Off, High,Medium or Low.
>The level is changed and the set level isdisplayed in the button.
Related information
Climate system controls (p. 207)
Activating and deactivating the heated frontseat* (p. 209)